


 Loading...
Multi-Protocol On-board Ethernet Print Server
NETWORK USER’S GUIDE
Please read this manual thoroughly before using the machine. Keep the CD/DVD-ROM in a convenient place so you can use it quickly if you need to.
A32P-9562-00A
Symbols used in this guide
We use the following icons throughout this User’s Guide:
IMPORTANT describes procedures you must follow or avoid to prevent possible printer problems or printer damage, or damage to other objects.
Notes tell you how you should respond to a situation that may arise or give tips about how the current operation works with other features.
Trademarks
KONICA MINOLTA and the KONICA MINOLTA logo are trademarks or registered trademarks of KONICA MINOLTA HOLDINGS, INC.
bizhub and PageScope are trademarks or registered trademarks of KONICA MINOLTA BUSINESS TECHNOLOGIES, INC.
Microsoft, Windows, Windows Server and Internet Explorer are registered trademarks of Microsoft Corporation in the United States and/or other countries.
Windows Vista is either a registered trademark or a trademark of Microsoft Corporation in the United States and/or other countries.
Apple, Macintosh and Safari are trademarks of Apple Inc., registered in the United States and other countries. Linux is the registered trademark of Linus Torvalds in the U.S. and other countries.
UNIX is a registered trademark of The Open Group in the United States and other countries.
PostScript and PostScript3 are either registered trademarks or trademarks of Adobe Systems Incorporated in the United States and/or other countries.
BROADCOM, SecureEasySetup and the SecureEasySetup logo are trademarks or registered trademarks of Broadcom Corporation in the United States and/or other countries.
Each company whose software title is mentioned in this manual has a Software License Agreement specific to its proprietary programs.
All other trademarks are the property of their respective owners.
i |

Compilation and publication notice
Under the supervision of KONICA MINOLTA BUSINESS TECHNOLOGIES, INC., this manual has been compiled and published, covering the latest product’s descriptions and specifications.
The contents of this manual and the specifications of this product are subject to change without notice.
KONICA MINOLTA reserves the right to make changes without notice in the specifications and materials contained herein and shall not be responsible for any damages (including consequential) caused by reliance on the materials presented, including but not limited to typographical and other errors relating to the publication.
©2010 KONICA MINOLTA BUSINESS TECHNOLOGIES, INC.
IMPORTANT NOTE
This product is approved for use in the country of purchase only.
Do not use this product outside the country of purchase as it may violate the power regulations of that country.
Windows® XP in this document represents Windows® XP Professional, Windows® XP Professional x64 Edition and Windows® XP Home Edition.
Windows Server® 2003 in this document represents Windows Server® 2003/2008 and Windows Server® 2003/2008 x64 Edition.
Windows Vista® in this document represents all editions of Windows Vista®.
Windows® 7 in this document represents all editions of Windows® 7.
ii |

Table of Contents |
|
|
1 |
Introduction |
1 |
|
Overview.................................................................................................................................................... |
1 |
|
Network features........................................................................................................................................ |
2 |
|
Network printing................................................................................................................................... |
2 |
|
Management utilities............................................................................................................................ |
2 |
|
Types of network connections ................................................................................................................... |
3 |
|
Network connection example .............................................................................................................. |
3 |
|
Protocols.................................................................................................................................................... |
5 |
|
TCP/IP protocols and functions ........................................................................................................... |
5 |
|
Other Protocol ..................................................................................................................................... |
7 |
2 |
Configuring your machine for a network |
8 |
|
Overview.................................................................................................................................................... |
8 |
|
IP addresses, subnet masks and gateways .............................................................................................. |
8 |
|
IP address ........................................................................................................................................... |
8 |
|
Subnet mask........................................................................................................................................ |
9 |
|
Gateway (and router)........................................................................................................................... |
9 |
|
Step by step chart...................................................................................................................................... |
9 |
|
Setting the IP address and subnet mask ................................................................................................. |
10 |
|
Using the BRAdmin Light utility to configure your machine as a network printer .............................. |
10 |
|
Using other methods to configure your machine for a network ......................................................... |
12 |
|
Changing the print server settings ........................................................................................................... |
12 |
|
Using the BRAdmin Light utility to change the print server settings .................................................. |
12 |
|
Using Web Based Management (web browser) to change the print server settings......................... |
12 |
|
Using other methods to change print server settings ........................................................................ |
12 |
3 |
Control panel features |
13 |
|
Overview.................................................................................................................................................. |
13 |
|
Printing the Printer Settings Page............................................................................................................ |
14 |
|
Reset the network settings to the factory default..................................................................................... |
14 |
4 |
Web Based Management |
15 |
|
Overview.................................................................................................................................................. |
15 |
|
How to configure the machine settings using Web Based Management (web browser)......................... |
16 |
iii

|
|
|
|
|
|
5 |
Network printing from Windows® basic TCP/IP Peer-to-Peer printing |
18 |
|
|
|
Overview.................................................................................................................................................. |
18 |
|
|
|
Configuring the standard TCP/IP port...................................................................................................... |
19 |
|
|
|
Printer driver not yet installed ............................................................................................................ |
19 |
|
|
|
Printer driver already installed ........................................................................................................... |
21 |
|
|
6 |
Internet printing for Windows® |
22 |
|
|
|
Overview.................................................................................................................................................. |
22 |
|
|
|
IPP printing for Windows® 2000/XP, Windows Vista®, Windows® 7 and Windows Server® |
|
|
|
|
2003/2008............................................................................................................................................. |
22 |
|
|
|
For Windows Vista®, Windows® 7 and Windows Server® 2008 ....................................................... |
22 |
|
|
|
For Windows® 2000/XP and Windows Server® 2003 ....................................................................... |
24 |
|
|
|
Specifying a different URL................................................................................................................. |
26 |
|
|
|
Other sources of information ................................................................................................................... |
26 |
|
|
7 |
Network printing from Macintosh using the BR-Script 3 driver |
27 |
|
|
|
Overview.................................................................................................................................................. |
27 |
|
|
|
How to choose the printer driver (TCP/IP)............................................................................................... |
27 |
|
|
8 |
Security features |
31 |
|
|
|
Overview.................................................................................................................................................. |
31 |
|
|
|
Security terms.................................................................................................................................... |
31 |
|
|
|
Security protocols .............................................................................................................................. |
32 |
|
|
|
Security methods for E-mail notification ............................................................................................ |
32 |
|
|
|
Configuring the protocol settings ............................................................................................................. |
33 |
|
|
|
Managing your network printer securely.................................................................................................. |
34 |
|
|
|
Secure Management using Web Based Management (web browser) .............................................. |
34 |
|
|
|
Printing documents securely using IPPS................................................................................................. |
37 |
|
|
|
Specifying a different URL................................................................................................................. |
37 |
|
|
|
Using E-mail notification with user authentication ................................................................................... |
38 |
|
|
|
Creating and installing a certificate.......................................................................................................... |
40 |
|
|
|
Creating and installing a self-signed certificate ................................................................................. |
42 |
|
|
|
Creating CSR and installing a certificate ........................................................................................... |
55 |
|
|
|
Import and export the certificate and private key............................................................................... |
56 |
|
iv

9 |
Troubleshooting |
57 |
|
Overview.................................................................................................................................................. |
57 |
|
General problems .................................................................................................................................... |
57 |
|
Network print software installation problems ........................................................................................... |
59 |
|
Printing problems..................................................................................................................................... |
61 |
|
Protocol-specific troubleshooting............................................................................................................. |
62 |
|
Windows® 2000/XP, Windows Vista®, Windows® 7 and Windows Server® 2003/2008 |
|
|
IPP troubleshooting ....................................................................................................................... |
62 |
|
Web Based Management (web browser) troubleshooting (TCP/IP).................................................. |
62 |
A |
Appendix |
65 |
|
Using services ......................................................................................................................................... |
63 |
|
Other ways to set the IP address (For advanced users and administrators)........................................... |
63 |
|
Using DHCP to configure the IP address .......................................................................................... |
63 |
|
Using BOOTP to configure the IP address........................................................................................ |
64 |
|
Using RARP to configure the IP address .......................................................................................... |
65 |
|
Using APIPA to configure the IP address.......................................................................................... |
65 |
|
Using ARP to configure the IP address ............................................................................................. |
66 |
|
Using the TELNET console to configure the IP address ................................................................... |
67 |
|
Installation when using a Network Print Queue or Share ........................................................................ |
68 |
|
Installation when using Web Services (For Windows Vista®/Windows® 7 users) ................................... |
69 |
B |
Appendix |
70 |
|
Print server specifications........................................................................................................................ |
70 |
|
Ethernet wired network...................................................................................................................... |
70 |
C |
Appendix |
71 |
|
Open Source Licensing Remarks ............................................................................................................ |
71 |
|
OpenSSL statements ........................................................................................................................ |
71 |
|
Part of the software embedded in this product is gSOAP software................................................... |
73 |
|
This product includes SNMP software from WestHawk Ltd. ............................................................. |
73 |
D |
Index |
74 |
v |

1 Introduction
1
Overview
Your KONICA MINOLTA machine can be shared on a 10/100 MB wired Ethernet network using the internal network print server. The print server provides printing services for Windows® 2000/XP/XP Professional x64
Edition, Windows Vista®, Windows® 7, Windows Server® 2003/2008, Windows Server® 2003 x64 Edition supporting the TCP/IP protocols and Mac OS X 10.3.9 or greater supporting TCP/IP. The following chart shows what network features and connections are supported by each operating system.
Operating Systems |
Windows® 2000/XP |
Mac OS X 10.3.9 or greater |
|
|
Windows® XP Professional x64 |
|
|
|
Edition |
|
|
|
Windows Vista® |
|
|
|
Windows® 7 |
|
|
|
Windows Server® 2003/2008 |
|
|
|
Windows Server® 2003 x64 Edition |
|
|
10/100BASE-TX Wired Ethernet |
r |
r |
|
(TCP/IP) |
|||
|
|
||
Printing |
r |
r |
|
BRAdmin Light |
r |
r |
|
Web Based Management |
r |
r |
|
(web browser) |
|||
|
|
||
Internet Printing (IPP) |
r |
|
|
Status Monitor 1 |
r |
r |
1 For more information, see the User’s Guide on the CD/DVD-ROM.
To use the KONICA MINOLTA machine through a network, you need to configure the print server, and set up the computers you use.
1 |

Introduction
Network features
1
Your KONICA MINOLTA machine has the following basic network functions.
Network printing
The print server provides printing services for Windows® 2000/XP/XP Professional x64 Edition, Windows
Vista®, Windows® 7 and Windows Server® 2003/2008 supporting TCP/IP protocols and Macintosh supporting TCP/IP (Mac OS X 10.3.9 or greater).
Management utilities
BRAdmin Light
BRAdmin Light is a utility for initial setup of KONICA MINOLTA network connected devices. This utility can search for KONICA MINOLTA products on your network, view the status and configure basic network
settings, such as IP address. The BRAdmin Light utility is available for Windows® 2000/XP, Windows Vista® and Windows Server® 2003/2008 and Mac OS X 10.3.9 (or greater) computers. For installing BRAdmin Light
on Windows®, please see the Quick Guide we provided with the machine. For Macintosh users, BRAdmin Light will be installed automatically when you install the printer driver. If you have already installed the printer driver, you don’t have to install it again.
Web Based Management (web browser)
Web Based Management (web browser) is a utility for managing network connected KONICA MINOLTA devices, using the HTTP (Hyper Text Transfer Protocol). This utility can view the status of KONICA MINOLTA products on your network and configure the machine or network settings using a standard web browser that is installed on your computer.
For more information, see Chapter 4: Web Based Management.
For increased security Web Based Management also support HTTPS. For more information see Managing your network printer securely on page 34.
2 |
Introduction
Types of network connections
1
Network connection example
Peer-to-Peer printing using TCP/IP
In a Peer-to-Peer environment, each computer directly sends and receives data to each device. There is no central server controlling file access or printer sharing.
WindowsR |
Windows R |
Windows R |
2
|
1 |
TCP/IP |
TCP/IP |
1)Router
2)Network printer (your machine)
In a smaller network of 2 or 3 computers, we recommend the Peer-to-Peer printing method as it is easier to configure than the Network Shared printing method. See Network Shared printing on page 4.
Each computer must use the TCP/IP Protocol.
The KONICA MINOLTA machine needs to have an appropriate IP address configuration.
If you are using a router, the Gateway address must be configured on the computers and the KONICA MINOLTA machine.
3 |
Introduction
Network Shared printing
In a Network Shared environment, each computer sends data via a centrally controlled computer. This type |
1 |
of computer is often called a “Server” or a “Print Server”. Its job is to control the printing of all print jobs.
1
WindowsR
1
WindowsR Windows R
3
TCP/IP
WindowsR |
1 |
|
2 |
4 |
1)Client computer
2)Also known as “Server” or “Print server”
3)TCP/IP, USB or parallel
4)Printer (your machine)
In a larger network, we recommend a Network Shared printing environment.
The “Server” or the “Print server” must use the TCP/IP print protocol.
The KONICA MINOLTA machine needs to have an appropriate IP address configuration unless the machine is connected via the USB or the parallel interface at the server.
4 |
Introduction
Protocols
1
TCP/IP protocols and functions
Protocols are the standardized sets of rules for transmitting data on a network. Protocols allow users to gain access to network connected resources.
The print server used on this KONICA MINOLTA product supports the TCP/IP (Transmission Control Protocol/Internet Protocol) protocols.
TCP/IP is the most popular set of protocols used for communication such as Internet and E-mail. This protocol
can be used in almost all operating systems such as Windows®, Windows Server® and Mac OS X. The following TCP/IP protocols are available on this KONICA MINOLTA product.
 Note
Note
•You can configure the protocol settings by using the HTTP interface (web browser).
See How to configure the machine settings using Web Based Management (web browser) on page 16.
•For information about the security protocols, see Security protocols on page 32.
DHCP/BOOTP/RARP
By using the DHCP/BOOTP/RARP protocols, the IP address can be automatically configured.
 Note
Note
To use the DHCP/BOOTP/RARP protocols, please contact your network administrator.
APIPA
If you do not assign an IP address manually (using the control panel of the machine or the BRAdmin Light) or automatically (using a DHCP/BOOTP/RARP server), the Automatic Private IP Addressing (APIPA) protocol will automatically assign an IP address from the range 169.254.1.0 to 169.254.254.255.
ARP
Address Resolution Protocol performs mapping of an IP address to MAC address in a TCP/IP network.
DNS client
The KONICA MINOLTA print server supports the Domain Name System (DNS) client function. This function allows the print server to communicate with other devices by using its DNS name.
NetBIOS name resolution
Network Basic Input/Output System name resolution enables you to obtain the IP address of the other device using its NetBIOS name during the network connection.
WINS
Windows Internet Name Service is an information providing service for the NetBIOS name resolution by consolidating an IP address and a NetBIOS name that is in the local network.
5 |

Introduction
LPR/LPD
Commonly used printing protocols on a TCP/IP network. |
1 |
SMTP client
Simple Mail Transfer Protocol (SMTP) client is used to send E-mails via the Internet or Intranet.
Custom Raw Port (default is Port9100)
Another commonly used printing protocol on a TCP/IP network. It enables interactive data transmission.
IPP
The Internet Printing Protocol (IPP Version 1.0) allows you to print documents directly to any accessible printer via the internet.
 Note
Note
For the IPPS protocol, see Security protocols on page 32.
mDNS
mDNS allows the KONICA MINOLTA print server to automatically configure itself to work in a Mac OS X Simple Network Configured system. (Mac OS X 10.3.9 or greater).
Telnet
The KONICA MINOLTA print server supports Telnet server for command line configuration.
SNMP
The Simple Network Management Protocol (SNMP) is used to manage network devices including computers, routers and KONICA MINOLTA network ready machines. The KONICA MINOLTA print server supports SNMPv1, SNMPv2c and SNMPv3.
 Note
Note
For the SNMPv3 protocol, see Security protocols on page 32.
LLMNR
The Link-Local Multicast Name Resolution protocol (LLMNR) resolves the names of neighboring computers, if the network does not have a Domain Name System (DNS) server. The LLMNR Responder function works in both the IPv4 or IPv6 environment when using a computer that has the LLMNR Sender function such as
Windows Vista®.
Web services
The Web Services protocol enables Windows Vista®/Windows® 7 users to install the KONICA MINOLTA printer driver by right-clicking the machine icon from the Network folder.
See Installation when using Web Services (For Windows Vista®/Windows® 7 users) on page 69. The Web Services also let you check the current status of the machine from your computer.
6 |

Introduction
Web server (HTTP)
The KONICA MINOLTA print server is equipped with a built in web server that allows you to monitor its status |
1 |
or change some of its configuration settings using a web browser. |
|
 Note
Note
•We recommend Microsoft® Internet Explorer® 6.0 (or greater) or Firefox 1.0 (or greater) for Windows® and Safari 1.3 (or greater) for Macintosh. Please also make sure that JavaScript and Cookies are always enabled in whichever browser you use. If a different web browser is used, make sure it is compatible with HTTP 1.0 and HTTP 1.1.
•For the HTTPS protocol, see Security protocols on page 32.
IPv6
This machine is compatible with the IPv6, the next generation internet protocol.
Other Protocol
LLTD
The Link Layer Topology Discovery protocol (LLTD) lets you locate the KONICA MINOLTA machine easily
on the Windows Vista® Network Map. Your KONICA MINOLTA machine will be shown with a distinctive icon and the node name. The default setting for this protocol is Off.
7 |

2 Configuring your machine for a network
Overview
2
Before using your KONICA MINOLTA machine in a network environment, you must install the KONICA MINOLTA software and also configure the appropriate TCP/IP network settings on the machine itself. In this chapter, you will learn the basic steps required to print over the network using TCP/IP protocol.
We recommend that you use the KONICA MINOLTA installer on the CD/DVD-ROM to install the KONICA MINOLTA software as this will guide you through the software and network installation. Please follow the instructions in the supplied Quick Setup Guide.
IP addresses, subnet masks and gateways
To use the machine in a networked TCP/IP environment, you need to configure its IP address and subnet mask. The IP address you assign to the print server must be on the same logical network as your host computers. If it is not, you must properly configure the subnet mask and the gateway address.
IP address
An IP address is a series of numbers that identifies each device connected to a network. An IP address consists of four numbers separated by dots. Each number is between 0 and 255.
Example: In a small network, you would normally change the final number.
•192.168.1.1
•192.168.1.2
•192.168.1.3
How the IP address is assigned to your print server:
If you have a DHCP/BOOTP/RARP server in your network the print server will automatically obtain its IP address from that server.
 Note
Note
On smaller networks, the DHCP server may also be the Router.
For more information on DHCP, BOOTP and RARP, see:-
Using DHCP to configure the IP address on page 63 Using BOOTP to configure the IP address on page 64 Using RARP to configure the IP address on page 65.
If you do not have a DHCP/BOOTP/RARP server, the Automatic Private IP Addressing (APIPA) protocol will automatically assign an IP address from the range 169.254.1.0 to 169.254.254.255. For more information on APIPA, see Using APIPA to configure the IP address on page 65.
If the APIPA protocol is disabled, the default IP address of a KONICA MINOLTA print server is 192.0.0.192. However, you can easily change this IP address number to match with the IP address details of your network. For information on how to change the IP address, see Setting the IP address and subnet mask on page 10.
8 |

Configuring your machine for a network
Subnet mask
Subnet masks restrict network communication.
Example: Computer 1 can talk to Computer 2 |
2 |
|
• Computer 1 |
||
|
IP Address: 192.168. 1. 2
Subnet Mask: 255.255.255.000
•Computer 2
IP Address: 192.168. 1. 3 Subnet Mask: 255.255.255.000
Where the 0 is in the Subnet mask, there is no limit to communication at this part of the address. What this means in the above example is, we can communicate with any device that has an IP address that begins with 192.168.1.x. (where x.x. are numbers between 0 and 255).
Gateway (and router)
A gateway is a network point that acts as an entrance to another network and sends data transmitted via the network to an exact destination. The router knows where to direct data that arrives at the gateway. If a destination is located at an external network, the router transmits data to the external network. If your network communicates with other networks, you may need to configure the Gateway IP address. If you do not know the Gateway IP address then contact your Network Administrator.
Step by step chart
a
b
Configure the TCP/IP settings. |
|
|
|
o Configure the IP address |
i |
See page 10 |
|
o |
Configure the subnet mask |
i |
See page 10 |
o |
Configure the gateway |
i |
See page 10 |
Change the print server settings.
o Using the BRAdmin Light utility |
i |
See page 12 |
|
o |
Using the Web Based Management (web |
i |
See page 12 |
o |
browser) |
i |
|
Using other methods |
See page 12 |
||
9 |

Configuring your machine for a network
Setting the IP address and subnet mask
Using the BRAdmin Light utility to configure your machine as a network printer
2
BRAdmin Light
The BRAdmin Light utility is designed for initial setup of the KONICA MINOLTA network connected devices. It also can search for KONICA MINOLTA products in a TCP/IP environment, view the status and configure
basic network settings, such as IP address. The BRAdmin Light utility is available for Windows® 2000/XP, Windows Vista®, Windows® 7, Windows Server® 2003/2008 and Mac OS X 10.3.9 or greater.
How to configure your machine using the BRAdmin Light utility
 Note
Note
•Please use the BRAdmin Light utility that was supplied on the CD/DVD-ROM of your KONICA MINOLTA product.
•If you require more advanced printer management, use the PageScope Net Care Device Manager utility that is available as a download from http://pagescope.com/. This utility is only available for Windows® users.
•If you are using a firewall function of anti-spyware or antivirus applications, temporarily disable them. Once you are sure that you can print, configure the software settings following the instructions.
•Node name: Node name appears in the current BRAdmin Light window. The default node name of the print server in the machine is “KMNxxxxxxxxxxxx”. (“xxxxxxxxxxxx” is your machine’s MAC Address / Ethernet Address.)
•The default password for KONICA MINOLTA print servers is “access”.
a
b
Start the BRAdmin Light utility.
For Windows® 2000/XP, Windows Vista®, Windows® 7 and Windows Server® 2003/2008 Click Start / All Programs 1 / KONICA MINOLTA / BRAdmin Light / BRAdmin Light.
1 Programs for Windows® 2000 users
For Mac OS X 10.3.9 or greater
Double-click Macintosh HD (Startup Disk) / Library / Printers / KONICA MINOLTA / Utilities / BRAdmin Light.jar file.
BRAdmin Light will search for new devices automatically.
10 
Configuring your machine for a network
c Double-click the unconfigured device. |
|
Windows® |
Macintosh |
2
 Note
Note
•If the print server is set to its factory default settings (if you don’t use a DHCP/BOOTP/RARP server), the device will appear as Unconfigured in the BRAdmin Light utility screen.
•You can find the node name and MAC Address (Ethernet Address) by printing out the Printer Settings Page.
See Printing the Printer Settings Page on page 14.
d Choose STATIC from Boot Method. Enter the IP Address, Subnet Mask and Gateway (if needed) of
your print server. |
|
Windows® |
Macintosh |
e Click OK.
f With the correctly programmed IP address, you will see the KONICA MINOLTA print server in the device list.
11

Configuring your machine for a network
Using other methods to configure your machine for a network
You can configure your machine for a network using other methods.
See Other ways to set the IP address (For advanced users and administrators) on page 63.
2
Changing the print server settings
Using the BRAdmin Light utility to change the print server settings
a
b c d e
Start the BRAdmin Light utility.
For Windows® 2000/XP, Windows Vista®, Windows® 7 and Windows Server® 2003/2008 Click Start/All Programs 1/KONICA MINOLTA/BRAdmin Light/BRAdmin Light.
1 Programs for Windows® 2000 users
For Mac OS X 10.3.9 or greater
Double-click Macintosh HD (Startup Disk) / Library / Printers / KONICA MINOLTA / Utilities / BRAdmin Light.jar file.
Choose the print server which you want to change the settings.
Choose Network Configuration from the Control menu.
Enter a password. The default password is “access”.
You can now change the print server settings.
 Note
Note
If you want to change more advanced settings, use the PageScope Net Care Device Manager utility that is available as a download from http://pagescope.com/. (For Windows® only)
Using Web Based Management (web browser) to change the print server settings
A standard web browser can be used to change your print server settings using the HTTP (Hyper Text Transfer Protocol).
See How to configure the machine settings using Web Based Management (web browser) on page 16.
Using other methods to change print server settings
You can configure your network printer using other methods.
See Other ways to set the IP address (For advanced users and administrators) on page 63.
12
3 Control panel features
Overview
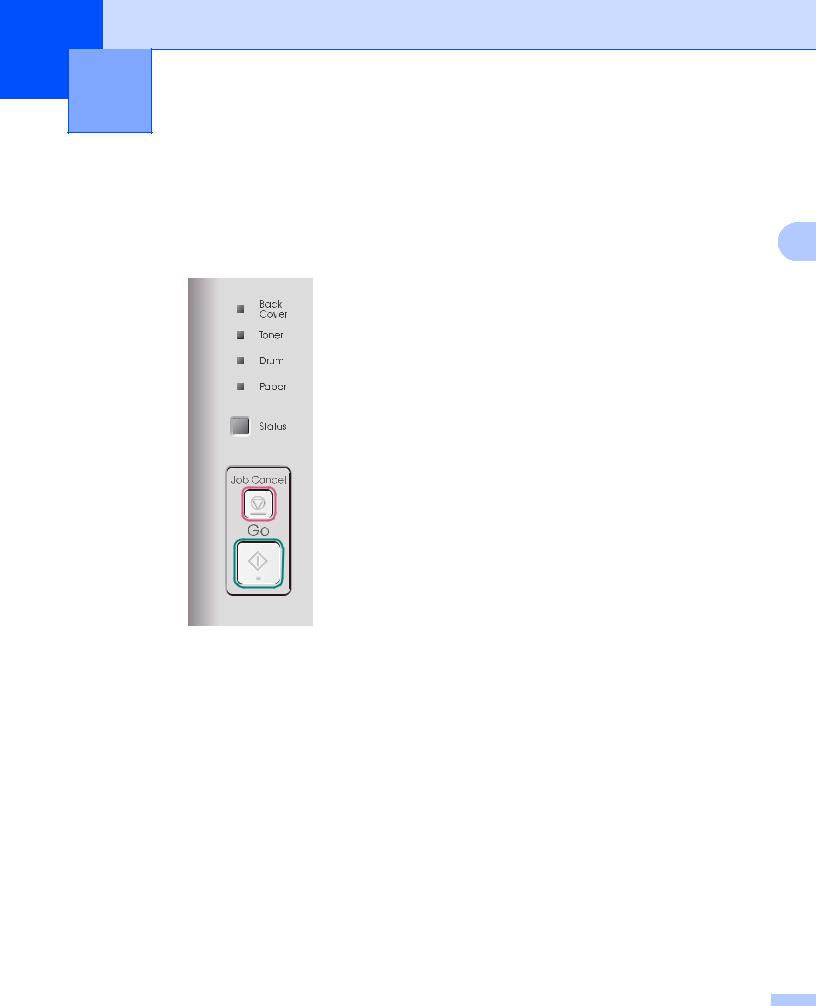
bizhub 20P has five LEDs (Back Cover, Toner, Drum, Paper, Status) and two buttons (Job Cancel and |
3 |
Go) on the control panel. |
With the control panel you can do the following:
Print the Printer Settings Page
See Printing the Printer Settings Page on page 14.
Reset the network settings to the factory default
See Reset the network settings to the factory default on page 14.
13

Control panel features
Printing the Printer Settings Page
The Printer Settings Page prints a report listing all the current printer settings including the network settings. You can print the Printer Settings Page using Go of the machine.
a Make sure that the front cover is closed and the power cord is plugged in.
b Turn on the machine and wait until the machine is in the Ready state. |
3 |
|
c Press Go three times within 2 seconds. The machine will print the current Printer Settings Page.
 Note
Note
If the IP Address on the Printer Settings Page shows 0.0.0.0, wait for one minute and try again.
Reset the network settings to the factory default
You can reset the print server back to its factory default settings (resetting all information such as the password and IP address information.)
 Note
Note
You can also reset the print server back to its factory default settings using the Web Based Management (web browser). For more information, see Changing the print server settings on page 12.
a b c
d e
Turn off the machine.
Make sure that the front cover is closed and the power cord is plugged in.
Hold down Go as you turn on the power switch. Keep Go pressed down until the all LEDs light up, and then the Status LED turns off.
Release Go. Make sure that all the LEDs turn off.
Press Go six times. Make sure that all the LEDs light up to indicate the print server has been reset to its factory default settings. The machine will restart.
14
4 Web Based Management
Overview
A standard Web Browser can be used to manage your machine using the HTTP (Hyper Text Transfer Protocol). You can get the following information from a machine on your network using a web browser.
Machine status information
Change network settings such as TCP/IP information |
4 |
Software version information of the machine and print server
Change network and machine configuration details
Log data for printed job
 Note
Note
We recommend Microsoft® Internet Explorer® 6.0 (or greater) or Firefox 1.0 (or greater) for Windows® and Safari 1.3 (or greater) for Macintosh. Please also make sure that JavaScript and Cookies are always enabled in whichever browser you use. If a different web browser is used, make sure it is compatible with HTTP 1.0 and HTTP 1.1.
You must use the TCP/IP protocol on your network and have a valid IP address programmed into the print server and your computer.
 Note
Note
•To learn how to configure the IP address on your machine, see Setting the IP address and subnet mask on page 10.
•You can use a web browser on most computing platforms, for example, Macintosh and UNIX users are also able to connect to the machine and manage it.
•You can also use the BRAdmin applications to manage the machine and its network configuration.
•This print server also supports HTTPS for secure management using SSL. See Managing your network printer securely on page 34.
15

Web Based Management
How to configure the machine settings using Web Based Management (web browser)
A standard web browser can be used to change your print server settings using the HTTP (Hyper Text Transfer Protocol).
 Note
Note
To use a web browser, you will need to know the IP address or node name of the print server.
4
a Start your web browser.
b Type “http://printer's IP address/” into your browser. (where “printer's IP address” is the printer’s IP address)
For example: http://192.168.1.2/
 Note
Note
•If you have edited the hosts file on your computer or are using a Domain Name System (DNS), you can also enter the DNS name of the print server.
•For Windows® users, as the print server supports TCP/IP and NetBIOS names, you can also enter the NetBIOS name of the print server. The NetBIOS name can be seen on the Printer Settings Page. To learn how to print the Printer Settings Page, see Printing the Printer Settings Page on page 14. The NetBIOS name assigned is the first 15 characters of the node name and by default it will appear as “KMNxxxxxxxxxxxx”. (“xxxxxxxxxxxx” is your machine’s MAC Address / Ethernet Address.)
•For Macintosh users, you can have easy access to the Web Based Management System by clicking the machine icon on Status Monitor screen. For more information, see the User’s Guide on the CD/DVD-ROM.
c d
e f
If you want to configure the print server settings, go to c.
If you want to configure the log browser settings, go to g.
Click Network Configuration.
Enter a user name and a password. The default User Name is “admin” and the default Password is “access”.
Click OK.
You can now change the print server settings.
 Note
Note
If you have changed the protocol settings, restart the printer after clicking Submit to activate the configuration.
g Click Administrator Settings.
h Enter a user name and a password. The default User Name is “admin” and the default Password is “access”.
16

Web Based Management
i Click OK.
j Choose the Log Configuration tag. Choose On and then choose Maximum log file size from the pull down menu. Click Submit.
k Click Administrator Settings again. Choose the View Print Log tag. Check the items you wish to view, and choose the format you wish to export the data. Click Submit.
 Note
Note
If you have not printed any data, no log data will appear.
4
l You can now view the log data for the printed job.
17

|
|
|
|
|
|
5 |
Network printing from Windows® basic |
|
|
||
|
|
|
TCP/IP Peer-to-Peer printing |
Overview
To connect your machine to your network, you need to follow the steps in the Quick Guide. We recommend that you use the KONICA MINOLTA installer application on the CD/DVD-ROM which we have provided with the machine. By using this application, you can easily connect your machine to your network and install the network software and printer driver which you need to complete the configuration of your machine for a network. You will be guided by the on-screen instructions until you are able to use your KONICA MINOLTA network machine.
If you are a Windows® user and want to configure your machine without using the KONICA MINOLTA |
5 |
installer application, use the TCP/IP protocol in a Peer-to-Peer environment. Please follow the instructions in this chapter. This chapter explains how to install the network software and the printer driver which you will need to be able to print using your network machine.
 Note
Note
•You must configure the IP address on your machine before you proceed with this chapter. If you need to configure the IP address, see Chapter 2 first.
•Verify the host computer and the machine are either on the same subnet, or that the router is properly configured to pass data between the two devices.
•If you are connecting to a Network Print Queue or Share (printing only), see Installation when using a Network Print Queue or Share on page 68 for installation details.
•The default password for KONICA MINOLTA print server is “access”.
18

Network printing from Windows® basic TCP/IP Peer-to-Peer printing
Configuring the standard TCP/IP port
Printer driver not yet installed
For Windows Vista®, Windows® 7 and Windows Server® 2008
a (For Windows Vista®) Click the |
button, Control Panel, Hardware and Sound, and then Printers. |
(For Windows® 7) Click the |
button, Devices and Printer. |
(For Windows Server® 2008) Click the Start button, Control Panel, Hardware and Sound, and then
Printers.
5
b Click Add a printer.
c Choose Add a local printer.
d You must now choose the correct Network printing port. Choose Create a new port and then Standard TCP/IP Port from the pull-down window, then click Next.
e Choose TCP/IP Device from the pull-down window of Device type. Enter the IP address, or the node name you wish to configure. The Wizard will automatically enter the Port name information for you, then click Next.
f Windows Vista® and Windows Server® 2008 will now contact the printer that you specified. If you did not specify the correct IP address or name then an error dialog will appear.
g Now that you have configured the port, you must specify which printer driver you wish to use. Choose the appropriate driver from the list of supported printers. If you are using a driver supplied with the machine on the CD/DVD-ROM then choose the Have Disk option to browse to the CD/DVD-ROM.
h For example, choose the “X:\\install\your language\PCL\win2kxpvista 1” folder (where X is your drive letter). Click Open.
1 win2kxpvista folder for 32-bit OS users and winxpx64vista64 folder for 64-bit OS users
iSpecify a name and click Next.
 Note
Note
•When the User Account Control screen appears, click Continue.
•If the printer driver that you are installing does not have a Digital Certificate you will see a warning message. Click Install this driver software anyway to continue with the installation.
j Continue through the Wizard clicking Finish when complete.
19
Loading...