


 Loading...
Quick Guide
Start Here
Before you can use the printer, read this Quick Guide for the correct setup and installation.
 IMPORTANT
DO NOT connect the interface cable yet.
1 |
Unpack the printer and check the components |
|
1 |
8 |
|
2 |
7 |
a Front Cover Release Button |
3 |
|
b Control Panel |
|
c Face-down Output Tray |
|
4 |
|
Support Flap 1 (Support Flap 1) |
|
|
d Front Cover |
|
|
e Paper Tray |
|
6 |
f Power Switch |
|
g Face-down Output Tray |
|
|
|
Support Flap 2 (Support Flap 2) |
|
|
h Face-down Output Tray |
|
9 |
i Multi-purpose Tray (MP Tray) |
5 |
|
|
|
|
|
CD/DVD-ROM |
|
Safety Information |
DrumUnitandToner |
|
|
(including User's Guide and |
Quick Guide |
AC Power Cord |
|||
Network User's Guide) |
Guide |
Cartridge Assembly |
|||
|
|
 WARNING
Plastic bags are used in the packaging of your printer. To avoid danger of suffocation, please keep these bags away from babies and children.
 Note
Note
•Save all packing materials and the box in case for any reason you must ship your printer.
•The interface cable is not a standard accessory. Buy the appropriate interface cable for the interface you want to use (USB, Parallel or Network).
USB cable
•Please make sure you use a USB 2.0 interface (Type A/B) cable that is no longer than 6 feet (2.0 meters).
•When you use a USB cable, make sure you connect it to the USB port of your computer and not to a USB port on a keyboard or non-powered USB hub.
Parallel cable
DO NOT use a parallel interface cable that is longer than 6 feet (2.0 meters).Use a shielded interface cable that is IEEE 1284-compliant.
Network cable
Use a straight-through Category5 (or greater) twisted-pair cable for 10BASE-T or 100BASE-TX Fast Ethernet Network.
A32P-9200-01
1
 Note
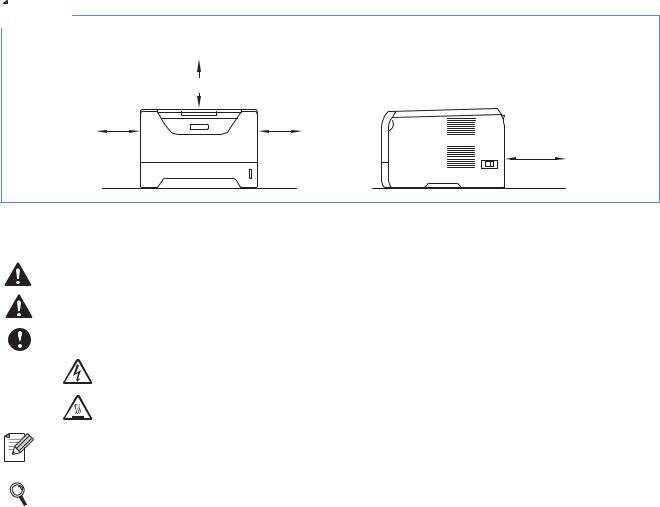
Note
Keep a minimum gap around the printer as shown in the illustration.
|
100mm(4 in.) |
100mm |
100mm |
(4 in.) |
(4 in.) |
130mm (5.12 in.)
Symbols used in this guide
WARNING |
WARNINGS tell you what to do to prevent possible personal injury. |
|
|
|
|
CAUTION |
CAUTIONS specify procedures you must follow or avoid to prevent possible minor injuries. |
|
|
|
|
IMPORTANT |
IMPORTANT specify procedures you must follow or avoid to prevent possible |
|
|
damage to the printer or other objects. |
|
|
Electrical Hazard icons alert you to a possible electrical shock. |
|
|
|
|
|
Hot Surface icons warn you not to touch machine parts that are hot. |
|
|
|
|
Note |
Notes tell you how you should respond to a situation that may arise or give tips about |
|
how the current operation works with other features. |
||
|
||
|
|
|
User's Guide |
Indicates reference to the User's Guide or Network User's Guide which is on the |
|
Network User's |
||
CD/DVD-ROM we have supplied. |
||
Guide |
||
|
2
2 |
Install the drum unit and |
|
toner cartridge assembly |
 IMPORTANT
DO NOT connect the interface cable yet.
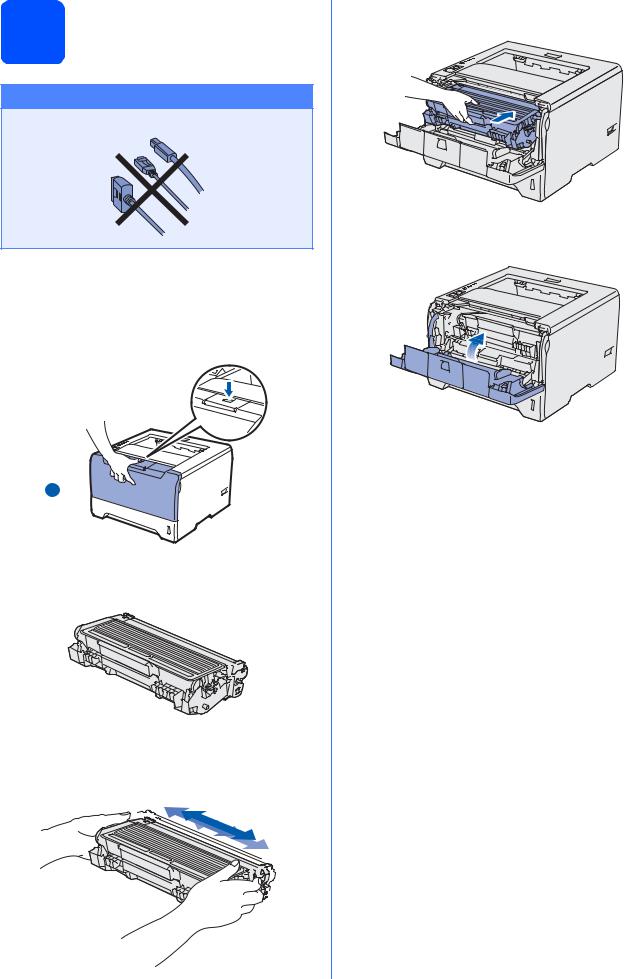
a Remove the packing tape from the outside of the printer.
b Press the front cover release button and open the front cover a.
1 

c Unpack the drum unit and toner cartridge assembly.
d Gently shake it from side to side several times to distribute the toner evenly inside the assembly.
e Put the drum unit and toner cartridge assembly into the printer until it clicks into place.
f Close the front cover of the printer.
3

3 |
Load paper in the paper |
|
tray |
a Pull the paper tray completely out of the printer.
b While pressing the blue paper-guide release lever a, slide the paper guides to fit the paper size you are loading in the tray. Make sure that the guides are firmly in the slots.
1
 Note
Note
For Legal or Folio size paper, press the release button a in the bottom of the paper tray and then pull out the back of the paper tray.
(Legal or Folio size paper are not available in some regions.)
1
4
c Fan the stack of paper well to avoid paper jams and misfeeds.
d Put paper in the tray, and make sure that the paper is below the maximum paper mark a. The side to be printed on must be face down.
1
 IMPORTANT
Make sure the paper guides touch the sides of the paper so it will feed properly.
e Put the paper tray firmly back in the printer. Make sure that it is completely inserted into the printer.
4 Print a test page
 IMPORTANT
DO NOT connect the interface cable yet.
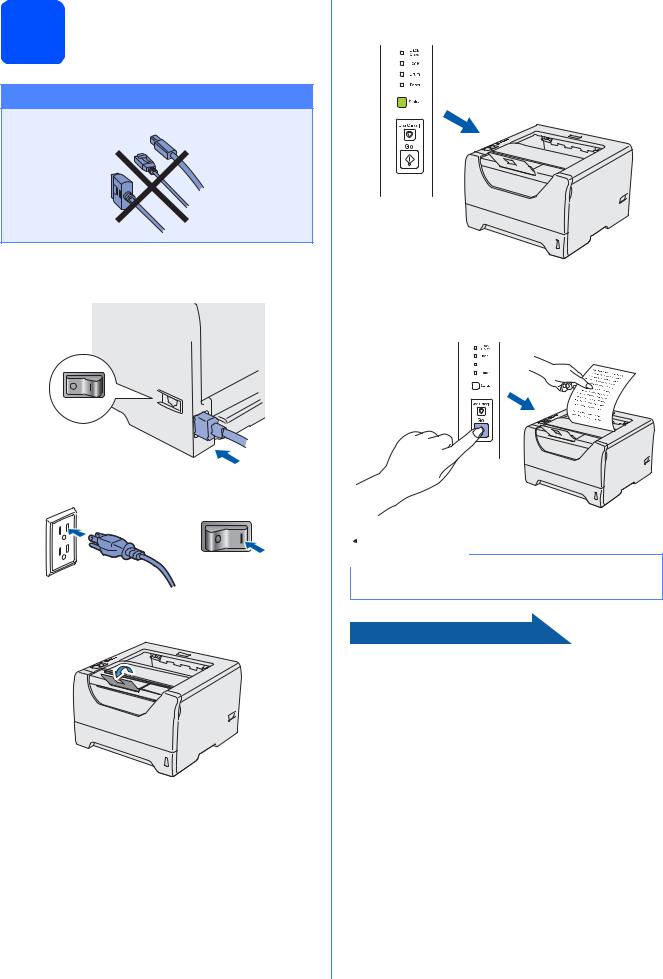
a Make sure that the printer power switch is off. Connect the AC power cord to the printer.
b Turn on the printer power switch.
c Unfold support flap1.
d After the printer has finished warming up, the Status LED stops blinking and stays green.
e Press Go. The printer prints a test page. Check that the test page has printed correctly.
 Note
Note
This function will not be available after the first print job you send from your computer.
Now go to
Go to the next page to install the printer driver.
5
6
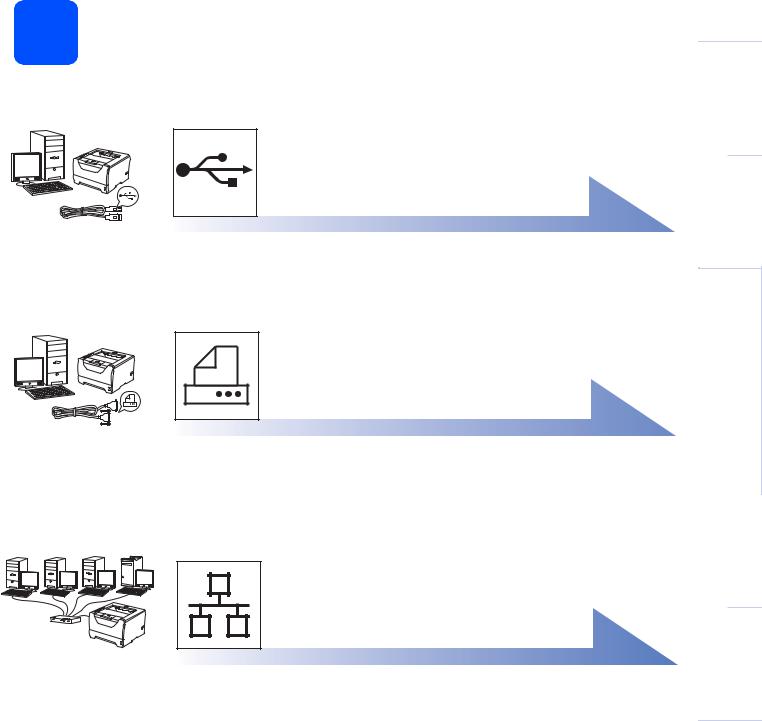
5 Choose your connection type
For USB interface cable
Windows®, go to page 8
Macintosh, go to page 11
For Parallel interface cable
Windows®, go to page 12
For Wired Network
Windows®, go to page 14
Macintosh, go to page 19
|
|
|
Windows |
|
USB |
|
Macintosh ® |
|
Parallel |
|
Windows |
|
|
||
|
|
|
® |
|
|
|
|
|
Wired |
|
Windows |
|
|
® |
|
|
Network |
|
Macintosh |
|
|
|
|
7
USB |
Windows® |
For USB Interface Cable Users
6 |
Install the printer driver |
and connect the printer |
|
to your computer |
 IMPORTANT
DO NOT connect the USB interface cable yet.
 Note
Note
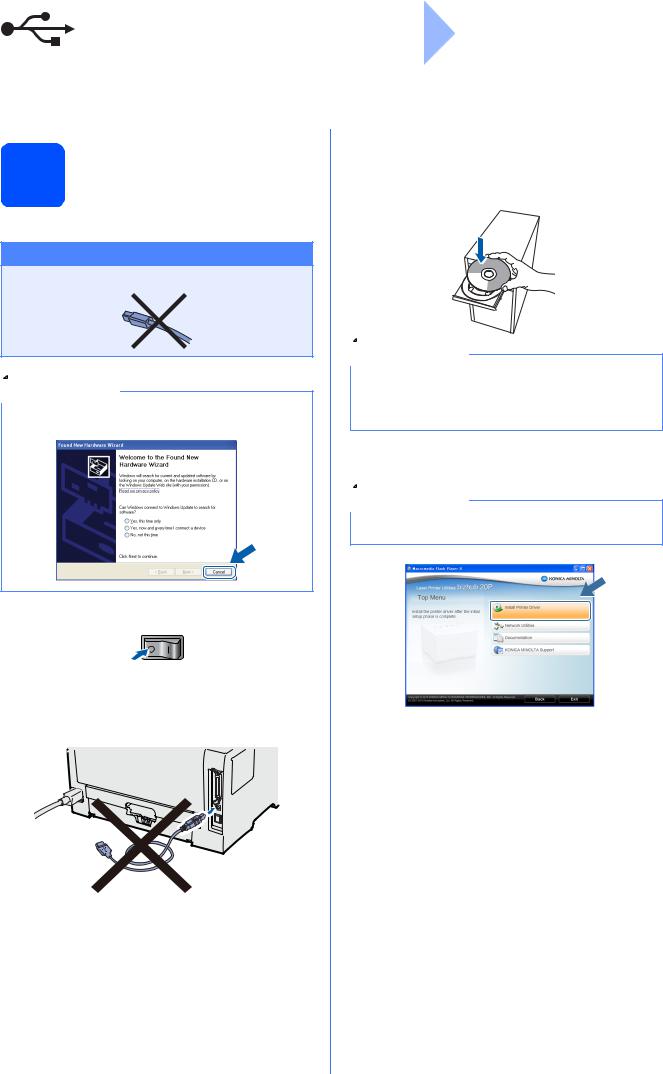
If the Found New Hardware Wizard appears on your computer, click Cancel.
a Turn off the printer power switch.
b Make sure the USB interface cable is NOT connected to the printer, and then begin installing the printer driver. If you have already connected the cable, remove it.
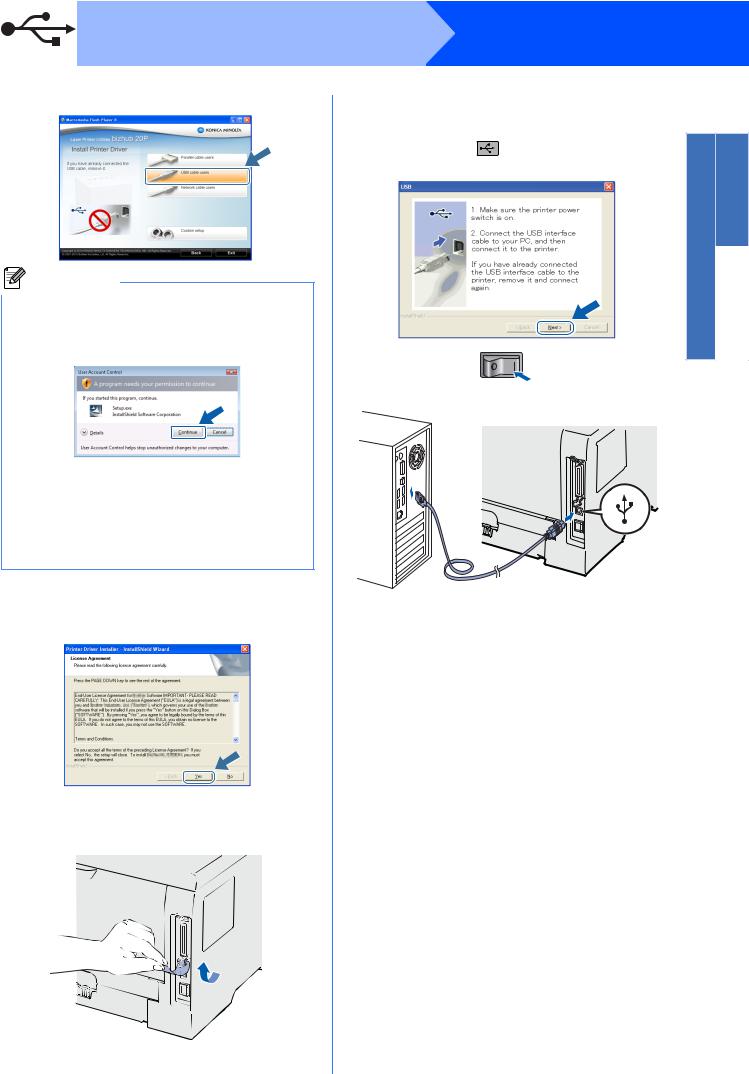
d Put the supplied CD/DVD-ROM into your CD/DVD-ROM drive. The opening screen will appear automatically.
Choose your language.
 Note
Note
If the KONICA MINOLTA screen does not appear automatically, go to My Computer (Computer), double-click the CD/DVD-ROM icon, and then double-click start.exe.
e Click Install Printer Driver on the menu screen.
 Note
Note
Choose the Install Printer Driver icon for your region.
c Turn on your computer. (You must be logged on with Administrator rights.)
8
|
USB |
|
|
Windows® |
|
f |
Click USB cable users. |
i |
When this screen appears, make sure the |
|
|
|
|
|
printer power switch is on. |
|
|
|
|
|
Connect the USB cable to the USB connector |
|
|
|
|
|
marked with a |
symbol, and then connect |
Windows |
|
|
|
the cable to the computer. Click Next. |
||
|
|
|
|
||
|
Continue (Yes). |
|
|
|
Macintosh® USB |
|
Note |
|
|
|
|
|
• For Windows Vista®/Windows® 7, when the |
|
|
|
|
|
User Account Control screen appears, click |
|
|
|
|
|
• If you want to install the PS driver (BR-Script |
|
|
|
|
|
Driver), choose Custom setup and then follow |
|
|
|
|
|
the on-screen instructions. When the Select |
|
|
|
|
|
Components screen appears, check PS |
|
|
|
|
|
(PostScript Emulation) Driver, and then |
|
|
|
|
|
continue following the on-screen instructions. |
|
|
|
|
g When the License Agreement window appears, click Yes if you agree to the License Agreement.
h Remove the label covering the USB interface connector.
9
USB |
Windows® |
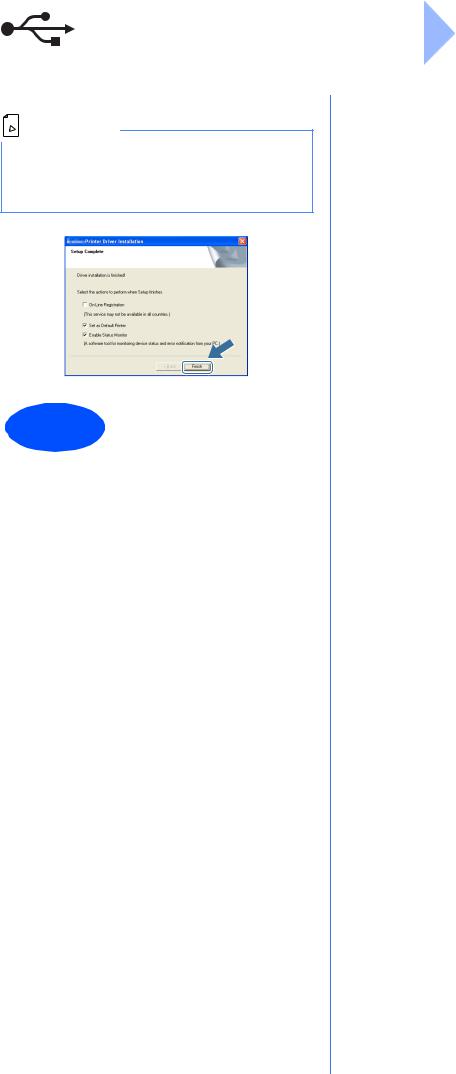
j Click Finish.
 Note
Note
•If you do not want to set your printer as Default printer, uncheck Set as Default Printer.
•If you want to disable the Status Monitor, uncheck Enable Status Monitor.
Finish |
The installation is now |
complete. |
10
Loading...