


Konica Minolta DIMAGE SCAN DUAL IV, DIMAGE SCAN ELITE 5400, DIMAGE SCAN DUAL I, DIMAGE SCAN ELITE 5400 II, DIMAGE SCAN DUAL III Manual
...
9222-7310-11 AV-A304/ME-0304
E SOFTWARE MANUAL
Tone-curve corrections
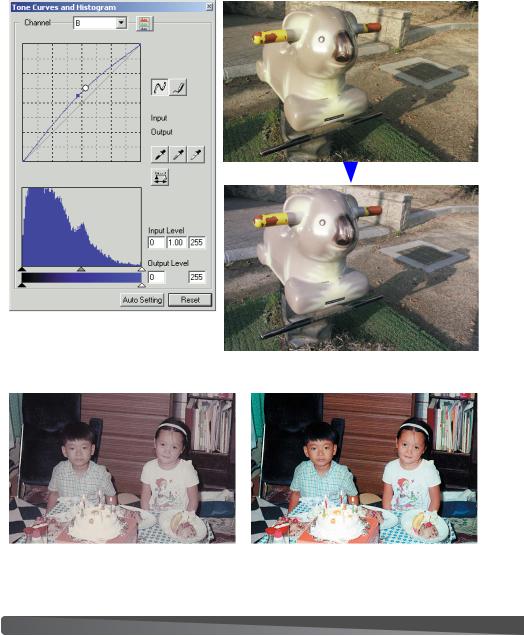
By selecting individual color channels on the tone curve, adjustments to the overall color of an image can be made. In this example, the image is too yellow. By moving the blue curve up, the image looks more neutral. For more on tone curve corrections, see page 50.
Digital ROC - Reconstruction Of Color
Original image |
After Digital ROC processing |
Digital ROC restores the color of old faded film, see page 45.
2 Color examples

BEFORE YOU BEGIN
Thank you for purchasing this Minolta product. Please take the time to read through this instruction manual so you can enjoy all the features of your new scanner. Check the packing list in the scanner hardware manual before using this product.
The DiMAGE Scan functions available vary between scanner models. To find the functions listed in this software manual that are not compatible with your scanner, see “Compatibility with the
DiMAGE Scan Utility” in the scanner notes section of the hardware manual.
If the operating system’s display controls are set to a large font size, the text in the DiMAGE Scan applications will not be displayed correctly. Use the computer’s initial display text size.
This instruction manual does not provide instruction in the basic operation of the personal computers, nor the basic operation of Windows or Macintosh operating systems; refer to the manuals supplied with the computer.
The examples in this manual use Windows software. The appearance of the screens may differ from the examples when using Macintosh or other Windows operating systems. The screens can also vary with the scanner model.
Every precaution has been taken to ensure the accuracy of this material. Specifications in this manual are based on the latest information available at the time of printing and are subject to change without notice. Minolta is not responsible for any loss or damage caused by the use of this software. This instruction manual may not be copied either in part or in its entirety without the prior permission of Minolta.
 Before installing the DiMAGE Scan Utility
RAM-stationed programs such as anti-virus or installation-monitoring software may cause the installer to fail. Remove or disable these programs before installing the DiMAGE Scan Utility.
Reinstall or enable the software when the installation is complete.
The scanner hardware manual contains the system requirements for the purchased scanner unit; do NOT connect the scanner to a computer before installing the DiMAGE Scan Utility software.
Microsoft, Windows, Windows 98, Windows Me, Windows 2000 Professional, and Windows XP are registered trademarks of the Microsoft Corporation. Macintosh, Apple, and Power Macintosh are registered trademarks of Apple Computer, Inc. Adobe and Photoshop are registered trademarks of Adobe Systems Incorporated. Digital ICE3, Digital ICE, Digital ROC, and Digital GEM are trademarks of registered trademarks and technologies of Applied Science Fiction, Inc in U. S. A. Other corporate and product names are the trademarks and registered trademarks of their respective companies.
3

TABLE OF CONTENTS
This manual contains information on the DiMAGE Scan Utility software. See the supplied hardware manual for information on connecting the scanner to a computer and loading the film holders. The scanner notes section of that manual provides additional information on software operation for your particular model scanner.
Color examples .............................................................................................................. |
2 |
Before you begin ............................................................................................................ |
3 |
Before installing the DiMAGE Scan Utility .......................................................... |
3 |
Installation ................................................................................................................ |
6 |
Windows .............................................................................................................. |
6 |
Macintosh ............................................................................................................ |
8 |
Easy Scan Utility .......................................................................................................... |
10 |
Launching the Easy Scan Utility ...................................................................... |
10 |
Using the Easy Scan Utility .............................................................................. |
11 |
Basic scanning ............................................................................................................ |
14 |
Launching the DiMAGE Scan Utility.................................................................. |
14 |
Scanning basics ................................................................................................ |
14 |
Scanner setup .................................................................................................. |
15 |
Main window and index scan tab ...................................................................... |
15 |
Making an index scan ...................................................................................... |
16 |
Selecting index thumbnails................................................................................ |
16 |
Flip and rotate images ...................................................................................... |
17 |
Fit-to-window button .......................................................................................... |
17 |
Main window and prescan tab .......................................................................... |
18 |
Making a prescan.............................................................................................. |
18 |
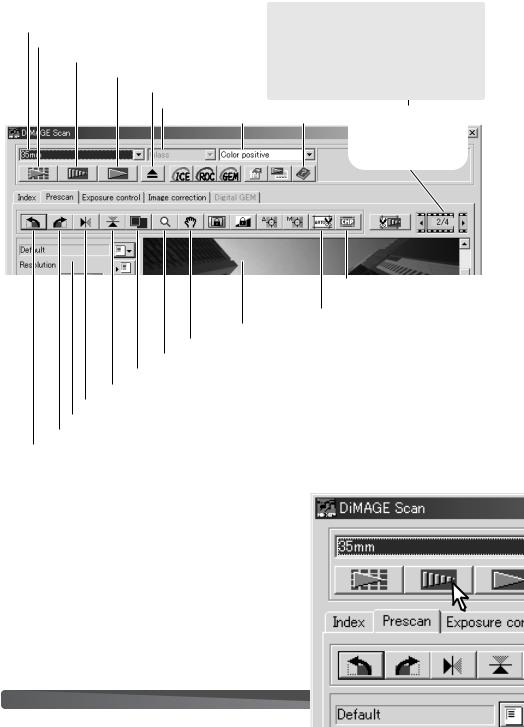
Grab tool............................................................................................................ |
19 |
Magnifying tool .................................................................................................. |
19 |
Auto cropping .................................................................................................... |
19 |
CHP button (APS film) ...................................................................................... |
19 |
Making the final scan ........................................................................................ |
20 |
Basic image processing................................................................................................ |
22 |
Main window and image-correction tab ............................................................ |
22 |
Pixel Polish ........................................................................................................ |
23 |
Digital ICE - Image Correction Enhancement .................................................. |
24 |
Variation palette ................................................................................................ |
25 |
Brightness, contrast, and color-balance palette ................................................ |
26 |
An introduction to color .................................................................................... |
27 |
Comparing pre and post-correction images...................................................... |
28 |
Undoing and redoing image corrections .......................................................... |
28 |
Grain Dissolver .................................................................................................. |
29 |
Quitting the DiMAGE Scan Utility...................................................................... |
29 |
Advanced scanning ...................................................................................................... |
30 |
Setting scanner preferences ............................................................................ |
30 |
Exposure control tab ........................................................................................ |
32 |
Saving exposure settings ...................................................................... |
33 |
Loading exposure settings .................................................................... |
33 |
More index scan functions ................................................................................ |
34 |
Reverse frame order .............................................................................. |
34 |
Saving the index thumbnails .................................................................. |
35 |
Saving an index file................................................................................ |
35 |
Loading an index file .............................................................................. |
35 |
4 |
Table of contents |

More prescan functions .................................................................................... |
36 |
Point AF (Autofocus) .............................................................................. |
36 |
Manual focus.......................................................................................... |
37 |
Manual cropping .................................................................................... |
38 |
Autoexposure ........................................................................................ |
39 |
AE area selection .............................................................................. |
39 |
AE lock .............................................................................................. |
39 |
Inputting scan settings manually ...................................................................... |
40 |
About resolution and output size ...................................................................... |
41 |
Scan setting examples ...................................................................................... |
42 |
Saving scan settings as a Job .......................................................................... |
43 |
Deleting a Job .................................................................................................. |
43 |
Advanced image processing ........................................................................................ |
44 |
More image-processing tools ............................................................................ |
44 |
Digital ROC - Reconstruction Of Color ............................................................ |
45 |
Digital GEM - Grain Equalization & Management ............................................ |
46 |
Tone curve / histogram palette .......................................................................... |
48 |
Using tone curves ............................................................................................ |
48 |
Drawing tone curves by freehand .................................................................... |
49 |
A short guide to tone-curve corrections ............................................................ |
50 |
Histogram corrections ...................................................................................... |
52 |
Tone-curve / histogram auto setting .................................................................. |
53 |
White, black, and gray-point corrections .......................................................... |
54 |
Setting the white and black-point values .......................................................... |
55 |
Tracking image corrections - snapshot button .................................................. |
55 |
Hue, saturation, and lightness palette .............................................................. |
56 |
Selective-color palette ...................................................................................... |
57 |
About RGB and CMY ........................................................................................ |
57 |
Unsharp mask .................................................................................................. |
58 |
Saving image corrections .................................................................................. |
59 |
Loading image-correction Jobs ........................................................................ |
59 |
Custom Wizard ............................................................................................................ |
60 |
Batch Scan Utility ........................................................................................................ |
62 |
Color matching.............................................................................................................. |
66 |
Setting the output color space .......................................................................... |
66 |
Output color spaces .......................................................................................... |
67 |
Setting the monitor ICC profile.......................................................................... |
68 |
Scanner color profiles ...................................................................................... |
68 |
Color matching recommendations .................................................................... |
69 |
Appendix .............................................................................................................. |
70 |
Using multiple scanners .................................................................................... |
70 |
Uninstalling the DiMAGE Scan software .......................................................... |
70 |
Installed file and folders .................................................................................... |
71 |
Dimage Scan Multi and Multi II system requirements ...................................... |
72 |
About the Dimage Scan Multi and Multi II ........................................................ |
73 |
Record keeping ................................................................................................ |
73 |
Image Data Sheet ............................................................................................ |
74 |
Color examples ................................................................................................ |
75 |
5
INSTALLATION
Windows
In the example below, the hard disk is drive C, and the CD-ROM drive is drive D. The letters designating the drives will vary between computers.
Turn on the computer to start up the Windows operating system.
Insert the DiMAGE Scan Utility CD-ROM into the CD-
ROM drive. The DiMAGE Scan Utility setup screen will open.
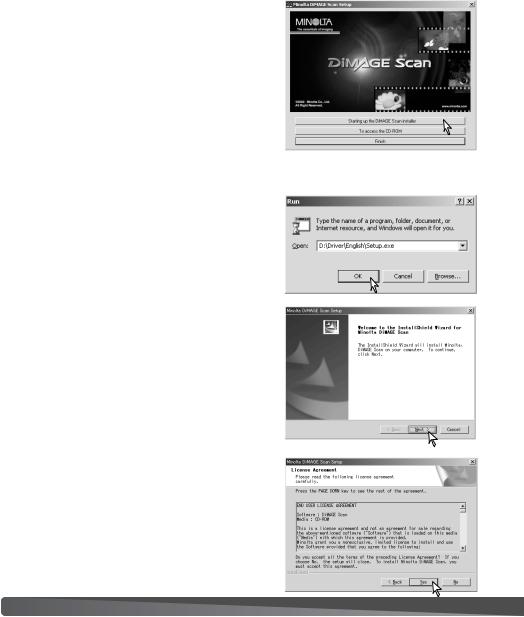
Click the “Starting up the DiMAGE Scan installer” button. The program decompression screen will briefly appear. The Install Shield Wizard will start automatically.
If the Install Shield Wizard does not start up automatically, execute the following procedure:
1.Initiate the run routine on the start menu.
2.Click the browse button in the run dialog box.
3.Select the CD-ROM drive from the look-in box in the browse window.
4.Open the driver folder.
5.Open the English folder.
6.Click on the Setup.exe file. It will be displayed with its location in the run dialog box: D:\Driver\English\Setup.exe. Click OK.
The opening screen of the InstallShield Wizard will appear. Click the next button to continue.
Click the yes button to accept the agreement and continue. Read the entire agreement carefully before continuing. If you do not agree to the terms of the license agreement, click the no button to exit the setup program.
6 Installation
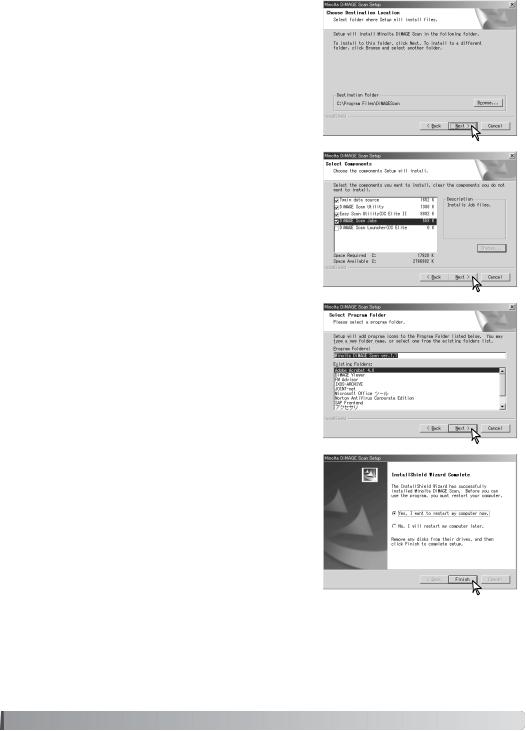
To install the software in the default folder (C:\Program
Files\DiMAGEScan), click Next.
To install the software in another folder, click the browse button to display the folder selection window. Specify the directory in which to install the software, then click OK.
Select the components to be installed, then click the next button. The DiMAGE Scan Launcher and Quick Scan Utility should only be installed with compatible scanners, see “Compatibility with the DiMAGE Scan Utility” in the scanner notes section of the hardware manual. Normally, the TWAIN data source should be installed. The descriptions in this manual assume the utility was installed with the TWAIN data source.
The name of the default program folder is displayed. To install the software in this folder, click Next.
To install the software to another existing folder, select one of the folders listed in the existing-folders box below. Click the next button to begin installation.
The InstallShield Wizard will indicate that installation was successful. Select the restart-computer option and then click Finish. When the computer restarts, the scanner driver software will be ready to use. Print out a copy of the Read Me file for reference.
The scanner software can be launched directly from most image-processing applications. Although the TWAIN driver cannot be seen, it allows the utility to be launched from an image-pro- cessing application using the import option as well as allowing the computer and scanner to communicate.
7
Macintosh
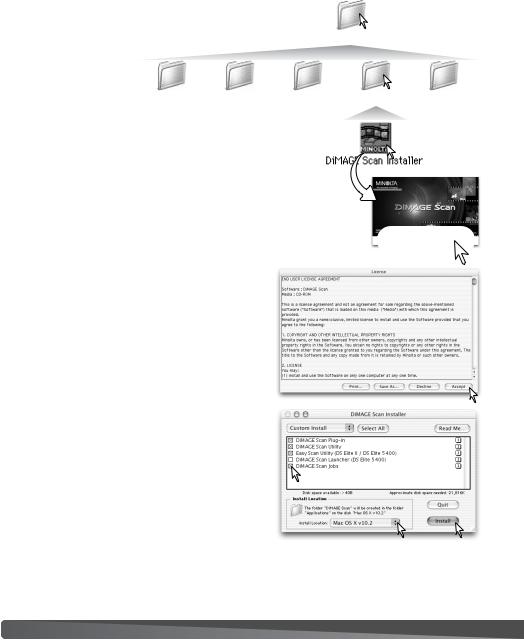
Turn on the computer to start the Mac OS. Insert the DiMAGE Scan Utility CD-ROM into the CD-
ROM drive. The Dimage Scan Utility CD-ROM icon will appear on the desktop. Double-click on the icon; the driver, manual, and acrobat reader folders will be displayed.
Open the driver folder to view the language folders.
|
|
|
Driver |
|
Open the appropriate |
|
|
|
|
language folder. |
Espanol |
Francais |
English |
Japanese |
Deutsch |
Double click on the DiMAGE Scan installer; the installer’s startup screen will open.
Click the continue button on the installer screen to begin the installation routine.
The end-user license agreement will appear. If you accept the terms of the agreement, click the accept button to continue the installation routine. If you do not agree to the conditions in the end-user license agreement, click the decline button and the software will not be installed.
With custom installation selected from the pop-up menu at the top left of the installer screen, click the check box of the files to be installed. The DiMAGE Scan Launcher and Quick Scan Utility should only be installed with compatible scanners, see “Compatibility with the DiMAGE Scan Utility” in the scanner notes section of the hardware manual. At the bottom of the installer screen, specify the location in which the software will be installed. To change the designated location, use the install-location menu; this menu can be used to select an existing location or create a new one.
Click the install button to begin installation.
8 Installation
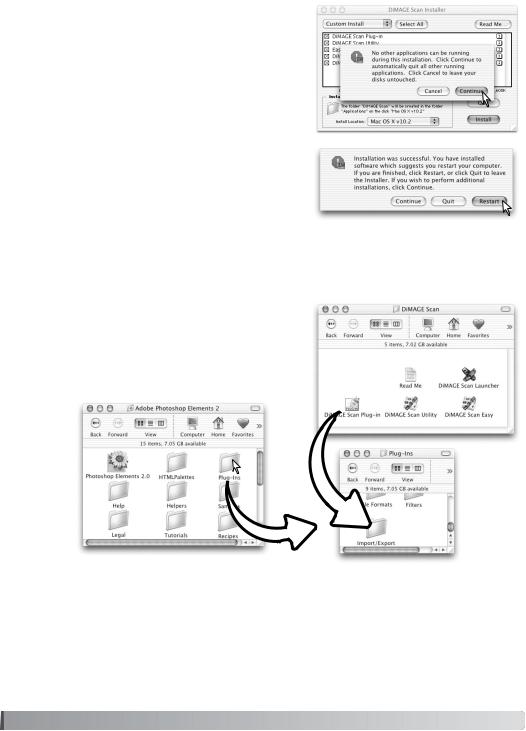
Any software that is running must be closed before the DiMAGE Scan Utility can be installed. Click the continue button to shut down any active applications and continue the installation routine. The cancel option will end the installation routine.
A screen confirming the successful installation of the software will appear. Click the restart button to exit the installation program and restart the computer.
The quit button exits the installer without restarting the computer. To make additional installations, click the continue button.
After the computer restarts, confirm the selected
DiMAGE Scan applications are installed in the designated location. Print out a copy of the Read Me file for reference.
If the DiMAGE Scan plug-in was installed, simply drag and drop the plug-in file into an image-processing application’s import folder. This will allow the DiMAGE Scan Utility to be launched directly from that application.
9
EASY SCAN UTILITY
The DiMAGE Scan Easy Scan Utility is a simple, automatic scanning application for trouble-free scans. The utility works as a stand-alone program, and cannot be launched through another application. This software is not available with all scanner models, see the scanner notes section in the scanner hardware manual.
The following settings are automatically made when using the Easy Scan Utility:
•Autofocusing with each 35mm frame, or with the first APS frame only.
•Index scan priority: speed setting (p. 30).
•Color depth: 8 bit.
•No multi-sample scanning.
•Automatic cropping to inside edge (p. 19).
•When Digital ROC is active, color matching is turned off.
•sRGB output color space when color matching is on. (p. 66)
•Autoexposure with all films except black and white slides.
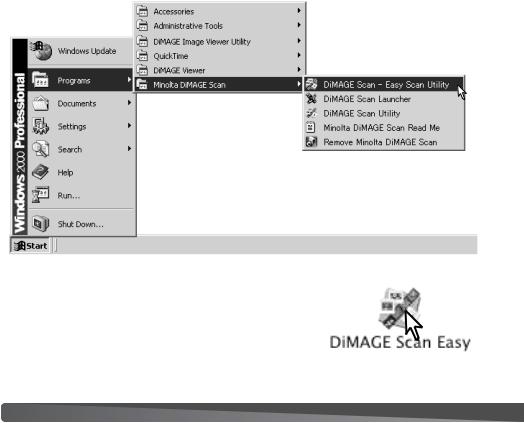
Launching the Easy Scan Utility
Do not launch the utility with a film holder in the scanner. If the scanner model has a manual front door, the door must be closed.
Windows
Select DiMAGE Scan - Easy Scan Utility from the Minolta DiMAGE
Scan folder in the program option of the start menu.
Macintosh
Open the DiMAGE Scan folder. Double click the DiMAGE Scan
Easy icon.
10 |
Easy scan utility |
Using the Easy Scan Utility
When the Easy Scan Utility is launched, the Easy Scan Wizard opens. Simply follow the instructions on the Wizard to scan images. Screens and functions differ between scanner models.
A screen requesting a film holder appears. Load and insert the holder following the instructions in the loading a film holder section of the hardware manual.
If an optional APS adapter is used, an index scan will be made and the next window is skipped. The APS auto-detect function automatically sets the film type between color and black and white, and positive and negative.
The status bar at the top of each window gives instructions or describes function on which the mouse pointer is located.
To exit the Easy Scan Utility at any point, click the quit button in the bottom left corner of the window. The film holder will be ejected automatically.
When scanning 35mm film, click the appropriate button to specify the film type; film for slides is positive film, and film for prints is negative film. The border of the film-type button is highlighted to indicate the selection. Click the next button to begin an index scan.
Film-type buttons
Scanner Notes (Macintosh)
To cancel an index scan, prescan, or final scan once it has started, click and hold the mouse on the cancel button in the progress dialog box or press and hold the command and period (.) keys until the cancel button appears to depress.
11
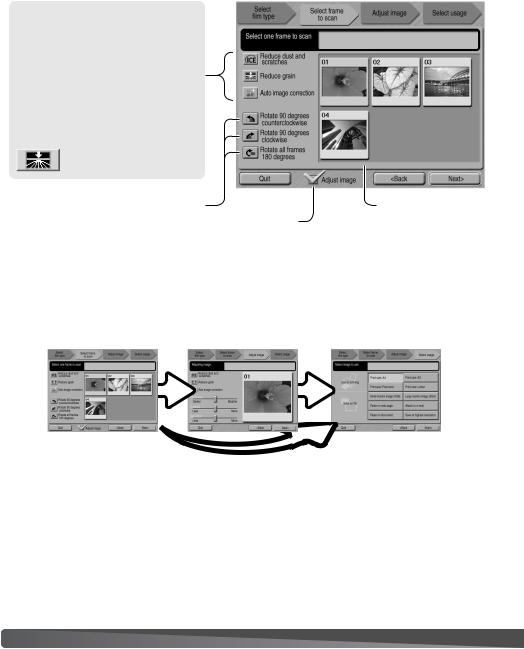
When the index scan is complete, thumbnails of all the images in the holder are displayed. Click the image to be scanned. The border is highlighted to indicate selection. Only one image can be selected. When using an optional APS adapter, the thumbnail frame numbers correspond to the film frame numbers.
The functions available vary between scanner model.
 Digital ICE (p. 24)
 Digital ROC (p. 45)
 Digital GEM (p. 46)
 Pixel Polish (p. 23)
Grain Dissolver (p. 29) |
|
Rotate buttons |
Index thumbnails |
Adjust-image check box |
|
Once an image-processing function is selected, it will remain in effect until canceled. Not all the functions can be used with black and white film. The Grain Dissolver automatically activates with Digital ICE when both functions are available.
Click the adjust-image check box to access the adjust-image screen to control image brightness, contrast, and saturation. Uncheck the box to go directly to the select-usage screen.
When scanning with the optional APS adapter, more thumbnails will be created than can be displayed. Scroll buttons will appear at the side of the window. The single-arrow button scrolls one line at a time, the double-arrow button scrolls two lines.
Select the image to be scanned. Select image processing or rotate the image as necessary. Click the next button to continue.
12 |
Easy scan utility |

If the adjust-image option was checked in the previous screen, the adjust-image screen will be displayed. The same automatic image-processing functions shown in the previous screen are also displayed here.
Click and drag the brightness, contrast, and saturation sliders to adjust the image; change are reflected in the display. Any changes made to brightness, contrast, and saturation will remain in effect until reset or the utility is closed. Returning to the previous screen and unchecking the adjust-image box will not reset these settings.
After making adjustments to the image, click the next button.
Select the option which best describes the final use of the scanned image. Only one choice can be made. Click the scan button to continue; the save-as screen will open. If an image has multiple uses, repeat the
Easy Scan procedure for each use of the image.
On the save-as screen, specify the file name, file format, and destination of the image data. Images can be saved in BMP,
JPEG, TIFF, or PICT file formats. See page 21 for more about these formats. When saving JPEG files, the compression ratio can be specified. Click the save button to complete the final scan.
When using a USB storage device on the same bus as the scanner, save the data on the computer’s hard disk first before transferring it to the storage device. Saving the scanned data directly to the device may corrupt the image data.
After the scanning is completed, the image is ready to use.
Click the appropriate button to continue or close the utility. The quit button closes the Easy Scan Utility and ejects the film holder. The replace-film button ejects the holder so the film can be changed. The continue button allows other images in the film holder to be scanned. Turn off the scanner when not in use.
13

BASIC SCANNING
Launching the DiMAGE Scan Utility
Do not launch the utility with a film holder in the scanner. If the scanner model has a manual front door, the door must be closed. The utility can also be launched from an image-processing application. See the Windows and Macintosh installation section.
Windows
Select DiMAGE Scan Utility from the Minolta DiMAGE Scan folder in the program option of the start menu. See page 70 when using multiple scanners.
Macintosh
Open the DiMAGE Scan folder, and double click the DiMAGE
Scan Utility icon. See page 70 when using multiple scanners.
Scanning basics
Please read the basic scanning section in its entirety before moving on. Before any scan is made, the film holder must be loaded and inserted into the scanner. Refer to the scanner hardware manual for instructions as well as film handling tips.
Three types of scans can be made singularly or in combination depending on the workflow and degree of processing:
Index scan
Prescan
Scan
To display thumbnails of each image in the 35mm or APS film holder. An index scan is useful when scanning multiple frames on one film strip or for selecting a specific frame among similar images.
To display a preview of a specific image. A prescan allows an image to be cropped or corrected using the DiMAGE Scan’s image-processing tools.
To save and export an image. Image size, resolution, and file format are specified with this scan.
14 |
Basic scanning |

Scanner setup
Before making a scan, the film format and type must be specified. Refer to the film format and type settings section of the hardware manual for more information.
Film format and type are selected from the drop-down menus in the top left corner of the main window. If the holder and selected film format do not match, a warning will be displayed and the scan will not be made.
Some model scanners use both glass
and glassless film holders, see the scanner notes section in the hardware manual. This must be set with the holder type drop-down list.
Main window and index scan tab
|
|
|
|
|
Eject button |
|
Help |
||
|
Film format |
|
Holder type |
Film type |
|||||
|
|
|
|
|
|
|
|
|
|
Scan button (p. 20) |
|
|
|
|
|
|
|
||
|
|
|
|
|
|
||||
Index scan button (p. 16) |
|
|
|
|
|
|
|
||
|
|
|
|
|
|
||||
Prescan button (p. 18) |
|
|
|
|
|
||||
Index tab
Rotate buttons (p. 17)
Flip buttons (p. 17)
Fit-to-window button (p. 17)
The utility window can be resized by clicking and dragging the bottom right corner.
Index thumbnail
Frame number
Scan-setting window (p. 20)
15

Making an index scan
Index scans can be made of 35mm or APS film. An index scan cannot be made with single-frame medium format film holders. The type of film holder available vary with scanner model.
With a loaded film holder in the scanner, click the index-scan button in the main window to start the scan. All the frames in the film holder will be
scanned. The frame number of the index scan corresponds to the frame number in the film holder. Images can be prescanned or scanned without making an index scan.
To cancel the index scan, click the cancel button in the small dialog box that appears during the scan, or press the escape key (Windows), or press the command key and period (.) at the same time (Macintosh).
Index thumbnails will remain in the display until another index scan is made or the film format and type are changed. To initialize the index display and remove the current thumbnails press the control key (Windows) or command key (Macintosh) together with the shift and R keys.
Selecting index thumbnails
The thumbnail display allows the selection of single or multiple images for prescanning or scanning. Selected images can also be affected by the scanner software functions such as the rotate buttons.
Simply click on a thumbnail to select it; the border will darken to indicate selection.
To select multiple images, press and hold the control key (Windows) or command key
(Macintosh) and then click on each image to be scanned; the selected frames will have a dark border. To deselect an image, click on the thumbnail a second time while holding the con-
trol key (Windows) or command key (Macintosh). To select consecutive images, press and hold the shift key and then click on the first and last images of the series. Press the control key
(Windows) or command key (Macintosh) and A key at the same time to select all frames.
16 |
Basic scanning |
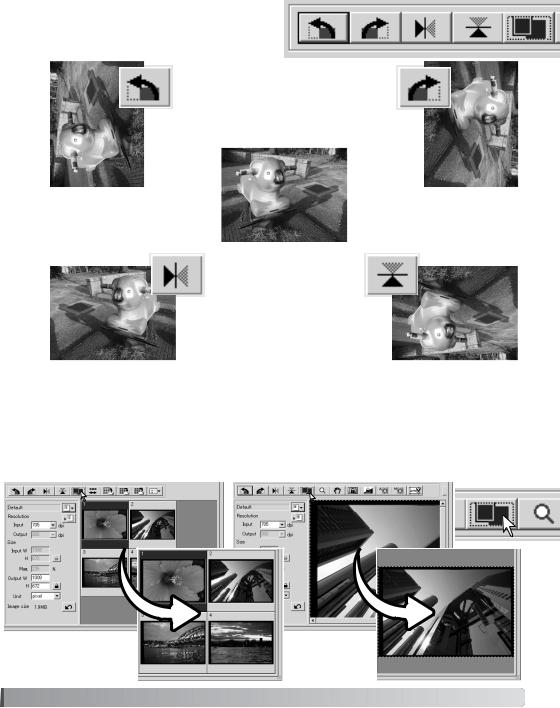
Flip and rotate images
The orientation of the index thumbnails and prescan images can be changed with the flip and rotate buttons on the tool bar.
Rotate - the rotate-right button rotates the thumbnail 90° clockwise and the rotateleft button rotates the image 90° counterclockwise each time the buttons are clicked.
Original image
Flip - when an image is flipped, it will create a mirror image.
Fit-to-window button
Normally, index thumbnails and prescan images are displayed based on their size and resolution.
When the number of thumbnails or the size of the prescan is too large or small for the display area, clicking the fit-to-window button automatically resizes the images to fit the display area. Clicking the button again displays the images at their original size. The prescan grab and zoom tools cannot be used with the fit-to-window function.
17
Main window and prescan tab
Film format
Index scan button (p. 16)
Prescan button
Scan button (p. 20) Eject button
Holder type
This display indicates the frame number of the displayed image and the number of images in the holder. Click the arrows to load the previous or next image.
Film type Help
CHP button
(for APS film) (p. 19)
Auto-cropping button (p. 19)
Prescan display area Grab button (p. 19)
Magnifying button (p. 19) Fit-to-window button (p. 17)
Flip-vertically button (p. 17) Flip-horizontally button (p. 17)
Scan-setting window (p. 20) Rotate-right button (p. 17)
Rotate-left button (p. 17)
Making a prescan
When using an index scan, select the index frame to be prescanned. Click the prescan button in the main window. Double clicking on the index frame will also activate the prescan even if no thumbnail is displayed in the frame; the prescan window will be displayed automatically.
When using a single-frame medium-format film holder, click the prescan button in the main window.
18 |
Basic scanning |
Grab tool
When an image is larger than the display area, the grab tool can be used to scroll the image. Click the grab button on the tool bar. Click and drag on the image to scroll. This tool cannot be used with the fit-to- window function (p. 17).
Magnifying tool
The display image can be enlarged or reduced. Click the magnifying button on the tool bar. Click on the image to enlarge. To reduce, hold down the control (Windows) or option key (Macintosh) and click on the image. When the image has reached the magnification limit, the plus or minus sign in the magnifying icon will disappear. This tool cannot be used with the fit-to-win- dow function (p. 17).
Enlarge |
Reduce |
Auto cropping
Auto cropping eliminates the blank space around the image area. Clicking the auto-cropping button cycles through its three positions: crop to outside edge of the image area, crop to inside edge of the image area, and entire scan area. The cropping frame is indicated by a marquee (dotted line). The cropping area can also be adjusted manually (p. 38). When using the image-correc- tion tools, only the cropped area is displayed.
CHP button (APS film)
Scanner models that accept optional APS adapters can use the CHP button to crop an image to one of the APS formats. Clicking the CHP button cycles the cropping frame through the C, H, and P APS framing formats. The cropping area can be moved by placing the mouse pointer within the marquee (dotted line) and then clicking and dragging. The cropping area can also be adjusted manually (p. 40). When using the image-correction tools, only the cropped area is displayed.
H
P |
C |
19
Making the final scan
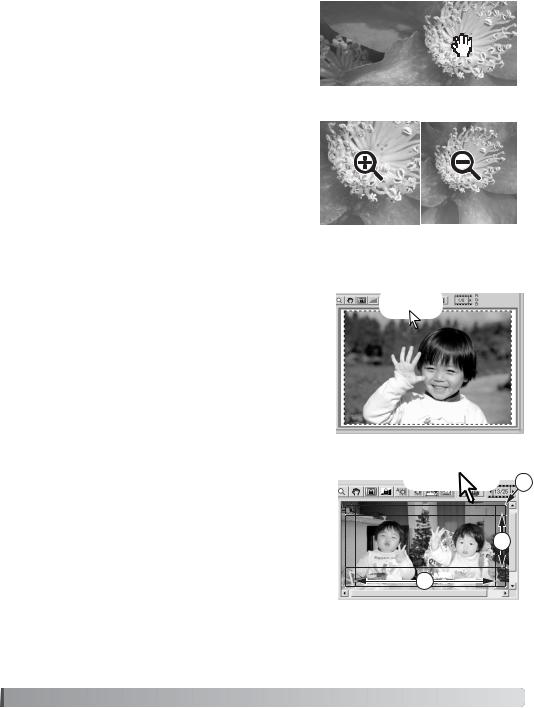
Before making the final scan, the input and output parameters must be specified. While it’s possible to input the scan settings yourself, DiMAGE Scan Utility gives you an easier choice - the Job function. This function automatically loads the scan settings based on the final use of the image.
The scan-setting dialog box is located on the left of both the index scan and prescan windows.
The Standard Scan Utility contains over 100 Job files to cover a wide range of image use. To create your own Job files or to input the scan settings manually, see page 40. For a list of Job parameters, see the Job file lists section in the scanner hardware manual.
 Job name
Load Job button
 Scan resolution
 File resolution
Scan dimensions and magnification
File dimensions
 Unit of dimensions
 Reset button
Size is based on the total number of pixels in the image and can be different from the size of the saved data depending on the file format selected.
Click the load Job button. The Job-selection dialog box will open.
Select a Job category from the drop-down list. The Job categories will vary between scanner models.
20 |
Basic scanning |
Click a Job file name to select it. The Job names can be sorted chronologically or alphabetically by clicking the name or date radio buttons at the bottom of the dialog box.
The scan settings of the selected Job file are displayed on the right side of the window. The Job settings vary with the film format. Click the OK button to apply the Job settings.
When the Job file is loaded, a cropping frame will appear on the image. The frame is proportional to the output use specified with the Job. The frame can be resized, but the proportions will remain the same; the input and output values are automatically adjusted to match the change to the cropping frame.
Click the scan button in the main window to start the final scan. If the DiMAGE Scan Utility was opened in an imageprocessing application, the scanned image will be opened in that application. If the utility is used by itself, the save as dialog box will open.
On the save-as dialog box, enter the file name, and select the file destination and file format for the image data. If multiple images are scanned, a serial number can be added to the file name automatically; click the add-number check box and then enter the first number of the series. When saving JPEG files, the compression ratio must be specified. Click the save button to make the final scan.
File types
This file can be compressed to reduce the file size. The compression ratio can be selectJPEG ed when saving. The higher the compression ratio, the smaller the file size, and more loss
to image quality.
TIFF
A high-resolution bitmap that can be opened on any computer platform. The color depth can be specified in the preference window (p. 30).
BMP
A file type used in Windows. This file type can be opened in the paint software installed in the Windows operating system.
A file type used in Macintosh. This file can be opened in the Simple Text application PICT installed with Macintosh operating systems. The file cannot have a width greater than
4096 pixels.
21
BASIC IMAGE PROCESSING
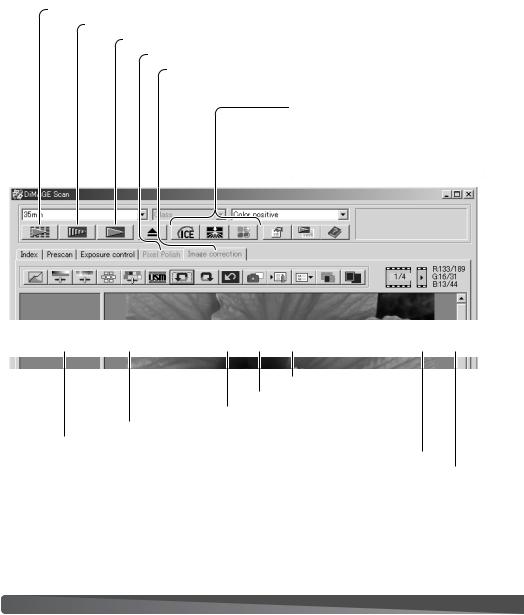
Main window and image-correction tab
This section contains details on the basic image-processing tools. For descriptions of the advanced tools, see pages 44 though 59. The prescan image or a selected index image can be displayed in the image correction window by simple clicking the tab. If the image has not been prescanned, a prescan will be made automatically.
Index scan button (p. 16) Prescan button (p. 18)
Scan button (p. 20)
Pixel Polish tab Image-correction tab
Display area
The functions available vary between scanner model.
 Digital ICE (p. 24)
 Digital ROC (p. 45)
 Digital GEM (p. 46)
 Pixel Polish (p. 23)
 Grain Dissolver (p. 29)
Reset-all button (p. 28) Redo button (p. 28)
Undo button (p. 28)
Variation button (p. 25)
Brightness, contrast, and color-balance button (p. 26)
Comparison display button (p. 28) Fit-to-window button (p. 17)
The utility window can be resized by clicking and dragging the bottom right corner. If the fit-to-win- dow function is active, the displayed image will automatically adjust to fit the display area. If any changes are made to the image using Pixel Polish or the image-correction tab, the tab will turn red
(Windows) or an asterisk will be displayed (Macintosh).
22 |
Basic image processing |
 Pixel Polish
Pixel Polish makes automatic or custom image corrections. This function is not available with all scanner models. See the scanner notes section in the hardware manual for compatibility and system requirements. Pixel Polish cannot be used with black and white film, 16-bit or 16-bit linear color depth (p. 30). Scanning time increases. The effect of Pixel Polish is based on the prescan image area. If the image is cropped after applying Pixel Polish, click the crop-prescan button (p. 38) to view the results.
Click the Pixel Polish button in the main window to automatically correct the images in the film holder; previous corrections are canceled. The correction is applied to the prescan image.
Pixel Polish remains in effect until canceled; click the Pixel Polish button again. To reapply image corrections made before using Pixel Polish, open the image in the image-correction tab and click the undo button.
Pixel Polish button
Pixel Polish tab
Apply-all button
Auto radio button
Custom radio button
Custom correction list boxes
To make custom corrections, click the Pixel Polish tab. If a prescan has not been made, the scanner will make one automatically.
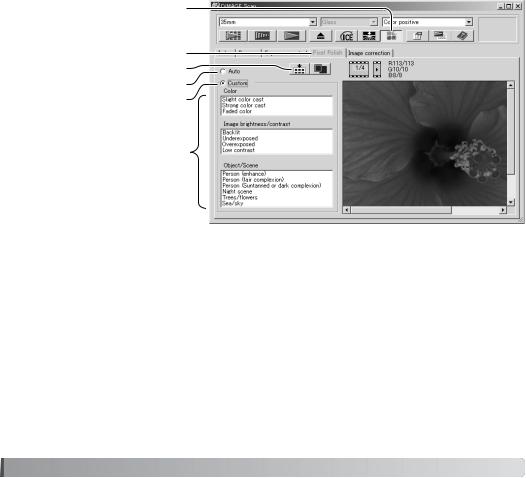
Click the custom radio button. Click on the descriptions in the list boxes which best describes the image. To deselect a description, click on it again (Windows) or press the command key and click on it (Macintosh).
The apply-all button applies the custom settings to all images in the film holder. To reset the images to the auto correction setting, click the auto radio button and then the apply-all button.
23
 Loading...