


 Loading...
BR 30/4 C
BR 30/4 C Adv
English |
3 |
Français |
14 |
Español |
27 |
Register. |
|
www |
|
kaercher |
|
and |
|
. |
win! |
com |
|
59649540 10/12

2

IMPORTANT SAFETY IN-
STRUCTIONS
READ ALL INSTRUCTIONS
BEFORE USING.
WARNING
To reduce the risk of fire, electric shock, or injury:
–DO NOT LEAVE appliance unattended when plugged in. Unplug from outlet when not in use and before servicing.
WARNING
–TO REDUCE THE RISK OF ELECTRIC SHOCK-USE INDOORS ONLY
–Do not allow to be used as a toy. Close attention is necessary when used near children.
–Use only as discribed in this manual. Use only manufacturer’s recommended attachments.
–Do not use with damaged cord or plug. If appliance is not working as it should, has been dropped, damaged, left outdoors, or dropped into water, return it to a service center.
–Do not pull or carry by cord, use cord as a handle, close a door on cord, or pull cord around sharp edges or corners. Do not run the unit over cord. Keep cord away from heated surfaces.
–Do not unplug by pulling on cord. To unplug, grasp the plug, not the cord.
–Do not handle plug or appliance with wet hands.
–Do not put any object into openings. Do not use with any opening blocked; keep free of dust, lint, hair,
and anything that may reduce air flow.
–Keep hair, loose clothing, fingers, and all parts of body away from openings and moving parts.
–Turn off all controls before unplugging.
–Use extra care when cleaning on stairs.
–Do not use to pick up flammable or combustible liquids, such as gasoline, or use in areas where they may be present.
–Connect to a properly grounded outlet only. See Grounding Instructions.
SAVE THESE INSTRUCTIONS
GROUNDING INSTRUCTIONS
This appliance must be grounded. If it should malfunction or break down, grounding provides a path of least resistance for electric current to reduce the risk of electric shock.
The plug must be inserted into an appropriate outlet that is properly installed and grounded in accordance with all local codes and ordinances.
WARNING
Improper connection of the equipmentgrounding conductor can result in a risk of electric shock.
Check with a qualified electrician or service person if you are in doubt as to whether the outlet is properly grounded.
Do not modify the plug provided with the appliance.
If it will not fit the outlet, have a proper outlet installed by a qualified electrician.
EN – 1 |
3 |
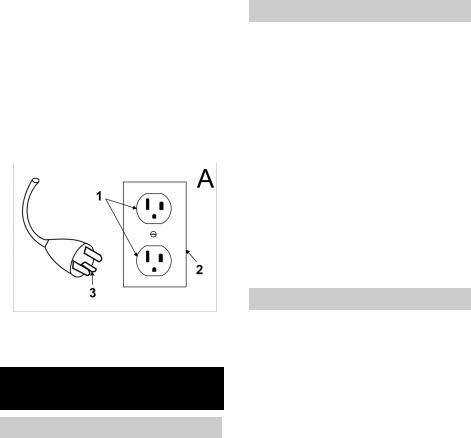
This appliance is for use on a nominal 120-volt circuit and has a grounding attachment plug that looks like the plug illustrated in sketchpicture A. Make sure that the appliance is connected to an outlet having the same configuration as the plug. No adaptor should be used with this appliance.
CONNECT TO A PROPERLY GROUNDED OUTLET ONLY
1Grounded outlet
2Grounded outlet box
3Grounded pin
OPERATING SAFETY RULES
AND PRACTICES
Operator Responsibility
Save operation is in the responsibility of the operator.
The operator shall be familiar with the operation and function of all controls and instruments before undertaking to operate the unit.
Before operating the unit, operators shall have read and be familiar with the operator’s manual for the particular unit being operated and they shall also abide by the safety rules and practices in the following paragraphs.
Before operating any unit, the operator shall be familiar with unusual operating conditions which may require additional safety precautions or special operating instructions.
General
Before starting to operate the unit be in operating position.
Do not start or operate the unit, any of its functions or attachments, from any place other than from the designated operators position.
Before leaving the operator’s position:
Abring the unit to a complete stop;
Bif the unit must be on an incline, block the wheels.
Maintain a safe distance from the edge of ramps, platforms, and other similar working surfaces.
Do not add to, or modify the unit.
Do not block access to fire aisles, stairways or fire equipment.
Travelling
Yield the right of way to pedestrians and emergency vehicles such as ambulances and fire trucks.
Cross railroad tracks at an angle wherever possible. Do not park closer than 6 ft (1800 mm) to the nearest rail of a railroad track.
Keep a clear view of the path of travel and observe for other traffic, personnel, and safe clearances.
Under all travel conditions, operate the unit at a speed that will pernit it to be brought to a stop in a safe manner. Do not indulge in stunt driving or horseplay.
Slow down for wet and slippery floors. Before driving over a dockboard or bridge plate, be sure that it is properly secured. Drive carefully and slowly across the dockboard or bridge plate, and never exceed its rated capacity. When negotiating turns, reduce speed to a safe level consistent with the operating environment. Make the turns smoothly.
4 |
EN – 2 |

Operator care of the unit
If the unit is found to be in need of repair or in any way unsafe, or contributes to an unsafe condition, the matter shall be reported immediately to the user’s designated authority, and the unit shall not be operated until it has been restored to safe operating condition.
If during operation the unit becomes unsafe in any way, the matter shall be reported immediately to the user’s designated authority, and the unit shall not be operated until it has been restored to safe operating condition.
Do not make repairs or adjustments unless specifically authorized to do so.
MAINTENANCE AND REBUILD PRACTICES
Operation of the unit may be hazardous if maintenance is neglected or repairs, rebuilds, or adjustments are not performed in accordance with the manufacturer’s design criteria. Therefore, maintenance facilities (on or off premises), trained personnel, and detailed procedures shall be provided. Maintenance and inspection of the unit shall be performed in conformance with the following practices:
Aa schedules planned maintenance, lubrication, and inspection system shall be followed; consult the manufacturer’s recommendations.
Bonly tranined and authorized personnel shall be permitted to maintain, repair, adjust, and inspect the unit, and in accordance with manufacturer’s specifications.
Avoid fire hazards and have fire protection equipment present in the work area. Do not use open pans of fuel or
flammable cleaning fluids for cleaning parts.
FIRE SAFETY STANDARD
Any unit not in safe operating condition shall be removed from service. Repairs shall not be made in Class I, Class II, and Class III locations.
Fire Prevention: The unit shall be kept in a clean condition and reasonably free of lint, excess oil, and grease. Noncombustible agents are preferred for cleaning the unit. Flammable liquids [those having flash points at or above 100°F (37,8°C)] are not allowed. Precautions regarding toxicity, ventilation, and fire hazard shall be appropriate for the agent or solvent used.
Nameplate Visibility: The unit type designations as shown on the nameplate and the type markers shall not be covered over with paint so that their identification information is obscured.
The unit shall not be used in classified areas.
EN – 3 |
5 |

Please read and comply with these instructions prior
to the initial operation of your appliance. Retain these operating instructions for future reference or for subsequent possessors.
Contents
Safety instructions . . . . . . . EN . . .4 Function . . . . . . . . . . . . . . . EN . . .4 Proper use . . . . . . . . . . . . . EN . . .4 Environmental protection . . EN . . .4 Control elements . . . . . . . . EN . . .5 Initial startup. . . . . . . . . . . . EN . . .5 Operation . . . . . . . . . . . . . . EN . . .5 Maintenance and care . . . . EN . . .7 Faults . . . . . . . . . . . . . . . . . EN . . .8 Technical specifications . . . EN . .10 Warranty. . . . . . . . . . . . . . . EN . . 11 Spare parts. . . . . . . . . . . . . EN . . 11
Safety instructions
Before using the appliance for the first time, read and observe these operating instructions and the accompanying brochure: Safety information for brush cleaning units and spray-extraction units, 5.956-251.
Symbols in the operating instructions
Danger
Immediate danger that can cause severe injury or even death.
Warning
Possible hazardous situation that could lead to severe injury or even death.
Caution
Possible hazardous situation that could lead to mild injury to persons or damage to property.
Function
The appliance is used for the wet cleaning of level floors.
A working width of 300 mm and a capacity of 4 l each of the fresh and dirt water reservoirs enable an effective cleaning of smaller surfaces.
The power supply operation allows a high capacity without a restriction of the working time.
Note
The appliance can be equipped with various accessories depending on the cleaning task. Please request our catalogue or visit us on the Internet at www.kaercher.com.
Proper use
Use this appliance only as directed in these operating instructions.
–The appliance may only be used for the cleaning of hard surfaces that are not sensitive to moisture and polishing operations.
The application temperature ranges from +5°C to +40°C.
–The appliance is not suited for the cleaning of frozen grounds (e.g. in cold stores).
–The appliance may only be equipped with original accessories and spare parts.
–The appliance was designed for the cleaning of floors inside or of covered surfaces.
–The appliance is not intended for the cleaning of public traffic routes.
–The appliance is not suited for the use in potentially explosive environments.
6 |
EN – 4 |

Environmental protection
The packaging materials are recyclable. Please do not throw packaging in the domestic waste but pass it on for recycling.
Old units contain valuable recyclable materials. Batteries, oil and similar substances may not be released into the environment. Therefore please dispose of old units through suitable collection systems.
Notes about the ingredients (REACH)
You will find current information about the ingredients at: www.kaercher.com/REACH
Control elements
Figure 1, see cover page
1Handle
2Water pump switch
3Main switch for brushing/vacuuming operations
4Carrying handle
5Support bow in waste water reservoir
6Dirt water reservoir
7Fresh water tank
8Fresh water tank lock
9Cleaning head
10Vacuum bar lift pedal
11Release, park position
12Suction tube
13Suction tube connection
14Suction nozzle (BR 30/4 C Adv only)
15Brush roller
16Vacuum bar
17 Unlocking button for the changeable brush
18 Cover dirt water reservoir
19Lock
20Cable hook, rotating
21Mains cable with mains plug
22Suction tube handle (BR 30/4 C Adv only)
Colour coding
–The operating elements for the cleaning process are yellow.
–The controls for the maintenance and service are light gray.
Initial startup
Figure 2, see cover page
Insert tube into the opening of the appliance at the end of the handle.
Press down and slide the handle into the appliance until it clicks.
Operation
Fill fresh water reservoir
Caution
Risk of damage. Only use the recommended detergents. With respect to different detergents the operator bears the increased risk regarding the operational safety, accident risk and reduced product life of the appliance. Only use detergents that are free from solvents, hydrochloric acid and hydrofluoric acid. Follow the safety instructions for using detergents.
Note
Do not use highly foaming detergents. Observe the dosing notes.
Recommended detergents:
EN – 5 |
7 |

Application |
Detergent |
|
|
Everday cleaner, alkali- |
RM 743 |
based |
|
|
|
Everyday cleaner, acid- |
RM 738 |
ic, for sanitary applica- |
|
tions, swimming pools, |
|
etc. Removes limestone |
|
deposits. |
|
Remove the fresh water reservoir from the appliance.
Open the cover of the fresh water reservoir.
Pour in water/detergent mixture. Maximum temperature of the liquid 50 °C.
Close the cover of the fresh water reservoir.
Insert the fresh water container into the appliance.
Establish mains contact
Swivel bottom cable hook upward and remove cable.
Check mains cable and plug for damage or breakage. Get them replaced only through customer service agent or an electrician.
Insert the mains plug into the socket.
Cleaning
Danger
Risk of injury on account of electric shock caused by a damaged mains cable. Do not let the mains cable come in contact with the rotating brushes.
Caution
Risk of damage to the floor covering. The cleaning method for severe soiling must only be used on floors suitable for this kind of cleaning.
Risk of damage to the fresh water pump if it runs dry because of empty fresh water reservoir. Monitor the fill level indicator and switch the water pump switch off if the fresh water reservoir is empty.
Normal soiling
Move the suction bar lift pedal to position „suction off“ (Fig. 3 - position "1/ON", see inside front cover).
Press the park position release and swivel the handle toward the rear.
Set main switch for brush/vacuum operation to “1”.
Activate the water pump switch.
Move the appliance over the surface to be cleaned.
Severe soiling
Caution
Risk of damage to the floor covering. The cleaning method for severe soiling must only be used on floors suitable for this kind of cleaning.
Move the vacuum bar lift pedal to position „do not suction off“ (Fig. 3 - position "0/OFF" see inside front cover) and perform the cleaning as you would with normal soiling. The detergent liquid remains on the surface to be cleaned and has time to settle in.
Move the vacuum bar lift pedal to position "suction off" and reclean the surface.
Vacuuming in corners (BR 30/4 C Adv only)
Pull the suction tube out toward the top, attach the suction nozzle and vacuum the dirt.
Remove the nozzle, replace the suction tube and insert handle.
8 |
EN – 6 |

Complete cleaning
Turn off the water pump switch.
Push the appliance a little further to vacuum up the remaining water.
Set main switch for brush/vacuum operation to “0”.
Swivel the appliance handle forward and arrest in the park position.
Disconnect the main plug from the socket.
Emptying the Dirt Water Reser-
voir
Note
If the dirt water reservoir is full the float closes the suction channel. The suction operation is interrupted. Empty the dirt water reservoir.
Warning
Please observe the local provisions regarding the wastewater treatment.
Turn off the appliance.
Position the appliance upright and arrest it in the park position.
Remove the fresh water reservoir from the appliance.
Swivel support bow downward and remove the waste water reservoir.
Lift the lock and remove the lid of the waste water reservoir.
Pour out dirt water.
The rinse the dirt water reservoir with clear water.
Replace the lid of the waste water reservoir and lock it.
Insert the waste water container into the appliance.
Emptying the Fresh Water Res-
ervoir
Remove the fresh water reservoir from the appliance.
Open the cover of the fresh water reservoir.
Pour out the cleaning liquid.
Close the cover of the fresh water reservoir.
Insert the fresh water container into the appliance.
Transport
Caution
Risk of injury and damage! Observe the weight of the appliance when you transport it.
Swivel the appliance handle forward and arrest in the park position.
Swivel the pushing handle backwards and push the appliance.
or
Lift appliance by the carrying handle and carry it.
When transporting in vehicles, secure the appliance according to the guidelines from slipping and tipping over.
Storage
Caution
Risk of injury and damage! Note the weight of the appliance in case of storage.
This appliance must only be stored in interior rooms.
Maintenance and care
Danger
Risk of injury by inadvertent startup of appliance and electrical shock.
First pull out the plug from the mains before carrying out any tasks on the machine.
Caution
Risk of damage to the appliance on account of water leakage. Empty the
EN – 7 |
9 |

waste water reservoir and the fresh water reservoir prior to performing maintenance on the appliance.
Maintenance schedule
After the work
Caution
Risk of damage. Do not wash down the appliance with water and do not use aggressive detergents.
Empty the dirt water reservoir.
Clean the seals between the waste water reservoir and the appliance.
Empty the fresh water reservoir.
Rinse the appliance: Fill the fresh water reservoir with clear water (without detergent) and let the appliance run for one minute with the brush water supply turned on.
Empty the fresh water reservoir.
Clean the outside of the appliance with a damp cloth which has been soaked in mild detergent.
Clean the vacuum bar, check for wear and replace if required (see "Maintenance tasks").
Check the brush for wear and replace if required (see "Maintenance tasks").
Yearly
Have the prescribed safety inspection carried out by an electrician.
Maintenance Works
Replace the vacuum bar.
Note
The vacuum bars are attached to the appliance with snaps and can simply be pulled off.
Move the suction bar lift pedal to position „suction off“ (Fig. 3 - position "1/ON", see inside front cover).
Remove the fresh water reservoir.
Remove the dirt water reservoir.
Lay the device on the reverse.
Pull off the vacuum bar downwards.
Insert the new vacuum bars and lock them into place.
Replacing the brush roller
Remove the fresh water reservoir.
Remove the dirt water reservoir.
Lay the device on the reverse.
Press the release button for the brush roller and swivel the brush roller toward the bottom and pull it off the driver.
Place the new brush roller on the driver and lock into place on the opposite side.
Frost protection
In case of danger of frost:
Empty the fresh and dirt water reservoirs.
Store the appliance in a frost-pro- tected room.
Faults
Danger
Risk of injury by inadvertent startup of appliance and electrical shock.
First pull out the plug from the mains before carrying out any tasks on the machine.
Caution
Risk of damage to the appliance on account of water leakage. Empty the waste water reservoir and the fresh water reservoir prior to performing maintenance on the appliance.
In case of faults that cannot be remedied using the table below please contact the customer service.
10 |
EN – 8 |
Fault |
Remedy |
Appliance cannot |
Check if the mains plug is connected. |
be started |
|
|
|
Insufficient water |
Check fresh water level, refill tank if necessary. |
quantity |
|
Open the lock of the fresh water reservoir. If a vacuum is |
|
|
detected when the tank is opened, clean the ventilation |
|
valve in the lock of the fresh water reservoir. |
|
Clean the water distributor (see chapter "Cleaning the wa- |
|
ter distributor"). |
|
|
|
Remove the fresh water tanke and check the sieve for con- |
|
tamination. If necessary, remove the sieve and clean it. |
|
|
|
Pull off the valve with filter on the fresh water reservoir (Fig. |
|
4, see inside front cover) and rinse in lukewarm water. |
Fresh water reser- |
Pull off the valve with filter on the fresh water reservoir (Fig. |
voir drips when re- |
4, see inside front cover) and rinse in lukewarm water. |
filled |
|
|
|
Insufficient vacu- |
Empty the dirt water reservoir. |
um performance |
|
Lock the waste water reservoir in place on the appliance. |
|
|
Clean the seals between dirt water reservoir and cover and |
|
check for tightness, replace if required. |
|
|
|
Check the seals between the lid of the waste water reser- |
|
voir and the appliance. Contact Customer Service if the |
|
seals are damaged. |
|
|
|
Check that all vacuum bars are locked into place in the |
|
cleaning head. |
|
Suction bar plugged, clean. |
|
Suction bar worn; exchange the front and rear suctions |
|
bars. If both suction bars are worn, install new suction bars. |
|
|
|
Check that both suction tube parts are correctly attached to |
|
the suction tube connection. |
|
Check the suction tube and the suction channel in the |
|
cleaning head for obstruction and remove if necessary (see |
|
"Cleaning suction tube"). |
|
|
|
Check whether the cable behind the tanks has been routed |
|
flat and whether the included cover is attached. |
|
|
Insufficient clean- |
Check the brush roller for wear, replace if required. |
ing result |
|
Brush does not |
Check if foreign matters are blocking the brush roller; re- |
turn |
move foreign matter if required. |
|
|
Creaking sound, |
Slip clutch was triggered. Switch off the appliance, check/ |
brush does not turn |
clean the brush roller. |
|
|
EN – 9 |
11 |

Clean water distributor
Take out the brush roller.
Pull the water distribution bar out of the brush tunnel (Fig. 5, see inside front cover).
Clean the irrigation channel and the opening in the water distribution bar under running water.
Clean suction tube
Remove the fresh water reservoir from the appliance.
Swivel support bow downward and remove the waste water reservoir.
Pull the suction tube connection out toward the rear of the appliance and swivel out both ends of the suction tube (Fig. 6, see inside front cover). The suction tube is separated and both ends are accessible for cleaning.
Pull the vacuum bar off toward the bottom, the suction channel in the cleaning head is accessible for cleaning (Fig. 7, see inside front cover).
Flush the suction hose and the suction channel with water or pull or push the obstruction out with a blunt object.
Technical specifications
Power |
|
|
|
|
Nominal voltage |
|
V/Hz |
|
120 / |
|
|
|
|
1~60 |
|
|
|
|
|
Power consumption |
|
A |
|
6 |
Protective class |
|
|
|
I |
Type of protection |
|
|
|
IPX4 |
Vacuuming |
|
|
|
|
Cleaning power, air |
|
gpm |
|
380 |
quantity |
|
(l/s) |
|
(24) |
|
|
|
|
|
Cleaning power, nega- |
|
psi |
|
2.0 (14) |
tive pressure |
|
(kPa) |
|
|
|
|
|
|
|
Cleaning brush |
|
|
|
|
Working width |
|
in |
|
11,8 |
|
|
(mm) |
|
(300) |
Brush diameter |
|
in |
|
2.4 (60) |
|
|
(mm) |
|
|
|
|
|
|
|
Brush speed |
|
1/min |
|
1550 |
Dimensions and |
|
|
|
|
weights |
|
|
|
|
Theoretical surface |
|
ft²/h |
|
2152 |
cleaning performance |
|
(m²/h) |
|
(200) |
|
|
|
|
|
Fresh/dirt water reser- |
|
gal (l) |
|
1 (4) |
voir volume |
|
|
|
|
Length |
|
in |
|
15.4 |
|
|
(mm) |
|
(390) |
|
|
|
|
|
Width |
|
in |
|
13.2 |
|
|
(mm) |
|
(335) |
|
|
|
|
|
Height |
|
in |
|
46.5 |
|
|
(mm) |
|
(1180) |
|
|
|
|
|
Weight |
|
lb (kg) |
|
35.3 |
|
|
|
|
(16) |
Values determined as |
|
per EN |
|
60335-2- |
72 |
|
m/s2 |
|
|
Hand-arm vibration |
|
|
<2,5 |
|
|
|
|||
value |
|
m/s2 |
|
|
Uncertainty K |
|
|
0,2 |
|
Sound pressure level |
|
dB(A) |
|
72 |
LpA |
|
|
|
|
Uncertainty KpA |
|
dB(A) |
|
1 |
Sound pressure level |
|
dB(A) |
|
85 |
LWA |
|
|
|
|
Uncertainty KWA |
|
dB(A) |
|
1 |
12 |
EN – 10 |

Warranty
The warranty terms published by our competent sales company are applicable in each country. We will repair potential failures of your accessory within the warranty period free of charge, provided that such failure is caused by faulty material or defects in fabrication. In the event of a warranty claim please contact your dealer or the nearest authorized Customer Service center. Please submit the proof of purchase.
Spare parts
–Only use accessories and spare parts which have been approved by the manufacturer. The exclusive use of original accessories and original spare parts ensures that the appliance can be operated safely and trouble free.
–At the end of the operating instructions you will find a selected list of spare parts that are often required.
–For additional information about spare parts, please go to the Service section at www.kaercher.com.
EN – 11 |
13 |

CONSIGNES DE SÉCURITÉ
IMPORTANTES
LIRE L'INTÉGRALITÉ DES INSTRUCTIONS AVANT L'UTILISATION.
AVERTISSEMENT
Afin de réduire les risques d'incendie, d'électrocution et de blessures, prendre les précautions suivantes :
–NE PAS LAISSER l'appareil sans surveillance lorsqu'il est branché. Débrancher l'appareil lorsqu'il n'est pas utilisé et avant de procéder à l'entretien.
AVERTISSEMENT
–UTILISER L'APPAREIL EXCLUSIVEMENT À L'INTÉRIEUR POUR RÉDUIRE LES RISQUES D'ÉLECTROCUTION
–Cet appareil n'est pas un jouet. Ne jamais le laisser sans surveillance lorsqu'il est utilisé à proximité d'enfants.
–Respecter impérativement les consignes d'utilisation de ce manuel. Utiliser uniquement les accessoires recommandés par le fabricant.
–Ne pas mettre l'appareil en service en cas d'endommagement du cordon ou de la prise. Si l'appareil ne fonctionne pas correctement, s'il est tombé, s’il a été endommagé, s’il est resté à l’extérieur ou est tombé dans l’eau, le retourner à un centre de service.
–Ne pas tirer ou transporter l’appareil par le cordon électrique ou se servir de ce dernier comme d’une poignée. Veiller à ne pas coincer le
cordon dans une porte et éviter de le tirer sur des bords ou des coins tranchants. Ne pas rouler sur le cordon électrique. Tenir le cordon à l'écart des surfaces chaudes.
–Ne pas tirer sur le cordon électrique pour débrancher l'appareil. Tirer au niveau de la fiche pour déconnecter l'appareil du secteur.
–Ne pas manipuler l’appareil ou la fiche électrique avec les mains mouillées.
–Ne rien introduire dans les orifices. Ne pas utiliser l’appareil si l’un des orifices est obstrué. Protéger les orifices de la poussière, des peluches, des cheveux et autres matières susceptibles de réduire le débit d'air.
–Veiller à ne pas approcher les cheveux, vêtements larges, doigts ou toute autre partie du corps des orifices et composants mobiles de l’appareil.
–Désactiver toutes les commandes avant de débrancher l'appareil.
–Faire particulièrement attention lors du nettoyage d'escaliers.
–Ne pas aspirer de liquides inflammables ou combustibles, tels que de l’essence avec l'appareil. Ne pas utiliser ce dernier dans des zones susceptibles de contenir de tels produits.
–Brancher uniquement sur une prise correctement reliée à la terre. Voir les instructions de mise à terre.
CONSERVER CES
CONSIGNES
14 |
FR – 1 |
Loading...