


FC5
FC 5
FC 5 Premium
OPERATOR MANUAL
Floor Cleaner . . . . . . . . . . . . . . . . . 2
MANUAL DE USUARIO
Limpiador de piso . . . . . . . . . . . .22
MANUEL D’UTILISATION
Nettoyant pour sols . . . . . . . . . . .44
59682960 2018.03
2 English
DANGER
Pointer to immediate danger, which
leads to severe injuries or death.
몇 WARNING
Pointer to a possibly dangerous situa-
tion, which can lead to severe injuries
or death.
몇 CAUTION
Pointer to a possibly dangerous situa-
tion, which can lead to minor injuries.
ATTENTION
Pointer to a possibly dangerous situa-
tion, which can lead to property dam-
age.
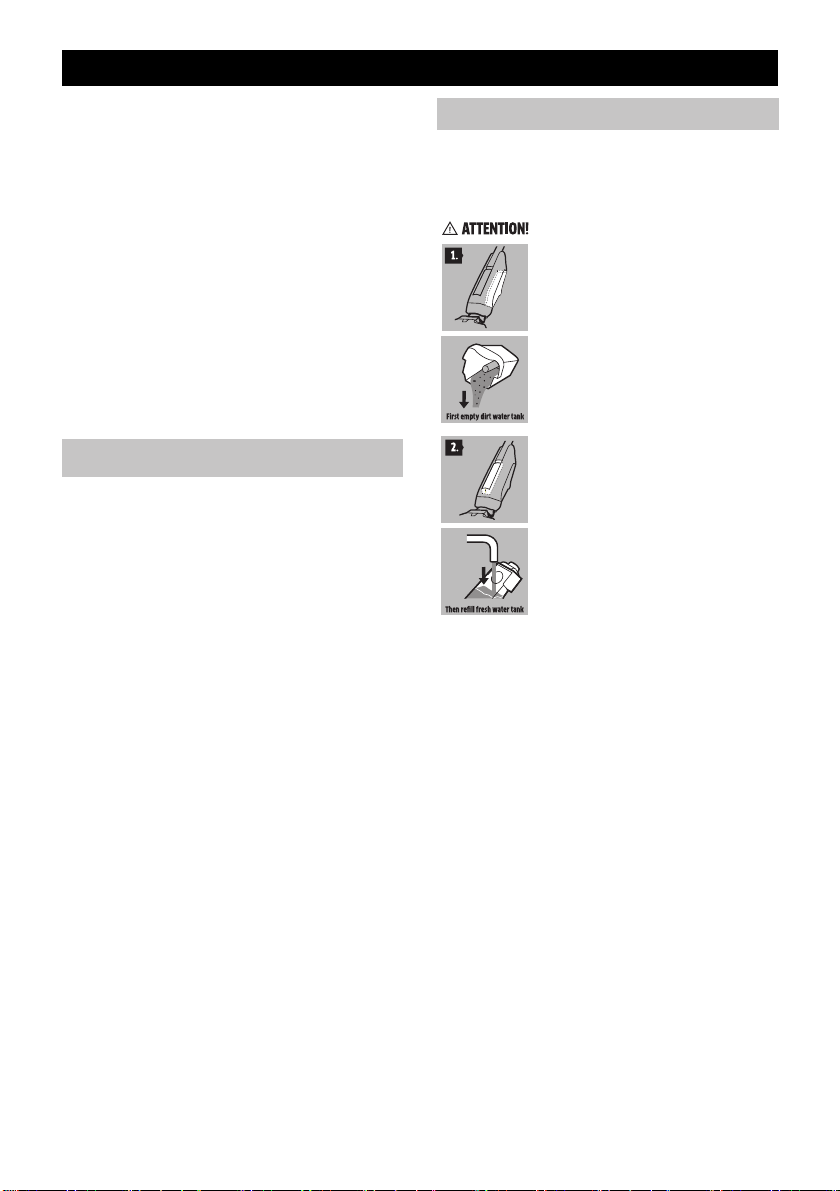
ATTENTION
Do not exceed MAX fill line on the
waste water tank to avoid overflowing.
FLOOR CLEANER OPERATOR MANUAL
FLOOR CLEANER OPERATOR
MANUAL . . . . . . . . . . . . . . . .
2
IMPORTANT SAFETY IN-
STRUCTIONS . . . . . . . . . . . .
5
READ ALL INSTUCTIONS BE-
FORE USING THIS APPLIANCE
5
SAVE THESE INSTRUCTIONS
6
GROUNDING INSTRUCTIONS
6
MODEL OVERVIEW . . . . . . .
6
ASSEMBLY INSTRUCTIONS
7
OPERATING INSTRUCTIONS
8
CARE AND MAINTENANCE IN-
STRUCTIONS . . . . . . . . . . . .
16
TROUBLESHOOTING . . . . . .
20
Safety Alert Symbols
Symbols on the machine
Please observe the follow-
ing procedure:
1.
Ensure waste water tank is
empty.
2.
Fill fresh water tank not ex-
ceeding MAX level to
avoid overflowing.
English 3
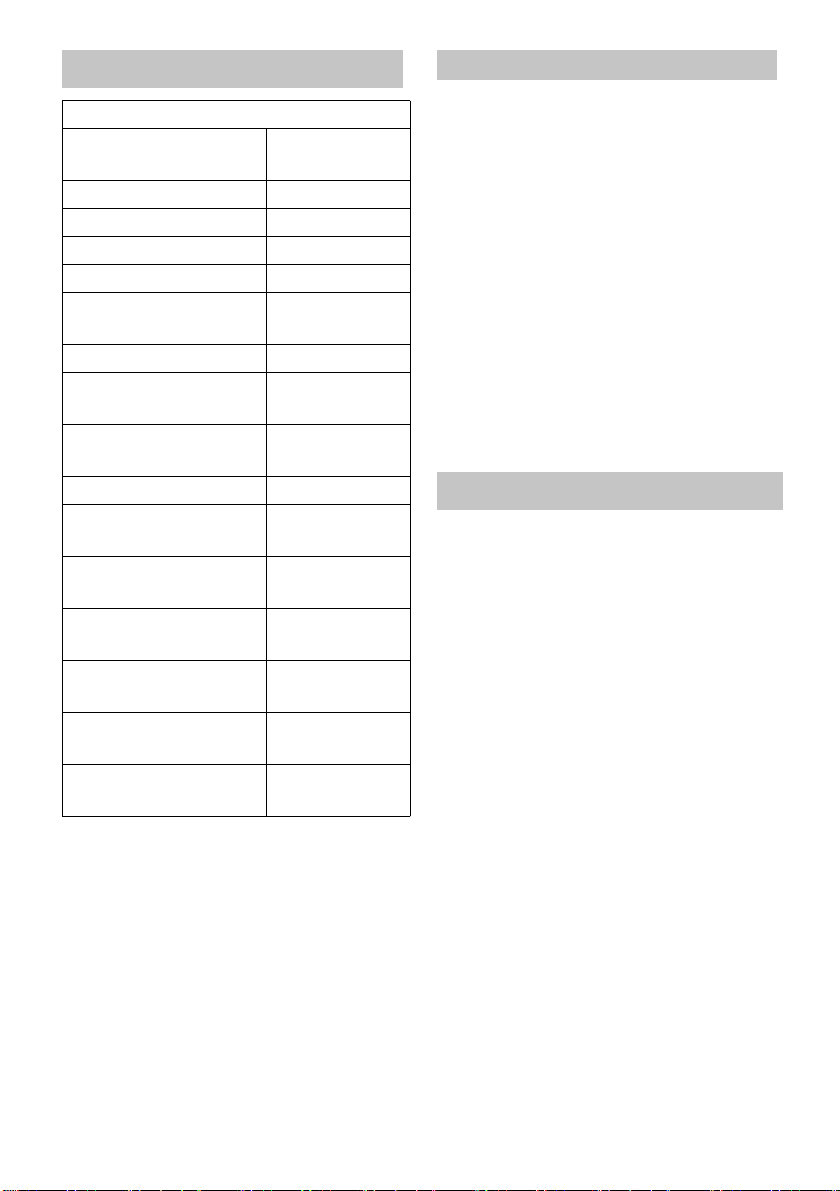
Subject to technical modifications!
– This device is designed for cleaning
sealed hard floors only in house-
hold applications.
– Do not clean unsealed floors such
as untreated cork floors (the mois-
ture could penetrate and damage
the floor).
– The device is suitable for cleaning
PVC, linoleum, tiled, stone, oiled
and waxed parquet, laminate and
all sealed floor coverings.
Any use extending beyond what is list-
ed above is not considered as proper
use. The manufacturer is not liable for
any losses resulting from improper
use.
The owner and/or user must have an
understanding of the manufacturer’s
operating instructions and warnings
before using this appliance.
Warning information should be empha-
sized and understood.
If the operator is not fluent in English,
the manufacturer’s instructions and
warnings shall be read to and dis-
cussed with the operator in the opera-
tor’s native language by the purchaser/
owner, making sure that the operator
comprehends its contents.
Owner and/or user must study and
maintain for future reference the man-
ufacturers’ instructions.
Specifications
Power connection
Voltage 120
~60
V
Hz
Protective class II
Protection class IPX4
Performance data
Intake performance 0.46 kW
Roller revolutions per
minute
500 rpm
Filling quantity
Fresh water tank 13.5
(0.4)
oz
l
Cleaning station 6.7
(0.2)
oz
l
Dimensions
Cable length 275.59
(7.0
in
m
Weight (without clean-
ing liquids)
11.02
(5.0)
lbs
kg
Length 12.60
(320)
in
mm
Width 10.63
(270)
in
mm
Height 48.03
(1220)
in
mm
Part No. 1.055-507.0
1.055-521.0
Proper use
Owner/User Responsibility

4 English
The scope of delivery of the device is il-
lustrated on the packaging. Check the
contents of the device for complete-
ness when unpacking.
In the event of missing accessories or
any transport damage, please contact
your dealer.
To register this product, please visit:
www.karcher-register.com
For technical support, go to:
www.karcher-help.com
If you need to file a warranty claim,
please call: 1-800-537-4129
You will need to fax or email your re-
ceipt to a customer service agent. All
other information can be found at:
www.karcherresidential.com
Call: 01-800-024-13-13 for help or visit
our website: www.karcher.com.mx
Scope of delivery
Customer Support
USA and Canada
Customer Support Mexico

English 5
When using this device basic precau-
tions should always be followed, in-
cluding the following:
For household use only!
몇 WARNING
To reduce the risk of fire, electric
shock, or injury:
DO NOT LEAVE appliance unat-
tended when plugged in. Unplug
from outlet when not in use and be-
fore servicing.
– Do not expose to rain. Store in-
doors.
– Do not allow to be used as a toy.
Close attention is necessary when
used by or near children.
– Use only as described in this manu-
al. Use only manufacturer’s recom-
mended attachments.
– Do not use with damaged cord or
plug. If device is not working as it
should, has been dropped, dam-
aged, left outdoors, or dropped into
water, return it to a service center.
– Repairs must only be performed by
an authorized service agent in ac-
cordance with national and local
safety regulations. Unauthorized
repairs could cause injury or ma-
chine damage.
– The voltage indicated on the type
plate must correspond to the supply
voltage.
– Do not pull or carry by the cord, do
not use cord as a handle, do not
close a door on the cord, or pull
cord around sharp edges or cor-
ners. Do not run device over cord.
Keep cord away from heated sur-
faces.
– Do not unplug by pulling cord. To
unplug, grasp plug.
– Never touch the mains plug with
wet hands.
– Use extra care when cleaning on
stairs.
– Turn off all controls before unplug-
ging.
– Never fill solvents, solvent-contain-
ing liquids or undiluted acids (e.g.
detergents, petrol, paint thinner,
and acetone) into the water reser-
voir as these substances corrode
the materials used in the device.
– Do not put any objects into open-
ings. Do not use with any opening
blocked.
– Never immerse the device in water
or other liquids.
– Never use the device in pools con-
taining water.
– Do not service the device when it is
plugged in.
– Do not clean over floor electrical
outlets.
– Create stability for the device prior
to any work on or with the device to
prevent accidents or damage.
– Keep hair, loose clothing, fingers
and all parts of body away from
openings and moving parts.
IMPORTANT SAFETY INSTRUCTIONS
READ ALL
INSTUCTIONS
BEFORE USING
THIS APPLIANCE

6 English
– Keep your hands protected while
cleaning the suction head- risk of in-
jury from sharp objects (e.g. splin-
ters).
– The device may not be operated in
explosive atmospheres.
– The air vents on the device must
not be blocked up.
– Do not add acetic acids, descaling
agents, essential oils or similar sub-
stances to the fresh water tank.
Also ensure that the substances
are not drawn in.
– Only use this device on sealed hard
floors (e. g. varnished parquet,
enamelled tiles, Linoleum).
– Store the steam cleaner indoors in
a cool, dry place.
– Only carry the device by the carry-
ing handle.
– The device must not be used for the
intake of sharp or large objects (e.g.
shards, pebbles, toy parts).
– Do not use the device for cleaning
of carpets or carpeted floors.
– Do not use the device over the floor
vents of convector heaters. The de-
vice is not able to take in the water
discharged when used above
vents.
– Do not overfill the tank. Do not ex-
ceed the maximum filling level.
– Only switch on the device when the
fresh water tank and waste water
tank are fitted.
– Do not store and operate the device
at temperatures below 32 °F (0 °C).
– Do not let the device operate in the
same spot too long, as this may
damage the floor.
PROP 65 WARNING
This product may contain one or more
chemicals known to the state of Cali-
fornia to cause cancer and birth de-
fects or other reproductive harm.
Was hands after handling.
SAVE THESE
INSTRUCTIONS
English 7
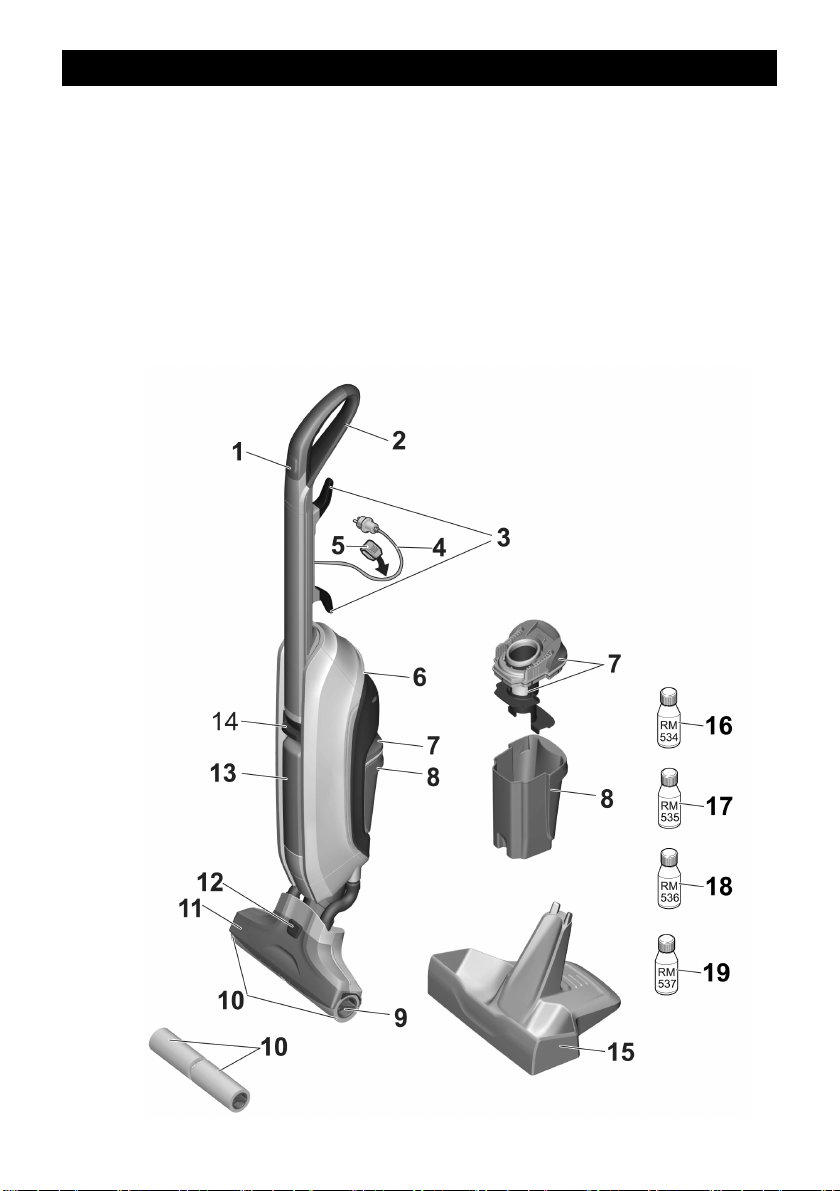
** FC 5 Premium
MODEL OVERVIEW
1 ON/OFF switch
2 Handle
3 Cord release
4 Power Cord
5 Cord clip
6 Carrying handle
7 Waste water tank/separator lid
8 Waste water tank
9 Roller release grip
10 Cleaning rollers
11 Suction head cover
12 Lock suction head
13 Fresh water tank
14 Handle fresh water tank
15 Storage station
16 Detergent RM 534
17 Detergent RM 535
18 Detergent RM 536
19 Detergent RM 537
10 **Cleaning rollers 2 x
8 English
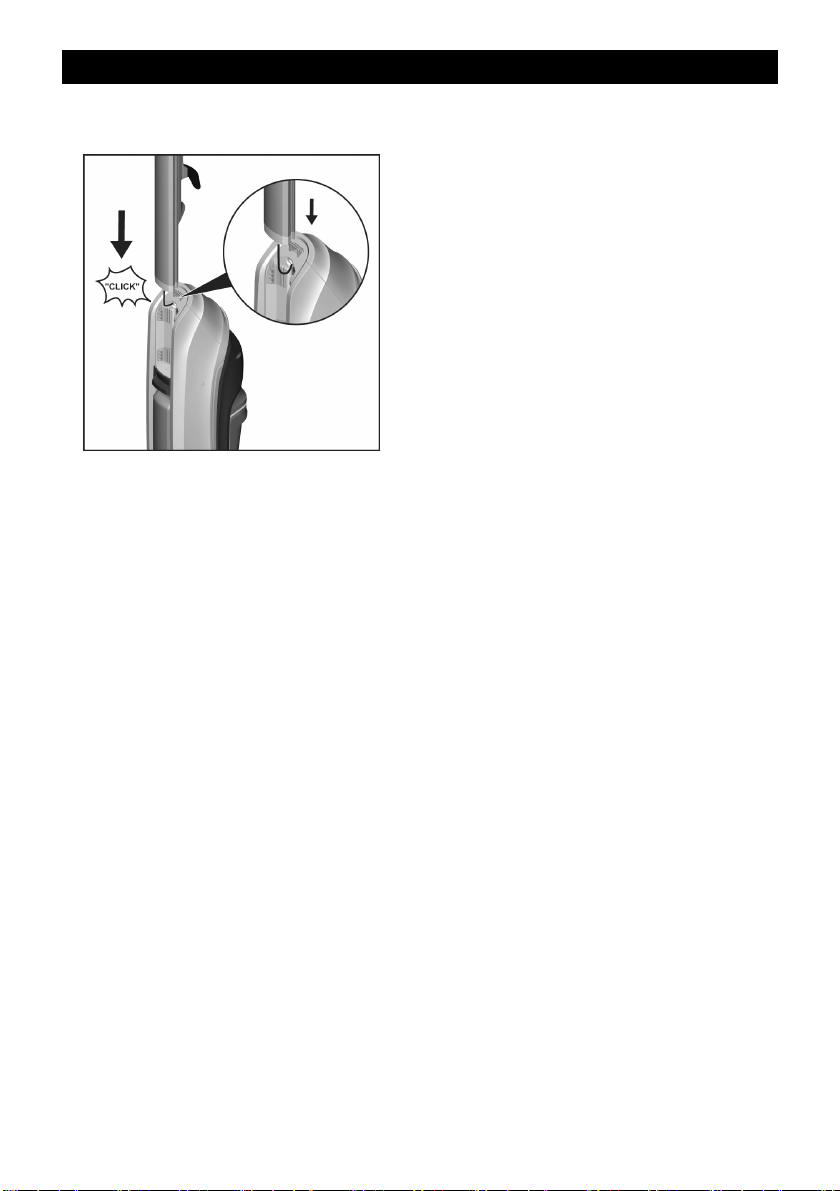
Insert handle into the basic unit as
far as it goes until you hear it click.
ASSEMBLY INSTRUCTIONS

English 9
CAUTION
To avoid tripping on cord, hold device
in one hand and cord in the other.
ATTENTION
This device must only be used for the
intake of dirt and fluids (max. 8,5 oz /
0.25 L).
Before cleaning, remove larger ob-
jects from the floor that could dam-
age the device.
Before use, check the floor for wa-
ter consistency at suspect areas.
Do not clean unsealed floors, such
as untreated cork floors where
moisture can penetrate and dam-
age floor.
Hold device at approximately 60-
degree angle.
Clean floor by moving device back
and forth similar to vacuum clean-
ing until floor is clean.
OPERATING INSTRUCTIONS
General operating information
10 English
ATTENTION
Store device in storage station when
not in use. A lack of stability can cause
device to tip over leaking fluid and
causing floor damage.
Store device in storage station
when not in use.
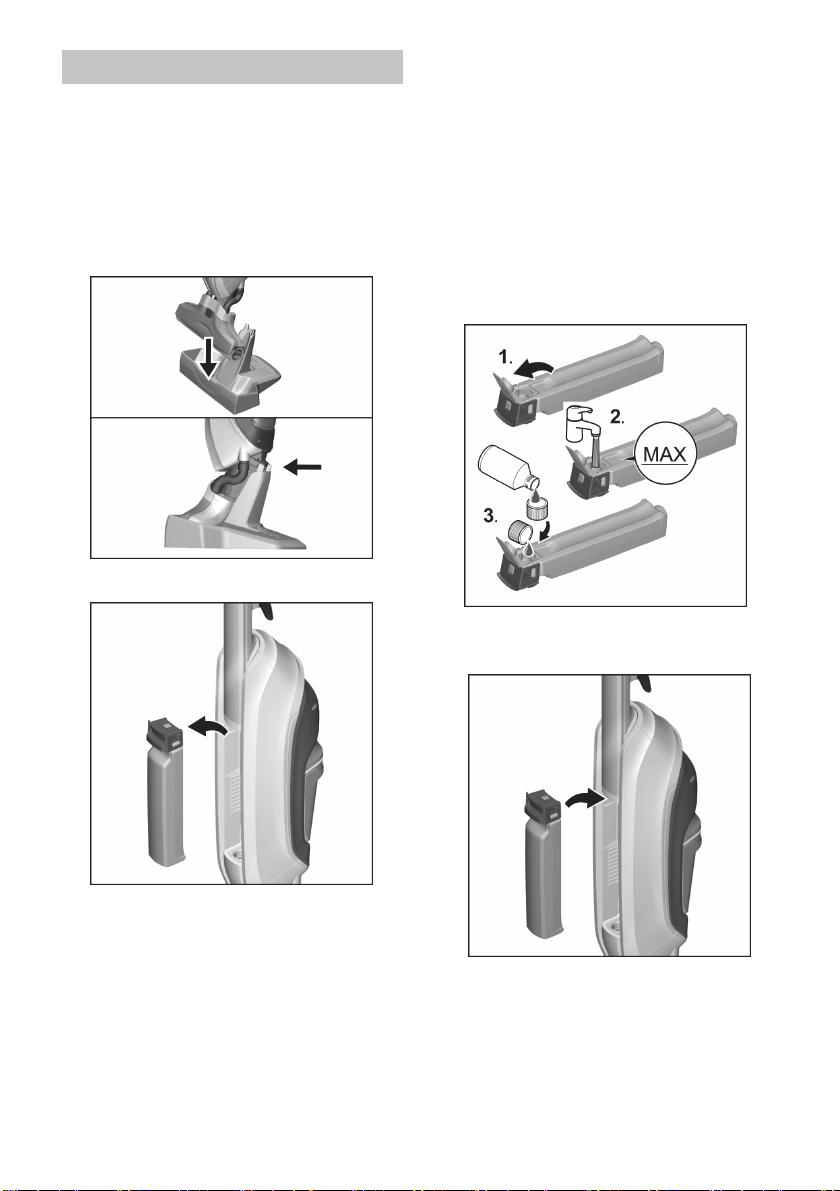
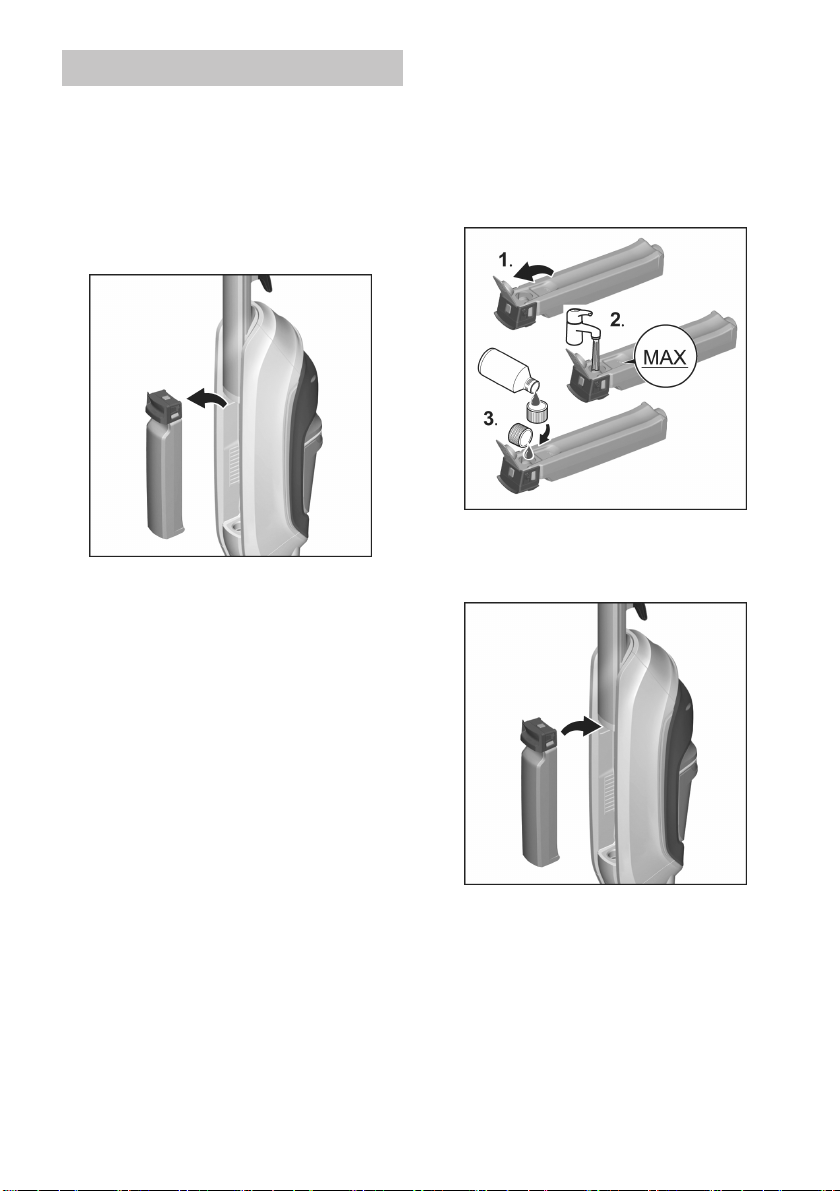
Remove fresh water tank.
ATTENTION
*Follow recommended dosage instruc-
tions on the detergent.
1 Open fresh water tank lock.
2 Fill fresh water tank with cold or
lukewarm tap water.
Do not exceed "MAX" fill line.
3 KÄRCHER detergents can be add-
ed to fresh water tank as required.*
See chapter Using detergents.
Close tank lock.
Insert fresh water tank until you
hear a click.
Fill fresh water reservoir
English 11
CAUTION
Cleaning rollers will start to rotate
when device is powered on. Hold the
handle tight to prevent the device from
moving forward by itself.
ATTENTION
The device should only be operated
with water. Before operating, ensure
fresh water tank is full and waste water
tank is empty.
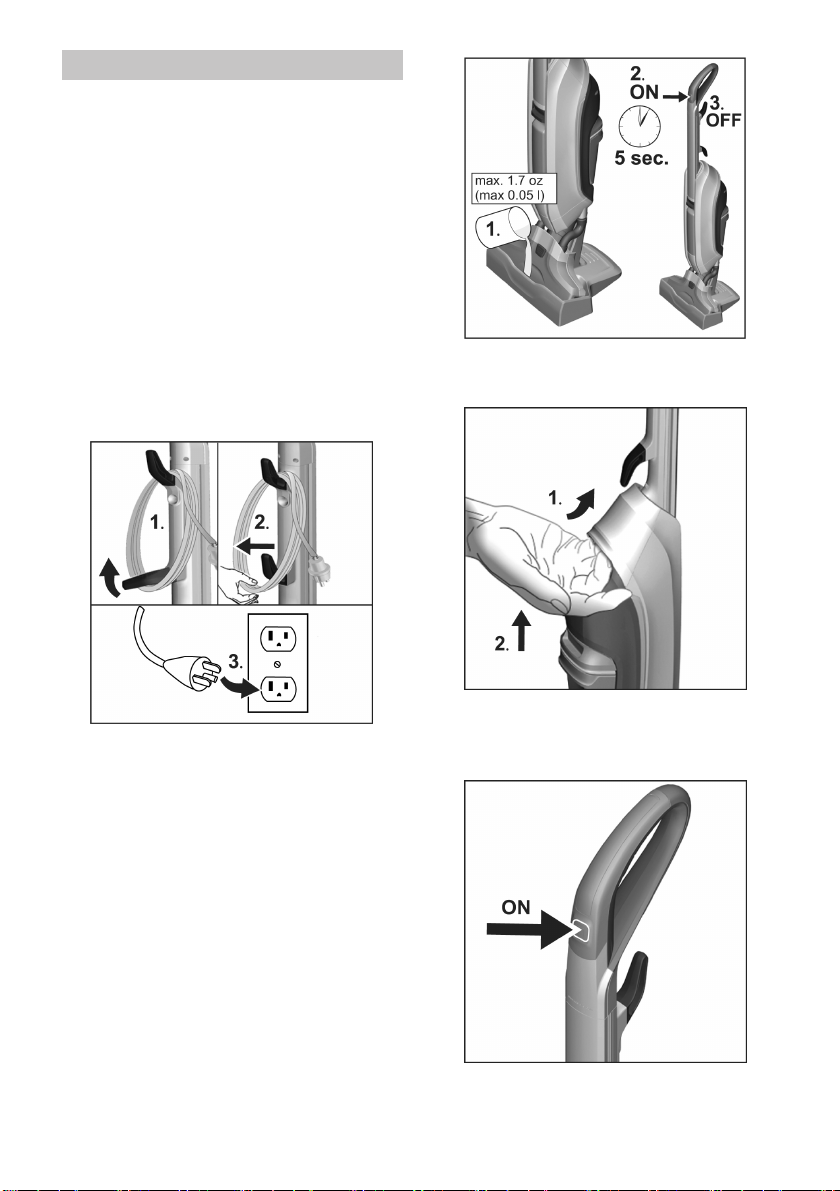
1 Remove the power cord by swive-
ling cord releases and plug into an
outlet.
1 To quickly wet rollers, use measur-
ing cup to fill the storage station
with 1,7 oz (0.05 l) of fresh water.
2 Press On/Off button to power ON
device and place in storage station
for 5 seconds.
The device now has correct level of
moisture to allow for cleaning.
3 Press On/Off button to power OFF
device.
Remove the device from storage
station and place on floor.
Firmly hold device using handle.
Press On/Off button to power ON
device.
Operating device
12 English
ATTENTION
Store device in storage station when
not in use. A lack of stability can cause
device to tip over leaking fluid and
causing floor damage.
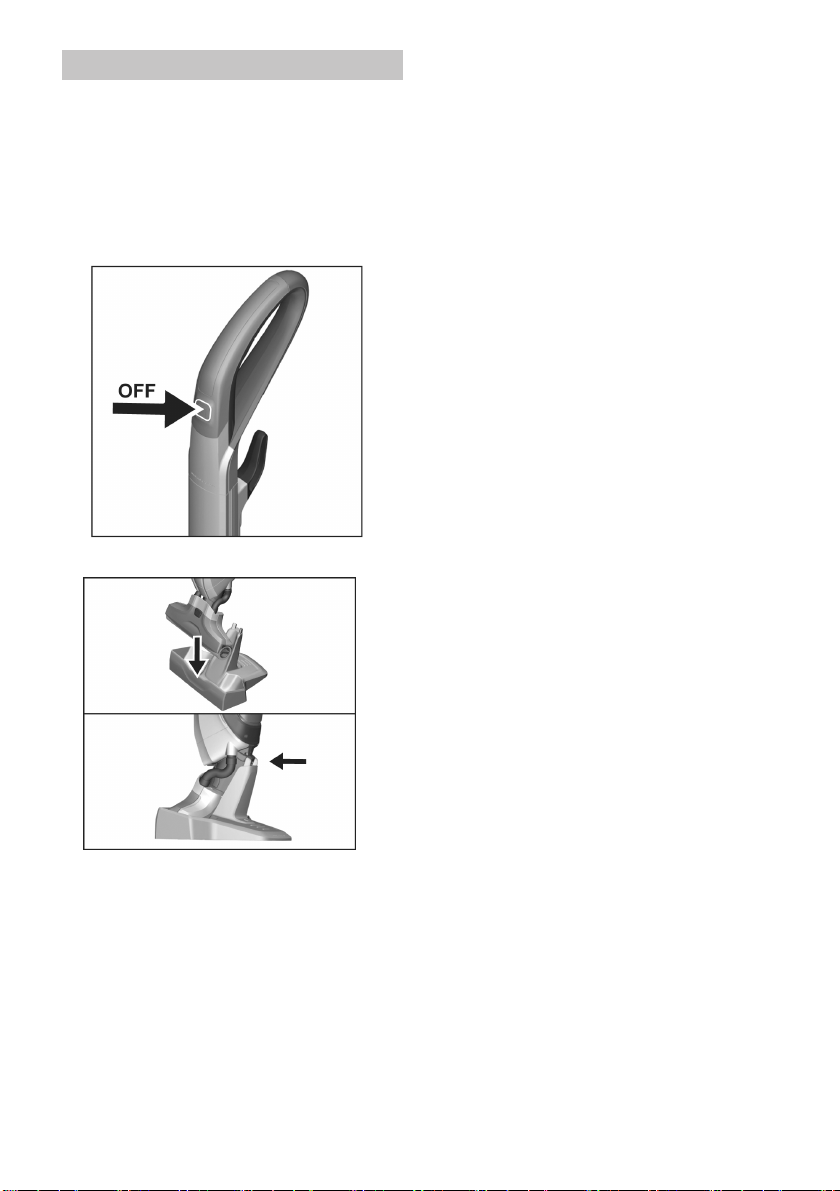
Press On/Off button to power OFF
device.
Place device into storage station.
When Not Operating
English 13
ATTENTION
Before filling the fresh water tank, emp-
ty waste water tank to avoid overflow-
ing.
See Chapter "Emptying the waste wa-
ter tank".
Remove fresh water tank.
1 Remove tank cap.
2 Fill the fresh water tank with cold or
lukewarm tap water.
Do not exceed "MAX" fill line.
3 KÄRCHER detergents can be add-
ed to fresh water tank as required.*
See chapter Using detergents.
Close tank lock.
Insert fresh water tank until you
hear a click.
Refill detergent
14 English
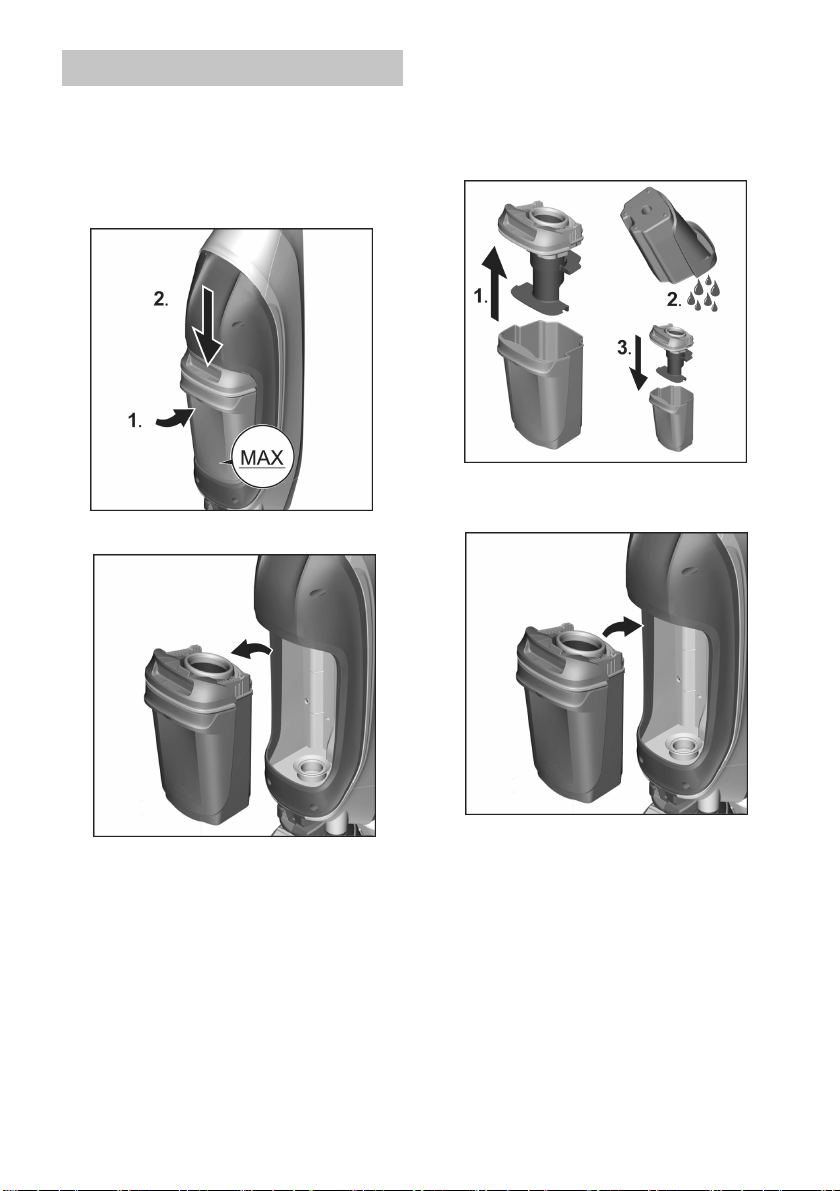
ATTENTION
After cleaning is finished, clean device
in rinse cycle. See "Cleaning device"
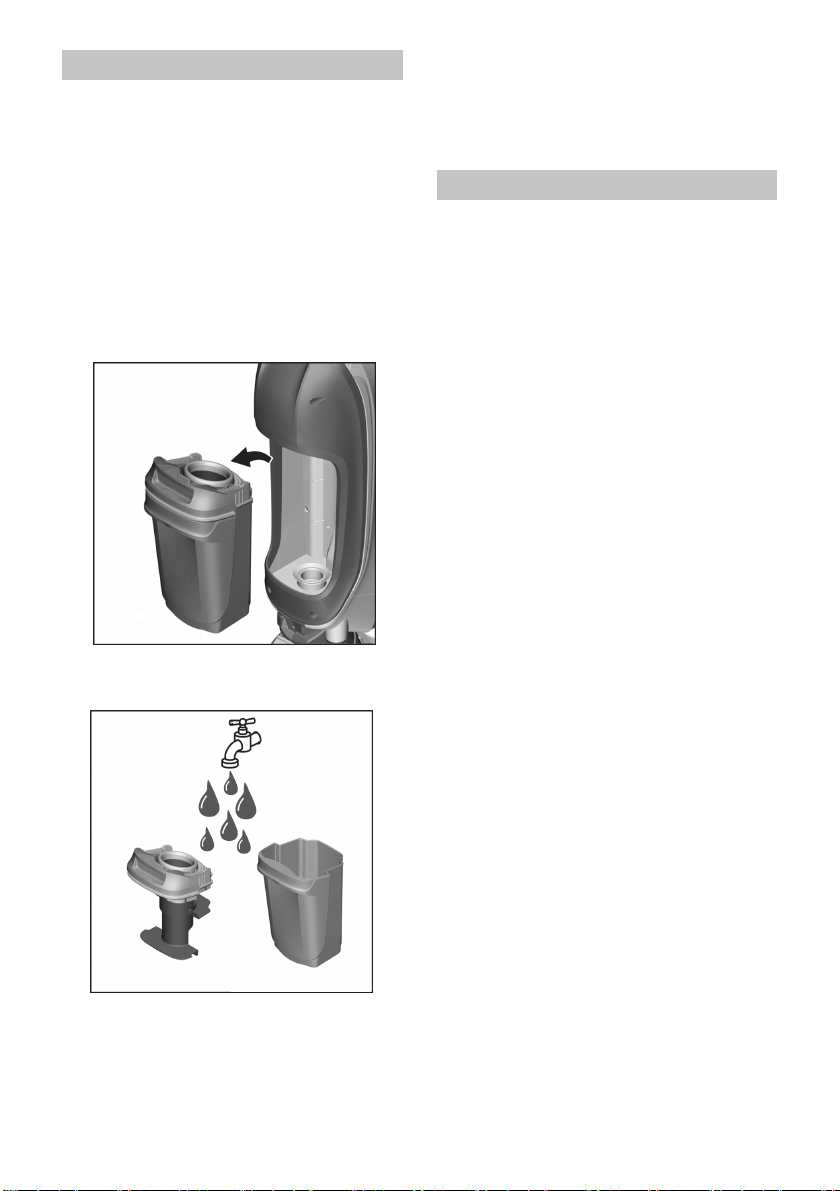
To remove waste water tank,
squeeze upper lid while pulling out.
Remove waste water tank.
1 Remove lid from waste water tank.
2 Empty waste water tank and rinse
with tap water.
3 To secure lid, place on waste water
tank and press until it clicks.
Insert waste water tank into device
until it clicks.
Emptying waste Water tank
English 15
ATTENTION
After completing the work, clean the
appliance by applying a rinse cycle.
See "Cleaning the appliance by rins-
ing".
Press On/Off button to power OFF
device.
Unplug from socket.
Place device into storage station.
Empty both fresh and waste water
tanks.
Empty waste water tank.
See Chapter "Emptying waste wa-
ter tank".
ATTENTION
To prevent odors empty and rinse the
fresh water and waste water tanks be-
fore storing.
Move device using the handle and
store in the storage station.
Store the device indoors in a cool,
dry place.
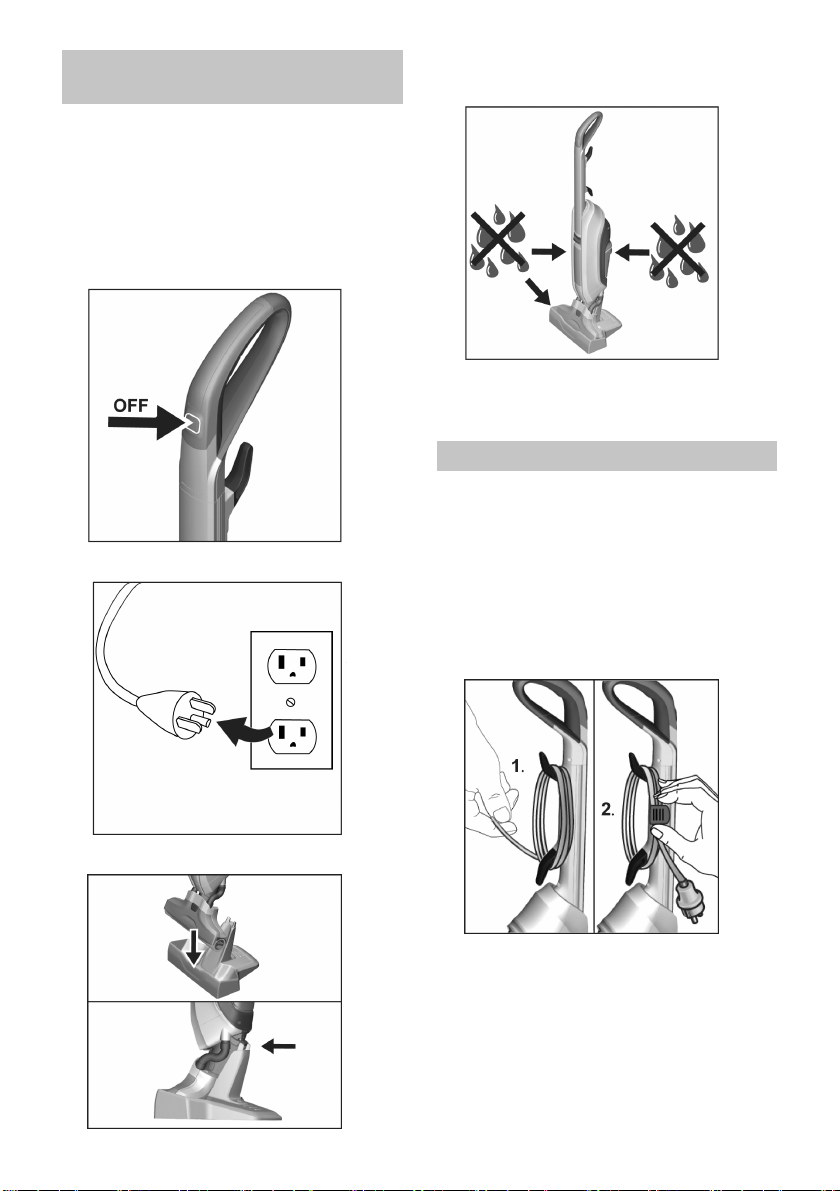
Press On/Off button to power
OFF.
Storing the Device

16 English
ATTENTION
Rinse the device with fresh water in the
storage station when finished using.
Press On/Off button to power OFF
device.
Place device into storage station.
Empty any remaining liquid in fresh
water tank.
1 Empty the waste water tank.
See Chapter "Emptying the waste
water tank".
Re-insert waste water tank.
2 Fill the measuring cup with 6,7 oz
(0.2 l) water.
Fill storage station with water.
If necessary, add appropriate
KÄRCHER detergents
3 Press On/Off button to power ON
device.
4 Allow device to run for 30-60 sec-
onds until water is completely
drawn out of storage station.
The rinsing procedure is now com-
plete.
5 Press On/Off button to power OFF
device.
Note
Continue running the device to reduce
the amount of moisture left in rollers.
Empty fresh and waste water tanks.
See Chapters "Emptying fresh wa-
ter tank" or "Emptying waste water
tank."
Unplug from socket.
CARE AND MAINTENANCE INSTRUCTIONS
Cleaning device
English 17
ATTENTION
To prevent liquid from leaking from
tanks, empty fresh and waste water
tanks before laying device on ground.
Note
If rollers are excessively dirty, remove
from device and clean.
Press On/Off button to power OFF
device.
Unplug from socket.
Empty fresh and waste water tanks.
See Chapters "Emptying fresh wa-
ter tank" and "Emptying waste wa-
ter tank."
Remove cleaning rollers.
Clean rollers under running water.
or
Wash rollers in washing machine
up to 140 °F (60 °C).
ATTENTION
Do not use:
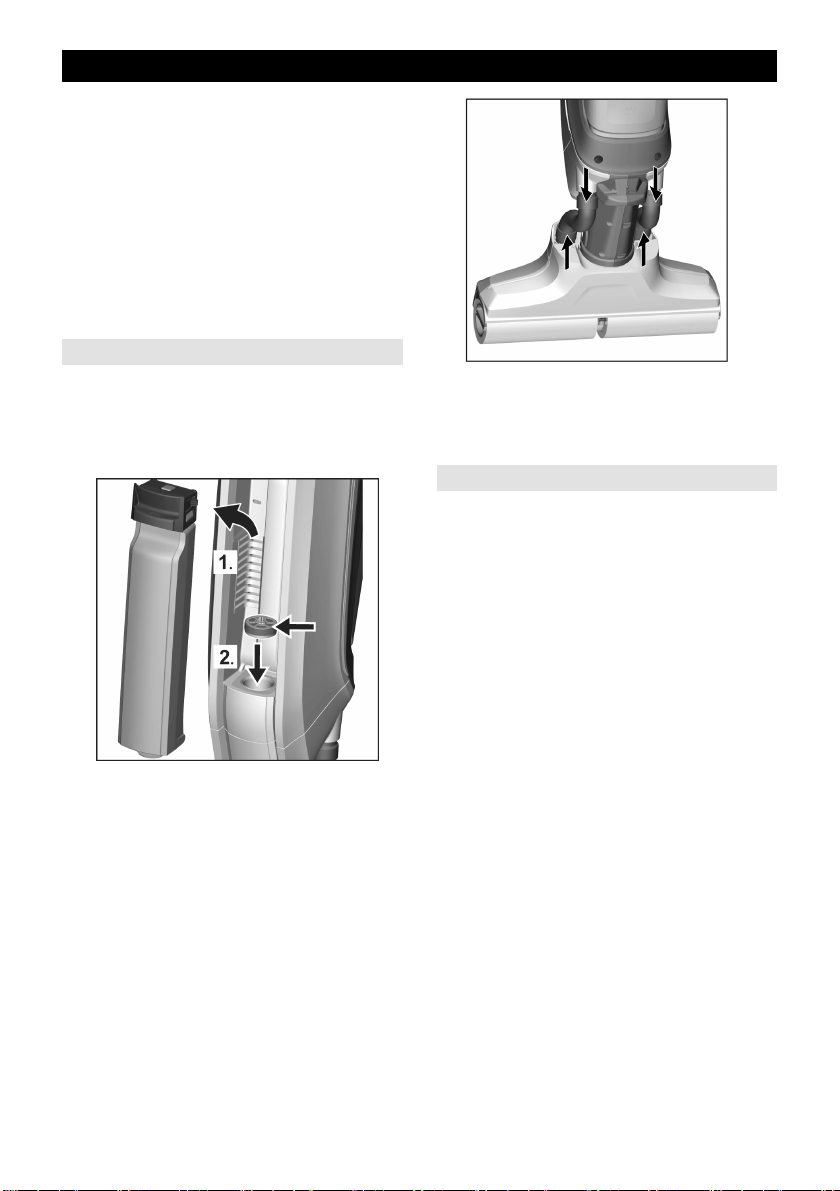
After cleaning, allow the rollers to
air-dry.
Screw cleaning rollers in until tight
Match colour coding between roller
and holder (e.g., connect blue with
blue), and ensure rollers are se-
cure.
Cleaning rollers
18 English
ATTENTION
To avoid performance issues, clean
device if large debris. While the appli-
ance is working, these parts will cause
a rattling noise or will block up the suc-
tion ducts, diminishing suction perfor-
mance.
Press On/Off button to power OFF
device.
Unplug from socket.
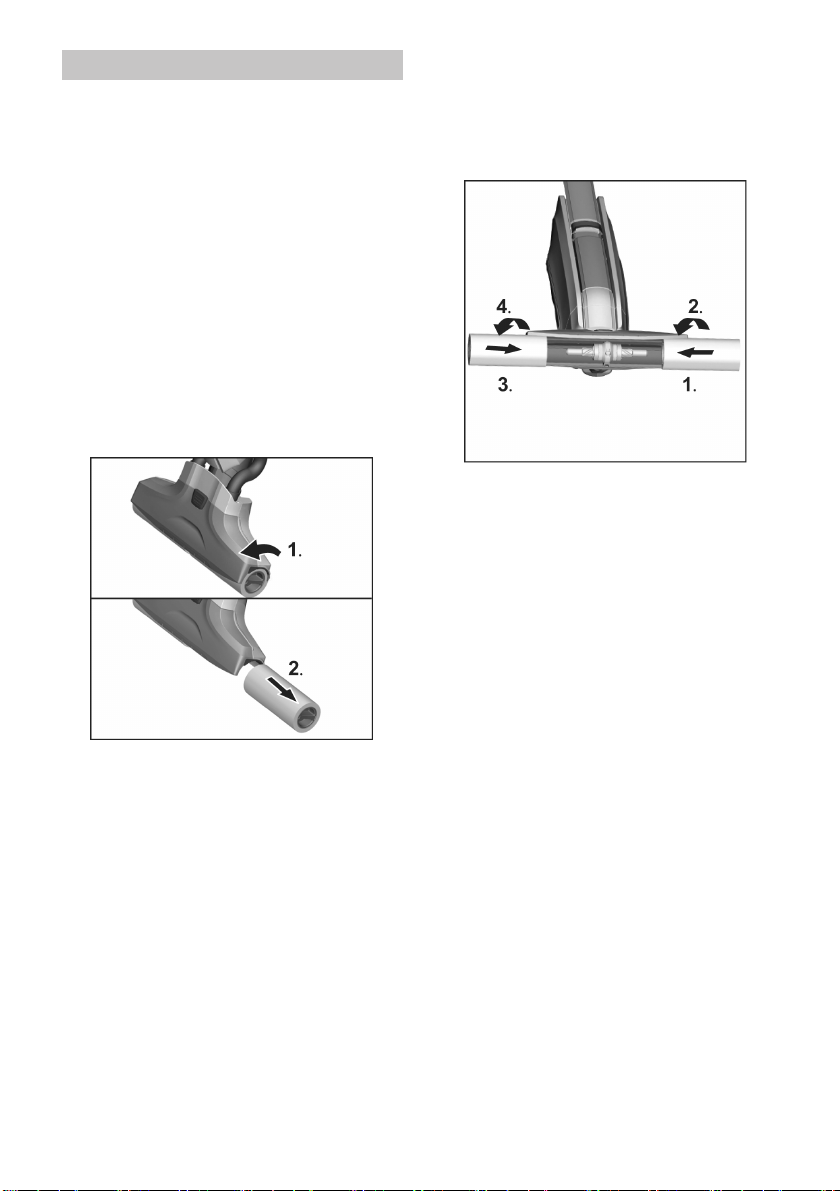
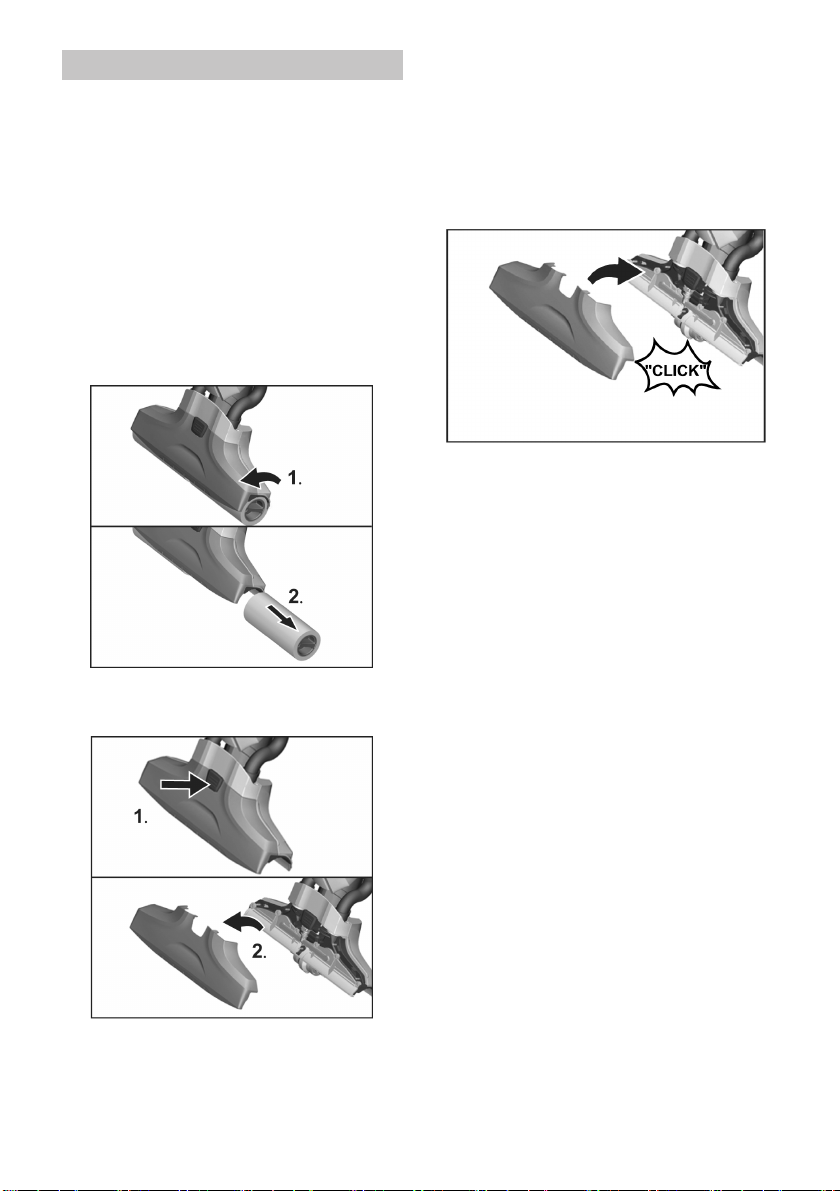
Remove the cleaning rollers.
See "Cleaning the rollers".
1 Press the suction head lock.
2 Take off the suction head lid.
Clean suction head cover under
running water.
If necessary, remove particle de-
posits from suction ducts and slits in
the suction head cover.
Clean the suction head with a damp
cloth.
Fix the suction head lid onto the
suction head.
Screw cleaning rollers onto the
threaded rod until secure.
See "Cleaning the rollers".
Cleaning the suction head
English 19
ATTENTION
Regularly clean waste water tank to
prevent blockage to separator and to
prevent dirt from building in tank.
Press On/Off button to power OFF
device.
Place device into storage station.
Unplug from socket.
Remove waste water tank.
See Chapter "Emptying the waste
water tank".
Clean waste water tank lid and tank
tank with tap water.
Note
The waste water tank can also be
cleaned in the dishwasher.
After cleaning, attach lid and insert
waste water tank into device.
ATTENTION
The use of non-approved detergents
can damage the appliance and will
void the warranty.
Note
Add detergent as required.
When dosing detergent, follow the
manufacturer's instructions.
To prevent foaming, fill fresh water
tank with water then add detergent.
To avoid overfilling, leave room for
detergent when filling with water.
Clean waste water tank
Using detergents
20 English
DANGER
Turn off the appliance and remove the
mains plug prior to any care and main-
tenance work.
Failures are often simple and can be
fixed using the following guidelines. If
the issue is not listed here, please con-
tact customer service.
Filter inlay is not inserted.
Remove fresh water tank and insert
filter inlay with rubber pin facing up-
wards.
Filter inlay is inserted wrong way .
Remove filter inlay and insert with
pin facing upwards.
The suction hose is blocked.
Carefully remove suction hoses
from the suction head.
Place the suction hoses in cold wa-
ter for 10–20 minutes.
Clean suction hoses with a dull ob-
ject and/or under running water.
No water in fresh water tank.
Fill the fresh water tank with cold or
lukewarm tap water.
Fresh water tank does not fit properly
in the device.
Insert fresh water tank until you
hear a click.
Cleaning rollers missing or not fitted
correctly.
Fit the cleaning rollers or turn them
onto the roller holder until secure.
See "Cleaning the rollers".
Cleaning rollers are dirty or worn.
Clean the cleaning rollers.
or
Replace the cleaning rollers.
TROUBLESHOOTING
Rollers not wet
Do dirt pick up
English 21
Rollers are blocked.
Remove rollers and check if an ob-
ject is blocking rollers.
See "Cleaning the rollers".
Rollers are too dry.
Moisten rollers with 1,7 oz (0.05 l) of
water in storage station.
See „Start working“.
There are parts (e.g. stones or splin-
ters).
Remove suction head lid and clean
the suction head.
See Chapter "Cleaning the suction
head".
The suction ducts and slits on the suc-
tion head are blocked.
Remove suction head lid and clean
the suction head.
See Chapter "Cleaning the suction
head".
Waste water tank is overfilled.
Empty waste water tank.
See Chapter "Cleaning the waste
water tank".
Waste water tank does not fit properly.
Check whether cover is secure on
waste water tank.
See Chapter "Cleaning the waste
water tank".
Separator is blocked.
Remove cover from waste water
tank and clean separator.
See Chapter "Cleaning the waste
water tank".
The filter net of the waste water tank
separator was damaged during clean-
ing.
Replace separator.
Detergent used was not effective or im-
properly used.
Only use detergents approved by
KÄRCHER.
See chapter "Using detergents".
Follow the manufacturer's dosage
instructions.
Initial moistening of rollers.
Completely moisten rollers.
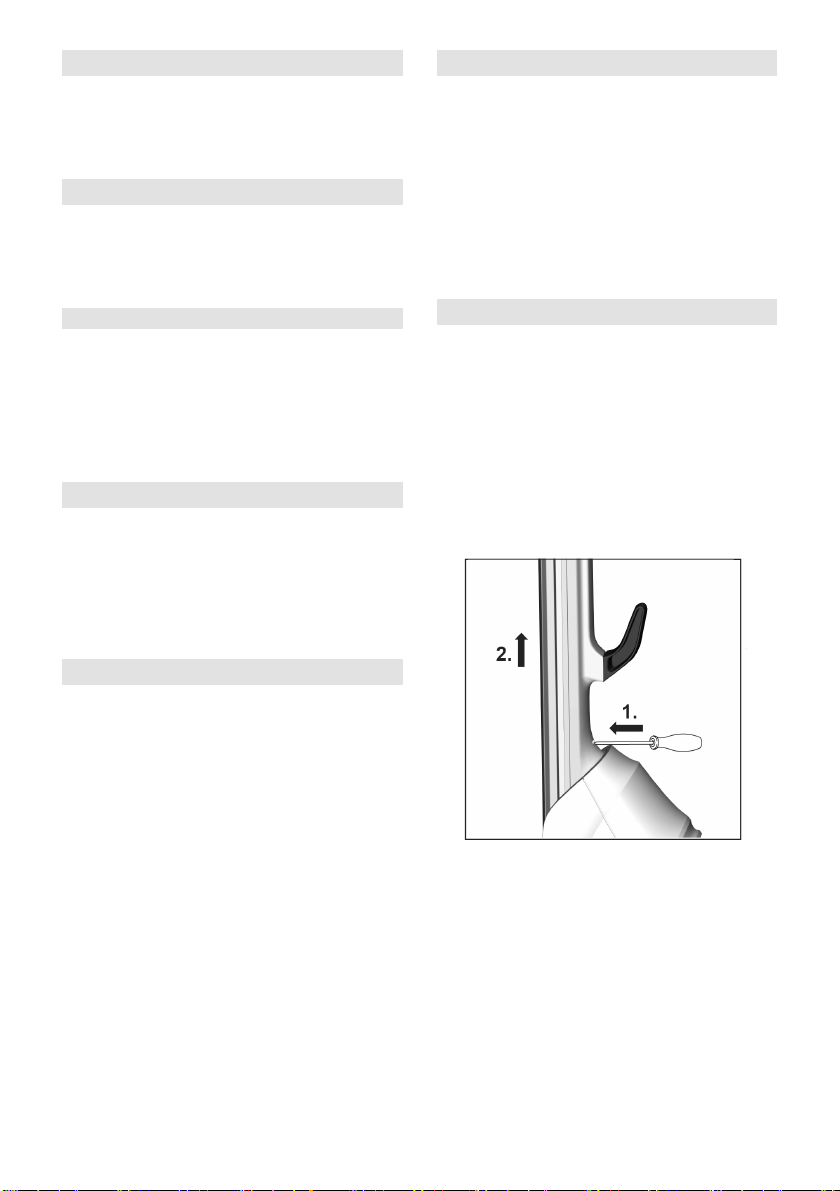
ATTENTION
Do not remove handle from the device
once assembled.
The handle may only be removed if
shipping service purposes.
Insert screwdriver at a 90 degree
angle in small opening at rear of de-
vice and simultaneously pull handle
up until it slides off.
ATTENTION
Please ensure cord between body and
handle are not damaged.
Rollers do not turn
Loud rattling when powered on
Noise in suction head
Suction power decreases
Appliance leaking waste water
Streaks on floor
Removing handle from device
 Loading...