


 Loading...
HP Photosmart C6200 All-in-One series
Basics Guide

Hewlett-Packard Company notices
The information contained in this document is subject to change without notice.
All rights reserved. Reproduction, adaptation, or translation of this material is prohibited without prior written permission of Hewlett-Packard, except as allowed under copyright laws. The only warranties for HP products and services are set forth in the express warranty statements accompanying such products and services. Nothing herein should be construed as constituting an additional warranty. HP shall not be liable for technical or editorial errors or omissions contained herein.
© 2007 Hewlett-Packard Development Company, L.P.
Windows, Windows 2000, and Windows XP are U.S. registered trademarks of Microsoft Corporation.
Windows Vista is either a registered trademark or trademark of Microsoft Corporation in the United States and/or other countries.
Intel and Pentium are trademarks or registered trademarks of Intel Corporation or its subsidiaries in the United States and other countries.

Contents
1 HP All-in-One overview |
|
|
|
The HP All-in-One at a glance.................................................................................................... |
2 |
|
Control panel features................................................................................................................ |
3 |
|
Find more information................................................................................................................. |
4 |
2 |
Network setup |
|
|
Wired network setup................................................................................................................... |
6 |
|
Install the software for a network connection............................................................................. |
8 |
|
Connect to additional computers on a network.......................................................................... |
9 |
|
Change the HP All-in-One from a USB connection to a network connection............................. |
9 |
|
Manage your network settings.................................................................................................... |
9 |
3 Use the HP All-in-One features |
|
|
|
Load originals and load paper.................................................................................................. |
12 |
|
Avoid paper jams...................................................................................................................... |
15 |
|
View and select photos............................................................................................................. |
15 |
|
Scan an image.......................................................................................................................... |
16 |
|
Make a copy............................................................................................................................. |
17 |
|
Replace the ink cartridges........................................................................................................ |
17 |
|
Clean the HP All-in-One........................................................................................................... |
20 |
4 |
Troubleshooting and support |
|
|
Uninstall and reinstall the software........................................................................................... |
22 |
|
Hardware setup troubleshooting............................................................................................... |
22 |
|
Network troubleshooting........................................................................................................... |
25 |
|
Clear paper jams...................................................................................................................... |
26 |
|
Information on ink cartridges and the print head...................................................................... |
27 |
|
Support process....................................................................................................................... |
28 |
5 |
Technical information |
|
|
System requirements................................................................................................................ |
29 |
|
Product specifications............................................................................................................... |
29 |
|
Ink cartridge yield..................................................................................................................... |
29 |
|
Regulatory notices.................................................................................................................... |
30 |
|
Warranty................................................................................................................................... |
31 |
Contents
1

1 HP All-in-One overview
Use the HP All-in-One to quickly and easily accomplish tasks such as making a copy, scanning documents, or printing photos. You can access many HP All-in-One functions directly from the control panel, without turning on your computer.
 NOTE: This guide introduces basic operations and troubleshooting, as well as provides information for contacting HP support and ordering supplies.
The onscreen Help details the full range of features and functions, including use of the HP Photosmart software that came with the HP All-in-One.
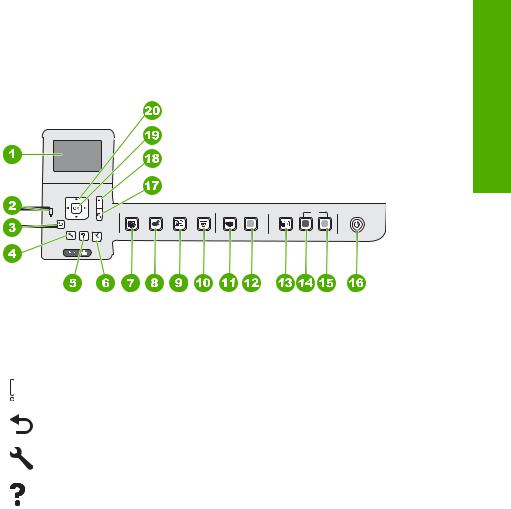
The HP All-in-One at a glance
All HP in-
Oneoverview
Label |
Description |
|
|
1 |
Color graphics display (also referred to as the |
|
display) |
|
|
2 |
Control panel |
|
|
3 |
Output tray (currently shown in the up position) |
|
|
4 |
Paper-width guide for the main input tray |
|
|
5 |
Main input tray (also referred to as the input tray) |
|
|
6 |
Paper tray extender (also referred to as the tray |
|
extender) |
|
|
7 |
Paper-width and paper-length guides for the |
|
photo tray |
|
|
8 |
Photo tray |
|
|
9 |
Paper-length guide for the main input tray |
|
|
10 |
Ink cartridge door |
2 HP All-in-One overview
(continued)
Label |
Description |
|
|
11 |
Memory card slots |
|
|
12 |
Glass |
|
|
13 |
Lid backing |
|
|
14 |
Ethernet port |
|
|
15 |
USB port |
|
|
16 |
Power connection* |
17 |
Two-sided printing accessory |
|
|
*Use only with the power adapter supplied by HP.
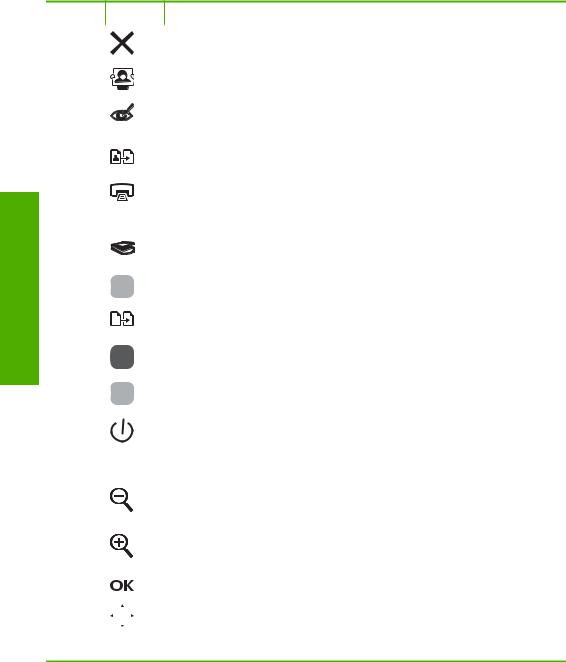
Control panel features
The following diagram and related table provide a quick reference to the HP All-in-One control panel features.
HP All-in-One overview
Label |
Icon |
Name and Description |
|
|
|
1 |
|
Color graphics display (also referred to as the display): Displays menus, photos, |
|
|
and messages. The display can be pulled up and angled for better viewing. |
|
|
|
2 |
|
Attention light: Indicates a problem occurred. See the display for more information. |
|
|
|
3 |
|
Back: Returns to the previous screen on the display. |
|
|
|
4 |
|
Setup: Opens the Setup menu where you can generate reports, change device |
|
|
settings, and perform maintenance functions. |
|
|
|
5 |
|
Help: Opens the Help Menu menu on the display where you can select a topic to |
|
|
learn more about it. From the idle state, pressing Help lists a menu of items for which |
|
|
help is available. Depending on the topic you select, the topic will appear on your |
|
|
display or on your computer screen. When viewing screens other than Idle, the |
|
|
Help button provides context sensitive help. |
Control panel features |
3 |
All HP in-
Oneoverview
Chapter 1 (continued)
Label |
Icon |
Name and Description |
||
6 |
|
|
|
Cancel: Stops the current operation. |
|
|
|
|
|
7 |
|
|
|
Photo Menu: Launches the Photosmart Express menu for printing, saving, editing, |
|
|
|
|
and sharing photos. |
|
|
|
|
|
8 |
|
|
|
Red Eye Removal: Turns the Red Eye Removal feature on or off. By default, this |
|
|
|
|
feature is turned off. When the feature is turned on, the HP All-in-One automatically |
|
|
|
|
corrects red eye coloring in the photo currently shown on the display. |
|
|
|
|
|
9 |
|
|
|
Photo Reprints: Enables you to make a copy of an original photo placed on the |
|
|
|
|
glass. |
10 |
|
|
|
Print Photos: Depending on whether you access your photos from the View, |
|
|
|
|
Print, or Create menu, the Print Photos button will display the Print Preview screen |
|
|
|
|
or it will print any selected photo(s). If no photos are selected, a prompt appears |
|
|
|
|
asking if you want to print all the photos on your card. |
|
|
|
|
|
11 |
|
|
|
Scan Menu: Opens the Scan Menu where you can select a destination for your |
|
|
|
|
scan. |
12 |
|
|
|
Start Scan: Starts a scan. |
|
|
|
|
|
13 |
|
|
|
Copy Menu: Opens the Copy Menu where you can select copy options, such as |
|
|
|
||
|
|
|
|
number of copies, paper size, and paper type. |
|
|
|
|
|
|
|
|
|
|
14 |
|
|
|
Start Copy Black: Starts a black-and-white copy. |
|
|
|
|
|
15 |
|
|
|
Start Copy Color: Starts a color copy. |
|
|
|
|
|
16 |
|
|
|
On: Turns the HP All-in-One on or off. When the HP All-in-One is off, a minimal |
|
|
|
|
amount of power is still supplied to the device. You can further reduce power supply |
|
|
|
|
by holding down the On button for 3 seconds. This will put the HP All-in-One in |
|
|
|
|
Standby/Off state. To completely remove power, turn the HP All-in-One off, and then |
|
|
|
|
unplug the power cord. |
|
|
|
|
|
17 |
|
|
|
Zoom out - (magnifying glass icon): Zooms out to show more of a photo. If you press |
|
|
|
|
this button when a photo is shown on the display at 100%, the Fit to Page feature is |
|
|
|
|
applied to the photo automatically. |
18 |
|
|
|
Zoom in + (magnifying glass icon): Zooms in to enlarge the image on the display. |
|
|
|
|
You can also use this button together with the arrows on the directional pad to adjust |
|
|
|
|
the crop box for printing. |
|
|
|
|
|
19 |
|
|
|
OK: Selects a menu setting, value, or photo on the display. |
|
|
|
|
|
20 |
|
|
|
Directional pad: Allows you to navigate through photos and menu options by |
|
|
|
|
pressing the up, down, left, or right arrow buttons. |
If you are zooming in on a photo, you can also use the arrow buttons to pan around the photo and select a different area to print.
Find more information
A variety of resources, both printed and onscreen, provide information about setting up and using the HP All-in-One.
4 HP All-in-One overview

•Setup Guide
The Setup Guide provides instructions for setting up the HP All-in-One and installing software. Make sure you follow the steps in the Setup Guide in order.
If you have problems during setup, see Troubleshooting in the last section of the Setup Guide, or see “Troubleshooting and support” on page 22 in this guide.
•Onscreen Help
The onscreen Help provides detailed instructions on features of the HP All-in-One that are not described in this Basics Guide, including features that are only available using the software you installed with the HP All-in-One.
•www.hp.com/support
If you have Internet access, you can get help and support from the HP Web site. This Web site offers technical support, drivers, supplies, and ordering information.
HP All-in-One overview
Find more information |
5 |

2 Network setup
This section describes how to connect the HP All-in-One to a network and how to view and manage network settings.
|
If you want to: |
See this section: |
|
|
|
|
|
|
Connect to a wired (Ethernet) network. |
“Wired network setup” on page 6 |
|
|
|
|
|
|
Install the HP All-in-One software for use in a |
“Install the software for a network connection” |
|
|
networked environment. |
on page 8 |
|
|
|
|
|
|
Add connections to more computers on the |
“Connect to additional computers on a |
|
|
network. |
network” on page 9 |
|
|
|
|
|
|
Change the HP All-in-One from a USB |
“Change the HP All-in-One from a USB |
|
|
connection to a network connection. |
connection to a network connection” |
|
|
|
|
on page 9 |
|
NOTE: Use the instructions in this section if |
||
|
|
||
|
you first installed the HP All-in-One with a USB |
|
|
|
connection, and you now want to change to an |
|
|
|
Ethernet network connection. |
|
|
|
|
|
|
|
|
|
|
|
View or change the network settings. |
“Manage your network settings” on page 9 |
|
|
|
|
|
|
Find troubleshooting information. |
“Network troubleshooting” on page 25 |
|
|
|
|
|
Wired network setup
This section describes how to connect the HP All-in-One to a router, switch, or hub using an Ethernet cable and how to install the HP All-in-One software for a network connection. This is known as a wired or Ethernet network.
setup Network
To set up the HP All-in-One on a wired |
See this section: |
network, you need to do the following: |
|
|
|
First, collect all of the required materials. |
“What you need for a wired network” |
|
on page 7 |
|
|
Next, connect to a wired network. |
“Connect the HP All-in-One to the network” |
|
on page 7 |
|
|
Finally, install the software. |
“Install the software for a network connection” |
|
on page 8 |
|
|
6 Network setup
What you need for a wired network
Before you connect the HP All-in-One to a network, make sure you have all of the required materials.
A functional Ethernet network that includes a router, switch, or hub with an Ethernet port.
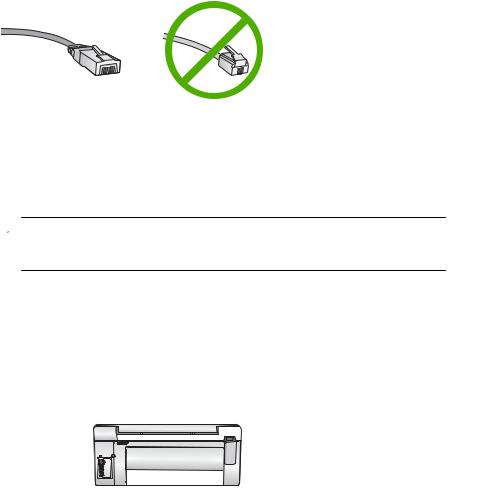
CAT-5 Ethernet cable.
Although standard Ethernet cables look similar to standard telephone cables, they are not interchangeable. There is a different number of wires in each one, and each has a different connector. An Ethernet cable connector (also called an RJ-45 connector) is wider and thicker and always has 8 contacts on the end. A phone connector has between 2 and 6 contacts.
A desktop computer or laptop with an Ethernet connection.
 NOTE: The HP All-in-One supports both 10 Mbps and 100 Mbps Ethernet networks. If you are purchasing, or have purchased, a network interface card (NIC), make sure it can operate at either speed.
Connect the HP All-in-One to the network
To connect the HP All-in-One to the network, use the Ethernet port on the back of the device.
To connect the HP All-in-One to the network
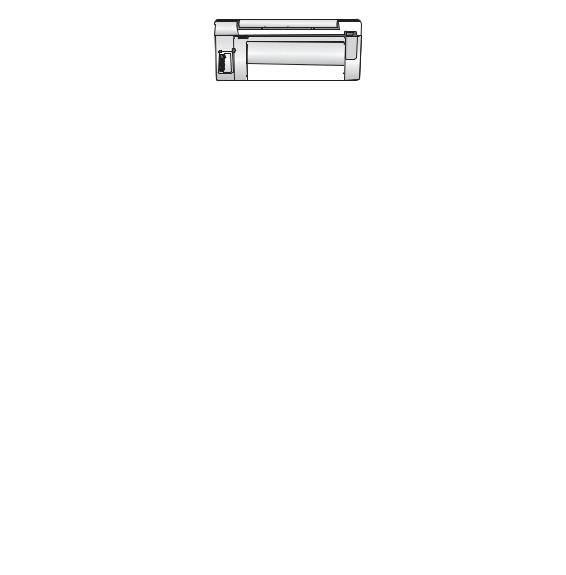
1. Remove the yellow plug from the back of the HP All-in-One.
2. Connect the Ethernet cable to the Ethernet port on the back of the HP All-in-One.
Network setup
Wired network setup |
7 |
Chapter 2
setup Network
3.Connect the other end of the Ethernet cable to an available port on your Ethernet router, switch, or wireless router.
4.Once you have connected the HP All-in-One to the network, install the software as described in “Install the software for a network connection” on page 8.
Install the software for a network connection
Use this section to install the HP All-in-One software on a computer connected to a network. Before you install the software, make sure you have connected the HP All-in- One to a network.
 NOTE: If your computer is configured to connect to a series of network drives, make sure that your computer is currently connected to these drives before installing the software. Otherwise, HP All-in-One installation software might try to use one of the reserved drive letters, and you will not be able to access that network drive on your computer.
NOTE: Installation time can range from 20 to 45 minutes depending on your operating system, the amount of available space, and the processor speed of your computer.
To install the Windows HP All-in-One software
1.Quit all applications running on your computer, including any virus detection software.
2.Insert the Windows CD that came with the HP All-in-One into the CD-ROM drive on your computer and follow the onscreen instructions.
3.If a dialog box about firewalls appears, follow the instructions. If you see firewall popup messages, you must always accept or allow the pop-up messages.
4.On the Connection Type screen, select Through the network, and then click
Next.
The Searching screen appears as the Setup program searches for the HP All-in-One on the network.
8 Network setup
5.On the Printer Found screen, verify that the printer description is correct.
If more than one printer is found on the network, the Printers Found screen appears. Select the HP All-in-One you want to connect.
6.Follow the prompts to install the software.
When you have finished installing the software, the HP All-in-One is ready for use.
7.If you disabled any virus detection software on your computer, make sure to enable it again.
8.To test your network connection, go to your computer and print a self-test report to the HP All-in-One.
Connect to additional computers on a network
You can connect the HP All-in-One to more than one computer on a small network of computers. If the HP All-in-One is already connected to a computer on a network, for each additional computer you must install the HP All-in-One software. Once you have set up the HP All-in-One on the network you will not need to configure it again when you add additional computers.
Change the HP All-in-One from a USB connection to a network connection
If you first install the HP All-in-One with a USB connection, you can later change to an Ethernet network connection. If you already understand how to connect to a network, you can use the general directions below.
To change a USB connection to a wired (Ethernet) connection
1.Unplug the USB connection from the back of the HP All-in-One.
2.Connect an Ethernet cable from the Ethernet port on the back of the HP All-in-One to an available Ethernet port on the router or switch.
3.Install the software for a network connection, choose Add a Device, and then choose
Through the network.
4.When the installation is complete, open Printers and Faxes (or Printers) in the Control Panel and delete the printers from the previous USB installation.
Manage your network settings
You can manage network settings for the HP All-in-One through the HP All-in-One control panel. Additional advanced settings are available in the Embedded Web Server, a configuration and status tool you access from your Web browser using an existing network connection to the HP All-in-One.
Network setup
Change basic network settings from the control panel
You can perform a variety of network management tasks from the control panel, such as printing the network settings and restoring network defaults.
View and print network settings
You can display a summary of the network settings on the HP All-in-One control panel, or you can print a more detailed configuration page. The network configuration page lists all of the important network settings such as the IP address, link speed, DNS, and mDNS.
Connect to additional computers on a network |
9 |
Loading...