


HP Deskjet 6800 series
Network Guide

English
English
Edition 1 May 2004
Copyright 2004 Hewlett-Packard Development Company, L.P.
Notice
Reproduction, adaptation, or translation without prior written permission is prohibited, except as allowed under the copyright laws.
The information contained herein is subject to change without notice.
The only warranties for HP products and services are set forth in the express warranty statements accompanying such products and services. Nothing herein should be construed as constituting an additional warranty. HP shall not be liable for technical or editorial errors or omissions contained herein.
Acknowledgements
Microsoft®, MS-DOS, and Windows are registered trademarks of Microsoft Corporation.
Mac, Macintosh, AppleTalk, and Mac OS are trademarks of Apple Computer, Inc., registered in the U.S. and other countries.
This product includes software developed by the OpenSSL Project for use in the OpenSSL Toolkit (http://www.openssl.org).
Wi-Fi® and the Wi-Fi logo are registered trademarks of the Wi-Fi Alliance.
PictBridge and the PictBridge logo are trademarks of the Camera & Imaging Products Association (CIPA).
1

English
Networking the HP Deskjet 6800 series printer
Thank you for buying the HP Deskjet 6800 series printer!
This guide contains the following information about networking your printer:
Connecting the printer to a wireless network . . . . . . . . . . . . . . . . 3
Step 1: Find the network basic wireless settings . . . . . . . . . . . . . . . . . . . . .5 Step 2: Find the network wireless security settings . . . . . . . . . . . . . . . . . . .7 Step 3: Install the printer software for a wireless connection . . . . . . . . . . .9 Troubleshooting a wireless connection . . . . . . . . . . . . . . . . . . . . . . . . . . . .27
Connecting the printer to a wired Ethernet network . . . . . . . . . 36
Step 1: Connect the printer to the network . . . . . . . . . . . . . . . . . . . . . . . . .37 Step 2: Install the printer software over a wired Ethernet connection . . .39 Troubleshooting a wired Ethernet connection . . . . . . . . . . . . . . . . . . . . . .42
Managing the printer on a network . . . . . . . . . . . . . . . . . . . . . . . 48
HP Report page. . . . . . . . . . . . . . . . . . . . . . . . . . . . . . . . . . . . . . . . . . . . . . . .49 Embedded Web server (EWS) . . . . . . . . . . . . . . . . . . . . . . . . . . . . . . . . . . . .50 Changing wireless security settings . . . . . . . . . . . . . . . . . . . . . . . . . . . . . .51 Configuring the printer for a software firewall. . . . . . . . . . . . . . . . . . . . . . .52 Resetting the printer to factory default settings . . . . . . . . . . . . . . . . . . . . .57
Glossary . . . . . . . . . . . . . . . . . . . . . . . . . . . . . . . . . . . . . . . . . . . . . 58
2

Connecting the printer to a wireless network
Getting started
Has the printer hardware been set up?
Follow the instructions on the setup poster that came with the printer to set up the printer hardware before connecting the printer to the network.
Are computers on the network protected by a software firewall?
If the any of the computers on the network are protected by a software firewall, follow the instructions under “Configuring the printer for a software firewall” on page 52 before connecting the printer to the network.
Connecting to the printer
Step 1: Find the network basic wireless settings
You need to know the network name (SSID) and communication mode of the network. Consult the configuration utility for the network Wireless Access Point (WAP) or the computer network card for these settings.
For more information, see “Step 1: Find the network basic wireless settings” on page 5.
Step 2: Find the network wireless security settings
You need to know what type of security your network uses: WPA, WEP, or none.
For more information, see “Step 2: Find the network wireless security settings” on page 7.
Go to the next page...
English
3

English
Step 3: Install the printer software for a wireless connection
The steps for installing the printer software on your computer vary by operating system and communication mode.
For installation instructions, see “Step 3: Install the printer software for a wireless connection” on page 9.
Wireless Network Key? If you use a USB flash drive as a Wireless Network Key to configure devices for your wireless network, skip steps 1 and 2 and go to “Infrastructure network with a Wireless Network Key” on page 10.
4

Step 1: Find the network basic wireless settings
In order to install the printer on a wireless network, you need to know the communication mode and network name (SSID) of the network. To find these settings, consult the configuration utility for the computer network card or for the network Wireless Access Point (WAP).
Communication mode
There are two options for the network communication mode:
•Infrastructure
•Ad hoc
Infrastructure (recommended)
If you want to use a Wireless Access Point (WAP) to connect the printer to a network, then set the printer to the infrastructure communication mode. In the Infrastructure mode the printer communicates with other devices on the network, whether the devices are wired or wireless, through a WAP. WAPs commonly act as routers or gateways on small networks.
Ad hoc or computer-to-computer networks
If you do not want to use a WAP to connect the printer to a wireless network, then set the printer to the ad hoc, or “computer-to-computer,” communication mode. In the ad hoc mode, the printer communicates directly with other wireless devices.
English
5

English
Network name (SSID)
A network name, or “Service Set Identifier (SSID),” identifies a particular wireless network. In order to operate on a network, a device must know the network name of the network.
More information
For more information about wireless networking concepts, see the online user’s guide. The online user’s guide is available after you install the printer software on your computer.
6

Step 2: Find the network wireless security settings
The printer must share the same network wireless security settings as the other devices on the network. If the printer does not have the correct wireless security settings, other devices on the network will not be able to use the printer.
To find the security settings for the wireless network, consult the configuration utility for the computer wireless network card or the network Wireless Access Point (WAP).
Types of wireless security
You can configure the printer to use the following wireless security options:
•Open system (no security)
•Wired Equivalent Privacy (WEP)
•Wi-Fi Protected Access (WPA)
Open system (no security)
On an open system, the network does not require authorization or encryption.
To configure the printer to operate on an open system, you need to know the network communication mode and network name (SSID). For help finding these items, see “Step 1: Find the network basic wireless settings” on page 5.
English
7

English
Wired Equivalent Privacy (WEP)
Wired Equivalent Privacy (WEP) provides security by encrypting data sent over radio waves from one wireless device to another wireless device. Devices on a WEPenabled network use WEP keys to encode data.
To configure the printer to operate on a network that uses WEP, you must know the WEP key(s) that the network uses.
Wi-Fi Protected Access (WPA)
Wi-Fi Protected Access (WPA) provides security by doing the following:
•Encrypting data sent over radio waves from one wireless device to another wireless device
•Controlling access to network resources through authentication protocols
To configure the printer to operate on a network that uses WPA, you must know the passphrase and authentication protocol that the network uses.
8
Step 3: Install the printer software for a wireless connection
Software Firewall? If your computer is protected by a software firewall, follow the steps under “Configuring the printer for a software firewall” on page 52 before installing the printer software.
Windows
Wireless Network Key? If you use a USB flash drive as a Wireless Network Key to configure devices for your wireless network, see “Infrastructure network with a Wireless Network Key” on page 10.
Infrastructure network (recommended)
1.Use an Ethernet cable to connect the printer to an Ethernet port on the network, such as an available Ethernet port on a Wireless Access Point (WAP), router, hub, or wall socket.
2.Insert the printer software CD in the computer CD-ROM drive, and then follow the onscreen instructions.
3.On the Connection Type screen, select Wireless, and then click Next.
4.Follow the onscreen instructions to complete the software installation.
Additional computers
You must install the printer software on each computer that will use the printer. Follow steps 2 through 4 above to install the printer software on other network computers.
The Ethernet cable is only needed when installing the printer software and configuring its wireless settings during the first installation on the network. The Ethernet cable is not required for installing the printer on other computers on the network.
English
9

English
Infrastructure network with a Wireless Network Key
Getting ready
Using a USB flash drive as a Wireless Network Key is a fast and convenient way to configure a device to operate on a wireless network.
In order to use a USB flash drive as a Wireless Network Key to configure the printer, you must have a computer with Windows XP Service Pack 2 and a wireless network card installed. To obtain Windows XP Service Pack 2, visit the Microsoft Web site at this address: www.microsoft.com.
Using the Wireless Network Key
Follow these steps to use a Wireless Network Key to configure the printer for your wireless network:
1.On the Windows desktop, click Start, point to Programs, point to Accessories, point to Communications, and then click Wireless Network Setup.
2.On the wireless network setup wizard, enter the network name of the wireless network, then do one of the following tasks:
•To let Windows create the Wireless Network Key, select the automatic option.
•To create the Wireless Network Key yourself, select the manual option.
Note: If the router on your network does not support the use of a Wireless Network Key, you must select the manual option. If you select the manual option, you must know the wireless network security settings.
3.Follow the onscreen instructions until you are prompted to remove the Wireless Network Key from the computer.
Go to the next page...
10

4.With the printer powered on, plug the Wireless Network Key into the PictBridge USB port on the front of the printer.
English
5.Wait for the printer lights to flash simultaneously three times.
6.Plug the Wireless Network Key into the computer, and then follow the onscreen instructions to complete the wireless network setup wizard.
7.Insert the printer software CD in the computer CD-ROM drive, and then follow the onscreen instructions.
8.On the Connection Type screen, select Wireless, and then click Next.
9.Follow the onscreen instructions to complete the software installation.
Additional computers
You must install the printer software on each computer that will use the printer. Follow steps 7 through 9 above to install the printer software on other network computers.
11

English
Ad hoc
Devices on the ad hoc network must:
•Be 802.11b compatible
•Have ad hoc as the communication mode
•Have the same network name (SSID)
•Be on the same subnet
•Be on the same channel
•Have the same wireless security settings
Follow these steps to connect to the printer using the factory default ad hoc network settings:
1.Open the configuration utility for the computer wireless network card, and then do the following tasks:
a.Create a new wireless profile with the following values:
•Communication mode: ad hoc
•Network Name (SSID): hpsetup
•Security (encryption): disabled
b.Activate the profile.
2.Wait two minutes for the printer to obtain an IP address, and then press the Report Page button to print an HP Report page.
3.On the HP Report page, verify the following settings:
• The network name (SSID) is hpsetup
• The communication mode is ad hoc
• The subnet mask and channel match those of your wireless network
• The IP address is something other than 0.0.0.0
If one of the above is not true, delete the wireless profile created in step 1, and then repeat steps 1 through 3.
Go to the next page...
12

4.Insert the printer software CD in the computer CD-ROM drive, and then follow the onscreen instructions.
5.On the Connection Type screen, select Wireless, and then click Next.
6.Follow the onscreen instructions to complete the software installation.
Additional computers
You must install the printer software on each computer that will use the printer. Follow steps 4 through 6 above to install the printer software on other network computers.
Advanced setup
For instructions on configuring the printer to operate on ad hoc networks other than the hpsetup factory default, visit the HP Web site at www.hp.com/support.
802.11g
The printer defaults to 802.11b in ad hoc mode in order to be compatible with the widest assortment of 802.11 devices. If your network is made up of only 802.11g devices, then you might want to configure the printer to operate in 802.11g mode in order to optimize network performance.
Follow these steps to configure the printer to operate in 802.11g mode while connected to an ad hoc network:
1.Open the printer embedded Web server (EWS). For help opening the EWS, see page 50.
2.Click the Networking tab.
3.Under the Connections heading, click Wireless (802.11).
4.Click the Advanced tab.
5.Scroll to the bottom of the Web page, and clear the In an ad hoc network use 802.11b behavior check box.
6.Click the Apply button, and then close the EWS.
English
13

English
Macintosh
Mac OS X
Infrastructure network (recommended)
1.Use an Ethernet cable to connect the printer to an Ethernet port on the network, such as an available Ethernet port on a Wireless Access Point (WAP), router, hub, or wall socket.
2.Insert the printer software CD in the computer CD-ROM drive, and then doubleclick the CD desktop icon.
3.Double-click the HP Deskjet 6800 installer icon, and then follow the onscreen instructions.
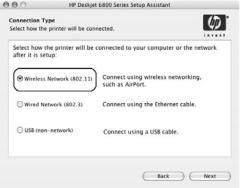
4.On the Connection Type screen, select Wireless Network (802.11), and then click Next.
5. Proceed through the next several screens to find the printer on the network.
Go to the next page...
14
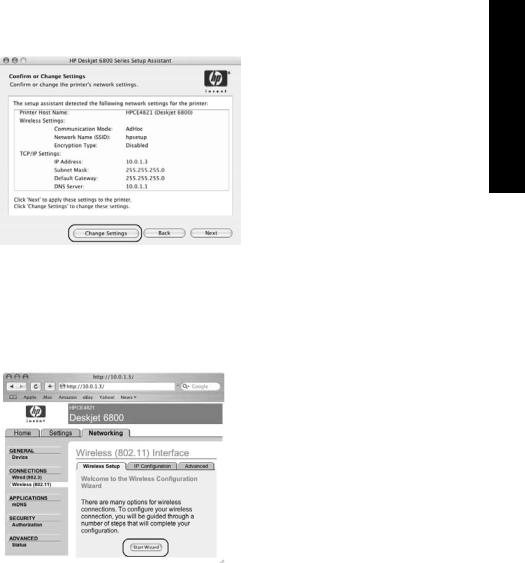
6. On the Confirm or Change Settings screen, click the Change Settings button.
English
7.On the Change Settings screen, click the Change Settings button. The printer embedded Web server (EWS) opens.
8.On the EWS, click the Networking tab.
9.Under the Connections heading, click Wireless (802.11).
10.On the Wireless (802.11) Interface screen, click the Start Wizard button to start the Wireless Configuration Wizard.
Go to the next page...
15

|
11. |
Follow the onscreen instructions to configure the printer settings. |
||
|
12. |
After the Wireless Configuration Wizard is finished, close the EWS. |
||
English |
13. |
On the Confirm or Change Settings screen, click Next. |
||
14. |
Follow the onscreen instructions to complete the printer software installation. |
|||
|
||||
|
15. |
On the Add Printer screen, click Open Print Center. |
||
|
16. |
Click Add Printer. |
|
|
|
17. |
Do one of the following depending on the version of Mac OS X you are using: |
||
|
|
Mac OS X v 10.2.3 and later |
Mac OS X v 10.2.2 and earlier |
|
Select Rendezvous. |
Select HP IP Printing, then click the |
|
Discover button. |
18.Select the printer, and then click the Add button.
19.Close Print Center.
Additional computers
Follow these steps to install the printer software on each computer that will use the printer.
1.Insert the printer software CD in the computer CD-ROM drive, and then doubleclick the CD desktop icon.
2.Double-click the HP Deskjet 6800 installer icon, and then follow the onscreen instructions.
3.Close the HP Deskjet 6800 series printer Setup Assistant when it appears.
Since the printer is already configured for the network, you do not need to use the setup assistant.
4.Open Print Center, and then follow steps 15 through 19 above.
16
Ad hoc or computer-to-computer |
|
|
1. |
Use an Ethernet cable to connect the printer to the computer. |
|
2. |
Insert the printer software CD in the computer CD-ROM drive, and then double- |
English |
|
click the CD desktop icon. |
|
|
|
|
3. |
Double-click the HP Deskjet 6800 installer icon, and then follow the onscreen |
|
|
instructions. |
|
4. |
On the Connection Type screen, select Wireless Network (802.11), and then click |
|
|
Next. |
|
|
|
|
5. Proceed through the next several screens to find the printer on the network.
Go to the next page...
17

6. On the Confirm or Change Settings screen, click the Change Settings button.
English
7.On the Change Settings screen, click the Change Settings button. The printer embedded Web server (EWS) opens.
8.On the EWS, click the Networking tab.
9.Under the Connections heading, click Wireless (802.11).
10.On the Wireless (802.11) Interface screen, click the Advanced tab.
11.Enter the wireless network settings for the wireless network to which you want to connect the printer:
•Under the Network Name heading, enter the network name (such as “MyNetwork”) in the SSID box.
•Under the Network Settings heading:
•Select Ad Hoc.
•Select the channel from the Channel drop-down list.
•Enter the network wireless security settings.
12.After entering the wireless network settings, click the Apply button, and then close the EWS.
13.On the Add Printer screen, click Open Print Center.
14.Click Add Printer.
Go to the next page...
18
 Loading...