


 Loading...
HP Deskjet 2000 J210 series

Contents
1 |
How Do I?.................................................................................................................................. |
3 |
2 |
Get to know the HP Printer |
|
|
Printer parts................................................................................................................................ |
5 |
|
Control panel features................................................................................................................ |
6 |
|
Status Lights............................................................................................................................... |
6 |
3 |
|
|
|
Print documents.......................................................................................................................... |
9 |
|
Print photos.............................................................................................................................. |
10 |
|
Print envelopes......................................................................................................................... |
11 |
|
Tips for print success................................................................................................................ |
12 |
5 |
Work with cartridges |
|
|
Check the estimated ink levels................................................................................................. |
23 |
|
Order ink supplies..................................................................................................................... |
24 |
|
Replace the cartridges.............................................................................................................. |
25 |
|
Use single-cartridge mode........................................................................................................ |
27 |
|
Cartridge warranty information................................................................................................. |
27 |
6 |
Solve a problem |
|
|
Improve print quality................................................................................................................. |
29 |
|
Clear a paper jam..................................................................................................................... |
31 |
|
Unable to print.......................................................................................................................... |
33 |
|
HP support................................................................................................................................ |
36 |
7 |
Technical information |
|
|
Notice........................................................................................................................................ |
39 |
|
Specifications........................................................................................................................... |
39 |
|
Environmental product stewardship program........................................................................... |
41 |
|
Regulatory notices.................................................................................................................... |
44 |
Index.............................................................................................................................................. |
49 |
|
Contents
1

Contents
2

1 How Do I?
Learn how to use your HP Printer
•Printer parts
•Load media
•Replace the cartridges
•Clear a paper jam
How Do I?
How Do I? |
3 |

Chapter 1
I? Do How
4 How Do I?
2Get to know the HP Printer
•Printer parts
•Control panel features
•Status Lights
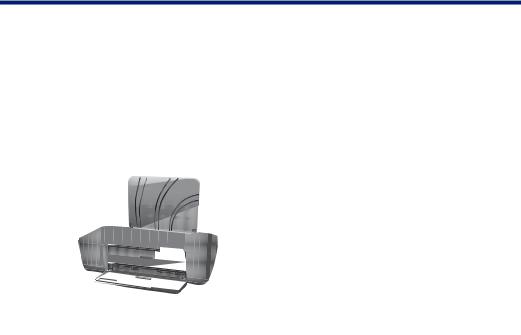
Printer parts
|
|
|
|
|
|
|
|
|
|
|
|
|
|
|
|
|
|
|
|
|
|
|
|
|
|
|
|
|
|
|
|
|
|
|
|
|
|
|
|
|
|
|
|
|
|
|
|
1 |
|
Input tray |
|
|
|||||||
|
|
|
|
|
|||||||
2 |
|
Paper width guide |
|
|
|||||||
3 |
|
Control panel |
|
|
|||||||
|
|
|
|
|
|||||||
4 |
|
Output tray |
|
|
|||||||
|
|
|
|
|
|||||||
5 |
|
Output tray extender (also referred to as the tray extender) |
|
Printer |
|||||||
|
|
|
|
|
|
|
|
|
|
|
|
6 |
|
Cartridge door |
|||||||||
|
|
|
|||||||||
|
|
|
|
|
|||||||
7 |
|
Print cartridges |
|
HP |
|||||||
|
|
|
|
|
|
|
|
|
|
|
|
8 |
|
USB port |
|||||||||
|
|
the |
|||||||||
|
|
|
|
|
|
|
|
|
|
|
|
9 |
|
Power connection: Use only with the power adapter supplied by HP |
|||||||||
|
|
Get to know |
|||||||||
|
|
|
|
|
|
|
|
|
|
|
|
|
|
|
|
|
|
|
|
|
|
||
|
|
|
|
|
|
|
|
|
|
|
|
Printer parts |
5 |
Chapter 2
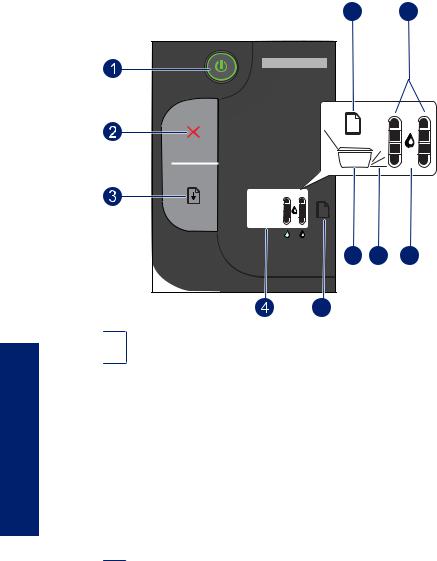
Control panel features
10 |
|
9 |
! |
|
|
6 |
7 |
8 |
5 |
|
|
1On: Turns the product on or off. When the product is off, a minimal amount of power is still used. To completely remove power, turn off the product, then unplug the power cord.
|
2 |
Cancel: Stops the current operation. |
|
Get |
3 |
Resume: Instructs the HP Printer to continue after a problem is solved. |
|
|
|
||
4 |
Printer display: Displays printer status and current estimated ink levels. |
||
to |
|||
|
|
||
5 |
Attention light: Signals if there is an error, indicating a user action is required. |
||
know |
|||
|
|
||
6 |
Printer icon: Signals a carriage stall, the carriage door should be closed, or the output tray |
||
the |
|
should be opened. |
|
7 |
Output tray icon: Signals that the output tray should be opened. |
||
HP |
|||
Printer |
8 |
Ink drop icon: Signals a problem with one or both cartridges. |
|
9 |
Ink gauge icons: Displays estimated current ink levels and signals when there are cartridge |
||
|
|||
|
|
problems. |
|
|
|
|
|
|
10 |
Paper icon: Signals printer is out of paper or there is a paper jam. |
Status Lights
When the printer is turned on, the On button light will be lit. When the printer is processing a job, the on light will be blinking. The ink level gauges on the printer display will show
6 Get to know the HP Printer

the current estimated ink levels of the cartridges. Blinking lights and printer display icons signal errors which you can resolve. See the table below to learn what to do.
Behavior |
Solution |
||||
Paper icon on + Attention light is blinking |
The printer is out of paper or there is a |
||||
|
|
|
|
|
paper jam. |
|
|
|
|
|
Load media into tray or Clear a paper |
|
|
|
|
|
|
|
|
|
|
|
jam. Then press the Resume button to |
|
|
|
|
|
continue printing. |
|
|
|
|
|
|
|
|
|
|
||
Printer icon on + Output tray icon is blinking + Attention |
Output tray is closed. |
||||
light is on |
Open output tray. |
||||
|
|
|
|
|
|
|
|
|
|
|
|
|
|
|
|
|
|
Printer icon is blinking + Attention light is on |
The cartridge door is open, or the |
||||||||||||||||
|
|
|
|
|
|
|
|
|
|
|
|
|
|
|
|
|
carriage is obstructed. |
|
|
|
|
|
|
|
|
|
|
|
|
|
|
|
|
|
If the cartridge door is open, close it. |
|
|
|
|
|
|
|
|
|
|
|
|
|
|
|
|
|
See Prepare the trays for more |
|
|
|
|
|
|
|
|
|
|
|
|
|
|
|
|
|
information. If the carriage is |
|
|
|
|
|
|
|
|
|
|
|
|
|
|
|
|
|
obstructed, open cartridge door and |
|
|
|
|
|
|
|
|
|
|
|
|
|
|
|
|
|
move the carriage to the right to clear |
|
|
|
|
|
|
|
|
|
|
|
|
|
|
|
|
|
the obstruction. Press the Resume |
|
|
|
|
|
|
|
|
|
|
|
|
|
|
|
|
|
button to continue. See Clear the print |
|
|
|
|
|
|
|
|
|
|
|
|
|
|
|
|
|
carriage for more information. |
|
|
|
|
|
|
|
|
|
|
|
|
|
|
|
|
|
|
Ink drop icon blinking + one or both ink gauge icons are |
The cartridge that corresponds to the |
||||||||||||||||
blinking |
blinking ink gauge icon is low on ink. |
||||||||||||||||
|
|
|
|
|
|
|
|
|
|
|
|
|
|
|
|
|
Replace the cartridges when print |
|
|
|
|
|
|
|
|
|
|
|
|
|
|
|
|
|
quality is no longer acceptable. Ink |
|
|
|
|
|
|
|
|
|
|
|
|
|
|
|
|
|
level warnings and indicators provide |
|
|
|
|
|
|
|
|
|
|
|
|
|
|
|
|
|
|
|
|
|
|
|
|
|
|
|
|
|
|
|
|
|
|
|
estimates for planning purposes only. |
|
|
|
|
|
|
|
|
|
|
|
|
||||||
Ink drop icon on + one ink gauge icon is blinking |
The cartridge that corresponds to the |
||||||||||||||||
|
|
|
|
|
|
|
|
|
|
|
|
|
|
|
|
|
blinking ink gauge icon has the tape on |
|
|
|
|
|
|
|
|
|
|
|
|
|
|
|
|
|
it, is not installed, incompatible, or not |
|
|
|
|
|
|
|
|
|
|
|
|
|
|
|
|
|
installed correctly. |
|
|
|
|
|
|
|
|
|
|
|
|
|
|
|
|
|
|
|
|
|
|
|
|
|
|
|
|
|
|
|
|
|
|
|
Remove the pink tape if it is still on the |
|
|
|
|
|
|
|
|
|
|
|
|
|
|
|
|
|
|
|
|
|
|
|
|
|
|
|
|
|
|
|
|
|
|
|
cartridge or insert a cartridge if one is |
|
|
|
|
|
|
|
|
|
|
|
|
|
|
|
|
|
missing. If the cartridge is not installed |
|
|
|
|
|
|
|
|
|
|
|
|
|
|
|
|
|
correctly, reinsert the cartridge. If the |
|
|
|
|
|
|
|
|
|
|
|
|
|
|
|
|
|
cartridge is incompatible, Replace the |
|
|
|
|
|
|
|
|
|
|
|
|
|
|
|
|
|
cartridges with a compatible cartridge. |
|
|
|
|
|
|
||||||||||||
Ink drop icon on + both ink gauge icons are blinking |
Both cartridges have the tape on, are |
||||||||||||||||
|
|
|
|
|
|
|
|
|
|
|
|
|
|
|
|
|
not installed, incompatible, not |
|
|
|
|
|
|
|
|
|
|
|
|
|
|
|
|
|
installed correctly, or defective. |
|
|
|
|
|
|
|
|
|
|
|
|
|
|
|
|
|
Remove the pink tape if it is still on the |
|
|
|
|
|
|
|
|
|
|
|
|
|
|
|
|
|
|
|
|
|
|
|
|
|
|
|
|
|
|
|
|
|
|
|
cartridges or insert cartridges if they |
|
|
|
|
|
|
|
|
|
|
|
|
|
|
|
|
|
|
|
|
|
|
|
|
|
|
|
|
|
|
|
|
|
|
|
are missing. If the cartridges are not |
|
|
|
|
|
|
|
|
|
|
|
|
|
|
|
|
|
installed correctly, reinsert the |
|
|
|
|
|
|
|
|
|
|
|
|
|
|
|
|
|
cartridges. If the cartridges are |
Get to know the HP Printer
Status Lights |
7 |

Chapter 2
(continued)
Behavior |
Solution |
|
|
incompatible, Replace the cartridges |
|
|
with compatible cartridges. See |
|
|
Identify a defective cartridge for |
|
|
additional information. |
|
All lights and icons are blinking |
The printer is in an error state. |
|
|
To exit the error state, reset the |
|
|
product. |
|
|
1. |
Turn off the product. |
|
2. |
Unplug the power cord. |
|
3. |
Wait a minute, then plug the |
|
|
power cord back in. |
|
4. |
Turn on the product. |
|
If the problem persists, contact HP |
|
|
support. |
|
Printer HP the know to Get
8 Get to know the HP Printer
3 Print
Choose a print job to continue.
Print documents
Print photos
Print envelopes
Print documents
To print from a software application
1.Make sure the output tray is open.
2.Make sure you have paper loaded in the input tray.
See Load media for more information.
3.From your software application, click the Print button.
4.Make sure the product is the selected printer.
5.Click the button that opens the Properties dialog box.
Depending on your software application, this button might be called Properties,
Options, Printer Setup, Printer, or Preferences.
6.Select the appropriate options.
•On Layout tab select Portrait or Landscape orientation.
•On Paper/Quality tab select the appropriate paper type and print quality from the Media drop-down list.
•Click Advanced to select the appropriate paper size from the Paper/Output list.
Print documents |
9 |

Chapter 3
7.Click OK to close the Properties dialog box.
8.Click Print or OK to begin printing.
 NOTE: You can print your document on both sides of the paper, instead of just one side. Click on the Advanced button on the Paper/Quality or Layout tab. From the Pages to Print drop-down menu select Print Odd Pages Only. Click OK to print. After the odd numbered pages of the document have been printed, remove the document from the output tray. Reload the paper in the input tray with the blank side facing up. Return to the Pages to Print drop-down menu and then select Print Even Pages Only. Click OK to print.
Print photos
To print a photo on photo paper
1.Make sure the output tray is open.
2.Remove all paper from the input tray, and then load the photo paper with side to be printed on facing up.
 NOTE: If the photo paper you are using has perforated tabs, load photo paper so that tabs are on top.
See Load media for more information.
3.On the File menu in your software application, click Print.
4.Make sure the product is the selected printer.
5.Click the button that opens the Properties dialog box.
Depending on your software application, this button might be called Properties,
Options, Printer Setup, Printer, or Preferences.
6.Click the Paper/Quality tab.
10 Print

7.Select the appropriate options.
•On Layout tab select Portrait or Landscape orientation.
•On Paper/Quality tab select the appropriate paper type and print quality from the Media drop-down list.
•Click Advanced to select the appropriate paper size from the Paper/Output list.
 NOTE: For maximum dpi resolution, go to the Paper/Quality tab and select Photo Paper, Best Quality from the Media drop-down list. Make sure you are printing in color. Then go to the Advanced tab and select Yes from the Print in Max DPI drop-down list. For more information, see Print using the maximum dpi.
8.Click OK to return to the Properties dialog box.
9.Click OK, and then click Print or OK in the Print dialog box.
 NOTE: Do not leave unused photo paper in the input tray. The paper might start to curl, which could reduce the quality of your printout. Photo paper should be flat before printing.
Print envelopes
You can load one or more envelopes into the input tray of the HP Printer. Do not use shiny or embossed envelopes or envelopes that have clasps or windows.
 NOTE: For specific details on how to format text for printing on envelopes, consult the help files in your word processing software. For best results, consider using a label for the return address on envelopes.
To print envelopes
1.Make sure the output tray is open.
2.Slide the paper guide all the way to the left.
3.Place the envelopes in the right side of the tray. The side to be printed on should face up. The flap should be on the left side.
4.Push the envelopes into the printer until they stop.
5.Slide the paper guide firmly against the edge of the envelopes.
Print envelopes |
11 |

Chapter 3
See Load media for more information.
6.Click the button that opens the Properties dialog box.
Depending on your software application, this button might be called Properties,
Options, Printer Setup, Printer, or Preferences.
7.Select the appropriate options.
•On Paper/Quality tab select a Plain paper type.
•Click the Advanced button, and select the appropriate envelope size from the Paper Size drop down menu.
8.Click OK, and then click Print or OK in the Print dialog box.
Tips for print success
To successfully print, the HP cartridges should be functioning properly with sufficient ink, the paper should be loaded correctly, and the product should have the appropriate settings.
Cartridge tips
•Use genuine HP ink cartridges.
•Install both the black and tri-color cartridges correctly. For more information, see Replace the cartridges.
•Check the estimated ink levels in the cartridges to make sure there is sufficient ink. For more information, see Check the estimated ink levels.
•For more information, see Improve print quality.
Paper loading tips
•Load a stack of paper (not just one page). All of the paper in the stack should be the same size and type to avoid a paper jam.
•Load paper with side to be printed on facing up.
•Ensure that paper loaded in the input tray lays flat and the edges are not bent or torn.
•Adjust the paper-width guide in the input tray to fit snugly against all paper. Make sure the paper-width guide does not bend the paper in the input tray.
•For more information, see Load media.
Printer settings tips
•On the Paper/Quality tab of the print driver, select the appropriate paper type and quality from the Media drop down menu.
•Click the Advanced button, and select the appropriate Paper Size from the Paper/ Output drop-down menu.
•Click the HP Printer desktop icon to open the Printer Software. In the Printer Software, click Printer Actions and then click Set Preferences to access the print driver.
 NOTE: You can also access the Printer Software by clicking Start > Programs
>HP > HP Deskjet 2000 J210 series > HP Deskjet 2000 J210 series
12 Print

Notes
•Genuine HP ink cartridges are designed and tested with HP printers and papers to help you easily produce great results, time after time.
 NOTE: HP cannot guarantee the quality or reliability of non-HP supplies. Product service or repairs required as a result of using a non-HP supply will not be covered under warranty.
If you believe you purchased genuine HP ink cartridges, go to: www.hp.com/go/anticounterfeit
•Ink level warnings and indicators provide estimates for planning purposes only.
 NOTE: When you receive a low-ink warning message, consider having a replacement cartridge available to avoid possible printing delays. You do not need to replace the cartridges until print quality becomes unacceptable.
For more information, see Check the estimated ink levels.
•You can print your document on both sides of the paper, instead of just one side.
 NOTE: Click the Advanced button on the Paper/Quality or Layout tab. From the Pages to Print drop-down menu select Print Odd Pages Only. Click OK to print. After the odd numbered pages of the document have been printed, remove the document from the output tray. Reload the paper in the input tray with the blank side facing up. Return to the Pages to Print drop-down menu and then select Print Even Pages Only. Click OK to print.
•Print using black ink only
 NOTE: If you want to print a black and white document using black ink only, click the Advanced button. From the Print in Grayscale drop-down menu select Black Ink Only, then click the OK button. If you see Black and White as an option on the Paper/Quality tab or the Layout tab, select it.
 Click here to go online for more information.
Print using the maximum dpi
Use maximum dots per inch (dpi) mode to print high-quality, sharp images on photo paper.
See technical specifications for the print resolution of the maximum dpi mode.
Printing in maximum dpi takes longer than printing with other settings and requires a large amount of disk space.
To print in Maximum dpi mode
1.Make sure you have photo paper loaded in the input tray.
2.On the File menu in your software application, click Print.
3.Make sure the product is the selected printer.
Print using the maximum dpi |
13 |

Chapter 3
4.Click the button that opens the Properties dialog box.
Depending on your software application, this button might be called Properties,
Options, Printer Setup, Printer, or Preferences.
5.Click the Paper/Quality tab.
6.In the Media drop-down list, click Photo Paper, Best Quality.
 NOTE: Photo Paper, Best Quality must be selected from the Media drop-down list on the Paper/Quality tab to enable printing in maximum DPI.
7.Click the Advanced button.
8.In the Printer Features area, select Yes from the Print in Max DPI drop-down list.
9.Select Paper Size from Paper/Output drop-down menu.
10.Click OK to close the advanced options.
11.Confirm Orientation on Layout tab, then click OK to print.
14 Print
Loading...