Hilti PR16 Manual

PR 16
en Operating instructions
|
*373165* |
373165 |
|
|
|
|
|
|
|
|
|
|
|
|
|
||
|
|
|
|
|
||||
|
|
|
|
|
||||
|
|
|
|
|
|
|
|
|

|
|
|
|
|
|
|
|
80 |
|
300 |
|
0 |
|
|
|
X |
|
|
|
Y |
|
|
|
|
|
|
|
|
|
50 |
|
+Y |
|
|
|
|
+X |
|
|
|
|
|
|
|
|
|
|
|
|
|
|
|
|
|
|
|
|
|
|
PR 16 |
|
|
|
|
|
|
|
|
|
|
|
|
|
|
|

|
|
|
|
|
|
|
|
|
|
|
I |
|
|
|
|
+X |
|
+Y |
|
|
|
|
0 |
|
|
|
|
|
|
|
50 |
|
|
|
300 |
|
|
|
|
|
|
|
80 |
|
|
|
|
|
1m |
30m |
|
|
|
|
|
|
50 |
|
|
|
+Y |
|
|
|
+X |
|
|
|
|
|
|
|
2m |
150m |
|
|
|
|
|
|
50 |
|
|
|
+Y |
|
|
+X |
|
|
|

X
Y
 +Y +X
+Y +X
 50
50

A
20m |
20m |
A
 4mm
4mm
B
20m |
20m |
B |
A |
B1 |
A1 |
B |
A |
B1 |
A1 |
|
D1 |
|
A2 |
|
x |
B |
A |
B1 |
A1 |
D2 |
|
B2 |
|

It is essential to read these operating instructions carefully before operating the laser for the first time.
Always keep these instructions with the laser.
The operating instructions should always be with the laser when it is given to other persons.
Laser components
PR 16 Rotating Laser
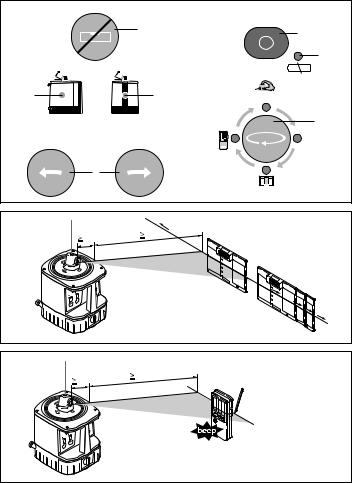
1.Plumb beam (90° to the plane of rotation)
2.Laser beam (plane of rotation)
3.Rotating head
4.Laser exit aperture
5.Control panel
6.Grip
7.Foot screws for vertical setup
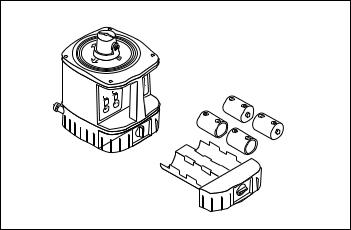
8.Battery compartment
9.Baseplate with 5/8“ thread
PA 331/341 Beam Catcher
10.Marking notches
11.Magnetic bracket
12.Reflective surfaces
13.Hole for mounting on telescopic staff
Control panel
14.On/off button
15.Speed of rotation button
16.„Inclination/direction“ button (activates the servo motors in the X/Y inclination/direction
17.Servo button (adjusts the X/Y inclination/direction)
18.Battery LED
19.X inclination/direction LED
20.Y inclination/direction LED
1

Contents / 1. General Information
Contents
1. General Information . . . . . . . . . . . . . . . . . . . . . . . . . . . . . . . . . . . 2
2. Description . . . . . . . . . . . . . . . . . . . . . . . . . . . . . . . . . . . . . . . . . . 4
3. Tools and Accessories . . . . . . . . . . . . . . . . . . . . . . . . . . . . . . . . . 7
4. Technical Data. . . . . . . . . . . . . . . . . . . . . . . . . . . . . . . . . . . . . . . . 8
5. Safety Precautions . . . . . . . . . . . . . . . . . . . . . . . . . . . . . . . . . . . 11
6. Preparation . . . . . . . . . . . . . . . . . . . . . . . . . . . . . . . . . . . . . . . . . 16
7. Operation . . . . . . . . . . . . . . . . . . . . . . . . . . . . . . . . . . . . . . . . . . 18
8. Checks and Adjustments. . . . . . . . . . . . . . . . . . . . . . . . . . . . . . . 24
9. Care and Maintenance. . . . . . . . . . . . . . . . . . . . . . . . . . . . . . . . . 29
10. Disposal . . . . . . . . . . . . . . . . . . . . . . . . . . . . . . . . . . . . . . . . . . . 30
11. Warranty . . . . . . . . . . . . . . . . . . . . . . . . . . . . . . . . . . . . . . . . . . . 32
12. FCC Statement . . . . . . . . . . . . . . . . . . . . . . . . . . . . . . . . . . . . . . 34
13. EC Certificate of Conformity . . . . . . . . . . . . . . . . . . . . . . . . . . . . 36
1. General Information
1.1 Headings indicating danger
CAUTION
Used to indicate a potentially dangerous situation that could lead to minor personal injuries or serious damage to property or the environment.
NOTE
Information that helps the user employ the product efficiently and in a technically correct manner.
2

1. General Notes
1.2 Pictograms
WARNING
Warning of general danger
Laser radiation. Do not stare into beam
Class 2 laser product
Symbols
Read operating instructions before use
The numbers refer to figures on the pages of the cover, which should be kept folded out when studying the operating instructions. The PR 16 rotating laser is always referred to in these operating instructions simply as the laser.
Location of identification details on laser
The type designation and serial number are marked on the nameplate of your laser. Make a note of these details on your set of operating instructions and always quote them when contacting our dealer or service centre.
Type : |
PR 16 |
Serial number (S.no.): |
___________ |
3

2. Description
2. Description
2.1 PR 16 rotating laser for quick and accurate levelling and alignment work
The Hilti PR 16 is a laser with a plumb beam at 90° to its rotating beam.
2.2 Features
–Choice of rotation speeds (0, 50, 80 or 300 revolutions per minute (rpm)).
–With rotation switched off, the laser beam can also be aligned manually.
–LEDs show the operating status.
–The laser can be set up directly on the floor, on a tripod, the wall bracket or the various other brackets
2.3Functional description
2.3.1 Levelled plane (auto levelling)
When the laser is switched on, it levels itself automatically using the 2 built-in servomotors for the X- and Y-axes.
2.3.2 Plane with inclined X-axis (defined direction of inclination)
The inclination of the X-axis can be set with the servo buttons. The servo system then keeps the Y-axis horizontal.
4

2. Description
2.3.3 Any inclined plane (free alignment)
The inclination can be aligned with any given marks or contours by operating the X- and Y-axis motor alternately.
2.3.4 Vertical plane (auto plumbing)
The laser plumbs itself (X-axis) automatically. The vertical plane can be aligned (rotated) manually with the servo buttons.
2.3.5 Any inclined plane with vertical laser setup. (free alignment)
This function corresponds to free alignment in X- or Y- axis.
2.3.6 Automatic cut-out
During automatic levelling of one or both axes, the servo system monitors whether the specified accuracy is achieved.
The system switches off:
–if levelling is not accomplished (laser outside levelling range or mechanical obstruction)
–if the laser is vibrated or knocked off plumb.
Rotation then switches off, the laser beam blinks, and all the LEDs blink.
5

2. Description
2.3.7 Increased visibility of laser beam
The visibility of the laser beam depends on the operating distance and brightness of the surroundings. It can be improved with the aid of the beam catcher or laser detector.
–The beam catcher is used for distances from 1 to 30m.
–The laser detector is used for distances from 2 to 150m.
6

3. Tools and Accessories
3. Tools and Accessories
Included
One PR 16 rotating laser
one PA 331/341 beam catcher one set of operating instructions four D size batteries
one pack of desiccant one Hilti carrying case
Accessories:
Various tripods |
PA 910, PA 911, PA 920, PA 930 and |
|
PA 931/2 |
Wall bracket |
PA 311 / 321 |
Laser detector |
PA 350 |
Detector clamp |
PA 360 |
Telescopic levelling staffs |
PA 950/960 and PA 951/961 |
Sight rail mount |
PA 370 |
Tripod adapter |
PA 371 |
Façade adapter |
PA 372 |
Sighting glasses |
PA 970 |
7

4. Technical Data
4. Technical Data
Range (radius)
1 to 30m [3 to 100’] with beam catcher
2 to 150m [6 to 500’] with laser detector
Accuracy (at 24°C/+75°F)
± 1.0mm @ 10m [± 3/32“ @ 60’]
Laser product class
2, visible, 635nm, < 1mW (IEC825-1/EN60825; FDA 21 CFR 1040)
Beam diameter
Approx 3.3x3.9mm @ 10m, approx 6.5x6.3mm @ 30 m, [approx < 0.13x0.15“ @ 30’, approx < 0.26x0.25“ @ 100’]
Plumb beam Continuously at right angles to plane of rotation
Speed of rotation [rpm]
0 |
Stop mode |
50 |
Additional manual mode |
80 |
Mode for beam catcher |
300 |
Mode for laser detector |
|
|
Scanning lengths
From approx 150mm (5m) to approx 2000mm (30m) [5.9“ (16.5’) to approx 79“ (100’];
depending on selected mode (apart from Smart Scan function).
8
 Loading...