


 Loading...
Gaggenau Instruction manual
BS 470/471 BS 474/475 BS 484/485
Combi-steam oven

Table of contents
Intended use |
4 |
|
|
Important safety information |
5 |
|
|
Causes of damage |
6 |
|
|
Environmental protection |
6 |
Saving energy |
6 |
Environmentally-friendly disposal |
6 |
|
|
Getting to know the appliance |
7 |
Steam oven |
7 |
Display and operating controls |
8 |
Symbols |
8 |
Colours and display |
9 |
Automatic door opening |
9 |
Additional information ( and ) |
9 |
Cooling fan |
9 |
Function selector positions |
10 |
Accessories |
12 |
Installation accessories |
12 |
Special accessories |
12 |
|
|
Before using for the first time |
13 |
Setting the language |
13 |
Setting the time format |
13 |
Setting the clock |
13 |
Setting the date format |
13 |
Setting the date |
14 |
Setting the temperature format |
14 |
Setting the water filter |
14 |
Setting the water hardness |
14 |
Ending initial set-up |
15 |
Calibration |
15 |
Cleaning accessories |
15 |
|
|
Water filter |
16 |
Operation with or without a water filter |
16 |
Changing the water filter |
16 |
|
|
Activating the appliance |
16 |
Standby |
16 |
Activating the appliance |
16 |
|
|
Operating the appliance |
17 |
Cooking compartment |
17 |
Inserting accessories |
17 |
Switching on |
18 |
Misting |
18 |
Steam removal |
18 |
After every use |
18 |
Safety shut-off |
18 |
Timer functions |
19 |
Calling up the timer menu |
19 |
Timer |
19 |
Stopwatch |
19 |
Cooking time |
20 |
End of cooking time |
21 |
Long-term timer |
22 |
Setting the long-term timer |
22 |
|
|
Individual recipes |
22 |
Recording a recipe |
22 |
Programming a recipe |
23 |
Entering names |
23 |
Starting recipes |
24 |
Change recipe |
24 |
Deleting recipes |
24 |
|
|
Core temperature probe |
25 |
Inserting the core temperature probe in the food |
|
to be cooked |
25 |
Setting the core temperature |
26 |
Core temperature guidelines |
26 |
|
|
Child lock |
27 |
Activate the child lock |
27 |
Deactivating the child lock |
27 |
|
|
Basic settings |
28 |
|
|
Cleaning and maintenance |
31 |
Cleaning agents |
31 |
Cleaning programme |
32 |
Drying programme |
34 |
Descaling programme |
34 |
|
|
Trouble shooting |
36 |
Power cut |
37 |
Demo mode |
37 |
Replacing the oven light |
37 |
|
|
Aftersales service |
38 |
E number and FD number |
38 |
|
|
Settings table and tips |
39 |
Vegetables |
39 |
Fish |
40 |
Fish – low-temperature steaming |
41 |
Meat – cooking at higher temperatures |
42 |
Meat/poultry – low-temperature cooking |
43 |
Poultry |
44 |
Sous-vide cooking |
45 |
2
Grilling |
48 |
Side dishes |
49 |
Desserts |
49 |
Miscellaneous |
50 |
Baking |
50 |
Raising dough |
52 |
Regenerating (reheating) |
52 |
Defrosting |
53 |
Preserving |
54 |
Extracting juice (soft fruit) |
54 |
Preparing yoghourt |
55 |
Preparing bulky food |
55 |
Acrylamide in foodstuffs |
55 |
Additional information on products, accessories, replacement parts and services can be found at www.gaggenau.com and in the online shop www.gaggenau-eshop.com
3
m Intended use
Read these instructions carefully. Only then will you be able to operate your appliance safely and correctly. Retain the instruction manual and installation instructions for future use or for subsequent owners.
This appliance is only intended to be fully fitted in a kitchen. Observe the special installation instructions.
Check the appliance for damage after unpacking it. Do not connect the appliance if it has been damaged in transport.
Only a licensed professional may connect appliances without plugs. Damage caused by incorrect connection is not covered under warranty.
This appliance is intended for domestic use only. The appliance must only be used for the preparation of food and drink. The appliance must be supervised during operation. Only use this appliance indoors.
This appliance is intended for use up to a maximum height of 2000 metres above sea level.
This appliance may be used by children over the age of 8 years old and by persons with reduced physical, sensory or mental capabilities or by persons with a lack of experience or knowledge if they are supervised or are instructed by a person responsible for their safety how to use the appliance safely and have understood the associated hazards.
Children must not play with, on, or around the appliance. Children must not clean the appliance or carry out general maintenance unless they are at least 8 years old and are being supervised.
Keep children below the age of 8 years old at a safe distance from the appliance and power cable.
Always slide accessories into the cooking compartment correctly. See description of accessories in the instruction manual.
4
m Important safety information
Risk of fire!
Combustible items stored in the cooking compartment may catch fire. Never store combustible items in the cooking compartment. Never open the appliance door if there is smoke inside. Switch off the appliance and unplug it from the mains or switch off the circuit breaker in the fuse box.
A draught is created when the appliance door is opened. Greaseproof paper may come into contact with the heating element and catch fire. Do not place greaseproof paper loosely over accessories during preheating. Always weight down the greaseproof paper with a dish or a baking tin. Only cover the surface required with greaseproof paper. Greaseproof paper must not protrude over the accessories.
Risk of burns!
The appliance becomes very hot. Never touch the interior surfaces of the cooking compartment or the heating elements. Always allow the appliance to cool down. Keep children at a safe distance.
Accessories and ovenware become very hot. Always use oven gloves to remove accessories or ovenware from the cooking compartment.
Alcoholic vapours may catch fire in the hot cooking compartment. Never prepare food containing large quantities of drinks with a high alcohol content. Only use small quantities of drinks with a high alcohol content. Open the appliance door with care.
Hot steam may escape during operation. Do not touch the ventilation openings. Keep children away.
Risk of scalding!
When you open the appliance door, hot steam can escape. Steam may not be visible, depending on its temperature. When opening, do not stand too close to the appliance. Open the appliance door carefully. Keep children away.
Hot liquid may spill over the sides of the accessory when it is removed from the cooking compartment. Remove hot accessories with care and always wear oven gloves.
Risk of electric shock!
Incorrect repairs are dangerous. Repairs may only be carried out and damaged power cables replaced by one of our trained aftersales technicians. If the appliance is defective, unplug the appliance from the mains or switch off the circuit breaker in the fuse box. Contact the after-sales service.
The cable insulation on electrical appliances may melt when touching hot parts of the appliance. Never bring electrical appliance cables into contact with hot parts of the appliance.
Do not use any high-pressure cleaners or steam cleaners, which can result in an electric shock.
A defective appliance may cause electric shock. Never switch on a defective appliance. Unplug the appliance from the mains or switch off the circuit breaker in the fuse box. Contact the after-sales service.
The insulation of an incompatible meat probe may be damaged. Only use the meat probe which is recommended for this appliance.
5

Causes of damage |
|
Environmental protection |
Caution!
–Do not place anything on the cooking compartment floor. Do not cover it with aluminium foil. A build-up of heat could damage the appliance.
The cooking compartment floor must always be kept clear. Always place ovenware in a perforated cooking container or on a wire rack.
–Aluminium foil in the cooking compartment must not come into contact with the door panel. This could cause permanent discolouration of the door panel.
–We recommend you install a descaling system for hard mains water. You can inquire with your waterworks to obtain information about your mains water.
–Ovenware must be heat and steam resistant. Silicone baking tins are not suitable for combined operation with steam.
–Use only original accessories in the cooking compartment. Rusting material (such as serving platters or knives and forks) can cause corrosion in the oven interior.
–Use original small parts (e.g. knurled nuts) only. Order small parts from our after-sales service if these should be lost.
–Do not store moist food in the closed cooking compartment for long periods. It can lead to corrosion in the cooking compartment.
–Salt, spicy sauces (e.g. ketchup or mustard) or salted dishes (e.g. cured roast) contain chloride and acids. These corrode the surfaces of stainless steel. Always remove residues immediately.
–Fruit juice may leave stains in the cooking compartment. Always remove fruit juice immediately and wipe the cooking compartment with a moist and dry cloth.
–Improper care of the appliance may lead to corrosion in the cooking compartment. Refer to the care and cleaning instructions in the instruction manual. Clean the cooking compartment each time you use it as soon as the appliance has cooled down. After cleaning the cooking compartment, use the drying programme to dry it.
–Do not detach the door seal. The appliance door will no longer close properly if the door seal is damaged. The fronts of adjacent units could be damaged. Have the door seal replaced.
Your new appliance is particularly energy-efficient. Here you can find tips on how to save even more energy when using the appliance, and how to dispose of your appliance properly.
Saving energy
Open the appliance door as little as possible while cooking.
Use dark, black lacquered or enamelled baking tins for baking. They absorb the heat particularly well.
It is best to bake several cakes one after the other. The oven will still be hot. This reduces the baking time for the second cake. You can also place two loaf tins next to each other.
For longer cooking times, you can switch off the steam oven 10 minutes before the end of the cooking time and you can use the residual heat to finish cooking.
When steaming, you can cook simultaneously on several levels. If dishes require different cooking times, insert the dishes that require the longest time first.
Environmentally-friendly disposal
Dispose of packaging in an environmentally-friendly manner.
This appliance is labelled in accordance with European Directive 2012/19/EU concerning used electrical and electronic appliances (waste electrical and electronic equipment - WEEE). The guideline determines the framework for the return and recycling of used appliances as applicable throughout the EU.
6
Getting to know the appliance
Use this section to familiarise yourself with your new appliance. The control panel and the individual operating controls are explained. You will find information on the cooking compartment and the accessories.
Steam oven
|
|
|
|
|
|
|
|||||||
|
|
|
|
|
|
|
|
|
|
|
|
|
|
|
|
|
|
|
|
|
|
|
|
|
|
|
|
|
|
|
|
|
|
|
|
|
|
|
|
|
|
|
|
|
|
|
|
|
|
|
|
|
|
|
|
|
|
|
|
|
|
|
|
|
|
|
|
|
|
|
|
|
|
|
|
|
|
|
|
|
|
|
|
|
|
|
|
|
|
|
|
|
|
|
|
|
|
|
|
|
|
|
|
|
|
|
|
|
|
|
|
|
|
|
|
|
|
|
|
|
|
|
|
|
|
|
|
|
|
|
|
|
|
|
|
|
|
|
|
|
|
|
|
|
|
|
|
|
|
|
|
|
|
|
|
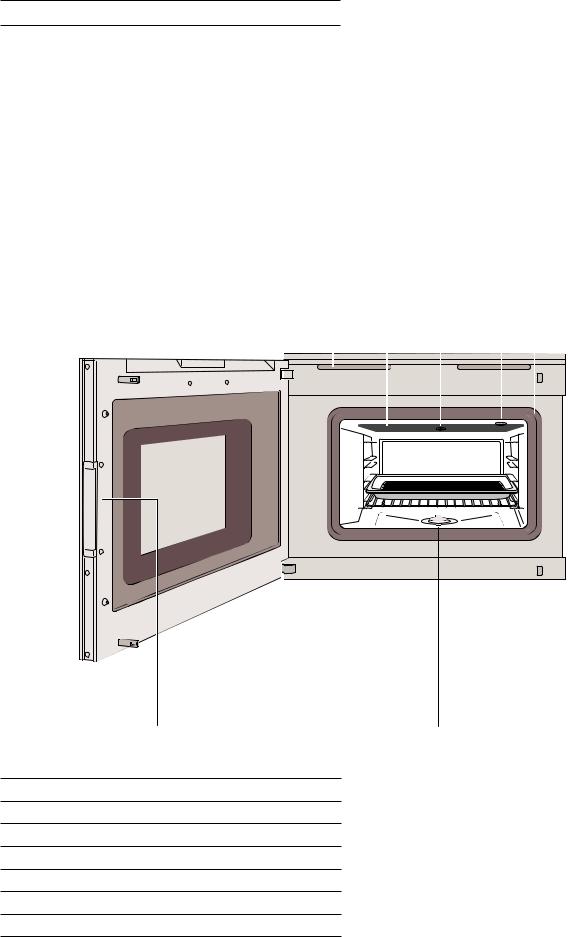
1Ventilation slots
2Glass ceramic grilling surface
3Socket for cleaning and descaling cartridge
4Slot for core temperature sensor
5Door seal
6Drain filter
7Recessed handle
7

Display and operating controls
These instructions are valid for different versions of the appliance. Depending on the appliance model, some details may differ.
All versions of the appliance are operated in an identical manner.
Operating controls on the upper side of the appliance
|
|
|
1 |
Control panel |
These areas are touch sensitive. |
|
|
Touch a symbol to select the cor- |
|
|
responding function. |
|
|
|
2 |
Display |
The display shows, for example, |
|
|
current settings and options. |
|
|
|
3 |
Rotary selector |
You can use the rotary selector to |
|
|
set the temperature and to make |
|
|
further settings. |
|
|
|
4 |
Function selector |
The function selector is used to |
|
|
select the type of heating, the |
|
|
cleaning function or the basic set- |
|
|
tings. |
|
|
|
|
|
|
|
|
|
|
|
|
|
|
|
|
|
|
|
|
|
|
|
|
|
|
|
|
|
|
|
|
|
|
|
||||
Operating controls on the lower side of the appliance
|
|
||||
|
|
|
|
|
|
|
|
|
|
|
|
|
|
|
|
|
|
|
|
|
|
|
|
|
|
|
|
|
|
Symbols
Symbol |
Function |
|
|
I |
Start |
|
|
Ø |
Stop |
|
|
H |
Pause/End |
|
|
' |
Cancel |
|
|
Ž |
Delete |
|
|
™ |
Confirm/save settings |
|
|
C |
Selection arrow |
|
|
! |
Open appliance door |
|
|
( |
Call up additional information |
|
|
“ |
Heating up with status indicator |
|
|
i |
Call up individual recipes |
|
|
g |
Record menu |
|
|
% |
Edit settings |
|
|
4 |
Enter name |
|
|
l |
Delete letters |
|
|
0 |
Child lock |
|
|
M |
Call up timer menu |
|
|
/ |
Call up long-term timer |
|
|
° |
Demo mode |
|
|
+ |
Call up core temperature probe |
|
|
2 |
Misting |
|
|
¡ |
Steam removal start |
|
|
¢ |
Steam removal stop |
|
|
|
|
|
8

Colours and display
Colours
The different colours are used to guide the user in the relevant setting situations.
Orange |
Initial settings |
|
Main functions |
|
|
Blue |
Basic settings |
|
Cleaning |
|
|
White |
Values which can be set |
|
|
Display
The appearance of the symbols, values or the entire display changes depending on the situation.
Zoom |
The setting which is currently being |
|
changed is displayed in an enlarged for- |
|
mat. |
|
A cooking time that is coming to an end |
|
is shown in an enlarged format shortly |
|
before running out (e.g. the last 60 sec- |
|
onds of the timer). |
|
|
Reduced display |
After a short time, the display is reduced |
|
and only the most important information |
|
is displayed. This function is preset and |
|
can be changed in the basic settings. |
|
|
|
|
Automatic door opening
The appliance door springs open when you touch the ! symbol and you can open it fully by using the recessed handle on the side.
Automatic door opening does not work if the child lock is activated or there is a power cut. You can open the recessed handle on the side by hand.
Additional information ( and )
By touching the ( symbol, you can call up additional information. For example, information on the heating function set or on the current temperature of the cooking compartment.
Note: During continuous operation, small fluctuations in temperature are normal after the oven has heated up.
The ) symbol is displayed for important information and action prompts.Important information on safety and operation mode are occasionally shown automatically. These messages either disappear automatically after a few seconds or must be confirmed with ™.
Cooling fan
Your appliance has a cooling fan. The cooling fan switches on during operation. Depending on the appliance version, the hot air escapes above or under the door.
After removing cooked food, keep the door closed until the appliance cools down. The appliance door must not be left ajar, as adjoining kitchen furniture may be damaged. The cooling fan continues to run for a certain time after operation and then switches off automatically.
Caution!
Do not cover the ventilation slots. Otherwise, the appliance will overheat.
9

Function selector positions
|
|
|
|
|
|
|
|
|
|
||
|
|
|
|
|
|
|
|
|
|
|
|
|
|
|
|
|
|
|
|
|
|
||
|
|
|
|
|
|
|
|
|
|
|
|
Position |
Function/heating function |
Temperature |
Use |
||
|
|
|
|
|
|
0 |
Off position |
|
|
|
|
žLight
2 |
\ |
30 - 230 °C |
Steaming at 70 °C - 100 °C: For vegetables, fish and |
|
Hot air + 100% humidity |
Default temperature 100 °C |
side dishes. |
|
The food is completely surrounded by steam |
||
|
|
|
|
|
|
|
'Combination' mode at 120 - 230 °C: For puff pastry, |
|
|
|
bread and bread rolls. |
|
|
|
Hot air and steam are combined. |
|
|
|
|
3 |
^ |
30 - 230 °C |
Combination mode: For puff pastry, meat and poultry. |
|
Hot air + 80% humidity |
Default temperature 170 °C |
Hot air and steam are combined. |
|
|
|
|
4 |
_ |
30 - 230 °C |
Combination mode: For yeast-risen dough and bread. |
|
Hot air + 60% humidity |
Default temperature 170 °C |
Hot air and steam are combined. |
|
Dough proving, allowing dough to rise: For yeast |
||
|
|
|
|
|
|
|
dough and sourdough. |
|
|
|
Dough will rise considerably more quickly than at |
|
|
|
room temperature. Hot air and steam are combined so |
|
|
|
that the surface of the dough does not dry out. The |
|
|
|
optimal temperature setting for yeast dough is 38 °C. |
|
|
|
|
5 |
` |
30 - 230 °C |
Cooking without added liquid: For pastries |
|
Hot air + 30% humidity* |
Default temperature 170 °C |
With this setting, no steam is generated and the venti- |
|
|
|
lation flap is closed. Any steam escaping from the food |
|
|
|
therefore remains in the cooking compartment and |
|
|
|
prevents the food from drying out. |
|
|
|
|
6 |
a |
30 - 230 °C |
Hot air: For cakes, biscuits and bakes. |
|
Hot air and 0% humidity |
Default temperature 170 °C |
The fan in the back panel of the oven distributes the |
|
|
|
heat evenly throughout the cooking compartment. |
|
|
|
|
7 |
› |
30 - 90 °C |
Low temperature cooking for meat. |
|
Low temperature cooking |
Default temperature 70 °C |
Gentle, slow cooking for a particularly tender result. |
|
|
|
|
8 |
§ |
50 - 95 °C |
Cooking under a vacuum at low temperatures between |
|
Sous-vide cooking |
Default temperature 60 °C |
50 and 95 °C and 100% steam: Suitable for meat, fish, |
|
vegetables and desserts. |
||
|
|
|
|
|
|
|
A vacuum-packing machine is used to heat-seal the |
|
|
|
food in a special air-tight, heat-resistant cooking bag. |
|
|
|
The protective envelope retains the nutrients and fla- |
|
|
|
vours. |
|
|
|
|
9 |
Z |
30 - 230 °C |
For vegetable skewers and prawn skewers. |
|
Full surface grill + |
Default temperature 230 °C |
|
|
circulated air |
|
|
|
|
|
|
10 |
Q |
30 - 230 °C |
For grilled vegetables, browning (e.g. cakes with |
|
Full surface grill |
Default temperature 230 °C |
meringue) and toast with topping. |
|
|
||
|
|
|
|
11 |
b |
30 - 230 °C |
Grill mode with humidity: For bakes and gratins. |
|
Full surface grill level 1 + |
Default temperature 170 °C |
|
|
humidity |
|
|
*Type of heating used to determine the energy efficiency class in accordance with EN 60350-1.
10
Position |
Function/heating function |
Temperature |
Use |
|
|
|
|
12 |
c |
30 - 230 °C |
Grill mode with humidity: For stuffed vegetables. |
|
Full surface grill level 2 + |
Default temperature 170 °C |
The grill output is increased. |
|
humidity |
|
|
|
|
|
|
13 |
W |
40 - 60 °C |
For vegetables, meat, fish and fruit. |
|
Defrosting |
Default temperature 45 °C |
The moisture gently transfers the heat to the food. |
|
|
|
The food does not dry out or lose its shape. |
|
|
|
|
14 |
d |
60 - 180 °C |
For cooked food and baked goods. |
|
Regenerating |
Default temperature 120 °C |
Cooked food is gently reheated. The steam ensures |
|
|
|
that the food does not dry out. |
|
|
|
Reheat plated meals at 120 °C and baked goods at |
|
|
|
180 °C. |
|
|
|
|
S |
t Basic settings |
|
Your appliance can be individually adjusted in the |
|
|
|
basic settings. |
|
|
|
|
|
¢ Cleaning programme |
|
The cleaning programme can be used to remove |
|
|
|
stubborn dirt from the cooking compartment. |
|
|
|
|
|
j Drying programme |
|
The drying programme dries the cooking compart- |
|
|
|
ment after steaming or cleaning. |
|
|
|
|
|
‘ Descaling programme |
|
The descaling programme can be used to remove |
|
|
|
limescale from the cooking compartment. |
|
|
|
|
|
œ Water filter change |
|
Change the water filter if a descaling system is |
|
|
|
installed. |
|
|
|
|
|
¥ Delete the descaling hint |
|
Delete the message on the display after descaling. |
*Type of heating used to determine the energy efficiency class in accordance with EN 60350-1.
11
Accessories
Use only the accessories supplied with the product or available from the after-sales service. They are specially designed for your appliance. Ensure that you always insert the accessories into the cooking compartment the right way round.
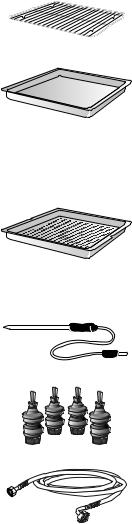
Your appliance is equipped with the following accessories:
Wire rack
for cookware, cake tins and casseroles and for roasts
Stainless steel cooking container, unperforated, GN Z, 40 mm deep
for cooking rice, pulses and cereals, for baking cake baked on trays and for collecting dripping liquid during steaming
Stainless steel cooking container, perforated, GN Z,
40 mm deep
for steaming vegetables or fish, for extracting juice and for defrosting
Core temperature probe for precise preparation of meat, fish, poultry and bread
Set with 4 cleaning cartridges
Water inlet hose, 3 m
Outlet hose, 3 m
Installation accessories
BA 476 310 Handle, stainless steel for BS 470/471/474/475
BA 478 310 Handle, stainless steel for BS 484/485
GF 111 100 Water descaling system
(Filter head with filter cartridge for initial installation)
GF 121 110 Filter cartridge for water descaling system
GZ 010 011 Inlet and outlet hose extension, 2 m
Special accessories
You can order the following special accessories from your specialist dealer:
CL S10 040 Set with 4 cleaning cartridges
CL S20 040 Set with 4 descaling cartridges
GN 114 130 Stainless steel cooking container
GN 1/3, perforated, 40 mm deep, 1.5 l
GN 114 230 Stainless steel cooking container
GN 2/3, unperforated, 40 mm deep, 3 l
GN 124 130 Stainless steel cooking container
GN 1/3, perforated, 40 mm deep, 1.5 l
GN 124 230 Stainless steel cooking container GN 2/3, perforated, 40 mm deep, 3 l
GN 144 130 GN 1/3 cooking insert, non-stick, unperforated, depth: 40 mm, 1.5 l
GN 144 230 GN 2/3 cooking insert, non-stick, unperforated, depth: 40 mm, 3 l
GN 154 130 GN 1/3 cooking insert, non-stick, perforated, depth: 40 mm, 1.5 l
GN 154 230 GN 2/3 cooking insert, non-stick, perforated, depth: 40 mm, 3 l
GN 340 230 Cast aluminium roaster GN 2/3, 165 mm high, non-stick coated
GN 410 130 Stainless steel lid, GN 1/3
GN 410 230 Stainless steel lid, GN 2/3
GR 220 046 Wire rack, chrome-plated, with feet
Only use the accessories as specified. The manufacturer accepts no liability if these accessories are used incorrectly.
12

Before using for the first time
In this section, you can find out what you must do before using your appliance to prepare food for the first time. Read the section entitled 'Important safety information' beforehand.
The appliance must be fully installed and connected to the mains.
After connection to the mains, the "Initial settings" menu appears in the display. You can now make settings for your new appliance.
Language
Time format
Time
Date format
Date
Temperature format
Water hardness
Notes
‒The "Initial settings" menu will appear only after the appliance has been connected to a power supply and switched on for the first time, or if the appliance has not been connected to a power supply for a number of days.
Once the appliance has been connected to a power supply, the GAGGENAU logo will appear first for approximately 30 seconds. The "Initial settings" menu will then appear automatically.
‒You can change the settings at any time (see section entitled 'Basic settings').
Setting the language
The preset language appears in the display.
1Turn the rotary selector to select the required display language.
2Confirm with ™.
'HXWVFK
6SUDFKH
Note: If the language is changed, the system restarts. This takes a few seconds.
Setting the time format
The two possible formats 24h and AM/PM appear in the display. The default is the 24h format.
1Use the rotary selector to select the desired format.
2Confirm with ™.
7LPH IRUPDW
Setting the clock
The time is shown in the display.
1Set the desired time using the rotary selector.
2Confirm with ™.
7LPH
Setting the date format
The three possible formats D.M.Y, D/M/Y and M/D/Y appear in the display. The default is the D.M.Y format.
1Use the rotary selector to select the desired format.
2Confirm with ™.
'DWH IRUPDW
13

Setting the date
The preset date appears in the display. The day setting is already active.
1Set the day using the rotary selector.
2Touch the C symbol to switch to the month setting.
3Set the month using the rotary selector.
4Touch the C symbol to switch to the year setting.
5Set the year using the rotary selector.
6Confirm with ™.
'DWH
Setting the temperature format
The two possible formats °C and °F appear in the display. The default setting is °C.
1Use the rotary selector to select the desired format.
2Confirm with ™.
7HPSHUDWXUH IRUPDW
Setting the water filter
"Water filter" appears in the display. The default is "Available".
It is recommended to install the descaling system GF 111 100 if the water hardness exceeds 7°dH (carbonate hardness 5°dH).
1Use the rotary selector to select "Available" (with water filter) or "Not available" (without water filter).
2Confirm with ™.
3If water filter "Available" has been selected: "Water filter capacity” is shown in the display.
4Turn the rotary selector to select the capacity of the filter cartridge (between 100 - 9000 litres). Refer to the instructions included with the filter cartridge.
5Confirm with ™.
$YDLODEOH
:DWHU ILOWHU
Setting the water hardness
"Water hardness" appears in the display.
1Check the mains water with the included carbonate hardness test: fill the small measurement tube with mains water up to the 5 ml mark.
2Add drops of indicator solution until the color changes from purple to yellow.
Important: count the drops and carefully swing the measurement tube after every drop until the liquids have mixed thoroughly. The number of drops corresponds to the water hardness.
3Use the rotary selector to set the measured water hardness. The value 12 is set by default.
4Confirm with ™.
:DWHU KDUGQHVV
14

Ending initial set-up
"Initial set-up complete. Please calibrate the appliance before first cooking." appears in the display.
Confirm with ™.
,QLWLDO VHW XS FRPSOHWH
3OHDVH FDOLEUDWH WKH DSSOLDQFH
EHIRUH ILUVW FRRNLQJ
The appliance enters standby mode and the standby screen appears. The appliance is now ready for operation.
Calibrate the appliance before steaming for the first time. The appliance sets the boiling point.
Calibration
The boiling point of water depends on barometric pressure. As air pressure drops with increasing elevation, the boiling point drops as well. During calibration, the appliance sets the boiling point to the pressure conditions at the place where it is installed.
It is important that the appliance steams without interruption for 20 minutes at 100°C. Do not open the appliance door during this time.
Notes
‒Calibrate the appliance only when it is cold.
‒During calibration, the appliance generates more steam than it normally would do.
1Turn the function selector to S.
2Select "Basic settings" using the rotary selector.
3Touch the ™ symbol.
4Select "Calibration" using the rotary selector.
5Touch the % symbol.
6Remove all accessories from the oven interior and touch the ™ symbol.
7The duration of 20:00 minutes appears. Touch I to start calibration.
Calibration begins. The elapsing time is shown on the display.
&$/ 

Note: Do not interrupt calibration. Do not turn the function selector. Do not open the appliance door.
A message appears in the display once calibration has ended. Touch ™to confirm and turn the function selector to 0.
After moving house
Repeat calibration so that the appliance adapts automatically to the new installation location.
After resetting to the factory settings
After resetting to the factory settings in the basic settings menu, you must repeat calibration.
Following a power cut
The appliance saves the calibration settings even in the event of a power cut or disconnection from the mains. Recalibration is not necessary.
Cleaning accessories
Before using the accessories for the first time, clean them thoroughly using hot detergent solution and a soft cloth.
&$/ 

&DOLEUDWLRQ
15

Water filter
Operation with or without a water filter
You can use the appliance with or without a water filter.
If the water hardness exceeds 7°dH or carbonate hardness 5°dH, we recommend the installation of the descaling system GF 111 100.
Changing the water filter
Filter cartridges should be replaced regularly. Replacement cartridges are available from after-sales service or in the online shop (order number
GF 121 110).
The capacity of the filter cartridge depends on the frequency of use of the appliance and your regional water hardness. A message will appear in the display to remind you when the filter needs to be replaced. Regardless of the actual amount of water filtered the filter cartridge needs to be changed after 12 months at the latest.
1Set the function selector to S. Select "Water filter change" using the rotary selector.
2The œ symbol is displayed. Confirm with ™.
3Change the water filter cartridge. Refer to the
instructions included with the filter cartridge. Confirm with ™.
4"Water filter capacity” is shown in the display. Confirm with ™.
5Turn the rotary selector to select the capacity of the
filter cartridge (between 100 - 9000 litres). Confirm with ™.
The water filter change is complete. Confirm with ™. The appliance is now ready for operation.
Activating the appliance
Standby
The appliance goes into standby mode if no function has been set or the child lock is activated.
The brightness of the control panel is dimmed in standby mode.
Notes
‒Different displays are available for standby mode. The default setting is the GAGGENAU logo and the clock. To change the display, refer to the Basic settings section.
‒The brightness of the display depends on the
vertical viewing angle. You can adjust the display using the "Brightness" setting in the basic settings.
Activating the appliance
To exit standby mode, you can either
Turn the function selector,
Touch a control panel,
Open or close the door.
You can now set the desired function. You can read about how to set functions in the respective chapters.
Notes
‒When "Standby screen = off" is selected in the basic settings, you must turn the function selector to exit standby mode.
‒The appliance returns to the standby screen if you have not made any settings for a long time after activation.
‒When the door is open, the interior lighting switches off after a short time.
16

Operating the appliance
Cooking compartment
The cooking compartment has four rack levels. The rack levels are counted from the bottom up.
Note: When steaming, defrosting, dough proving and reheating, you can use up to three rack levels at a time (levels 2, 3 and 4). Only one level can be used for baking; level 2 is designated for this (or level 1 for high baking tins).
|
|
|
|
Caution! |
–Do not place anything directly on the cooking compartment floor. Do not cover it with aluminium foil. A build-up of heat could damage the appliance. The cooking compartment floor must always be kept clear. Always place cookware in the perforated cooking container or on the wire rack.
–Do not slide any accessories between the shelf positions, or they may tip.
Inserting accessories
The wire rack and the perforated cooking container feature a locking function. The locking function prevents the accessories from tilting when they are pulled out. The accessories must be inserted into the cooking compartment correctly for the tilt protection to work properly. When removing accessories, you must raise them slightly.
When inserting the wire rack, check
that the engaging lug (a) is pointing upward
that the safety bar on the wire rack is at the back and facing upwards.
D |
D |
When pushing in the perforated cooking container, make sure that the recess (a) is pointing to the side.
D |
D |
17
Loading...