


Gaggenau Instruction Manual
Oven
BO 210/211

Table of Contents
Safety Notes |
4 |
|
|
|
|
Before Use |
4 |
|
|
|
|
Intended Use |
4 |
|
|
|
|
Safety while Baking |
4 |
|
|
|
|
Damage to the Appliance |
4 |
|
|
|
|
|
|
|
|
|
|
Operating for the First Time |
5 |
|
|
|
|
|
|
|
|
|
|
|
Avoiding Damage to the Appliance and the |
|
|
|
|
Cabinet |
5 |
|
|
|
|
Oven |
5 |
|
|
|
|
Cabinet Fronts near the Oven |
5 |
|
|||
|
|
|
|||
Features of your New Oven |
6 |
|
|||
Oven |
6 |
|
|
||
Display and Controls |
7 |
|
|
|
|
Keys |
7 |
|
|
|
|
|
|
|
|
||
Accessories |
8 |
|
|
|
|
|
|
|
|
|
|
|
Heating Modes |
9 |
|
|
|
|
|
|
|
|
|
|
First Settings after Installation |
10 |
|
|
|
Note |
10 |
|
|
|
|
Setting the Clock |
10 |
|
|
||
Choosing the Time Format |
10 |
|
|||
Temperature Unit °C or °F |
10 |
||||
Exiting Menu and Saving Settings |
10 |
|
|
|
|
|
|
|
|
||
Activating the Oven |
11 |
|
|
|
|
Standby |
11 |
|
|
||
Activating the Oven |
11 |
|
|
|
|
|
|
|
|
||
Setting the Oven |
12 |
|
|
|
|
Setting the Temperature and Cooking Mode |
12 |
|
|
||
Current Oven Temperature Display |
12 |
|
|||
|
|
|
|
|
|
Baking Table |
13 |
|
|
|
|
|
|
|
|
|
|
|
Roasting Table |
14 |
|
|
|
|
|
|
|
|
|
|
Grilling Table |
16 |
|
|
|
|
|
|
|
|
|
|
Tips and Tricks |
17 |
|
|
|
Baking |
17 |
|
|
|
|
Further Tips for Baking |
18 |
|
|
|
|
Tips for Roasting and Grilling |
18 |
|
|||
Timer |
19 |
|
Calling up the Timer Menu |
19 |
|
Timer |
19 |
|
Stopwatch |
20 |
|
Cooking Time Duration |
21 |
|
Cooking Time End |
22 |
|
Child Lock |
23 |
|
|
|
Activating the Child Lock |
23 |
|
|
|
Deactivating the Child Lock |
23 |
|
||
Note |
23 |
|
|
|
|
|
|
|
|
Safety Deactivation |
24 |
|
|
|
|
|
|
|
|
|
Changing the Basic Settings |
25 |
|
|
Note |
25 |
|
|
|
Example: Changing the Standby Screen |
25 |
|||
|
|
|
|
|
The Following Settings Can Be Changed |
26 |
|
|
|
|
|
|
|
|
|
Care and Manual Cleaning |
27 |
|
|
Safety Notes |
27 |
|
|
|
Cleaning the Oven Interior |
27 |
|
||
Cleaning the Glass Front |
27 |
|
|
|
Cleaning the Door Seal |
27 |
|
|
|
Cleaning the Accessories |
27 |
|
||
Cleaning the Baking Stone |
27 |
|
|
|
|
|
|
|
|
Catalytic Cleaning |
28 |
|
|
|
Before Starting Catalytic Cleaning |
28 |
|
|
|
Setting the Program |
28 |
|
||
Note |
29 |
|
|
|
|
|
|
||
Removing the Rails |
29 |
|
|
|
To Unhook the Rails |
29 |
|
|
|
To Hook Rails Back into Position |
29 |
|
||
|
|
|
|
|
Trouble Shooting |
30 |
|
|
|
Error Messages |
30 |
|
|
|
Exhibition Mode |
30 |
|
|
|
Power Cut |
31 |
|
||
|
|
|
||
Replacing the Oven Light |
31 |
|
||
3

$ Safety Notes
Before Use
The appliance is only guaranteed safe to use if installed by a specialist in accordance with the installation instructions. The installer is liable for any damage resulting from incorrect installation.
The appliance may only be connected by a licensed specialist. The local electricity supplier’s regulations and construction regulations apply.
Read the instruction manual carefully before operating the appliance. Only then will you be able to operate your appliance safely and correctly. Keep the instruction and installation manual for future reference.
Do not connect the appliance if it has been damaged.
Intended Use
This appliance is intended only for domestic use. Only use the appliance to prepare meals. Do not use the appliance to heat up the room in which it is installed.
Never allow children to play with the appliance.
Do not let adults or children operate the appliance unsupervised:
–if they are mentally or physically unable to use the appliance safely and correctly
–if they don’t have the knowledge and experience to use the appliance safely and correctly.
Safety while Baking
Warning, risk of burns! Do not touch hot heating elements or interior surfaces of oven. Keep children away.
Warning, risk of fire! Do not store flammable products in the oven. Only leave the parts needed inside the oven during use.
Warning, if preparing food with alcoholic beverages (for example rum, cognac, wine, etc.). Remember that alcohol evaporates at high temperatures. It is possible that vapours released by the alcohol can catch fire.
Warning, risk of fire! Oil and fat can ignite quickly. Remove cooking oil and fat deposits before the next use.
Warning! Hot steam can escape during use. Do not touch the ventilation openings.
Warning! Hot steam can escape when opening the oven door.
Warning, risk of burns! The inside of the door gets very hot during operation; observe appropriate caution when opening the appliance. The open door can swing back.
Do not trap connecting cables of electrical appliances in the hot oven door. The cable insulation can melt. Risk of short-circuiting!
Damage to the Appliance
If the appliance is damaged, switch off the corresponding household fuse. Call after-sales service.
Incorrect repairs are dangerous. Repairs must be carried out by one of our experienced after-sales engineers.
4
Operating for the First Time
Remove the packaging from the appliance and dispose of it according to local regulations. Be careful to remove all accessories from the
packaging. Keep packaging elements and plastic bags away from children.
Check the appliance for transport damage after unpacking it. Do not connect the appliance if it has been damaged.
The appliance must be connected by an authorised specialist. No warranty claims can be lodged for any damage resulting from incorrect connection. Observe the installation instructions.
Heat the empty oven for an hour at 240 °C before using it for the first time. This will eliminate any ‘newness’ smells.
This appliance is labelled in accordance with the European Directive 2002/96/EG
concerning used electrical and electronic
appliances (waste electrical and electronic equipment – WEEE). The guideline
determines the framework for the return and recycling of used appliances as applicable.
Avoiding Damage to the Appliance and the Cabinet
Oven
Remove fruit acids such as the juice of lemons or plums etc. after every baking operation. The acid can cause spots on the oven’s enamel.
Never splash water into a hot oven. This could damage the enamel.
Do not place the baking tray directly onto the bottom of the oven. Do not place utensils (for example a roaster) directly onto the bottom of the oven. Do not line the bottom of the oven with aluminium foil. This will cause a build-up of heat which can damage the enamel.
Do not cover the ventilation openings of the oven.
Do not take off the door seal. A damaged door seal must be changed immediately.
The socket for the separate heating element for the baking stone (special accessory) can be found in the middle of the back panel at the bottom. During normal operation, please leave the cover in the socket.
Cabinet Fronts near the Oven
After taking the food out of the oven, allow the oven to cool down with the door closed. Do not leave the oven door half open, the hot air can cause damage to adjacent cabinets. The cooling fan will continue to run for a while and will then switch off automatically.
5

Features of your New Oven
Oven
Display and controls |
1230 |
Ventilation openings
Door seal |
Socket for heating |
element BA 056-110/120 |
6
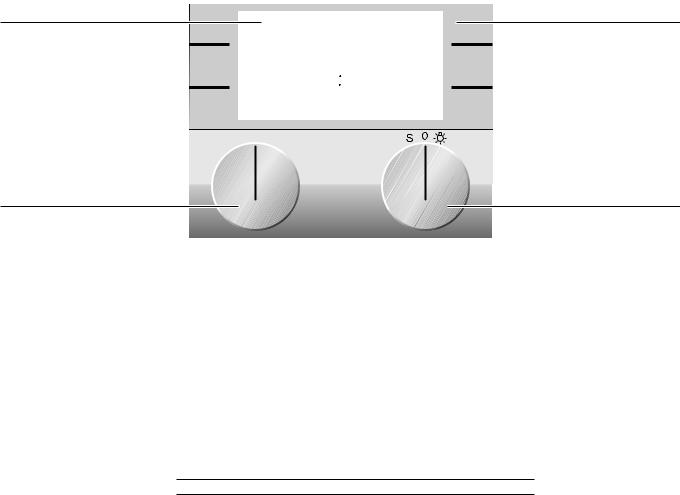
Display and Controls
Display |
|
In the top part of the display |
|
is the status bar or a call up |
|
menu. The lower part shows |
1230 |
the different settings. |
Function selector
Use the left knob to select the cooking mode you will use to prepare your meal or the catalysis function. You can turn the knob to the right or left.
Keys
Symbol Function
gmove right
fmove left
bsave selected values / start
jcancel
dincrease values
edecrease values
qtimer menu
cbasic settings menu
acall up current oven temperature
ochild lock activate
pchild lock deactivate
ltimer stop
mtimer start
Touch keys
The keys on the left and right beside the display are touch sensitive. The function of the keys depends on the chosen setting. The icon beside the key shows the function of the key.
Temperature selector
You can set a temperature between 50 and 300 °C or the catalysis function. You can turn the knob to the right or left. To switch on the light in the oven, turn the temperature selector one position to the right. The light in the oven remains off if the temperature is set below 70 °C.
7
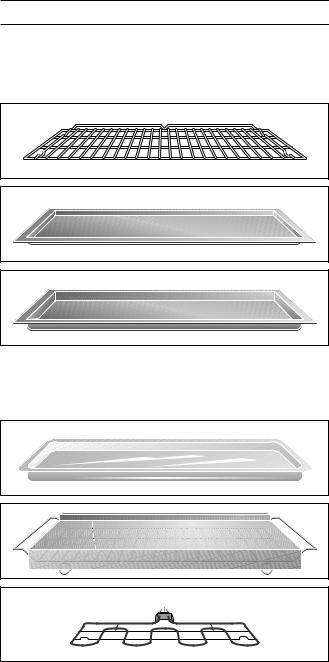
Accessories
As standard, your appliance comes with the following accessories:
• Wire rack for cake tins, roasts, grilled pieces and crockery
Always insert the wire rack with the double crossbrace to the back.
• Baking tray for cakes, biscuits and pastries
• Grilling tray for roasts or as a grease collecting tray
You can order the following special accessories:
• Glass tray for gratins and fruit cake
• Baking stone with wire rack and wooden pizza spatula for pizza and bread
Additionally you will require the heating element.
• Heating element 230 V Heating element 400 V
Heating element for baking stone
• 4 level telescopic shelf rails
8

Heating Modes
Display |
Heating mode |
Use |
|||
|
|
|
|
|
|
|
|
|
Hot air |
For cakes, biscuits and puff pastry on |
|
|
165 |
||||
|
|
|
|
|
several levels |
|
|
|
|
|
|
|
Economy |
Energy saving hot air mode for cakes, |
|||
|
165 |
||||
|
|
|
|
(the oven light is off) |
small pastries or gratins |
|
|
|
|
|
|
165 |
Hot air and bottom heat |
Additional heat from beneath for moist cakes, |
|
|
for example fruit cakes |
170 |
Bottom heat |
Further baking, for example for fruit cakes, |
|
|
for preserving or for food in a bain-marie |
170 |
Top and bottom heat |
For cakes in tins or on trays, gratins or roasts |
170 |
Top heat |
Direct heat from the top, for example to brown |
|
|
meringue on a fruit cake |
190 |
Grilling with hot air |
Evenly distributed heat for meat, poultry or |
|
|
whole fish |
200 |
Grilling |
Grilling flat pieces of meat, sausages or fish fillets |
|
|
melting cheese, gratins |
300 |
Baking stone operation |
Heated baking stone for crispy pizza, bread |
|
(only with special accessories) |
or bread rolls like from a solid stone oven |
|
300 |
Catalysis |
Catalytic cleaning function |
||
|
|
|
|
|
|
|
|
|
|
|
|
9
First Settings after Installation
When your new oven has been connected, the first settings menu appears on the display. You can set the clock, time format, and the temperature unit.
Note
The first settings menu appears only after the appliance has been connected or if the appliance is without electricity for several days.
Refer to the chapter basic settings if you wish to change these parameters at any time.
800 |
2400 |
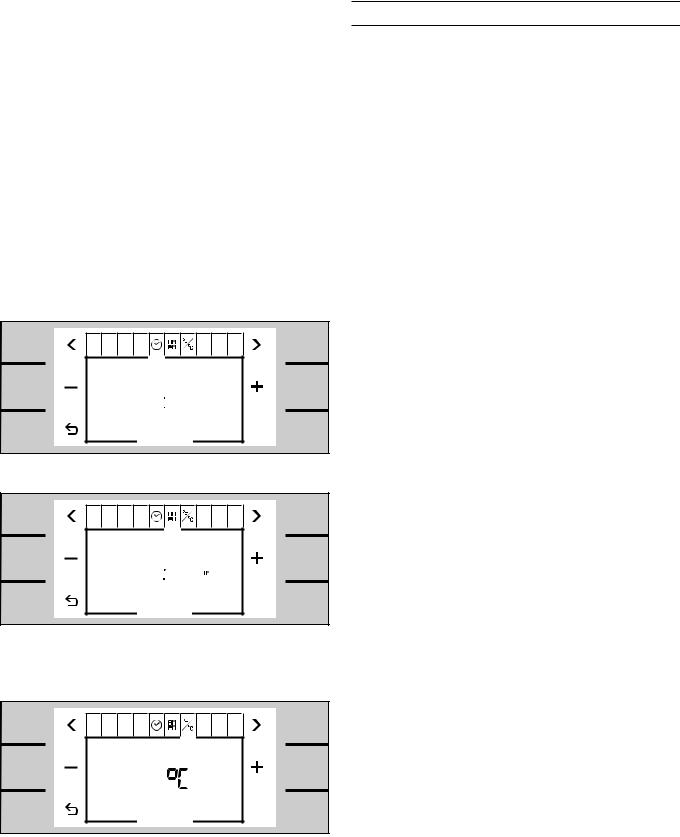
Setting the Clock
The clock function appears on the screen.
Using the d / e keys set the correct time.
Choosing the Time Format
1Using the menu key g select the time fomat setup menu.
2The time fomat can be either 12 hour format (AM/PM) or 24 hour format. The 24 hour format is pre-selected.
You can change the time format using the d / e keys.
Temperature Unit °C or °F
1Using the menu key g select the temperature unit function l. °C is pre-selected.
2You can change the temperature unit using the d / e keys.
Exiting Menu and Saving Settings
Touch the b key to exit the menu. All settings are saved.
The oven is on standby. The standby screen appears.
10
 Loading...