


 Loading...
Gaggenau
Use and care manual and installation instructions Notice d’utilisation et de montage
Instrucciones de uso y montaje
AF 2..
Hood AF 2..
Hotte aspirante AF 2..
Campana extractora AF 2..

Table of Contents
Use and care manual 3
Safety Definitions 3
IMPORTANT SAFETY INSTRUCTIONS 4 General notes 4
Fire Safety 4 Burn Prevention 5 Child Safety 5 Cleaning Safety 6 Safe use 6
Proper Installation and Maintenance 6
State of California Proposition 65 Warnings 7 Causes of damage 8
Protecting the environment 8 Saving energy 8
Operating modes 9 Exhaust air mode 9 Recirculation 9
Operating the appliance 9 Operating the appliance 9 Turn on the fan 9
Intense level 10 Run-on function 10 Interval ventilation 10 Lighting 10
Saturation notification 10 Cleaning and maintenance 11 Troubleshooting 13 Customer service 13
Accessories 14
Installation Instructions 14
IMPORTANT SAFETY INSTRUCTIONS 15 Appliance Handling Safety 16
Safety Codes and Standards 16 Electric Safety 16
Related Equipment Safety 17
State of California Proposition 65 Warnings 17 Before you begin 18
Tools and parts needed 18 Parts included 18
Safety clearances 18 General notes 19
Exhaust air mode 19 Ventilation line 19
Preparing the units 20 Preparing the appliance 21
Electrical connection 22 Installation 23
Mounting the appliance 23 Detaching the appliance 23 Final assembly 24 Removing the appliance 24
2
Additional information on products, accessories, replacement parts and services can be found at www.gaggenau.com and in the online shop www.gaggenau.com/zz/store
Safety Definitions
9WARNING
This indicates that death or serious injuries may occur as a result of non-observance of this warning.
9CAUTION
This indicates that minor or moderate injuries may occur as a result of non-observance of this warning.
NOTICE: This indicates that damage to the appliance or property may occur as a result of noncompliance with this advisory.
Note: This alerts you to important information and/or tips.
3

9 IMPORTANT SAFETY INSTRUCTIONS
READ AND SAVE THESE INSTRUCTIONS
WARNING
When properly cared for, your new appliance has been designed to be safe and reliable. Read all instructions carefully before use. These precautions will reduce the risk of burns, electric shock, fire, and injury to persons. When using kitchen appliances, basic safety precautions must be followed, including those in the following pages.
General notes
Examine the appliance after unpacking it. In the event of transport damage, do not plug it in.
Fire Safety
Always have a working smoke detector near the kitchen.
WARNING
TO REDUCE THE RISK OF A RANGE TOP GREASE FIRE:
a)Never leave surface units unattended at high settings. Boilovers cause smoking and greasy spillovers that may ignite. Heat oils slowly on low or medium settings.
b)Always turn hood ON when cooking at high heat.
c)Clean ventilating fans frequently. Grease should not be allowed to accumulate on fan or filter.
d)Use proper pan size. Always use cookware appropriate for the size of the surface element.
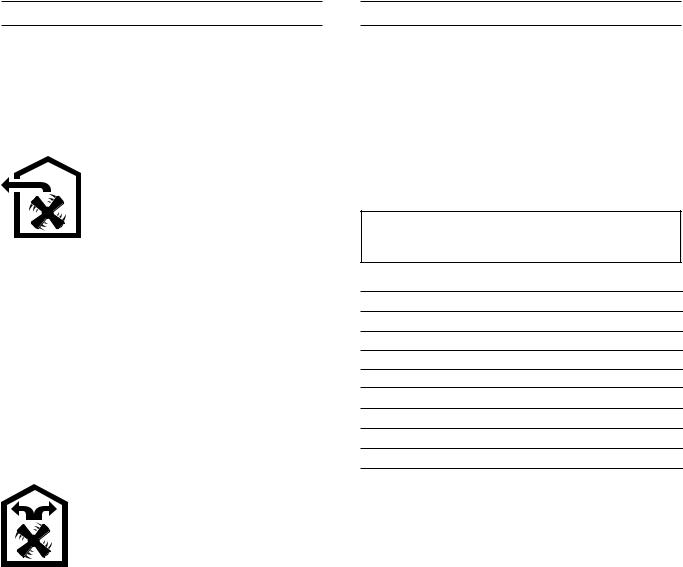
Do not flambé under the extractor hood or work with a naked flame. When switched on, the extractor hood draws flames into the filter. There is a risk of fire due to deposits on the grease filter!
CAUTION
For general ventilating use only. Do not use to exhaust hazardous or explosive materials and vapors.
Do not operate any fan with a damaged cord or plug. Discard fan or return to an authorized service facility for examination and/or repair.
Do not run cord under carpeting. Do not cover cord with throw rugs, runners, or similar coverings. Do not route cord under furniture or appliances. Arrange cord away from traffic area and where it will not be tripped over.
In the event that personal clothing or hair catches fire, drop and roll immediately to extinguish flames.
Smother flames from food fires other than grease fires with baking soda. Never use water on cooking fires.
WARNING
TO REDUCE THE RISK OF INJURY TO PERSONS IN
THE EVENT OF A RANGE TOP GREASE FIRE,
OBSERVE THE FOLLOWING:
‒SMOTHER FLAMES with a close-fitting lid, cookie sheet, or metal tray, then turn off the burner. BE CAREFUL TO PREVENT BURNS. If the flames do not go out immediately, EVACUATE AND CALL THE FIRE DEPARTMENT.
‒NEVER PICK UP A FLAMING PAN – You may be burned.
‒DO NOT USE WATER, including wet dishcloths or towels – a violent steam explosion will result.
‒Use an extinguisher ONLY if:
‒You know you have a Class ABC extinguisher, and you already know how to operate it.
‒The fire is small and contained in the area where it started.
‒The fire department is being called.
‒You can fight the fire with your back to an exit.
Have an appropriate fire extinguisher available, nearby, highly visible and easily accessible near the appliance.
Whenever possible, do not operate the ventilation system during a cooktop fire. However, do not reach through fire to turn it off.
WARNING
Risk of fire
Grease deposits in the grease filter can ignite.
Clean the grease filter at least every two months.
Never operate the appliance without the grease filter.
4
9 IMPORTANT SAFETY INSTRUCTIONS
READ AND SAVE THESE INSTRUCTIONS
WARNING
Risk of fire
Grease deposits in the grease filter can catch fire. Never work with a naked flame near the appliance (e.g. flambéing). Install the unit near a heat-producing appliance for solid fuels (e.g. wood or coal) only if there is a closed, non-detachable cover. There must be no flying sparks.
WARNING
Risk of fire
Hot oil and fat catch fire fast. Never leave hot oil and fat unsupervised. Never extinguish a fire with water. Switch off the cooking position. Suffocate flames carefully with a lid, a fire blanket or similar.
WARNING
Risk of fire
When gas burners are in operation without any cookware placed on them, they can build up a lot of heat. A ventilation appliance installed above the cooker may become damaged or catch fire. Only operate the gas burners with cookware on them.
WARNING
Risk of fire
During simultaneous use of multiple gas burners, a great deal of heat is created. A ventilation device located above it can become damaged or catch fire. Never use two gas burners together at maximum heat for longer than 15 minutes. One large burner with over 17,000 BTU/hr (5 kW) (wok) is equal to the wattage of two gas burners.
WARNING
Risk of fire
Operating several gas burners at the same time gives rise to a great deal of heat. The ventilation appliance may become damaged or catch fire. The ventilation appliance must only be combined with gas burners that do not exceed the maximum total output of 61,000 BTU/hr (18 kW). If 41,000 BTU/hr (12 kW) is exceeded, the local regulations concerning room ventilation, room size, and combination with ventilation devices in exhaust and recirculating operation must be followed.
Burn Prevention
WARNING
Risk of burns
The accessible parts get hot during operation. Never touch hot parts. Keep children away.
Child Safety
When children become old enough to use the appliance, it is the responsibility of the parents or legal guardians to ensure that they are instructed in safe practices by qualified persons.
Remove all tape and packaging before using the appliance. Destroy the packaging after unpacking the appliance. Never allow children to play with packaging material.
Do not allow anyone to climb, stand, lean, sit, or hang on any part of an appliance, especially a door, warming drawer, or storage drawer. This can damage the appliance, and the unit may tip over, potentially causing severe injury.
Do not allow children to use this appliance unless closely supervised by an adult. Children and pets should not be left alone or unattended in the area where the appliance is in use. They should never be allowed to play in its vicinity, whether or not the appliance is in use.
CAUTION
Items of interest to children should not be stored in an appliance, in cabinets above an appliance or on the backsplash. Children climbing on an appliance to reach items could be seriously injured.
5

9 IMPORTANT SAFETY INSTRUCTIONS
READ AND SAVE THESE INSTRUCTIONS
Cleaning Safety
WARNING
Be sure the entire appliance (including the grease filters and light bulbs, if applicable) has cooled and grease has solified before attempting to clean any part of the appliance.
Do not use steam cleaners to clean the appliance.
Safe use
WARNING
Do not repair, replace or remove any part of the appliance unless specifically recommended in the manuals. Improper installation, service or maintenance can cause injury or property damage. Refer to this manual for guidance. All other servicing should be done by an authorized servicer.
WARNING
Risk of injury
Items placed on the appliance may fall down. Do not place any objects on the appliance.
WARNING
Risk of injury
The light emitted by LED lights is very dazzling, and can damage the eyes (risk group 1). Do not look directly into the switched on LED lights for longer than 100 seconds.
Proper Installation and Maintenance
Have the installer show you the location of the circuit breaker or fuse. Mark it for easy reference.
This appliance must be properly installed and grounded by a qualified technician. Connect only to properly grounded outlet. Refer to Installation Instructions for details.
This appliance is intended for normal family household use only. It is not approved for outdoor use. See the Statement of Limited Product Warranty. If you have any questions, contact the manufacturer.
Do not store or use corrosive chemicals, vapors, flammables or nonfood products in or near this appliance. It is specifically designed for use when heating or cooking food. The use of corrosive chemicals in heating or cleaning will damage the appliance and could result in injury.
Do not operate this appliance if it is not working properly, or if it has been damaged. Contact an authorized servicer.
Do not repair or replace any part of the appliance unless specifically recommended in this manual. Refer all servicing to a factory authorized service center.
CAUTION
Grease left on filters can remelt and move into the vent.
CAUTION
Turn power off at breaker before removing a damaged bulb. Do not touch the bulbs immediately after use. The bulbs will remain hot for several minutes.
WARNING
Make sure the appliance and lights are cool and power to the appliance has been turned off before replacing the light bulb(s). Failure to do so could result in electrical shock or burns.The lenses (if equipped) must be in place when using the appliance.The lenses (if equipped) serve to protect the light bulb from breaking.The lenses (if equipped) are made of glass. Handle carefully to avoid breaking. Broken glass can cause an injury.
Hidden surfaces may have sharp edges. Use caution when reaching behind or under appliance.
6

9 IMPORTANT SAFETY INSTRUCTIONS
READ AND SAVE THESE INSTRUCTIONS
WARNING
When the hood is operated in exhaust-air mode simultaneously with a different burner which also makes use of the same chimney (such as gas, oil or coal-fired heaters, continuous-flow heaters, hot-water boilers) care must be taken to ensure that there is an adequate supply of fresh air which will be needed by the burner for combustion.
Safe operation is possible provided that the under pressure in the room where the burner is installed does not exceed 4 Pa (0.04 mbar).
This can be achieved if combustion air can flow through non-lockable openings, e.g. in doors, windows and via the air-intake/exhaust-air wall box or by other technical measures, such as reciprocal interlocking, etc.
WARNING
Avoid carbon monoxide poisoning – Provide adequate air intake so combustion gases are not drawn back into the room.
An air-intake/exhaust-air wall box by itself is no guarantee that the limiting value will not be exceeded.
Note: When assessing the overall requirement, the combined ventilation system for the entire household must be taken into consideration. This rule does not apply to the use of cooking appliances, such as cooktops and ovens.
State of California Proposition 65
Warnings
WARNING
This product contains chemicals known to the State of California to cause cancer, birth defects or other reproductive harm.
7

Causes of damage
NOTICES:
Risk of damage due to corrosion. Always turn appliance on when cooking to avoid condensation buildup. Condensation can lead to corrosion damages.
Risk of damage due to ingress of humidity into the electronic circuitry. Never clean operator controls with a wet cloth.
Surface damage due to incorrect cleaning. Clean stainless steel surfaces in the grind direction only. Do not use any stainless steel cleaners for operator controls.
Surface damage due to strong or abrasive cleaning agents. Never use strong and abrasive cleaning agents.
Risk of damage from condensation back flow. Install exhaust vent at a slight downward slope away from the appliance (1° slope).
Protecting the environment
Your new appliance is particularly energy-efficient. Here you can find tips on how to save even more energy when using the appliance, and how to dispose of your appliance properly.
Unpack the appliance and dispose of the packaging in an environmentally friendly manner.
Saving energy
When cooking, ensure that there is sufficient supply air so that the extractor hood works efficiently and quietly.
Fan level adjust to the intensity of the cooking fumes. Only use the intensive mode if necessary. A lower fan level means lower energy consumption.
With intensive cooking fumes, select a higher fan level early on. Cooking fumes that are already distributed in the kitchen mean that the extractor hood will have to be operated longer.
Switch off the extractor hood when it is no longer required.
Switch off the lighting when it is no longer required.
Clean and change the filter at the specified intervals in order to increase the effectiveness of the ventilation and prevent a risk of fire.
8
Operating modes
You can use this appliance in the air extraction or the recirculation mode.
Exhaust air mode
The air that is drawn in is cleaned by the grease filters and conveyed to the exterior by a pipe system.
Note: Ventilation may not exit through an already operational smoke or exhaust chimney, nor a duct used for ventilating furnace installation areas.
If the ventilation is intended to pass through a smoke or exhaust chimney that is not in operation, the responsible area heating inspector must give approval.
If the ventilation passes through an external wall, use a telescope wall sleeve.
Recirculation
The aspirated air is cleaned by the grease filters and an activated charcoal filter and is returned to the kitchen.
Note: You must install an activated charcoal filter to bind odors in the recirculation mode. Refer to the manual or ask your specialist dealer for details of the various options for operating the appliance in the recirculation mode. You can obtain the necessary accessories from specialist dealers, from our aftersales service or in the online shop.
Operating the appliance
Note: Turn the extractor hood on when you start cooking and switch it off again a few minutes after you have finished cooking. This is the most effective way to eliminate cooking vapor.
Operating the appliance
Control panel
Explanation
# Fan On/off
1Fan speed 1
2Fan speed 2
3Fan speed 3 Ž Intensive setting
ž Run-on funcion
œ Saturation display
c Light on/off
Turn on the fan
Switching on
Press down lightly in the middle of the handle strip to extend the filter pull-out.
1Press the ÿ button to switch on the appliance. The fan starts in setting 2.
2With the buttons 1, 2, 3 or Ž, set the fan speed according to the cooking situation.
Switching off
Use the ÿ button to switch the appliance off.
9

Intense level
For especially strong odor or vapor, use the intense level.
1Press the ÿ button to switch on the appliance. The fan starts in setting 2.
2Press the Ž button to switch on the Intensive setting.
Note: If the button was pressed while the fan is running on speed 1, 2 or 3, the electronics automatically switch back to the previouslyselected fan speed after 5 minutes.
3To switch off the Intensive setting earlier, press the ÿ button or the button for another fan speed.
Setting the duration
You can set the duration after which the Intensive setting switches off automatically.
Duration |
Press buttons simultaneously |
|
|
3 minutes |
Ž and 1 |
|
|
5 minutes |
Ž and 2 |
|
|
10 minutes |
Ž and 3 |
|
|
The factory setting is set to 5 minutes.
Run-on function
The run-on function can be set for any fan speed.
1First press the button for the desired fan speed 1, 2, 3 or Ž and then press the ž button.
Notes
‒The run-on time is ten minutes for all fan speed settings. Once this time has elapsed, ventilation switches off automatically.
‒If the lighting is switched on, it remains on.
2To switch off the run-on function earlier, press the ÿ button.
Interval ventilation
For interval ventilation, the device is switched on automatically for five minutes per hour.
1Press the ÿ button to switch on the appliance. The fan starts at level 2. The interval ventilation can be used on level 1, 2 or 3.
2Press the run-on button ž twice.
Note: This mode is indicated by alternating lighting up of the ž button with the corresponding speed.
3To end interval ventilation, press the ÿ button.
Lighting
The lighting can be switched on and off independently of the ventilation.
Press the @ button.
Setting the brightness
Press and hold the @ button until the desired brightness is reached.
Saturation notification
After 30 hours of operation, the saturation display œ of the grease filter blinks.
At the latest now the metal mesh grease filter should be cleaned. For instructions on how to clean the metal mesh grease filter, please see the chapter about Cleaning and maintenance.
While the saturation display is blinking, it can be reset with the œ button.
10
Cleaning and maintenance
9WARNING
Risk of burns
The appliance will become hot when in use, especially in the area surrounding the bulbs. Let cool before cleaning.
9WARNING
Risk of electric shock
Penetrating damp can cause electric shock. Only clean appliance with a damp cloth. Prior to cleaning, pull the plug or flip the breaker in the fusebox.
9WARNING
Risk of electrical shock
Moisture entering the appliance can cause an electrical shock. Don't use a high-pressure cleaner or steam cleaner.
9WARNING
Risk of injury
Components inside the appliance may have sharp edges. Wear protective gloves.
Cleaning agents
To ensure that the different surfaces are not damaged by using the wrong cleaning agent, follow the information in the table. Do not use:
Harsh or abrasive cleaning agents,
Cleaning agents with a high alcohol content,
Hard scouring pads or cleaning sponges,
High-pressure cleaners or steam cleaners.
Wash new sponge cloths thoroughly before use.
Follow all instructions and warnings included with the cleaning agents.
Area |
Cleaning agent |
Stainless steel |
Hot soapy water: |
|
Clean with a dishcloth and then dry with |
|
a soft cloth. |
|
Clean stainless steel surfaces in the |
|
grind direction only. |
|
Special stainless steel cleaning prod- |
|
ucts are available from customer service |
|
or from specialist retailers. Apply a very |
|
thin layer of the cleaning product with a |
|
soft cloth. |
|
|
Painted |
Hot soapy water: |
surfaces |
Clean using a damp dishcloth and dry |
|
with a soft cloth/towel. |
|
Do not use any stainless steel cleaners. |
|
|
Aluminum and |
Glass cleaner: |
plastic |
Clean with a soft cloth. |
|
|
Glass |
Glass cleaner: |
|
Clean with a soft cloth. Do not use a |
|
glass scraper. |
|
|
Operating |
Hot soapy water: |
controls |
Clean using a damp dishcloth and dry |
|
with a soft cloth/towel. |
|
Risk of electric shock from penetrating |
|
moisture. |
|
Risk of damage to the electronics from |
|
penetrating moisture. Never clean |
|
operating controls with a wet cloth. |
|
Do not use any stainless steel |
|
cleaners. |
|
|
Cleaning the metal grease filter
These instructions apply to several appliance models. It is possible that individual features are described that do not apply to your appliance.
9WARNING
Risk of fire
Grease deposits in the grease filter can ignite.
Clean the grease filter at least every two months.
Never operate the appliance without the grease filter.
Notes
‒Do not use any aggressive, acidic or alkaline cleaning agents.
‒When cleaning the metal grease filters, also clean the metal grease filter holder in the appliance with a moist cloth.
‒You can clean the metal grease filters in a dishwasher or by hand.
11
By hand:
Note: You can use a special grease solvent if soiling is stubborn. You can order it via the online shop.
Soak the metal grease filters in hot soapy solution.
Use a brush for cleaning and then rinse the filters well.
Allow the metal grease filters to drip dry.
In the dishwasher:
Note: Slight discoloration is possible when cleaning the grease filters in the dishwasher. This does not affect the metal grease filter's functioning.
Do not clean extremely dirty metal grease filters with dishes.
Loosely position the metal grease filter in the dishwasher. The metal grease filters must not be jammed in.
Uninstalling metal grease filter
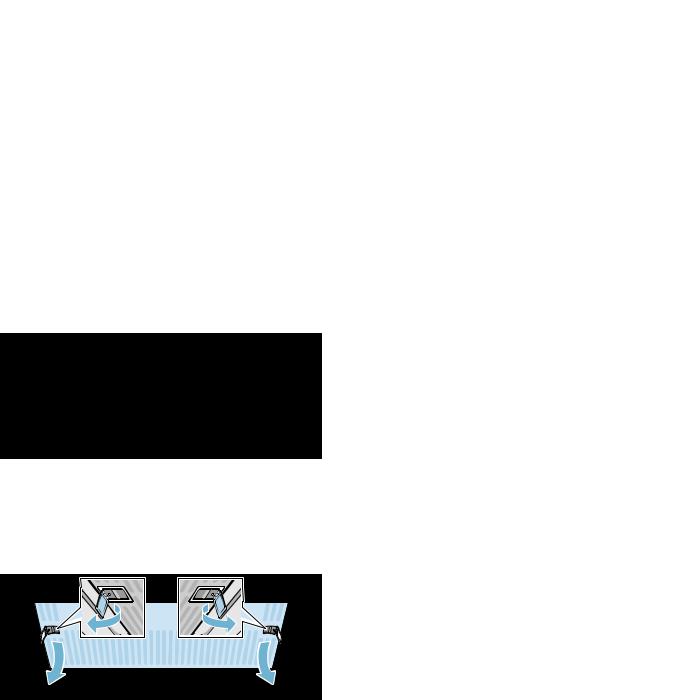
1Pull out the filter pull-out and push in the push- to-open mechanism.
2Open the lock on the metal grease filter and pull the metal grease filter out of the retainer at an angle. When you do this, take hold of the metal grease filter from underneath with your other hand.


|
|
Notes
‒Fat may accumulate in the bottom of the metal grease filter.
‒Hold the metal grease filter level to prevent
fat from dripping out.
3 Clean the metal grease filter.
For appliances with a glass plate in the filter pull-out:
The glass plate can be removed easily and can be cleaned in the dishwasher.
To remove the glass plate, carefully lift it out.
Installing metal grease filter
1Insert the metal grease filter at an angle.
When you do this, take hold of the metal grease filter from underneath with your other hand.
2Lift the metal grease filter up and lock it in place.
3Push and open the push-to-open mechanism again.
Note: The push-to-open mechanism must be pressed in order to guarantee that the drawer is working correctly.
12

Troubleshooting
You can often easily eliminate problems that may occur on your own. Before calling customer service, take into account the following information.
9WARNING
Risk of electric shock
Improper repairs are dangerous. Only an authorized servicer may perform repairs and may replace damaged plug and connections. Remove the power plug or turn off the circuit breaker or fuse in the fuse box if the appliance is damaged or not working. Call Customer Service.
Troubleshooting table
Disruption |
Possible |
Solution |
|
cause |
|
|
|
|
Appliance is |
Plug is not |
Connect the appliance to |
not working |
plugged in |
the mains |
|
|
|
|
Power outage |
Check whether other |
|
|
kitchen appliances are |
|
|
working |
|
|
|
|
Fuse defective |
Check in the fuse box |
|
|
whether the fuse for the |
|
|
appliance is in working |
|
|
order |
|
|
|
LED lights
Defective LED lights may be replaced by the manufacturer, his customer service or a qualified technician (electrician) only.
9WARNING
Risk of injury
The light emitted by LED lights is very dazzling, and can damage the eyes (risk group 1). Do not look directly into the switched on LED lights for longer than 100 seconds.
Customer service
Our customer service department is there for you if your appliance requires repair.
When calling, please give the Product Number (P-No.) and the Serial Number (S-No.) to help facilitate your repair. The identification plate listing the numbers can be found inside of the appliance (remove metal grease filter to find it).
So that you don't have to search for these numbers when you need them, you can enter your appliance information and the customer service number here.
P-No. S-No.
Customer serviceO
Please note that a service visit to instruct the customer on the proper use of the appliance is not covered by the warranty.
Please find the contact data of all countries in the enclosed customer service list.
To book an engineer visit and product advice
USA 877 442 4436 toll-free
CANADA 877 442 4436 toll-free
You can rely on the manufacturer’s expertise. Rest assured that the repair will be handled by trained service technicians who have the original replacement parts for your appliance.
13

Accessories
(not included in the delivery)
Note: These instructions apply to several appliance models. It may be the case that an optional accessory that is listed does not apply to your appliance.
Note: Observe the installation instructions in the accessory.
Basic equipment |
|
CleanAir air recirculation module |
AA210812 |
Spin-on filter for CleanAir air recircula- |
AA210110 |
tion module |
|
|
|
Lowering frame: |
|
Appliance width: 24" (60 cm) |
AA210460 |
|
|
Lowering frame: |
|
Appliance width: 36” (90 cm) |
AA210490 |
|
|
Installation kit: |
|
Top cabinet: 36" (90 cm) |
AA210491 |
|
|
14

9 IMPORTANT SAFETY INSTRUCTIONS
READ AND SAVE THESE INSTRUCTIONS
INSTALLER: LEAVE THESE INSTRUCTIONS WITH THE APPLIANCE AFTER INSTALLATION IS COMPLETE.
IMPORTANT: SAVE THESE INSTRUCTIONS FOR THE LOCAL ELECTRICAL INSPECTOR'S USE.
WARNING
If the information in this manual is not followed exactly, fire or shock may result causing property damage or personal injury.
WARNING
Do not repair, replace or remove any part of the appliance unless specifically recommended in the manuals. Improper installation, service or maintenance can cause injury or property damage. Refer to this manual for guidance. All other servicing should be done by an authorized servicer.
WARNING
WARNING – TO REDUCE THE RISK OF FIRE, ELECTRIC SHOCK, OR INJURY TO PERSONS, OBSERVE THE FOLLOWING:
‒Installation work and electrical wiring must be done by qualified person(s) in accordance with all applicable codes and standards, including firerated construction.
‒Sufficient air is needed for proper combustion and exhausting of gases through the flue (chimney) of fuel burning equipment to prevent back drafting. Follow the heating equipment manufacturer’s guideline and safety standards such as those published by the National Fire Protection Association (NFPA), and the American Society for Heating, Refrigeration and Air Conditioning Engineers (ASHRAE), and the local code authorities.
‒When cutting or drilling into wall or ceiling, do not damage electrical wiring and other hidden utilities.
‒Ducted fans must always be vented to the outdoors.
WARNING
The applicable regulations of the energy supply companies and the regional construction regulations must be observed when installing the hood.
WARNING
Risk of fire
Grease deposits in the grease filter can catch fire. Never work with a naked flame near the appliance (e.g. flambéing). Install the unit near a heat-producing appliance for solid fuels (e.g. wood or coal) only if there is a closed, non-detachable cover. There must be no flying sparks.
WARNING
Risk of fire
Operating several gas burners at the same time gives rise to a great deal of heat. The ventilation appliance may become damaged or catch fire. The ventilation appliance must only be combined with gas burners that do not exceed the maximum total output of 61,000 BTU/hr (18 kW). If 41,000 BTU/hr (12 kW) is exceeded, the local regulations concerning room ventilation, room size, and combination with ventilation devices in exhaust and recirculating operation must be followed.
WARNING
To reduce risk of fire and to properly exhaust air, be sure to duct air outside. Do not vent exhaust air into spaces within walls, ceilings, attics, crawl spaces or garages.
WARNING
To reduce the risk of fire, use only metal ductwork.
15

9 IMPORTANT SAFETY INSTRUCTIONS
READ AND SAVE THESE INSTRUCTIONS
WARNING
When the hood is operated in exhaust-air mode simultaneously with a different burner which also makes use of the same chimney (such as gas, oil or coal-fired heaters, continuous-flow heaters, hot-water boilers) care must be taken to ensure that there is an adequate supply of fresh air which will be needed by the burner for combustion.
Safe operation is possible provided that the under pressure in the room where the burner is installed does not exceed 4 Pa (0.04 mbar).
This can be achieved if combustion air can flow through non-lockable openings, e.g. in doors, windows and via the air-intake/exhaust-air wall box or by other technical measures, such as reciprocal interlocking, etc.
WARNING
Avoid carbon monoxide poisoning – Provide adequate air intake so combustion gases are not drawn back into the room.
An air-intake/exhaust-air wall box by itself is no guarantee that the limiting value will not be exceeded.
Note: When assessing the overall requirement, the combined ventilation system for the entire household must be taken into consideration. This rule does not apply to the use of cooking appliances, such as cooktops and ovens.
CAUTION
For general ventilating use only. Do not use to exhaust hazardous or explosive materials and vapors.
Risk of damage from condensation back flow. Install exhaust vent at a slight downward slope away from the appliance (1° slope).
Appliance Handling Safety
Unit is heavy and requires at least two people or proper equipment to move.
Hidden surfaces may have sharp edges. Use caution when reaching behind or under appliance.
WARNING
Risk of injury
The appliance may fall from the wall if it is not attached properly. All fastening components must be fixed firmly and securely in place.
Safety Codes and Standards
This appliance complies with the latest version of one or more of the following standards:
UL 507 - Electric Fans
CAN/CSA C22.2 No. 113 - Fans and Ventilators
It is the responsibility of the installer to determine if additional requirements and/or standards apply to specific installations.
Electric Safety
WARNING
GROUNDING INSTRUCTIONS
This appliance must be grounded. In the event of an electrical short circuit, grounding reduces the risk of electric shock by providing an escape wire for the electric current.
This appliance is equipped with a cord having a grounding wire with a grounding plug. The plug must be plugged into an outlet that is properly installed and grounded.
WARNING
Improper grounding can result in a risk of electric shock. Consult a qualified electrician if the grounding instructions are not completely understood, or if doubt exists as to whether the appliance is properly grounded. Do not use an extension cord. If the power supply cord is too short, have a qualified electrician install an outlet near the appliance.
16
9 IMPORTANT SAFETY INSTRUCTIONS
READ AND SAVE THESE INSTRUCTIONS
WARNING
Before you plug in an electrical cord or turn on power supply, make sure all controls are in the OFF position.
For appliances equipped with a cord and plug, do not cut or remove the ground prong. It must be plugged into a matching grounding type receptacle to avoid electrical shock. If there is any doubt as to whether the wall receptacle is properly grounded, the customer should have it checked by a qualified electrician.
If required by the National Electrical Code (or Canadian Electrical Code), this appliance must be installed on a separate branch circuit.
WARNING
To reduce the risk of fire or electric shock, do not use this fan with any solid-state speed control device.
Installer – show the owner the location of the circuit breaker or fuse. Mark it for easy reference.
Before installing, turn power OFF at the service panel. Lock service panel to prevent power from being turned ON accidentally.
WARNING
TO REDUCE THE RISK OF FIRE, ELECTRIC SHOCK, OR INJURY TO PERSONS, OBSERVE THE FOLLOWING:
‒Use this unit only in the manner intended by the manufacturer. If you have questions, contact the manufacturer.
‒Before servicing or cleaning unit, switch power off at service panel and lock the service disconnecting means to prevent power from being switched on accidentally.
When the service disconnecting means cannot be locked, securely fasten a prominent warning device, such as a tag, to the service panel.
Be sure your appliance is properly installed and grounded by a qualified technician. Installation, electrical connections and grounding must comply with all applicable codes.
WARNING
Risk of electric shock
Parts inside the appliance can have sharp edges. The connection cable can be damaged. Do not bend or pinch connection cables during installation.
Related Equipment Safety
Remove all tape and packaging before using the appliance. Destroy the packaging after unpacking the appliance. Never allow children to play with packaging material.
The appliance should only be used if installed by a qualified technician in accordance with these installation instructions. The manufacturer is not responsible for any damage resulting from incorrect installation.
Never modify or alter the construction of the appliance. For example, do not remove leveling legs, panels, wire covers or anti-tip brackets/screws.
State of California Proposition 65
Warnings
WARNING
This product contains chemicals known to the State of California to cause cancer, birth defects or other reproductive harm.
17

Before you begin
These instructions apply to several appliance models. It is possible that individual features are described that do not apply to your appliance.
Tools and parts needed
Measuring tape
Pencil
Torx screwdriver TX20
Drill with the following bits: 5/16" (8 mm)
Spirit-level
Aluminum tape (DO NOT use insulating tape)
Exhaust channel (configuration depends on the installation situation)
Additional sheet metal screws (if necessary for installation of the exhaust air duct)
Appliance width 36" (90 cm):
[ |
[ |
PP |
[ |
PP |
[ |
[ |
Parts included
Appliance width 24" (60 cm):


 [
[
[
[
[
Safety clearances
9WARNING
Risk of fire
Grease deposits in the grease filter may catch fire. The specified safety distances must be observed in order to prevent an accumulation of heat. Observe the specifications for your cooking appliance. If gas and electric cooktops are operated together, the largest specified distance applies.
Only one side of the appliance may be installed directly next to a high-sided unit or a wall. The distance between the appliance and wall or high-sided unit must be at least 2"
(50 mm).
The minimum distance between the supporting surface for the cooking equipment on the hob and the lowest part of the range hood must be not less than 17 " (430 mm) from electric cookers and 25^" (650 mm) from gas or mixed cookers.
18
If the instructions for installation for the gas hob specify a greater distance, this must be adhered to.
!ê PP
!PP
General notes
This appliance is installed in a top cabinet.
Follow the enclosed installation instructions for additional special accessories (e.g. for circulating-air mode).
The surfaces of the appliance are sensitive. Avoid damaging them during installation.
Exhaust air mode
9WARNING
Risk of death
Risk of poisoning from flue gases that are drawn back in. The exhaust air must not be conveyed into a functioning smoke or exhaust gas flue or into a shaft that is used to ventilate installation rooms that contain heating appliances. If the exhaust air is to be conveyed into a non-functioning smoke or exhaust gas flue, you must obtain the consent of the heating engineer responsible.
If the exhaust air is conveyed through the outer wall, a telescopic wall box should be used.
Ventilation line
Note: The appliance manufacturer does not assume any warranty for complaints attributable to the pipe section.
The appliance achieves its optimum performance by means of a short, straight exhaust air pipe and as large a pipe diameter as possible.
As a result of long rough exhaust air pipes, many pipe bends or pipe diameters that are smaller than 6” (150 mm), the optimum extraction performance is not achieved and fan noise is increased.
The pipes or hoses for laying the exhaust air line must consist of non-combustible material.
Round pipes
An inner diameter of 6” (150 mm), but at least 4 _” (120 mm), is recommended.
19

Flat ducts
The inner cross-section must correspond to the diameter of the round pipes.
dia. 6” (150 mm) approx. 27^ sq in (177 cm2)
dia. 4 _” (120 mm) approx. 26_ sq in (113 cm2)
Flat ducts should have no sharp deflections.
Use sealing strip for deviating pipe diameters.
Preparing the units
The fitted unit must be level and have sufficient load-bearing capacity.
The max. weight of the extractor hood is 40 lbs (18 kg).
Appliance dimensions and safety clearances
Observe the appliance's dimensions.
Comply with the safety clearances.
If the installation instructions for the gas cooking appliances specify a different distance, the largest distance must always be provided for.
Fitted units must be heat-resistant up to 194° F (90 °C). The stability of the fitted unit must also be guaranteed after the cut-out work.
To install the extractor hood in a top cupboard, the extractor hood must be provided with the following dimensions:
Width |
24" (600 mm) |
Depth |
min. 12 5/8" (320 mm) |
Depth |
min. 13 ¾" (350 mm) with lowering frame |
|
|
Elevation |
min. 16 9/16" (420 mm) |
Elevation |
min. 24" (600 mm) with CleanAir air recir- |
|
culation module |
|
|
1Make cut-out for the exhaust air pipe. To do this, make an opening in the top or back panel of the fitted unit with an additional recess for the power cord.
èç¼ʓʘ |
PP |
20
2Remove cabinet base, if installed. Mark the fastening points on the inside of the cabinet and use a bradawl to make indentations where the holes are to be. To help you mark the fastening points, use the mounting piece provided.
ë PP |
PLQ èè¼ʓʘ |
PP |
|
PP |
ʌ¼ʓʘ |
PP |
ç¼ʚ |
PP |
Body wall thickness: 5/8" (16 mm)
1Screw the mounting pieces to the body on the left and right. ¨
2Remove the tabs from the bottom of the mounting pieces. ©
$ |
ʌ¼ʚ PP |
% |
[ |
Body wall thickness: 3/4" (19 mm)
1Fold out the tabs on both of the mounting pieces. ¨
2Screw the mounting pieces to the body on the left and right. ©
3Remove the tabs from the bottom of the mounting pieces. ª
$ |
% |
ë PP |
& |
èç¼ʓʘ PP |
[ |
Preparing the appliance
1Connect the enclosed power cord to the appliance.¨
2Use the strain relief to secure the power cord in place.©
$ |
% |
21

Electrical connection
9WARNING
Risk of electric shock
Parts inside the appliance can have sharp edges. The connection cable can be damaged. Do not bend or pinch connection cables during installation.
The necessary connection information is located on the identification plate in the appliance interior, remove metal grease filter to access it.
Length of the connecting cable: Approx. 4] ft
(1.30 m)
This appliance meets EC radio interference suppression requirements.
9WARNING
Risk of electric shock
It must always be possible to disconnect the appliance from the electricity supply. The appliance must only be connected to a protective contact socket that has been correctly installed. If the plug can no longer be reached after installation, the permanent electrical installation must be provided with an energy-isolating device in the phases in accordance with installation regulations. The permanent electrical installation must only be wired by a professional electrician. We recommend installing a residual current device (RCD) in the appliance's electricity supply circuit.
The branch-circuit breakers ampacity, the wire sizes and the connections must conform to the requirements of the National Electrical Code or Canadian Electrical Code and all local codes and ordinances.
This appliance is connected with a plug
Plug has to be conform with NEMA CONFIGURATIONS FOR PLUGS AND RECEPTACLES.
The appliance must be properly grounded.
Plug must be rated not less than type 6-20 P (2- pole 3-wire grounding).
Only a qualified electrician should connect the plug.
Install a socket outlet earthed in accordance with regulations approx. 27" (700 mm) above the floor behind the appliance. The socket outlet must still be accessible after installation.
22
Installation
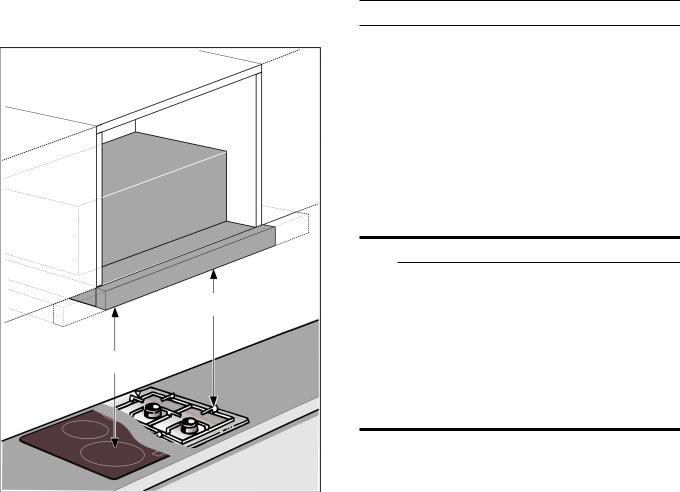
Mounting the appliance
1Mount the appliance and align. ¨
2Measure the distance from the appliance to the wall and mark this on the filler strip.
3If required, shorten the filler strip to the required dimension. ©
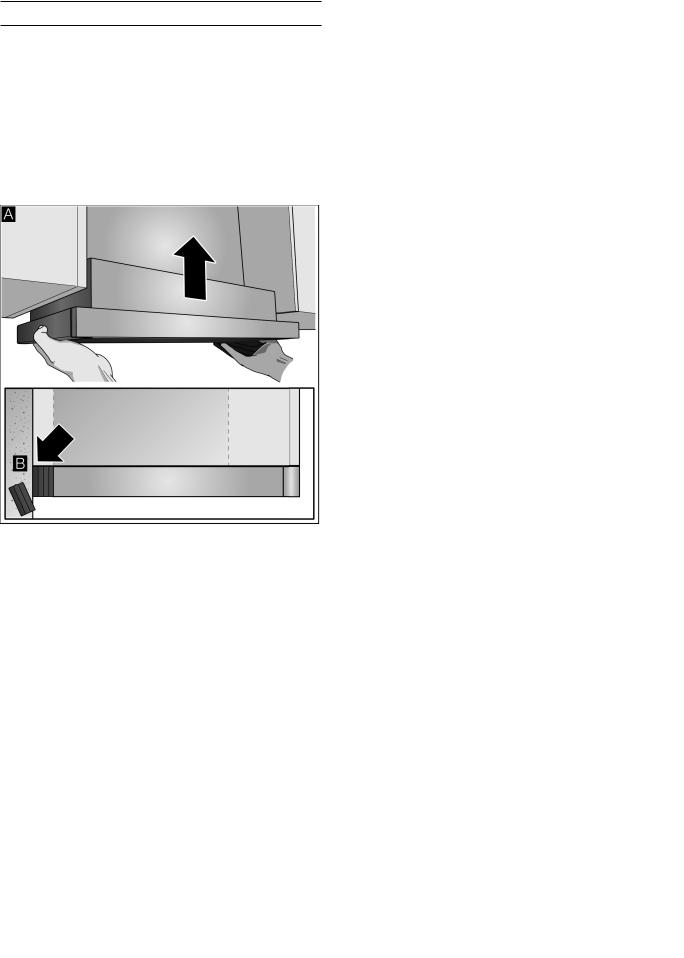
Detaching the appliance
Note: Before removing the appliance, protect the cook-top with a piece of polystyrene from the packaging.
1Use a flat head screwdriver to push in the
fastening bolt, and turn it 90° until it locks into place. ¨
2Push in the fastening bolt gently with your
fingers, and turn it until it comes out of the housing along with the spring.©
Grip the bottom of the appliance with one hand
while gently pulling on the fastening bolt with the other. ª
& 
3 Carefully remove the appliance.
23 |
Loading...