


Gaggenau BS 281, BS 274, BS 271, BS 270, BS 275 Manual
...Gaggenau Instruction Manual
Steam Oven BS 270/271 BS 274/275 BS 280/281

Table of Contents
Safety Notes |
4 |
|
|
Before Use |
4 |
|
|
Intended Use |
4 |
|
|
Safety while Baking and Steaming |
4 |
|
|
Damage to the Appliance |
4 |
||
|
|
|
|
Operating for the First Time |
5 |
|
|
|
|
|
|
|
Avoiding Damage to the Appliance and the |
|
|
Cabinet |
5 |
|
|
Steam Oven and Cabinet Fronts |
5 |
|
|
Avoiding Damage to the Oven Interior |
5 |
||
|
|
|
|
Features of your New Steam Oven |
6 |
|
|
Steam Oven |
6 |
|
|
Display and Controls |
7 |
|
|
Keys |
7 |
|
|
|
|
|
|
Accessories |
8 |
|
|
|
|
|
|
|
Heating Modes |
9 |
|
|
|
|
|
|
First Settings after Installation |
10 |
|
Setting the Language |
10 |
|
|
Choosing the Time Format |
10 |
|
|
Setting the Clock |
10 |
|
|
Setting the Date |
11 |
|
|
Temperature Unit °C or °F |
11 |
||
Setting the Water Hardness |
11 |
|
|
Exiting Menu and Saving Settings |
11 |
|
|
Note |
11 |
|
|
|
|
|
|
Calibration |
12 |
|
|
Calibrating the Steam Oven |
12 |
|
|
Note |
12 |
|
|
|
|
|
|
Activating the Steam Oven |
13 |
|
|
Standby |
13 |
|
|
Activating the Steam Oven |
13 |
||
|
|
|
|
Setting the Steam Oven |
14 |
|
|
Setting the Temperature and Heating Mode |
14 |
|
|
Note |
14 |
|
|
Current Oven Temperature Display |
15 |
|
|
After Every Use |
15 |
|
|
Misting |
15 |
|
|
Steam Removal |
15 |
|
|
|
|
|
|
Meat Probe |
16 |
|
|
Programming the Meat Probe |
16 |
|
|
Note |
17 |
|
|
Cleaning |
17 |
|
|
Recommended Temperature Values |
17 |
|
|
|
|
|
|
Cooking Table |
18 |
|
|
Timer |
28 |
|
Calling up the Timer Menu |
28 |
|
Timer |
28 |
|
Stopwatch |
29 |
|
Cooking Time Duration |
30 |
|
Cooking Time End |
31 |
|
Extended Timer |
32 |
|
|
Setting the Program |
32 |
|
|
Note |
32 |
|
|
|
|
|
|
Memory Recipes |
33 |
|
|
Calling up the Memory Menu |
33 |
|
|
Storing the Settings |
33 |
|
|
Note |
33 |
|
|
Starting a Memory Recipe |
34 |
||
Note |
34 |
|
|
|
|
|
|
Child Lock |
35 |
|
|
Activating the Child Lock |
35 |
|
|
Deactivating the Child Lock |
35 |
||
Note |
35 |
|
|
|
|
|
|
Safety Deactivation |
36 |
|
|
|
|
|
|
|
Changing the Basic Settings |
37 |
|
Note |
37 |
|
|
Example: Changing the Standby Screen |
37 |
||
|
|
|
|
Basic Settings |
38 |
|
|
|
|
|
|
|
Care and Manual Cleaning |
41 |
|
|
|
|
|
|
Cleaning Function |
42 |
|
How to Proceed |
42 |
|
|
Note |
42 |
|
|
|
|
|
|
Drying Function |
43 |
|
|
How to Proceed |
43 |
|
|
Note |
43 |
|
|
|
|
|
|
Changing the Filter Cartridge |
44 |
|
|
|
|
|
|
|
Descaling |
45 |
|
How to Proceed |
45 |
|
|
|
|
|
|
Trouble Shooting |
46 |
|
|
Error Messages |
46 |
|
|
Power Cut |
47 |
|
|
Exhibition Mode |
47 |
|
|
No Water Available |
47 |
|
|
3

$ Safety Notes
Before Use
The appliance is only guaranteed safe to use if installed by a specialist in accordance with the installation instructions. The installer is liable for any damage resulting from incorrect installation.
The appliance may only be connected by a licensed specialist. The local electricity supplier’s regulations and construction regulations apply.
Read the instruction manual carefully before operating the appliance. Only then will you be able to operate your appliance safely and correctly. Keep the instruction and installation manual for future reference.
Do not connect the appliance if it has been damaged.
Intended Use
This appliance is intended only for domestic use. Only use the appliance to prepare meals. Do not use the appliance to heat up the room in which it is installed.
Never allow children to play with the appliance.
Do not let adults or children operate the appliance unsupervised:
–if they are mentally or physically unable to use the appliance safely and correctly
–if they don’t have the knowledge and experience to use the appliance safely and correctly.
Safety while Baking and Steaming
Warning, risk of burns! Do not touch hot interior surfaces of oven. Keep children away.
Warning, risk of fire! Do not store flammable products in the oven. Only leave the parts needed inside the oven during use.
Warning! Hot steam can escape during use. Do not touch the ventilation openings.
Warning! Hot steam can escape when opening the oven door. Hot water may drip from the door. Keep children away.
Tip: before opening the appliance door use the steam removal function. As a result, very little steam will escape when you open the appliance door.
Warning! Use an oven glove to take the cooking inserts out of the hot oven. Hot liquid may spill over when taking out the cooking inserts.
Warning, risk of burns! The inside of the door gets very hot during operation; observe appropriate caution when opening the appliance. The open door can swing back.
Do not trap connecting cables of electrical appliances in the hot oven door. The cable insulation can melt. Risk of short-circuiting!
Damage to the Appliance
If the appliance is damaged, switch off the corresponding household fuse. Call after-sales service.
Incorrect repairs are dangerous. Repairs must be carried out by one of our experienced after-sales engineers.
4

Operating for the First Time
Remove the packaging from the appliance and dispose of it according to local regulations. Be careful to remove all accessories from the
packaging. Keep packaging elements and plastic bags away from children.
Check the appliance for transport damage after unpacking it. Do not connect the appliance if it has been damaged.
The appliance must be connected by an authorised specialist. No warranty claims can be lodged for any damage resulting from incorrect connection. Observe the installation instructions.
Thoroughly clean the appliance before using it for the first time. This will eliminate any ‘newness’ smells and soiling.
This appliance is labelled in accordance with the European Directive 2002/96/EG
concerning used electrical and electronic
appliances (waste electrical and electronic equipment – WEEE). The guideline
determines the framework for the return and recycling of used appliances as applicable.
Avoiding Damage to the Appliance and the Cabinet
Steam Oven and Cabinet Fronts
Do not cover the ventilation openings of the steam oven.
Do not take off the door seal. A damaged door seal must be changed immediately.
After taking the food out of the oven, allow the oven to cool down with the door closed. Do not leave the oven door half open, the hot air can cause damage to adjacent cabinets. The cooling fan will continue to run for a while and will then switch off automatically.
Avoiding Damage to the Oven Interior
The interior of your new steam oven is made out of high grade stainless steel. However, lack of care and maintenance might cause corrosion.
Observe the following tips to avoid corrosion in the oven. No warranty claims can be lodged for any damage resulting from non compliance with these notes.
•Clean the oven interior after it has cooled
down. After cleaning, use the drying function to dry the oven interior.
•Aggressive cleaners may cause corrosion. Only use hot soapy water to clean the oven interior. Use the cleaning function.
•Do not use oven cleaner or caustic cleaners. Do not use cleaners containing chloride.
•Salt in the oven reacts aggressively. Salt residues on the oven interior may cause spots of corrosion. Always remove residues immediately.
•Spicy sauces (e.g. ketchup, mustard) and salted food (e.g. salted roasts) contain chloride and acids. These act aggressively on stainless steel. Always clean the oven interior after use.
•Only use original accessories in the oven interior. Rusting materials (e.g. serving plates, cutlery) may cause corrosion of the oven interior.
•Only use original small parts (e.g. knurled nuts). Order small parts from our after-sales service, should you loose any.
5

Features of your New Steam Oven
Steam Oven
This manual applies to different models.
The pictures of this manual show the model BS 274/275.
The operation is identical for all models.
The models BS 270/271/280/281 feature display and controls on the bottom front.
These models are especially suitable for installation above an oven.
Display and controls
The models BS 274/275 feature display and controls on the top front.
These models are especially suitable for single installation.
Ventilation openings |
Air flap |
Socket for meat probe |
Grease filter |
Strainer |
Door seal |
6

Display and Controls
Display |
|
|
|
|
|
|
Touch keys |
|
|
|
|
|
|
||
|
|
|
|
|
|
||
In the top part of the display |
|
|
|
|
|
|
The keys on the left and |
is the status bar or a call up |
|
|
|
|
|
|
right beside the display |
menu. The lower part shows |
|
|
|
|
|
|
are touch sensitive. The |
the different settings. |
|
|
|
|
|
|
function of the keys |
|
|
|
|
|
|
||
|
|
|
|
|
|
|
depends on the chosen |
|
|
|
|
|
|
|
setting. The icon beside |
|
|
|
|
|
|
|
|
|
|
|
|
|
|
|
the key shows the function |
|
|
|
|
|
|
|
|
|
|
|
|
|
|
|
of the key. |
|
|
|
|
|
|
|
|
|
|
|
|
|
|
|
|
Function selector |
|
|
|
Temperature selector |
Use the left knob to select |
|
|
|
You can turn the |
the cooking mode and |
|
|
|
temperature selector to |
moisture level you will use |
|
|
|
the right or left. |
to prepare your meal. |
|
|
|
Temperature range is |
You can turn the knob to |
|
|
|
|
|
|
|
between 30 and 230 °C. |
|
the right or left. |
|
|
|
|
|
|
|
|
|
|
|
|
|
First position to the right: |
|
|
|
|
switches on light |
|
|
|
|
First position to the left: |
|
|
|
|
operates special functions |
|
|
|
|
(cleaning function, drying |
|
|
|
|
function, memory recipes) |
Keys
Symbol |
Function |
g |
move right |
f |
move left |
b |
save selected values / start |
j |
cancel |
d |
increase values |
e |
decrease values |
q |
timer menu |
c |
basic settings menu |
a |
call up current oven temperature |
o |
child lock activate |
p |
child lock deactivate |
V |
extended timer |
l |
timer stop |
mtimer start
kstore memory recipe
Cmisting
Dsteam removal
7

Accessories
As standard, your appliance comes with the following accessories:
• Stainless steel cooking insert GN 2/3, 40 mm deep
• Stainless steel cooking insert GN 2/3, perforated, 40 mm deep
• |
• |
Wire rack
Meat probe
•Water supply hose (3 m)
•Drain hose (3 m)
You can order the following special accessories:
•KB 220-000: Stainless steel cooking insert GN 2/3, 40 mm deep
•KB 220-324: Stainless steel cooking insert GN 2/3, perforated, 40 mm deep
•KB 220-114: Stainless steel cooking insert GN 1/3, 40 mm deep
•KB 220-124: Stainless steel cooking insert GN 1/3, perforated, 40 mm deep
•GR 220-046: Wire rack
•GZ 010-011: Extension for inlet and outlet
•WF 040-020: Brita descaling sytem (filter head and filter cartridge).
Must be installed when connecting the appliance if water hardness exceeds 7 °dH.
•WF 040-021: Set of three filter cartridges
8

Heating Modes
Display |
Heating mode |
Use |
100
100
Moisture 100 % |
C Steaming at 100 °C - 120 °C: fish, vegetables, |
temperature 30 - 230 °C |
side dishes. The food is completely surrounded by |
|
steam. |
|
B Steam baking at 120 - 230 °C: puff pastry, bread, |
|
bread rolls. |
80
170
Moisture 80 % |
Combination steaming: puff pastry, meat, poultry. |
temperature 30 - 230 °C |
|
60
160
Moisture 60 % |
Combination steaming: yeast dough cakes, bread. |
temperature 30 - 230 °C |
|
30
180
Moisture 30 % |
Cooking in own moisture: pastries. |
temperature 30 - 230 °C |
Low-temperature cooking: meat. |
|
With this setting no additional steam is added, but |
|
the air flap remains closed. Thus the natural moisture |
|
of the food remains in the oven and keeps the food |
|
from drying out. |
0
180
Moisture 0 % |
Hot air: cakes, biscuits, gratin. |
temperature 30 - 230 °C |
|
|
Dough proofing |
Raising yeast dough, the perfect temperature |
38 |
temperature 30 - 50 °C |
setting is 38 °C. The moisture distributes the |
|
heat evenly and avoids the surface of the |
|
|
|
dough drying out. |
|
|
|
|
|
|
|
Defrosting |
Even and gentle defrosting of vegetables, meat, |
|
||
50 |
temperature 40 - 60 °C |
fish and fruit. The food will not dry out and will |
|
keep its shape. |
|
|
|
|
|
|
|
|
Regenerating |
Gently refresh previously prepared dishes. |
|
||
120 |
temperature 60 - 140 °C |
The moisture keeps the food from drying out. |
|
Refresh dishes on plates at 120°C, |
|
|
|
pastries at 140°C. |
|
|
|
|
|
|
100
60
Cleaning aid, |
The cleaning function loosens soiling with steam. |
drying aid |
|
|
|
|
|
|
|
|
Memory recipes |
Store and recall the settings for meals that |
|
00:05 |
00:50 |
00:30 |
00:20 |
00:30 |
|
||
|
|
|
|
|
|
|
|
you often prepare |
|
100% |
60% |
0% |
60% |
0% |
|
|
|
|
|
|
|
|
|
|
|
|
|
|
|
|
|
|
|
|
|
|
|
|
|
|
|
|
|
|
9
First Settings after Installation
When your new steam oven has been connected, the first settings menu appears on the display. You can set the
•time format,
•language,
•clock,
•date,
•temperature unit,
•water hardness.
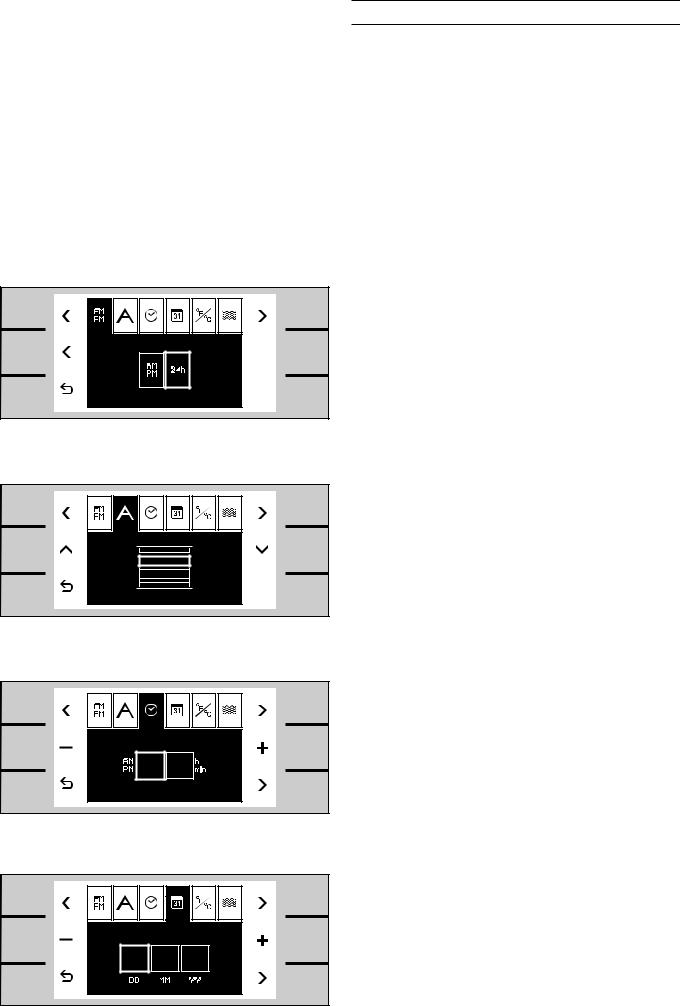
Choosing the Time Format
1The time fomat setup menu appears on the screen.
The time fomat can be either 12 hour format (AM/PM) or 24 hour format. The 24 hour format is pre-selected.
2You can change the time format using the centre f key.
English |
Deutsch |
Fran ais |
Italiano |
Setting the Language
1Using the menu key g select the language setup menu. The available languages for the display messages appear on the screen. German is pre-selected.
2You can change the language using the h or i keys or switch the display messages off.
08 30 |
26 10 07 |
10 |
Setting the Clock
1Using the menu key g select the clock function Q.
08:30 appears on the screen.
2Using the d / e keys set the correct time.
Use the arrow key g bottom right to change from hours to minutes.
Setting the Date
1Using the menu key g select the date function a.
26.10.07. appears on the screen.
2Using the d / e keys enter day, month, year.
Use the arrow key g bottom right to change from day/month/year.
Temperature Unit °C or °F
1Using the menu key g select the temperature unit function l. °C is pre-selected.
2You can change the temperature unit using the d / e keys.
12 |
Setting the Water Hardness
1Use the test kit included to test the water hardness of your tap water. Fill the phial with mains water up to the 5 ml marker.
2Add indicator solution drop by drop until the colour changes from purple to yellow. Carbonate hardness content:
1 drop = 1°dh = 1.25°e = 1.8°f
Please note: count the number of drops that are necessary and gently shake the phial after each drop.
3Use the d / e keys to enter the value between 1 and 18. Pre-set value is 12. Depending on the value entered the appliance will calculate the intervals for descaling.
Exiting Menu and Saving Settings
Touch the b key to exit the menu. All settings are saved.
The appliance is on standby. The standby screen appears.
Note
Refer to the chapter basic settings if you want to change these parameters.
The “first settings” menu reappears if the appliance is without electricity for several days.
11

Calibration
The boiling point depends on the air pressure. The higher the altitude, the lower the air pressure, and also the boiling point.
During the first steaming after installation, the appliance calibrates the boiling point. During calibration, the appliance is adjusted to the pressure of the altitude where the appliance is installed.
Calibrating the Steam Oven
1Remove all accessories from the oven (cooking inserts, wire rack). The oven must be empty and cold.
2Turn the temperature knob to 100 °C and the function knob to the top position, steaming at 100% moisture.
The steam oven starts to calibrate.
During calibration more steam might escape from the oven than during normal use. Calibration takes about 15 minutes.
Note
Do not interrupt the calibration cycle. Do not open the oven door during calibration.
Should the calibration process be interrupted by opening the door or switching off the appliance, the steaming function will not operate properly. Switching on the appliance will automatically restart calibration until the operation has been completed.
Recalibration is not necessary after a power failure.
Recalibrate the appliance manually if you should move home to a different altitude.
•First reset all parameters to the factory setting. Refer to the chapter basic settings.
•Now it is possible to recalibrate the appliance.
12

|
|
|
|
|
|
Activating the Steam Oven |
|
|
|
|
|
|
Standby |
|
|
|
|
|
|
The steam oven remains on standby when no |
|
|
|
|
|
||
|
|
|
|
|
||
|
|
|
|
|
|
operating mode is selected or the child lock is |
|
|
|
|
|
|
activated. |
|
|
|
|
|
|
The keys are not activated. The display is not lit. |
|
|
13:30 |
|
|
|
Note: |
|
|
|
||||
|
|
|
|
|
|
You can choose between different standby screens. |
|
|
|
|
|
|
GAGGENAU and the clock is pre-selected. Refer to |
|
|
|
|
|
||
|
|
|
|
|
|
the chapter basic settings if you want to change the |
|
|
|
|
|
|
standby screen. |
|
|
|
|
|
|
Note: |
|
|
|
|
|
|
The display contrast depends on the vertical |
|
|
|
|
|
|
viewing angle. You can adjust the contrast of the |
|
|
|
|
|
|
display in the basic settings. |
Activating the Steam Oven
To leave standby do one of the following:
•touch a key
•open or close the oven door
•turn the temperature knob
•turn the function knob
Now you are able to set the required function. Read the relevant chapter on how to activate the required function.
Note:
The standby screen reappears after one minute if no further function is chosen. The display light goes off.
13

Setting the Steam Oven
The main operations of your steam oven are easily set using the knobs.
Using the right knob you can set the temperature. To switch on the light in the oven, turn the temperature knob one position to the right.
Temperature range: |
|
|
Steaming, hot air |
30 |
- 230 °C |
Dough proofing |
30 |
- 50 °C |
Defrosting |
40 |
- 60 °C |
Regenerating |
60 |
- 140 °C |
The light in the oven remains off if the temperature is set below 70 °C.
Using the left knob you can set the heating mode. The top position is steaming at 100% moisture.
13.30 |
100 |
100 |
Setting the Temperature and
Heating Mode
1Turn the function knob until the required heating mode appears on the screen.
2Set the temperature knob to the required temperature.
Temperature, moisture level and cooking mode symbol appear on the display. The light in the oven goes on.
The heating up symbol f appears until the required temperature is reached. The symbol appears again when the oven heats during operation.
The temperature and heating mode can be changed at any time.
When the meal is ready switch the steam oven off using the temperature knob. The oven light goes off. The standby screen appears.
Note
The appliance rinses automatically when you switch it on.
If the L symbol appears on the left top side of the display and three dashes instead of the temperature, there is no water available. Check the water supply.
If three dashes appear on the display instead of the temperature, the knobs have not been set to the correct position. Check the position of the temperature and function selectors.
14

166 |
Current Oven Temperature Display
The current oven temperature is briefly shown when you press the a info key. Using the b key you can return to the standard screen.
Note:
Depending on the heating mode, a slight temperature variation after heating up during use is normal.
After Every Use
Dry the oven interior with a soft cloth or use the drying aid.
13.30 |
0 |
180 |
Misting C
Misting brings additional steam to the oven interior. You can add moisture to food while cooking (e.g. bread, bread rolls).
Misting is only possible with the “Hot air” function (0% moisture) or with 30% moisture.
Touch the key C as long as you want to add steam, up to 8 seconds. After waiting at least one second, you can trigger misting again by pressing the misting key C.
13.30 |
100 |
100 |
13.30 |
100 |
100 |
Steam Removal D
Steam removal brings cold water to the oven interior. This cools down the oven interior, the steam condenses. This reduces the steam escaping when opening the door.
Caution! Hot water may drip from the door when opened.
You can use the steam removal function only up to a temperature of 130 °C and at the moisture levels 100 %, 80 % and 60 %.
Touch the steam removal key D for at least one second. Steam removal starts. The symbol D appears on the display.
Steam removal lasts about 20 seconds. The heating remains switched off during steam removal.
To stop steam removal:
Open the oven door or touch the steam removal key D again.
15
 Loading...