


Gaggenau Operating and Installation Instructions
Gaggenau Notice d’utilisation et d’installation
Gaggenau Instrucciones de utilización y de montaje
Extractor hood
AH 900761/900791
Downloaded from www.Manualslib.com manuals search engine
2
Downloaded from www.Manualslib.com manuals search engine
Table of Contents
Operating Instructions
How to use these operating instructions |
3 |
|
|
|
|
|
Features |
4 |
|
|
|
|
Safety instructions |
5 |
Read and Save These Instructions |
5 |
|
|
|
|
Safety notes |
6 |
|
|
|
|
|
Operation |
7 |
Light |
7 |
|
Fan levels |
7 |
|
Special functions |
9 |
|
|
|
|
Cleaning and care |
10 |
|
|
|
|
|
Lamp replacement |
12 |
Installation Instructions
Important information |
13 |
Installation |
13 |
Electrical information |
14 |
|
|
Electrical connection |
14 |
Wire diagram |
15 |
|
|
Installation |
16 |
How to use these
operating instructions
Dear customer,
Congratulation on your decision to purchase an exclusive kitchen appliance from Gaggenau.
To make sure you will be able to use all functions of the appliance as quickly and safely as possible, we have tried to make these operating instructions as concise as possible.
Please keep the operating instructions in a safe place.
These documents also include installation instructions. Certain installation work may only be done by a qualified electrician. Please make sure that these instructions are always available whenever needed.
3
Downloaded from www.Manualslib.com manuals search engine
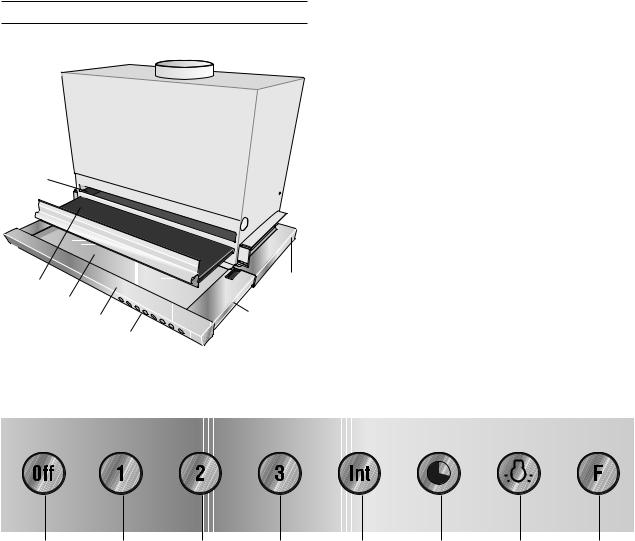
Features
|
|
|
1 |
Smoke screen |
|
|
|
2 |
Control panel |
|
|
|
3 |
Grease filter |
|
|
|
4 |
Handle strip |
6 |
|
|
5 |
Viewing window |
|
|
6 |
Activated charcoal filter |
|
|
|
|
||
|
|
|
7 |
Spacer rail |
3 |
|
|
7 |
|
|
|
|
|
|
|
5 |
|
1 |
|
|
|
4 |
|
|
|
|
|
|
|
|
|
|
2 |
|
Motor off |
Fan Level 1 Fan Level 2 Fan Level 3 Intensive |
After- |
Lightning |
Grease filter |
|
|
fan level |
running |
|
saturation |
|
|
|
|
|
|
display |
|
This flat screen hood offers you: |
|
|||
|
• an outstanding stainless steel design, |
||||
|
• a good extraction capacity with little noise, |
||||
|
• easy operation and care, |
|
|||
|
• |
exhaust or circulating air operation depending |
|||
|
|
on the requirement, |
|
|
|
|
• |
a large number of operator control functions |
|||
|
|
thanks to electronic control and |
|
||
|
• |
various special functions (e.g. interval |
|||
|
|
ventilation). |
|
|
|
4
Downloaded from www.Manualslib.com manuals search engine

Safety Instructions
Read And Save These Instructions.
WARNING - TO REDUCE THE RISK OF FIRE, ELECTRIC SHOCK, OR INJURY TO PERSONS, OBSERVE THE FOLLOWING:
a.) Use this unit only in the manner intended by the manufacturer. If you have questions, contact the manufacturer.
b.) Before servicing or cleaning unit, switch power off at service panel and lock the service disconnecting means to prevent power from being switched on accidentally. When the service disconnecting means cannot be locked, securely fasten a prominent warning device, such as a tag, to the service panel.
CAUTION:
FOR GENERAL VENTILATION USE ONLY. DO NOT USE TO EXHAUST HAZARDOUS OR EXPLOSIVE MATERIALS AND VAPORS.
WARNING - TO REDUCE THE RISK OF A RANGE TOP GREASE FIRE.
a.) Never leave surface units unattended at high settings. Boilovers cause smoking and greasy spillovers that may ignite. Heat oils slowly on low or medium settings.
b.) Always turn hood ON when cooking at high heat or when flambeing food (i.e. Crepes Suzette, Cherries Jubilee, Peppercorn Beef Flambe’).
c.) Clean ventilating fans frequently. Grease should not be allowed to accumulate on fan or filter.
d.) Use proper pan size. Always use cookware appropriate for the size of the surface element.
WARNING - TO REDUCE THE RISK OF INJURY TO PERSONS IN THE EVENT OF A RANGE TOP GREASE FIRE, OBSERVE THE FOLLOWING:
a.) SMOTHER FLAMES with a close-fitting lid, cookie sheet, or metal tray, then turn off the burner. BE CAREFUL TO PREVENT BURNS. If the flames do not go out immediately, EVACUATE AND CALL THE FIRE DEPARTMENT.
b.) NEVER PICK UP A FLAMING PAN - You may be burned.
c.) DO NOT USE WATER, including wet dishcloth or towels - a violent steam explosion will result.
d.) Use an extinguisher ONLY if:
1.You know you have Class ABC extinguisher, and you already know how to operate it.
2.The fire is small and contained in the area where it started.
3.The fire department is being called.
4.You can fight the fire with your back to an exit.
5
Downloaded from www.Manualslib.com manuals search engine

$ Safety Notes
Do not operate damaged appliances.
Isolate the appliance from the mains during every maintenance operation. To do this, switch-off the corresponding fuse.
The appliance must only be connected by an authorised specialist, paying attention to the relevant regulations of the power supply companies and the regional construction regulations.
Repairs must be carried out by authorised specialists, thus ensuring electrical safety.
Observe the assembly instructions!
No warranty claims can be lodged in the event of damage caused by failure to observe these instructions.
Connecting cables must not come into contact with hot cooking surfaces.
If the connecting cable for this appliance is damaged, the cable must be replaced by the manufacturer or his customer service or a similarly qualified person in order to prevent serious injury to the user.
Do not operate the extractor hood without inserted lamps. Defective bulbs should be replaced immediately to prevent the remaining bulbs from overloading.
Never operate the appliance without a grease filter. Hazardous or explosive substances and vapours must not be extracted!
The user is responsible for expert use and the perfect condition of the appliance.
Only ever operate the appliance under supervision. Overheated fat or oil can easily catch fire. If you are cooking with fat or oil, e.g. chips, etc., never leave the cooker unattended.
Caution! Over-greased filters are a fire risk! Only ever deep-fry under the extractor under constant supervision. Pay attention to cleaning the grease filter on a regular basis.
Fire risk! Do not flambé meals under the extractor hood!
Operation of the extractor hood above a hearth for solid fuels (coal or wood etc.) is only partly permitted.
Gas appliances may only be used under the extractor hood when pots and pans are placed on them!
6
Do not operate all hotplates simultaneously over a prolonged period (max. 15 minutes) at maximum thermal load, otherwise there is a risk of burns from touching the housing surfaces or a risk of damaging the extractor hood. When operating the extractor hood above a hob, operate the hood at maximum setting if three or more hotplates are on at the same time.
The appliance is not intended for use by young children or infirmed persons without supervision. Young children should be supervised to ensure they do not play with the appliance.
Do not let adults or children operate the appliance unsupervised:
–if they are mentally or physically unable to use the appliance safely and correctly,
–if they don’t have the knowledge and experience to use the appliance safely and correctly.
When children become old enough to operatethe appliance, it is the legal responsibility of the parents or legal guardians to ensure that they are instructed in safe practices by qualified persons.
Do not place any heavy objects on the appliance.
Do not clean the appliance with a steam cleaning apparatus or with water pressure because this poses a risk of short-circuits.
Adequate incoming air must be ensured if a wood, coal, gas or oil heater or an open hearth is operated in the same room as the one in which the hood is installed.
Safe operation is possible whenever the partial vacuum in the place where the firing equipment is installed does not exceed 4 Pa (0.04 mbar). This can be achieved whenever the air needed for combustion is able to enter through openings that cannot be sealed, for example in doors, windows, incoming/exhaust air wall boxes or other technical means.
Dispose of packaging materials properly (see Installation instructions).
This extractor hood is designed for domestic use only.
If malfunctions should occur, contact your dealer or Gaggenau after-sales service. In doing so, please specify the model number concerned (the rating plate is under the grease filter).
We cannot be held responsible for damage caused by failure to observe these instructions.
Technical modifications reserved.
Downloaded from www.Manualslib.com manuals search engine
Operation
Fig. 3
The control panel is built into the handle rail of the screen slide and is located on the right hand side. After installation, the unit can be operated from the front.
After activation, all function selection keys with the exception of the OFF key („Motor off") are back-lit in green.
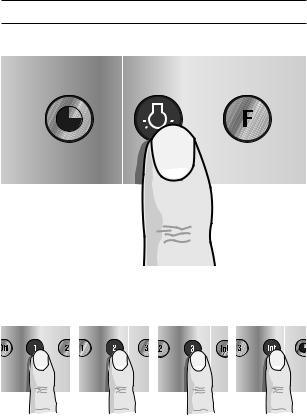
Light
The lighting can be switched on or off, regardless of whether the extractor is in operation, by pressing the 0 key (see Fig. 3).
|
|
|
Fan levels |
|
|
|
Three fan speeds and one intensive speed are |
|
|
|
available (see Fig. 4). |
or |
or |
or |
You set the fan level required to suit your needs by |
|
|
|
pressing the function selector keys 1, 2, 3 or Int. |
Fig. 4 |
|
|
The corresponding indicator lamp on the control |
|
|
|
panel lights up. |
7
Downloaded from www.Manualslib.com manuals search engine
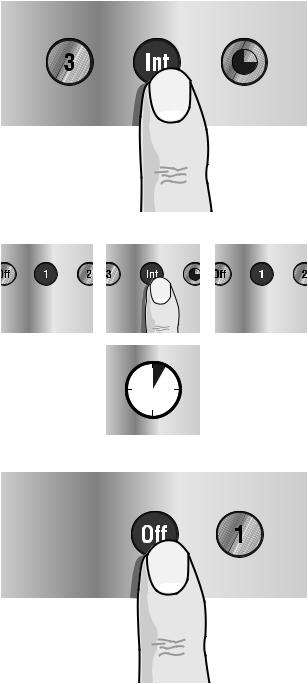
The Int key for the intensive level should be pressed when browning and frying in an open pan.
(see Fig. 5)
If you have switched on the hood by selecting the intensive level, it will be switched off again automatically after 5 minutes.
Fig. 5
If you press the Int key while the hood is running at fan level 1, 2 or 3 the electronic control will switch back automatically to the previously selected fan level after 5 minutes (see Fig. 6).
Fig. 6
Press the OFF key (motor off) if you wish to switch off the intensive level before the 5 minute period has elapsed (see Fig.7). You can switch off the hood’s extraction function at any time by pressing the OFF key (motor off).
Fig. 7
8
Downloaded from www.Manualslib.com manuals search engine
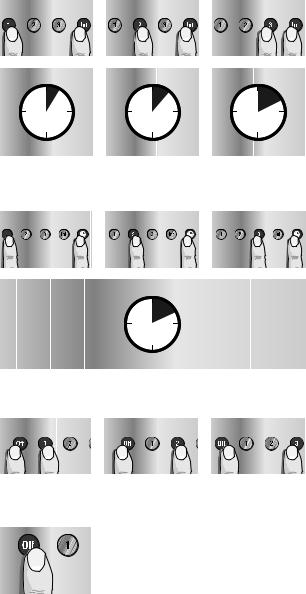
Fig. 8 |
or |
or |
or |
or |
Fig. 9
Fig. 10 |
or |
or |
Fig. 11
Special functions
Intensive:
You can set the hood on intensive for 3, 5 or
10 minutes by simultaneously pressing the Int key and the 1, 2 or 3 key and you can store this setting (see Fig. 8). When delivered, the appliance is set to five minutes, i.e. the combination of the Int key and the key 2.
After-running level:
You can set and store the after-running level by simultaneously pressing the key r and the key 1, 2 or 3 (see Fig. 9).
Level 2, i.e. the combination of the key r and the key 2, are set at the factory.
The after-running time for all settings is ten minutes. The ventilation and lighting functions switch off automatically after this time.
Interval ventilation:
Interval ventilation is a special feature of this appliance which activates the fan for five minutes every hour. You can activate this function by simultaneously pressing the OFF key and the 1, 2 or 3 key depending on the required extraction capacity (see Fig. 10).
This mode of operating is indicated by alternating Illumination of the key r together with the corresponding fan level indicator.
You can switch off interval ventilation by pressing the key OFF.
9
Downloaded from www.Manualslib.com manuals search engine
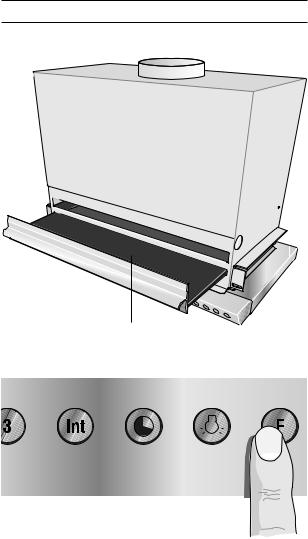
Cleaning and care
Fig. 12 |
Grease filter |
Fig. 13
10
The grease filter saturation display F flashes after operating 30 hours to indicate you that you should clean the grease filter (see Fig. 2). It goes without saying that the grease filter can be cleaned at any time, even if the grease filter saturation display is not flashing.
The metal grease filters can be removed easily for cleaning (see Fig. 12):
Grip the handle rail of the grease filter and pull the grease filter towards you out of the unit.
The metal grease filters can be cleaned in a dishwasher at a maximum temperature of 65 °C
(149 °F), where it should be supported vertically to allow food or residue to drain off.
Slight discolorations may occur when cleaning metal filters in a dishwasher.
If possible, the inner parts of the housing should be wiped out with hot water when replacing the filters.
The sound insulation mats can be cleaned easily.
Avoid using pointed or rough objects when cleaning them.
After cleaning it, re-insert the grease filter in the hood in the position from where you removed it.
The grease filter saturation display is reset by pressing the F key. Flashing of the indicating lamp goes off.
Note:
Activated charcoal filters do not contain any polluting substances. They can be disposed of through the normal refuse collection channels.
Downloaded from www.Manualslib.com manuals search engine
Activated |
Cover strip |
charcoal |
|
filter |
|
Fig. 14
Recirculating air mode
If you decided to purchase the hood with circulating air capability, you must replace the activated charcoal filter (optional) after a certain period of operation (see Fig. 14). If used once daily, the charcoal filter must be replaced approximately once to twice annually: First remove the grease filter from the mount. As shown in Fig. 14, remove the activated charcoal filter from the extractor towards you and replace the old one by a new activated charcoal filter.
Spare part Nos. for the activated charcoal filter:
•for AH 900-76 1 KF 900-055
•for AH 900-79 1 KF 900-090
Viewing window
The viewing window consisting of hardened glass should be cleaned as needed. It can be removed in the upward direction after pulling out the smoke screen. The viewing window can be cleaned in a dishwasher.
Clean the control panel with a moist cloth and a little detergent.
Do not use brushes or abrasive agents such as scrubbing cleaners.
11
Downloaded from www.Manualslib.com manuals search engine

Lamp replacement
Deactivate the wall hood's power supply as described on Page 4.
First remove the grease filter.
Detach the lamp cover by removing the screws that secure the lamp cover to the inside of the housing.
Remove the securing clip and first pull the fluorescent lamp downwards out of the plastic holder and then horizontally out of the socket.
Defective fluorescent lamps must only be replaced by lamps of the same type.
The original spare part:
• for AH 900-76 1
spare part number 211406
• for AH 900-79 1
spare part number 292103
is available from specialist dealers or your Gaggenau after-sales service.
Insert the new fluorescent lamp in the socket so that it audibly engages. Then press the lamp securely into the plastic holder and close the securing clip onto the holder. The lamp is now secure against dropping out.
Clean the lamp cover in mild detergent and then secure it on the hood again.
Connect the unit to the power again.
Note:
As standard, your hood contains a fluorescent tube with the colour „bright white". This ensures optimum illumination of your cooking area. If you wish a different colour, you can order the colours „warm tone" and „Interna” from your specialist dealer.
12
Downloaded from www.Manualslib.com manuals search engine

$ Important information
Installation
WARNING - TO REDUCE THE RISK OF FIRE, ELECTRIC SHOCK, OR INJURY TO PERSONS, OBSERVE THE FOLLOWING:
a.) Installation work and electrical wiring must be done by qualified person(s) in accordance with all applicable codes and standards, including fire-rated construction.
b.) Sufficient air is needed for proper combustion end exhausting of gases through the flue (chimney) of fuel burning equipment to prevent back drafting. Follow the heating equipment manufacturer’s guideline and safety standards such as those published by the National Fire Protection Association (NFPA), and the American Society for Heating, Refrigeration and Air Conditioning (ASHRAE), and the local code authorities.
c.) When cutting or drilling into wall or ceiling, do not damage electrical wiring and other hidden utilities.
d.) Ducted fans must always be vented to the outdoors.
e.) NEVER place a switch where it can be reached from a tub or shower.
WARNING – TO REDUCE THE RISK OF FIRE, USE ONLY METAL DUCTWORK.
WARNING:
The applicable regulations of the energy supply companies and the regional construction regulations must be observed when installing the hood.
Minimum distance between electric cooktop and bottom edge of hood: 18 1/2” (47 cm)
Minimum distance on gas cooktops between the upper edge of the grate and lower edge of the hood: 26” (65 cm)
Connection possibilities
The wall hood was conceived for the exhaust air or air recirculation mode. The exhaust air can be routed into a separate exhaust air shaft or directly into the open through the outside wall.
It is not allowed to pass the exhaust air into a flue or exhaust air chimney that is in operation or into a shaft that is linked to the heating basement. Consult the chimney sweep responsible for your district whenever you wish to pass the exhaust air into a chimney that is not in operation.
During the course of planning, a chimney sweep must be consulted if a room air-dependent hearth is operated in the same room as the one in which a hood is operated in the exhaust air mode. Adequate incoming air must be ensured. The applicable construction and safety regulations must be observed.
Adequate incoming air must be ensured if a wood, coal, gas or oil heater or an open hearth is operated in the same room as the one in which the hood is installed.
Safe operation is possible whenever the partial vacuum in the place where the firing equipment is installed does not exceed 4 Pa (0.04 mbar).
This can be achieved whenever the air needed for combustion is able to enter through openings that cannot be sealed, for example in doors, windows, incoming/exhaust air wall boxes or other technical means.
Grounding Instructions
The appliance must be grounded. In the event of an electrical short circuit, grounding reduces the risk of electric shock by providing an escape wire for the electric current. This appliance is equipped with a cord having a grounding wire with a grounding plug. The plug must be plugged into an outlet that is properly installed and grounded.
WARNING – IMPROPER GROUNDING CAN RESULT IN A RISK OF ELECTRIC SHOCK.
Consult a qualified electrician if the grounding instructions are not completely
understood, or if doubt exists as to whether the appliance is properly grounded.
Do not use an extension cord. If the power supply cord is too short, have a qualified electrician install an outlet near the appliance.
13
Downloaded from www.Manualslib.com manuals search engine

$ Important information
Electrical connection:
Observe the specifications on the rating plate. The unit may only be connected by an authorized electrician, who is responsible for the proper functioning at the time of installation.
He must explain operation of the unit to the User with reference to its instruction manual.
If the appliance cannot be disconnected completely from the power supply by means of an accessible plug, then a switch, fuse or circuit breaker which complies with local code must be installed.
The User should be instructed on how to disconnect the appliance in an emergency.
Notes on repair:
If the appliance does not function correctly check the fuses first. If the power supply is functioning correctly but your appliance still does not work, notify your Gaggenau dealer, who will provide you with the address an telephone number of your nearest factory authorized service agent or contact Gaggenau USA, +1 877 4GAGGENAU.
Repairs may only be carried out by authorized electrician in order to guarantee the safety of the appliance. Unauthorized tampering with the appliance will invalidate any warranty claims. The appliance must always be disconnected from the power supply when being repaired.
14
Old appliances are not worthless rubbish. Valuable raw materials can be reclaimed by recycling old appliances. Before disposing of your old appliance, render it unusable.
You received your new appliance in a protective shipping carton. All packaging materials are environmentally friendly and recyclable. Please contribute to a better environment by disposing of packaging materials in an environmentally-friendly manner.
Please ask your dealer or inquire at your local authority about current means of disposal.
The extractor hood can be used in exhaust air or circulating air mode.
Always mount the extractor hood over the centre of the hob.
The extractor hood must not be installed over a solid fuel cooker – a potential fire hazard (e.g. flying sparks) – unless the cooker features a closed, nonremovable cover and all national regulations are observed.
The smaller the gap between the extractor hood and hotplates, the greater the likelihood that droplets will form on the underside of the extractor hood.
Additional information concerning gas cookers:
When installing gas hotplates, comply with the relevant national statutory regulations (e.g. in Germany: Technische Regeln Gasinstallation TRGI).
Always comply with the currently valid regulations and installation instructions supplied by the gas appliance manufacturer.
Only one side of the extractor hood may be installed next to a high-sided unit or high wall. Gap at least 2”.
Downloaded from www.Manualslib.com manuals search engine

Wire diagram
AH900761 |
AH900791 |
15
Downloaded from www.Manualslib.com manuals search engine
 Loading...