


 Loading...
User's Guide
NPD5247-00 EN
User's Guide
Copyright
Copyright
No part of this publication may be reproduced, stored in a retrieval system, or transmitted in any form or by any means, electronic, mechanical, photocopying, recording, or otherwise, without the prior written permission of Seiko Epson Corporation. No patent liability is assumed with respect to the use of the information contained herein. Neither is any liability assumed for damages resulting from the use of the information herein. The information contained herein is designed only for use with this Epson product. Epson is not responsible for any use of this information as applied to other products.
Neither Seiko Epson Corporation nor its affiliates shall be liable to the purchaser of this product or third parties for damages, losses, costs, or expenses incurred by the purchaser or third parties as a result of accident, misuse, or abuse of this product or unauthorized modifications, repairs, or alterations to this product, or (excluding the U.S.) failure to strictly comply with Seiko Epson Corporation's operating and maintenance instructions.
Seiko Epson Corporation and its affiliates shall not be liable for any damages or problems arising from the use of any options or any consumable products other than those designated as Original Epson Products or Epson Approved Products by Seiko Epson Corporation.
Seiko Epson Corporation shall not be held liable for any damage resulting from electromagnetic interference that occurs from the use of any interface cables other than those designated as Epson Approved Products by Seiko Epson Corporation.
© 2015 Seiko Epson Corporation. All rights reserved.
The contents of this manual and the specifications of this product are subject to change without notice.
2
User's Guide
Trademarks
Trademarks
EPSON®is a registered trademark, and EPSON EXCEED YOUR VISION or EXCEED YOUR VISION is a trademark of Seiko Epson Corporation.
PRINT Image Matching™ and the PRINT Image Matching logo are trademarks of Seiko Epson Corporation. Copyright © 2001 Seiko Epson Corporation. All rights reserved.
EPSON Scan software is based in part on the work of the Independent JPEG Group.
libtiff
Copyright © 1988-1997 Sam Leffler Copyright © 1991-1997 Silicon Graphics, Inc.
Permission to use, copy, modify, distribute, and sell this software and its documentation for any purpose is hereby granted without fee, provided that (i) the above copyright notices and this permission notice appear in all copies of the software and related documentation, and (ii) the names of Sam Leffler and Silicon Graphics may not be used in any advertising or publicity relating to the software without the specific, prior written permission of Sam Leffler and Silicon Graphics.
THE SOFTWARE IS PROVIDED "AS-IS" AND WITHOUT WARRANTY OF ANY KIND, EXPRESS, IMPLIED OR OTHERWISE, INCLUDING WITHOUT LIMITATION, ANY WARRANTY OF MERCHANTABILITY OR FITNESS FOR A PARTICULAR PURPOSE.
IN NO EVENT SHALL SAM LEFFLER OR SILICON GRAPHICS BE LIABLE FOR ANY SPECIAL, INCIDENTAL, INDIRECT OR CONSEQUENTIAL DAMAGES OF ANY KIND, OR ANY DAMAGES WHATSOEVER RESULTING FROM LOSS OF USE, DATA OR PROFITS, WHETHER OR NOT ADVISED OF THE POSSIBILITY OF DAMAGE, AND ON ANY THEORY OF LIABILITY, ARISING OUT OF OR IN CONNECTION WITH THE USE OR PERFORMANCE OF THIS SOFTWARE.
Microsoft®, Windows®, and Windows Vista®are registered trademarks of Microsoft Corporation.
Apple, Macintosh, Mac OS, OS X, Bonjour, Safari, iPad, iPhone, iPod touch, and iTunes are trademarks of Apple Inc., registered in the U.S. and other countries. AirPrint and the AirPrint logo are trademarks of Apple Inc.
Google Cloud Print™, Chrome™, Chrome OS™, and Android™ are trademarks of Google Inc.
Adobe, Adobe Reader, Acrobat, and Photoshop are trademarks of Adobe systems Incorporated, which may be registered in certain jurisdictions.
Intel® is a registered trademark of Intel Corporation.
General Notice: Other product names used herein are for identification purposes only and may be trademarks of their respective owners. Epson disclaims any and all rights in those marks.
3

User's Guide
Contents
Contents
Copyright
Trademarks
About This Manual
Introduction to the Manuals. . . . . . . . . . . . . . . . . . .7 Marks and Symbols. . . . . . . . . . . . . . . . . . . . . . . . . 7 Descriptions Used in this Manual. . . . . . . . . . . . . . . 8 Operating System References. . . . . . . . . . . . . . . . . . 8
Important Instructions
Safety Instructions. . . . . . . . . . . . . . . . . . . . . . . . . . 9
Printer Advisories and Warnings. . . . . . . . . . . . . . . 9
Advisories and Warnings for Setting Up the Printer. . . . . . . . . . . . . . . . . . . . . . . . . . . . . . . .10 Advisories and Warnings for Using the Printer. . 10 Advisories and Warnings for Transporting or Storing the Printer. . . . . . . . . . . . . . . . . . . . . . . 11 Advisories and Warnings for Using the
Printer with a Wireless Connection. . . . . . . . . . . 11 Advisories and Warnings for Using the LCD Screen. . . . . . . . . . . . . . . . . . . . . . . . . . . . . . . . 11
Protecting Your Personal Information. . . . . . . . . . . 11
Printer Basics
Part Names and Functions. . . . . . . . . . . . . . . . . . . 12 Control Panel. . . . . . . . . . . . . . . . . . . . . . . . . . . . 14 Buttons and Lights. . . . . . . . . . . . . . . . . . . . . . . 14 Icons Displayed on the LCD Screen. . . . . . . . . . .15 Menu Options. . . . . . . . . . . . . . . . . . . . . . . . . . . . 15
Copy Mode. . . . . . . . . . . . . . . . . . . . . . . . . . . . 15
Scan Mode. . . . . . . . . . . . . . . . . . . . . . . . . . . . 16
Fax Mode. . . . . . . . . . . . . . . . . . . . . . . . . . . . . 17
Setup Mode. . . . . . . . . . . . . . . . . . . . . . . . . . . .18
Loading Paper
Paper Handling Precautions. . . . . . . . . . . . . . . . . . 23
Available Paper and Capacities. . . . . . . . . . . . . . . . 24
List of Paper Types. . . . . . . . . . . . . . . . . . . . . . . 24
Loading Paper in the Rear Paper Feed. . . . . . . . . . . 25
Placing Originals
Available Originals for the ADF. . . . . . . . . . . . . . . 29
Placing Originals on the ADF. . . . . . . . . . . . . . . . . 29
Placing Originals on the Scanner Glass. . . . . . . . . . 30
Printing
Printing from a Computer. . . . . . . . . . . . . . . . . . . 32
Printing Basics - Windows. . . . . . . . . . . . . . . . . 32 Printing Basics - Mac OS X. . . . . . . . . . . . . . . . .34 Printing on 2-Sides (for Windows only). . . . . . . .36 Printing Several Pages on One Sheet. . . . . . . . . . 37 Printing to Fit the Paper Size. . . . . . . . . . . . . . . .38 Printing Multiple Files Together (for
Windows Only). . . . . . . . . . . . . . . . . . . . . . . . . 39 Printing One Image on Multiple Sheets to
Create a Poster (for Windows Only). . . . . . . . . . 40 Printing Using Advanced Features. . . . . . . . . . . 46 Printing Photos Using Epson Easy Photo Print. . 48
Printing from Smart Devices. . . . . . . . . . . . . . . . . 48
Using Epson iPrint. . . . . . . . . . . . . . . . . . . . . . . 48
Using AirPrint. . . . . . . . . . . . . . . . . . . . . . . . . . 50
Canceling Printing. . . . . . . . . . . . . . . . . . . . . . . . . 51
Canceling Printing - Printer Button. . . . . . . . . . .51
Canceling Printing - Windows. . . . . . . . . . . . . . 51
Canceling Printing - Mac OS X. . . . . . . . . . . . . . 51
Copying
Scanning
Scanning Using the Control Panel. . . . . . . . . . . . . .53
Scanning to the Cloud. . . . . . . . . . . . . . . . . . . . 53 Scanning to a Computer. . . . . . . . . . . . . . . . . . . 53 Scanning to a Computer (WSD). . . . . . . . . . . . . 54
Scanning from a Computer. . . . . . . . . . . . . . . . . . .54
Scanning Basics. . . . . . . . . . . . . . . . . . . . . . . . . 54
Scanning Using Advanced Features. . . . . . . . . . .56
Scanning from Smart Devices. . . . . . . . . . . . . . . . . 59
Installing Epson iPrint. . . . . . . . . . . . . . . . . . . . 59
Using Epson iPrint. . . . . . . . . . . . . . . . . . . . . . . 59
Faxing
Setting Up a Fax. . . . . . . . . . . . . . . . . . . . . . . . . . .61
Connecting to a Phone Line. . . . . . . . . . . . . . . . 61 Making Basic Fax Settings. . . . . . . . . . . . . . . . . 64
4

User's Guide
Contents
Registering Contacts for Faxing. . . . . . . . . . . . . . . 67
Registering Contacts. . . . . . . . . . . . . . . . . . . . . 67
Registering Grouped Contacts. . . . . . . . . . . . . . 67
Registration and Backup of Contacts Using a
Computer. . . . . . . . . . . . . . . . . . . . . . . . . . . . . 68
Sending Faxes. . . . . . . . . . . . . . . . . . . . . . . . . . . . 68
Basic Fax Sending Operations. . . . . . . . . . . . . . .68
Various Ways of Sending Faxes. . . . . . . . . . . . . . 69
Receiving Faxes. . . . . . . . . . . . . . . . . . . . . . . . . . . 70
Setting Receiving Mode. . . . . . . . . . . . . . . . . . . 70 Various Ways of Receiving Faxes. . . . . . . . . . . . .71 Saving Received Faxes on a Computer. . . . . . . . .73
Using Other Faxing Features. . . . . . . . . . . . . . . . . .74
Printing Fax Report and List. . . . . . . . . . . . . . . .74
Reprinting Received Faxes. . . . . . . . . . . . . . . . . . . 74
Refilling Ink
Checking the Ink Levels. . . . . . . . . . . . . . . . . . . . . 76
Checking the Ink Levels - Windows. . . . . . . . . . .76
Checking the Ink Levels - Mac OS X. . . . . . . . . . 76
Ink Bottle Codes. . . . . . . . . . . . . . . . . . . . . . . . . . 77
Ink Bottle Handling Precautions. . . . . . . . . . . . . . . 77
Ref illing the Ink Tanks. . . . . . . . . . . . . . . . . . . . . . 78
Improving Print and Scan Quality
Checking and Cleaning the Print Head. . . . . . . . . . 82
Checking and Cleaning the Print Head -
Control Panel. . . . . . . . . . . . . . . . . . . . . . . . . . 82
Checking and Cleaning the Print Head -
Windows. . . . . . . . . . . . . . . . . . . . . . . . . . . . . . 83
Checking and Cleaning the Print Head -
Mac OS X. . . . . . . . . . . . . . . . . . . . . . . . . . . . . 83
Replacing Ink inside the Ink Tubes. . . . . . . . . . . . . 84
Replacing Ink inside the Ink Tubes - Windows. . .84 Replacing Ink inside the Ink Tubes - Mac OS X. . 84
Aligning the Print Head. . . . . . . . . . . . . . . . . . . . . 84
Aligning the Print Head - Control Panel. . . . . . . 84
Aligning the Print Head - Windows. . . . . . . . . . .85
Aligning the Print Head - Mac OS X. . . . . . . . . . 85
Cleaning the Paper Path for Ink Smear. . . . . . . . . . 86
Cleaning the ADF. . . . . . . . . . . . . . . . . . . . . . . . . 86
Cleaning the Scanner Glass. . . . . . . . . . . . . . . . . . .88
Network Service and Software
Information
Epson Connect Service. . . . . . . . . . . . . . . . . . . . . .89
Web Conf ig. . . . . . . . . . . . . . . . . . . . . . . . . . . . . . 89
Running Web Config on a Web Browser. . . . . . . 90 Running Web Conf ig on Windows. . . . . . . . . . . 90 Running Web Conf ig on Mac OS X. . . . . . . . . . . 90
Windows Printer Driver. . . . . . . . . . . . . . . . . . . . . 91
Restricting Settings for the Windows Printer Driver. . . . . . . . . . . . . . . . . . . . . . . . . . . . . . . . 91 Making Operation Settings for the Windows Printer Driver. . . . . . . . . . . . . . . . . . . . . . . . . . 92
Mac OS X Printer Driver. . . . . . . . . . . . . . . . . . . . 92
Making Operation Settings for the Mac OS X Printer Driver. . . . . . . . . . . . . . . . . . . . . . . . . . 93
EPSON Scan (Scanner Driver). . . . . . . . . . . . . . . . 93
Epson Event Manager. . . . . . . . . . . . . . . . . . . . . . .93
PC-FAX Driver (Fax Driver). . . . . . . . . . . . . . . . . .94
FAX Utility. . . . . . . . . . . . . . . . . . . . . . . . . . . . . . 94
Epson Easy Photo Print. . . . . . . . . . . . . . . . . . . . . 95
E-Web Print (for Windows Only). . . . . . . . . . . . . . 95
EPSON Software Updater. . . . . . . . . . . . . . . . . . . .95
EpsonNet Conf ig. . . . . . . . . . . . . . . . . . . . . . . . . . 96
Uninstalling Applications. . . . . . . . . . . . . . . . . . . . 96
Uninstalling Applications - Windows. . . . . . . . . 96
Uninstalling Applications - Mac OS X. . . . . . . . . 97
Installing Applications. . . . . . . . . . . . . . . . . . . . . . 98
Updating Applications and Firmware. . . . . . . . . . . 98
Solving Problems
Checking the Printer Status. . . . . . . . . . . . . . . . . . 99
Checking Messages on the LCD Screen. . . . . . . . 99 Checking the Printer Status - Windows. . . . . . . 100 Checking Printer Status - Mac OS X. . . . . . . . . 100
Removing Jammed Paper. . . . . . . . . . . . . . . . . . . 100
Removing Jammed Paper from the Rear
Paper Feed. . . . . . . . . . . . . . . . . . . . . . . . . . . .101 Removing Jammed Paper from Inside the
Printer. . . . . . . . . . . . . . . . . . . . . . . . . . . . . . .101 Removing Jammed Paper from the ADF. . . . . . 103
Paper Does Not Feed Correctly. . . . . . . . . . . . . . . 104
Paper Jams. . . . . . . . . . . . . . . . . . . . . . . . . . . .105 Paper Feeds at a Slant. . . . . . . . . . . . . . . . . . . . 105 Several Sheets of Paper are Fed at a Time. . . . . . 105 No Paper Feeds. . . . . . . . . . . . . . . . . . . . . . . . 105 Paper Out Error Occurs. . . . . . . . . . . . . . . . . . 105 Original Does Not Feed in the ADF. . . . . . . . . .105
Power and Control Panel Problems. . . . . . . . . . . . 106
Power Does Not Turn On. . . . . . . . . . . . . . . . . 106
Power Does Not Turn Of f. . . . . . . . . . . . . . . . . 106
LCD Screen Gets Dark. . . . . . . . . . . . . . . . . . . 106
5

User's Guide
Contents
Printer Does Not Print. . . . . . . . . . . . . . . . . . . . . 106
Printout Problems. . . . . . . . . . . . . . . . . . . . . . . . 107
Nothing or a Very Faint Image is Printed. . . . . . 107 Print Quality Is Poor. . . . . . . . . . . . . . . . . . . . 107 Copy Quality Is Poor. . . . . . . . . . . . . . . . . . . . 108 An Image of the Reverse Side of the Original Appears in the Copied Image. . . . . . . . . . . . . . 109 The Position, Size, or Margins of the Printout
Are Incorrect. . . . . . . . . . . . . . . . . . . . . . . . . . 109 Paper Is Smeared or Scuffed. . . . . . . . . . . . . . . 109 Printed Characters Are Incorrect or Garbled. . . 110 T he Printed Image Is Inverted. . . . . . . . . . . . . . 110 The Printout Problem Could Not be Cleared. . . 110
Other Printing Problems. . . . . . . . . . . . . . . . . . . 110
Printing Is Too Slow. . . . . . . . . . . . . . . . . . . . . 110
Printing Slows Down Dramatically During
Continuous Printing. . . . . . . . . . . . . . . . . . . . .111
Cannot Start Scanning. . . . . . . . . . . . . . . . . . . . . 111
Cannot Start Scanning when Using the
Control Panel. . . . . . . . . . . . . . . . . . . . . . . . . .112
Scanned Image Problems. . . . . . . . . . . . . . . . . . . 112
Scan Quality Is Poor. . . . . . . . . . . . . . . . . . . . . 112 Characters Are Blurred. . . . . . . . . . . . . . . . . . .113 An Image of the Reverse Side of the Original Appears in the Scanned Image. . . . . . . . . . . . . 113 Moiré (Cross-Hatch) Patterns Appear in the Scanned Image. . . . . . . . . . . . . . . . . . . . . . . . .113 Scanning Area or Direction Is Not Correct. . . . 113 The Scanned Image Problem Could Not be Cleared. . . . . . . . . . . . . . . . . . . . . . . . . . . . . . 114
Other Scanning Problems. . . . . . . . . . . . . . . . . . . 114
Thumbnail Preview Does Not Work Properly. . .114 Scanning Is Too Slow. . . . . . . . . . . . . . . . . . . . 114 Scanning Stops when Scanning to PDF/ Multi-TIFF. . . . . . . . . . . . . . . . . . . . . . . . . . . 115
Problems when Sending and Receiving Faxes. . . . .115
Cannot Send or Receive Faxes. . . . . . . . . . . . . .115 Cannot Send Faxes. . . . . . . . . . . . . . . . . . . . . . 116 Cannot Send Faxes to a Specific Recipient. . . . . 116 Cannot Send Faxes at a Specif ied Time. . . . . . . 117 Cannot Receive Faxes. . . . . . . . . . . . . . . . . . . . 117 Memory Full Error Occurs. . . . . . . . . . . . . . . . 117 Sent Fax Quality Is Poor. . . . . . . . . . . . . . . . . . 118 Faxes Are Sent at the Wrong Size. . . . . . . . . . . .118 Received Fax Quality Is Poor. . . . . . . . . . . . . . .118 Received Faxes Are Not Printed. . . . . . . . . . . . 118
Other Faxing Problems. . . . . . . . . . . . . . . . . . . . .119
Cannot Make Calls on the Connected
Telephone. . . . . . . . . . . . . . . . . . . . . . . . . . . . 119
Answering Machine Cannot Answer Voice
Calls. . . . . . . . . . . . . . . . . . . . . . . . . . . . . . . . 119 Sender's Fax Number Not Displayed on
Received Faxes or the Number Is Wrong. . . . . . 119
Other Problems. . . . . . . . . . . . . . . . . . . . . . . . . . 119
Slight Electric Shock when Touching the
Printer. . . . . . . . . . . . . . . . . . . . . . . . . . . . . . .119 Operation Sounds Are Loud. . . . . . . . . . . . . . . 119 T he ADF Does Not Work. . . . . . . . . . . . . . . . . 120 T he Date and Time Are Incorrect. . . . . . . . . . . 120 Application Is Blocked by a Firewall (for
Windows Only). . . . . . . . . . . . . . . . . . . . . . . . 120 A Message Prompting You to Reset the Ink
Levels is Displayed. . . . . . . . . . . . . . . . . . . . . . 120
Appendix
Technical Specif ications. . . . . . . . . . . . . . . . . . . . 121
Printer Specif ications. . . . . . . . . . . . . . . . . . . . 121 Scanner Specifications. . . . . . . . . . . . . . . . . . . 121 Interface Specifications. . . . . . . . . . . . . . . . . . . 122 Fax Specif ications. . . . . . . . . . . . . . . . . . . . . . .122 Wi-Fi Specif ications. . . . . . . . . . . . . . . . . . . . . 122 Ethernet Specifications. . . . . . . . . . . . . . . . . . . 123 Security Protocol. . . . . . . . . . . . . . . . . . . . . . . 123 Supported T hird Party Services. . . . . . . . . . . . . 123 Dimensions. . . . . . . . . . . . . . . . . . . . . . . . . . . 124 Electrical Specifications. . . . . . . . . . . . . . . . . . 124 Environmental Specifications. . . . . . . . . . . . . . 125 System Requirements. . . . . . . . . . . . . . . . . . . . 125
Regulatory Information. . . . . . . . . . . . . . . . . . . . 126
Standards and Approvals. . . . . . . . . . . . . . . . . 126 Restrictions on Copying. . . . . . . . . . . . . . . . . . 127
Checking the Total Number of Pages Fed
T hrough the Printer. . . . . . . . . . . . . . . . . . . . . . . 127
Checking the Total Number of Pages Fed
T hrough the Printer - Control Panel. . . . . . . . . 128 Checking the Total Number of Pages Fed
T hrough the Printer - Windows. . . . . . . . . . . . .128 Checking the Total Number of Pages Fed
T hrough the Printer - Mac OS X. . . . . . . . . . . . 128
Saving Power. . . . . . . . . . . . . . . . . . . . . . . . . . . . 128
Saving Power - Control Panel. . . . . . . . . . . . . . 128
Transporting the Printer. . . . . . . . . . . . . . . . . . . . 129
Where to Get Help. . . . . . . . . . . . . . . . . . . . . . . . 131
Technical Support Web Site. . . . . . . . . . . . . . . .131
Contacting Epson Support. . . . . . . . . . . . . . . . 131
6

User's Guide
About This Manual
About This Manual
Introduction to the Manuals
The following manuals are supplied with your Epson printer. As well as the manuals, see the help included in the various Epson software applications.
Start Here (paper manual)
Provides you with information on setting up the printer, installing the software, using the printer, solving problems, and so on.
User's Guide (digital manual)
This manual. Provides overall information and instructions on using the printer, and on solving problems.
Network Guide (digital manual)
Provides information on network settings and solving problems when using the printer on a network.
You can obtain the latest versions of the above manuals with the following methods.
Paper manual
Visit the Epson Europe support website at http://www.epson.eu/Support, or the Epson worldwide support website at http://support.epson.net/.
Digital manual
Start EPSON Software Updater on your computer. EPSON Software Updater checks for available updates of Epson software applications and the digital manuals, and allows you to download the latest ones.
Related Information
& “EPSON Software Updater” on page 95
Marks and Symbols
!Caution:
Instructions that must be followed carefully to avoid bodily injury.
cImportant:
Instructions that must be observed to avoid damage to your equipment.
Note:
Provides complementary and reference information.
& Related Information
Links to related sections.
7

User's Guide
About This Manual
Descriptions Used in this Manual
Screenshots of the printer driver and the EPSON Scan (scanner driver) screens are from Windows 8.1 or Mac OS X v10.10.x. The content displayed on the screens varies depending on the model and situation.
Illustrations of the printer used in this manual are examples only. Although there may be slight differences depending on the model, the method of operation is the same.
Some of the menu items on the LCD screen vary depending on the model and settings.
Operating System References
Windows
In this manual, terms such as "Windows 8.1", "Windows 8", "Windows 7", "Windows Vista", "Windows XP", "Windows Server 2012 R2", "Windows Server 2012", "Windows Server 2008 R2", "Windows Server 2008", "Windows Server 2003 R2", and "Windows Server 2003" refer to the following operating systems. Additionally, "Windows" is used to refer to all versions.
Microsoft® Windows® 8.1 operating system
Microsoft® Windows® 8 operating system
Microsoft® Windows® 7 operating system
Microsoft® Windows Vista® operating system
Microsoft® Windows® XP operating system
Microsoft® Windows® XP Professional x64 Edition operating system
Microsoft® Windows Server®2012 R2 operating system
Microsoft® Windows Server®2012 operating system
Microsoft® Windows Server®2008 R2 operating system
Microsoft® Windows Server®2008 operating system
Microsoft® Windows Server®2003 R2 operating system
Microsoft® Windows Server®2003 operating system
Mac OS X
In this manual, "Mac OS X v10.10.x" refers to OS X Yosemite, "Mac OS X v10.9.x" refers to OS X Mavericks, and "Mac OS X v10.8.x" refers to OS X Mountain Lion. Additionally, "Mac OS X" is used to refer to "Mac OS X v10.10.x", "Mac OS X v10.9.x", "Mac OS X v10.8.x", "Mac OS X v10.7.x", and "Mac OS X v10.6.8".
8

User's Guide
Important Instructions
Important Instructions
Safety Instructions
Read and follow these instructions to ensure safe use of this printer. Make sure you keep this manual for future reference. Also, be sure to follow all warnings and instructions marked on the printer.
Use only the power cord supplied with the printer and do not use the cord with any other equipment. Use of other cords with this printer or the use of the supplied power cord with other equipment may result in fire or electric shock.
Be sure your AC power cord meets the relevant local safety standard.
Never disassemble, modify, or attempt to repair the power cord, plug, printer unit, scanner unit, or options by yourself, except as specifically explained in the printer's manuals.
Unplug the printer and refer servicing to qualified service personnel under the following conditions:
The power cord or plug is damaged; liquid has entered the printer; the printer has been dropped or the casing damaged; the printer does not operate normally or exhibits a distinct change in performance. Do not adjust controls that are not covered by the operating instructions.
Place the printer near a wall outlet where the plug can be easily unplugged.
Do not place or store the printer outdoors, near excessive dirt or dust, water, heat sources, or in locations subject to shocks, vibrations, high temperature or humidity.
Take care not to spill liquid on the printer and not to handle the printer with wet hands.
Keep the printer at least 22 cm away from cardiac pacemakers. Radio waves from this printer may adversely affect the operation of cardiac pacemakers.
If the LCD screen is damaged, contact your dealer. If the liquid crystal solution gets on your hands, wash them thoroughly with soap and water. If the liquid crystal solution gets into your eyes, flush them immediately with water. If discomfort or vision problems remain after a thorough flushing, see a doctor immediately.
Avoid using a telephone during an electrical storm. There may be a remote risk of electric shock from lightning.
Do not use a telephone to report a gas leak in the vicinity of the leak.
Be careful not to touch any ink when you handle the ink tanks, ink tank caps, and opened ink bottles or ink bottle caps.
If ink gets on your skin, wash the area thoroughly with soap and water.
If ink gets into your eyes, flush them immediately with water. If discomfort or vision problems continue after a thorough flushing, see a doctor immediately.
If ink gets into your mouth, see a doctor right away.
Do not tilt or shake an ink bottle after removing its seal; this can cause leakage.
Keep ink bottles and the ink tank unit out of the reach of children. Do not allow children to drink from or handle the ink bottles and ink bottle cap.
Printer Advisories and Warnings
Read and follow these instructions to avoid damaging the printer or your property. Make sure you keep this manual for future reference.
9
User's Guide
Important Instructions
Advisories and Warnings for Setting Up the Printer
Do not block or cover the vents and openings in the printer.
Use only the type of power source indicated on the printer's label.
Avoid using outlets on the same circuit as photocopiers or air control systems that regularly switch on and off.
Avoid electrical outlets controlled by wall switches or automatic timers.
Keep the entire computer system away from potential sources of electromagnetic interference, such as loudspeakers or the base units of cordless telephones.
The power-supply cords should be placed to avoid abrasions, cuts, fraying, crimping, and kinking. Do not place objects on top of the power-supply cords and do not allow the power-supply cords to be stepped on or run over. Be particularly careful to keep all the power-supply cords straight at the ends and the points where they enter and leave the transformer.
If you use an extension cord with the printer, make sure that the total ampere rating of the devices plugged into the extension cord does not exceed the cord's ampere rating. Also, make sure that the total ampere rating of all devices plugged into the wall outlet does not exceed the wall outlet's ampere rating.
If you plan to use the printer in Germany, the building installation must be protected by a 10 or 16 amp circuit breaker to provide adequate short-circuit protection and over-current protection for the printer.
When connecting the printer to a computer or other device with a cable, ensure the correct orientation of the connectors. Each connector has only one correct orientation. Inserting a connector in the wrong orientation may damage both devices connected by the cable.
Place the printer on a flat, stable surface that extends beyond the base of the printer in all directions. The printer will not operate properly if it is tilted at an angle.
Allow space above the printer so that you can fully raise the document cover.
Leave enough space in front of the printer for the paper to be fully ejected.
Avoid places subject to rapid changes in temperature and humidity. Also, keep the printer away from direct sunlight, strong light, or heat sources.
Advisories and Warnings for Using the Printer
Do not insert objects through the slots in the printer.
Do not put your hand inside the printer during printing.
Do not touch the white flat cable and ink tubes inside the printer.
Do not use aerosol products that contain flammable gases inside or around the printer. Doing so may cause fire.
Do not move the print head by hand; otherwise, you may damage the printer.
Be careful not to trap your fingers when closing the scanner unit.
Do not press too hard on the scanner glass when placing the originals.
Prolonged use of the printer when the ink level is below the lower line could damage the printer. Epson recommends filling the ink tank to the upper line when the printer is not operating to reset the ink level.
Always turn the printer off using the P button. Do not unplug the printer or turn off the power at the outlet until the P light stops flashing.
If you are not going to use the printer for a long period, be sure to unplug the power cord from the electrical outlet.
10
User's Guide
Important Instructions
Advisories and Warnings for Transporting or Storing the Printer
When storing or transporting the printer, avoid tilting it, placing it vertically, or turning it upside down; otherwise ink may leak.
Before transporting the printer, make sure that the print head is in the home (far right) position.
Advisories and Warnings for Using the Printer with a Wireless Connection
Radio waves from this printer may negatively affect the operation of medical electronic equipment, causing them to malfunction. When using this printer inside medical facilities or near medical equipment, follow directions from the authorized personnel representing the medical facilities, and follow all posted warnings and directions on the medical equipment.
Radio waves from this printer may negatively affect the operation of automatically controlled devices such as automatic doors or fire alarms, and could lead to accidents due to malfunction. When using this printer near automatically controlled devices, follow all posted warnings and directions on these devices.
Advisories and Warnings for Using the LCD Screen
The LCD screen may contain a few small bright or dark spots, and because of its features it may have an uneven brightness. These are normal and do not indicate that it is damaged in any way.
Only use a dry, soft cloth for cleaning. Do not use liquid or chemical cleaners.
The exterior cover of the LCD screen could break if it receives a heavy impact. Contact your dealer if the screen's surface chips or cracks, and do not touch or attempt to remove the broken pieces.
Protecting Your Personal Information
When you give the printer to someone else or dispose of it, erase all the personal information stored in the printer's memory by selecting Setup > Restore Default Settings > Clear All Data and Settings on the control panel.
11
User's Guide
Printer Basics
Printer Basics
Part Names and Functions
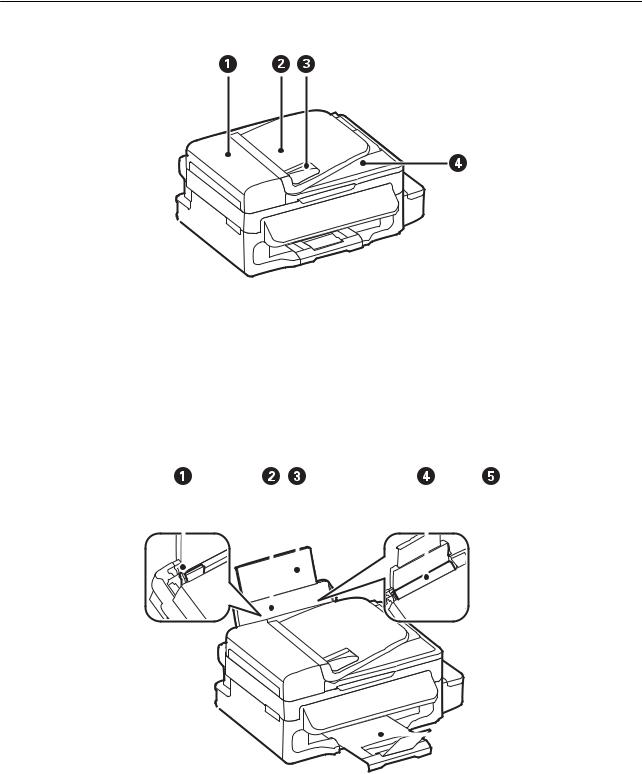
A |
ADF (Automatic Document Feeder) cover |
Open when removing jammed originals in the ADF. |
||||||
|
|
|
|
|
|
|
|
|
B |
ADF input tray |
Feeds originals automatically. |
||||||
|
|
|
|
|
|
|
|
|
C |
ADF edge guide |
Feeds originals straight into the printer. Slide to the |
||||||
|
|
|
edges of the originals. |
|||||
|
|
|
|
|
|
|
|
|
D |
ADF output tray |
Holds originals ejected from the ADF. |
||||||
|
|
|
|
|
|
|
|
|
|
|
|
|
|
|
|
|
|
|
|
|
|
|
|
|
|
|
|
|
|
|
|
|
|
|
|
|
|
|
|
|
|
|
|
|
|
|
|
|
|
|
|
|
|
|
|
|
|
|
|
|
|
|
A |
Edge guide |
Feeds the paper straight into the printer. Slide to the |
|
|
edges of the paper. |
|
|
|
12
User's Guide
|
|
Printer Basics |
|||||||
|
|
|
|
|
|
|
|
|
|
B |
Rear paper feed |
|
|
|
|
Loads paper. |
|||
|
|
|
|
|
|
|
|
|
|
C |
Paper support |
|
|
|
|
Supports loaded paper. |
|||
|
|
|
|
|
|
|
|
|
|
D |
Feeder guard |
|
|
|
|
Prevents foreign substance from entering the printer. |
|||
|
|
|
|
|
|
Usually keep this guard closed. |
|||
|
|
|
|
|
|
|
|
|
|
E |
Output tray |
|
|
|
|
Holds the ejected paper. |
|||
|
|
|
|
|
|
|
|
|
|
|
|
|
|
|
|
|
|
|
|
|
|
|
|
|
|
|
|
|
|
|
|
|
|
|
|
|
|
|
|
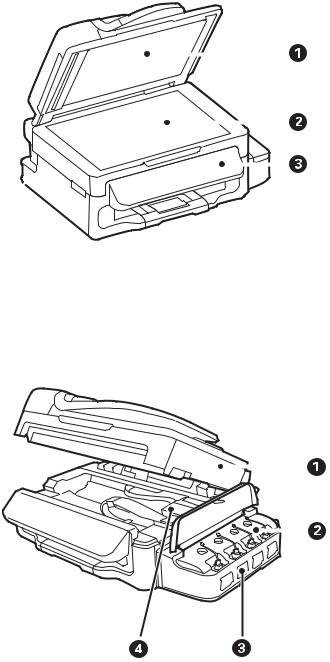
A |
Document cover |
Blocks external light while scanning. |
||||
|
|
|
|
|
|
|
B |
Scanner glass |
Place the originals. |
||||
|
|
|
|
|
|
|
C |
Control panel |
Operates the printer. |
||||
|
|
|
|
|
|
|
|
|
|
|
|
|
|
|
|
|
|
|
|
|
|
|
|
|
|
|
|
|
|
|
|
|
|
|
A |
Scanner unit |
Scans placed originals. Open when removing jammed |
|
|
paper inside the printer. |
|
|
|
B |
Ink tank unit |
Contains the ink tanks. |
|
|
|
13

User's Guide
|
|
Printer Basics |
C |
Ink reservoir tanks (Ink tanks) |
Supplies ink to the print head. |
D |
Print head (under this section) |
Fires ink. |
A |
AC inlet |
Connects the power cord. |
|
|
|
B |
USB port |
Connects a USB cable. |
|
|
|
C |
LINE port |
Connects a phone line. |
|
|
|
D |
EXT. port |
Connects external phone devices. |
|
|
|
E |
LAN port |
Connects a LAN cable. |
|
|
|
Control Panel
Buttons and Lights
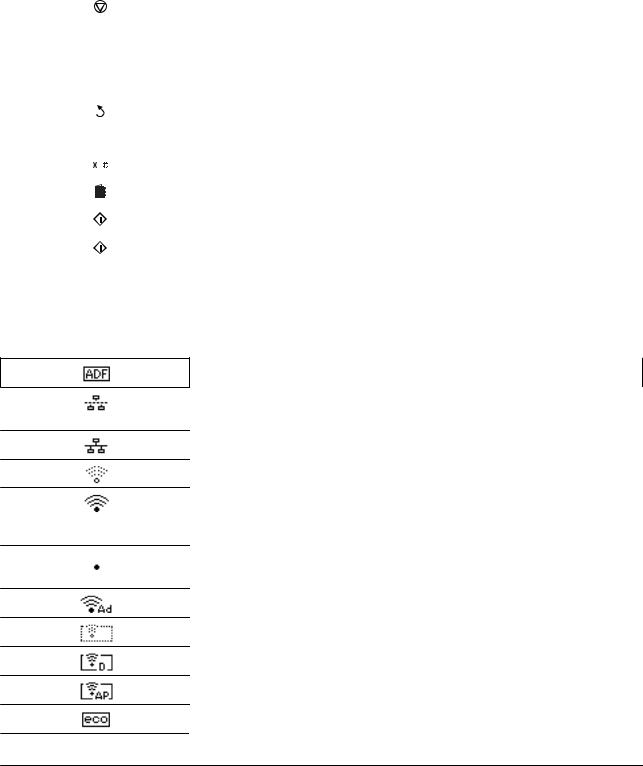
A |
|
Turns the printer on or off. |
|
|
Unplug the power cord when the power light is off. |
|
|
|
B |
|
Displays the home screen. |
|
|
|
C |
|
Enter the last dialed number or enter a pause when entering a fax number. |
|
|
|
14
User's Guide
Printer Basics
D |
|
Stops the current operation. |
|
|
|
E |
- |
Displays menus and messages. |
|
|
|
F |
l, u, r, d, OK |
Press l, u, r, and d to select menus. Press OK to confirm your selection or run the selected |
|
|
feature. |
|
|
|
G |
|
Returns to the previous screen. |
|
|
|
H |
0 - 9 |
Enters numbers, characters, and symbols. |
|
, |
|
|
|
|
I |
|
Opens the contacts list. |
|
|
|
J |
|
Starts printing, copying, scanning, and faxing in black and white. |
|
|
|
K |
|
Starts printing, copying, scanning, and faxing in color. |
|
|
|
Icons Displayed on the LCD Screen
The following icons are displayed on the LCD screen depending on the printer's status.
Turns on when originals are placed in the ADF.
Turns on when the wired (Ethernet) network is disabled and an Ethernet cable is not connected.
Turns on while the printer is connected to a wired (Ethernet) network.
Turns on while the printer is not connected to a wireless (Wi-Fi) network.
Turns on while the printer is connected to a wireless (Wi-Fi) network. The number of bars indicates the signal strength of the connection. The more bars there are, the stronger the connection.
Indicates a problem with the printer's wireless (Wi-Fi) network connection, or that the printer is searching for a wireless (Wi-Fi) network connection.
Indicates that the printer is connected to a network in Ad Hoc mode.
Indicates that Simple AP mode and Wi-Fi Direct mode are disabled.
Indicates that the printer is connected to a network in Wi-Fi Direct mode.
Indicates that Simple AP mode is enabled.
Turns on when Eco Mode is enabled.
Menu Options
Copy Mode
Note:
Available menus vary depending on the layout you selected.
Press the OK button to display hidden setting menus.
15

User's Guide
Printer Basics
Menu |
Settings and Explanations |
|
|
|
|
Number of copies |
Enter the number of copies. |
|
|
|
|
Layout |
With Border |
Copies with a border around the edges. |
|
|
|
|
2-up |
Copies multiple page originals onto one sheet. |
|
|
When placing originals in the ADF, insert them into the feeder from the top or |
|
|
left edge. |
|
|
Load vertical originals as shown below, and select Portrait from Document |
|
|
Orientation. |
Load horizontal originals as shown below, and select Landscape from
Document Orientation.
|
ID Card |
Scans both sides of an ID card and copies onto one side of A4 size paper. |
|
|
|
Document Size |
Select the size of your original. |
|
|
|
|
Zoom |
Enlarges or reduces the original. |
|
|
Select Auto Fit Page to fit to the paper size of the selected paper source. |
|
|
|
|
Document |
Select the orientation of your original. |
|
Orientation |
|
|
|
|
|
Quality |
Select the type of your original. |
|
|
Draft: Provides faster printing, but the printouts may be faint. |
|
|
For users in Belgium, the draft mode is not available. |
|
|
Best: Provides higher quality printing, but the printing speed may be slower. |
|
|
|
|
Density |
Set the density of your copies. |
|
|
|
|
Layout Order |
Select the copy layout for multiple pages when you have selected 2-up as the Layout setting. |
|
Scan Mode
Cloud
Menu |
Settings and Explanations |
|
|
Destination |
Select a destination that has been registered in the Epson Connect Server. |
|
|
16
User's Guide
|
|
Printer Basics |
|
|
|
Menu |
Settings and Explanations |
|
|
|
|
Settings |
Format |
Select the format in which to save the scanned image. |
|
|
|
|
Scan Area |
Select the scan area. |
|
|
Auto Cropping: Crops the white space around the text or image when |
|
|
scanning. |
|
|
Max Area: Scans at the maximum scan area of the scanner glass or the ADF. |
|
|
|
|
Document Type |
Select the type of your original. |
|
|
|
|
Density |
Select the contrast of the scanned image. |
|
|
|
|
Document |
Select the orientation of your original. |
|
Orientation |
|
|
|
|
Computer |
|
|
|
|
|
Menu |
Settings and Explanations |
|
|
|
|
Select Computer |
From the list of computers connected using USB or over the network, select the computer you want |
|
|
to save the scanned image to. |
|
|
|
|
Settings |
Format |
Select the format in which to save the scanned image. |
|
|
|
Computer (WSD)
This menu has no setting item.
Fax Mode
Select Fax on the home screen, and then press the OK button.
Menu |
Settings and Explanations |
|
|
Resolution |
Select the resolution of the outgoing fax. |
|
Select Photo for originals that contain both text and photo images. |
|
|
Density |
Set the density of the outgoing fax. |
|
|
Direct Send |
See the page that describes this feature for more details. |
|
|
Transmission |
Prints a transmission report automatically after you send a fax. Select Print on Error to print a report |
Report |
only when an error occurs. |
|
|
Send Fax Later |
See the pages that describes these features for more details. |
|
|
Polling Receive |
|
|
|
Reprint Faxes |
Prints received faxes temporarily stored in the printer's memory from the latest one. |
|
|
17
User's Guide
|
|
Printer Basics |
|
|
|
Menu |
Settings and Explanations |
|
|
|
|
Fax Report |
Fax Settings List |
Prints the current fax settings. |
|
|
|
|
Fax Log |
Displays or prints a history of sent and received fax jobs. You can set to print |
|
|
this report automatically using the following menu. |
|
|
Setup > Fax Settings > Output Settings > Fax Log Auto Print |
|
|
|
|
Last Transmission |
Prints a report for the previous fax that was sent or received through polling. |
|
|
|
|
Protocol Trace |
Prints a detailed report for the previous fax that was sent or received. |
|
|
|
Related Information
&“Sending Many Pages of a Monochrome Document (Direct Send)” on page 70
&“Sending Faxes at a Specified Time (Send Fax Later)” on page 69
&“Receiving Faxes by Polling (Polling Receive)” on page 72
Setup Mode
Menu |
Settings and Explanations |
|
||
|
|
|
|
|
Maintenance |
Print Head Nozzle |
Prints a pattern to check if the print head nozzles are clogged. |
||
|
Check |
|
|
|
|
|
|
|
|
|
Print Head Cleaning |
Cleans clogged nozzles in the print head. |
||
|
|
|
|
|
|
Reset Ink Levels |
Select this feature to reset the ink levels before you refill the ink tanks. |
||
|
|
|
|
|
|
Print Head |
Adjusts the print head to improve print quality. |
||
|
Alignment |
Perform this feature if your printouts look blurry or text and lines are |
||
|
|
|||
|
|
misaligned. |
|
|
|
|
|
|
|
|
Paper Guide |
Perform this feature to clean the roller inside the printer when the printout |
||
|
Cleaning |
are smeared or scuffed. |
|
|
|
|
|
|
|
Paper Setup |
Select the paper size and paper type you loaded in the paper source. |
|||
|
|
|
|
|
Print Status Sheet |
Configuration Status |
Prints an information sheet showing the current printer status and |
||
|
Sheet |
settings. |
|
|
|
|
|
|
|
|
Usage History Sheet |
Prints an information sheet showing the usage history of the printer. |
||
|
|
|
|
|
Printer Settings |
Paper Source |
A4/Letter Switching |
|
Enable this feature so that error messages are not |
|
Settings |
|
|
displayed even when the paper size setting for |
|
|
|
|
the print job and the paper loaded in the paper |
|
|
|
|
source do not match. This feature is only available |
|
|
|
|
when the paper size is set to A4 or Letter. |
|
|
|
|
|
|
|
Error Notice |
|
Displays an error message when the paper size or |
|
|
|
|
type settings in Paper Setup and the print |
|
|
|
|
settings do not match. |
|
|
|
|
|
|
PC Connection via |
Enables the printer which is connected to the computer over a USB |
||
|
USB |
connection. If this feature is disabled, the computer does not recognize |
||
|
|
printers with a USB connection. |
||
|
|
|
|
|
18
User's Guide
|
|
Printer Basics |
|
|
|
|
|
|
|
Menu |
Settings and Explanations |
|
||
|
|
|
|
|
Common Settings |
Sound |
Adjust the volume and select the type of audio. |
||
|
|
|
|
|
|
Sleep Timer |
Select the time period before the printer enters sleep mode (energy saving |
||
|
|
mode) when no operations are performed. |
||
|
|
The LCD screen turns black when the set time passes. |
||
|
|
|
|
|
|
Power Off Timer |
You can adjust the time before power management is applied. Any |
||
|
|
increase will affect the product’s energy efficiency. Please consider the |
||
|
|
environment before making any change. |
||
|
|
|
|
|
|
LCD Contrast |
Adjust the contrast of the LCD screen. |
||
|
|
|
|
|
|
Date/Time Settings |
Date/Time |
Enter the current date and time. |
|
|
|
|
|
|
|
|
Daylight Saving Time |
Select the summer time setting that applies to |
|
|
|
|
your area. |
|
|
|
|
|
|
|
|
Time Difference |
Enter the time difference between your local time |
|
|
|
|
and UTC (Coordinated Universal Time). |
|
|
|
|
|
|
|
Country/Region |
Select the country or region. |
||
|
|
|
|
|
|
Language |
Select the display language. |
||
|
|
|
|
|
|
Scroll Speed |
Select the scroll speed of the LCD screen. |
||
|
|
|
|
|
Network Settings |
Network Status |
Displays or prints the network settings and connection status. |
||
|
|
|
|
|
|
Wi-Fi Setup |
Wi-Fi Setup Wizard |
See the Network Guide for more details. |
|
|
|
|
|
|
|
|
Push Button Setup |
|
|
|
|
(WPS) |
|
|
|
|
|
|
|
|
|
PIN Code Setup |
|
|
|
|
(WPS) |
|
|
|
|
|
|
|
|
|
Wi-Fi Auto Connect |
|
|
|
|
|
|
|
|
|
Disable Wi-Fi |
You may be able to resolve network problems by |
|
|
|
|
disabling the Wi-Fi settings or making the Wi-Fi |
|
|
|
|
settings again. See the Network Guide for more |
|
|
|
|
details. |
|
|
|
|
|
|
|
|
Wi-Fi Direct Setup |
See the Network Guide for more details. |
|
|
|
|
|
|
|
Connection Check |
Checks the status of the network connection and prints the network |
||
|
|
connection check report. If there are any problems with the connection, |
||
|
|
see the check report to solve the problem. |
||
|
|
|
||
|
Advanced Setup |
See the Network Guide for more details. |
||
|
|
|
|
|
Epson Connect |
You can suspend or resume the Epson Connect or Google Could Print service, or cancel using the |
|||
Services |
services (restore the default settings). |
|
||
|
See the Epson Connect portal website for more details. |
|||
Google Cloud Print |
||||
|
|
|
||
Services |
https://www.epsonconnect.com/ |
|
||
|
http://www.epsonconnect.eu (Europe only) |
|
||
|
|
|
||
Fax Settings |
See the list of menus in Fax Settings. |
|
||
|
|
|
|
|
19
User's Guide
|
|
Printer Basics |
|
|
|
Menu |
Settings and Explanations |
|
|
|
|
Universal Print |
These print settings are applied when you print using an external device without using the printer |
|
Settings |
driver. |
|
|
|
|
|
Top Offset |
Adjust the top or left margin of the paper. |
|
|
|
|
Left Offset |
|
|
|
|
|
Skip Blank Page |
Skips blank pages in the print data automatically. |
|
|
|
Eco Mode |
Sleep Timer |
Select the time period before the printer enters sleep mode (energy saving |
|
|
mode) when no operations are performed. |
|
|
The LCD screen turns black when the set time passes. |
|
|
When this setting is disabled, the setting made in Common Settings is |
|
|
applied. |
|
|
|
Restore Default |
Resets the selected settings to their defaults. |
|
Settings |
|
|
|
|
|
Related Information
&“Copy Mode” on page 15
&“Scan Mode” on page 16
&“Fax Settings” on page 20
Fax Settings
Select Setup > Fax Settings from the home screen.
Menu |
Settings and Explanations |
|
|
|
|
User Default |
The settings made in this menu become your default settings for sending faxes. For details on the |
|
Settings |
setting items, see the list of menus in Fax mode. |
|
|
|
|
Receive Settings |
Receive Mode |
Select the receive mode. |
|
|
|
|
DRD |
If you have subscribed to a distinctive ring service from your telephone |
|
|
company, select the ring pattern to be used for incoming faxes (or select On). |
|
|
|
|
Rings to Answer |
Select the number of rings that must occur before the printer automatically |
|
|
receives a fax. Select "0" (zero) if you want to receive faxes with no ringing. |
|
|
|
|
Remote Receive |
When you answer an incoming fax call on a phone connected to the printer, |
|
|
you can start receiving the fax by entering the code using the phone. |
|
|
|
20
User's Guide
Printer Basics
Menu |
Settings and Explanations |
|
|
|
|
Output Settings |
Fax Output |
Saves received documents on a computer. |
|
|
You need to make settings on FAX Utility on a computer. |
|
|
|
|
Auto Reduction |
Reduces large received documents to fit on the paper in the paper source. |
|
|
Reducing may not always be possible depending on the received data. If this |
|
|
is turned off, large documents are printed at their original size on multiple |
|
|
sheets, or a blank second page may be ejected. |
|
|
|
|
Auto Rotation |
Rotates automatically to print on A5 size paper when a landscape-oriented |
|
|
A5 size document is received and the paper source setting is set to A5. |
|
|
Prints on A4 size paper when this feature is disabled. |
|
|
|
|
Collation Stack |
Prints received documents from the last page (print in descending order) so |
|
|
that the printed documents are stacked in the correct page order. When the |
|
|
printer is running low on memory, this feature may not be available. |
|
|
|
|
Print Suspend Time |
Stops and restarts printing received documents at the entered time. The |
|
|
received documents are not printed during the specified time period but |
|
|
saved in the memory. When the printer is running low on memory, this |
|
|
feature may not be available. Received documents are printed automatically |
|
|
after the restarting time. This feature can be used for noise prevention at |
|
|
night or to prevent confidential documents from being disclosed while you |
|
|
are away. |
|
|
|
|
Attach Image to |
Prints a Transmission Report with an image of the first page of the sent |
|
Report |
document. |
|
|
On(Large Image): Prints the upper part of the page without reducing. |
|
|
On(Small Image): Prints the entire page reducing it to fit onto the report. |
|
|
|
|
Fax Log Auto Print |
Prints the fax log automatically. |
|
|
On(Every 30): Prints a log every time 30 fax jobs are completed. |
|
|
On(Time): Prints the log at a specified time. However, if the number of fax jobs |
|
|
exceeds 30, the log is printed before the specified time. |
|
|
|
|
Report Format |
Select a format for fax reports other than Protocol Trace. Select Detail to |
|
|
print with error codes. |
|
|
|
21

User's Guide
Printer Basics
Menu |
Settings and Explanations |
|
|
|
|
Basic Settings |
Fax Speed |
Select the fax transmission speed. |
|
|
We recommend selecting Slow(9,600bps) when a communication error |
|
|
occurs frequently, when sending/receiving a fax to/from abroad, or when you |
|
|
are using an IP (VoIP) phone service. |
|
|
|
|
ECM |
Automatically corrects errors in the fax transmission (Error Correction Mode), |
|
|
mostly caused by telephone line noise. If this is disabled, you cannot send or |
|
|
receive documents in color. |
|
|
|
|
Dial Tone Detection |
Detects a dial tone before starting to dial. |
|
|
If the printer is connected to a PBX (Private Branch Exchange) or digital phone |
|
|
line, the printer may fail to start dialing. In this situation, change the Line |
|
|
Type setting to PBX. If this does not work, disable this feature. However, |
|
|
disabling this feature may drop the first digit of a fax number and send the |
|
|
fax to the wrong number. |
|
|
|
|
Dial Mode |
Select the type of phone system to which you have connected the printer. |
|
|
When set to Pulse, you can temporarily switch the dialing mode from pulse |
|
|
to tone by pressing ("T" is entered) while entering numbers on the fax top |
|
|
screen. Depending on the region, this setting may not be displayed. |
|
|
|
|
Line Type |
Select the line type to which you have connected the printer. For more |
|
|
details, see the page that describes basic fax settings. |
|
|
|
|
Header |
Enter your sender name and fax number. These appear as a header on |
|
|
outgoing faxes. |
|
|
You can enter up to 40 characters for your name, and up to 20 digits for your |
|
|
fax number. |
|
|
|
Security Settings |
Backup Data Auto |
Fax documents deleted by using the control panel disappear from the LCD |
|
Clear |
screen, but their backups are temporarily stored in the memory. The |
|
|
following features delete backups. |
|
Clear Backup Data |
|
|
Backup Data Auto Clear: Automatically deletes backups each time a sent or |
|
|
|
|
|
|
received document is deleted. |
|
|
Clear Backup Data: Deletes all backups. Run this before you give the printer to |
|
|
someone else or dispose of it. |
|
|
|
Check Fax |
Checks if the printer is connected to the phone line and ready for fax transmission, and prints the |
|
Connection |
check result on A4 size plain paper. |
|
|
|
|
Fax Setting Wizard |
Select to make basic fax settings by following the on-screen instructions. |
|
|
For more details, see the page that describes basic fax settings. |
|
|
|
|
Related Information
&“Fax Mode” on page 17
&“Saving Received Faxes on a Computer” on page 73
&“Making Basic Fax Settings” on page 64
22
User's Guide
Loading Paper
Loading Paper
Paper Handling Precautions
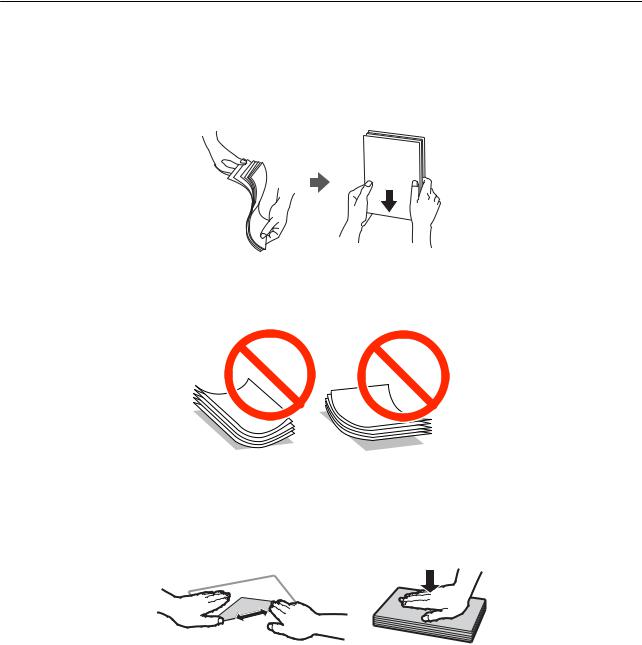
Read the instruction sheets supplied with the paper.
Fan and align the edges of the paper before loading. Do not fan or curl photo paper. Doing so may damage the printable side.
If the paper is curled, flatten it or curl it slightly in the opposite direction before loading. Printing on curled paper may cause paper jams and smears on the printout.
Do not use paper that is wavy, torn, cut, folded, damp, too thick, too thin, or paper that has stickers stuck to it. Using these types of paper causes paper jams and smears on the printout.
Fan and align the edges of the envelopes before loading. When the stacked envelopes are puffed up with air, press them down to flatten them before loading.
Do not use envelopes that are curled or folded. Using these envelopes causes paper jams and smears on the printout.
Do not use envelopes with adhesive surfaces on the flaps or window envelopes.
Avoid using envelopes that are too thin, as they may curl during printing.
Related Information
& “Printer Specifications” on page 121
23

User's Guide
Loading Paper
Available Paper and Capacities
Epson recommends using genuine Epson paper to ensure high-quality printouts.
Genuine Epson Paper
Media Name |
Size |
Loading Capacity |
Manual 2-Sided |
|
|
(Sheets) |
Printing |
|
|
|
|
Epson Bright White Ink Jet Paper |
A4 |
80*1 |
|
Epson Premium Glossy Photo Paper*2 |
A4, 13 × 18 cm (5 × 7 in.), 16:9 |
20 |
- |
|
wide size (102 × 181 mm), 10 × |
|
|
|
15 cm (4 × 6 in.) |
|
|
|
|
|
|
Epson Matte Paper-Heavyweight*2 |
A4 |
20 |
- |
Epson Photo Quality Ink Jet Paper*3 |
A4 |
80 |
- |
*1 For manual 2-sided printing, you can load up to 30 sheets for paper with one side already printed. *2 Only printing from computer or smart device is available.
*3 Only printing from computer is available.
Note:
The availability of paper varies by location. For the latest information on paper available in your area, contact Epson support.
Commercially Available Paper
Media Name |
Size |
Loading Capacity |
Manual 2-Sided |
|
|
(Sheets) |
Printing |
|
|
|
|
Plain paper |
Letter*1, A4, B5*1, A5*1, A6*1 |
Up to the line |
|
|
|
indicated by the |
|
|
|
triangle symbol on the |
|
|
|
edge guide.*2 |
|
|
Legal*1, User Defined*1 |
1 |
|
Envelope*1 |
Envelope #10, Envelope DL, |
10 |
- |
|
Envelope C6 |
|
|
|
|
|
|
*1 Only printing from computer or smart device is available.
*2 For manual 2-sided printing, you can load up to 30 sheets for paper with one side already printed.
Related Information
& “Technical Support Web Site” on page 131
List of Paper Types
To obtain optimum printing results, select the paper type that suits the paper.
24
User's Guide
Loading Paper
Media Name |
Media Type |
|
|
|
|
|
Control Panel |
Printer Driver, Smart device* |
Epson Bright White Ink Jet Paper |
plain papers |
plain papers |
|
|
|
Epson Premium Glossy Photo Paper |
Prem. Glossy |
Epson Premium Glossy |
|
|
|
Epson Matte Paper-Heavyweight |
Matte |
Epson Matte |
|
|
|
Epson Photo Quality Ink Jet Paper |
Matte |
Epson Matte |
|
|
|
Plain paper |
plain papers |
plain papers |
|
|
|
Envelope |
Envelope |
Envelope |
|
|
|
*For smart devices, these media types can be selected when printing using Epson iPrint.
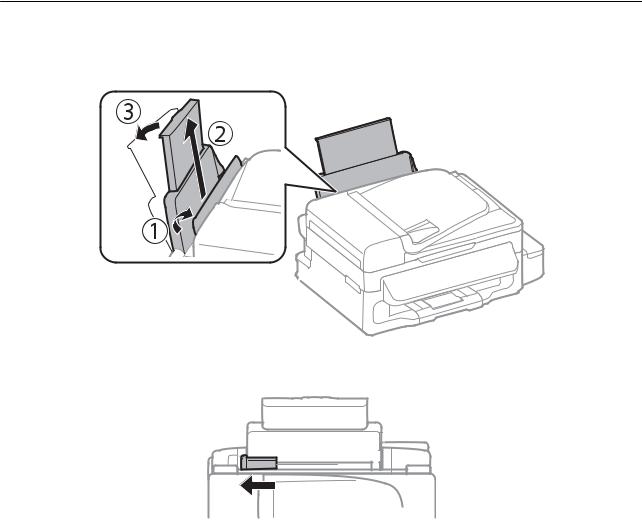
Loading Paper in the Rear Paper Feed
1.Open the feeder guard and pull out the paper support.
2.Slide the edge guide.
25
User's Guide
Loading Paper
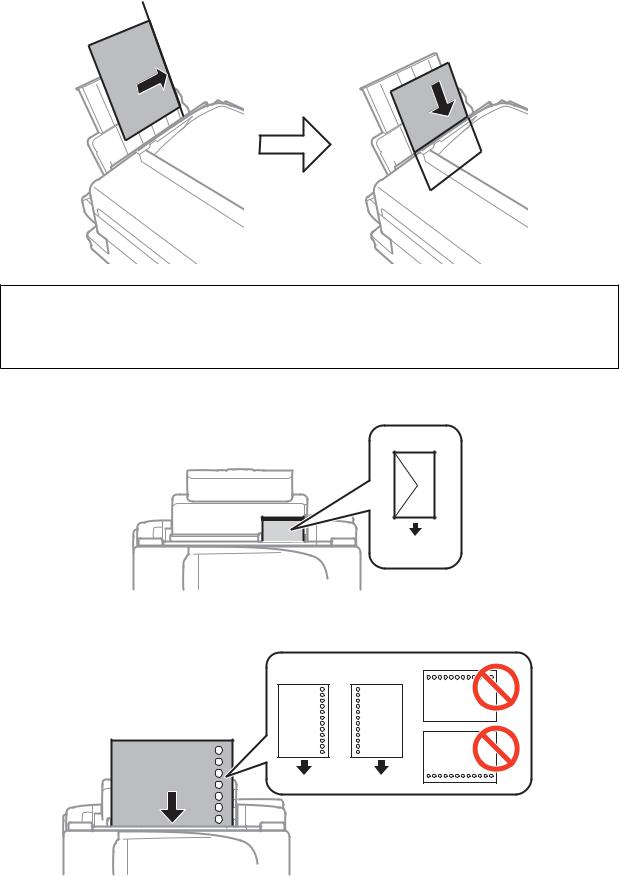
3.Load paper vertically along the right side of the rear paper feed with the printable side facing up.
cImportant:
Do not load more than the maximum number of sheets specified for the paper. For plain paper, do not load above the line just under the d symbol inside the edge guide.
Envelopes
Pre-punched paper
26
User's Guide
Loading Paper
Note:
You can use pre-punched paper under the following conditions.
Loading capacity: One sheet
Available size: A4, B5, A5, A6, Letter, Legal
Binding holes: Do not load paper with the binding holes at the top or the bottom. Adjust the print position of your file to avoid printing over the holes.
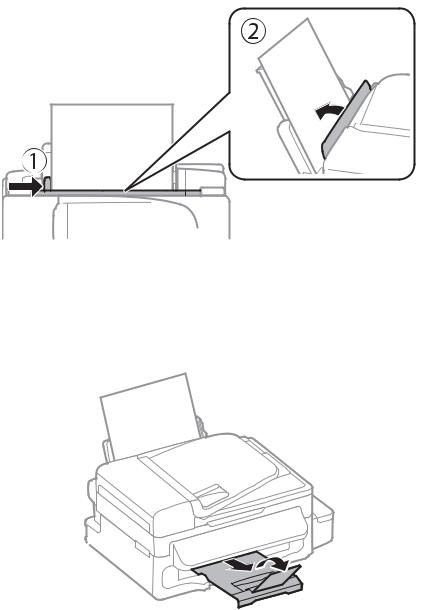
4.Slide the edge guide to the edge of the paper, and then close the feeder guard.
5.On the control panel, set the size and type of the paper you loaded in the rear paper feed.
Note:
You can also display the paper size and paper type settings screen by selecting Setup > Paper Setup.
6.Slide out the output tray.
Note:
Return the remaining paper to its package. If you leave it in the printer, the paper may curl or the print quality may decline.
Related Information
& “Paper Handling Precautions” on page 23
27
User's Guide
Loading Paper
& “Available Paper and Capacities” on page 24
28
User's Guide
Placing Originals
Placing Originals
Place originals on the scanner glass or the ADF. Use the scanner glass for originals that the ADF does not support. You can scan multiple originals at the same time with the ADF.
Available Originals for the ADF
Available Paper Sizes |
A4, Letter, Legal |
|
|
Paper Type |
Plain paper |
|
|
Paper Thickness (Weight of Paper) |
64 to 95 g/m2 |
|
|
Loading Capacity |
A4, Letter: 30 sheets or 3 mm |
|
Legal: 10 sheets |
|
|
To prevent paper jams, avoid placing the following originals in the ADF. For these types, use the scanner glass.
Originals that are torn, folded, wrinkled, deteriorated, or curled
Originals with binder holes
Originals held together with tape, staples, paper clips etc.
Originals that have stickers or labels stuck to them
Originals that are cut irregularly or not right angled
Originals that are bound
OHPs, thermal transfer paper, or carbon backs
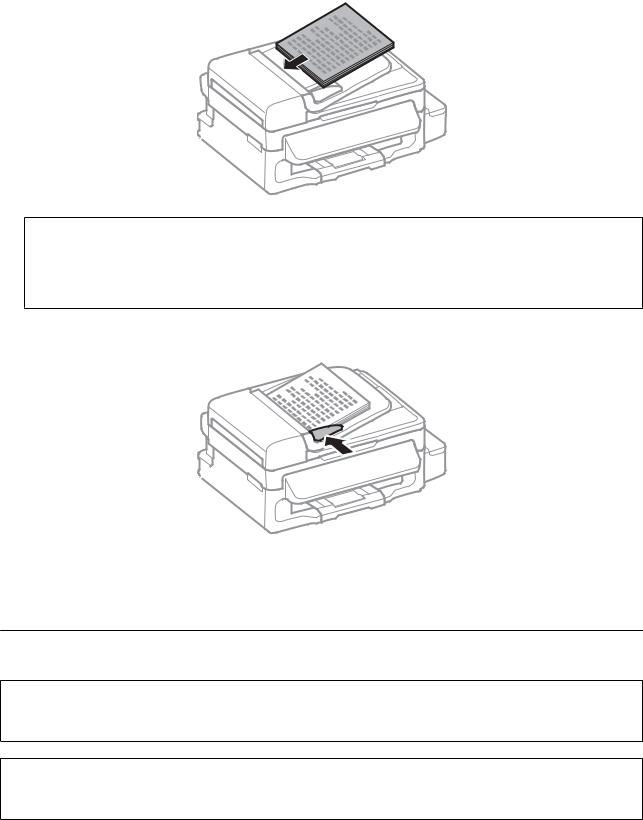
Placing Originals on the ADF
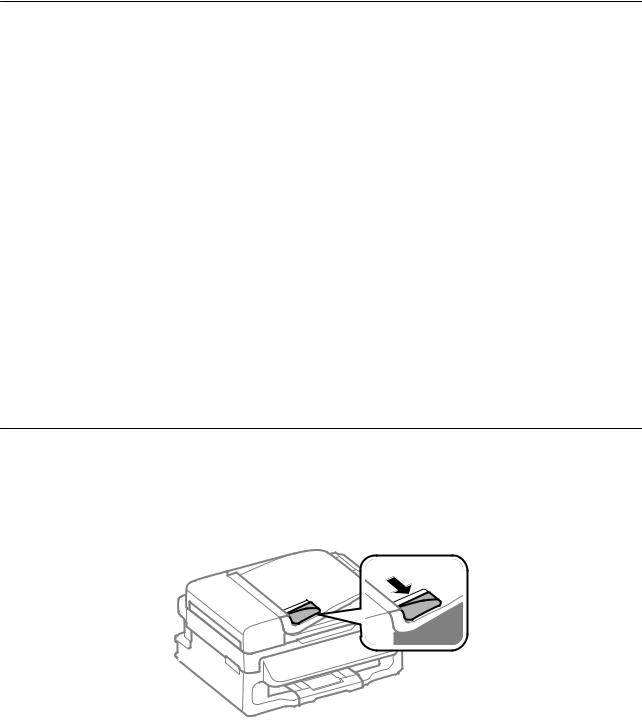
1.Align the edges of the originals.
2.Slide the ADF edge guide.
29
User's Guide
Placing Originals
3.Place the originals face up in the ADF.
cImportant:
Do not load originals above the line just under the d symbol inside the ADF edge guide.
Do not add originals while scanning.
4.Slide the ADF edge guide to the edge of the originals.
Related Information
& “Available Originals for the ADF” on page 29
Placing Originals on the Scanner Glass
!Caution:
Be careful not to trap your fingers when closing the document cover. Otherwise you may be injured.
cImportant:
When placing bulky originals such as books, prevent exterior light from shining directly onto the scanner glass.
30
Loading...