


 Loading...
Version 1.00 | 2019/11/22
S M A R T A X 1 5 0 0 W I - F I 6
R O U T E R
DIR-X1560
User Manual

Preface
D-Link reserves the right to revise this publication and to make changes in the content hereof without obligation to notify any person or organization of such revisions or changes.
Manual Revisions
Hardware |
Revision |
Date |
Description |
|
|
|
|
A1 |
v1.00 |
2019/11/22 |
Initial release |
|
|
|
|
Trademarks
D-Link and the D-Link logo are trademarks or registered trademarks of D-Link Corporation or its subsidiaries in the United States or other countries. All other company or product names mentioned herein are trademarks or registered trademarks of their respective companies.
Apple®, Apple logo®, Safari®, iPhone®, and Macintosh® are trademarks of Apple Inc., registered in the U.S. and other countries. App StoreSM is a service mark of Apple Inc.
Chrome™ browser, Google Play™ and Android™ are trademarks of Google Inc.
Internet Explorer®, Windows® and the Windows logo are trademarks of the Microsoft group of companies.
Copyright © 2019 by D-Link Corporation, Inc.
All rights reserved. This publication may not be reproduced, in whole or in part, without prior expressed written permission from D-Link Corporation, Inc.
D-Link DIR-X1560 User Manual |
i |

ErP Power Usage
This device is an Energy Related Product (ErP) with High Network Availability (HiNA), and automatically switches to a powersaving Network Standby mode within 1 minute of no packets being transmitted. It can also be turned off through a power switch to save energy when it is not needed.
DIR-X1560 Network Standby: 2.77 watts
Switched Off: 0.09 watts
D-Link DIR-X1560 User Manual |
ii |

Table of Contents
Table of Contents
Product Overview.............................................................. |
1 |
Package Contents......................................................................... |
1 |
System Requirements.................................................................. |
2 |
Features............................................................................................ |
3 |
Hardware Overview...................................................................... |
4 |
LED Indicators......................................................................... |
4 |
Back Panel................................................................................ |
5 |
Installation.......................................................................... |
6 |
Before you Begin........................................................................... |
6 |
Wireless Installation Considerations...................................... |
7 |
Setup................................................................................................. |
8 |
D-Link Wi-Fi App Setup....................................................... |
9 |
Hardware Setup................................................................... |
11 |
Setup Wizard......................................................................... |
14 |
Configuration................................................................... |
21 |
Home............................................................................................... |
22 |
Internet................................................................................... |
23 |
DIR-X1560.............................................................................. |
24 |
Connected Clients............................................................... |
25 |
Settings........................................................................................... |
27 |
Wizard...................................................................................... |
27 |
Internet - IPv4....................................................................... |
28 |
IPv4 - Dynamic IP (DHCP)............................................ |
29 |
IPv4 - Static IP................................................................... |
30 |
IPv4 - PPPoE...................................................................... |
31 |
IPv4 - PPTP........................................................................ |
33 |
IPv4 - L2TP......................................................................... |
35 |
IPv4 - DS-Lite.................................................................... |
37 |
Internet - IPv6....................................................................... |
38 |
IPv6 - Auto Detection.................................................... |
39 |
IPv6 - Static IPv6.............................................................. |
41 |
IPv6 - Auto Configuration (SLAAC/DHCPv6)......... |
43 |
IPv6 - PPPoE...................................................................... |
46 |
IPv6 - 6rd............................................................................ |
50 |
IPv6 - Local Connectivity Only................................... |
52 |
Internet - VLAN..................................................................... |
53 |
Wireless................................................................................... |
55 |
Guest Zone....................................................................... |
61 |
Network.................................................................................. |
62 |
Features.......................................................................................... |
64 |
QoS Engine............................................................................ |
64 |
Firewall Settings - Advanced........................................... |
66 |
Firewall Settings - IPv4/IPv6 Rules................................. |
68 |
Port Forwarding................................................................... |
70 |
Port Forwarding - Virtual Server..................................... |
72 |
Website Filter........................................................................ |
74 |
Static Route - IPv4............................................................... |
75 |
Static Route - IPv6............................................................... |
76 |
Dynamic DNS........................................................................ |
77 |
Quick VPN............................................................................... |
79 |
Management................................................................................ |
80 |
Time & Schedule - Time..................................................... |
80 |
Time & Schedule - Schedule............................................ |
81 |
D-Link DIR-X1560 User Manual |
iii |

Table of Contents
System Log............................................................................ |
82 |
System Admin - Admin..................................................... |
84 |
System Admin - System.................................................... |
85 |
User.......................................................................................... |
86 |
Upgrade.................................................................................. |
87 |
Statistics.................................................................................. |
88 |
Third Party Services......................................................... |
89 |
Registering a D-Link Cloud Service Account..................... |
90 |
Amazon Alexa Setup.......................................................... |
93 |
Amazon Alexa Voice Commands................................... |
97 |
The Google Assistant Setup............................................ |
98 |
The Google Assistant Voice Commands.................. |
101 |
Quick VPN....................................................................... |
102 |
Important Information........................................................... |
103 |
iOS Devices................................................................................. |
104 |
VPN Setup Instructions.................................................. |
104 |
Connect or Disconnect................................................... |
106 |
Mac OS X..................................................................................... |
107 |
VPN Setup Instructions.................................................. |
107 |
Connect or Disconnect................................................... |
109 |
Windows 7.................................................................................. |
110 |
VPN Setup Instructions.................................................. |
110 |
Connect or Disconnect................................................... |
113 |
Windows 8.1/8........................................................................... |
114 |
VPN Setup Instructions.................................................. |
114 |
Connect or Disconnect................................................... |
119 |
Windows 10................................................................................ |
120 |
VPN Setup Instructions.................................................. |
120 |
Connect or Disconnect................................................... |
122 |
Android........................................................................................ |
123 |
VPN Setup Instructions.................................................. |
123 |
Connect or Disconnect................................................... |
125 |
Connect a Wireless Client to your Router..................... |
127 |
WPS Button................................................................................ |
127 |
Windows® 10.............................................................................. |
128 |
Windows® 8 - WPA/WPA2...................................................... |
129 |
Windows® 7................................................................................ |
131 |
Troubleshooting............................................................. |
133 |
Wireless Basics................................................................ |
135 |
Wireless Modes............................................................... |
139 |
Networking Basics.......................................................... |
140 |
Wireless Security............................................................ |
142 |
Technical Specifications................................................. |
143 |
Regulatory Statements.................................................. |
144 |
Wall Mounting................................................................ |
164 |
D-Link DIR-X1560 User Manual |
iv |

Section 1 - Product Overview
Product Overview
Package Contents
|
DIR-X1560 |
|
|
DIR-X1560 |
V |
|
|
Quick Installation Guide |
V |
|
|
Quick Installation Card |
V |
|
|
Ethernet Cable (RJ45) |
V |
|
|
Power Adapter |
V |
|
|
If any of the above items are missing or damaged, please contact your local reseller.
Note: Using a power supply with a different voltage rating than the one included with the router will cause damage and void the warranty for this product.
D-Link DIR-X1560 User Manual |
1 |

Section 1 - Product Overview
System Requirements
Network Requirements |
• An Ethernet-based cable, DSL or fiber modem |
|
• IEEE 802.11ax/ac/n/g/b/a wireless clients |
||
|
• 10/100/1000 Ethernet |
|
|
Computer with the following: |
|
|
• Windows®, Macintosh, or Linux-based operating system |
|
|
• An installed Ethernet adapter |
|
Web-based |
Browser Requirements: |
|
• Internet Explorer 10 or higher |
||
Configuration Utility |
||
Requirements |
• Firefox 28 or higher |
|
|
• Safari 6 or higher |
|
|
• Chrome 28 or higher |
|
|
Windows® Users: Make sure you have the latest version of Java |
|
|
installed. Visit www.java.com to download the latest version. |
|
D-Link Wi-Fi App |
• iOS® or Android™ device (Please refer to the app's store page |
|
Requirements |
to check whether your device is compatible.) |
D-Link DIR-X1560 User Manual |
2 |

Section 1 - Product Overview
Features
Need super-fast Wi-Fi for your wire-free, all-streaming house? With a powerful dual-core processor, the AX1500 Wi-Fi 6 Router packs in enough processing power to handle every networking task you throw at it. It’s a powerful, intelligent home router with integrated voice assistant compatibility for Amazon Alexa and Google Assistant so you can control your network with voice commands.
Handle More with a High-Power Processor
With the DIR-X1560, you’re not only enjoying buffer-free gaming and lightning fast surfing, you’re also enjoying features such as an optimizing QoS, an automatic firmware update system that ensures the best protection and the latest features, and compatibility with voice assistants. All this is possible with the router’s 1.5 GHz tri-core high-power processor, 128 MB of flash memory and 256 MB of RAM.
Enhanced Quality of Service Features
The built-in Quality of Service (QoS) engine allows you to prioritize important traffic to ensure that your favorite applications are receiving optimal bandwidth.
Always Up-to-Date with the Latest Features
The DIR-X1560 will automatically check daily for updates to make sure that the device always has the latest features and the most secure firmware, and will install the update silently in the background. For an extra peace of mind, in the event of failure during the firmware update, the router will store a backup system image in the memory before proceeding with the update.
Easy to Set Up and Manage
Sharing your Internet connection doesn’t have to be a complicated process; just download the free D-Link Wi-Fi app for your mobile device and follow the on-screen step-by-step instructions to set up your DIR-X1560. You also have the option to use a web browser to access the setup wizard and to manage your router. Support for industry-standard Wi-Fi Protected Setup (WPS) lets you create encrypted connections to new devices by pressing a button.
D-Link DIR-X1560 User Manual |
3 |

Section 1 - Product Overview
Hardware Overview
LED Indicators
|
|
|
1 |
2 |
3 |
4 |
|
|
|
|
|
||||
|
|
Solid White |
The device is on and the system is healthy. |
||||
1 |
Power |
Solid Orange |
The device is booting up or performing the factory reset process. |
||||
|
|
Blinking Orange |
The device is under recovery mode. |
||||
|
|
Solid White |
The Internet port connection is established. |
||||
2 |
Internet |
Solid Orange |
The device cannot connect to the Internet. |
||||
|
|
Blinking Orange |
The device is undergoing the firmware upgrade process. |
||||
3 |
Wireless (2.4 GHz) |
Solid White |
The 2.4 GHz wireless band is enabled. |
||||
Blinking White |
The device is processing WPS. |
||||||
|
|
||||||
4 |
Wireless (5 GHz) |
Solid White |
The 5 GHz wireless band is enabled. |
||||
Blinking White |
The device is processing WPS. |
||||||
|
|
||||||
D-Link DIR-X1560 User Manual |
4 |

Section 1 - Product Overview
Back Panel
|
|
1 |
2 |
3 |
4 |
5 |
6 |
|
|
|
|||||
1 |
Gigabit LAN Ports |
Connect Ethernet devices such as computers, switches, storage (NAS) devices, and game |
|||||
(1- 4) |
consoles. |
|
|
|
|
|
|
|
|
|
|
|
|
||
2 |
Gigabit WAN Port |
Using an Ethernet cable, connect your broadband modem to this port. |
|||||
|
|
|
|||||
3 |
Reset Button |
Insert a paperclip in the hole, wait for 10 seconds, and release to reset the router to default |
|||||
settings. |
|
|
|
|
|
||
|
|
|
|
|
|
|
|
4 |
WPS Button |
Press to start the WPS process and automatically create an encrypted connection to a WPS |
|||||
client. |
|
|
|
|
|
||
|
|
|
|
|
|
|
|
5Power Connector Connector for the supplied power adapter.
6Power Button Press the power button to power the device on or off.
D-Link DIR-X1560 User Manual |
5 |
Section 2 - Installation
Installation
This section will walk you through the installation of your DIR-X1560.
Before you Begin
•Placement of the router is very important. Do not place the router in an enclosed area such as a closet, cabinet, attic, or garage.
•Configure the router with the computer that was last connected directly to your Internet connection. Verify that it is connected to the Internet before connecting additional devices.
•If your ISP provided you with a modem/router combo, you will need to set it to “bridge” mode so the router can work properly. Please contact your ISP or refer to the user manual for your modem/router device.
•You can only use the Ethernet port on your modem. If you were using the USB connection before using the router, then you must turn off your modem, disconnect the USB cable and connect an Ethernet cable to the Internet port on the router, and then turn the modem back on. In some cases, you may need to call your Internet Service Provider (ISP) to change connection types (USB to Ethernet).
•If connecting to a DSL modem, make sure to have your DSL service information provided by your Internet Service Provider handy. This information is likely to include your DSL account's Username and Password. Your ISP may also supply you with additional WAN configuration settings which might be necessary to establish a connection.
•If you are connecting a considerable amount of networking equipment, it may be a good idea to take the time to label each cable or take a picture of your existing setup before making any changes.
•If you have DSL and are connecting via PPPoE, make sure you disable or uninstall any PPPoE software such as WinPoET, BroadJump, or EnterNet 300 from your computer or you will not be able to connect to the Internet.
D-Link DIR-X1560 User Manual |
6 |

Section 2 - Installation
Wireless Installation Considerations
The D-Link wireless router lets you access your network using a wireless connection from virtually anywhere within the operating range of your wireless network. Keep in mind that the number, thickness and location of walls, ceilings, or other objects that the wireless signals must pass through may limit the range. Typical ranges vary depending on the types of materials and background RF (radio frequency) noise in your home or business. The key to maximizing wireless range is to follow these basic guidelines:
1.Keep the number of walls and ceilings between the D-Link router and other network devices to a minimum - each wall or ceiling can reduce your adapter’s range from 3-90 feet (1-30 meters.) Position your devices so that the number of walls or ceilings is minimized.
2.Be aware of the direct line between network devices. A wall that is 1.5 feet thick (0.5 meters), at a 45-degree angle appears to be almost 3 feet (1 meter) thick. At a 2-degree angle it looks over 42 feet (14 meters) thick. Position devices so that the signal will travel straight through a wall or ceiling (instead of at an angle) for better reception.
3.Building materials make a difference. A solid metal door or aluminum studs may have a negative effect on range. Try to position access points, wireless routers, and computers so that the signal passes through drywall or open doorways.
Materials and objects such as glass, steel, metal, walls with insulation, water (fish tanks), mirrors, file cabinets, brick, and concrete will degrade your wireless signal.
4.Keep your product away (at least 3-6 feet or 1-2 meters) from electrical devices or appliances that generate RF noise.
5.If you are using 2.4 GHz cordless phones or X-10 (wireless products such as ceiling fans, lights, and home security systems), your wireless connection may degrade dramatically or drop completely. Make sure your 2.4 GHz phone base is as far away from your wireless devices as possible. The base transmits a signal even if the phone is not in use.
D-Link DIR-X1560 User Manual |
7 |

Section 2 - Installation
Setup
There are several different ways you can configure your router to connect to the Internet
•D-Link Wi-Fi App - Use your compatible iOS or Android device to install and configure your router. Refer to D-Link Wi-Fi App Setup on page 9.
•Hardware Setup - This section explains how to setup your DIR-X1560. Refer to Hardware Setup on page 11.
•D-Link Setup Wizard - This wizard will launch when you log into the router by using your PC for the first time. Refer to
Setup Wizard on page 14.
•Manual Setup - Log in to the router to manually configure your router. Refer to Configuration on page 21
D-Link DIR-X1560 User Manual |
8 |
Section 2 - Installation
D-Link Wi-Fi App Setup
The D-Link Wi-Fi app allows you to install and configure your DIR-X1560 from your compatible Android or iOS device.
Note: The screenshots may be different depending on your mobile device’s OS version. The following steps show the iOS interface of the D-Link Wi-Fi app. If you are using an Android device, the appearance may be different from that of the screenshots, but the process is the same.
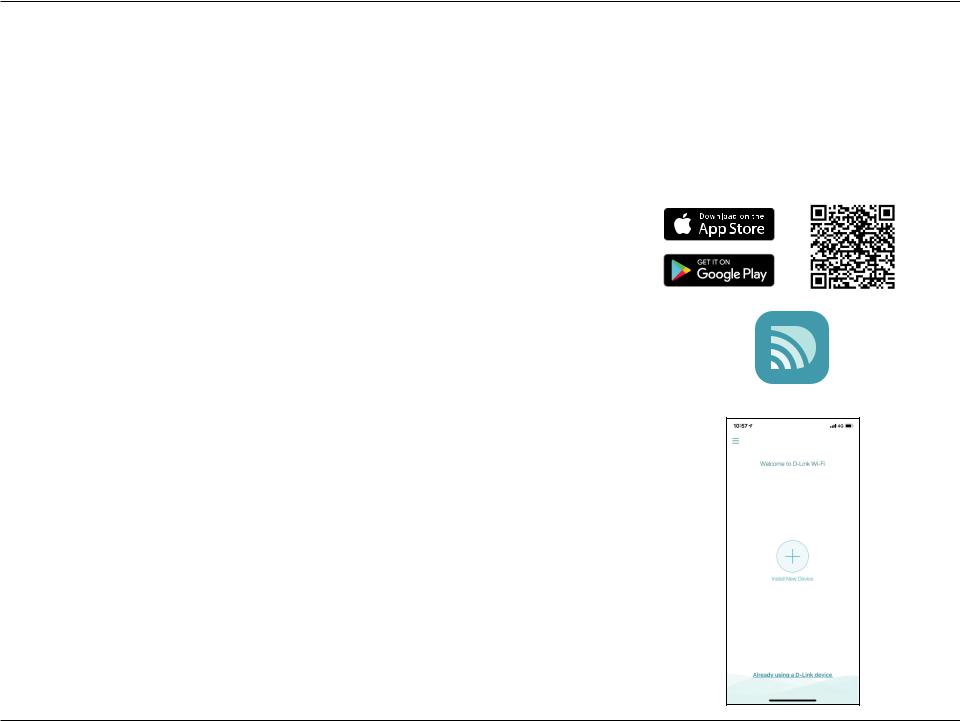
Step 1
Search and install the free D-Link Wi-Fi app available on the App Store or on Google Play. You can also scan the QR code on the right, which will take you to the respective D-Link Wi-Fi app store page.
Step 2
Launch the D-Link Wi-Fi app from the home screen of your device.
D-Link Wi-Fi
Step 3
Tap on the Install New Device button at the middle of the screen.
D-Link DIR-X1560 User Manual |
9 |
Section 2 - Installation
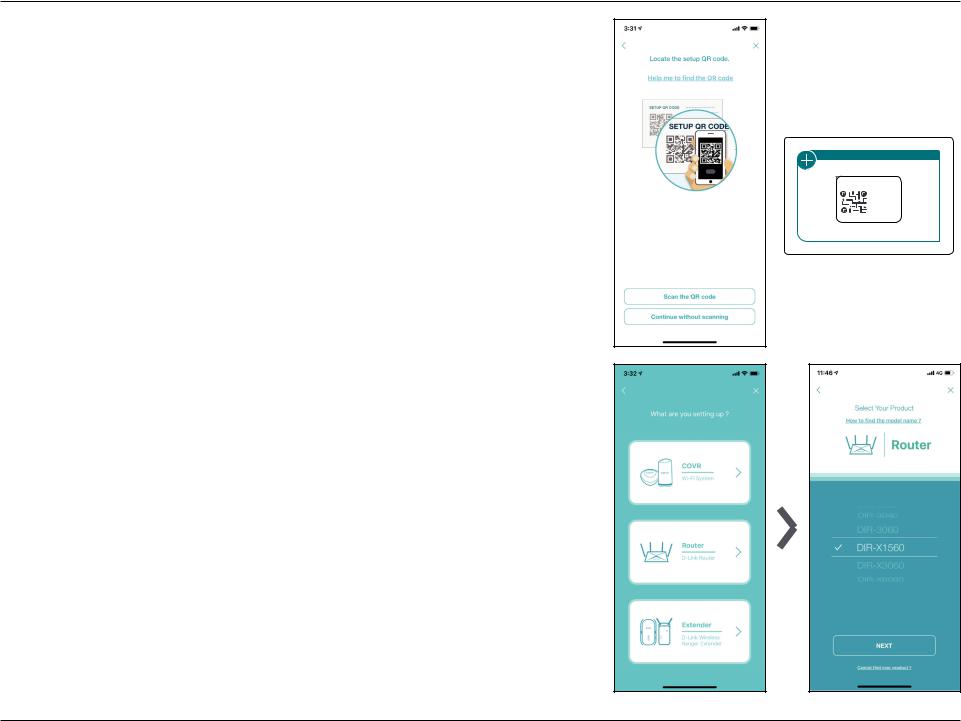
Step 4
Tap Scan the QR code to scan the setup QR code located on the Quick Installation Card and proceed to step 6. Alternatively, you can tap Continue without scanning to proceed to step 5.
QUICK INSTALLATION CARD
SETUP QR CODE
Model Name: DEVICE
Wi-Fi Name: dlink-XXXX
Password: XXXXXXXX
S/N: 123456789
 www.dlink.com
Step 5
Select Router and select DIR-X1560 from the list of available devices. Tap
Next to continue.
Step 6
You will now be guided through a step-by-step process for setting up your router. Simply follow the on-screen instructions to continue the installation and the configuration process.
D-Link DIR-X1560 User Manual |
10 |
Section 2 - Installation
Hardware Setup
Step 1
Position your DIR-X1560 near your Internet-connected modem. Place it in an open area for better wireless coverage.
Step 2
Turn off and unplug the power to your cable or DSL broadband modem. This is required. In some cases, you may need to turn it off for up to five minutes.
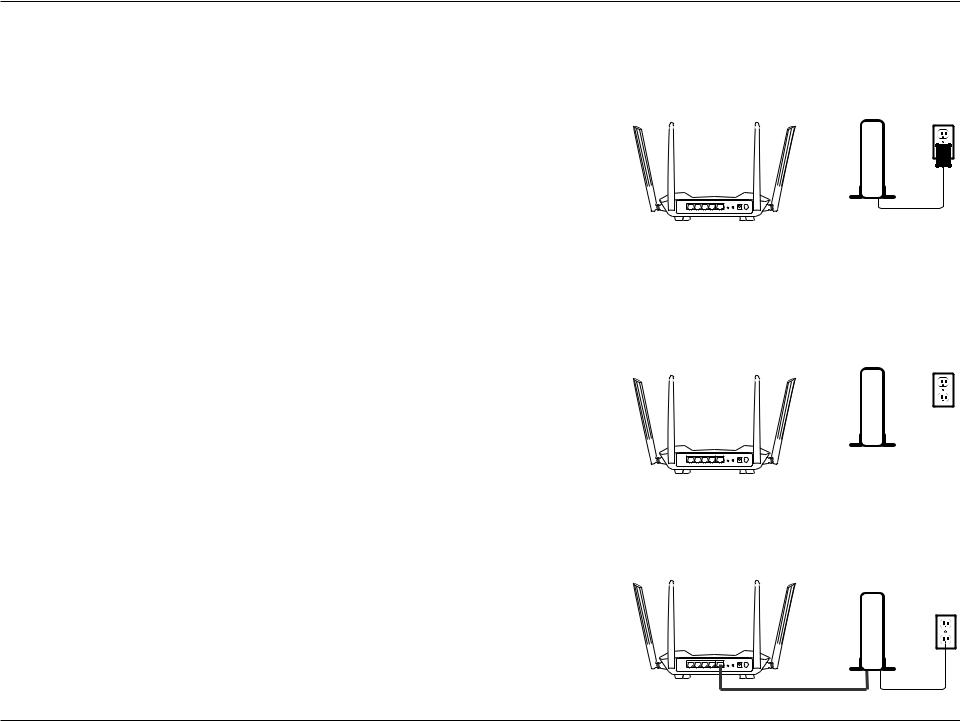
Step 3
Use the Ethernet cable to connect your modem to the port labelled INTERNET on the router.
Modem
Modem
Modem
D-Link DIR-X1560 User Manual |
11 |

Section 2 - Installation
Step 4
Plug in and turn your modem back on and wait approximately one minute before proceeding.
Step 5
Connect the supplied power adapter to the router and a power outlet, press the power button, and wait approximately one minute until the LED indicator on the front of the device changes from orange to solid white.
Modem
Modem
Step 6
If you are configuring the router wirelessly from a PC, connect to the Wi-Fi network printed on the label attached to the bottom of your router or on the Quick Installation Card.
SSID:
Password:
Modem
D-Link DIR-X1560 User Manual |
12 |

Section 2 - Installation
If you are configuring the router from a PC with a wired Ethernet connection, plug one end of an Ethernet cable into the port labeled 1 on the back of the router, and the other end into the Ethernet port on your computer.
Modem
Step 7
If you are connecting to a broadband service that uses a dynamic connection (not PPPoE), you may be online already. Try opening a web browser and connecting to a website. If the website does not load, proceed to Setup Wizard on page 14.
D-Link DIR-X1560 User Manual |
13 |
Section 2 - Installation
Setup Wizard
The setup wizard is designed to guide you through a step-by-step process to configure your new DIR-X1560 and connect to the Internet via a wireless setup process.
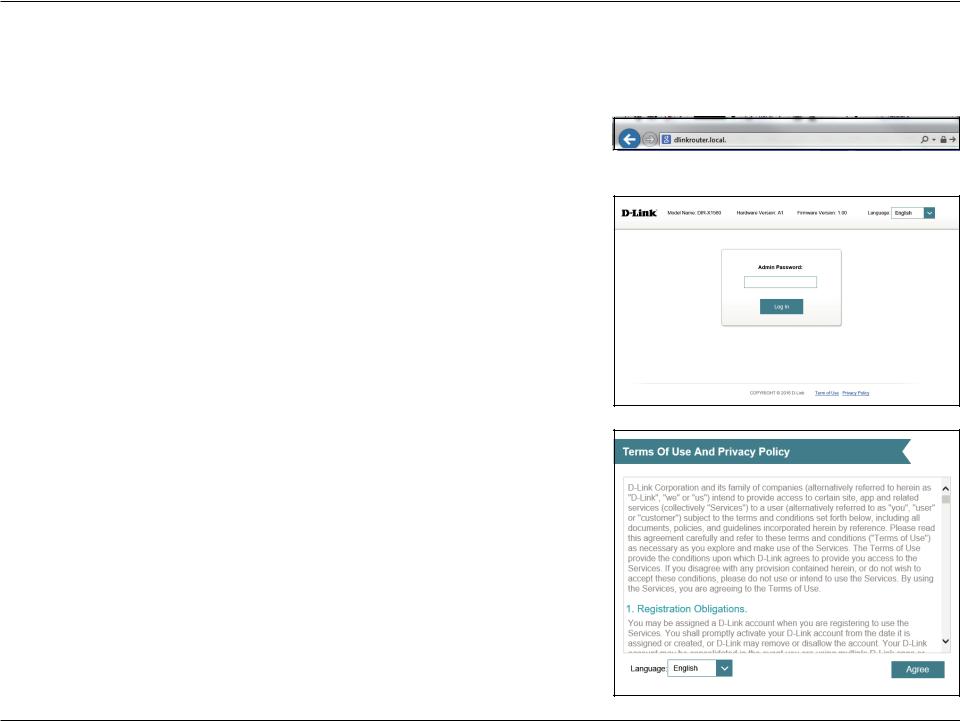
If this is your first time installing the router, open your web browser and enter http://dlinkrouter.local./ in the address bar. Alternatively, enter the IP address of the router (default: http://192.168.0.1).
If this is your first time logging in to the page and no connection has been established, then log in with the password shown on the device label or Quick Install Guide.
Agree to the Terms of Use and Privacy Policy before proceeding.
D-Link DIR-X1560 User Manual |
14 |

Section 2 - Installation
Follow the on-screen instructions to configure your new D-Link router and connect to the Internet.
Click Next to continue.
Please wait while your router detects your Internet connection type.
D-Link DIR-X1560 User Manual |
15 |
Section 2 - Installation
If the router does not detect a valid Internet connection, a list of connection types to choose from will be displayed. Select your Internet connection type (this information can be obtained from your Internet Service Provider).
Click Next to continue.
If the router detected or you selected PPPoE, enter your PPPoE username and password. If you do not have this information, please contact your ISP.
Click Next to continue.
Note: Make sure to remove all other existing PPPoE software from your computer. The software is no longer needed and will not work through a router.
D-Link DIR-X1560 User Manual |
16 |
Section 2 - Installation
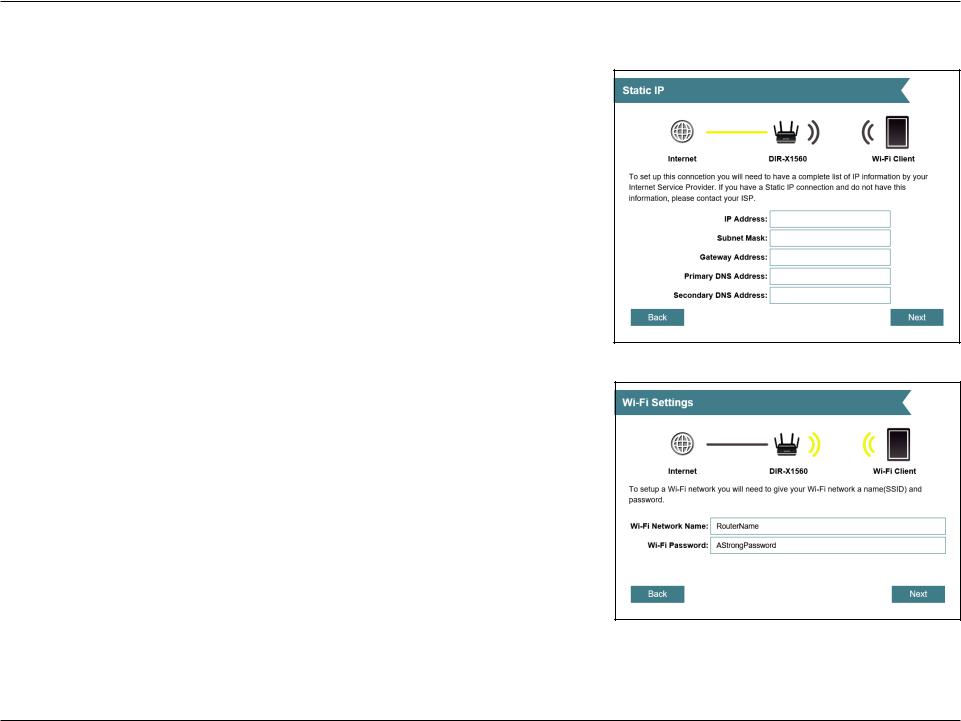
If the router detected or you selected Static, enter the IP and DNS settings supplied by your ISP. If you do not have this information, please contact your ISP.
Click Next to continue.
Type in a Wi-Fi Network Name and Wi-Fi Password to setup your Wi-Fi network. Your wireless clients will need to have this passphrase to be able to connect to your wireless network.
Click Next to continue.
Note: The router's Smart Connect feature presents a single wireless network. When connecting clients to an extension network, they will be automatically added to the best band, either 2.4 GHz or 5 GHz. To disable the Smart Connect feature and individually configure 2.4 GHz and 5 GHz networks, refer to Wireless on page 55.
D-Link DIR-X1560 User Manual |
17 |

Section 2 - Installation
In order to secure the router's configuration access, please enter a password. You will be prompted for this password every time you want to use the router’s web configuration utility.
Click Next to continue.
Select your time zone from the drop-down menu.
Click Next to continue.
D-Link DIR-X1560 User Manual |
18 |

Section 2 - Installation
Keeping your router's firmware up-to-date provides you with the latest protection and new features over the air. Choose whether to keep your device up-to-date automatically or to manage the device updates by yourself.
Click Next to continue.
You will be presented with a summary of your settings.
Click Next to finalize the settings or Back to make changes.
D-Link DIR-X1560 User Manual |
19 |

Section 2 - Installation
Please wait while the device settings are saved.
Do not turn off or unplug your router during this time.
Your new settings have been saved and your router is now configured. Click OK to close the Setup Wizard.
Congratulations, your device has been successfully configured!
You can log in to the configuration utility by inputting the Admin Password.
D-Link DIR-X1560 User Manual |
20 |

Section 3 - Configuration
Configuration
To access the configuration utility, open your web-browser and enter http:// dlinkrouter.local./ or you may also connect by typing the IP address of the router (by default this is http://192.168.0.1) in the address bar.
Enter your password. If you previously followed the setup wizard, please use the admin password you entered during the wizard. Otherwise, leave the password blank. Click Log In to proceed.
Note: If you cannot remember your password and cannot log in, use a paperclip to press the recessed Reset button on the back of the device for longer than 10 seconds to restore the router to its default settings.
The router’s home page will open displaying its current connection status.
The bar at the top of the page has quick access to Settings, Features and Management functions. You can quickly jump back Home at any time.
Note: The system will automatically log out after a period of inactivity.
D-Link DIR-X1560 User Manual |
21 |

Section 3 - Configuration
Home
The Home page displays the current status of the router in the form of an interactive diagram. You can click each icon to display information about each part of the network at the bottom of the screen. The menu bar at the top of the page will allow you to quickly navigate to other pages.
The Home page displays whether or not the router is currently connected to the Internet.
If it is disconnected, click Click to repair to bring up the setup wizard, refer to the Setup Wizard on page 14 for more information.
D-Link DIR-X1560 User Manual |
22 |

Section 3 - Configuration
Internet
To bring up more details about your Internet connection, click on the Internet icon.
Click IPv4 or IPv6 to see details of the IPv4 connection and IPv6 connection respectively.
Click Release IP Address to disconnect from the Internet. If you do this and wish to reconnect, click Renew.
To reconfigure the Internet settings, refer to Internet - IPv4 on page 28
D-Link DIR-X1560 User Manual |
23 |
Section 3 - Configuration
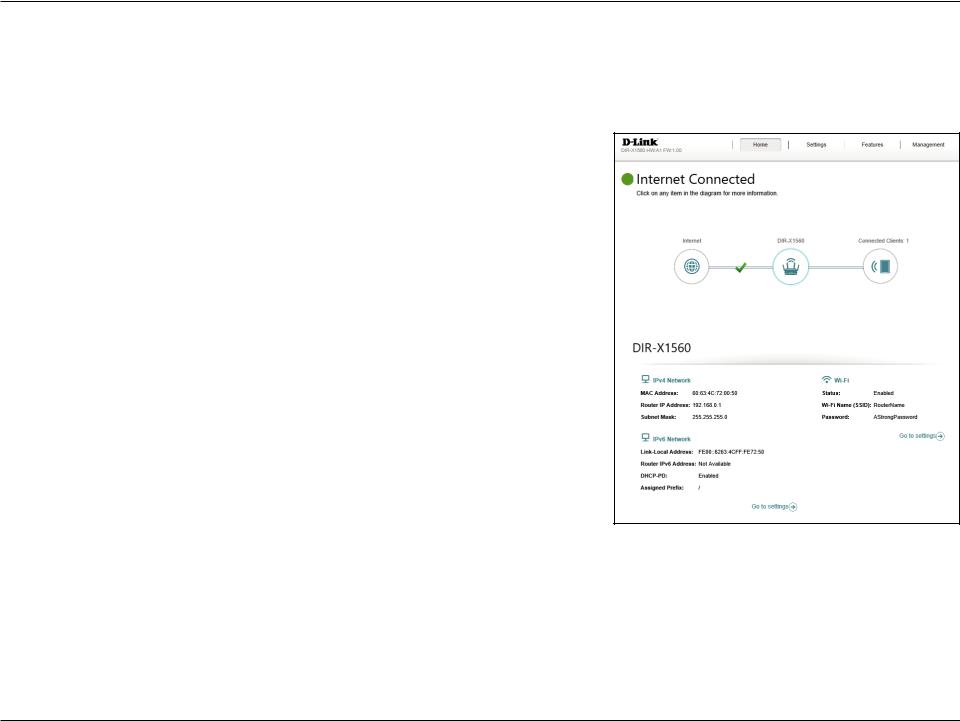
DIR-X1560
Click on the DIR-X1560 icon to view details about the router and its wireless settings.
Here you can see the router’s current Wi-Fi network name and password, as well as the router's MAC address, IPv4 address, and IPv6 address.
To reconfigure the network settings, either click Go to settings on the lower left, or click Settings (at the top of the page) and then Network on the menu that appears. Refer to Network on page 62 for more information.
To reconfigure the wireless settings, either click Go to settings, on the lower right, or click Settings (at the top of the page) and then Wireless on the menu that appears. Refer to Wireless on page 55 for more information.
D-Link DIR-X1560 User Manual |
24 |
Section 3 - Configuration
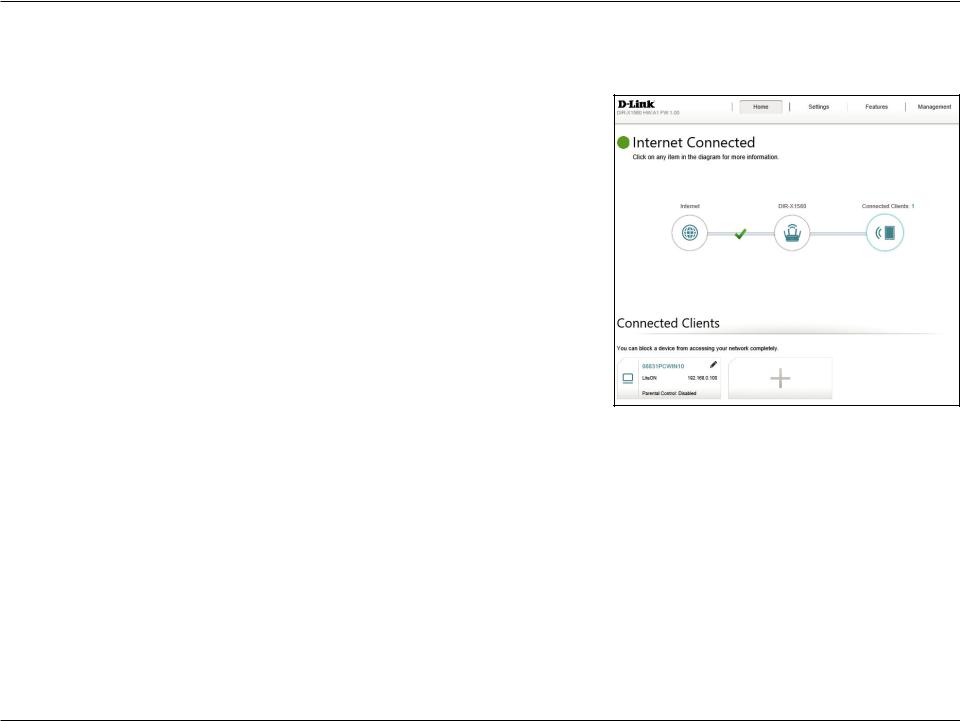
Connected Clients
Click on the Connected Clients icon to view details about the connected clients to the router and their wireless settings.
On this page you can see all the clients currently connected to the router, and their IP addresses.
To edit each client’s settings, click the pencil icon on the client you want to edit.
D-Link DIR-X1560 User Manual |
25 |
Loading...