


 Loading...
ADOBE® PREMIERE® PRO
Help and tutorials
February 2013
Contents |
|
What's New.................................................................................................................................................... |
1 |
What's New in CS6.................................................................................................................................................................. |
2 |
What's New in Adobe Media Encoder CS6............................................................................................................................. |
8 |
What’s new (CS5.5) .............................................................................................................................................................. |
16 |
What’s new (CS5) ................................................................................................................................................................. |
17 |
Premiere Pro getting started tutorials.......................................................................................................... |
19 |
Learn Adobe Premiere Pro CS5 and CS5.5.......................................................................................................................... |
20 |
Workspace and workflow............................................................................................................................. |
22 |
Workspaces........................................................................................................................................................................... |
23 |
Working with Panels.............................................................................................................................................................. |
28 |
Using the Source Monitor and Program Monitor................................................................................................................... |
31 |
Customizing the Project panel............................................................................................................................................... |
37 |
Basic workflow....................................................................................................................................................................... |
41 |
Default keyboard shortcuts in CS6........................................................................................................................................ |
47 |
Default keyboard shortcuts (CS5 and CS5.5)........................................................................................................................ |
60 |
Preferences........................................................................................................................................................................... |
68 |
Adobe Dynamic Link.............................................................................................................................................................. |
72 |
Cross-application workflows.................................................................................................................................................. |
75 |
Cross-platform workflow........................................................................................................................................................ |
81 |
Finding and customizing keyboard shortcuts......................................................................................................................... |
82 |
Setting up your system.......................................................................................................................................................... |
84 |
Project setup................................................................................................................................................ |
91 |
Creating and changing projects............................................................................................................................................. |
92 |
Archiving projects.................................................................................................................................................................. |
95 |
Trim or copy your project....................................................................................................................................................... |
96 |
Importing footage......................................................................................................................................... |
98 |
Transferring and importing files............................................................................................................................................. |
99 |
Importing assets from tapeless formats............................................................................................................................... |
105 |
Importing still images........................................................................................................................................................... |
107 |
Importing digital audio.......................................................................................................................................................... |
110 |
Importing sequences, clip lists, libraries, and compositions................................................................................................ |
112 |
Importing XML project files from Final Cut Pro.................................................................................................................... |
114 |
Support for growing files...................................................................................................................................................... |
117 |
Working with Adobe Prelude CS6....................................................................................................................................... |
118 |
Batch capturing and recapturing.......................................................................................................................................... |
119 |
Capturing DV or HDV video................................................................................................................................................. |
124 |
Capturing HD video............................................................................................................................................................. |
125 |
Capturing and digitizing....................................................................................................................................................... |
126 |
Capturing content for DVD................................................................................................................................................... |
133 |
Create clips for offline editing.............................................................................................................................................. |
134 |
Digitizing analog video......................................................................................................................................................... |
135 |
Working with timecode......................................................................................................................................................... |
137 |
Managing assets........................................................................................................................................ |
141 |
Customizing the Project panel............................................................................................................................................. |
142 |
Organizing assets in the Project panel................................................................................................................................ |
146 |
Managing metadata............................................................................................................................................................. |
|
|
|
153 |
|
Working with aspect ratios................................................................................................................................................... |
|
|
157 |
||
Working with markers.......................................................................................................................................................... |
|
|
|
161 |
|
Monitoring assets....................................................................................................................................... |
|
|
|
|
167 |
Using the Source Monitor and Program Monitor................................................................................................................. |
|
168 |
|||
Playing assets...................................................................................................................................................................... |
|
|
|
|
174 |
Using the Waveform monitors and vectorscope.................................................................................................................. |
|
178 |
|||
Using the Reference Monitor............................................................................................................................................... |
|
|
181 |
||
Editing sequences and clips...................................................................................................................... |
|
|
183 |
||
Creating and changing sequences...................................................................................................................................... |
|
|
184 |
||
Creating and playing clips.................................................................................................................................................... |
|
|
200 |
||
Adding clips to sequences................................................................................................................................................... |
|
|
203 |
||
Working with offline clips..................................................................................................................................................... |
|
|
211 |
||
Trimming clips (CS6)........................................................................................................................................................... |
|
|
|
213 |
|
Trimming clips (CS5 and CS5.5)......................................................................................................................................... |
|
|
229 |
||
þÿ E d i t i n g |
m u l t i |
c a m e r a |
s e q u e n c e s |
( C S 5 a n d C S 5 . 5 ) |
............................................................239 |
þÿ E d i t i n g |
m u l t i |
c a m e r a |
s e q u e n c e s |
( C S 6 )........................................................................................ |
243 |
Synchronizing audio and video with Merge Clips (CS5.5 and later).................................................................................... |
249 |
||||
Modifying clip properties with Interpret Footage.................................................................................................................. |
|
252 |
|||
Creating special clips (synthetics)....................................................................................................................................... |
|
|
253 |
||
Correcting mistakes............................................................................................................................................................. |
|
|
|
255 |
|
Rearranging clips in a sequence......................................................................................................................................... |
|
|
257 |
||
Remove alerts with the Events panel.................................................................................................................................. |
|
|
261 |
||
Rendering and previewing sequences................................................................................................................................. |
|
262 |
|||
Working with clips in a sequence......................................................................................................................................... |
|
|
267 |
||
Editing audio.............................................................................................................................................. |
|
|
|
|
272 |
Overview of audio and the Audio Mixer............................................................................................................................... |
|
273 |
|||
Working with clips, channels, and tracks............................................................................................................................. |
|
280 |
|||
Editing audio in a Timeline panel......................................................................................................................................... |
|
|
285 |
||
Recording audio................................................................................................................................................................... |
|
|
|
288 |
|
Adjusting volume levels....................................................................................................................................................... |
|
|
|
291 |
|
Recording audio mixes........................................................................................................................................................ |
|
|
|
295 |
|
Advanced mixing................................................................................................................................................................. |
|
|
|
297 |
|
Editing and mixing audio in Adobe Audition........................................................................................................................ |
|
301 |
|||
Editing audio in Adobe Soundbooth.................................................................................................................................... |
|
|
302 |
||
Panning and balancing........................................................................................................................................................ |
|
|
|
303 |
|
Titling and the Titler................................................................................................................................... |
|
|
|
|
306 |
Creating and editing titles.................................................................................................................................................... |
|
|
307 |
||
Creating and formatting text in titles.................................................................................................................................... |
|
|
310 |
||
Drawing shapes in titles....................................................................................................................................................... |
|
|
|
314 |
|
Add images to titles............................................................................................................................................................. |
|
|
|
318 |
|
Working with text and objects in titles.................................................................................................................................. |
|
|
319 |
||
Fills, strokes, and shadows in titles..................................................................................................................................... |
|
|
322 |
||
Rolling and crawling titles.................................................................................................................................................... |
|
|
325 |
||
Titler text styles.................................................................................................................................................................... |
|
|
|
326 |
|
Effects and transitions............................................................................................................................... |
|
|
|
328 |
|
About effects........................................................................................................................................................................ |
|
|
|
|
329 |
Applying, removing, finding, and organizing effects............................................................................................................ |
|
333 |
|||
Viewing and adjusting effects and keyframes...................................................................................................................... |
336 |
Applying effects to audio...................................................................................................................................................... |
338 |
Working with audio transitions............................................................................................................................................. |
342 |
Effect presets....................................................................................................................................................................... |
344 |
Stabilize motion with the Warp Stabilizer effect (CS6)........................................................................................................ |
347 |
Color correction and adjustment.......................................................................................................................................... |
350 |
Adjustment Layers (CS6)..................................................................................................................................................... |
364 |
The rolling shutter repair effect (CS6).................................................................................................................................. |
366 |
Three-way Color Corrector effect (CS6).............................................................................................................................. |
367 |
Audio effects and transitions reference............................................................................................................................... |
368 |
Creating common results..................................................................................................................................................... |
375 |
Duration and speed............................................................................................................................................................. |
377 |
Effects and transitions reference......................................................................................................................................... |
384 |
Eliminate flicker.................................................................................................................................................................... |
427 |
Interlacing and field order.................................................................................................................................................... |
428 |
Modifying and customizing transitions................................................................................................................................. |
430 |
Motion: position, scale, and rotate a clip.............................................................................................................................. |
434 |
Transition overview: applying transitions............................................................................................................................. |
438 |
Animation and keyframes.......................................................................................................................... |
442 |
Adding, navigating, and setting keyframes.......................................................................................................................... |
443 |
Moving and copying keyframes........................................................................................................................................... |
449 |
Controlling effect changes using keyframe interpolation..................................................................................................... |
451 |
Optimize keyframe automation............................................................................................................................................ |
454 |
Compositing............................................................................................................................................... |
455 |
Compositing, alpha channels, and adjusting clip opacity.................................................................................................... |
456 |
Blending modes................................................................................................................................................................... |
459 |
Exporting.................................................................................................................................................... |
462 |
Workflow and overview for exporting................................................................................................................................... |
463 |
Formats exported directly from Premiere Pro...................................................................................................................... |
465 |
Export to Panasonic P2 format............................................................................................................................................ |
466 |
Exporting OMF files for Pro Tools........................................................................................................................................ |
467 |
Export a still image.............................................................................................................................................................. |
469 |
Exporting to DVD or Blu-ray Disc........................................................................................................................................ |
470 |
Smart rendering................................................................................................................................................................... |
471 |
Working with Adobe SpeedGrade CS6............................................................................................................................... |
472 |
Exporting for the Web and mobile devices.......................................................................................................................... |
474 |
Exporting projects for other applications.............................................................................................................................. |
477 |
Exporting to videotape......................................................................................................................................................... |
480 |
What's New
1

What's new in CS6
New features overview
Introduction to Adobe Premiere Pro CS6 Redesigned, customizable user interface
New default workspace
Redesigned Source and Program Monitors Redesigned Project panel
Timecode panel
Primary edit display in Cinema mode Dropped Frame indicator
Trackpad gesture support for Mac OS Editing workflow improvements
Mercury Playback Engine improvements Efficient ingest and logging with Adobe Prelude Multicam improvements
Improved trimming Continuous playback
New functionality for clip markers Improved Adobe Dynamic Link Smart rendering
Support for growing files Audio workflow improvements
Redesigned Audio Mixer Redesigned Audio Meter panel New audio track functionality
Improved audio channel functionality in Source monitor Use timecode from master audio in merged clips
Effects enhancements and workflow improvements Adjustment layers
Warp Stabilizer effect Rolling Shutter Repair effect
Redesigned 3-Way Color Corrector effect Adobe SpeedGrade Color Correction
Premiere Pro CS6 updates
New features overview
To the top
Resources:
Video tutorial series: What's new and changed in Premiere Pro CS6
Video tutorial series: Learn Premiere Pro
Video tutorial: What's new in Premiere Pro CS6
Blog: What's new and changed in Premiere Pro CS6
Redesigned, customizable user interface |
To the top |
|
New default workspace
Premiere Pro CS6 has a new default editing workspace with larger Source and Program monitors (a configuration referred to as "2-up"). This view allows you to view high-definition video much more easily in this workspace.
To return to the standard editing workspace found in Premiere Pro CS5.5 and earlier, choose Window > Workspace > Editing (CS5.5).
Resources:
The 2-up editing workspace (CS6)
Video tutorial: Project panel and Media Browser changes
2

Redesigned Source and Program Monitors
The Source and Program monitors have been redesigned to be more customizable.
Customizable button bar.
Timecode numbers can be toggled on or off (also available in the Timeline).
Pop-up menu for direct access to playback resolution.
Setting button for easier access to monitor settings.
Resources:
Source Monitor and Program Monitor overview
Video tutorial: Source Monitor, Program Monitor, timecode, and Timeline panel changes
Redesigned Project panel
The Project Panel has been redesigned with these features:
Resizable clip thumbnails.
Clip thumbnails maximized to use space more efficiently.
In thumbnail view, scrub clips by dragging the mouse across a thumbnail. This technique is called "hover scrubbing".
In thumbnail view, clips can be selected and scrubbed with the Clip Playhead, or by using the JKL and Spacebar keyboard shortcuts.
Mark In and Out points on clips as you are scrubbing, or on the fly as you are playing back by using the JKL and Spacebar keyboard shortcuts.
A usage icon can be used to navigate to clips in sequences.
Resources:
Customizing the Project panel
Video tutorial: Project panel and Media Browser changes Video tutorial: Introducing the Project panel
Timecode panel
A panel that displays oversized timecode, and feet+frames is now available in Premiere Pro CS6.
To view the Timecode panel, choose Window > Timecode.
Resources:
View timecode in the Timecode panel
Video tutorial: Source Monitor, Program Monitor, timecode, and Timeline panel changes
Primary edit display in Cinema mode
Put either the Program monitor or the Source monitor into full-screen, “cinema” mode on your system’s primary display.
To toggle Cinema mode on and off, press the Ctrl key and the Accent key, and then click either the Source monitor or Program monitor. Press the keyboard shortcuts once more to return to the interface.
Resources:
Source Monitor and Program Monitor overview Video tutorial: Toggle full screen
Dropped Frame indicator
Both the Source and the Program monitor now have the option to display an icon that indicates if frames are being dropped during playback.
Resources:
Dropped Frame indicator (CS6)
Video tutorial: Source Monitor, Program Monitor, timecode, and Timeline panel changes
Trackpad gesture support for Mac OS
Use trackpad gestures to navigate the Timeline and other panels in Premiere Pro using the MacBook Pro's trackpad or the Apple Magic Trackpad.
Resources:
Zoom into or out of a sequence in a Timeline panel
Video tutorial: Miscellaneous new and removed features
3

Editing workflow improvements
To the top
Mercury Playback Engine improvements
The Adobe Mercury Transmit feature enables third-party capture cards to plug directly in to the performance of the Mercury Playback Engine. The feature gives you access to CUDA acceleration and enhanced support for SDI I/O and professional broadcast monitoring.
New support for the OpenCL-based AMD Radeon HD 6750M, and 6770 graphics cards makes the Mercury Playback Engine (Hardware) available on certain Apple MacBook Pro computers.
More CUDA-based video cards are approved for the Mercury Playback Engine. For an up-to-date list of supported cards, see: www.adobe.com/go/64bitsupport
Resources:
Project Settings
Device Control preferences
Video tutorial: Mercury Playback Engine: GPU acceleration Blog: Improvements to the Mercury Playback Engine
Efficient ingest and logging with Adobe Prelude
Ingest clips using Adobe Prelude. Then log clips and create subclips, markers, In and Out points, searchable notes, metadata, and rough cuts. You can bring the data from the Prelude project right into Premiere Pro.
Note: Adobe Prelude is a separate application.
Resources:
Adobe Prelude Help
Video tutorial: What is Adobe Prelude?
Video tutorial: An overview of the interface
Video tutorial: Improved markers and importing from Prelude
Video tutorial: Sharing clips and rough cuts directly with Adobe Premiere Pro CS6
Multicam improvements
You can now use more than four camera angles in multicam editing. You are limited in number of angles only by the power of your computer. It's also easier to create multicam sequences.
Resources:
Editing multi-camera sequences (CS6)
Video tutorial: Multicamera improvements
Video tutorial: Setting up multi-camera sequences
Improved trimming
There are powerful new options for quickly selecting and shifting edit points using the mouse, new keyboard shortcuts, or the numeric keypad. JKL dynamic trimming is supported, as well. The new Trim Mode provides a two-up display showing the outgoing and incoming frames right inside the Program monitor. Timeline trimming has also been improved with a keyboard driven workflow.
To open Trim mode, double-click any edit point.
Resources:
Trimming clips (CS6)
Video tutorial: Dynamic trimming and editing with the keyboard
Video tutorial: J-K-L Trimming
Video tutorial: Trimming on the Timeline
Continuous playback
The Timeline transport now continues playback unless the user specifically issues a Stop command. This feature supports real-time adjustment of common editing actions.
Resources:
Continuous playback (CS6)
Video tutorial: Adjustment layers, applying effects, and continuous playback
New functionality for clip markers
Clip markers have been improved with color labels and the ability to span a duration of time. Functionality previously available only in sequence
4

markers is now available in clip markers. Customize markers in the redesigned Marker dialog box. View all of your clip markers in the new Markers panel.
Resources:
Working with Markers
Video tutorial: Improved markers and importing from Prelude
Improved Adobe Dynamic Link
Improved Dynamic Link, including performance enhancements, and removal of the limitation of Dynamic Link to only work within a suite (for example, Dynamic Link will now work between CS6 applications purchased as individual products).
Resources:
Adobe Dynamic Link (CS6)
Video tutorial: Dynamic Link improvements
Smart rendering
In Premiere Pro CS6 (6.0.1), smart rendering capability has been added for Long GOP MPEG2 OP1a exports, where the original material is a matching long GOP MPEG2 OP1a or XDCAM EX file. Smart rendering in Premiere Pro CS6 (6.0.1) accelerates MXF render times for long GOP MPEG2 essences, while avoiding recompression.
Resources:
Smart Rendering
Blog: Smart Rendering in Premiere Pro CS6 (6.0.1, and later)
Support for growing files
Growing files are video files which grow in duration after they are ingested. Premiere Pro CS6 now supports growing files for the following codecs:
AVCI50/100
IMX30/40/50
RDD9-compliant XDCAM HD 50/35/25/18
QuickTime wrapped files in these formats are supported in Premiere Pro CS6 (6.0.2), and later
Resources:
Growing files
Blog: Support for growing files in Premiere Pro CS6
Audio workflow improvements |
To the top |
|
Redesigned Audio Mixer
The Audio Mixer panel has been redesigned to include the following features.
Select between two visual metering modes.
Double-click a fader to return it to 0dB.
Separate dB scales for the meters and faders.
A context menu for meter options in the panel menu.
Resources:
Audio Mixer overview
Video tutorial: Changes to the Audio Mixer and Audio Meters panels
Redesigned Audio Meter panel
The Audio Meter panel has been redesigned to be more accurate, customizable, and easier to use. The Audio Meter panel offers these features:
Meters auto layout horizontally or vertically
Meters scale as needed
New Solo buttons for each channel
Audio Meter panel now meters the Source Monitor content
Several options for displaying audio
Resources:
Audio Meters panel
5

Video tutorial: Changes to the Audio Mixer and Audio Meters panels
New audio track functionality
Mono and stereo audio tracks are no longer separate. A new kind of audio track, called "Standard" can contain both stereo and mono clips.
Resources:
Overview of audio and the Audio Mixer Video tutorial: New audio track functionality
Improved audio channel functionality in Source monitor
In the Source monitor, you can now view clips with multiple audio channels, including grouped clips, or merged clips.
Resources:
Working with audio clips in the Source Monitor
Video tutorial: Changes in audio tracks and merged clip audio
Use timecode from master audio in merged clips
A new DSLR workflow allows you to use the timecode from an audio master clip to be used when you create a merged clip. You can also choose to omit the source camera audio when creating a merged clip.
Resources:
Use timecode from an audio master clip to create a merged clip (CS6) Video tutorial: Miscellaneous new and removed features
Effects enhancements and workflow improvements |
To the top |
|
Adjustment layers
Adjustment layers, used in products like Photoshop and After Effects, are now available in Premiere Pro CS6. Adjustment layers are useful for many things, including greater control in color correction.
To add an adjustment layer to your project, select the Project panel and then choose File > New Adjustment Layer.
Resources:
Adjustment layers
Video tutorial: Adjustment layers, applying effects, and continuous playback Video tutorial: Working with Adjustment Layers
Warp Stabilizer effect
Formerly available only in After Effects CS5.5 (and later), Warp Stabilizer is a CUDA accelerated effect that allows you to smooth out shaky, handheld footage.
Locate the effect in the Effects panel, Effects > Distort > Warp Stabilizer.
Resources:
Stabilize Motion with the Warp Stabilizer effect (CS6) Video tutorial: Warp Stabilizer effect
Rolling Shutter Repair effect
Use the Rolling Shutter Repair effect for fixing clips with rolling shutter artifacts.
Locate the effect in the Effects panel, then choose Effects > Distort > Rolling Shutter Repair.
Resources:
The rolling shutter repair effect (CS6)
Video tutorial: The rolling shutter repair effect
Redesigned 3-Way Color Corrector effect
The 3-Way Color Corrector effect is more intuitive. Tools are easier to find and use.
The 3-Way Color Corrector is located in the Effects panel. Choose Effects > Color Correction > 3-Way Color Corrector.
Resources:
6
Three-Way Color Corrector effect (CS6)
Video tutorial: Newly designed 3-Way Color Corrector effect
Adobe SpeedGrade Color Correction
Export sequences to Adobe SpeedGrade to professionally color-grade your work.
To export your sequence to SpeedGrade, select it in the Project panel, and then choose File > Send to Adobe SpeedGrade. You can also export an EDL from Premiere Pro and import it into SpeedGrade and reconnect the clips.
Note: Adobe SpeedGrade is a separate application.
Resources:
Working with Adobe SpeedGrade CS6
SpeedGrade Help
Video tutorial: Exporting to SpeedGrade
Video tutorial: Loading and conforming material in SpeedGrade CS6 Video tutorial series: Learn SpeedGrade CS6
Premiere Pro CS6 updates
To the top
Premiere Pro CS6 (6.0.3) update (Windows only)
The Premiere Pro CS6 (6.0.3) update is a Windows-only update that contains an important change to the code signing to address the following issues:
Security certificate updates
Certificate revocation FAQ
Adobe to revoke code signing certificate
Guidance for IT administrators | Adobe certificate revocation
This issue also affects Windows versions of Adobe Prelude and Adobe Media Encoder. See this blog post for information about the The Premiere Pro CS6 (6.0.3) update.
Premiere Pro CS6 (6.0.2) update
The Premiere Pro CS6 (6.0.2) update includes the following changes and updates:
Numerous bug fixes.
Windows 8 certification.
Updates for HiDPI display, which improves appearance on computers that use Retina Display, such as MacBook Pro computers.
Added GPUs to the list of those that Premiere Pro CS6 will use for GPU processing: GT 650M (which is in the newer MacBook Pro computers) and GTX 680.
See this blog post for information and full details about the The Premiere Pro CS6 (6.0.2) update.
Premiere Pro CS6 (6.0.1) update
The Premiere Pro CS6 (6.0.1) update includes the following changes and updates:
Numerous bug fixes
Improved performance using OpenCL, especially when used on Mac OSX v10.7.4 or later.
Added encoding presets with additional bit-rate settings for XDCAM HD.
Added Automatic Peak File Generation preference in the Audio category for turning off automatic peak file generation for imported audio.
When this preference is disabled, importing audio or opening projects will not cause peak files to be generated.
Enabled “smart rendering” and added Enable Smart Rendering Codec setting to the Video tab of the MXF OP1a exporters for XDCAM HD and XDCAM EX to enable or disable smart rendering for these formats.
 Added support for import of files and use of growing files from Sony XDCAM deck (XDSPE2000). See this blog post for information and full details about the The Premiere Pro CS6 (6.0.1) update.
 Twitter™ and Facebook posts are not covered under the terms of Creative Commons.
Legal Notices | Online Privacy Policy
7

What's New in Adobe Media Encoder CS6
Queue and Watch Folders: Independent handling of source and output Preset browser
Import and export presets Improved scaling of source frames Creating custom workspaces Workflow enhancements
Changes to exporters Keyboard shortcuts
New keyboard shortcuts in CS6
Queue and Watch Folders: Independent handling of source and output
To the top
Source and output are now handled independent of each other. This independent handling allows a given source to be configured with multiple outputs. Among the advantages, Adobe Media Encoder can simultaneously encode multiple outputs of a given source. Compared to individually encoding each output, simultaneous encoding is faster.
Preset browser
To the top
The new Preset Browser provides you with options that help streamline your workflow in Adobe Media Encoder.
System presets in the browser are organized as categories based on their use (such as Broadcast, Web Video) and device destination (such as DVD, Blu-ray, Camera, Tablet). You can modify these presets to create custom presets, also called User Presets.
In the Preset Browser, you can quickly find a preset using search, or using the enhanced navigation provided by the collapsible folder structure.
User presets, preset groups, and aliases
You can modify system presets to create user presets. You can organize user presets in separate folders called as preset groups. Preset groups allow you to apply multiple presets to a source in a single step.
Aliases allow you to create multiple instances of a preset for use in multiple preset groups.
For example, if you want a preset to exist in more than one preset group, create aliases to the preset instead of duplicating it. Then, add the aliases to other preset groups. When you edit the preset, the changes are applied to all its aliases.
Managing Presets
To manage presets, use the Preset menu or the options in The Preset Browser (Window>Preset Browser). You can also right-click a preset in the Preset Browser to view the context menu for the available options.
The Preset Browser
8

A. User preset B. Alias created to a preset C. Preset group D. Create new preset E. Delete preset F. Create new preset group G. Preset settings H. Import presets I. Export presets J. Search for presets
Create presets, preset groups, and aliases
Preset Groups can contain user presets, aliases to presets, or other preset groups.
Select Preset > Create Preset to create a preset. Select Preset > Create Group to create a preset group.
To create a preset alias, right-click the preset in the Preset Browser, and select Create Alias.
To quickly create an alias to a system preset, drag the system preset to the User Presets and Groups section.
To quickly create an alias to a user preset, Alt -drag (Win) or Opt - drag (Mac OS) the user preset to a preset group.
Modify user presets
To rename a preset, click the name of a selected preset. Type a name for the preset and press Enter. Alternatively, select Preset > Rename to rename a preset.
To modify preset settings, select a preset, and select Preset > Settings.
To delete a preset, select the preset and press Delete. Alternatively, select Preset > Delete.
Note: Only user presets can be edited. Changes to system presets can be saved as new user presets by clicking the Save A Copy button in the Preset Settings dialog.
Apply presets or preset groups to the Queue
To apply presets to sources in the Queue, do one of the following:
Drag presets, preset groups, or aliases from the Preset Browser and drop them on sources or outputs in the Queue.
Dropping a preset on a source adds an output to the source.
Dropping a preset on an existing output replaces the settings of the output with the settings of the preset.
To add an output to the source, drag a source from the Queue to a preset, preset group, or alias in the Preset Browser.
To replace the settings of the output with the settings of the preset, drag an output from the Queue to a preset, preset group, or alias in the Preset Browser.
Select a source in the Queue and double-click a preset, preset group, or alias in the Preset Browser.
Select a source in the Queue. Select presets, preset groups, or aliases selected in the Preset Browser. Click Apply Preset.
Apply presets or preset groups to Watch Folders
To apply presets to watch folders in the Watch Folders panel, do one of the following:
Drag presets, preset groups, or aliases from the Preset Browser and drop them on watch folders or outputs in the Watch Folders panel.
Dropping presets on a watch folder adds new outputs to the watch folder.
Dropping presets on an existing output replaces the settings of the output with the settings of the preset.
To add an ouput to the watch folder, drag a watch folder from the Watch Folders panel to a preset, preset group, or alias in the Preset Browser.
To replace the settings of the output with the settings of the preset, drag an output from the Watch Folders panel to a preset, preset group, or alias in the Preset Browser.
Select a watch folder in the Watch Folders panel. Alt + double-click (Win) or Opt + double-click (Mac) a preset, preset group, or alias in the Preset Browser.
Select a watch folder in the Watch Folders panel. Select presets, preset groups, or aliases in the Preset Browser. Alt + click (Win) or Opt + click (Mac) the Apply Preset button.
Apply presets to Premiere Pro sequences, After Effects compositions, and media assets during import
Apply presets to Adobe Premiere Pro sequences
Drag a sequence from the Project panel of an open Adobe Premiere Pro project and drop it on a preset, alias, or preset group in the Preset Browser.
Note: This procedure is the only way to add multiple presets to Adobe Premiere Pro sequences in a single step. The Export Settings dialog in Adobe Premiere Pro allows you to apply single presets when exporting sequences to Adobe Media Encoder.
Apply presets to After Effects compositions
9
Drag a composition from the Project panel of an open After Effects project to a preset, preset group, or alias in the Preset Browser.
Apply presets to video and audio assets
Drag video and audio assets from Finder or Windows Explorer and drop them on a preset, preset group, or alias in the Preset Browser.
Important considerations when applying presets
Dropping a single preset on an output replaces the output. The new outputs inherit the output path, output name, and source range settings from the targeted output
Dropping a single preset on a source adds an output.
Dropping a preset group (or multiple selected presets) on an output adds outputs. The new outputs inherit the output path, output name, and source range settings from the targeted output.
Dropping a preset group (or multiple selected presets) on a source adds outputs. Settings such as output path from existing outputs are not inherited.
Import and export presets
To the top
Presets can be imported and exported as EPR files. EPR files are saved in the XML format.
Select Preset > Import to import EPR files. Imported presets appear in the User Presets and Groups section.
Select Preset > Export to export selected presets as EPR files.
Note: You can also drag-and-drop EPR files on an existing preset in the Preset Browser to import them.
Show the location of a preset in Finder or Explorer
Right-click the preset in the Preset Browser and select Reveal Preset File.
Quickly find a preset in the browser
As you type in the search field  , the Preset Browser filters the preset list to match your search string. All columns are scanned for matching results.
Improved scaling of source frames
To the top
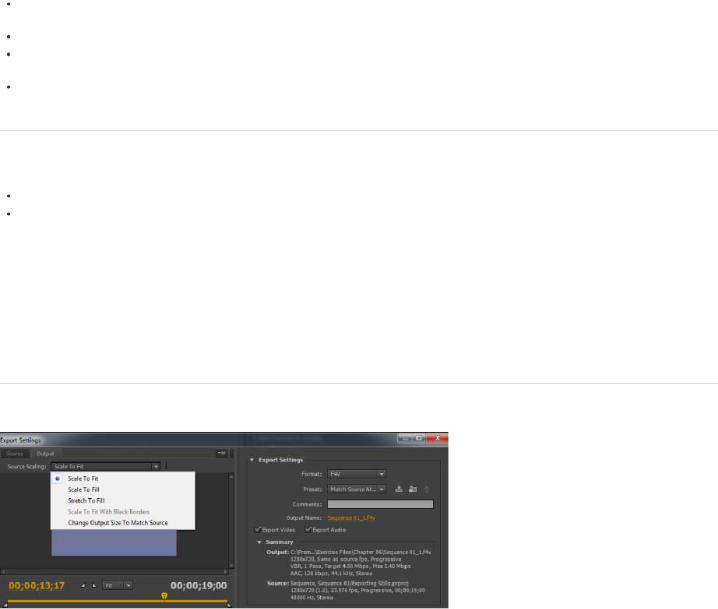
Source Scaling options
In Adobe Media Encoder CS6, it is not necessary that you enable a crop before using this option. Also, this setting is available for any output format with editable frame dimensions.
Use the options in the Source Scaling menu of the Export Settings dialog for better scaling of source frames within output frames of a different size.
Scale To Fit Scales the source frame to fit within the output frame while maintaining pixel aspect ratio of the source. Source frames are letterboxed or pillar-boxed within the output frame as necessary.
Scale To Fill Scales the source frame to completely fill the output frame while cropping the source frame as necessary. Pixel aspect ratio of the source frame is maintained.
Stretch To Fill Resizes the source frame to completely fill the output frame. Pixel aspect ratio of the source is not maintained.
Scale To Fit With Black Borders Source frame, including the cropped area, is fit within the output frame. Pixel aspect ratio is maintained.
10
Note: This option is the same as the Black Borders option in the Crop Settings menu of Adobe Media Encoder CS5.5.
Change Output Size To Match Source Overrides the output frame size settings to match the crop settings of the source.
Note: This option is the same as Change Output Size in the Crop Settings menu of Adobe Media Encoder CS5.5.
Creating custom workspaces
To the top
In the new interface, you can group panels as tabs in a single frame or float them as separate panels.
1.Move the panels by clicking them and dragging them around. To group panels, drag the panel to the topmost section of another panel. Release the mouse when a purple patch appears in the center of the host panel.
2.After you customize the workspace to your requirements, select Window > Workspace > New Workspace to create a custom workspace.
The new Workspace is added to the Workspace menu. You can now use the options in the Window > Workspace menu to switch workspaces.
Workflow enhancements
To the top
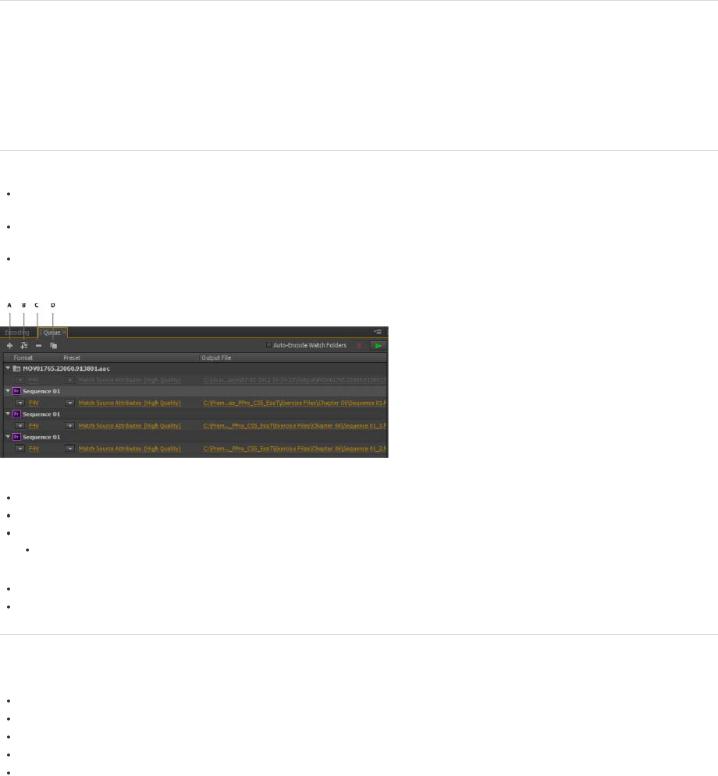
Sources are still encoded in sequence, but all outputs of a source are now encoded in parallel. To disable parallel encoding, select Edit > Preferences, and deselect Enable Parallel Encoding.
For multiple outputs, the Encoding panel displays a thumbnail preview, progress bar, and the completion time estimate of each encoding output
In certain cases, export settings require an output to encode in serial rather than in parallel mode. In such cases, the queue returns to parallel encoding after temporary serial encoding is complete.
A. Add Source B. Add Output C. Remove Source/Output D. Duplicate
You can associate multiple outputs with a source. Each output can have a different format, preset, and output file location assigned to it. You can reorder outputs in the output list. However, you cannot move them to other sources.
Clicking the output file path opens the folder containing the encoded file. Previous to encoding, however, the Save As dialog appears.
To change the output path and filename, click the Output File link for that output.
 To access an encoded file, click the Output File link for that output Use the Add Output button to quickly add an output to a source.
Both sources and outputs can be duplicated. A duplicated source uses all the outputs from the original source.
Changes to exporters
To the top
For better performance, the following exporters have been updated for this release:
AAC Audio ("Audio Only" in previous versions)
H.264
H.264 Blu-ray
MPEG4
Windows Media (Windows only)
For compatibility reasons, older versions of the following CS5.5 exporters have been included in CS6:
H.264 (Legacy) Dolby Digital Surcode audio encoding is not available in the new exporter.
11

H.264 Blu-ray (Legacy) Preserves support for Match Source presets and Surcode for Dolby.
MPEG4 (Legacy)
Presets created in previous versions of Adobe Media Encoder can be imported into Adobe Media Encoder CS6. However, presets for H.264 and H.264 Blu-ray apply only to legacy exporters. Presets for the Audio Only or Windows Media exporters from previous versions cannot be imported.
Change render settings for an After Effects composition
Adobe Media Encoder CS6 allows you to modify the Guide Layers render setting for an After Effects composition. To enable or disable guide layer visibility, select an After Effects comp source, and select File > Source Settings.
Keyboard shortcuts
To the top
Result |
Windows |
Mac OS |
Add item to queue |
Ctrl+I |
Cmd+I |
Start/pause queue |
Enter |
Return |
Stop queue |
Esc |
Esc |
Open Preferences dialog |
Ctrl+,(comma) |
Cmd+,(comma) |
Save queue |
Ctrl+S |
Cmd+S |
Quit |
Ctrl+Q |
Cmd+Q |
Duplicate selected items |
Ctrl+D |
Cmd+D |
Select all items in current list |
Ctrl+A |
Cmd+A |
Open the Export Settings dialog |
Ctrl+E |
Cmd+E |
Undo |
Ctrl+Z |
Cmd+Z |
Redo |
Ctrl+Y |
Cmd+Y |
Adobe Media Encoder Help |
F1 |
F1 |
Export Settings dialog
Result |
Windows |
Mac OS |
Moves playhead one frame earlier/later |
Left/Right arrows |
Left/Right arrows |
|
|
|
Move playhead to the start/end frame |
Home/End |
Home/End |
Set source range In Point to playhead's |
I |
I |
current position |
||
|
|
|
Set source range Out Point to playhead's |
O |
O |
current position |
||
|
|
|
Move playhead to the In Point |
Q |
Q |
Move playhead to the Out Point |
W |
W |
Zooms in frame preview |
Ctrl++(plus) |
Cmd++(plus) |
Zooms out frame preview |
Ctrl+-(minus) |
Cmd+-(minus) |
Exports preset as an EPR file |
Alt+click Save Preset button |
Opt+click Save Preset button |
New keyboard shortcuts in CS6 |
To the top |
|
|
Customize keyboard shortcuts |
|
Select Edit > Keyboard Shortcuts (Windows) or Application > Keyboard Shortcuts (Mac OS) to customize keyboard shortcuts in Adobe Media Encoder CS6.
For example, to change the keyboard shortcut for the cut operation from Ctrl+x to Ctrl+t, do the following:
1.Select Edit > Keyboard Shortcuts.
2.In the Keyboard Shortcuts panel, expand the Edit menu by clicking it.
12
3.Select Cut.
4.Click  next to Ctrl+x to delete the existing command.
5.Click Add.
6.Press Ctrl+t.
7.Click OK.
File menu
Result |
Windows |
Mac OS |
Add watch folder |
Ctrl+Alt+I |
Cmd+Opt+I |
|
||
|
|
|
Stop current item |
Ctrl+ - (minus sign) |
Cmd+ - (minus sign) |
|
|
|
|
|
|
Show log |
Ctrl+L |
Ctrl+L |
Show errors |
Ctrl+Alt+L |
Cmd+Opt+L |
Edit menu
Result |
Windows |
Mac OS |
Redo |
Ctrl+Shift+Z |
Cmd+Shift+Z |
Reset status |
Ctrl+ . (period) |
Cmd+.(period) |
Skip selection |
Ctrl+Shift+. (period) |
Cmd+Shift+.(period) |
Show errors |
Ctrl+Alt+L |
Cmd+Opt+L |
Open Keyboard Shortcuts dialog |
Ctrl+Alt+Shift+K |
Cmd+Opt+Shift+K |
Preset menu
Result |
Windows |
Mac OS |
Open Preset Settings dialog |
Ctrl+Alt+E |
Cmd+Opt+E |
|
||
|
|
|
Apply to queue |
Ctrl+U |
Cmd+U |
|
|
|
|
|
|
Apply to watch folders |
Ctrl+Alt+U |
Cmd+Opt+U |
|
|
|
|
|
|
Create preset |
Ctrl+N |
Cmd+N |
|
||
|
|
|
Create preset group |
Ctrl+G |
Cmd+G |
|
||
|
|
|
Create alias to preset |
Ctrl+B |
Cmd+B |
|
||
|
|
|
Rename user preset or preset group |
Ctrl+R |
Cmd+R |
Window menu
Result |
Windows |
Mac OS |
Queue panel |
Ctrl+1 |
Cmd+1 |
|
||
|
|
|
Encoding panel |
Ctrl+2 |
Cmd+2 |
|
|
|
|
|
|
Watch folders panel |
Ctrl+3 |
Cmd+3 |
|
|
|
|
|
|
Preset browser |
Ctrl+4 |
Cmd+4 |
|
||
|
|
|
13
Main user interface
Result |
Windows |
Mac OS |
|
Close the current panel |
Ctrl+W |
Cmd+W |
|
|
|||
|
|
|
|
Maximize/Restore the panel under the |
` (backtick sign under tilde) |
` (backtick sign under tilde) |
|
pointer cursor |
|||
|
|||
|
|
|
|
Maximize or restore current panel |
Shift+` (bactick sign under tilde) |
Shift+` (bactick sign under tilde) |
|
|
|
||
|
|
|
|
Maximize/Restore panel under the pointer |
< |
< |
|
cursor (non-English keyboards) |
|||
|
|
|
|
Maximize or restore current panel (non- |
Shift+ < |
Shift+ < |
|
English keyboards) |
|||
|
|
|
|
Select previous/next item in list |
Up and Down Arrows |
Up and Down Arrows |
|
|
|||
|
|
|
|
Add previous/next item in list to current |
Shift + Up/Down Arrows |
Shift + Up/Down Arrows |
|
selection |
|||
|
|||
|
|
|
|
Select previous/next item in list. If a folder |
|
|
|
is selected, Right Arrow opens the folder |
Right and Left Arrows |
Right and Left Arrows |
|
and Left Arrow closes it. |
|
|
|
|
|
|
|
Add previous/next item in list to current |
|
|
|
selection. If a folder is selected, Right |
Shift+Right and Left Arrows |
Shift+Right and Left Arrows |
|
Arrow opens folder and Left Arrow closes |
|||
it. |
|
|
|
|
|
|
Export Settings dialog
Numeric field with whole numbers (ex. Frame Width setting): |
|
||
|
|
|
|
Result |
Windows |
Mac OS |
|
Increase or decrease current value by 1 |
Up and Down Arrows |
Up and Down Arrows |
|
|
|
||
|
|
|
|
Increase or decrease current value by 10 |
Shift+Up/Down Arrows |
Shift+Up/Down Arrows |
|
|
|
||
|
|
|
|
Increase or decrease current value by 10 |
Ctrl+Up/Down Arrows |
Cmd+Up/Down Arrows |
|
|
|
||
|
|
|
|
Increase or decrease current value by 100 |
Ctrl+Shift+Up/Down Arrows |
Cmd+Shift+Up/Down Arrows |
|
|
|
||
|
|
|
|
|
|
|
|
Bit rate field in Mbps: |
|
|
|
|
|
|
|
Result |
Windows |
Mac OS |
|
Increase or decrease current value by 1 |
Shift+Up/Down Arrows |
Shift+Up/Down Arrows |
|
|
|
||
|
|
|
|
Increase or decrease current value by .1 |
Up and Down Arrows |
Up and Down Arrows |
|
|
|
||
|
|
|
|
Increase or decrease current value by .01 |
Ctrl+Up/Down Arrows |
Cmd+Up/Down Arrows |
|
|
|
||
|
|
|
|
Increase or decrease current value by |
Ctrl+Alt+Up/Down Arrows |
Cmd+Opt+Up/Down Arrows |
|
.001 |
|||
|
|||
|
|
|
|
|
|
|
|
Bit rate field in Kbps: |
|
|
|
|
|
|
|
Result |
Windows |
Mac OS |
|
|
|
|
|
14

Increase or decrease current value by 10 |
Shift+Up/Down Arrows |
Shift+Up/Down Arrows |
|
|
|
|
|
|
Increase or decrease current value by 1 |
Up and Down Arrows |
Up and Down Arrows |
|
|
|
|
|
|
Increase or decrease current value by .1 |
Ctrl+Up/Down Arrows |
Cmd+Up/Down Arrows |
|
|
|
|
|
|
Increase or decrease current value by .01 |
Ctrl+Alt+Up/Down Arrows |
Cmd+Opt+Up/Down Arrows |
|
|
|
|
|
|
Keyboard Shortcuts dialog
Result |
Windows |
Mac OS |
Expand/Collapse all categories in dialog |
Alt+Click Category heading |
Opt+Click Category heading |
 Twitter™ and Facebook posts are not covered under the terms of Creative Commons.
Legal Notices | Online Privacy Policy
15

What’s new (CS5.5)
For a complete list of what’s new and changed in Adobe Premiere Pro CS5.5, see this post on the Premiere Pro Work Area blog. To see the new features of Adobe Premiere Pro CS5.5 in action, see this video tutorial series by Video2Brain.
For more information about new features in Premiere Pro, see the Adobe website.
Merged Clips Adobe Premiere Pro CS5.5 features a method for synchronizing "dual-system" audio and video. This streamlines the process by which users can synchronize audio and video recorded separately. See Synchronizing audio and video with Merge Clips (CS5.5 and later) and this video by Video2Brain.
Mercury Engine Performance Gains New GPU-accelerated features include speed changes, footage interpretation options, field-order processing, and video effects and transitions. More video cards are supported, as well. See this video by Video2Brain.
Usability Improvements Lot of usability improvements have been added to Adobe Premiere Pro CS5.5, as described in this video by Video2Brain.
Keyboard customization: You can now customize your keyboard even more easily with the search field in the keyboard shortcuts dialog box. See Find keyboard shortcuts and this video about keyboard shortcuts in Premiere Pro CS5.5 by Video2Brain.
A new overlay allows you to drag clips from the Media Browser, Project panel, or Source panel into the Program panel to perform an insert or overwrite edit. See Insert or Overwrite by dragging a clip to the Program panel.
Add keyframes directly into the timeline using the Pen or Selection tools without having to first enable keyframing. A modifier key is no longer needed to set keyframes, as well. See Add, select, and delete keyframes.
The Unlink command now decouples the audio portion of a clip while automatically leaving the video portion selected. The Unlink command now works on multiple clips at the same time, as well. See Link and unlink video and audio clips.
Editing in Adobe Audition A new workflow allows you to interchange with Adobe Audition CS5.5 a clip, or an entire sequence worth of video and audio data, including tracks, individual clips, and keyframes. See Edit audio in Adobe Audition and this video by Video2Brain.
Accelerated Video Effects More video effects and transitions are now GPU-accelerated for the Mercury Playback Engine. See List of GPU accelerated effects in Premiere Pro CS5.
Unified Audio Effects Audio effects are now combined into a single, unified effect. See Audio effects and this video by Video2Brain. Expanded native support for RED digital cinema workflows The RED R3D Source Settings dialog has been redesigned, and offers intuitive controls to those working with RED media. Saves and loads the latest versions of RMD, creates presets, and allows you to adjust color with a
histogram or with curves. Choose a desired Color Science, and apply settings to multiple RED clips simultaneously. See File formats supported for importand this video by Video2Brain.
Speech analysis improvements with Adobe Story You can find and fix speech analysis errors more easily by making side-by-side comparisons of the text of the speech analysis with the text of the Adobe Story script. You can also attach an Adobe Story script file (.astx) to a single or multiple clips directly in Adobe Premiere Pro. You don't have to use OnLocation for this step anymore. See Improve speech analysis with Adobe Story scripts (CS5.5 and later) and this video by Video2Brain.
Closed Captioning You can attach a closed caption data file to a sequence and display the closed captions in the Program Monitor and through Firewire DV output. See Attach closed caption files (CS5.5 and later) and this video by Video2Brain.
Integration with Adobe CS Review Enables clients and teammates to take part in reviewing video sequences using a web browser and annotation tools. Reviewers can make frame-accurate comments that visually correlate to the Adobe Premiere Pro timeline.
Legal Notices | Online Privacy Policy
16
What’s new (CS5)
For Premiere Pro system requirements, see the Adobe website.
For lists of various categories of hardware compatible with Adobe Premiere Pro, see the Adobe website. See this page for what’s new and changed in Adobe Premiere Pro CS5 (5.0.2).
See this page for what’s new and changed in Adobe Premiere Pro CS5 (5.0.3). See this page for what’s new and changed in Adobe Premiere Pro CS5 (5.0.4). See this page for what’s new and changed in Adobe Media Encoder CS5.
This blog post on the animotion website details the advantages and considerations of upgrading to Premiere Pro CS5.
Native 64-bit and GPU-accelerated performance with Adobe Mercury Playback Engine Edit HD as fluidly as SD. The Mercury Playback Engine delivers native 64-bit support, GPU acceleration, and other performance and stability improvements. Open projects faster, refine effectsrich HD and higher-resolution sequences in real time, enjoy smooth scrubbing and play back of complex projects without rendering. See results instantly when applying multiple color corrections, the new Ultra Key, Gaussian blurs, and blending modes. Work with numerous other effects across many video layers. Work in real time on complex timelines and long-form projects with thousands of clips. Save rendering time with realtime playback, whether your project is in SD, HD, 2K, 4K or beyond. For more information. See GPU-accelerated effects.
Expanded native tapeless workflows In CS5, Premiere Pro gains native support for XDCAM HD 50, AVCCAM, DPX, and AVC-Intra as well as enhanced RED. Premiere Pro continues support for P2, XDCAM EX and HD, and AVCHD. You never waste valuable production time transcoding or rewrapping, and always have access to the pristine quality of the original files. Edit video natively from the latest DSLR cameras like the Canon 5D Mark II and Canon 7D. For more information, see Importing assets from tapeless formats.
Script-to-screen workflow Collaborate on writing scripts with Adobe Story, capturing key production direction as you go. Then, automatically create shot lists from your script in Adobe OnLocation to manage your shoot and capture logging notes. When you import the project into Premiere Pro, metadata from Adobe OnLocation makes it easy to create a preliminary rough cut. Use Speech Search to synchronize the script to footage, and then edit based on the dialogue transcript. With Premiere Pro, you reap the rewards of a well-planned project. For more information, see Working with Adobe Story, Adobe OnLocation, and Adobe Premiere Pro.
Round-trip editing with Final Cut Pro and Avid Media Composer Leverage the unique tools in Premiere Pro in any production workflow. Final Cut Pro export completes round-trip editing workflows with Apple Final Cut Pro and Avid Media Composer to enable a collaborative production process. Bring the creative benefits of Adobe tools to the whole project. Explore new possibilities with After Effects, Encore, and other Adobe applications. Edit with Speech Search, which turns spoken dialogue into searchable text for faster editing. For more information, see Crossapplication workflows.
Editing and production efficiencies from metadata features Add intelligence to your assets using innovative metadata features. Turn spoken dialogue into searchable text faster and with higher accuracy. Synchronize content with your Adobe Story script, or by using reference scripts that are optimized for your content. Accelerate editing by marking In and Out points in the speech analysis text. Use face detection technology to locate clips containing human faces. Plus, metadata stays with the assets you create, making your content more discoverable online. For more information, see Understanding the script-to-screen workflow and Analyze speech for text XMP metadata.
Client and team reviews made simple with CS Review CS Review is a new online service that allows you to share dailies and works in progress for review. CS Review eliminates the need for burning discs or swapping large files back and forth. Encode sequences and automatically upload them in the background for review and collaboration. Clients and teammates can comment on your video using just a web browser, and their frame-accurate comments automatically appear in the Premiere Pro sequence. Upgrading to Premiere Pro CS5 gives you a complimentary one year subscription to CS Review. The CS Review video workflows for Premiere Pro will not be available when Premiere Pro CS5 initially ships. Premiere Pro CS5 customers will automatically receive access to the CS5 Review video workflows when they become available.
Simplify everyday tasks with small changes that make large differences Take advantage of the most requested editing enhancements. See large productivity gains and smoother day-to-day workflows. Use automatic scene detection to create separate clips from HDV tapes. Import assets from DVDs. Use new extend edit and find gaps keyboard shortcuts. Control keyframes with greater precision. Clean up your sequences quickly with new commands for finding and removing gaps. For more information, see Log clips with automatic scene detection, Make rolling edits with the current-time indicator, and Find gaps in sequences and tracks.
Streamlined encoding with revamped Adobe Media Encoder Efficiently deliver your content in virtually any format with Adobe Media Encoder, now with a more intuitive user interface. Adobe Media Encoder saves you time by batch encoding multiple versions of your source files and Premiere Pro sequences. Set up multiple items for encoding, manage priorities, and control advanced settings for each item individually. Use any combination of sequences and clips as sources. Encode to a wide variety of video formats. DPX joins FLV, F4V, Windows Media (Windows only), QuickTime, MPEG-2, MPEG-4, and H.264 codecs. For more information, see the help document for Adobe Media Encoder: Using Adobe Media Encoder.
Log footage from virtually any camera with Adobe OnLocation CS5 Use the powerful logging options in Adobe OnLocation when working with tapeless cameras. tell Adobe OnLocation which shot is currently recording. Then enter notes, comments, and additional metadata. When you copy clips from the tapeless camera, Adobe OnLocation automatically merges the information. For more information see help for Adobe OnLocation:
Using Adobe OnLocation.
Ultra Key for fast, accurate keying—even on challenging footage Key HD footage in real time with the new Ultra Key chroma keyer in Premiere Pro. Ultra Key is optimized for footage that includes uneven lighting, wrinkled backgrounds, and frizzy hair. Ultra Key preserves shadows
17

and can achieve complex keys on smoke, liquids, and transparent objects. For more information, see Chromakey with the Ultra Key effect.
Native support for DSLR cameras Edit video from the latest DSLR cameras. New native support means that you never waste valuable production time transcoding or rewrapping, and always have access to the original file’s pristine quality. Premiere Pro supports video shot on the following DSLR cameras:
Canon EOS-1D Mark IV,
Canon EOS-5D Mark II,
Canon EOS 7D,
Nikon D90,
Nikon D300S,
Nikon D3S
Nikon D5000
Panasonic Lumix GH1 using AVCHD sequence presets.
Create searchable web-DVDs in Encore CS5 Create a more engaging experience with web-DVDs that now automatically include a search interface, making it easier for viewers to jump directly to content of interest. When you use Speech Analysis in Premiere Pro to turn spoken dialogue into searchable text, the information is passed along to Encore. Encore uses the metadata along with subtitles and menu button text to make your web-DVDs searchable. For more information, see Help for Encore: Using Adobe Encore.
Dynamic Link is now bidirectional Dynamic Link communication between Adobe Premiere Pro and Adobe After Effects is now bi-directional. Previously, if you used Dynamic Link to send information from After Effects to Premiere Pro, you could not later use Dynamic Link to send information from Premiere Pro to After Effects. You had to restart the applications to reset the direction and use Dynamic Link going in the other direction. In Creative Suite CS5, that limitation is gone.
More Help topics
Premiere Pro CS5 feature tour
Legal Notices | Online Privacy Policy
18
Premiere Pro getting started tutorials
To learn more, view these recommended resources online.
Premiere Pro CS6 video tutorials
(Aug. 14, 2012)
Premiere Pro CS6: New Features Workshop
(Apr. 12, 2012)
Premiere Pro CS6: what's new and changed
(Apr. 11, 2012)
Getting Started with Premiere Pro (CS4, CS5, & CS5.5)
(May. 20, 2011)
Premiere Pro user-to-user forum
(Apr. 16, 2012)
19

Adobe Premiere Pro CS5/CS5.5 tutorials
Essential Adobe Premiere Pro tutorials and learning resources for getting started and new features.
New content for CS6
Learn Adobe Premiere Pro CS6 video tutorials
Getting started and what's new content
Getting started
Setup
Downloading, installing, and setting up
Overview
Getting Started with Adobe Premiere Pro (CS4, CS5, & CS5.5)
Premiere Pro overview documents for Final Cut Pro and Avid Media Composer users Getting Started: What is Adobe Premiere Pro? (video 1:48)
The basic Adobe Premiere Pro workflow (HTML)
Getting Started with Adobe Premiere Pro from Video2Brain (HTML)
Premiere Pro Frequently Asked Questions: Zip Past Common Hurdles (video 45:00)
Tutorials
Getting Started (GS) tutorials, Learn Adobe Premiere Pro CS5 show (video series) Premiere Pro CS5.5 Tutorial - Import, Edit, Export (video)
Selecting Settings, Adjusting Preferences, and Managing Assets in Adobe Premiere Pro CS5 (book excerpt) Exporting with Adobe Media Encoder (video)
Increased editing efficiencies (video 8:05)
Adobe Premiere Pro tutorials from Andrew Devis (HTML)
Free sample video tutorials from Adobe Premiere Pro CS5: Learn By Video (HTML) Excerpts from Adobe Premiere Pro CS5: Classroom in a Book (HTML)
Adobe TV: Short and Suite (video series)
What's new in CS5 and CS5.5
What's new in Adobe Premiere Pro CS5 (HTML)
What's new in Adobe Premiere Pro CS5.5 (HTML)
What's new in Adobe Media Encoder CS5.5 (HTML)
Understanding GPU accelerated effect performance enhancements (video 4:37)
What's New and Changed in Adobe Premiere Pro CS5.5 (video 55:00)
Understanding the script-to-screen workflow (video 5:19)
Optimize a computer for Mercury Playback Engine (video 8:32)
Merged clips and dual-system sound in Adobe Premiere Pro CS5.5 (HTML)
Adobe Premiere Pro CS5.5 integration with Audition CS5.5 (HTML)
Closed captions in Adobe Premiere Pro CS5.5 (HTML)
Improved trial version for Adobe Premiere Pro CS5.5 (HTML)
To the top
To the top
To the top
20

Unified audio effects in Adobe Premiere Pro CS5.5 (HTML)
Adobe Premiere Pro CS5.5 improvements in CUDA processing and the Mercury Playback Engine (HTML) Adobe Premiere Pro CS5.5 integration with Adobe Story (HTML)
Learn more
To the top
Selecting a sequence preset (HTML)
Importing files into Adobe Premiere Pro (video 8:06)
Listing, logging, and commenting shots (video 5:02)
Streamlining your workflow with Dynamic Link (video 5:15)
CUDA, Mercury Playback Engine, and Premiere Pro (HTML)
Shooting and editing HD video from DSLR cameras in Adobe Premiere Pro CS5 (HTML) Using Final Cut Pro with Adobe Premiere Pro (video 5:38)
Creating a green screen key using Ultra Key (video 4:42)
New RED color science, and how to make it all work with After Effects CS5 and Premiere Pro CS5 (HTML) All tutorials on Adobe.com
 Twitter™ and Facebook posts are not covered under the terms of Creative Commons.
Legal Notices | Online Privacy Policy
21
Workspace and workflow
22
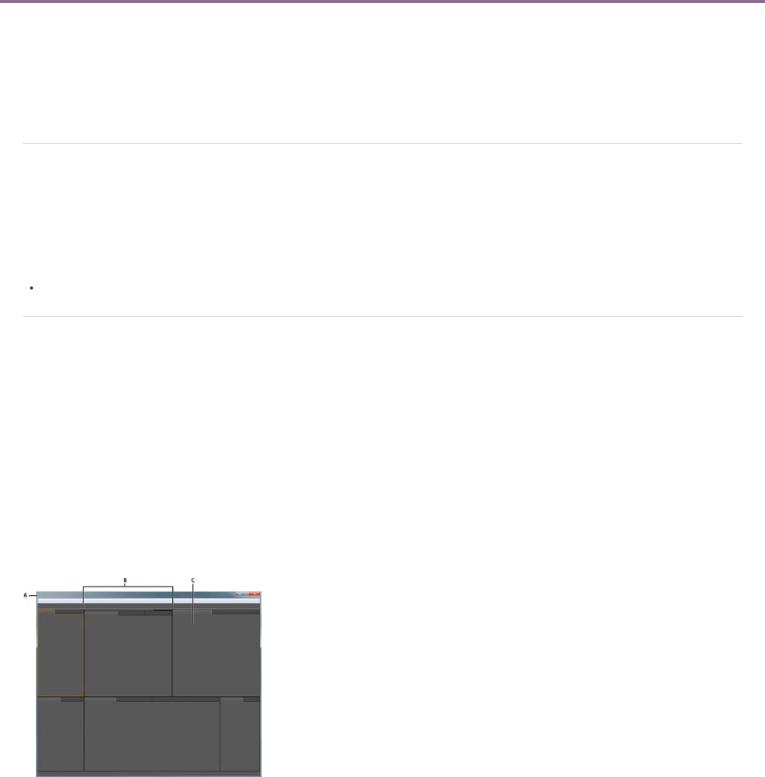
Workspaces
Import a workspace with a project
Customizing workspaces
Brighten or darken the interface
The 2-up editing workspace (CS6)
For an overview of the Premiere Pro interface, see this introduction to panels and workspaces from Peachpit Press. For an overview of the Premiere Pro interface, see this video from Learn By Video and Video2Brain by Maxim Jago.
Import a workspace with a project
To the top
Workspace selections and customizations made in a project are saved in the project file. By default, Premiere Pro opens projects in the current workspace. However, you can instead open a project in the workspace last used with it. This option is particularly helpful if you often rearrange the workspace for each project.
 If you import a project and the workspace is empty, close the project. Deselect Import Workspace From Projects. Import the project again, and select an existing workspace for the project.
Before opening a project, select Window > Workspace > Import Workspace From Projects.
Customizing workspaces |
To the top |
|
About workspaces
Adobe video and audio applications provide a consistent, customizable workspace. Although each application has its own set of panels (such as Project, Metadata, and Timeline), you move and group panels in the same way across products.
The main window of a program is the application window. Panels are organized in this window in an arrangement called a workspace. The default workspace contains groups of panels as well as panels that stand alone.
You customize a workspace by arranging panels in the layout that best suits your working style. As you rearrange panels, the other panels resize automatically to fit the window. You can create and save several custom workspaces for different tasks—for example, one for editing and one for previewing.
 You can use floating windows to create a workspace more like workspaces in previous versions of Adobe applications, or to place panels on multiple monitors.
In these two tutorials Andrew Devis from Creative Cow shows how to use different workspaces, and how to customize your workspace.
Example workspace
A. Application window B. Grouped panels C. Individual panel
Choose a workspace
Each Adobe video and audio application includes several predefined workspaces that optimize the layout of panels for specific tasks. When you
23

choose one of these workspaces, or any custom workspaces you’ve saved, the current workspace is redrawn accordingly.
Open the project you want to work on, choose Window > Workspace, and select the desired workspace.
Dock, group, or float panels
You can dock panels together, move them into or out of groups, and undock them so they float above the application window. As you drag a panel, drop zones—areas onto which you can move the panel—become highlighted. The drop zone you choose determines where the panel is inserted, and whether it docks or groups with other panels.
Docking zones
Docking zones exist along the edges of a panel, group, or window. Docking a panel places it adjacent to the existing group, resizing all groups to accommodate the new panel.
Dragging panel (A) onto docking zone (B) to dock it (C)
Grouping zones
Grouping zones exist in the middle of a panel or group, and along the tab area of panels. Dropping a panel on a grouping zone stacks it with other panels.
Dragging panel (A) onto grouping zone (B) to group it with existing panels (C)
Dock or group panels
1.If the panel you want to dock or group is not visible, choose it from the Window menu.
2.Do one of the following:
To move an individual panel, drag the gripper area in the upper-left corner of a panel’s tab onto the desired drop zone.
24
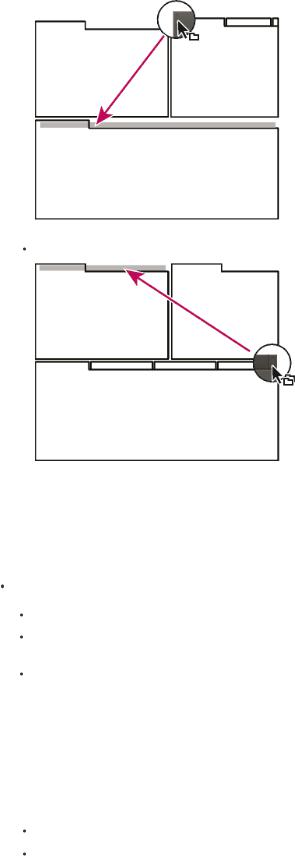
Drag panel gripper to move one panel
To move an entire group, drag the group gripper in the upper-right corner onto the desired drop zone.
Drag group gripper to move entire group
The application docks or groups the panel, according to the type of drop zone.
Undock a panel in a floating window
When you undock a panel in a floating window, you can add panels to the window and modify it similarly to the application window. You can use floating windows to use a secondary monitor, or to create workspaces like the workspaces in earlier versions of Adobe applications.
Select the panel you want to undock (if it’s not visible, choose it from the Window menu), and then do one of the following:
Choose Undock Panel or Undock Frame from the panel menu. Undock Frame undocks the panel group.
Hold down Ctrl (Windows®) or Command (Mac OS®), and drag the panel or group from its current location. When you release the mouse button, the panel or group appears in a new floating window.
Drag the panel or group outside the application window. (If the application window is maximized, drag the panel to the Windows taskbar.)
Resize panel groups
When you position the pointer over dividers between panel groups, resize icons appear. When you drag these icons, all groups that share the divider are resized. For example, suppose your workspace contains three panel groups stacked vertically. If you drag the divider between the bottom two groups, they are resized, but the topmost group doesn’t change.
 To quickly maximize a panel beneath the pointer, press the accent key. (Do not press Shift.) Press the accent key again to return the panel to its original size.
1. Do either of the following:
To resize either horizontally or vertically, position the pointer between two panel groups. The pointer becomes a double-arrow  .
.
To resize in both directions at once, position the pointer at the intersection between three or more panel groups. The pointer becomes a four-way arrow  .
.
2. Hold down the mouse button, and drag to resize the panel groups.
25

Dragging divider between panel groups to resize them horizontally
A. Original group with resize icon B. Resized groups
Open, close, and scroll to panels
When you close a panel group in the application window, the other groups resize to use the newly available space. When you close a floating window, the panels within it close, too.
To open a panel, choose it from the Window menu.
To close a panel or window, press Control-W (Windows) or Command-W (Mac OS), or click its Close button  . To see all the panel tabs in a narrow panel group, drag the horizontal scroll bar.
To bring a panel to the front of a group of panels, do one of the following:
Click the tab of the panel you want in front.
Hover the cursor above the tab area, and turn the mouse scroll wheel. Scrolling brings each panel to the front, one after another.
Drag tabs horizontally to change their order.
To reveal panels hidden in a narrow panel group, drag the scroll bar above the panel group.
Drag horizontal scroll bar to see all panels in narrow group
Working with multiple monitors
To increase the available screen space, use multiple monitors. When you work with multiple monitors, the application window appears on one monitor, and you place floating windows on the second monitor. Monitor configurations are stored in the workspace.
Save, reset, or delete workspaces
Save a custom workspace
As you customize a workspace, the application tracks your changes, storing the most recent layout. To store a specific layout more permanently, save a custom workspace. Saved custom workspaces appear in the Workspace menu, where you can return to and reset them.
Arrange the frames and panels as desired, and then choose Window > Workspace > New Workspace. Type a name for the workspace, and click OK.
Note: (After Effects, Premiere Pro, Encore) If a project saved with a custom workspace is opened on another system, the application looks for a workspace with a matching name. If it can’t find a match (or the monitor configuration doesn’t match), it uses the current local workspace.
Reset a workspace
Reset the current workspace to return to its original, saved layout of panels.
Choose Window > Workspace > Reset workspace name.
Delete a workspace
1. Choose Window > Workspace >Delete Workspace.
26
Loading...