


 Loading...
Using
ADOBE® PHOTOSHOP® ELEMENTS 8 EDITOR
MAC OS X

© 2009 Adobe Systems Incorporated. All rights reserved. Using Adobe® Photoshop® Elements 8 for Mac OS®
This user guide is protected under copyright law, furnished for informational use only, is subject to change without notice, and should not be construed as a commitment by Adobe Systems Incorporated. Adobe Systems Incorporated assumes no responsibility or liability for any errors or inaccuracies that may appear in the informational content contained in this guide.
This user guide is licensed for use under the terms of the Creative Commons Attribution Non-Commercial 3.0 License. This License allows users to copy, distribute, and transmit the user guide for noncommercial purposes only so long as (1) proper attribution to Adobe is given as the owner of the user guide; and
(2) any reuse or distribution of the user guide contains a notice that use of the user guide is governed by these terms. The best way to provide notice is to include the following link. To view a copy of this license, visit http://creativecommons.org/licenses/by-nc-sa/3.0/
Adobe, the Adobe logo, Adobe Premiere, Acrobat, GoLive, Illustrator, InDesign, Photoshop, PostScript, and Reader are either registered trademarks or trademarks of Adobe Systems Incorporated in the United States and/or other countries. Windows and Windows Vista are either registered trademarks or trademarks of Microsoft Corporation in the United States and/or other countries. Macintosh and Mac OS are trademarks of Apple Inc., registered in the United States and other countries. UNIX is a registered trademark of The Open Group in the US and other countries. SGI is a trademark of Silicon Graphics, Inc. All other trademarks are the property of their respective owners.
Updated Information/Additional Third Party Code Information available at http://www.adobe.com/go/thirdparty.
This product contains either BSAFE and/or TIPEM software by RSA Security, Inc.
This software is based in part on the work of the Independent JPEG Group.
This product includes software developed by the Apache Software Foundation (www.apache.org).
This Program was written with MacApp®: ©1985-1988 Apple Computer, Inc. APPLE COMPUTER, INC. MAKES NO WARRANTIES WHATSOEVER, EITHER EXPRESS OR IMPLIED, REGARDING THIS PRODUCT, INCLUDING WARRANTIES WITH RESPECT TO ITS MERCHANTABILITY OR ITS FITNESS FOR ANY PARTICULAR PURPOSE. The MacApp software is proprietary to Apple Computer, Inc. and is licensed to Adobe for distribution only for use in combination with Adobe Photoshop Elements 8.
PANTONE® colors displayed here may not match PANTONE-identified standards. Consult current PANTONE Color Publications for accurate color. PANTONE® and other Pantone, Inc. trademarks are the property of Pantone, Inc. © Pantone, Inc., 2009.
Portions © Eastman Kodak Company, 2009 and used under license. All rights reserved. Kodak is a registered trademark and Photo CD is a trademark of Eastman Kodak Company.
Portions of this code are licensed from Focoltone Colour System.
Software is produced under Dainippon Ink and Chemicals, Inc.’s (DIC) copyrights of color-data-base derived from Sample Books.
Portions © 1995-2005 Jean-loup Gailly and Mark Adler
Video compression and decompression is powered by On2 TrueMotion video technology. © 1992-2005 On2 Technologies, Inc. All Rights Reserved. http://www.on2.com.
This product includes software developed by the OpenSymphony Group (http://www.opensymphony.com/).
Portions of this code are licensed from Nellymoser, Inc. (www.nellymoser.com).
Sorenson Spark™ video compression and decompression technology licensed from Sorenson Media, Inc.
MPEG Layer-3 audio compression technology licensed by Fraunhofer IIS and THOMSON Licensing (http://www.iis.fhg.de/amm/).
Certain Spelling portions of this product is based on Proximity Linguistic Technology. ©Copyright 1990 Merriam-Webster Inc. ©Copyright 1990 All rights reserved. Proximity Technology A Division of Franklin Electronic Publishers, Inc. Burlington, New Jersey USA. ©Copyright 2003 Franklin Electronic Publishers Inc.©Copyright 2003 All rights reserved. Proximity Technology A Division of Franklin Electronic Publishers, Inc. Burlington, New Jersey USA. Legal Supplement ©Copyright 1990/1994 Merriam-Webster Inc./Franklin Electronic Publishers Inc. ©Copyright 1994 All rights reserved. Proximity Technology A Division of Franklin Electronic Publishers, Inc. Burlington, New Jersey USA. ©Copyright 1990/1994 Merriam-Webster Inc./Franklin Electronic Publishers Inc. ©Copyright 1997All rights reserved. Proximity Technology A Division of Franklin Electronic Publishers, Inc. Burlington, New Jersey USA ©Copyright 1990 Merriam-Webster Inc. ©Copyright 1993 All rights reserved. Proximity Technology A Division of Franklin Electronic Publishers, Inc. Burlington, New Jersey USA. ©Copyright 2004 Franklin Electronic Publishers Inc. ©Copyright 2004 All rights reserved. Proximity Technology A Division of Franklin Electronic Publishers, Inc. Burlington, New Jersey USA. ©Copyright 1991 Dr. Lluis de Yzaguirre I Maura ©Copyright 1991 All rights reserved. Proximity Technology A Division of Franklin Electronic Publishers, Inc. Burlington, New Jersey USA. ©Copyright 1990 Munksgaard International Publishers Ltd. ©Copyright 1990 All rights reserved. Proximity Technology A Division of Franklin Electronic Publishers, Inc. Burlington, New Jersey USA. ©Copyright 1990 Van Dale Lexicografie bv ©Copyright 1990 All rights reserved. Proximity Technology A Division of Franklin Electronic Publishers, Inc. Burlington, New Jersey USA. ©Copyright 1995 Van Dale Lexicografie bv ©Copyright 1996 All rights reserved. Proximity Technology A Division of Franklin Electronic Publishers, Inc. Burlington, New Jersey, USA. ©Copyright 1990 IDE a.s. ©Copyright 1990 All rights reserved. Proximity Technology A Division of Franklin Electronic Publishers, Inc. Burlington, New Jersey USA. ©Copyright 1992 Hachette/Franklin Electronic Publishers Inc. ©Copyright 2004 All rights reserved. Proximity Technology A Division of Franklin Electronic Publishers, Inc. Burlington, New Jersey USA. ©Copyright 1991 Text & Satz Datentechnik ©Copyright 1991 All rights reserved. Proximity Technology A Division of Franklin Electronic Publishers, Inc. Burlington, New Jersey USA. ©Copyright 2004 Bertelsmann Lexikon Verlag ©Copyright 2004 All rights reserved. Proximity Technology A Division of Franklin Electronic Publishers, Inc. Burlington, New Jersey USA. ©Copyright 2004 MorphoLogic Inc. ©Copyright 2004 All rights reserved. Proximity Technology A Division of Franklin Electronic Publishers, Inc. Burlington, New Jersey USA. ©Copyright 1990 William Collins Sons & Co. Ltd. ©Copyright 1990 All rights reserved. Proximity Technology A Division of Franklin Electronic Publishers, Inc. Burlington, New Jersey USA. ©Copyright 1993-95 Russicon Company Ltd. ©Copyright 1995 All rights reserved. Proximity Technology A Division of Franklin Electronic Publishers, Inc. Burlington, New Jersey USA. ©Copyright 2004 IDE a.s. ©Copyright 2004 All rights reserved. Proximity Technology A Division of Franklin Electronic Publishers, Inc. Burlington, New Jersey USA. The Hyphenation portion of this product is based on Proximity Linguistic Technology. ©Copyright 2003 Franklin Electronic Publishers Inc.©Copyright 2003 All rights reserved. Proximity Technology A Division of Franklin Electronic Publishers, Inc. Burlington, New Jersey USA. ©Copyright 1984 William Collins Sons & Co. Ltd. ©Copyright 1988 All rights reserved. Proximity Technology A Division of Franklin Electronic Publishers, Inc. Burlington, New Jersey USA. ©Copyright 1990 Munksgaard International Publishers Ltd. ©Copyright 1990 All rights reserved. Proximity Technology A Division of Franklin Electronic Publishers, Inc. Burlington, New Jersey USA. ©Copyright 1997 Van Dale Lexicografie bv
Last updated 7/26/2011
©Copyright 1997 All rights reserved. Proximity Technology A Division of Franklin Electronic Publishers, Inc. Burlington, New Jersey USA. ©Copyright 1984 Updated 12 June 2009 Editions Fernand Nathan ©Copyright 1989 All rights reserved. Proximity Technology A Division of Franklin Electronic Publishers, Inc. Burlington, New Jersey USA. © Copyright 1983 S Fischer Verlag ©Copyright 1997 All rights reserved. Proximity Technology A Division of Franklin Electronic Publishers, Inc. Burlington, New Jersey USA. ©Copyright 1989 Zanichelli ©Copyright 1989 All rights reserved. Proximity Technology A Division of Franklin Electronic Publishers, Inc. Burlington, New Jersey USA. ©Copyright 1989 IDE a.s. ©Copyright 1989 All rights reserved. Proximity Technology A Division of Franklin Electronic Publishers, Inc. Burlington, New Jersey USA. ©Copyright 1990 Espasa-Calpe ©Copyright 1990 All rights reserved. Proximity Technology A Division of Franklin Electronic Publishers, Inc. Burlington, New Jersey USA. ©Copyright 1989 C.A. Stromberg AB. ©Copyright 1989 All rights reserved.
Proximity Technology A Division of Franklin Electronic Publishers, Inc. Burlington, New Jersey USA.
Adobe Systems Incorporated, 345 Park Avenue, San Jose, California 95110, USA.
Notice to U.S. Government End Users. The Software and Documentation are “Commercial Items,” as that term is defined at 48 C.F.R. §2.101, consisting of “Commercial Computer Software” and “Commercial Computer Software Documentation,” as such terms are used in 48 C.F.R. §12.212 or 48 C.F.R. §227.7202, as applicable. Consistent with 48 C.F.R. §12.212 or 48 C.F.R. §§227.7202-1 through 227.7202-4, as applicable, the Commercial Computer Software and Commercial Computer Software Documentation are being licensed to U.S. Government end users (a) only as Commercial Items and (b) with only those rights as are granted to all other end users pursuant to the terms and conditions herein. Unpublished-rights reserved under the copyright laws of the United States. Adobe Systems Incorporated, 345 Park Avenue, San Jose, CA 95110-2704, USA. For U.S. Government End Users, Adobe agrees to comply with all applicable equal opportunity laws including, if appropriate, the provisions of Executive Order 11246, as amended, Section 402 of the Vietnam Era Veterans Readjustment Assistance Act of 1974 (38 USC 4212), and Section 503 of the Rehabilitation Act of 1973, as amended, and the regulations at 41 CFR Parts 60-1 through 60-60, 60-250, and 60-741. The affirmative action clause and regulations contained in the preceding sentence shall be incorporated by reference.
Last updated 7/26/2011

iv
Contents |
|
Chapter 1: Getting started |
|
Installing Photoshop Elements . . . . . . . . . . . . . . . . . . . . . . . . . . . . . . . . . . . . . . . . . . . . . . . . . . . . . . . . . . . . . . . . . . . . . . . . . . . . . . . . . . . . . . . |
. 1 |
Using Help and getting support . . . . . . . . . . . . . . . . . . . . . . . . . . . . . . . . . . . . . . . . . . . . . . . . . . . . . . . . . . . . . . . . . . . . . . . . . . . . . . . . . . . . . . . . |
1 |
New and enhanced features . . . . . . . . . . . . . . . . . . . . . . . . . . . . . . . . . . . . . . . . . . . . . . . . . . . . . . . . . . . . . . . . . . . . . . . . . . . . . . . . . . . . . . . . . . . |
2 |
Working in Photoshop Elements . . . . . . . . . . . . . . . . . . . . . . . . . . . . . . . . . . . . . . . . . . . . . . . . . . . . . . . . . . . . . . . . . . . . . . . . . . . . . . . . . . . . . . . |
3 |
Chapter 2: Photoshop Elements workspace |
|
About the workspace . . . . . . . . . . . . . . . . . . . . . . . . . . . . . . . . . . . . . . . . . . . . . . . . . . . . . . . . . . . . . . . . . . . . . . . . . . . . . . . . . . . . . . . . . . . . . . . . . . |
9 |
Context menus . . . . . . . . . . . . . . . . . . . . . . . . . . . . . . . . . . . . . . . . . . . . . . . . . . . . . . . . . . . . . . . . . . . . . . . . . . . . . . . . . . . . . . . . . . . . . . . . . . . . . . . |
11 |
Tools . . . . . . . . . . . . . . . . . . . . . . . . . . . . . . . . . . . . . . . . . . . . . . . . . . . . . . . . . . . . . . . . . . . . . . . . . . . . . . . . . . . . . . . . . . . . . . . . . . . . . . . . . . . . . . . . . |
12 |
Panels and bins . . . . . . . . . . . . . . . . . . . . . . . . . . . . . . . . . . . . . . . . . . . . . . . . . . . . . . . . . . . . . . . . . . . . . . . . . . . . . . . . . . . . . . . . . . . . . . . . . . . . . . |
15 |
Undo, redo, and cancel . . . . . . . . . . . . . . . . . . . . . . . . . . . . . . . . . . . . . . . . . . . . . . . . . . . . . . . . . . . . . . . . . . . . . . . . . . . . . . . . . . . . . . . . . . . . . . . |
19 |
Scratch disks and plug-ins . . . . . . . . . . . . . . . . . . . . . . . . . . . . . . . . . . . . . . . . . . . . . . . . . . . . . . . . . . . . . . . . . . . . . . . . . . . . . . . . . . . . . . . . . . . . |
21 |
Chapter 3: Import photos |
|
Importing photos . . . . . . . . . . . . . . . . . . . . . . . . . . . . . . . . . . . . . . . . . . . . . . . . . . . . . . . . . . . . . . . . . . . . . . . . . . . . . . . . . . . . . . . . . . . . . . . . . . . . |
23 |
Cameras and card readers . . . . . . . . . . . . . . . . . . . . . . . . . . . . . . . . . . . . . . . . . . . . . . . . . . . . . . . . . . . . . . . . . . . . . . . . . . . . . . . . . . . . . . . . . . . . |
24 |
Scanners . . . . . . . . . . . . . . . . . . . . . . . . . . . . . . . . . . . . . . . . . . . . . . . . . . . . . . . . . . . . . . . . . . . . . . . . . . . . . . . . . . . . . . . . . . . . . . . . . . . . . . . . . . . . . |
26 |
Local files, CDs, DVDs, and video . . . . . . . . . . . . . . . . . . . . . . . . . . . . . . . . . . . . . . . . . . . . . . . . . . . . . . . . . . . . . . . . . . . . . . . . . . . . . . . . . . . . . . |
27 |
Chapter 4: Working with files |
|
Opening files . . . . . . . . . . . . . . . . . . . . . . . . . . . . . . . . . . . . . . . . . . . . . . . . . . . . . . . . . . . . . . . . . . . . . . . . . . . . . . . . . . . . . . . . . . . . . . . . . . . . . . . . |
29 |
Managing and organizing files . . . . . . . . . . . . . . . . . . . . . . . . . . . . . . . . . . . . . . . . . . . . . . . . . . . . . . . . . . . . . . . . . . . . . . . . . . . . . . . . . . . . . . . . |
33 |
Viewing images . . . . . . . . . . . . . . . . . . . . . . . . . . . . . . . . . . . . . . . . . . . . . . . . . . . . . . . . . . . . . . . . . . . . . . . . . . . . . . . . . . . . . . . . . . . . . . . . . . . . . . |
35 |
Guides, grids, and rulers . . . . . . . . . . . . . . . . . . . . . . . . . . . . . . . . . . . . . . . . . . . . . . . . . . . . . . . . . . . . . . . . . . . . . . . . . . . . . . . . . . . . . . . . . . . . . . |
38 |
Saving and exporting images . . . . . . . . . . . . . . . . . . . . . . . . . . . . . . . . . . . . . . . . . . . . . . . . . . . . . . . . . . . . . . . . . . . . . . . . . . . . . . . . . . . . . . . . . |
39 |
Guided Edit . . . . . . . . . . . . . . . . . . . . . . . . . . . . . . . . . . . . . . . . . . . . . . . . . . . . . . . . . . . . . . . . . . . . . . . . . . . . . . . . . . . . . . . . . . . . . . . . . . . . . . . . . . |
45 |
Chapter 5: Using layers |
|
Creating layers . . . . . . . . . . . . . . . . . . . . . . . . . . . . . . . . . . . . . . . . . . . . . . . . . . . . . . . . . . . . . . . . . . . . . . . . . . . . . . . . . . . . . . . . . . . . . . . . . . . . . . . |
49 |
Editing layers . . . . . . . . . . . . . . . . . . . . . . . . . . . . . . . . . . . . . . . . . . . . . . . . . . . . . . . . . . . . . . . . . . . . . . . . . . . . . . . . . . . . . . . . . . . . . . . . . . . . . . . . . |
53 |
Copying and arranging layers . . . . . . . . . . . . . . . . . . . . . . . . . . . . . . . . . . . . . . . . . . . . . . . . . . . . . . . . . . . . . . . . . . . . . . . . . . . . . . . . . . . . . . . . . |
56 |
Opacity and blending modes . . . . . . . . . . . . . . . . . . . . . . . . . . . . . . . . . . . . . . . . . . . . . . . . . . . . . . . . . . . . . . . . . . . . . . . . . . . . . . . . . . . . . . . . . |
60 |
Adjustment and fill layers . . . . . . . . . . . . . . . . . . . . . . . . . . . . . . . . . . . . . . . . . . . . . . . . . . . . . . . . . . . . . . . . . . . . . . . . . . . . . . . . . . . . . . . . . . . . . |
62 |
Layer masks . . . . . . . . . . . . . . . . . . . . . . . . . . . . . . . . . . . . . . . . . . . . . . . . . . . . . . . . . . . . . . . . . . . . . . . . . . . . . . . . . . . . . . . . . . . . . . . . . . . . . . . . . . |
67 |
Layer styles . . . . . . . . . . . . . . . . . . . . . . . . . . . . . . . . . . . . . . . . . . . . . . . . . . . . . . . . . . . . . . . . . . . . . . . . . . . . . . . . . . . . . . . . . . . . . . . . . . . . . . . . . . |
68 |
Chapter 6: Camera raw files |
|
Processing camera raw image files . . . . . . . . . . . . . . . . . . . . . . . . . . . . . . . . . . . . . . . . . . . . . . . . . . . . . . . . . . . . . . . . . . . . . . . . . . . . . . . . . . . . |
72 |
Settings and controls . . . . . . . . . . . . . . . . . . . . . . . . . . . . . . . . . . . . . . . . . . . . . . . . . . . . . . . . . . . . . . . . . . . . . . . . . . . . . . . . . . . . . . . . . . . . . . . . . |
75 |
Color and camera raw . . . . . . . . . . . . . . . . . . . . . . . . . . . . . . . . . . . . . . . . . . . . . . . . . . . . . . . . . . . . . . . . . . . . . . . . . . . . . . . . . . . . . . . . . . . . . . . . |
76 |
Last updated 7/26/2011

USING PHOTOSHOP ELEMENTS 8 |
v |
Contents |
|
Chapter 7: Selecting parts of an image |
|
Making selections . . . . . . . . . . . . . . . . . . . . . . . . . . . . . . . . . . . . . . . . . . . . . . . . . . . . . . . . . . . . . . . . . . . . . . . . . . . . . . . . . . . . . . . . . . . . . . . . . . . |
. 80 |
Modifying selections . . . . . . . . . . . . . . . . . . . . . . . . . . . . . . . . . . . . . . . . . . . . . . . . . . . . . . . . . . . . . . . . . . . . . . . . . . . . . . . . . . . . . . . . . . . . . . . . . |
89 |
Smoothing selection edges with anti-aliasing and feathering . . . . . . . . . . . . . . . . . . . . . . . . . . . . . . . . . . . . . . . . . . . . . . . . . . . . . . . . . . |
93 |
Moving and copying selections . . . . . . . . . . . . . . . . . . . . . . . . . . . . . . . . . . . . . . . . . . . . . . . . . . . . . . . . . . . . . . . . . . . . . . . . . . . . . . . . . . . . . . . |
94 |
Saving selections . . . . . . . . . . . . . . . . . . . . . . . . . . . . . . . . . . . . . . . . . . . . . . . . . . . . . . . . . . . . . . . . . . . . . . . . . . . . . . . . . . . . . . . . . . . . . . . . . . . . . |
96 |
Chapter 8: Color and tonal correction |
|
Color and tonal correction basics . . . . . . . . . . . . . . . . . . . . . . . . . . . . . . . . . . . . . . . . . . . . . . . . . . . . . . . . . . . . . . . . . . . . . . . . . . . . . . . . . . . . . |
99 |
Adjusting shadows and light . . . . . . . . . . . . . . . . . . . . . . . . . . . . . . . . . . . . . . . . . . . . . . . . . . . . . . . . . . . . . . . . . . . . . . . . . . . . . . . . . . . . . . . . . |
108 |
Correcting color casts . . . . . . . . . . . . . . . . . . . . . . . . . . . . . . . . . . . . . . . . . . . . . . . . . . . . . . . . . . . . . . . . . . . . . . . . . . . . . . . . . . . . . . . . . . . . . . . |
115 |
Adjusting color saturation and hue . . . . . . . . . . . . . . . . . . . . . . . . . . . . . . . . . . . . . . . . . . . . . . . . . . . . . . . . . . . . . . . . . . . . . . . . . . . . . . . . . . |
119 |
Adjustment filters . . . . . . . . . . . . . . . . . . . . . . . . . . . . . . . . . . . . . . . . . . . . . . . . . . . . . . . . . . . . . . . . . . . . . . . . . . . . . . . . . . . . . . . . . . . . . . . . . . . |
125 |
Setting press target values . . . . . . . . . . . . . . . . . . . . . . . . . . . . . . . . . . . . . . . . . . . . . . . . . . . . . . . . . . . . . . . . . . . . . . . . . . . . . . . . . . . . . . . . . . . |
129 |
Chapter 9: Cropping, resizing, retouching, and transforming photos
Cropping . . . . . . . . . . . . . . . . . . . . . . . . . . . . . . . . . . . . . . . . . . . . . . . . . . . . . . . . . . . . . . . . . . . . . . . . . . . . . . . . . . . . . . . . . . . . . . . . . . . . . . . . . . . . 132 Image size and resolution . . . . . . . . . . . . . . . . . . . . . . . . . . . . . . . . . . . . . . . . . . . . . . . . . . . . . . . . . . . . . . . . . . . . . . . . . . . . . . . . . . . . . . . . . . . . 137 Retouching . . . . . . . . . . . . . . . . . . . . . . . . . . . . . . . . . . . . . . . . . . . . . . . . . . . . . . . . . . . . . . . . . . . . . . . . . . . . . . . . . . . . . . . . . . . . . . . . . . . . . . . . . 140 Sharpening . . . . . . . . . . . . . . . . . . . . . . . . . . . . . . . . . . . . . . . . . . . . . . . . . . . . . . . . . . . . . . . . . . . . . . . . . . . . . . . . . . . . . . . . . . . . . . . . . . . . . . . . . 153 Transforming . . . . . . . . . . . . . . . . . . . . . . . . . . . . . . . . . . . . . . . . . . . . . . . . . . . . . . . . . . . . . . . . . . . . . . . . . . . . . . . . . . . . . . . . . . . . . . . . . . . . . . . . 156 Recomposing . . . . . . . . . . . . . . . . . . . . . . . . . . . . . . . . . . . . . . . . . . . . . . . . . . . . . . . . . . . . . . . . . . . . . . . . . . . . . . . . . . . . . . . . . . . . . . . . . . . . . . . 160
Chapter 10: Understanding color |
|
Understanding color . . . . . . . . . . . . . . . . . . . . . . . . . . . . . . . . . . . . . . . . . . . . . . . . . . . . . . . . . . . . . . . . . . . . . . . . . . . . . . . . . . . . . . . . . . . . . . . . |
164 |
Using image modes and color tables . . . . . . . . . . . . . . . . . . . . . . . . . . . . . . . . . . . . . . . . . . . . . . . . . . . . . . . . . . . . . . . . . . . . . . . . . . . . . . . . . |
166 |
Setting up color management . . . . . . . . . . . . . . . . . . . . . . . . . . . . . . . . . . . . . . . . . . . . . . . . . . . . . . . . . . . . . . . . . . . . . . . . . . . . . . . . . . . . . . . |
171 |
Chapter 11: Filters, effects, styles, and artwork |
|
Effects . . . . . . . . . . . . . . . . . . . . . . . . . . . . . . . . . . . . . . . . . . . . . . . . . . . . . . . . . . . . . . . . . . . . . . . . . . . . . . . . . . . . . . . . . . . . . . . . . . . . . . . . . . . . . . |
173 |
Filters . . . . . . . . . . . . . . . . . . . . . . . . . . . . . . . . . . . . . . . . . . . . . . . . . . . . . . . . . . . . . . . . . . . . . . . . . . . . . . . . . . . . . . . . . . . . . . . . . . . . . . . . . . . . . . . |
178 |
Artistic filters . . . . . . . . . . . . . . . . . . . . . . . . . . . . . . . . . . . . . . . . . . . . . . . . . . . . . . . . . . . . . . . . . . . . . . . . . . . . . . . . . . . . . . . . . . . . . . . . . . . . . . . . |
183 |
Blur filters . . . . . . . . . . . . . . . . . . . . . . . . . . . . . . . . . . . . . . . . . . . . . . . . . . . . . . . . . . . . . . . . . . . . . . . . . . . . . . . . . . . . . . . . . . . . . . . . . . . . . . . . . . . |
185 |
Brush Stroke filters . . . . . . . . . . . . . . . . . . . . . . . . . . . . . . . . . . . . . . . . . . . . . . . . . . . . . . . . . . . . . . . . . . . . . . . . . . . . . . . . . . . . . . . . . . . . . . . . . . |
186 |
Distort filters . . . . . . . . . . . . . . . . . . . . . . . . . . . . . . . . . . . . . . . . . . . . . . . . . . . . . . . . . . . . . . . . . . . . . . . . . . . . . . . . . . . . . . . . . . . . . . . . . . . . . . . . |
187 |
Noise filters . . . . . . . . . . . . . . . . . . . . . . . . . . . . . . . . . . . . . . . . . . . . . . . . . . . . . . . . . . . . . . . . . . . . . . . . . . . . . . . . . . . . . . . . . . . . . . . . . . . . . . . . . |
192 |
Pixelate filters . . . . . . . . . . . . . . . . . . . . . . . . . . . . . . . . . . . . . . . . . . . . . . . . . . . . . . . . . . . . . . . . . . . . . . . . . . . . . . . . . . . . . . . . . . . . . . . . . . . . . . . |
193 |
Render filters . . . . . . . . . . . . . . . . . . . . . . . . . . . . . . . . . . . . . . . . . . . . . . . . . . . . . . . . . . . . . . . . . . . . . . . . . . . . . . . . . . . . . . . . . . . . . . . . . . . . . . . . |
194 |
Sketch filters . . . . . . . . . . . . . . . . . . . . . . . . . . . . . . . . . . . . . . . . . . . . . . . . . . . . . . . . . . . . . . . . . . . . . . . . . . . . . . . . . . . . . . . . . . . . . . . . . . . . . . . . |
197 |
Stylize filters . . . . . . . . . . . . . . . . . . . . . . . . . . . . . . . . . . . . . . . . . . . . . . . . . . . . . . . . . . . . . . . . . . . . . . . . . . . . . . . . . . . . . . . . . . . . . . . . . . . . . . . . |
198 |
Texture filters . . . . . . . . . . . . . . . . . . . . . . . . . . . . . . . . . . . . . . . . . . . . . . . . . . . . . . . . . . . . . . . . . . . . . . . . . . . . . . . . . . . . . . . . . . . . . . . . . . . . . . . |
200 |
Video filters . . . . . . . . . . . . . . . . . . . . . . . . . . . . . . . . . . . . . . . . . . . . . . . . . . . . . . . . . . . . . . . . . . . . . . . . . . . . . . . . . . . . . . . . . . . . . . . . . . . . . . . . . |
201 |
Other filters . . . . . . . . . . . . . . . . . . . . . . . . . . . . . . . . . . . . . . . . . . . . . . . . . . . . . . . . . . . . . . . . . . . . . . . . . . . . . . . . . . . . . . . . . . . . . . . . . . . . . . . . . |
201 |
Chapter 12: Painting |
|
Painting overview . . . . . . . . . . . . . . . . . . . . . . . . . . . . . . . . . . . . . . . . . . . . . . . . . . . . . . . . . . . . . . . . . . . . . . . . . . . . . . . . . . . . . . . . . . . . . . . . . . . |
204 |
Choosing colors . . . . . . . . . . . . . . . . . . . . . . . . . . . . . . . . . . . . . . . . . . . . . . . . . . . . . . . . . . . . . . . . . . . . . . . . . . . . . . . . . . . . . . . . . . . . . . . . . . . . . |
208 |
Painting tools . . . . . . . . . . . . . . . . . . . . . . . . . . . . . . . . . . . . . . . . . . . . . . . . . . . . . . . . . . . . . . . . . . . . . . . . . . . . . . . . . . . . . . . . . . . . . . . . . . . . . . . |
212 |
Last updated 7/26/2011

USING PHOTOSHOP ELEMENTS 8 |
vi |
Contents |
|
Setting up brushes . . . . . . . . . . . . . . . . . . . . . . . . . . . . . . . . . . . . . . . . . . . . . . . . . . . . . . . . . . . . . . . . . . . . . . . . . . . . . . . . . . . . . . . . . . . . . . . . . . |
219 |
Fills and strokes . . . . . . . . . . . . . . . . . . . . . . . . . . . . . . . . . . . . . . . . . . . . . . . . . . . . . . . . . . . . . . . . . . . . . . . . . . . . . . . . . . . . . . . . . . . . . . . . . . . . . |
223 |
Patterns . . . . . . . . . . . . . . . . . . . . . . . . . . . . . . . . . . . . . . . . . . . . . . . . . . . . . . . . . . . . . . . . . . . . . . . . . . . . . . . . . . . . . . . . . . . . . . . . . . . . . . . . . . . . . |
224 |
Gradients . . . . . . . . . . . . . . . . . . . . . . . . . . . . . . . . . . . . . . . . . . . . . . . . . . . . . . . . . . . . . . . . . . . . . . . . . . . . . . . . . . . . . . . . . . . . . . . . . . . . . . . . . . . |
226 |
Presets and libraries . . . . . . . . . . . . . . . . . . . . . . . . . . . . . . . . . . . . . . . . . . . . . . . . . . . . . . . . . . . . . . . . . . . . . . . . . . . . . . . . . . . . . . . . . . . . . . . . . |
230 |
Chapter 13: Adding text and shapes |
|
Add and edit text . . . . . . . . . . . . . . . . . . . . . . . . . . . . . . . . . . . . . . . . . . . . . . . . . . . . . . . . . . . . . . . . . . . . . . . . . . . . . . . . . . . . . . . . . . . . . . . . . . . . |
234 |
Work with Asian type . . . . . . . . . . . . . . . . . . . . . . . . . . . . . . . . . . . . . . . . . . . . . . . . . . . . . . . . . . . . . . . . . . . . . . . . . . . . . . . . . . . . . . . . . . . . . . . . |
240 |
Creating shapes . . . . . . . . . . . . . . . . . . . . . . . . . . . . . . . . . . . . . . . . . . . . . . . . . . . . . . . . . . . . . . . . . . . . . . . . . . . . . . . . . . . . . . . . . . . . . . . . . . . . . |
241 |
Editing shapes . . . . . . . . . . . . . . . . . . . . . . . . . . . . . . . . . . . . . . . . . . . . . . . . . . . . . . . . . . . . . . . . . . . . . . . . . . . . . . . . . . . . . . . . . . . . . . . . . . . . . . |
245 |
Chapter 14: Making projects |
|
Projects overview . . . . . . . . . . . . . . . . . . . . . . . . . . . . . . . . . . . . . . . . . . . . . . . . . . . . . . . . . . . . . . . . . . . . . . . . . . . . . . . . . . . . . . . . . . . . . . . . . . . |
247 |
Making photo projects . . . . . . . . . . . . . . . . . . . . . . . . . . . . . . . . . . . . . . . . . . . . . . . . . . . . . . . . . . . . . . . . . . . . . . . . . . . . . . . . . . . . . . . . . . . . . . |
247 |
Make a photo collage, greeting card, or other projects . . . . . . . . . . . . . . . . . . . . . . . . . . . . . . . . . . . . . . . . . . . . . . . . . . . . . . . . . . . . . . . . |
252 |
Editing photo projects . . . . . . . . . . . . . . . . . . . . . . . . . . . . . . . . . . . . . . . . . . . . . . . . . . . . . . . . . . . . . . . . . . . . . . . . . . . . . . . . . . . . . . . . . . . . . . . |
253 |
Making digital projects . . . . . . . . . . . . . . . . . . . . . . . . . . . . . . . . . . . . . . . . . . . . . . . . . . . . . . . . . . . . . . . . . . . . . . . . . . . . . . . . . . . . . . . . . . . . . . |
256 |
Creating slide shows . . . . . . . . . . . . . . . . . . . . . . . . . . . . . . . . . . . . . . . . . . . . . . . . . . . . . . . . . . . . . . . . . . . . . . . . . . . . . . . . . . . . . . . . . . . . . . . . . |
257 |
Stitching together panoramas . . . . . . . . . . . . . . . . . . . . . . . . . . . . . . . . . . . . . . . . . . . . . . . . . . . . . . . . . . . . . . . . . . . . . . . . . . . . . . . . . . . . . . . |
257 |
Chapter 15: Optimizing for the web |
|
Optimizing images . . . . . . . . . . . . . . . . . . . . . . . . . . . . . . . . . . . . . . . . . . . . . . . . . . . . . . . . . . . . . . . . . . . . . . . . . . . . . . . . . . . . . . . . . . . . . . . . . . |
261 |
Using transparency and mattes . . . . . . . . . . . . . . . . . . . . . . . . . . . . . . . . . . . . . . . . . . . . . . . . . . . . . . . . . . . . . . . . . . . . . . . . . . . . . . . . . . . . . . |
269 |
Dithering in web images . . . . . . . . . . . . . . . . . . . . . . . . . . . . . . . . . . . . . . . . . . . . . . . . . . . . . . . . . . . . . . . . . . . . . . . . . . . . . . . . . . . . . . . . . . . . . |
271 |
Previewing web images . . . . . . . . . . . . . . . . . . . . . . . . . . . . . . . . . . . . . . . . . . . . . . . . . . . . . . . . . . . . . . . . . . . . . . . . . . . . . . . . . . . . . . . . . . . . . |
273 |
Chapter 16: Printing and sharing photos |
|
Printing photos . . . . . . . . . . . . . . . . . . . . . . . . . . . . . . . . . . . . . . . . . . . . . . . . . . . . . . . . . . . . . . . . . . . . . . . . . . . . . . . . . . . . . . . . . . . . . . . . . . . . . |
275 |
Options for printing and sharing . . . . . . . . . . . . . . . . . . . . . . . . . . . . . . . . . . . . . . . . . . . . . . . . . . . . . . . . . . . . . . . . . . . . . . . . . . . . . . . . . . . . . |
279 |
Sharing photos . . . . . . . . . . . . . . . . . . . . . . . . . . . . . . . . . . . . . . . . . . . . . . . . . . . . . . . . . . . . . . . . . . . . . . . . . . . . . . . . . . . . . . . . . . . . . . . . . . . . . . |
279 |
Chapter 17: Keyboard shortcuts |
|
Shortcuts . . . . . . . . . . . . . . . . . . . . . . . . . . . . . . . . . . . . . . . . . . . . . . . . . . . . . . . . . . . . . . . . . . . . . . . . . . . . . . . . . . . . . . . . . . . . . . . . . . . . . . . . . . . |
281 |
Chapter 18: Glossary |
|
Find definitions for terms . . . . . . . . . . . . . . . . . . . . . . . . . . . . . . . . . . . . . . . . . . . . . . . . . . . . . . . . . . . . . . . . . . . . . . . . . . . . . . . . . . . . . . . . . . . . |
290 |
Digital imaging terms . . . . . . . . . . . . . . . . . . . . . . . . . . . . . . . . . . . . . . . . . . . . . . . . . . . . . . . . . . . . . . . . . . . . . . . . . . . . . . . . . . . . . . . . . . . . . . . |
290 |
Last updated 7/26/2011

1
Chapter 1: Getting started
Adobe® Photoshop® Elements software combines power and simplicity so you can easily make your photos look their best. You can share them in imaginative ways, and easily find and view all your photos.
Installing Photoshop Elements
Requirements
To review the complete system requirements and recommendations for your Adobe® software, see the ReadMe file included with your software.
Install the software
1Close any other Adobe applications open on your computer.
2Insert the installation disc into your DVD drive, and then follow the on-screen instructions.
Note: You can specify the language and select the country while installing the application. If you want to change these settings after installing the application, you need to uninstall the application and then re-install it.
For more information, see the ReadMe file included with your software.
Register
Register your product to receive complimentary installation support, notifications of updates, and other services.
To register, follow the on-screen instructions in the Registration dialog box, which appears after you install.
ReadMe file
The installation disc contains the ReadMe file for your software. (This file is also copied to the application folder during product installation.) Open the file to read important information.
Using Help and getting support
Using Photoshop Elements Help
Photoshop Elements Help is available several ways. To access Help, select Help > Photoshop Elements Help (use the Command+? keys on your keyboard). If your computer is connected to the Internet, Photoshop Elements automatically launches Help on the web.
Help on the web The most comprehensive and up-to-date version of Photoshop Elements Help is available on the web. Your computer must be connected to the Internet to access Help on the web. Use the Search field to search within Photoshop Elements Help. To view Help on the web, see www.adobe.com/go/learn_pse_mac_en. For the most comprehensive and up-to-date version of Adobe Bridge Help, see www.adobe.com/go/learn_bridge_en.
Last updated 7/26/2011

USING PHOTOSHOP ELEMENTS 8 |
2 |
Getting started
Help in the application Help in the application provides access to key tasks and concepts. If you aren’t connected to the Internet, Photoshop Elements launches Help in the application. Help in the application is a small subset of the complete Help available on the web.
Help PDF Help is also available as a PDF that is optimized for printing. Click the Help PDF link at the top of each Help page. The Help PDF is the best way to access the most comprehensive Help when you don’t have an Internet connection. For more information, see www.adobe.com/go/learn_pse_mac_printpdf_en.
Links in the application Some Help links are within Photoshop Elements. Clicking these links takes you to the corresponding topic in either Help on the web or Help in the application.
Note: If you try to access a Help topic that only exists in Help on the web, Photoshop Elements displays the URL and a link to the complete Help on the web.
Tips for searching Help
•If you search using a phrase, such as “shape tool,” place quotation marks around the phrase. The search returns only those topics containing all the words in the phrase.
•Make sure that the search terms are spelled correctly.
•If a search term doesn’t yield results, try using a synonym, such as “web” instead of “Internet.”
•If you find a topic you want to view again, bookmark it for easy access later.
Print a Help topic To print a topic from Help, use the Print command in the browser.
How to search for troubleshooting topics You can view top issues and search for common problems and error messages by going to www.adobe.com/support/photoshopelements. You can also ask questions of other Photoshop Elements users at www.adobe.com/go/forums.
Customer support
Visit the Adobe Support website at www.adobe.com/support to find troubleshooting information for your product and to learn about free and paid technical support options.
New and enhanced features
What’s new
To learn more about new and enhanced features, visit www.adobe.com/go/learn_pse_mac_features_en.
Make your photos look their best
Intelligent resizing The Recompose tool enables you to resize an image without changing important visual content, such as people, buildings, and animals.
Get a perfect blended photo You can blend photos together to get a perfectly exposed photo using Photomerge Exposure.
Get a perfect scenic photo Use Photomerge Scene Cleaner to create the perfect scenic photo from multiple photos.
Smart brushes Using Smart Brush tool, you can paint and change the adjustments as many times as you want without degrading your original photo.
Automated actions Photoshop Elements comes with a set of actions. The Action Player can play actions created in Photoshop if the actions use features supported by Photoshop Elements.
Last updated 7/26/2011
USING PHOTOSHOP ELEMENTS 8 |
3 |
Getting started
Do more with your photos
Share in many ways from one convenient place Quickly and easily share your photos in various ways—including e- mail, web galleries, and burning to CD.
Liven up your photo projects Use great-looking new themes and artwork to give your photo projects a professional look.
Surface blur The Surface Blur filter blurs an image while preserving edges.
Easily find and view photos
Quick Fix preview You can preview how a photo looks after adjustments, before you apply the adjustment to the photo.
Working in Photoshop Elements
When you start Photoshop Elements, it displays a Welcome screen that provides a starting point for you to open a blank document, browse for files with Adobe Bridge, or open files from a camera or a scanner.
Downloading and organizing photos
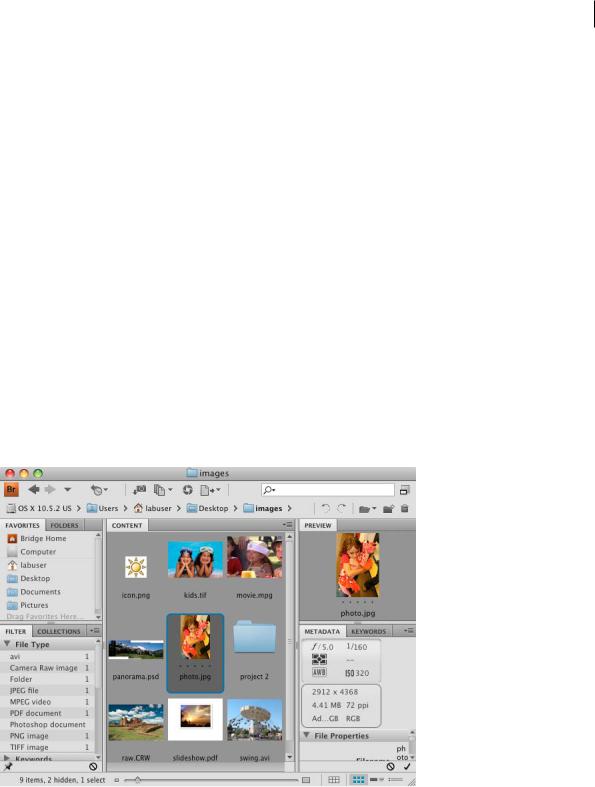
With Photoshop Elements, you can download photos from your camera or a card reader to view them in Adobe Bridge CS4. You can start the Adobe Bridge photo downloader from either Photoshop Elements or Adobe Bridge. You can also set the photo downloader to start any time you plug in a camera or card reader.
Use Adobe Bridge to manage photo files.
Last updated 7/26/2011

USING PHOTOSHOP ELEMENTS 8 |
4 |
Getting started
When working in Photoshop Elements, use Adobe Bridge to find and manage your photos and Adobe PDF documents, even if they’re stored in different locations. Adobe Bridge automatically organizes photos by date as they download. You can further sort and categorize photos by adding star ratings, stacking photos, and assigning keyword tags to help you identify people, places, and events. You can quickly view every photo you’ve taken of your dog. For example, click the keyword tag you have created in your dog’s name to view every photo of your dog. You can also search for images based on date range, caption, filename, media type, and more. For the most comprehensive and up- to-date version of the Adobe Bridge Help, see Adobe Bridge. You can also find video tutorials that teach you how to use Adobe Bridge. The Adobe Bridge Help document includes detailed information about the following:
•Working with Adobe Bridge
•Viewing and managing files
•Working with images and dynamic media
•Running automated tasks with Adobe Bridge
•Adobe Bridge keyboard shortcuts
•Workspace
Accessing Adobe Bridge from Photoshop Elements
Do one of the following:
•Click File > Browse With Bridge
•Click the Bridge icon  .
.
Editing photos
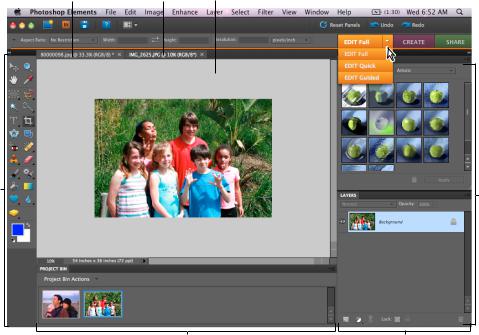
Photoshop Elements offers several levels of editing, from simple one-click fixes to advanced color correction and composition. The Photoshop Elements workspace provides three editing modes: Quick Fix, Guided Edit, and Full Edit. Quick Fix offers quick preview and slider controls for adjusting lighting and color and sharpening entire photos or selected areas of photos. Click the triangle beside Edit Full, and then select Edit Quick to navigate to Quick Fix mode. Edit Full mode provides a complete editing toolset and controls. You can adjust the exposure of specific areas of a photo using professional darkroom tools, such as dodge, burn, and sponge. You can also use fine-tune exposure with the enhanced Brightness/Contrast control, or use Color Curves adjustments to get the perfect exposure.
In Edit Full mode, you can also remove imperfections or unwanted elements, brush away wrinkles and flaws, and apply artistic filters and effects.
If you are not sure how to proceed, switch to Edit Guided mode. This mode provides step-by-step assistance on how to perform common tasks, such as rotating and straightening photos, correcting skin tone, and performing color corrections. Click the triangle beside Edit Full, and then select Edit Guided to navigate to Edit Guided mode.
Last updated 7/26/2011
USING PHOTOSHOP ELEMENTS 8 |
5 |
Getting started
Edit Guided mode walks you through each editing step to make improving your photos easier than ever.
You can feel free to experiment, too, because you can undo or redo multiple steps with a click.
Creating photo composites
You can create beautiful composites, including perfect group shots and seamless panoramas, with easy-to-use tools. New photo-blending technology, called Photomerge, lets you easily combine the best facial expressions from a series of group shots into one composite in which everyone looks their best. With Photomerge, you can also automatically stitch together a series of scenic photos to create smooth panoramic images.
You can use Photomerge to create composites in all three modes. Simply choose File > New, and then select one of the Photomerge commands. Or choose one of the Photomerge commands in the Guided Edit tab.
Last updated 7/26/2011

USING PHOTOSHOP ELEMENTS 8 |
6 |
Getting started
Use a single tool to easily combine the best facial expressions and body language from a series of group shots to create a single composite in which everyone looks great.
Photomerge Exposure and Photomerge Scene Cleaner
With Photomerge Scene Cleaner, you can create perfect scenic photos from multiple photos. For example, you can eliminate tourists that inadvertently wandered into the scenery. Select File > New > Photomerge Scene Cleaner, or choose Photomerge Scene Cleaner in the Guided Edit tab.
A B C
Photomerge Scene Cleaner
A. Dragging a photo to the Final window B. Using the Pencil tool to mark the area to be replaced in t he Final window C. Result in the Final window
With Photomerge Exposure, you can blend two photos together to get a perfectly exposed photo. For example, you have a photo of your family and the background is dark, and a similar photograph with a bright background and dark foreground. You can use Photomerge Exposure to blend these photos, and create a perfectly exposed photo. Select File > New > Photomerge Exposure, or choose Photomerge Exposure in the Guided Edit tab.
Last updated 7/26/2011

USING PHOTOSHOP ELEMENTS 8 |
7 |
Getting started
Photomerge Exposure
Creating and sharing photo projects
After you’ve perfected your photos in Photoshop Elements, you can use them in various fun projects that you can share with family and friends. For example, you can create printed photo projects, such as albums, scrapbook pages, greeting cards, CD/DVD labels and jackets, and photo collages that you can print at home. Professionally designed templates feature color-coordinated, themed layouts for scrapbook pages, cards, and more. In the Create or Share tab, choose the type of project you’d like to create, and Photoshop Elements walks you through the process with the appropriate tools and instructions.
Make printed CD/DVD labels and jackets.
To give your projects a more personal look, you can customize the templates. Adjust layout colors to better complement your photos, for example, and add new graphical elements, text, and effects, such as drop shadows and glows. Use the Contents panel to quickly browse hundreds of frames, themes, backgrounds, clip art, and effects to apply to your photos and photo projects.
Last updated 7/26/2011

USING PHOTOSHOP ELEMENTS 8 |
8 |
Getting started
Create customized photo collages with graphical elements, such as frames, drop shadows, backgrounds, and text.
You can also use your photos in projects such as online photo galleries and photo slide shows. As with print photo projects, Photoshop Elements guides you through the process of creating your project by helping you design the page, arrange the photos, customize the layout, and burn the project to a disc or upload it to the web.
Last updated 7/26/2011

9
Chapter 2: Photoshop Elements workspace
Use the Photoshop Elements workspace for creating, editing, and fixing your images. You can add functionality with plug-in modules and expand system memory by using scratch disks.
Select a photo and then choose Quick Fix, Full Edit, or Guided Edit to edit it.
About the workspace
The Welcome screen
When you start Photoshop Elements, the Welcome screen opens by default. The Welcome screen is a convenient starting place, or hub, for major tasks.
Click a button on the Welcome screen to open the workspace. You can browse with Adobe Bridge, start from scratch, or import photos from a camera or scanner.
You can close or reopen the Welcome screen at any time by choosing Window > Welcome. If you prefer to omit the Welcome screen when you start Photoshop Elements, deselect the Show At Startup box at the bottom of the Welcome screen.
The editing workspace
There are three ways to create and edit images: Full Edit, Edit Quick, and Guided Edit. The Full Edit workspace has tools to correct color problems, create special effects, and enhance photos. The Edit Quick workspace contains simple tools for correcting color and lighting, and commands to quickly fix common problems like red-eye. If you are new to digital imaging, Edit Quick or Guided Edit is a good place to start fixing photos.
If you’ve worked with image-editing applications before, you’ll find that the Full Edit workspace provides a flexible and powerful image-correction environment. It has lighting and color-correction commands, along with tools for fixing image defects, making selections, adding text, and painting on your images. You can rearrange the Full Edit workspace to best suit your needs by moving, hiding, and showing panels; arranging panels in the Panel Bin; zooming in or out of the photo; scrolling to a different area of the document window; and creating multiple windows and views.
Last updated 7/26/2011
USING PHOTOSHOP ELEMENTS 8 |
|
|
10 |
Photoshop Elements workspace |
|
|
|
A |
B |
C |
|
D
G
E F
Full Edit workspace
A. Inactive tab B. Active tab C. Active image area D Tools E. Project Bin F. Panel bin G. Panels
Menu bar Contains menus for performing tasks. The menus are organized by topic. For example, the Enhance menu contains commands for applying adjustments to an image.
Workspace buttons Moves you between the Guided Edit, Quick Fix, and Full Edit workspaces. These buttons change according to the current workspace.
Toolbox Holds tools for editing images.
Options bar Provides options for the tool you select.
Project Bin Displays thumbnails of opened images, and lets you easily manage them.
Panels Help you monitor and modify images.
Panel Bin Helps you organize the panels in your work area.
More Help topics
“Correct color in Quick Fix” on page 99
Last updated 7/26/2011
USING PHOTOSHOP ELEMENTS 8 |
11 |
Photoshop Elements workspace
Use Application frames
On the Mac, the Application frame groups all the workspace elements into a single, integrated window that enables you to treat the application as a single unit. When you move or resize the Application frame or any of its elements, all the elements within it respond to each other so that none overlap. Panels don’t disappear when you switch applications or when you accidentally click out of the application. If you work with two or more applications, you can position each application side by side on the screen or on multiple monitors. If you prefer the traditional, free-form user interface of the Mac, you can turn off the application frame. You can show or hide the application frame using the Window menu. Select Window > Application Frame to toggle the application frame on or off. Similarly, you can show or hide the Application Bar using Window > Application Bar.
Exit Photoshop Elements
1Choose Photoshop Elements > Quit Photoshop Elements.
2Choose whether to save any open files.
More Help topics
“Save changes in different file formats” on page 41
Context menus
Use context menus
You can use context menus to display commands that are relevant to the active tool, selection, or panel. These menus are often another way to access the commands in the window menus.
Control-click or right-click to open a context menu. This menu appears in the Project Bin in Full Edit.
1 Position the pointer over an image or a panel item.
Note: Not all panels offer context menus.
2 Right-click and choose a command from the menu.
Last updated 7/26/2011

USING PHOTOSHOP ELEMENTS 8 |
12 |
Photoshop Elements workspace
Using keyboard commands and modifier keys
Keyboard commands let you quickly execute commands without using a menu; modifier keys let you alter how a tool operates. When available, the keyboard command appears to the right of the command name in the menu.
More Help topics
“Keys for selecting and moving objects” on page 283
“Keys for selecting tools” on page 281
Tools
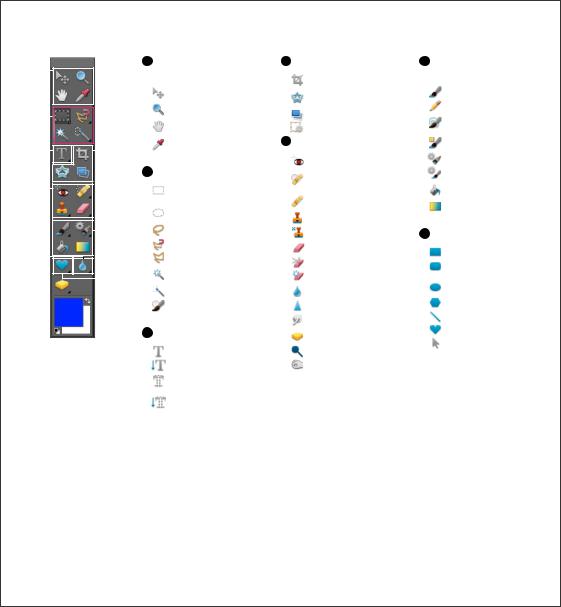
About the toolbox
Use tools in the toolbox to select, edit, and view images; some tools let you paint, draw, and type. The toolbox appears on the left side of the Full Edit and Quick Fix workspaces. In the Full Edit workspace, you can move the toolbox by dragging the gripper bar at the top of the box.
You must select a tool in the toolbox before you can use it. Once selected, the tool is highlighted in the toolbox, and optional settings for the tool appear in the options bar, which is located below the shortcuts bar at the top of the workspace. Some tools in the toolbox have additional tools beneath them. These are called nested tools. A small triangle at the lower right of the tool icon signals that there are nested tools. When you select a tool, any additional nested tools appear in the options bar.
Note: You cannot deselect a tool—once you select a tool, it remains selected until you select a different tool. For example, if you’ve selected the Lasso tool, and you want to click your image without selecting anything, select the Hand tool.
You can view information about any tool in the toolbox by positioning the pointer over it. The name of the tool appears below the pointer—this is called the tool tip. You can click a link in some tool tips to see additional information about the tool.
Last updated 7/26/2011
USING PHOTOSHOP ELEMENTS 8 |
13 |
Photoshop Elements workspace |
|
Toolbox overview
A |
|
|
|
|
|
|
|
|
|
A Navigation and |
D Crop tools |
F Painting and |
||||
|
|
|
|
|
|
|
|
|
|
|
measuring tools |
|
Crop (C) |
|
drawing tools |
|
|
|
|
|
|
|
|
|
|
|
|
|
|
|
|||
|
|
|
|
|
|
|
|
|
|
|
|
Move (V) |
|
|
Brush (B) |
|
|
|
|
|
|
|
|
|
|
|
|
|
|
Cookie Cutter (Q) |
|
||
|
|
|
|
|
|
|
|
|
|
|
|
|
||||
|
|
|
|
|
|
|
|
|
|
|
|
|
||||
|
|
|
|
|
|
|
|
|
|
|
|
Zoom (Z) |
|
|
Pencil (N) |
|
B |
|
|
|
|
|
|
|
|
|
|
|
|
Straighten (P) |
|
||
|
|
|
|
|
|
|
|
|
|
|
|
|
Impressionist |
|||
|
|
|
|
|
|
|
|
|
|
|
|
|||||
|
|
|
|
|
|
|
|
|
|
|
Hand (H) |
|
|
|||
|
|
|
|
|
|
|
|
|
|
|
|
|
Recompose (C+C) |
|
||
|
|
|
|
|
|
|
|
|
|
|
|
|
|
Brush (B) |
||
C |
|
|
|
|
|
|
|
|
D |
|
|
Eyedropper (I) |
E Retouching tools |
|
Color Replacement (B) |
|
|
|
|
|
|
|
|
|
B Selection tools |
|
Red Eye Removal (Y) |
|
Smart Brush (F) |
||||
|
|
|
|
|
|
|
|
|
|
|
|
|||||
|
|
|
|
|
|
|
|
|
|
|
Spot Healing |
|
Detail Smart Brush (F) |
|||
|
|
|
|
|
|
|
|
|
|
|
|
|
|
|
|
|
E |
|
|
|
|
|
|
|
|
|
|
|
Rectangular |
|
Brush (J) |
|
Paint Bucket (K) |
|
|
|
|
|
|
|
|
|
|
|
|
|
||||
|
|
|
|
|
|
|
|
|
|
|
|
Marquee (M) |
|
Healing Brush (J) |
|
Gradient (G) |
|
|
|
|
|
|
|
|
|
|
|
|
Elliptical Marquee (M) |
|
Clone Stamp (S) |
|
|
|
|
|
|
|
|
|
|
|
|
|
|
|
|
|
||
|
|
|
|
|
|
|
|
|
F |
|
|
Lasso (L) |
|
Pattern Stamp (S) |
G Shape tools |
|
|
|
|
|
|
|
|
|
|
|
|
|
|||||
|
|
|
|
|
|
|
|
|
|
|
|
Magnetic Lasso (L) |
|
|
||
|
|
|
|
|
|
|
|
|
|
|
|
|
Eraser (E) |
|
Rectangle (U) |
|
|
|
|
|
|
|
|
|
|
|
|
|
Polygonal Lasso (L) |
|
|
||
|
|
|
|
|
|
|
|
|
|
|
|
|
Background Eraser (E) |
|
||
|
|
|
|
|
|
|
|
|
|
|
|
|
|
Rounded |
||
|
|
|
|
|
|
|
|
|
|
|
|
|
|
|
||
|
|
|
|
|
|
|
|
|
|
|
|
Magic Wand (W) |
|
Magic Eraser (E) |
|
|
|
|
|
|
|
|
|
|
|
G |
|
|
|
|
Rectangle (U) |
||
|
|
|
|
|
|
|
|
|
|
|
|
|
||||
|
|
|
|
|
|
|
|
|
|
|
|
Quick Selection (A) |
|
Blur (R) |
|
Ellipse (U) |
|
|
|
|
|
|
|
|
|
|
|
|
|
|
|||
|
|
|
|
|
|
|
|
|
|
|
|
|
|
|||
|
|
|
|
|
|
|
|
|
|
|
|
Selection Brush (A) |
|
Sharpen (R) |
|
Polygon (U) |
|
|
|
|
|
|
|
|
|
|
|
|
|
|
Smudge (R) |
|
Line (U) |
|
|
|
|
|
|
|
|
|
|
|
|
|
|
|
Custom Shape (U) |
|
|
|
|
|
|
|
|
|
|
|
C Type tools |
|
Sponge (O) |
|
|||
|
|
|
|
|
|
|
|
|
|
|
|
Shape Selection (U) |
||||
|
|
|
|
|
|
|
|
|
|
|
|
Horizontal Type (T) |
|
Dodge (O) |
|
|
|
|
|
|
|
|
|
|
|
|
|
|
|
|
|
||
|
|
|
|
|
|
|
|
|
|
|
|
|
||||
|
|
|
|
|
|
|
|
|
|
|
|
Vertical Type (T) |
|
Burn (O) |
|
|
|
|
|
|
|
|
|
|
|
|
|
|
Horizontal Type |
|
|
|
|
|
|
|
|
|
|
|
|
|
|
|
|
Mask (T) |
|
|
|
|
|
|
|
|
|
|
|
|
|
|
|
|
Vertical Type |
|
|
|
|
|
|
|
|
|
|
|
|
|
|
|
|
Mask (T) |
|
|
|
|
 Indicates default tool * Keyboard shortcuts appear in parenthesis
Toolbox Overview
Select a tool
Do one of the following:
•Click a tool in the toolbox. If there is a small triangle in a tool’s lower-right corner, hold down the mouse button to view the hidden tools nested with the tool. Then click the tool you want to select.
•Press the tool’s keyboard shortcut. The keyboard shortcut is displayed in its tool tip. For example, you can select the Move tool by pressing the V key.
•To open a nested tool, use the tool’s keyboard shortcut several times to cycle through all nested tools.
Last updated 7/26/2011

USING PHOTOSHOP ELEMENTS 8 |
14 |
Photoshop Elements workspace
A
D E
B
C
F
Using tools
A. Toolbox B. Active tool C. Hidden tools D. Tool name E. Tool shortcut F. Hidden tool triangle
More Help topics
“Keys for selecting tools” on page 281
Set tool preferences
1Choose Photoshop Elements > Preferences > General.
2Set one or more of the following options, and click OK.
•Select Show Tool Tips to show or hide tool tips.
•Select Use Shift Key For Tool Switch to cycle through a set of hidden tools by holding down the Shift key. When this option is deselected, you can cycle through a set of hidden tools by pressing the shortcut key (without holding down Shift).
Set the appearance of a tool pointer
1Choose Photoshop Elements > Preferences > Display & Cursors.
2Select a setting for the Painting Cursors:
Standard Displays pointers as tool icons.
Precise Displays pointers as cross-hairs.
Note: When not in Preferences, use the Caps Lock key to toggle the appearance of the Precise cursors.
Normal Brush Tip Displays the pointers as circles at 50% of the size you specify for the brush.
Full Size Brush Tip Displays the pointers as circles at the full size you specify for the brush.
Show Crosshair In Brush Tip Displays cross-hairs in the circles when you choose either Normal Brush Tip or Full Size Brush Tip.
3 Select a setting for Other Cursors:
Standard Displays pointers as tool icons.
Precise Displays pointers as cross-hairs.
Set tool options
The options bar appears below the shortcuts bar at the top of the workspace. The options bar is context sensitive—it changes as you select different tools. Some settings in the options bar are common to several tools, and some are specific to one tool.
Last updated 7/26/2011
USING PHOTOSHOP ELEMENTS 8 |
|
|
|
|
15 |
||||||
Photoshop Elements workspace |
|
|
|
|
|
||||||
A B |
C |
D |
|||||||||
|
|
|
|
|
|
|
|
|
|
|
|
|
|
|
|
|
|
|
|
|
|
|
|
|
|
|
|
|
|
|
|
|
|
|
|
Lasso options bar
A. Tool icon B. Active tool C. Hidden tools D. Tool options
1Select a tool.
2Look in the options bar to see the available options. For more information on setting options for a specific tool, search for the tool’s name in Photoshop Elements Help.
Note: To return a tool or all tools to their default settings, click the tool icon, and then click the triangle in the options bar, then choose Reset Tool or Reset All Tools from the context menu.
More Help topics
“Keys for selecting tools” on page 281
Set a completed operations alert
1Choose Photoshop Elements > Preferences > General.
2Select Beep When Done, and click OK.
Panels and bins
About panels
Panels help you manage, monitor, and modify images. Some panels have menus that provide additional commands and options. You can organize panels in the workspace in many different ways. You can store panels in the Panel Bin to keep them out of your way, but easily accessible, or you can keep frequently used panels open in the workspace.
Another option is to group panels or dock one panel at the bottom of another panel. Panels are stored in the Panel Bin, which is accessible in Full Edit mode.
Note: Drag a panel out of the Panel Bin if you want to remove it from the Panel Bin and keep it open.
Dragging a panel
Last updated 7/26/2011

USING PHOTOSHOP ELEMENTS 8 |
16 |
Photoshop Elements workspace
Panel menus
Some commands appear in both the panel menu and the menu bar. Other commands are exclusive to panel menus. Click panel menu to view the different commands in each panel.
Pop-up sliders within panels
Some panels and dialog boxes contain settings that use pop-up sliders (for example, the Opacity option in the Layers panel). If there is a triangle next to the text box, you can activate the pop-up slider by clicking the triangle. Position the pointer over the triangle next to the setting, hold down the mouse button, and drag the slider or angle radius to the desired value. Click outside the slider box or press Enter to close the slider box. To cancel changes, press Esc.
To increase or decrease values in 10% increments when the pop-up slider box is open, hold down Shift and press the  Up Arrow or Down Arrow key.
A B C D
E F G H
Different ways to enter values
A. Dial B. Click to open window C. Text box D. Menu arrow E. Scrubby slider F. Check box G. Slider H Pop-up slider triangle
Work with panels
The Panel Bin lets you store multiple panels in a single area that you can easily configure, close, or keep open for easy and fast access. By default, the Panel Bin appears on the right side of the workspace. When you adjust panels, they remain as you leave them until you reset or change them.
Last updated 7/26/2011
USING PHOTOSHOP ELEMENTS 8 |
|
|
|
17 |
||||
Photoshop Elements workspace |
|
|
|
|
||||
|
|
|
B |
C |
||||
|
|
|
|
|
|
|
|
|
|
|
|
|
|
|
|
|
|
|
|
|
|
|
|
|
|
|
A |
|
|
|
|
|
|
|
|
|
|
|
|
|
|
|
D |
|
|
|
|
|
|
|
|
||
|
|
|
|
|
|
|
|
|
The Panel Bin
A. Change panel tools B. Adjust panel height C. Panel menu D. Scroll to view rest of panel
1To show or hide the bin, choose Window > Panel Bin.
2To use panels in the Panel Bin, do any of the following:
•To remove a panel from the Panel Bin, drag the panel’s title bar out of the Panel Bin.
•To add a panel to the Panel Bin, drag the panel’s title bar into the Panel Bin.
•To rearrange panels in the Panel Bin, drag the panel’s title bar to a new location.
3 To use panels outside of the Panel Bin, do any of the following:
•To open a panel, choose the panel’s name from the Window menu.
•To close a panel, choose the panel’s name from the Window menu. Or click the Close option in the panel’s menu.
•To change the size of a panel, drag any corner of the panel.
•To group panels together (one panel with multiple tabs), drag another panel’s tab onto the body of the target panel. A thick line appears around the body of the target panel when the pointer is over the correct area for grouping to occur. If you want to move a panel to another group, drag the panel’s tab to that group. To separate a panel from a group, drag the panel’s tab outside the group.
•To move a panel group, drag the title bar.
•To expand or collapse a panel or panel group, double-click the panel’s tab or title bar.
•To reset panels to their default positions, choose Window > Reset Panels.
Last updated 7/26/2011

USING PHOTOSHOP ELEMENTS 8 |
18 |
Photoshop Elements workspace
Note: If you want panels to always open in their default positions, choose Photoshop Elements > Preferences > General, and then deselect Save Panel Locations. The change takes effect the next time you start the application.
•To move a panel and keep it open, drag the panel. To reset the panel to its default position, select Window > Reset Panels.
Work with the Panel Bin
The Panel Bin appears on the right side of the workspace. It contains a tab for each of the basic steps of photo editing: Edit, Create, and Share. You can open the Panel Bin to access the tabs, or close it to expand the workspace.
Tabs on the Panel Bin
Show or hide the Panel Bin
Select Window > Panel Bin.
Use tools in the Edit, Create, and Share tabs
1In the Panel Bin, click the Edit, Create, or Share tab.
2Click a button for any of the tools listed on that tab.
Use the Project Bin
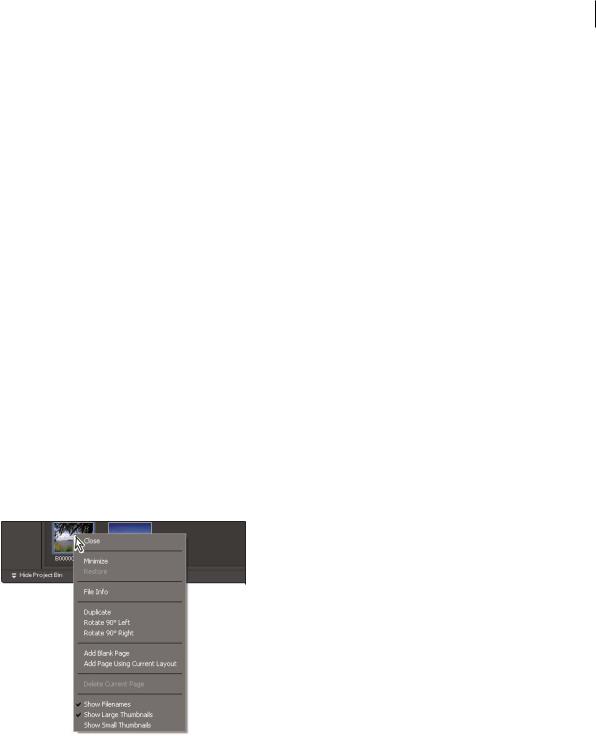
Located at the bottom of the edit workspaces, the Project Bin displays thumbnails of open photos. It’s useful for switching between multiple open photos in your workspace. The Project Bin has controls that let you open or close images, hide images, navigate through open images, make a specific image the frontmost, duplicate an image, rotate an image, or view file information. Because the Project Bin appears in both Full Edit and Quick Fix, you can easily bring open images into Quick Fix for editing. Multiple-page projects are highlighted by a gray frame around the page thumbnails. To show or hide the individual pages, click the right edge of the frame.
Do any of the following:
•To open an image, use File > Open.
•To bring an opened image forward as the frontmost image, double-click a thumbnail.
•To rearrange photos, drag thumbnails in the Project Bin.
•To close an image, right-click a thumbnail in the Project Bin and choose Close.
•To hide an image, right-click the thumbnail and choose Minimize from the context menu.
Note: To show an image after hiding it, double-click its thumbnail in the Project Bin, or right-click the thumbnail and choose Restore from the context menu.
•To view a photo’s file information, right-click a thumbnail and choose File Info from the context menu.
•To duplicate an image, right-click a thumbnail, choose Duplicate from the context menu, and name the file.
•To rotate an image, right-click a thumbnail and choose Rotate 90° Left or Rotate 90° Right from the context menu.
•To show filenames, right-click in the Project Bin and choose Show Filenames from the context menu.
•To open or close the Project Bin, choose Window > Project Bin.
•To manually show or hide Project Bin, click the title bar of the Project Bin.
Last updated 7/26/2011
USING PHOTOSHOP ELEMENTS 8 |
19 |
Photoshop Elements workspace
Undo, redo, and cancel
Undo, redo, or cancel operations
Many operations can be undone or redone. For instance, you can restore all or part of an image to its last saved version. Available memory may limit your ability to use these options.
1To undo or redo an operation, Choose Edit > Undo or choose Edit > Redo.
2To cancel an operation, hold down the Esc key until the operation in progress has stopped.
Using the Undo History panel
The Undo History panel (Window > Undo History) lets you jump to any recent state of the image created during the current work session. Each time you apply a change to pixels in an image, the new state of that image is added to the Undo History panel. You don’t need to save a change in order for the change to appear in the History.
For example, if you select, paint, and rotate part of an image, each of those states is listed separately in the panel. You can then select any of the states, and the image reverts to how it looked when that change was first applied. You can then work from that state.
Actions, such as zooming and scrolling, do not affect pixels in the image and do not appear in the Undo History panel. Nor do program-wide changes, such as changes to panels, color settings, and preferences.
A
B
C
The Undo History panel
A. Original state B. State C. Selected state and state slider
Note the following guidelines when using the Undo History panel:
•By default, the Undo History panel lists 50 previous states. Older states are automatically deleted to free more memory for Photoshop Elements. You can change the number of states displayed in the Undo History panel in Performance Preferences (Photoshop Elements > Preferences > Performance). The maximum number of states is 1000.
•The original state of the photo is always displayed at the top of the Undo History panel. You can always revert an image to its original state by clicking this top state. Clicking the original state is also handy for comparing before and after versions of your editing.
•When you close and reopen the document, all states from the last working session are cleared from the panel.
•States are added to the bottom of the list. That is, the oldest state is at the top of the list, the most recent one at the bottom.
•Each state is listed with the name of the tool or command used to change the image.
•Selecting a state dims those below. This way you can easily see which changes will be discarded if you continue working from the selected state.
•Selecting a state and then changing the image eliminates all states that came after it. Likewise, deleting a state deletes that state and those that came after it.
Last updated 7/26/2011

USING PHOTOSHOP ELEMENTS 8 |
20 |
Photoshop Elements workspace
Revert to the last saved version
When editing a photo in Full Edit or Quick Fix, you can revert to the last saved version.
Choose Edit > Revert.
Note: Revert is added as a history state in the Undo History panel and can be undone.
Revert to a previous state of an image
In Full Edit, do any of the following:
•Click the name of the state in the Undo History panel.
•Drag the slider at the left of the state up or down to a different state in the Undo History panel.
•Click the Undo  or Redo
  buttons on the shortcuts bar.
•Choose Undo or Redo from the Undo History panel menu or the Edit menu.
To set the keyboard command for Step Forward and Step Backward, choose Photoshop Elements > Preferences >  General, and choose from the Step Back/Fwd menu.
Delete one or more states from the Undo History panel
Do one of the following:
•To delete a state, click the name of the state, and choose Delete from the Undo History panel menu. States following the one you selected are also deleted.
•To delete the list of states from the Undo History panel, without changing the image, choose Clear Undo History from the panel menu or choose Edit > Clear > Undo History. Clearing is useful for freeing up memory, especially if you get an alert that Photoshop Elements is low on memory.
Note: Clearing the Undo History panel cannot be undone.
Clear memory used by the clipboard and the Undo History panel
You can delete items copied to the clipboard or states in the Undo History panel to free up memory.
In Full Edit, do one of the following:
•To clear memory used by the clipboard, choose Edit > Clear > Clipboard Contents.
•To clear memory used by the Undo History panel, choose Edit > Clear > Undo History or choose Clear Undo History from the Undo History panel menu.
•To clear the memory used in both the clipboard and the Undo History panel simultaneously, choose Edit > Clear > All.
Note: Clearing the Undo History panel or clipboard cannot be undone.
Restore default preferences
Preference settings control how Photoshop Elements displays images, cursors, and transparencies; saves files; uses plug-ins and scratch disks, and so on. If the application exhibits unexpected behavior, the preferences file may be damaged. You can restore all preferences to their defaults.
Press and hold Option+Command+Shift immediately after Photoshop Elements begins launching. Click Yes to delete the Adobe Photoshop Elements settings file.
A new preferences file is created the next time you start Photoshop Elements. For information on a specific preference option, search for the preference name in Help.
Last updated 7/26/2011

USING PHOTOSHOP ELEMENTS 8 |
21 |
Photoshop Elements workspace
Redisplay disabled warning messages
In certain situations, messages containing warnings or prompts are displayed. You can disable the display of these messages by selecting the Don’t Show Again option in the message, and reset the messages you’ve disabled at a later time.
1Choose Photoshop Elements > Preferences > General.
2Click Reset All Warning Dialogs, and click OK.
Scratch disks and plug-ins
About scratch disks
When your system does not have enough RAM to perform an operation, Photoshop Elements uses scratch disks. A scratch disk is any drive or partition of a drive with free memory. By default, Photoshop Elements uses the hard drive on which the operating system is installed as its primary scratch disk.
You can change the primary scratch disk or designate a second, third, or fourth scratch disk to be used when the primary disk is full. Your primary scratch disk should be your fastest hard disk and have plenty of defragmented space available.
For best performance, use the following guidelines when assigning scratch disks:
•Scratch disks should not be on the same physical drive as Photoshop Elements or any large files you are editing.
•Scratch disks should be not be on the same physical drive as the one used for the operating system’s virtual memory.
•Scratch disks should be on a local drive. That is, they should not be accessed over a network.
•Scratch disks should be conventional (non-removable) media.
•RAID disks/disk arrays are good choices for dedicated scratch disk volumes.
•Drives with scratch disks should be defragmented regularly. Or better yet, use an empty drive or a drive with plenty of unused space to avoid fragmentation issues.
Change scratch disks
Photoshop Elements needs contiguous hard drive space to create a scratch disk. For this reason you should frequently defragment your hard drive. Adobe recommends that you use a disk tool utility to defragment your hard drive on a regular basis.
1Choose Photoshop Elements > Preferences > Performance.
2Select the desired disks from the Scratch Disks menu (you can assign up to four scratch disks), and click OK.
3Restart Photoshop Elements for the change to take effect.
About plug-in modules
Plug-in modules are software programs developed by Adobe Systems and other software developers to add functionality to Photoshop Elements. A number of importing, exporting, and special-effects plug-ins come with your program; they are inside the Photoshop Elements Plug-ins folder. You can select an additional plug-ins folder in which to load compatible plug-ins stored with another application. You can also create a shortcut for a plug-in stored in another folder on your system. You can then add the shortcut or alias to the Plug-ins folder to use that plug-in with Photoshop Elements. Once installed, plug-in modules appear as options added to the Import or Export menu, as filters
Last updated 7/26/2011

USING PHOTOSHOP ELEMENTS 8 |
22 |
Photoshop Elements workspace
added to the Filter menu, or as file formats in the Open and Save As dialog boxes. If you install a large number of plug-ins, Photoshop Elements may not be able to list them all in their appropriate menus. If so, newly installed plug-ins appear in the Filter > Other submenu. To prevent a plug-in or folder of plug-ins from loading, add a tilde character
(~) at the beginning of the plug-in name, folder, or directory. That file (or all files in the folder) is ignored by the application when you restart it. To view information about installed plug-ins, choose Photoshop Elements > About Plug-In and select a plug-in from the submenu.
More Help topics
“Plug-in filters” on page 202
Install plug-in modules
Do one of the following:
•Use the plug-in installer, if provided.
•Follow the installation instructions that came with the plug-in module.
•Make sure the plug-in files are uncompressed, and then copy them to the appropriate Plug-ins folder in the Photoshop Elements folder.
Select an additional plug-ins folder
You can select an additional plug-ins folder in which to load compatible plug-ins stored with another application.
1Choose Photoshop Elements > Preferences > Plug-Ins.
2In the Preferences dialog, select Additional Plug-ins Folder, select a folder from the list, and click Choose.
3To display the contents of a folder, double-click the directory. The path to the folder appears in the preferences window.
Note: Do not select a location inside the Plug-ins folder for Photoshop Elements.
4 Restart Photoshop Elements to load the plug-ins.
Last updated 7/26/2011

23
Chapter 3: Import photos
Importing photos
About getting photos
When you begin to use Photoshop Elements, you can use media files from many sources, whether a camera, scanner, CD, or a folder on your hard disk. If you simply want to start editing a photo on your hard disk, and you know its filename and location, use the File > Open command to browse to the file. To open photos from another source, use the Photo Downloader in Adobe Bridge, or use the Photoshop Elements Import option or the Welcome screen to select the image’s source.
Open a file for editing on your hard disk
Choose File > Open and browse to the file.
Open a file from a device
Choose File > Import, select the camera or scanner, and browse to the file.
Open a file from the Welcome screen
1Choose Window > Welcome to open the Welcome screen.
2Click Import From Camera or Import From Scanner to open Adobe Bridge.
Open a file from Adobe Photo Downloader
Choose File > Adobe Photo Downloader to open Adobe Bridge Photo Downloader.
Guidelines for getting photos from devices
When downloading image files from a camera or a scanner, follow these guidelines:
1. Use the Adobe Photo Downloader
For some devices, you may need to install the device software on your computer before downloading files. During installation, the software may ask whether a specific program will be used to edit the images files. If asked, specify Photoshop Elements.
Some device software starts automatically when you connect and switch on the device. However, using Adobe Photo Downloader enables you to perform a variety of functions not offered by device software. To obtain image files with the Adobe Photo Downloader, close any device software that starts automatically.
2. Organize photos during the import process
The Adobe Photo Downloader Advanced dialog box enables you to improve and organize photos while importing them to your computer. Properly organizing photos during import makes finding and improving them later much easier and faster.
Last updated 7/26/2011

USING PHOTOSHOP ELEMENTS 8 |
24 |
Import photos
For example, you might have many pictures from a recent vacation stored in your digital camera. Some of the pictures are from a family reunion, and the rest are pictures of tourist attractions visited along the way. During the import process, you can divide these photos into Place and Family folders, and then name them accordingly.
Import keywords attached to photos
When you receive photos that contain keyword metadata, you can import them with the photo. You can decide whether to keep the attached keyword, rename the keyword, or map it to one of your own keywords. If you import a new keyword, it appears in the Adobe Bridge Keyword Tags panel, and you can use it to tag other photos.
Cameras and card readers
About cameras and card readers
You can download (copy) photos from cameras and card readers in several ways:
•Copy photos from your camera and import them into Photoshop Elements using the Adobe Photo Downloader. This method is recommended because it is quick and easy, and allows you to improve and organize your photos when importing them.
•Open the Welcome screen and click the Import From Camera option.
•If your camera or card reader displays as a drive, you can open the files from there and place them directly into Photoshop Elements.
In some cases, you need to install the software driver that came with your camera before you can download pictures to your computer.
Get photos from a digital camera or card reader
1Connect your camera or card reader to your computer. (See the documentation that came with your device, if necessary.)
2Do either of the following:
•If the Adobe Photo Downloader appears, choose the name of the camera or card reader from the Get Photos From menu. Usually, the connected device’s name automatically appears, and Photoshop Elements automatically detects your camera.
Note: Your camera or card reader must be switched on to appear in the Get Photos From list. If the menu doesn’t display the specific device name, choose Untitled. If no option for the device is available, choose Refresh List.
•If the downloader does not appear, use Photoshop Elements File > Adobe Photoshop Downloader or Bridge File > Get Photos From Camera to open it.
3 In the Import Settings area, set the following options:
Location Specifies the folder to which images are downloaded. To change the default folder location, click Choose, and specify a new location.
Create Subfolder(s) Creates a subfolder using the format selected from the pop-up menu. If you choose Custom Name, type a subfolder name in the box.
Rename Files Changes the filenames using the format selected from the pop-up menu. If you choose Custom Name, type a filename in the box.
Last updated 7/26/2011
Loading...