


 Loading...
Classroom in a Book®
www.adobepress.com
PeachpitPress/ScottDesign

© 2004 Adobe Systems Incorporated. All rights reserved.
Adobe® Encore DVD™ Classroom in a Book®
This book, as well as the software described in it, is furnished under license and may be used or copied only in accordance with the terms of such license. The content of this book is furnished for informational use only, is subject to change without notice, and should not be construed as a commitment by Adobe Systems Incorporated. Adobe Systems Incorporated assumes no responsibility or liability for any errors or inaccuracies that may appear in this book.
Except as permitted by such license, no part of this documentation may be reproduced, stored in a retrieval system, or transmitted, in any form or by any means, electronic, mechanical, recording, or otherwise, without the prior written permission of Adobe Systems Incorporated.
Please remember that existing artwork, movies, sounds, or images that you may want to include in your project may be protected under copyright law. The unauthorized incorporation of such material into your new work could be a violation of the rights of the copyright owner. Please be sure to obtain any permission required from the copyright owner.
Any references to company names or individual names in sample templates and other project files are for demonstration purposes only and are not intended to refer to any actual organization or person.
Adobe, the Adobe logo, the Adobe Press logo, After Effects, Acrobat, Acrobat Reader, Audition, Classroom in a Book, Adobe Encore, GoLive, Illustrator, Minion, Photoshop, PostScript, and Adobe Premiere are either registered trademarks or trademarks of Adobe Systems Incorporated in the United States and/or other countries. Microsoft and Windows are registered trademarks of Microsoft Corporation in the United States and/or other countries. Apple, Mac OS, and QuickTime are trademarks of Apple Computer, Inc., registered in the United States and other countries. Pentium is a registered trademark of Intel Corporation. MPEG Layer 3 audio compression technology is licensed by Fraunhofer IIS and Thompson. All other trademarks are the property of their respective owners.
Contains an implementation of the LZW algorithm licensed under U.S. Patent 4,558,302.
Music in lessons 1 and 9 courtesy of Jason A. Levine.
Books & Beans video assets in lessons 6 and 8 courtesy of Max Freedman, ASCI Advertising and Publishing, Mountain View, CA.
Lessons developed by Paul Carew and documented by Brie Gyncild.
Written and designed at Adobe Systems Incorporated, 345 Park Avenue, San Jose, California 95110, U.S.A.
www.adobepress.com
Adobe Press books are published by Peachpit Press, Berkeley, California 94710.
To report errors, please send a note to errata@peachpit.com.
Notice to U.S. Government End Users. The Software and Documentation are “Commercial Items,” as that term is defined at 48 C.F.R. §2.101, consisting of “Commercial Computer Software” and “Commercial Computer Software Documentation,” as such terms are used in 48 C.F.R. §12.212 or 48 C.F.R. §227.7202, as applicable. Consistent with 48 C.F.R. §12.212 or 48 C.F.R.
§§227.7202-1 through 227.7202-4, as applicable, the Commercial Computer Software and Commercial Computer Software Documentation are being licensed to U.S. Government end users (a) only as Commercial Items and (b) with only those rights as are granted to all other end users pursuant to the terms and conditions herein. Unpublished-rights reserved under the copyright laws of the United States. Adobe Systems Incorporated, 345 Park Avenue, San Jose, CA 95110-2704, USA. For U.S. Government End Users, Adobe agrees to comply with all applicable equal opportunity laws including, if appropriate, the provisions of Executive Order 11246, as amended, Section 402 of the Vietnam Era Veterans Readjustment Assistance Act of 1974 (38 USC 4212), and Section 503 of the Rehabilitation Act of 1973, as amended, and the regulations at 41 CFR Parts 60-1 through 60-60, 60-250, and 60-741. The affirmative action clause and regulations contained in the preceding sentence shall be incorporated by reference in this Agreement.
ISBN 0-321-20547-2
Printed in the U.S.A.
9 8 7 6 5 4 3 2
PeachpitPress/ScottDesign

iii
Contents
Getting Started
About Classroom in a Book . . . . . . . . . . . . . . . . . . . . . . . . . . . . . . . . . 1
Prerequisites . . . . . . . . . . . . . . . . . . . . . . . . . . . . . . . . . . . . . . . . . . . . . . . 1
Installing the Adobe Encore DVD program . . . . . . . . . . . . . . . . . . . 2
Copying the Classroom in a Book files . . . . . . . . . . . . . . . . . . . . . . . 2
Additional resources . . . . . . . . . . . . . . . . . . . . . . . . . . . . . . . . . . . . . . . 3
Adobe Certification . . . . . . . . . . . . . . . . . . . . . . . . . . . . . . . . . . . . . . . . . 3
Lesson 01 |
Creating a Simple DVD |
|
|
Getting started . . . . . . . . . . . . . . . . . . . . . . . . . . . . . . . . . . . . . . . . . . . . |
. 8 |
|
Planning your DVD . . . . . . . . . . . . . . . . . . . . . . . . . . . . . . . . . . . . . . . . |
11 |
|
Importing files as assets . . . . . . . . . . . . . . . . . . . . . . . . . . . . . . . . . . . . |
12 |
|
Creating a timeline . . . . . . . . . . . . . . . . . . . . . . . . . . . . . . . . . . . . . . . . |
12 |
|
Adding chapter points . . . . . . . . . . . . . . . . . . . . . . . . . . . . . . . . . . . . . |
15 |
|
Importing a layered Photoshop file as a menu . . . . . . . . . . . . . . |
17 |
|
Setting start and end behaviors. . . . . . . . . . . . . . . . . . . . . . . . . . . . |
19 |
|
Setting behaviors for remote control buttons . . . . . . . . . . . . . . . |
20 |
|
Previewing the project . . . . . . . . . . . . . . . . . . . . . . . . . . . . . . . . . . . . . |
21 |
|
Burning the DVD . . . . . . . . . . . . . . . . . . . . . . . . . . . . . . . . . . . . . . . . . . . |
22 |
|
Review questions . . . . . . . . . . . . . . . . . . . . . . . . . . . . . . . . . . . . . . . . . |
23 |
Lesson 02 |
Creating Menus in Adobe Encore DVD |
|
|
Getting started . . . . . . . . . . . . . . . . . . . . . . . . . . . . . . . . . . . . . . . . . . . . |
28 |
|
About menus . . . . . . . . . . . . . . . . . . . . . . . . . . . . . . . . . . . . . . . . . . . . . . |
29 |
|
Creating a new menu . . . . . . . . . . . . . . . . . . . . . . . . . . . . . . . . . . . . . . |
30 |
|
Adding text to a menu . . . . . . . . . . . . . . . . . . . . . . . . . . . . . . . . . . . . . |
32 |
|
Adding assets to menus . . . . . . . . . . . . . . . . . . . . . . . . . . . . . . . . . . . . |
35 |
|
Adding drop shadows to text . . . . . . . . . . . . . . . . . . . . . . . . . . . . . . |
38 |
|
Converting text blocks to buttons . . . . . . . . . . . . . . . . . . . . . . . . . . |
40 |
|
Adding subpictures to buttons . . . . . . . . . . . . . . . . . . . . . . . . . . . . |
41 |
PeachpitPress/ScottDesign

iv CONTENTS
|
Linking buttons to timelines . . . . . . . . . . . . . . . . . . . . . . . . . . . . . . |
45 |
|
Previewing the project . . . . . . . . . . . . . . . . . . . . . . . . . . . . . . . . . . . . |
47 |
|
Burning the DVD . . . . . . . . . . . . . . . . . . . . . . . . . . . . . . . . . . . . . . . . . |
. 48 |
|
Review questions . . . . . . . . . . . . . . . . . . . . . . . . . . . . . . . . . . . . . . . . . |
49 |
Lesson 03 |
Designing Menus in Adobe Photoshop |
|
|
Getting started . . . . . . . . . . . . . . . . . . . . . . . . . . . . . . . . . . . . . . . . . . . |
54 |
|
Teaming Adobe Encore DVD with Photoshop . . . . . . . . . . . . . . |
55 |
|
Creating a menu background in Photoshop. . . . . . . . . . . . . . . . |
56 |
|
Creating text in Photoshop . . . . . . . . . . . . . . . . . . . . . . . . . . . . . . . |
. 59 |
|
Applying layer styles in Photoshop . . . . . . . . . . . . . . . . . . . . . . . . |
. 65 |
|
Creating buttons in Photoshop . . . . . . . . . . . . . . . . . . . . . . . . . . . |
. 69 |
|
Importing a menu into Adobe Encore DVD . . . . . . . . . . . . . . . . |
. 75 |
|
Editing a menu in Photoshop . . . . . . . . . . . . . . . . . . . . . . . . . . . . . |
. 76 |
|
Linking buttons to timelines . . . . . . . . . . . . . . . . . . . . . . . . . . . . . . |
. 78 |
|
Repositioning overlapping objects . . . . . . . . . . . . . . . . . . . . . . . . |
. 80 |
|
Previewing the project . . . . . . . . . . . . . . . . . . . . . . . . . . . . . . . . . . . |
. 82 |
|
Review questions . . . . . . . . . . . . . . . . . . . . . . . . . . . . . . . . . . . . . . . . . |
83 |
Lesson 04 |
Using Adobe Encore DVD Templates |
|
|
Getting started . . . . . . . . . . . . . . . . . . . . . . . . . . . . . . . . . . . . . . . . . . . |
. 88 |
|
Exploring the Library palette . . . . . . . . . . . . . . . . . . . . . . . . . . . . . . |
. 90 |
|
Modifying a menu template . . . . . . . . . . . . . . . . . . . . . . . . . . . . . . |
. 93 |
|
Creating submenus from the same template. . . . . . . . . . . . . . . |
97 |
|
Replacing background elements . . . . . . . . . . . . . . . . . . . . . . . . . . |
. 99 |
|
Adding items to the Library palette . . . . . . . . . . . . . . . . . . . . . . . |
101 |
|
Linking menus to each other . . . . . . . . . . . . . . . . . . . . . . . . . . . . . |
104 |
|
Linking buttons to timelines . . . . . . . . . . . . . . . . . . . . . . . . . . . . . . |
105 |
|
Creating a text layer . . . . . . . . . . . . . . . . . . . . . . . . . . . . . . . . . . . . . . |
105 |
|
Checking links . . . . . . . . . . . . . . . . . . . . . . . . . . . . . . . . . . . . . . . . . . . |
107 |
|
Previewing the project . . . . . . . . . . . . . . . . . . . . . . . . . . . . . . . . . . . |
109 |
|
Building a DVD image. . . . . . . . . . . . . . . . . . . . . . . . . . . . . . . . . . . . . |
110 |
|
Burning a DVD from a DVD image file . . . . . . . . . . . . . . . . . . . . . |
110 |
|
Review questions . . . . . . . . . . . . . . . . . . . . . . . . . . . . . . . . . . . . . . . . . |
111 |
PeachpitPress/ScottDesign

ADOBE ENCORE DVD v
Classroom in a Book
Lesson 05 |
Assembling a DVD Quickly |
|
|
Getting started . . . . . . . . . . . . . . . . . . . . . . . . . . . . . . . . . . . . . . . . . . . |
116 |
|
Dragging items into the Library palette . . . . . . . . . . . . . . . . . . . |
117 |
|
Importing items into the Library palette . . . . . . . . . . . . . . . . . . . |
120 |
|
Creating buttons instantly. . . . . . . . . . . . . . . . . . . . . . . . . . . . . . . . |
121 |
|
Resizing and positioning buttons . . . . . . . . . . . . . . . . . . . . . . . . . |
123 |
|
Editing button text . . . . . . . . . . . . . . . . . . . . . . . . . . . . . . . . . . . . . . . |
125 |
|
Adding a title to the menu . . . . . . . . . . . . . . . . . . . . . . . . . . . . . . . |
127 |
|
Previewing the project . . . . . . . . . . . . . . . . . . . . . . . . . . . . . . . . . . . |
128 |
|
Adding data files to a disc . . . . . . . . . . . . . . . . . . . . . . . . . . . . . . . . |
128 |
|
Burning a CD . . . . . . . . . . . . . . . . . . . . . . . . . . . . . . . . . . . . . . . . . . . . . |
129 |
|
Review questions . . . . . . . . . . . . . . . . . . . . . . . . . . . . . . . . . . . . . . . . . |
130 |
Lesson 06 |
Overriding Default Actions |
|
|
Getting started . . . . . . . . . . . . . . . . . . . . . . . . . . . . . . . . . . . . . . . . . . |
134 |
|
About overrides . . . . . . . . . . . . . . . . . . . . . . . . . . . . . . . . . . . . . . . . . . |
136 |
|
Working with multiple menus . . . . . . . . . . . . . . . . . . . . . . . . . . . . |
137 |
|
Setting default end actions. . . . . . . . . . . . . . . . . . . . . . . . . . . . . . . |
138 |
|
Setting links for the main menu . . . . . . . . . . . . . . . . . . . . . . . . . . . |
140 |
|
Using the pick whip . . . . . . . . . . . . . . . . . . . . . . . . . . . . . . . . . . . . . . |
143 |
|
Setting overrides . . . . . . . . . . . . . . . . . . . . . . . . . . . . . . . . . . . . . . . . . |
144 |
|
Previewing the project . . . . . . . . . . . . . . . . . . . . . . . . . . . . . . . . . . . |
148 |
|
Making a DVD folder . . . . . . . . . . . . . . . . . . . . . . . . . . . . . . . . . . . . . |
149 |
|
Review questions . . . . . . . . . . . . . . . . . . . . . . . . . . . . . . . . . . . . . . . . . |
149 |
Lesson 07 |
Creating Motion Menus |
|
|
Getting started . . . . . . . . . . . . . . . . . . . . . . . . . . . . . . . . . . . . . . . . . . . |
154 |
|
Assembling your assets . . . . . . . . . . . . . . . . . . . . . . . . . . . . . . . . . . . |
156 |
|
Creating and naming chapter points . . . . . . . . . . . . . . . . . . . . . . |
159 |
|
Specifying an end action and a link for a timeline . . . . . . . . . |
162 |
|
Adding video to the background of a menu . . . . . . . . . . . . . . . |
164 |
|
Previewing the motion menu background . . . . . . . . . . . . . . . . |
166 |
|
Transcoding an AVI file from the Project window . . . . . . . . . . |
168 |
|
Creating video thumbnail buttons. . . . . . . . . . . . . . . . . . . . . . . . |
170 |
PeachpitPress/ScottDesign

vi CONTENTS
|
Creating animated thumbnail buttons . . . . . . . . . . . . . . . . . . . . |
178 |
|
Burning the DVD . . . . . . . . . . . . . . . . . . . . . . . . . . . . . . . . . . . . . . . . . |
180 |
|
Review questions . . . . . . . . . . . . . . . . . . . . . . . . . . . . . . . . . . . . . . . . |
180 |
Lesson 08 |
Working with Adobe Premiere Pro |
|
|
Getting started . . . . . . . . . . . . . . . . . . . . . . . . . . . . . . . . . . . . . . . . . . . |
186 |
|
Creating markers in Premiere Pro . . . . . . . . . . . . . . . . . . . . . . . . . |
187 |
|
Exporting an MPEG-2 file from Premiere Pro . . . . . . . . . . . . . . . |
189 |
|
Importing an MPEG-2 file with markers . . . . . . . . . . . . . . . . . . . . |
191 |
|
Linking chapter points to thumbnail buttons . . . . . . . . . . . . . . |
194 |
|
Previewing the project . . . . . . . . . . . . . . . . . . . . . . . . . . . . . . . . . . . |
196 |
|
Exporting an AVI file from Premiere Pro . . . . . . . . . . . . . . . . . . . |
198 |
|
Using the Edit Original command . . . . . . . . . . . . . . . . . . . . . . . . |
200 |
|
Using the ripple edit tool in Premiere Pro . . . . . . . . . . . . . . . . . |
201 |
|
Updating an AVI file in Adobe Encore DVD . . . . . . . . . . . . . . . . |
202 |
|
Creating links and behaviors . . . . . . . . . . . . . . . . . . . . . . . . . . . . . . |
203 |
|
Previewing the project . . . . . . . . . . . . . . . . . . . . . . . . . . . . . . . . . . . |
205 |
|
Burning the disc . . . . . . . . . . . . . . . . . . . . . . . . . . . . . . . . . . . . . . . . . |
205 |
|
Review questions . . . . . . . . . . . . . . . . . . . . . . . . . . . . . . . . . . . . . . . . |
206 |
Lesson 09 |
Working with Adobe After Effects |
|
|
Getting started . . . . . . . . . . . . . . . . . . . . . . . . . . . . . . . . . . . . . . . . . . |
212 |
|
Importing a Photoshop menu . . . . . . . . . . . . . . . . . . . . . . . . . . . . |
213 |
|
Modifying a Photoshop file in After Effects. . . . . . . . . . . . . . . . |
215 |
|
Animating a menu file in After Effects . . . . . . . . . . . . . . . . . . . . . |
218 |
|
Rendering a movie in After Effects . . . . . . . . . . . . . . . . . . . . . . . . |
222 |
|
Importing an After Effects movie into Adobe Encore DVD . . |
226 |
|
Activating a motion menu . . . . . . . . . . . . . . . . . . . . . . . . . . . . . . . . |
229 |
|
Editing a file in After Effects . . . . . . . . . . . . . . . . . . . . . . . . . . . . . . . |
230 |
|
Creating links to assets . . . . . . . . . . . . . . . . . . . . . . . . . . . . . . . . . . . |
234 |
|
Burning the DVD . . . . . . . . . . . . . . . . . . . . . . . . . . . . . . . . . . . . . . . . . |
236 |
|
Review questions . . . . . . . . . . . . . . . . . . . . . . . . . . . . . . . . . . . . . . . . |
236 |
PeachpitPress/ScottDesign

ADOBE ENCORE DVD vii
Classroom in a Book
Lesson 10 |
Creating a Slideshow from Still Images |
|
|
Getting started . . . . . . . . . . . . . . . . . . . . . . . . . . . . . . . . . . . . . . . . . . |
240 |
|
Assembling components for a slideshow . . . . . . . . . . . . . . . . . |
242 |
|
Laying out a slideshow menu . . . . . . . . . . . . . . . . . . . . . . . . . . . . |
243 |
|
Copying buttons to other menus . . . . . . . . . . . . . . . . . . . . . . . . . |
246 |
|
Linking menus to each other . . . . . . . . . . . . . . . . . . . . . . . . . . . . . |
247 |
|
Adding audio to a menu . . . . . . . . . . . . . . . . . . . . . . . . . . . . . . . . . . |
250 |
|
Previewing an audio file . . . . . . . . . . . . . . . . . . . . . . . . . . . . . . . . . . |
251 |
|
Setting end actions for slideshow menus . . . . . . . . . . . . . . . . . |
252 |
|
About creating slideshows with timelines. . . . . . . . . . . . . . . . . |
253 |
|
Organizing your assets . . . . . . . . . . . . . . . . . . . . . . . . . . . . . . . . . . . |
254 |
|
Creating a timeline from still images . . . . . . . . . . . . . . . . . . . . . . |
256 |
|
Setting behaviors for a slideshow. . . . . . . . . . . . . . . . . . . . . . . . . |
258 |
|
Previewing the project . . . . . . . . . . . . . . . . . . . . . . . . . . . . . . . . . . . |
260 |
|
Burning the DVD . . . . . . . . . . . . . . . . . . . . . . . . . . . . . . . . . . . . . . . . . |
260 |
|
Review questions . . . . . . . . . . . . . . . . . . . . . . . . . . . . . . . . . . . . . . . . . |
260 |
Lesson 11 |
Adding Audio Tracks and Subtitles |
|
|
Getting started . . . . . . . . . . . . . . . . . . . . . . . . . . . . . . . . . . . . . . . . . . . |
266 |
|
Including audio tracks in a project . . . . . . . . . . . . . . . . . . . . . . . . |
268 |
|
Adding audio tracks. . . . . . . . . . . . . . . . . . . . . . . . . . . . . . . . . . . . . . |
269 |
|
Previewing audio tracks . . . . . . . . . . . . . . . . . . . . . . . . . . . . . . . . . . |
271 |
|
Linking buttons to audio tracks . . . . . . . . . . . . . . . . . . . . . . . . . . . |
272 |
|
Adding a main menu. . . . . . . . . . . . . . . . . . . . . . . . . . . . . . . . . . . . . |
274 |
|
Adding a subtitle track . . . . . . . . . . . . . . . . . . . . . . . . . . . . . . . . . . . |
277 |
|
Modifying the appearance of subtitles . . . . . . . . . . . . . . . . . . . . |
280 |
|
Importing subtitles from a text script . . . . . . . . . . . . . . . . . . . . . . |
283 |
|
About subtitle scripts . . . . . . . . . . . . . . . . . . . . . . . . . . . . . . . . . . . . . |
285 |
|
Linking buttons to subtitle tracks . . . . . . . . . . . . . . . . . . . . . . . . . |
285 |
|
Previewing the project . . . . . . . . . . . . . . . . . . . . . . . . . . . . . . . . . . . |
289 |
|
Burning a DVD . . . . . . . . . . . . . . . . . . . . . . . . . . . . . . . . . . . . . . . . . . . . |
289 |
|
Review questions . . . . . . . . . . . . . . . . . . . . . . . . . . . . . . . . . . . . . . . . . |
289 |
|
Index. . . . . . . . . . . . . . . . . . . . . . . . . . . . . . . . . . . . . . . . . . . . . . . . . . . |
291 |
PeachpitPress/ScottDesign

PeachpitPress/ScottDesign

1
Getting Started
Adobe® Encore™ DVD gives you the tools you need to let you effortlessly create and burn customized DVDs. You can design menus and buttons in Adobe Encore DVD, or use menus and buttons you create in Adobe® Photoshop®. The navigational tools in Adobe Encore DVD give you total control over the viewers’ experience of your DVD. Whether you’re a corporate communications professional or an aspiring videographer, you’ll enjoy the versatility, ease of use, and power of Adobe Encore DVD software.
About Classroom in a Book
Adobe Encore DVD Classroom in a Book® is part of the official training series for Adobe graphics and publishing software developed with the help of experts at Adobe Systems. The lessons are designed to let you learn at your own pace.
Although each lesson provides step-by-step instructions for creating a specific project, there’s room for exploration and experimentation. You can follow the book from start to finish or do only the lessons that correspond to your interests and needs.
Prerequisites
Before beginning to use Adobe Encore DVD Classroom in a Book, you should have a working knowledge of your computer and the Windows operating system. Make sure that you know how to use the mouse and standard menus and commands and that you know how to open, save, and close files. If you need to review these techniques, see the printed or online documentation included with your Windows operating system. It is also helpful, but not necessary, to have experience with Adobe Photoshop, Adobe® Premiere®, and Adobe® After Effects®.
To complete some of the projects, you will need to have Adobe Photoshop, Adobe Premiere Pro, or Adobe After Effects installed on your system.
Note: You can use either Adobe Photoshop 7.0 or Adobe Photoshop CS with Adobe Encore DVD. Where necessary, instructions for each version of Photoshop are written separately.
PeachpitPress/ScottDesign

2
Getting Started
Installing the Adobe Encore DVD program
Before you begin using Adobe Encore DVD Classroom in a Book, make sure that your system is set up correctly and that you’ve installed the required software and hardware. You must purchase the Adobe Encore DVD software separately. For system requirements and complete instructions on installing the software, see the documentation included with your Adobe Encore DVD application DVD.
You must install the application from the Adobe Encore DVD application DVD onto your hard disk; you cannot run the program directly from the DVD-ROM. Follow the onscreen instructions. Make sure the serial number for your Adobe Encore DVD software is accessible before installing the application; you can find the serial number on the back of the DVD case.
Starting Adobe Encore DVD
You start Adobe Encore DVD just as you would any software application. In Windows, choose Start > Programs > Adobe Encore DVD 1.0.
Installing the fonts you’ll use in Classroom in a Book projects
The fonts used in the lessons in this book are included on the Adobe Encore DVD application DVD. Ensure that the fonts are available before you begin working with the lessons. If the fonts are not installed on your system, install them from the Adobe Encore DVD DVD-ROM, following the on-screen instructions.
Copying the Classroom in a Book files
The Adobe Encore DVD Classroom in a Book DVD includes folders containing all the electronic files for the lessons. Each lesson has its own folder, and you must copy the folders to your hard drive to do the lessons. To save room on your drive, you can install only the folder for each lesson as you need it, and remove the folder when you’re done.
To install the Classroom in a Book files:
1Insert the Adobe Encore DVD Classroom in a Book DVD into your DVD-ROM drive.
2Create a folder named Encore_CIB on your hard drive.
3Copy the lessons you want to your hard drive:
PeachpitPress/ScottDesign
ADOBE ENCORE DVD 3
Classroom in a Book
•To copy all the lessons, drag the Lessons folder from the DVD into the Encore_CIB folder.
•To copy a single lesson, drag the individual lesson folder from the DVD into the Encore_CIB folder.
•If you copied all the lessons to your hard drive, double-click the unlock.bat file in the Encore_CIB/Lessons folder.
Note: As you work through each lesson, you may overwrite the original files. To restore the original files, recopy the corresponding lesson folder from the Classroom in a Book DVD to the Encore_CIB folder on your hard drive.
Additional resources
Adobe Encore DVD Classroom in a Book is not intended to replace documentation that comes with the Adobe Encore DVD program. Only the commands and options used in the lessons are explained in this book. For comprehensive information about program features, refer to these resources:
•The Adobe Encore DVD User Guide, which is included with the Adobe Encore DVD software, contains a complete description of all features in the software.
•Online Help, an online version of the user guide, is accessible by choosing Help > Contents from the Adobe Encore DVD title bar.
•The Adobe Web site (www.adobe.com) can be viewed by choosing Help > Adobe Online if you have a connection to the World Wide Web.
Adobe Certification
The Adobe Training and Certification Programs are designed to help Adobe customers improve and promote their product-proficiency skills. The Adobe Certified Expert (ACE) program is designed to recognize the high-level skills of expert users. Adobe Certified Training Providers (ACTP) use only Adobe Certified Experts to teach Adobe software classes. Available in either ACTP classrooms or on-site, the ACE program is the best way to master Adobe products. For Adobe Certified Training Programs information, visit the Partnering with Adobe Web site at http://partners.adobe.com.
PeachpitPress/ScottDesign
1 Creating a Simple DVD
A DVD project includes video files, audio files, and menus. With Adobe Encore DVD, you can easily put the pieces together to create a simple DVD. In this lesson, you’ll learn about the core tools in Adobe Encore DVD as you create a project from start to finish.
PeachpitPress/ScottDesign

8LESSON 1
Creating a Simple DVD
This lesson introduces the Adobe Encore DVD workspace and basic concepts. In it, you will learn how to do the following:
•Create a new project.
•Import files as assets.
•Import a layered Adobe Photoshop file as a menu.
•Create chapter points.
•Link buttons on a menu to chapter points.
•Set start and end behaviors.
•Set menu and title behaviors.
•Preview a DVD project.
•Burn a DVD.
Getting started
In this lesson, you’ll create an Adobe Encore DVD project from start to finish. You’ll create a new project, import the assets and menu for the project, create links and behaviors, preview the DVD, and burn the DVD. Make sure you know the location of the file you need for Lesson 1. For help, see “Copying the Classroom in a Book files” on page 2.
Viewing the finished Adobe Encore DVD project
To see what you’ll be creating, take a look at the finished project.
1Start Adobe Encore DVD.
2Choose File > Open Project.
3In the Open dialog box, navigate to the Lesson 01 folder. Select Lesson_01_end.ncor, and then click Open.
PeachpitPress/ScottDesign

ADOBE ENCORE DVD 9
Classroom in a Book
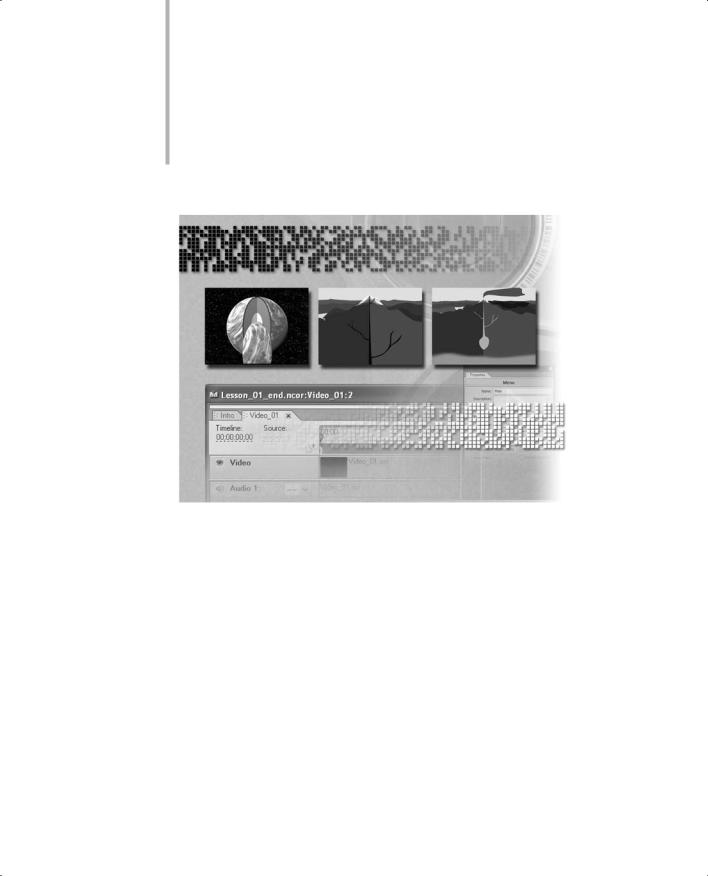
The Adobe Encore DVD workspace opens. By default, only some of the windows shown below are open. The Project window contains the source files used in the finished DVD project. Notice that there are several different types of files in the project. In Adobe Encore DVD, you can work with many types of audio, video, and still image files.
A
B
C
D
Adobe Encore DVD workspace (not all windows and palettes appear at all times) A. Toolbox B. Project window with Menus tab displayed C. Timeline window
D. Palette window E. Menu Editor window for selected menu F. Properties palette
E
F
4 Choose File > Preview.
PeachpitPress/ScottDesign
10LESSON 1
Creating a Simple DVD
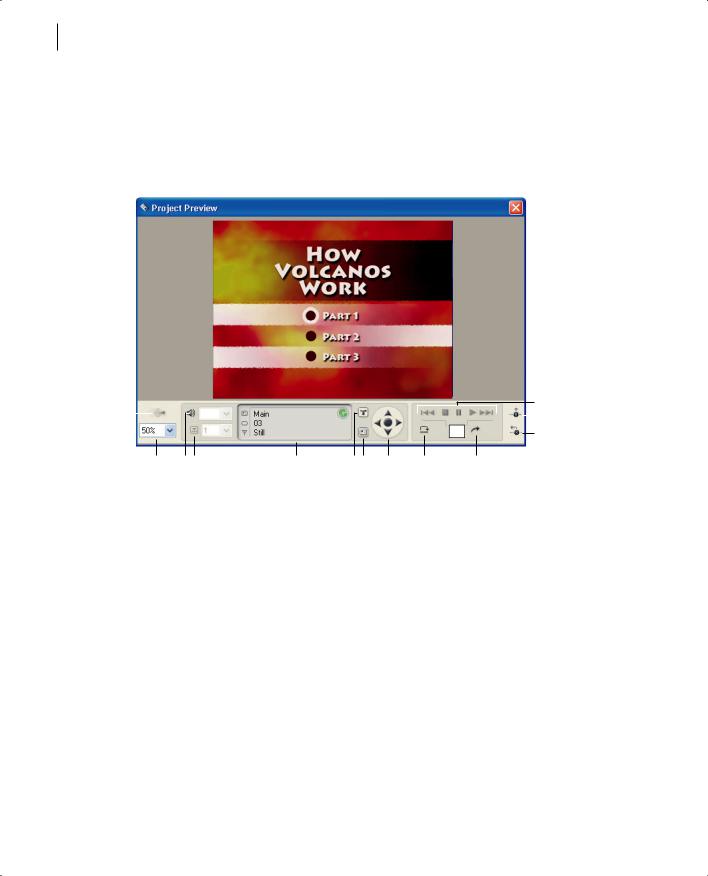
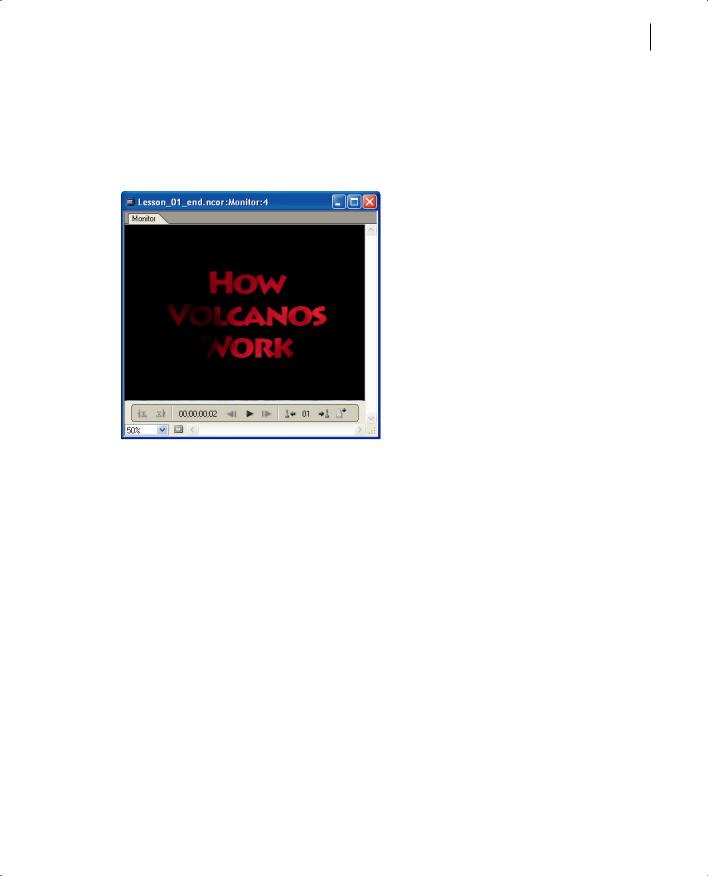
The Project Preview window opens, and a video plays for a few seconds. Then a DVD menu appears. You can use the Project Preview window to preview a viewer’s experience of a DVD project—including navigation, links, and other behaviors—before you burn a disc.
K
A |
|
|
|
|
|
|
|
L |
|
|
|
|
|
|
|||
|
|
|
|
|
M
B C D E F G H I J
Project Preview window
A. Render Current Motion Menu B. Display Area Zoom C. Cycle Through Audio Tracks
D. Cycle Through Subtitle Tracks E. Status Area F. Remote Control Title Button G. Remote Control Menu Button H. Arrow and Enter Keys I. Execute End Action J. Go to Entered Chapter K. Playback Controls
L. Exit Here M. Exit and Return
5Move the cursor over the buttons next to the chapter names. As you move the cursor over a button, a white border appears around it.
6Click the Part 1 button.
A video plays for approximately a minute. There are three distinct parts—or chapters— in the video; the menu links to each of them. When the video has finished playing, the menu reappears.
The Project Preview window has controls that represent those found on a television DVD player’s remote control.
7 Click the up and down arrows until the Part 3 button is highlighted. Then click the Part 3 button.
The third part of the video plays. When it is finished, the menu reappears.
PeachpitPress/ScottDesign
ADOBE ENCORE DVD 11
Classroom in a Book
8 Close the Project Preview window and the Lesson_01_end Project window.
Planning your DVD
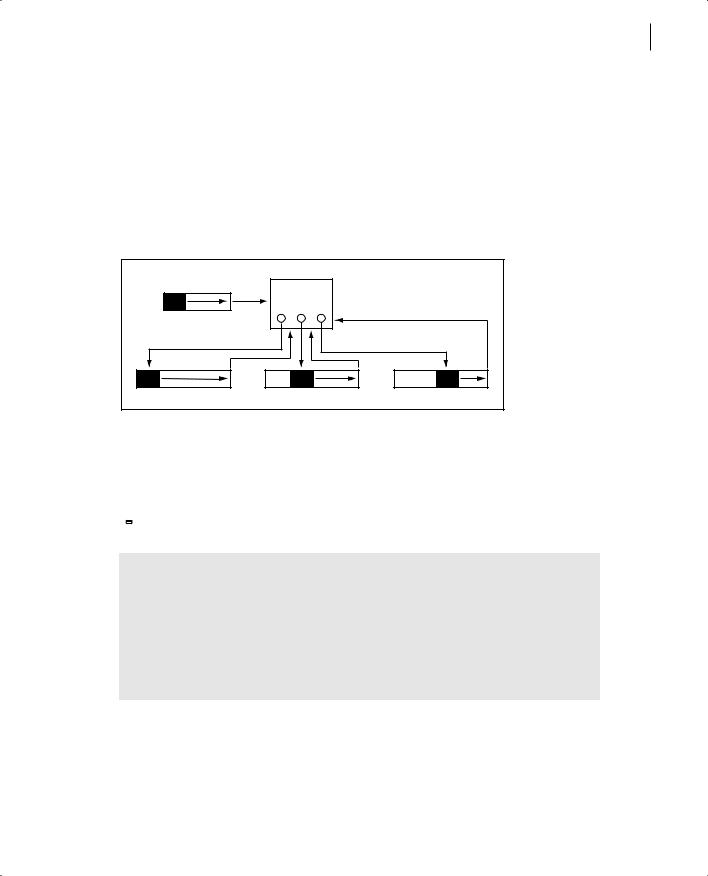
Now you’ll create the same DVD project you just previewed. You will import video and audio files as assets, and a layered Photoshop file as a menu. Following the organization shown in the diagram below, you will create links from buttons to chapter points in the video timeline, and then set behaviors for those links.
B
A
C D E
The Introduction timeline (A) plays when the DVD is inserted, and then the Main menu (B) opens. When the first button is activated, the Video_1 timeline (C) plays from beginning to end, and then the Main menu reappears. When the second button is activated, the Video_1 timeline plays from the Chapter 2 marker (D) to the end, and then the Main menu reappears. When the third button is activated, the Video_1 timeline plays from the Chapter 3 marker (E) to the end, and then the Main menu reappears.
 You might find it helpful to organize your project with simple flow charts.
About flow charts
Regardless of the complexity of the project, it is helpful to work through the flow of your project and determine how the elements should link together before you begin creating it. Some DVD authors use flow charts, and some use spreadsheets. However you choose to plan your project, it is valuable to draft possible navigation scenarios and anticipate problems before you start. Sketching each of the elements and drawing the links between them can help you clarify how you want your project to be viewed.
PeachpitPress/ScottDesign
12LESSON 1
Creating a Simple DVD
Importing files as assets
You can use a variety of video, audio, and still image files in Adobe Encore DVD. You can import files into an Adobe Encore DVD project as either assets or menus. Assets are the files that make up the content of the DVD; menus display options to give viewers access to that content. First, you’ll create a new Adobe Encore DVD project.
1Choose File > New Project. Click OK to accept NTSC as the television standard. A new Project window appears. Now you’ll import assets into the Project window.
2Choose File > Import as Asset.
3In the Import as Asset dialog box, navigate to the Lesson 01 folder on your hard drive. Then hold down the Ctrl key while you select Intro.m2v, Intro.wav, and Video_01.avi. (Holding down the Ctrl key lets you select multiple files at once.)
4Click Open.
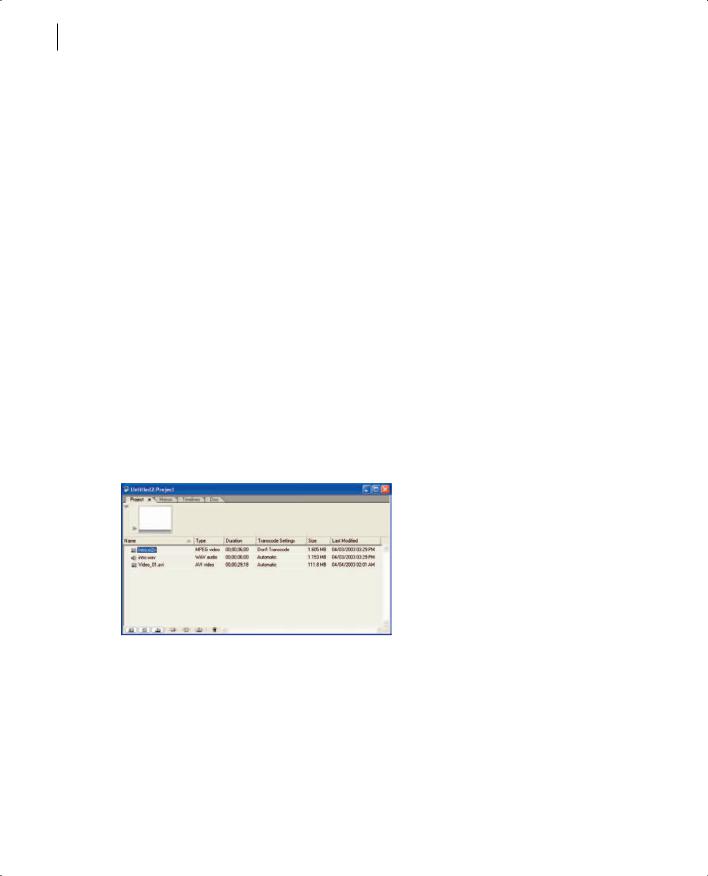
The files you selected appear in the Project window.
5 Resize the Project window or move the scroll bar at the bottom of the window to view information about the files you imported. By default, the Project window displays the name, file type, size, path, and transcode settings for each file.
6 Choose File > Save As to save the project. Name it Lesson_01.ncor.
Creating a timeline
In Adobe Encore DVD, you assemble video, audio, and subtitle assets into timelines, where you can identify different sections of the video using chapter points. Each timeline contains a single video track. Start the project by creating a timeline for the Intro video.
PeachpitPress/ScottDesign
ADOBE ENCORE DVD 13
Classroom in a Book
1 Choose Timeline > New Timeline.
An untitled Timeline window appears, and the Monitor window opens. Notice that the untitled timeline is also listed in the Project window.
A B C
D
E
F
G
H
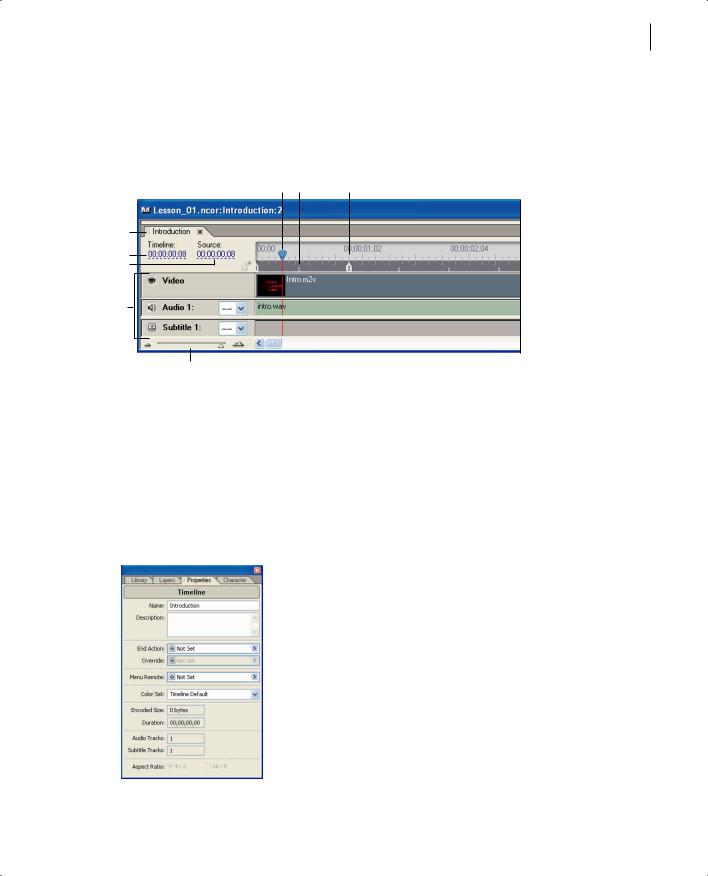
The Timeline window
A. Current-time indicator B. I-Frames C. Chapter point D. Timeline tabs E. Timeline F. Source
G. Tracks H. Zoom slider
You’ll need to name the timeline. The Properties palette displays the attributes for the item currently selected. If the Properties palette isn’t open, choose Window > Properties.
2 In the Name field of the Properties palette, type Introduction. (If you see attributes for something other than the timeline, click in the Timeline window to make the timeline active.)
PeachpitPress/ScottDesign
14LESSON 1
Creating a Simple DVD
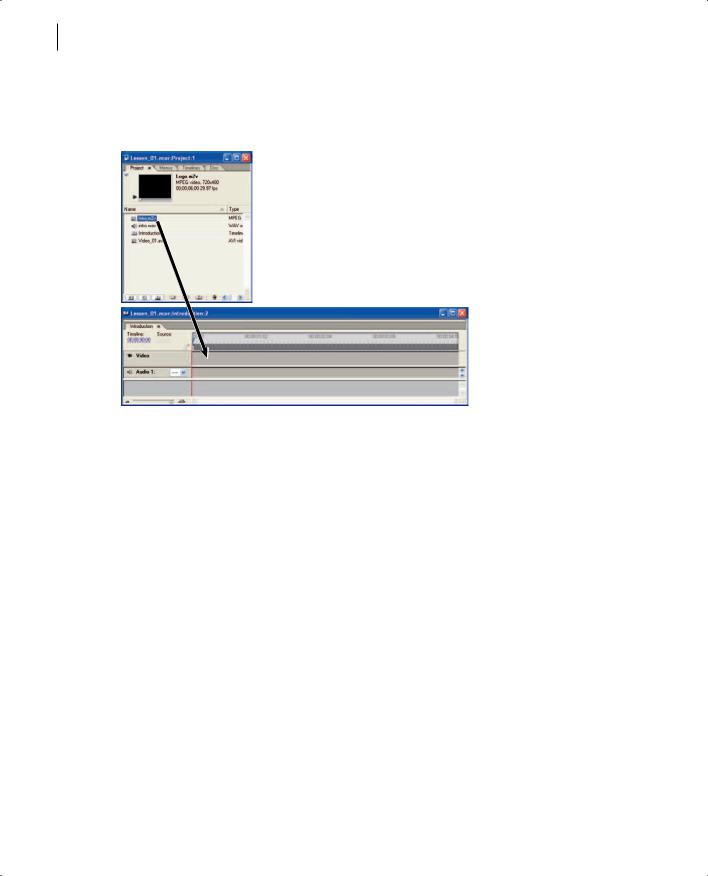
3 Select the Intro.m2v file in the Project window, and drag it onto the video track in the Timeline window.
4 Select the Intro.wav file in the Project window, and drag it onto the Audio 1 track in the Timeline window.
PeachpitPress/ScottDesign
ADOBE ENCORE DVD 15
Classroom in a Book
You can view the current timeline in the Monitor window. Unlike the Project Preview window, the Monitor window displays only the video and audio tracks in the timeline; it does not display the DVD behavior. The Monitor window opens when you create a timeline.
5 Click the Play button ( ) in the Monitor window.
The introductory video plays for about eight seconds, and then ends.
6 Save the project.
Adding chapter points
Chapter points identify locations in the video track to which you want to link buttons or other navigational behaviors. You can add chapter points in the Timeline window.
In this project, you want to create links to three different chapter points in the Video_01 clip, so you need to add chapter points to the clip. First, you will create a new timeline for the Video_01.avi clip.
1 In the Project window, select the Video_01.avi file, and then click the Create a New Timeline button ( ) at the bottom of the Project window.
Adobe Encore DVD creates a new timeline named Video_01, and places the Video_01.avi file in the video and audio tracks.
PeachpitPress/ScottDesign
16LESSON 1
Creating a Simple DVD
A tab appears at the upper-left side of the Timeline window for each timeline in the project. Click a tab to view the corresponding timeline. For example, if you click the Introduction tab, the Introduction timeline appears.
2Click the Video_01 tab to make sure the Video_01 timeline is active. Then click the Play button in the Monitor window to view the video. When it has finished, leave the Monitor window open.
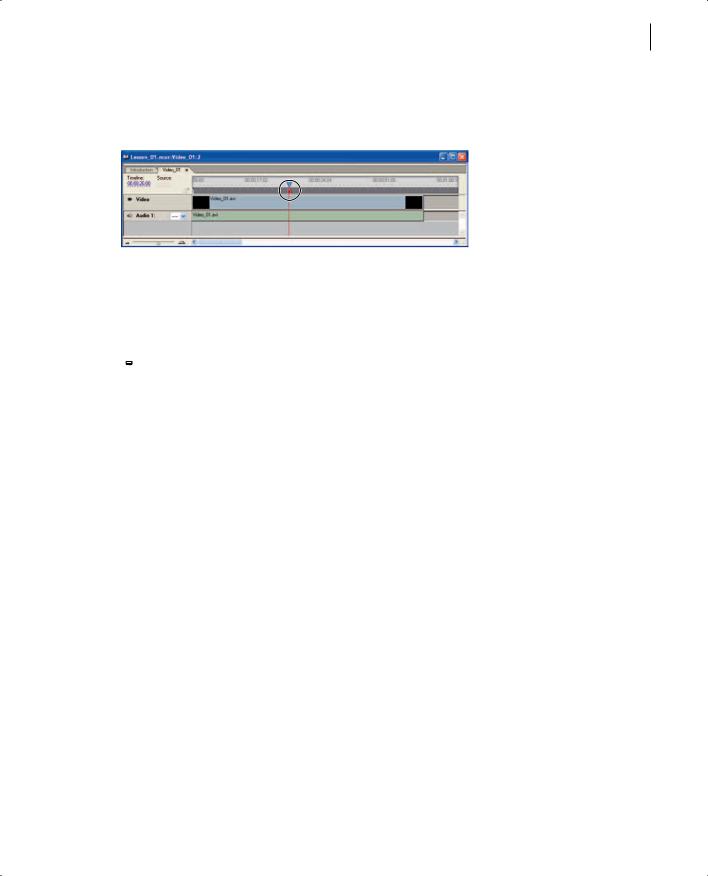
3Move the current-time indicator to the left edge of the timeline. The time displayed should be 00:00:00:00.
An initial chapter point is automatically created at the beginning of every timeline (that is, at 00:00:00:00).
4 In the Timeline window, move the current-time indicator to the right until the time display shows 00:00:26:00.
To position the current-time indicator quickly, move the scroll bar at the bottom of the Timeline window until the destination time is visible. Then click on the time graph.
5 Choose Timeline > Add Chapter Point.
PeachpitPress/ScottDesign
ADOBE ENCORE DVD 17
Classroom in a Book
A chapter point marker with the number 2 appears on the timeline at 00:00:26:00, where the current-time indicator is positioned. The marker is automatically numbered.
6 In the Timeline window, move the current-time indicator to the right until the time displayed is 00:00:48:00. Then choose Timeline > Add Chapter Point again.
A marker with the number 3 appears on the timeline at 00:00:48:00.
 You can also add a chapter point by pressing the asterisk key. This is a great way to add chapter points that correspond with audio cues.
7 Close the Timeline window and save the project. (The Monitor window closes automatically when you close the Timeline window.)
Importing a layered Photoshop file as a menu
One of the most powerful features of Adobe Encore DVD is its ability to import menus created in Photoshop. If you use Adobe Encore DVD naming conventions for layers in a Photoshop image, those layers remain intact when you import the file as a menu. You can make many changes and additions to the file directly in Adobe Encore DVD.
In this lesson, you’ll import a Photoshop image that has already been created with layers using the Adobe Encore DVD naming conventions.
1Choose File > Import as Menu.
2In the Import as Menu dialog box, select Main.psd, and click Open.
PeachpitPress/ScottDesign
18LESSON 1
Creating a Simple DVD
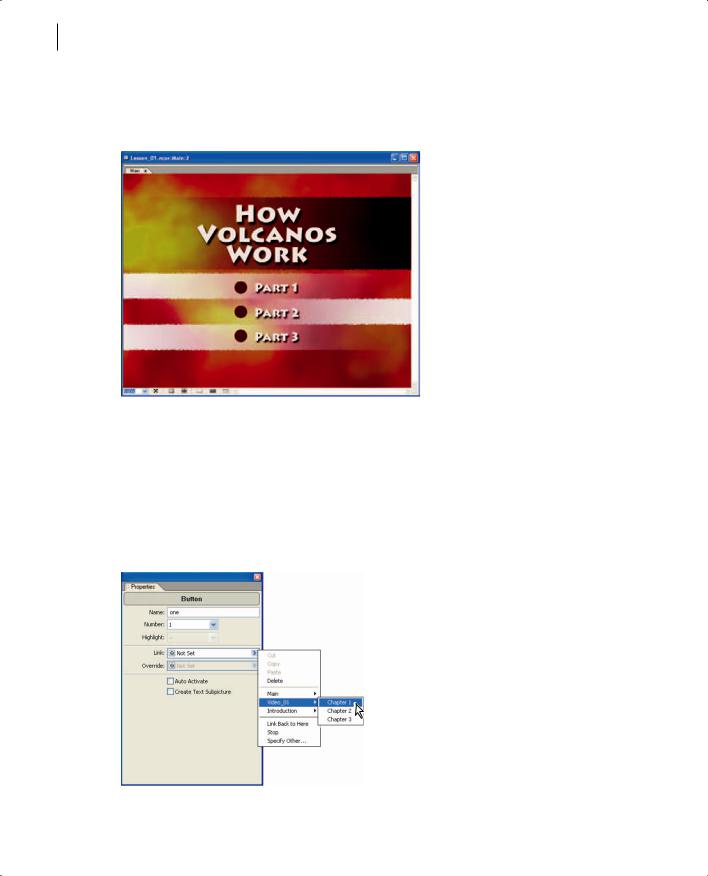
The Menu Editor window opens, displaying the Main menu you imported. The Photoshop layers are intact. To see them in the Layers palette, choose Window > Layers.
3 Select the selection tool (  ) in the toolbox. Then select Part 1 in the Menu Editor window.
A bounding box appears around the button and the text “Part 1.”
4If the Properties palette is not open, choose Window > Properties to open it. The Button Name field shows the name of the button: One.
5Choose Video_01 > Chapter 1 from the Link pop-up menu.
PeachpitPress/ScottDesign
ADOBE ENCORE DVD 19
Classroom in a Book
When the viewer clicks the Part 1 button on the DVD, Video_01 will play, beginning with the first chapter point, which was automatically created at the beginning of the timeline.
6With the selection tool, select Part 2 in the Menu Editor window. In the Properties palette, choose Video_01 > Chapter 2 from the Link pop-up menu.
7Using the same procedure, link the Part 3 button to Video_01 > Chapter 3.
8Save the project.
Setting start and end behaviors
You have set links that viewers can use to start playing the video at specific chapter points. Now you need to define the sequences that aren’t controlled by the viewer. For example, you need to determine which timeline or menu runs when the DVD is first inserted into the player, and which timeline or menu follows it.
For this project, you want the Introduction timeline to run when the viewer inserts the DVD. When it has finished playing, the main menu should appear.
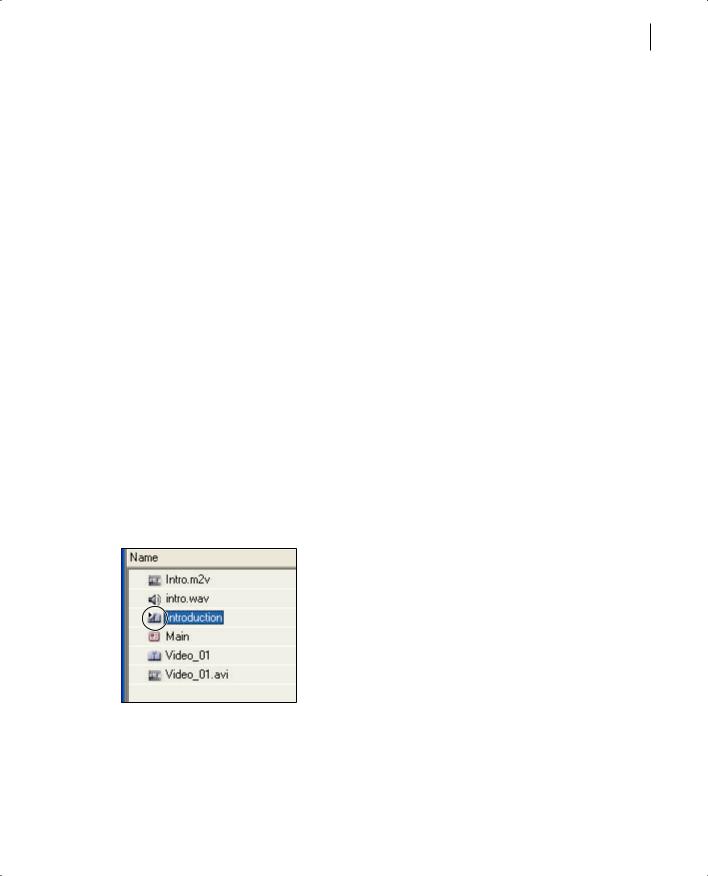
1 In the Project window, select the Introduction timeline.
On the icon next to the Introduction timeline is a small circle with an arrow in it (  ). This symbol indicates that this item plays first when the DVD is inserted into the player.
Note: If the symbol doesn’t appear on the icon next to the Introduction timeline, right-click the Introduction timeline in the Project window, and choose Set as First Play.
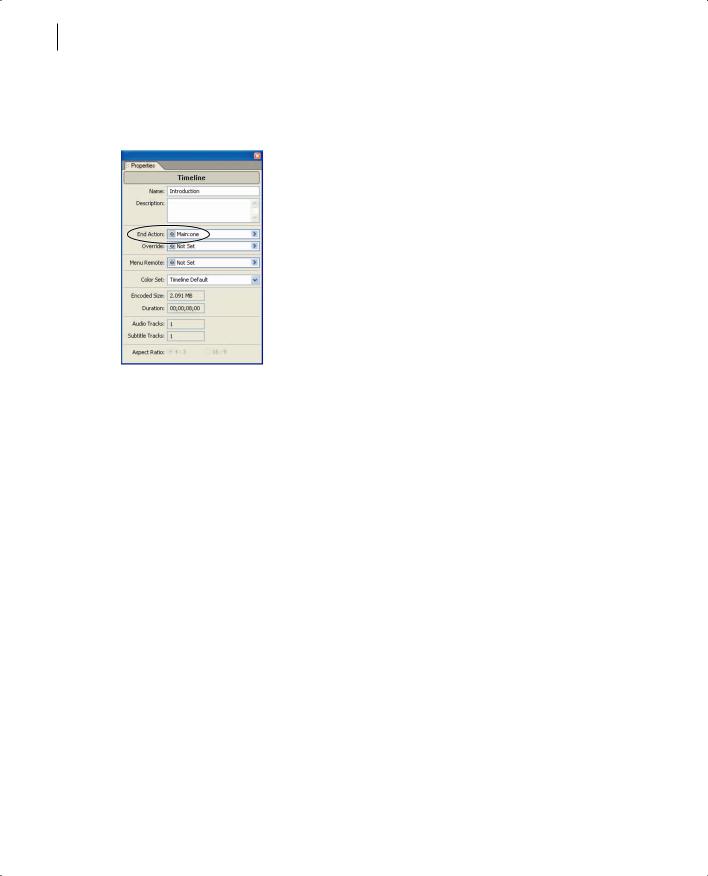
2 In the Properties palette, choose Main > One from the End Action pop-up menu.
PeachpitPress/ScottDesign
20LESSON 1
Creating a Simple DVD
When the Introduction timeline has finished playing, the Main menu will appear. The Part 1 button will be selected by default.
3 In the Project window, select the Video_01 timeline.
Note: Make sure you select the Video_01 timeline, and not Video_01.avi.
4 In the Properties palette, choose Main > One from the End Action pop-up menu.
When Video_01 has finished playing, the Main menu will appear. The Part 1 button will be selected by default.
5 Save the project.
Setting behaviors for remote control buttons
Next, you will define the behaviors for the Title and Menu buttons on a DVD player’s remote control.
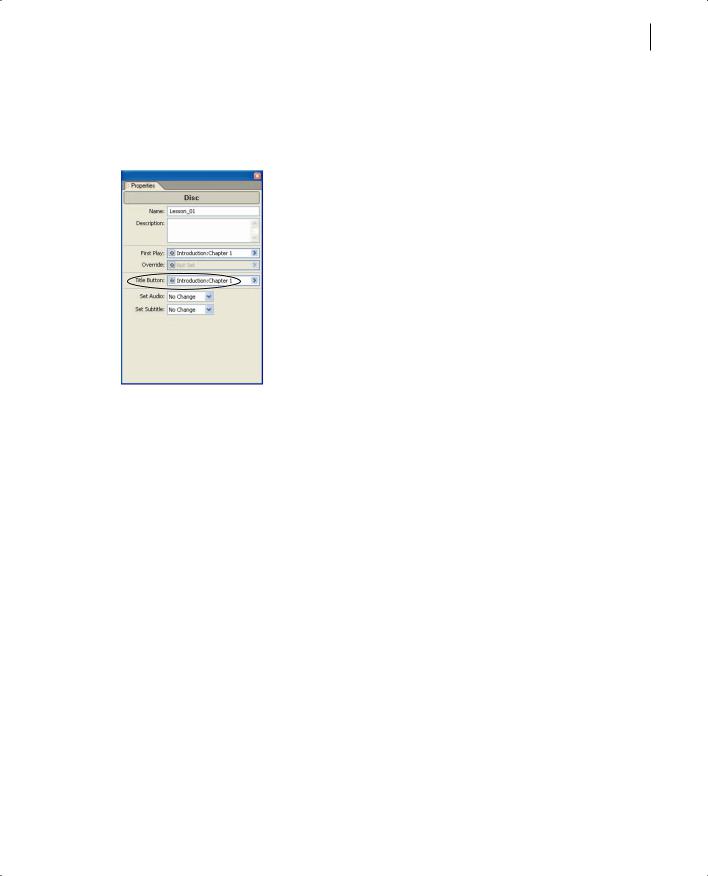
1In the Project window, click an empty space to deselect all assets, timelines, or menus. The Disc attributes should appear in the Properties palette.
2In the Properties palette, choose Introduction > Chapter 1 from the Title Button popup menu.
PeachpitPress/ScottDesign
ADOBE ENCORE DVD 21
Classroom in a Book
If the viewer clicks the Title button on the DVD player’s remote control, the Introduction timeline will play. This setting is for the entire disc, no matter what is showing when the Title button is pressed.
3 Select the Introduction timeline in the Project window. In the Properties palette, choose Main > One from the Menu Remote pop-up menu.
If the viewer clicks the Menu button on the DVD player’s remote control while the Introduction timeline is playing, the Main menu will appear, with the Part 1 button selected.
4 In the Project window, select the Video_01 timeline. In the Properties palette, choose Main > One from the Menu Remote pop-up menu.
If the viewer clicks the Menu button on the DVD player’s remote control while the Video_01 timeline is playing, the Main menu will appear, with the Part 1 button selected.
5 Save the project.
Previewing the project
Before burning your DVD project to a disc, it’s a good idea to make sure the project works as you expect it to. When you preview the DVD, you can test its sequencing and navigation, interacting with the DVD exactly as your audience will. The Project Preview window behaves just as if a disc has been inserted into a DVD player.
1 Choose File > Preview.
PeachpitPress/ScottDesign

22LESSON 1
Creating a Simple DVD
If the project is configured correctly, the Introduction timeline plays in the Project Preview window. When it has finished playing, the Main menu appears, and the Part 1 button is highlighted.
2Click a button in the Main menu. The video should play from the appropriate chapter point, and then the Main menu should reappear, with the Part 1 button selected. Click each button to ensure that the video begins playing at the appropriate chapter point.
3While the video is playing, click the Menu button (  ) at the bottom of the Project Preview window. The Main menu should appear.
4While the video is playing, click the Title button (  ) at the bottom of the Project Preview window. The Introduction timeline should play.
5Click the Exit and Return button (  ) to close the Project Preview window and return to your project.
 If you want to go directly from the Project Preview window to the timeline or menu currently displayed, click the Exit Here button (
  ).
).
If the DVD project didn’t behave as described above, return to the project and correct the behavior. Preview the DVD again to ensure that it behaves as expected before continuing.
Burning the DVD
You’re ready to burn the DVD!
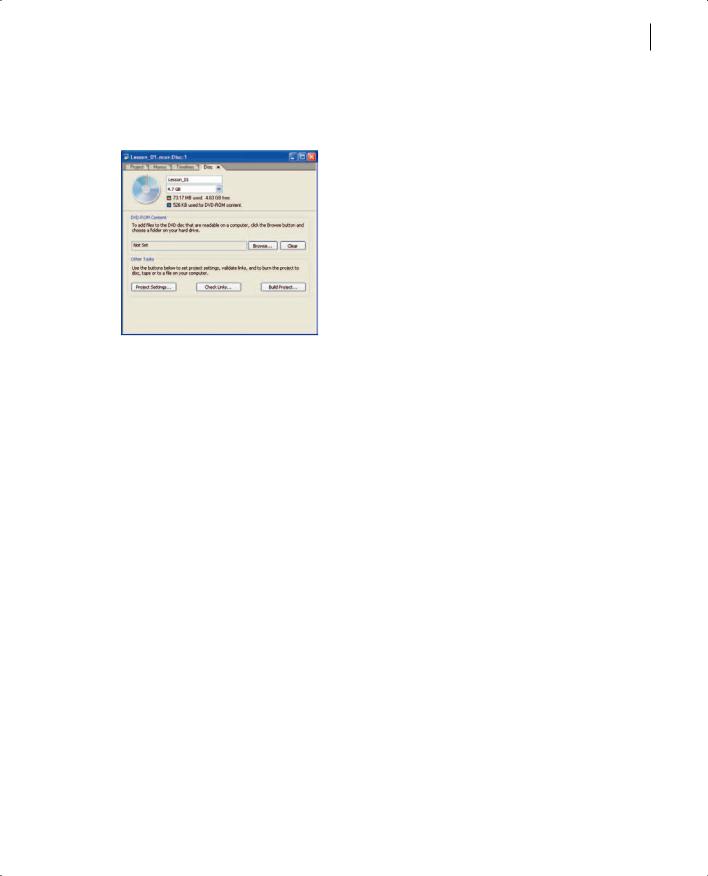
1 In the Project window, click the Disc tab.
PeachpitPress/ScottDesign
ADOBE ENCORE DVD 23
Classroom in a Book
The Disc tab lists the disc name, the space available on the disc, the type of media, and other information.
2From the pop-up menu beneath the disc name, choose the data size of the disc you’ll be burning.
3Click Build Project.
4In the Make DVD Disc dialog box, choose Current Project from the Create Using popup menu, and choose your DVD recorder from the Recorder pop-up menu.
If your recorder is not listed, verify that it is properly connected and installed. See the documentation for your recorder for assistance.
5 Insert a blank disc into the recorder, and click Next.
Note: If you click Next too quickly, you may see a Device Not Ready dialog box. Click OK to let your computer recognize the disc you inserted.
6 Review the information in the Make DVD Disc Summary dialog box. When you are ready to proceed, click Build.
Burning the disc may take several minutes, depending on the DVD recorder, the computer system, and the size of the media.
Review questions
1What does the Project window show?
2What is the difference between an imported asset and an imported menu?
3Why would you create a chapter point?
PeachpitPress/ScottDesign

24LESSON 1
Creating a Simple DVD
4 How does the Monitor window differ from the Project Preview window?
Review answers
1The Project window shows information about the assets, menus, timelines, and other objects included in the project.
2An imported asset is used as content on the DVD. An imported menu is used as a menu from which viewers can navigate to content.
3Create a chapter point to define a location in a video track to which you want to link a menu button or attach a behavior.
4The Monitor window displays only the selected video track. The Project Preview window plays the entire DVD project, as if you were viewing it on a television DVD player.
PeachpitPress/ScottDesign
2Creating Menus in Adobe Encore DVD
Menus are the key to most DVD projects. Adobe Encore DVD provides all the tools you need to create menus without ever leaving the application. In this lesson, you'll type directly onto menus, import backgrounds, add buttons, and more.
PeachpitPress/ScottDesign
Loading...