


 Loading...
ADOBE® MEDIA ENCODER
Help and tutorials
April 2014
Contents |
|
What’s new................................................................................................................................................... |
1 |
What’s new in Adobe Media Encoder CC 7.1 and CC 7.2..................................................................................................... |
2 |
What’s New in Adobe Media Encoder CC.............................................................................................................................. |
5 |
What’s New in Adobe Media Encoder CS6.......................................................................................................................... |
11 |
Encoding quick start and basics................................................................................................................. |
21 |
Overview of Adobe Media Encoder...................................................................................................................................... |
22 |
Encoding quick start............................................................................................................................................................. |
25 |
Using the Preset Browser..................................................................................................................................................... |
26 |
Add and manage items in the encoding queue.................................................................................................................... |
30 |
File formats supported for import.......................................................................................................................................... |
34 |
Custom presets..................................................................................................................................................................... |
36 |
Working with log files............................................................................................................................................................ |
38 |
File formats supported for export.......................................................................................................................................... |
39 |
AME keyboard shortcuts....................................................................................................................................................... |
41 |
Default keyboard shortcuts................................................................................................................................................... |
42 |
About video and audio encoding and compression.............................................................................................................. |
47 |
Compression tips.................................................................................................................................................................. |
50 |
Preferences.......................................................................................................................................................................... |
51 |
Encoding and exporting.............................................................................................................................. |
53 |
Sync Settings........................................................................................................................................................................ |
54 |
Export settings reference...................................................................................................................................................... |
56 |
Encode and export video and audio..................................................................................................................................... |
67 |
Custom presets..................................................................................................................................................................... |
70 |
Managing the media cache database................................................................................................................................... |
72 |
Working with cue points for FLV and F4V video files........................................................................................................... |
73 |
What's new
1
What's new in Adobe Media Encoder CC 7.1 and CC 7.2
This article describes the new and changed features in Adobe Media Encoder CC 7.2 and CC 7.1 releases. See this document for information on changes in the Adobe Media Encoder CC 7.0 release.
Enhancements in Adobe Media Encoder 7.2
Changes in AME 7.1
Improvements to AVCI-Intra export
GPU acceleration
DNxHD presets
Interpret footage
Native Premiere Pro and Prelude project loading
FCP XML import
Sync settings
Effects settings
To the top
Enhancements in Adobe Media Encoder 7.2
The Adobe Media Encoder 7.2 release now supports Dolby Digital Plus audio encoding through SurCode. This new option is available in any H.264 and MPEG-2 encoders. Set the multiplexer option to "MP4", "TS", or "None". Note that Dolby Digital Plus audio is for external use only. For now, no Adobe application can import this format.
H.264 export now allows you to mutiplex MP3 and Dolby audio in addition to AAC audio. In previous releases, you could only multiplex AAC audio.
Vimeo presets are now set to use 48kHz audio per Vimeo's recommended specifications.
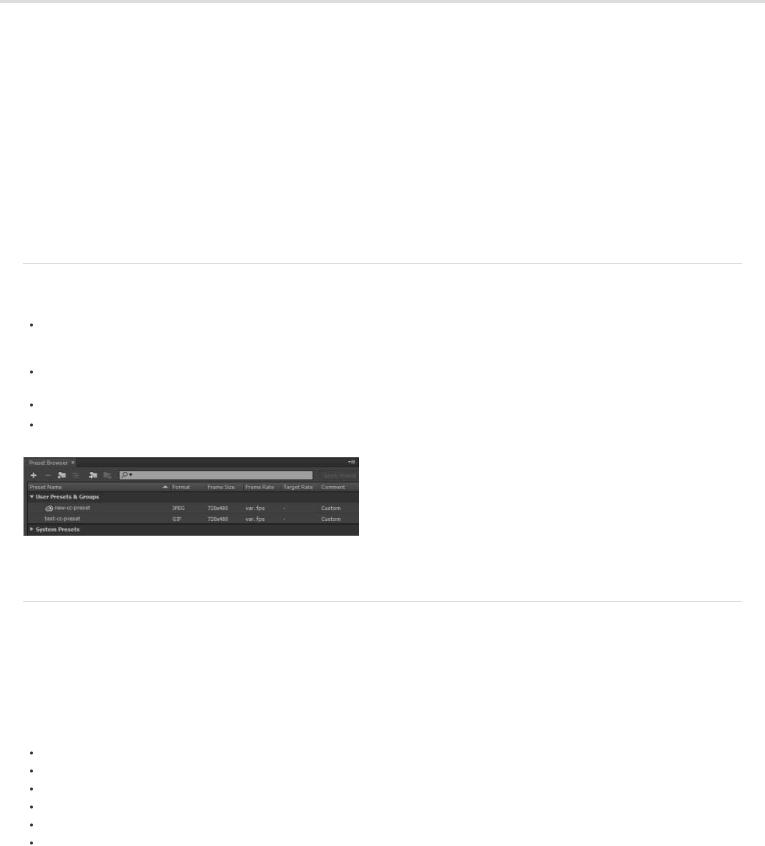
Presets synced to the cloud now show a CC icon  in the Preset Browser, which differentiates them from presets saved locally.
To the top
Changes in AME 7.1
Improvements to AVCI-Intra export
The export performance of MXF OP1a AVCI has been greatly improved. AME now uses the MainConcept AVCI codec for this format and as a result the files are rendered faster. The following options have been added:
AVCI100 1080p50
AVCI100 1080p60
AVCI200
XAVC Intra HD (1020x1080)
XAVC Intra 4K(3840x2160)
XAVC Intra 4K(4096x2160)
All of the above formats can be exported using smart rendering. For more information about smart rendering, see this Premiere Pro article.
2

GPU acceleration
Adobe Media Encoder now takes advantage of GPU for rendering purposes. Both CUDA and OpenCL are supported. The latest release of AME uses the GPU for the following renders:
Scaling (HD to SD; SD to HD)
Timecode filter
Pixel format conversions
Deinterlacing
Aspect ratio changes
All effects in the Effects tab
GPU accelerated effects in Premiere Pro
If you are rendering a Premiere Pro sequence, Adobe Media Encoder will use the GPU render preference you have set for the project. All GPU rendering capabilities of Premiere Pro are utilized. The limited set of GPU renderable tasks in Adobe Media Encoder is only for renders that originate in Adobe Media Encoder.
If you are rendering a sequence with native sequence support, the GPU setting in AME is used and the project setting is ignored. In this case, all GPU rendering capabilities of Premiere Pro are utilized directly in AME.
If your project uses 3rd party VSTs (Virtual Studio plugins), the GPU setting in the project is used. The sequence is encoded through headless Premiere Pro just as in earlier versions of Adobe Media Encoder. If Enable Native Premiere Pro Sequence Import option is unchecked, headless Premiere Pro will always be used and the GPU setting is used.
DNxHD presets
DNxHD MXF OP 1a presets have been renamed to better align with how Avid resolutions are named in other applications. Due to this change, DNxHD presets imported from previous versions of AME CC may not match the newer versions.
Interpret footage
Frame rates that are set lower than the default rate within the Interpret Footage dialog box now properly render a smooth succession of frames. Earlier versions of Adobe Media Encoder would improperly repeat the last frame to fill the end of the clip.
Native Premiere Pro and Prelude project loading
AME now loads Premiere Pro and Prelude projects natively which means that the headless version of Premiere Pro is not required and also the projects are loaded faster. Use this default option when you want to import a Premiere Pro sequence comprising of Red(.r3d)files that are stored on a Red Rocket card into Adobe Media Encoder.
Note: Red Rocket can be used by only one application at a time.
Note: If a Premiere Pro sequence contains offline media, you will be notified before encoding begins. Offline media cannot be relinked using AME. If your project has offline media, relink it in Premiere Pro before importing it in AME.
FCP XML import
Final Cut Pro (FCP) XML files can now be imported in Adobe Media Encoder. There is no mechanism for relinking the media. If you want to relink the media, open the project in Premiere Pro first.
FCP XML files from FCPX are different from the original FCP XML files and are not imported at this time.
Sync settings
3

AME now supports Sync Settings, a feature found in several Creative Cloud applications including Adobe Premiere Pro and After Effects. If you work on Creative Cloud applications on two machines, you probably want to maintain the same application settings on both your machines. Through the Sync Settings feature, you can upload the settings to your Creative Cloud account from one machine and download and apply them on your second machine.
The following settings can be synced to the Creative Cloud:
1.Application Preferences
2.Workspace Layout
3.Keyboard Shortcuts
4.User Presets
See the Sync Settings in AME article for detailed information.
Effects settings
The following new effects have been added to the Effects tab in the Export Settings dialog box:
Lumetri Look (SpeedGrade .look and LUT)
Image Overlay
Name Overlay
Timecode Overlay
See the article on Effects settings for detailed information about each of the effects.
Effect settings are automatically included in presets unless you disable the Save Effect Settings checkbox when saving a preset. GPU acceleration helps to speed up all the new effects.
Note: The Effects tab replaces the Filters tab found in previous versions of AME. The Gaussian Blur filter has also been removed.
 Twitter™ and Facebook posts are not covered under the terms of Creative Commons.
Legal Notices | Online Privacy Policy
4

What's New in Adobe Media Encoder CC
Adobe® Media Encoder CC offers new features and enhancements for an enhanced video encoding experience. Read on for a quick introduction to new features with links to resources offering more information.
Match Source presets
Exporting Closed Caption data
Import and export of Avid DNxHD assets
Updated MPEG-2 exporters
Enhancements to SurCode for Dolby Digital audio codec
Closer integration with After Effects
Other changes
Also, read this blog post by Adobe's Kevin Monahan for a look at some of the top new features in this release.
To the top
Match Source presets
When exporting video files in H.264 or MPEG-2 format, Adobe Media Encoder lets you automatically match the video settings of the source file using Match Source presets. Selecting a Match Source preset automatically activates the appropriate options in the Video settings tab in the Export Settings dialog.
Adobe Media Encoder provides the following two Match Source presets for both H.264 and MPEG-2 exporters:
Match Source - High bit rate: for High-Definition (HD) video sources. This preset is the default Match Source preset for both H.264 and MPEG-2 exporters.
Match Source - Medium bit rate: for Standard-Definition (SD) video sources.
Match Source presets are useful when you want to pass a few video attributes from the source, and select specific values for the other attributes. You can save the Match Source setting as a new preset and apply them to any source in the Queue or Watch Folder panels.
For example, say, you have a Watch Folder containing assets with varying frame sizes and frame rates. You want to convert all the assets in the Watch Folder to a single format at 24 fps. To do so, create a preset with source-matching enabled for all properties except Frame Rate, which is set to 24 fps.
Match source while exporting H.264 and MPEG-2 videos
1.In Adobe Media Encoder, select Edit > Export Settings.
2.In the Export Settings dialog box, select the Video tab.
3.Click Match Source to turn on source-matching. Source-matching is turned on for the following basic video settings:
Frame Size
Frame Rate
Field Order
Aspect ratio
5
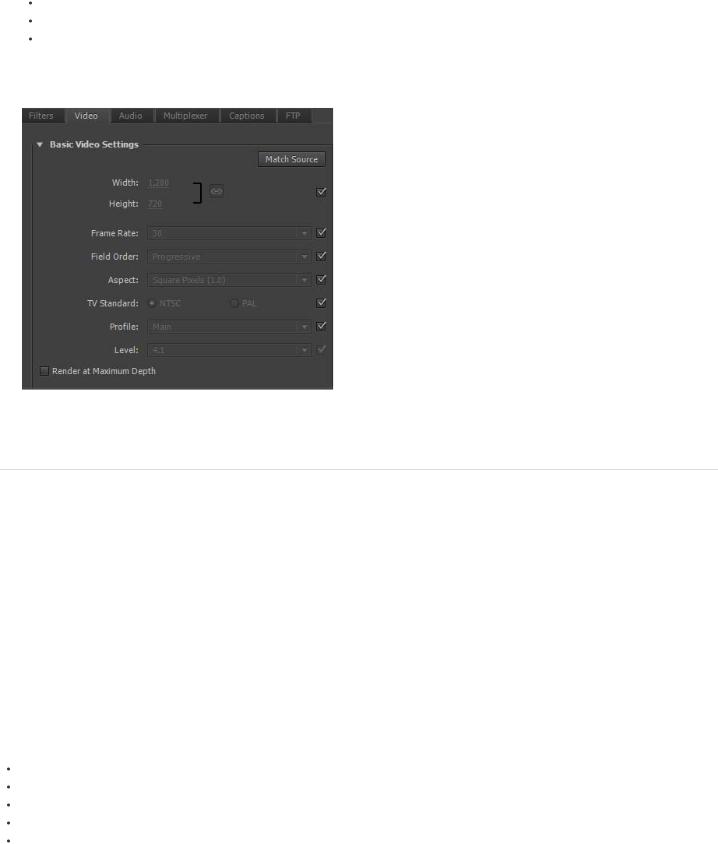
TV Standard
Profile
Level
You can choose to turn source matching on and off for individual properties by clicking the checkbox next to each property. Deselecting a Match Source shows you the matching source value for each setting, and lets you edit the value as required.
Match Source settings
To the top
Exporting Closed Caption data
Closed captions are typically used to display the audio portion of a video as text on televisions and other devices that support the display of closed captions.
Adobe Media Encoder can export closed caption tracks from Premiere Pro sequences as a separate "sidecar" file that contains the caption data. For QuickTime exports, you can choose to export the data either as a separate sidecar file, or embed the data within the output file.
For more information on exporting closed caption data from Adobe Premiere Pro through Adobe Media Encoder, see Closed Captioning, and watch this video:
Export Closed Caption data using the Export Settings dialog box
The new Captions tab in the Export Settings dialog box lets you specify the format and the frame rate while exporting closed caption data. The frame rate options depend on the file format that you choose while exporting.
Adobe Media Encoder provides you the following sidecar formats:
Scenarist Closed Caption File (.scc) - CC Standards: CEA-608
MacCaption VANC File (.mcc) - CC Standards: CEA-608 or CEA-708
SMPTE Timed Text (.xml) - CC Standards: CEA-608 or CEA-708
EBU Timed Text (.xml) - CC Standards: Teletext
EBU N19 Subtitle (.stl) - CC Standards: Teletext
6

Closed captions export options
1. Queue a Premiere Pro sequence with closed caption data by doing one of the following:
In Premiere Pro, select File > Export > Media.
 Load a closed caption asset in the Source Monitor or select it in the Project panel. Then, select File > Export > Media. In the Export Settings dialog box, click Queue to send the sequence into the Adobe Media Encoder queue.
Alternatively, you can also drag and drop the sequence from Premiere Pro into the Queue panel in Adobe Media Encoder.
2.In Adobe Media Encoder, select Export Settings from the file's context menu.
3.In the Export Settings dialog box, select the Captions tab.
4.Select the Export Option as:
Create Sidecar File, or
Embed in Output File (QuickTime movies only).
If you choose not to export the closed caption data, select None.
5.You can specify the file format for the sidecar file. The frame rate options that are provided depend on the sidecar file format that you choose.
To the top
Import and export of Avid DNxHD assets
Avid DNxHD is a codec that is used in several non-linear video editing systems. It can be used as an itermediate format while editing. To learn more about the Avid DNxHD codec, see this article from Avid.
Easy import and export of DNxHD assets
Adobe Media Encoder can import and export Avid DNxHD assets without having to install additional codecs. You can import DNxHD assets in the following formats:
MXF (MXF OP1a and MXF Op-Atom variants)
QuickTime (with uncompressed alpha channel)
You can also encode any source to the DNxHD MXF format (MXF OP1a variant).
New DNxHD MXF presets
Several DNxHD MXF presets have been added to Adobe Media Encoder. They are available in the Presets Browser under the Broadcast category.
DNxHD presets are available as 8 bits per channel or 10 bits per channel depth. The 8-bit depth variants are in YUV color space. The 10-bit depth variants can either be in YUV or RGB color space. Presets with "X" in their name denote a 10-bit depth.
See also:
7
Import and export assets using Adobe Media Encoder
To the top
Updated MPEG-2 exporters
Adobe Media Encoder has updated MPEG-2, MPEG-2 Blu-ray, and MPEG-2-DVD export formats.
The updates include performance enhancements and the following user interface changes:
Note: There are no changes to the functionality of these exporters.
To give a unified appearance across exporters, the order of fields is adjusted to match the layout of H.264 and other newer exporters.
The Quality slider now has a range of 0-100 (earlier range was 1-5). Approximate values in the new range can be calculated as 1=0, 2=25, 3=50, 4=75, 5=100.
 To import MPEG-2 presets from a CS6 version, you need to re-create the presets manually. You cannot import the presets directly.
To the top
Enhancements to SurCode for Dolby Digital audio codec
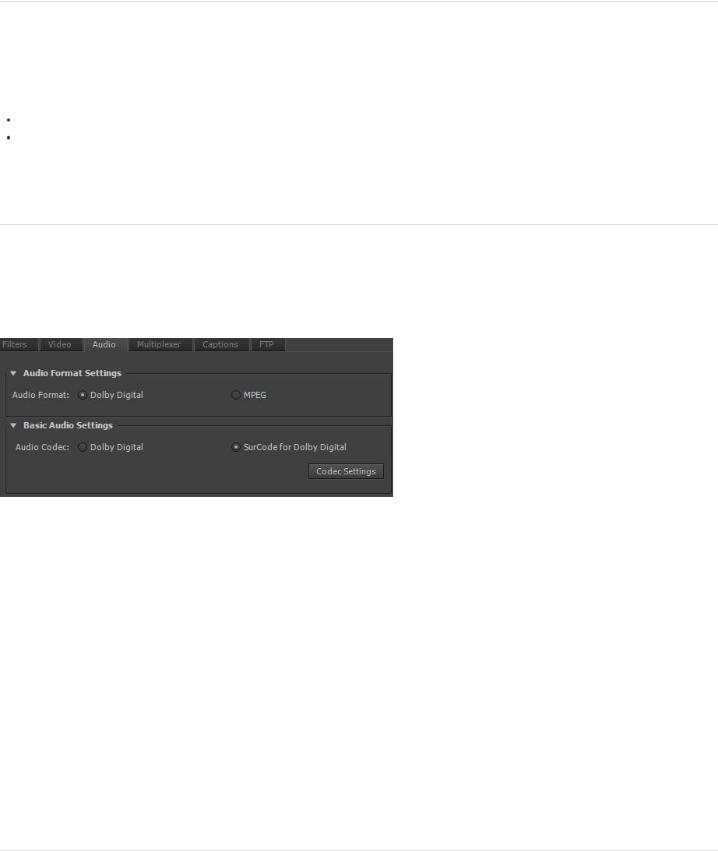
The SurCode for Dolby Digital audio codec is now available for MPEG-2, MPEG Blu-ray, MPEG-2-DVD, H.264, and H.264 Blu-ray exporters. You can select the SurCode for Dolby Digital audio codec from the Export Settings dialog box.
SurCode for Dolby Digital Audio Codec settings
1.In Adobe Media Encoder, select Edit > Export Settings.
2.In the Export Settings dialog box, select the Audio tab.
3.Under Audio Format Settings, select the audio format as Dolby Digital.
4.Under Basic Audio Settings, select the audio codec as SurCode for Dolby Digital.
5.For information about installing SurCode for Dolby Digital encoder and other additional information, click Codec Settings.
Note: Adobe Media Encoder installs a trial version of SurCode for Dolby Digital encoder by default. To continue using the SurCode for Dolby Digital encoder after the trial period ends, you need to purchase the third-party license from Minnetonka Audio Software.
To the top
Closer integration with After Effects
You can now send compositions from After Effects directly to Adobe Media Encoder. There are two new menu commands and a keyboard shortcut
8
to send compositions selected in the Project panel to the Adobe Media Encoder encoding queue:
In Adobe After Effects, select Composition > Add To Adobe Media Encoder Queue, or select File > Export > Add To Adobe Media Encoder Queue.
Use the keyboard shortcut Ctrl+Alt+M (Windows) and Cmd+Option+M (Mac OS)
Several export formats that were available in previous versions of Adobe After Effects are now available in Adobe Media Encoder.
Note: These export formats are now disabled by default in After Effects. If you want, you can re-enable the older versions of these formats in After Effects using the Output preferences in the Preferences dialog box. Adobe, however, recommends that you use newer versions of these formats that are available from Adobe Media Encoder.
H.264
H.264 Blu-ray
MPEG-2
MPEG-2 Blu-ray
MPEG2-DVD
MPEG4
Windows Media (available only on Windows)
To use these formats, export your compositions from Adobe After Effects to Adobe Media Encoder.
For more information, see What's New in After Effects CC and this blog post by Adobe's Todd Kopriva.
 Community resources:
To the top
Other changes
Additional system presets
Adobe Media Encoder CC includes new system presets for the following mobile devices:
Amazon Kindle Fire,
Barnes & Noble Nook,
and Android tablets.
Adobe Media Encoder also provides 1080p presets for the following new Apple devices:
iPad retina display (third and fourth generation),
iPad Mini,
iPhone 5, and
Apple TV (third generation).
You now also have new presets for XDCAM EX and AVC-Intra in MXF wrappers. For information about using and installing these presets, see this blog post by Adobe's Todd Kopriva.
Smart Rendering by default for MXF OP1a and MXF formats
Smart Rendering is turned on by default for MXF OP1a and DNxHD MXF formats. For more information about Smart Rendering, see this article.
Support for new formats
Adobe Media Encoder now imports the following new formats:
Sony 4K AVC-Intra (XAVC)
Panasonic AVCI-200
RED Epic Monochrome
9

DNxHD in an MXF container
DNxHD in a QuickTime (.mov) container
ProRes codecs in a QuickTime (.mov) container
XDCAMHD in a QuickTime (.mov) container
XDCAMEX in a QuickTime (.mov) container
OP1a files
OP-Atom DNxHD files
Ability to change the output folder for multiple selections
You can change the output directory for multiple outputs at once by following these steps:
1.Select two or more outputs in the Queue panel. You can select outputs from the same source or from different sources.
2.In the Output File column, click the output path of one of the selected outputs.
3.Select a folder from the dialog, and click Choose. The Output path of every output in your selection changes to the new folder.
Ability to import ARRIRAW (.ari) camera files
You can now import ARRIRAW (.ari) camera files directly into Adobe Media Encoder.
 Twitter™ and Facebook posts are not covered under the terms of Creative Commons.
Legal Notices | Online Privacy Policy
10

What's New in Adobe Media Encoder CS6
Queue and Watch Folders: Independent handling of source and output
Preset browser
Import and export presets
Improved scaling of source frames
Creating custom workspaces
Workflow enhancements
Changes to exporters
Keyboard shortcuts
New keyboard shortcuts in CS6
To the top
Queue and Watch Folders: Independent handling of source and output
Source and output are now handled independent of each other. This independent handling allows a given source to be configured with multiple outputs. Among the advantages, Adobe Media Encoder can simultaneously encode multiple outputs of a given source. Compared to individually encoding each output, simultaneous encoding is faster.
To the top
Preset browser
The new Preset Browser provides you with options that help streamline your workflow in Adobe Media Encoder.
System presets in the browser are organized as categories based on their use (such as Broadcast, Web Video) and device destination (such as DVD, Blu-ray, Camera, Tablet). You can modify these presets to create custom presets, also called User Presets.
In the Preset Browser, you can quickly find a preset using search, or using the enhanced navigation provided by the collapsible folder structure.
User presets, preset groups, and aliases
You can modify system presets to create user presets. You can organize user presets in separate folders called as preset groups. Preset groups allow you to apply multiple presets to a source in a single step.
Aliases allow you to create multiple instances of a preset for use in multiple preset groups.
For example, if you want a preset to exist in more than one preset group, create aliases to the preset instead of duplicating it. Then, add the aliases to other preset groups. When you edit the preset, the changes are applied to all its aliases.
Managing Presets
To manage presets, use the Preset menu or the options in The Preset Browser (Window>Preset Browser). You can also right-click a preset in the Preset Browser to view the context menu for the available options.
11
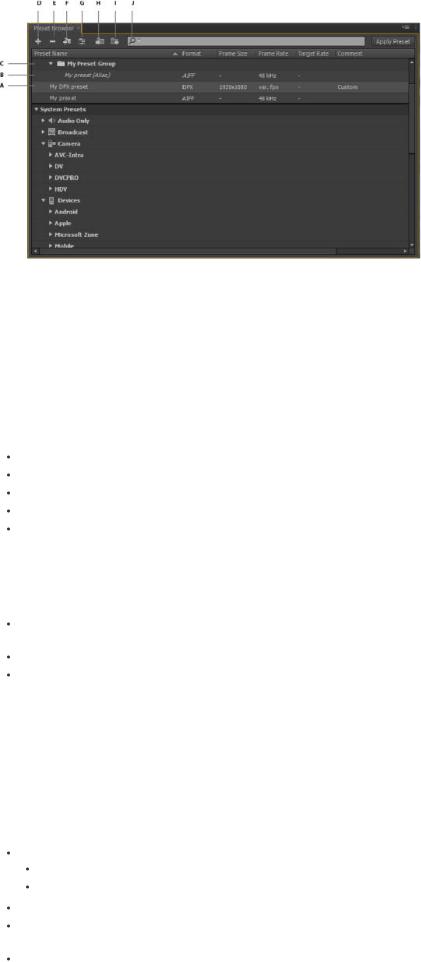
The Preset Browser
A. User preset B. Alias created to a preset C. Preset group D. Create new preset E. Delete preset F. Create new preset group G. Preset settings H. Import presets I. Export presets J. Search for presets
Create presets, preset groups, and aliases
Preset Groups can contain user presets, aliases to presets, or other preset groups.
Select Preset > Create Preset to create a preset. Select Preset > Create Group to create a preset group.
To create a preset alias, right-click the preset in the Preset Browser, and select Create Alias.
To quickly create an alias to a system preset, drag the system preset to the User Presets and Groups section.
To quickly create an alias to a user preset, Alt -drag (Win) or Opt - drag (Mac OS) the user preset to a preset group.
Modify user presets
To rename a preset, click the name of a selected preset. Type a name for the preset and press Enter. Alternatively, select Preset > Rename to rename a preset.
To modify preset settings, select a preset, and select Preset > Settings.
To delete a preset, select the preset and press Delete. Alternatively, select Preset > Delete.
Note: Only user presets can be edited. Changes to system presets can be saved as new user presets by clicking the Save A Copy button in the Preset Settings dialog.
Apply presets or preset groups to the Queue
To apply presets to sources in the Queue, do one of the following:
Drag presets, preset groups, or aliases from the Preset Browser and drop them on sources or outputs in the Queue.
Dropping a preset on a source adds an output to the source.
Dropping a preset on an existing output replaces the settings of the output with the settings of the preset.
To add an output to the source, drag a source from the Queue to a preset, preset group, or alias in the Preset Browser.
To replace the settings of the output with the settings of the preset, drag an output from the Queue to a preset, preset group, or alias in the Preset Browser.
Select a source in the Queue and double-click a preset, preset group, or alias in the Preset Browser.
12

Select a source in the Queue. Select presets, preset groups, or aliases selected in the Preset Browser. Click Apply Preset.
Apply presets or preset groups to Watch Folders
To apply presets to watch folders in the Watch Folders panel, do one of the following:
Drag presets, preset groups, or aliases from the Preset Browser and drop them on watch folders or outputs in the Watch Folders panel.
Dropping presets on a watch folder adds new outputs to the watch folder.
Dropping presets on an existing output replaces the settings of the output with the settings of the preset.
To add an ouput to the watch folder, drag a watch folder from the Watch Folders panel to a preset, preset group, or alias in the Preset Browser.
To replace the settings of the output with the settings of the preset, drag an output from the Watch Folders panel to a preset, preset group, or alias in the Preset Browser.
Select a watch folder in the Watch Folders panel. Alt + double-click (Win) or Opt + double-click (Mac) a preset, preset group, or alias in the Preset Browser.
Select a watch folder in the Watch Folders panel. Select presets, preset groups, or aliases in the Preset Browser. Alt + click (Win) or Opt + click (Mac) the Apply Preset button.
Apply presets to Premiere Pro sequences, After Effects compositions, and media assets during import
Apply presets to Adobe Premiere Pro sequences
Drag a sequence from the Project panel of an open Adobe Premiere Pro project and drop it on a preset, alias, or preset group in the Preset Browser.
Note: This procedure is the only way to add multiple presets to Adobe Premiere Pro sequences in a single step. The Export Settings dialog in Adobe Premiere Pro allows you to apply single presets when exporting sequences to Adobe Media Encoder.
Apply presets to After Effects compositions
Drag a composition from the Project panel of an open After Effects project to a preset, preset group, or alias in the Preset Browser.
Apply presets to video and audio assets
Drag video and audio assets from Finder or Windows Explorer and drop them on a preset, preset group, or alias in the Preset Browser.
Important considerations when applying presets
Dropping a single preset on an output replaces the output. The new outputs inherit the output path, output name, and source range settings from the targeted output
Dropping a single preset on a source adds an output.
Dropping a preset group (or multiple selected presets) on an output adds outputs. The new outputs inherit the output path, output name, and source range settings from the targeted output.
Dropping a preset group (or multiple selected presets) on a source adds outputs. Settings such as output path from existing outputs are not inherited.
To the top
Import and export presets
13
Presets can be imported and exported as EPR files. EPR files are saved in the XML format.
Select Preset > Import to import EPR files. Imported presets appear in the User Presets and Groups section.
Select Preset > Export to export selected presets as EPR files.
Note: You can also drag-and-drop EPR files on an existing preset in the Preset Browser to import them.
Show the location of a preset in Finder or Explorer
Right-click the preset in the Preset Browser and select Reveal Preset File.
Quickly find a preset in the browser
As you type in the search field  , the Preset Browser filters the preset list to match your search string. All columns are scanned for matching results.
To the top
Improved scaling of source frames
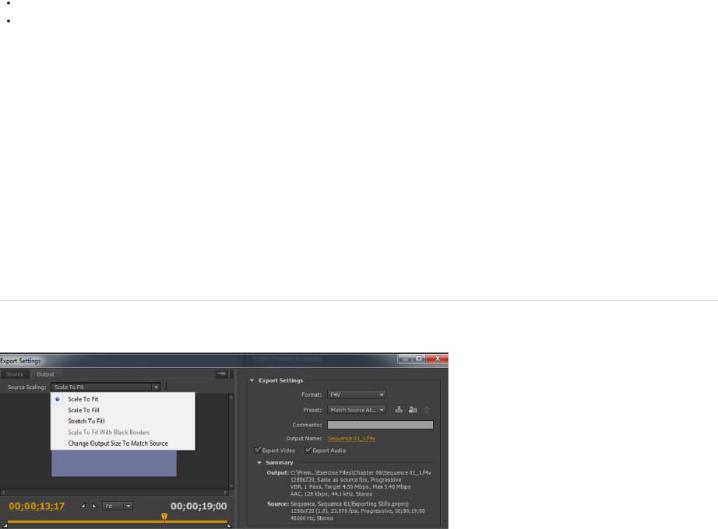
Source Scaling options
In Adobe Media Encoder CS6, it is not necessary that you enable a crop before using this option. Also, this setting is available for any output format with editable frame dimensions.
Use the options in the Source Scaling menu of the Export Settings dialog for better scaling of source frames within output frames of a different size.
Scale To Fit Scales the source frame to fit within the output frame while maintaining pixel aspect ratio of the source. Source frames are letterboxed or pillar-boxed within the output frame as necessary.
Scale To Fill Scales the source frame to completely fill the output frame while cropping the source frame as necessary. Pixel aspect ratio of the source frame is maintained.
Stretch To Fill Resizes the source frame to completely fill the output frame. Pixel aspect ratio of the source is not maintained.
Scale To Fit With Black Borders Source frame, including the cropped area, is fit within the output frame. Pixel aspect ratio is maintained.
Note: This option is the same as the Black Borders option in the Crop Settings menu of Adobe Media Encoder CS5.5.
14
Change Output Size To Match Source Overrides the output frame size settings to match the crop settings of the source.
Note: This option is the same as Change Output Size in the Crop Settings menu of Adobe Media Encoder CS5.5.
To the top
Creating custom workspaces
In the new interface, you can group panels as tabs in a single frame or float them as separate panels.
1.Move the panels by clicking them and dragging them around. To group panels, drag the panel to the topmost section of another panel. Release the mouse when a purple patch appears in the center of the host panel.
2.After you customize the workspace to your requirements, select Window > Workspace > New Workspace to create a custom workspace.
The new Workspace is added to the Workspace menu. You can now use the options in the Window > Workspace menu to switch workspaces.
To the top
Workflow enhancements
Sources are still encoded in sequence, but all outputs of a source are now encoded in parallel. To disable parallel encoding, select Edit > Preferences, and deselect Enable Parallel Encoding.
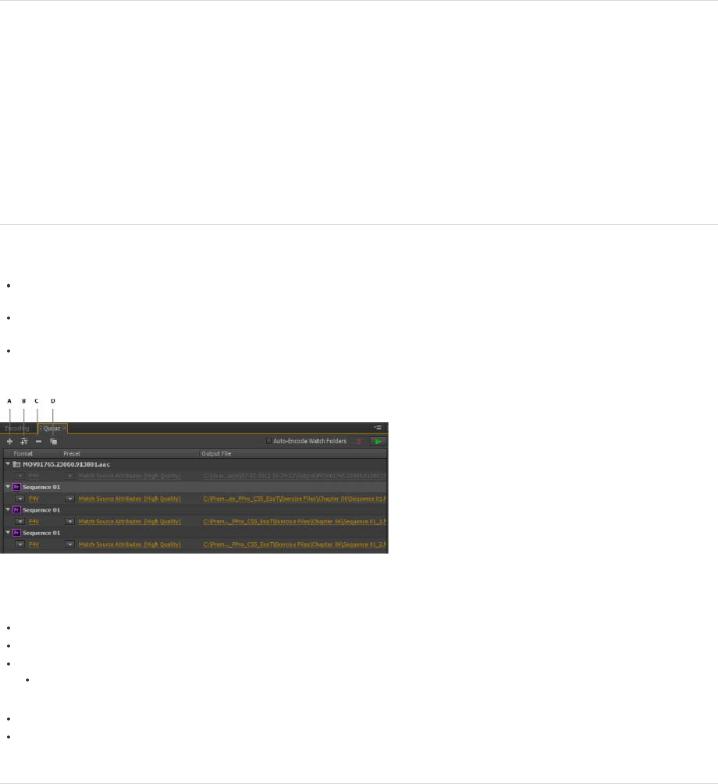
For multiple outputs, the Encoding panel displays a thumbnail preview, progress bar, and the completion time estimate of each encoding output
In certain cases, export settings require an output to encode in serial rather than in parallel mode. In such cases, the queue returns to parallel encoding after temporary serial encoding is complete.
A. Add Source B. Add Output C. Remove Source/Output D. Duplicate
You can associate multiple outputs with a source. Each output can have a different format, preset, and output file location assigned to it. You can reorder outputs in the output list. However, you cannot move them to other sources.
Clicking the output file path opens the folder containing the encoded file. Previous to encoding, however, the Save As dialog appears.
To change the output path and filename, click the Output File link for that output.
 To access an encoded file, click the Output File link for that output Use the Add Output button to quickly add an output to a source.
Both sources and outputs can be duplicated. A duplicated source uses all the outputs from the original source.
To the top
Changes to exporters
For better performance, the following exporters have been updated for this release:
15

AAC Audio ("Audio Only" in previous versions)
H.264
H.264 Blu-ray
MPEG4
Windows Media (Windows only)
For compatibility reasons, older versions of the following CS5.5 exporters have been included in CS6:
H.264 (Legacy) Dolby Digital Surcode audio encoding is not available in the new exporter.
H.264 Blu-ray (Legacy) Preserves support for Match Source presets and Surcode for Dolby.
MPEG4 (Legacy)
Presets created in previous versions of Adobe Media Encoder can be imported into Adobe Media Encoder CS6. However, presets for H.264 and H.264 Blu-ray apply only to legacy exporters. Presets for the Audio Only or Windows Media exporters from previous versions cannot be imported.
Change render settings for an After Effects composition
Adobe Media Encoder CS6 allows you to modify the Guide Layers render setting for an After Effects composition. To enable or disable guide layer visibility, select an After Effects comp source, and select File > Source Settings.
To the top
Keyboard shortcuts
Result |
Windows |
Mac OS |
Add item to queue |
Ctrl+I |
Cmd+I |
Start/pause queue |
Enter |
Return |
Stop queue |
Esc |
Esc |
Open Preferences dialog |
Ctrl+,(comma) |
Cmd+,(comma) |
Save queue |
Ctrl+S |
Cmd+S |
Quit |
Ctrl+Q |
Cmd+Q |
Duplicate selected items |
Ctrl+D |
Cmd+D |
Select all items in current list |
Ctrl+A |
Cmd+A |
Open the Export Settings dialog |
Ctrl+E |
Cmd+E |
Undo |
Ctrl+Z |
Cmd+Z |
Redo |
Ctrl+Y |
Cmd+Y |
Adobe Media Encoder Help |
F1 |
F1 |
Export Settings dialog
Result |
Windows |
Mac OS |
Moves playhead one frame |
Left/Right arrows |
Left/Right arrows |
|
||
|
|
|
16
earlier/later |
|
|
|
Move playhead to the start/end frame |
Home/End |
Home/End |
|
Set source range In Point to |
I |
I |
|
playhead's current position |
|
||
Set source range Out Point to |
O |
O |
|
playhead's current position |
|
||
Move playhead to the In Point |
Q |
Q |
|
Move playhead to the Out Point |
W |
W |
|
Zooms in frame preview |
Ctrl++(plus) |
Cmd++(plus) |
|
Zooms out frame preview |
Ctrl+-(minus) |
Cmd+-(minus) |
|
Exports preset as an EPR file |
Alt+click Save Preset button |
Opt+click Save Preset button |
|
|
|
To the top |
|
New keyboard shortcuts in CS6 |
|
|
|
Customize keyboard shortcuts
Select Edit > Keyboard Shortcuts (Windows) or Application > Keyboard Shortcuts (Mac OS) to customize keyboard shortcuts in Adobe Media Encoder CS6.
For example, to change the keyboard shortcut for the cut operation from Ctrl+x to Ctrl+t, do the following:
1.Select Edit > Keyboard Shortcuts.
2.In the Keyboard Shortcuts panel, expand the Edit menu by clicking it.
3.Select Cut.
4.Click  next to Ctrl+x to delete the existing command.
5.Click Add.
6.Press Ctrl+t.
7.Click OK.
File menu
Result |
Windows |
Mac OS |
Add watch folder |
Ctrl+Alt+I |
Cmd+Opt+I |
Stop current item |
Ctrl+ - (minus sign) |
Cmd+ - (minus sign) |
Show log |
Ctrl+L |
Ctrl+L |
Show errors |
Ctrl+Alt+L |
Cmd+Opt+L |
Edit menu
Result |
Windows |
Mac OS |
Redo |
Ctrl+Shift+Z |
Cmd+Shift+Z |
Reset status |
Ctrl+ . (period) |
Cmd+.(period) |
Skip selection |
Ctrl+Shift+. (period) |
Cmd+Shift+.(period) |
17
Show errors |
Ctrl+Alt+L |
Cmd+Opt+L |
Open Keyboard Shortcuts dialog |
Ctrl+Alt+Shift+K |
Cmd+Opt+Shift+K |
Preset menu
Result |
Windows |
Mac OS |
Open Preset Settings dialog |
Ctrl+Alt+E |
Cmd+Opt+E |
Apply to queue |
Ctrl+U |
Cmd+U |
Apply to watch folders |
Ctrl+Alt+U |
Cmd+Opt+U |
Create preset |
Ctrl+N |
Cmd+N |
Create preset group |
Ctrl+G |
Cmd+G |
Create alias to preset |
Ctrl+B |
Cmd+B |
Rename user preset or preset group |
Ctrl+R |
Cmd+R |
Window menu
Result |
Windows |
Mac OS |
Queue panel |
Ctrl+1 |
Cmd+1 |
Encoding panel |
Ctrl+2 |
Cmd+2 |
Watch folders panel |
Ctrl+3 |
Cmd+3 |
Preset browser |
Ctrl+4 |
Cmd+4 |
Main user interface
Result |
Windows |
Mac OS |
Close the current panel |
Ctrl+W |
Cmd+W |
Maximize/Restore the panel under the |
` (backtick sign under tilde) |
` (backtick sign under tilde) |
pointer cursor |
||
Maximize or restore current panel |
Shift+` (bactick sign under tilde) |
Shift+` (bactick sign under tilde) |
Maximize/Restore panel under the |
< |
< |
pointer cursor (non-English keyboards) |
||
Maximize or restore current panel |
Shift+ < |
Shift+ < |
(non-English keyboards) |
||
Select previous/next item in list |
Up and Down Arrows |
Up and Down Arrows |
Add previous/next item in list to |
Shift + Up/Down Arrows |
Shift + Up/Down Arrows |
current selection |
||
Select previous/next item in list. If a |
|
|
folder is selected, Right Arrow opens |
Right and Left Arrows |
Right and Left Arrows |
the folder and Left Arrow closes it. |
|
|
Add previous/next item in list to |
|
|
|
|
|
18
current selection. If a folder is |
Shift+Right and Left Arrows |
Shift+Right and Left Arrows |
selected, Right Arrow opens folder |
||
and Left Arrow closes it. |
|
|
|
|
|
Export Settings dialog
Numeric field with whole numbers (ex. Frame Width setting): |
|
||
Result |
Windows |
Mac OS |
|
Increase or decrease current value by |
Up and Down Arrows |
Up and Down Arrows |
|
1 |
|||
|
|
||
Increase or decrease current value by |
Shift+Up/Down Arrows |
Shift+Up/Down Arrows |
|
10 |
|||
Increase or decrease current value by |
Ctrl+Up/Down Arrows |
Cmd+Up/Down Arrows |
|
10 |
|||
Increase or decrease current value by |
Ctrl+Shift+Up/Down Arrows |
Cmd+Shift+Up/Down Arrows |
|
100 |
|||
|
|
|
|
Bit rate field in Mbps: |
|
|
|
Result |
Windows |
Mac OS |
|
Increase or decrease current value by |
Shift+Up/Down Arrows |
Shift+Up/Down Arrows |
|
1 |
|||
Increase or decrease current value by |
Up and Down Arrows |
Up and Down Arrows |
|
.1 |
|||
|
|
||
Increase or decrease current value by |
Ctrl+Up/Down Arrows |
Cmd+Up/Down Arrows |
|
.01 |
|||
Increase or decrease current value by |
Ctrl+Alt+Up/Down Arrows |
Cmd+Opt+Up/Down Arrows |
|
.001 |
|||
|
|
|
|
Bit rate field in Kbps: |
|
|
|
Result |
Windows |
Mac OS |
|
Increase or decrease current value by |
Shift+Up/Down Arrows |
Shift+Up/Down Arrows |
|
10 |
|||
Increase or decrease current value by |
Up and Down Arrows |
Up and Down Arrows |
|
1 |
|||
|
|
||
Increase or decrease current value by |
Ctrl+Up/Down Arrows |
Cmd+Up/Down Arrows |
|
.1 |
|||
Increase or decrease current value by |
Ctrl+Alt+Up/Down Arrows |
Cmd+Opt+Up/Down Arrows |
|
.01 |
|||
Keyboard Shortcuts dialog |
|
|
|
|
|
|
|
Result |
Windows |
Mac OS |
|
|
|
|
|
19

Expand/Collapse all categories in |
Alt+Click Category heading |
Opt+Click Category heading |
dialog |
 Twitter™ and Facebook posts are not covered under the terms of Creative Commons.
Legal Notices | Online Privacy Policy
20
Encoding quick start and basics
21
Overview of Adobe Media Encoder
Getting started with Adobe Media Encoder
Adobe Media Encoder workspace
Adobe Media Encoder functions as an encoding engine for Adobe Premiere Pro, Adobe After Effects, and Adobe Prelude. You can also use Adobe Media Encoder as a stand-alone encoder.
For an overview of using all the features in Adobe Media Encoder, see this video by Jan Ozer. Also, see this article by Larry Jordan.
To the top
Getting started with Adobe Media Encoder
Using Adobe Media Encoder, you can export videos to video-sharing websites like YouTube and Vimeo, devices ranging from professional tape decks to DVD players, mobile phones, and high-definition TV sets.
Here are a few helpful resources to get you started:
Blog post by Adobe's Kevin Monahan: Get started with exporting media with Adobe Media Encoder
Video tutorial: Exporting with Adobe Media Encoder
video2brain: Producing great video with Adobe Media Encoder
Workflow and overview of exporting video and audio from Premiere Pro using Adobe Media Encoder
To the top
Adobe Media Encoder workspace
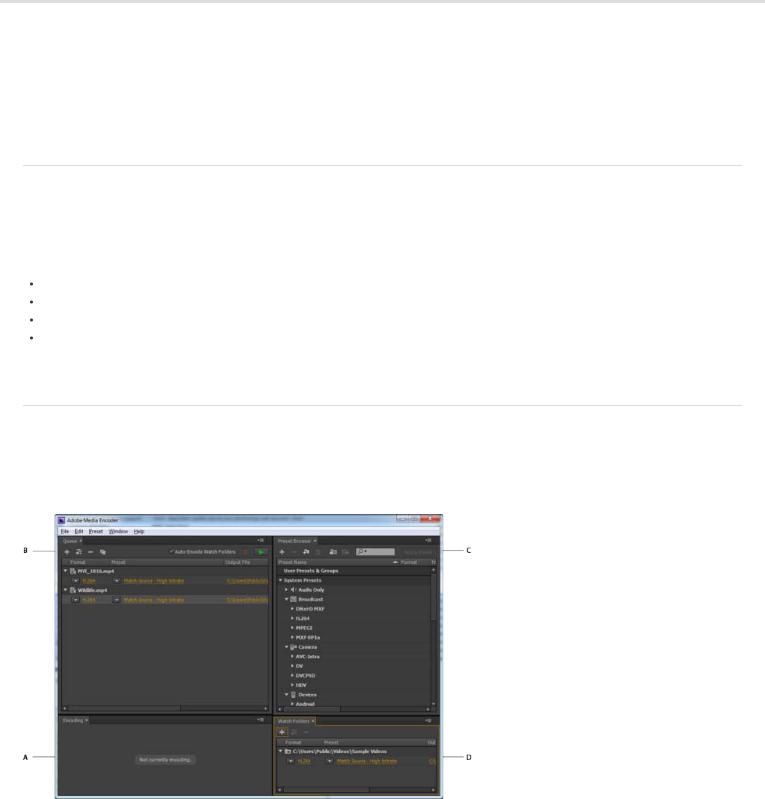
There are four main panels in Adobe Media Encoder that you use while encoding your files. You can group panels as tabs in a single frame or float them as separate panels.
Adobe Media Encoder user interface
A. Encoding panel B. Queue panel C. Preset Browser D. Watch Folder
22
Loading...