


 Loading...
ADOBE® AUDITION® 3
USER GUIDE
© 2007 Adobe Systems Incorporated. All rights reserved.
Adobe® Audition® 3.0 User Guide for Windows®
If this guide is distributed with software that includes an end user agreement, this guide, as well as the software described in it, is furnished under license and may be used or copied only in accordance with the terms of such license. Except as permitted by any such license, no part of this guide may be reproduced, stored in a retrieval system, or transmitted, in any form or by any means, electronic, mechanical, recording, or otherwise, without the prior written permission of Adobe Systems Incorporated. Please note that the content in this guide is protected under copyright law even if it is not distributed with software that includes an end user license agreement.
The content of this guide is furnished for informational use only, is subject to change without notice, and should not be construed as a commitment by Adobe Systems Incorporated. Adobe Systems Incorporated assumes no responsibility or liability for any errors or inaccuracies that may appear in the informational content contained in this guide.
Please remember that existing artwork or images that you may want to include in your project may be protected under copyright law. The unauthorized incorporation of such material into your new work could be a violation of the rights of the copyright owner. Please be sure to obtain any permission required from the copyright owner.
Any references to company names in sample templates are for demonstration purposes only and are not intended to refer to any actual organization.
Adobe, the Adobe logo, Adobe Audition, Adobe Premiere, After Effects, Creative Suite, and Photoshop are either registered trademarks or trademarks of Adobe Systems Incorporated in the United States and/or other countries.
Dolby is a trademark of Dolby Laboratories. Microsoft and Windows are either registered trademarks or trademarks of Microsoft Corporation in the United States and/or other countries. Apple, Mac OS, and Macintosh are trademarks of Apple Inc., registered in the United States and other countries. DEC is a trademark of Digital Equipment Corporation. Sun is a trademark or registered trademark of Sun Microsystems, Inc. in the United States and other countries. All other trademarks are the property of their respective owners.
MPEG Layer 3 audio compression technology is licensed by Fraunhofer IIS and Thomson.
mp3PRO audio coding technologies licensed from Coding Technologies, Fraunhofer IIS and Thomson Multimedia.
ReWire is a Propellerhead product.
Notice to U.S. Government end users: The Software and Documentation are “Commercial Items,” as that term is defined at 48 C.F.R. §2.101, consisting of “Commercial Computer Software” and “Commercial Computer Software Documentation,” as such terms are used in 48 C.F.R. §12.212 or 48 C.F.R. §227.7202, as applicable. Consistent with 48 C.F.R. §12.212 or 48 C.F.R. §§227.7202-1 through 227.7202-4, as applicable, the Commercial Computer Software and Commercial Computer Software Documentation are being licensed to U.S. Government end users (a) only as Commercial Items and (b) with only those rights as are granted to all other end users pursuant to the terms and conditions herein. Unpublished-rights reserved under the copyright laws of the United States. Adobe agrees to comply with all applicable equal opportunity laws including, if appropriate, the provisions of Executive Order 11246, as amended, Section 402 of the Vietnam Era Veterans Readjustment Assistance Act of 1974 (38 USC 4212), and Section 503 of the Rehabilitation Act of 1973, as amended, and the regulations at 41 CFR Parts 60-1 through 60-60, 60-250, and 60-741. The affirmative action clause and regulations contained in the preceding sentence shall be incorporated by reference.
Adobe Systems Incorporated, 345 Park Avenue, San Jose, California 95110, USA.

iii
Contents |
|
Chapter 1: Getting started |
|
Installation . . . . . . . . . . . . . . . . . . . . . . . . . . . . . . . . . . . . . . . . . . . . . . . . . . . . . . . . . . . . . . . . . . . . . . . . . . . . . |
. . 1 |
Resources . . . . . . . . . . . . . . . . . . . . . . . . . . . . . . . . . . . . . . . . . . . . . . . . . . . . . . . . . . . . . . . . . . . . . . . . . . . . . . |
. . 2 |
New features . . . . . . . . . . . . . . . . . . . . . . . . . . . . . . . . . . . . . . . . . . . . . . . . . . . . . . . . . . . . . . . . . . . . . . . . . . . |
. . 5 |
Chapter 2: Digital audio fundamentals |
|
Understanding sound . . . . . . . . . . . . . . . . . . . . . . . . . . . . . . . . . . . . . . . . . . . . . . . . . . . . . . . . . . . . . . . . . . . |
. . 8 |
Digitizing audio . . . . . . . . . . . . . . . . . . . . . . . . . . . . . . . . . . . . . . . . . . . . . . . . . . . . . . . . . . . . . . . . . . . . . . . . . |
. 10 |
Chapter 3: Workflow and workspace |
|
Workflow . . . . . . . . . . . . . . . . . . . . . . . . . . . . . . . . . . . . . . . . . . . . . . . . . . . . . . . . . . . . . . . . . . . . . . . . . . . . . . . |
. 13 |
Viewing, zooming, and navigating audio . . . . . . . . . . . . . . . . . . . . . . . . . . . . . . . . . . . . . . . . . . . . . . . . . |
. 19 |
Customizing workspaces . . . . . . . . . . . . . . . . . . . . . . . . . . . . . . . . . . . . . . . . . . . . . . . . . . . . . . . . . . . . . . . . |
. 23 |
Managing workspaces . . . . . . . . . . . . . . . . . . . . . . . . . . . . . . . . . . . . . . . . . . . . . . . . . . . . . . . . . . . . . . . . . . |
. 29 |
Chapter 4: Setting up Adobe Audition |
|
Connecting to inputs and outputs . . . . . . . . . . . . . . . . . . . . . . . . . . . . . . . . . . . . . . . . . . . . . . . . . . . . . . . |
. 31 |
Setting Adobe Audition preferences . . . . . . . . . . . . . . . . . . . . . . . . . . . . . . . . . . . . . . . . . . . . . . . . . . . . . |
. 33 |
Managing temporary files . . . . . . . . . . . . . . . . . . . . . . . . . . . . . . . . . . . . . . . . . . . . . . . . . . . . . . . . . . . . . . . |
. 41 |
Chapter 5: Importing, recording, and playing audio |
|
Opening audio files in Edit View . . . . . . . . . . . . . . . . . . . . . . . . . . . . . . . . . . . . . . . . . . . . . . . . . . . . . . . . . |
. 43 |
Opening and adding to sessions in Multitrack View . . . . . . . . . . . . . . . . . . . . . . . . . . . . . . . . . . . . . . |
. 46 |
Importing with the Files panel . . . . . . . . . . . . . . . . . . . . . . . . . . . . . . . . . . . . . . . . . . . . . . . . . . . . . . . . . . . |
. 48 |
Importing with Adobe Bridge . . . . . . . . . . . . . . . . . . . . . . . . . . . . . . . . . . . . . . . . . . . . . . . . . . . . . . . . . . . |
. 50 |
Importing audio from CDs . . . . . . . . . . . . . . . . . . . . . . . . . . . . . . . . . . . . . . . . . . . . . . . . . . . . . . . . . . . . . . |
. 50 |
Getting ready for recording and playback . . . . . . . . . . . . . . . . . . . . . . . . . . . . . . . . . . . . . . . . . . . . . . . . |
. 53 |
Recording audio . . . . . . . . . . . . . . . . . . . . . . . . . . . . . . . . . . . . . . . . . . . . . . . . . . . . . . . . . . . . . . . . . . . . . . . . |
. 56 |
Playing audio . . . . . . . . . . . . . . . . . . . . . . . . . . . . . . . . . . . . . . . . . . . . . . . . . . . . . . . . . . . . . . . . . . . . . . . . . . . |
. 60 |
Monitoring recording and playback levels . . . . . . . . . . . . . . . . . . . . . . . . . . . . . . . . . . . . . . . . . . . . . . . |
. 62 |
Chapter 6: Editing audio files |
|
Displaying audio in Edit View . . . . . . . . . . . . . . . . . . . . . . . . . . . . . . . . . . . . . . . . . . . . . . . . . . . . . . . . . . . . |
. 65 |
Selecting audio . . . . . . . . . . . . . . . . . . . . . . . . . . . . . . . . . . . . . . . . . . . . . . . . . . . . . . . . . . . . . . . . . . . . . . . . . |
. 72 |
Copying, cutting, pasting, and deleting audio . . . . . . . . . . . . . . . . . . . . . . . . . . . . . . . . . . . . . . . . . . . . |
. 76 |
Visually fading and changing amplitude . . . . . . . . . . . . . . . . . . . . . . . . . . . . . . . . . . . . . . . . . . . . . . . . . |
. 78 |
Working with markers . . . . . . . . . . . . . . . . . . . . . . . . . . . . . . . . . . . . . . . . . . . . . . . . . . . . . . . . . . . . . . . . . . . |
. 80 |
Creating and deleting silence . . . . . . . . . . . . . . . . . . . . . . . . . . . . . . . . . . . . . . . . . . . . . . . . . . . . . . . . . . . |
. 86 |
Inverting and reversing audio . . . . . . . . . . . . . . . . . . . . . . . . . . . . . . . . . . . . . . . . . . . . . . . . . . . . . . . . . . . |
. 87 |
Generating audio . . . . . . . . . . . . . . . . . . . . . . . . . . . . . . . . . . . . . . . . . . . . . . . . . . . . . . . . . . . . . . . . . . . . . . . |
. 88 |
Analyzing phase, frequency, and amplitude . . . . . . . . . . . . . . . . . . . . . . . . . . . . . . . . . . . . . . . . . . . . . . |
. 91 |
Converting sample types . . . . . . . . . . . . . . . . . . . . . . . . . . . . . . . . . . . . . . . . . . . . . . . . . . . . . . . . . . . . . . . . |
. 98 |
Recovery and undo . . . . . . . . . . . . . . . . . . . . . . . . . . . . . . . . . . . . . . . . . . . . . . . . . . . . . . . . . . . . . . . . . . . . . |
101 |

iv
Chapter 7: Applying effects |
|
Shared effects controls . . . . . . . . . . . . . . . . . . . . . . . . . . . . . . . . . . . . . . . . . . . . . . . . . . . . . . . . . . . . . . . . . . |
102 |
Applying effects in Edit View . . . . . . . . . . . . . . . . . . . . . . . . . . . . . . . . . . . . . . . . . . . . . . . . . . . . . . . . . . . . |
106 |
Applying effects in Multitrack View . . . . . . . . . . . . . . . . . . . . . . . . . . . . . . . . . . . . . . . . . . . . . . . . . . . . . . |
107 |
Adding third-party plug-ins . . . . . . . . . . . . . . . . . . . . . . . . . . . . . . . . . . . . . . . . . . . . . . . . . . . . . . . . . . . . . |
110 |
Chapter 8: Effects reference |
|
Amplitude and compression effects . . . . . . . . . . . . . . . . . . . . . . . . . . . . . . . . . . . . . . . . . . . . . . . . . . . . . |
112 |
Delay and echo effects . . . . . . . . . . . . . . . . . . . . . . . . . . . . . . . . . . . . . . . . . . . . . . . . . . . . . . . . . . . . . . . . . . |
122 |
Filter and equalizer effects . . . . . . . . . . . . . . . . . . . . . . . . . . . . . . . . . . . . . . . . . . . . . . . . . . . . . . . . . . . . . . |
128 |
Modulation effects . . . . . . . . . . . . . . . . . . . . . . . . . . . . . . . . . . . . . . . . . . . . . . . . . . . . . . . . . . . . . . . . . . . . . . |
137 |
Restoration effects . . . . . . . . . . . . . . . . . . . . . . . . . . . . . . . . . . . . . . . . . . . . . . . . . . . . . . . . . . . . . . . . . . . . . . |
141 |
Reverb effects . . . . . . . . . . . . . . . . . . . . . . . . . . . . . . . . . . . . . . . . . . . . . . . . . . . . . . . . . . . . . . . . . . . . . . . . . . |
152 |
Special effects . . . . . . . . . . . . . . . . . . . . . . . . . . . . . . . . . . . . . . . . . . . . . . . . . . . . . . . . . . . . . . . . . . . . . . . . . . |
158 |
Stereo imagery effects . . . . . . . . . . . . . . . . . . . . . . . . . . . . . . . . . . . . . . . . . . . . . . . . . . . . . . . . . . . . . . . . . . |
162 |
Time and pitch manipulation effects . . . . . . . . . . . . . . . . . . . . . . . . . . . . . . . . . . . . . . . . . . . . . . . . . . . . . |
169 |
Multitrack effects . . . . . . . . . . . . . . . . . . . . . . . . . . . . . . . . . . . . . . . . . . . . . . . . . . . . . . . . . . . . . . . . . . . . . . . |
174 |
Chapter 9: Mixing multitrack sessions |
|
Multitrack View overview . . . . . . . . . . . . . . . . . . . . . . . . . . . . . . . . . . . . . . . . . . . . . . . . . . . . . . . . . . . . . . . |
179 |
Basic track controls . . . . . . . . . . . . . . . . . . . . . . . . . . . . . . . . . . . . . . . . . . . . . . . . . . . . . . . . . . . . . . . . . . . . . |
182 |
Track routing and EQ controls . . . . . . . . . . . . . . . . . . . . . . . . . . . . . . . . . . . . . . . . . . . . . . . . . . . . . . . . . . . |
185 |
Arranging clips . . . . . . . . . . . . . . . . . . . . . . . . . . . . . . . . . . . . . . . . . . . . . . . . . . . . . . . . . . . . . . . . . . . . . . . . . |
191 |
Editing clips . . . . . . . . . . . . . . . . . . . . . . . . . . . . . . . . . . . . . . . . . . . . . . . . . . . . . . . . . . . . . . . . . . . . . . . . . . . . |
195 |
Automating mixes . . . . . . . . . . . . . . . . . . . . . . . . . . . . . . . . . . . . . . . . . . . . . . . . . . . . . . . . . . . . . . . . . . . . . . |
203 |
Synchronizing sessions with ReWire and SMPTE . . . . . . . . . . . . . . . . . . . . . . . . . . . . . . . . . . . . . . . . . . |
208 |
Setting advanced session properties . . . . . . . . . . . . . . . . . . . . . . . . . . . . . . . . . . . . . . . . . . . . . . . . . . . . . |
210 |
Chapter 10: Composing with MIDI |
|
MIDI sequencing basics . . . . . . . . . . . . . . . . . . . . . . . . . . . . . . . . . . . . . . . . . . . . . . . . . . . . . . . . . . . . . . . . . |
213 |
Importing, recording, and outputting MIDI . . . . . . . . . . . . . . . . . . . . . . . . . . . . . . . . . . . . . . . . . . . . . . |
215 |
Displaying and editing MIDI . . . . . . . . . . . . . . . . . . . . . . . . . . . . . . . . . . . . . . . . . . . . . . . . . . . . . . . . . . . . . |
217 |
Chapter 11: Loops |
|
Using loops in Multitrack View . . . . . . . . . . . . . . . . . . . . . . . . . . . . . . . . . . . . . . . . . . . . . . . . . . . . . . . . . . |
221 |
Creating loops in Edit View . . . . . . . . . . . . . . . . . . . . . . . . . . . . . . . . . . . . . . . . . . . . . . . . . . . . . . . . . . . . . . |
224 |
Chapter 12: Working with video |
|
Working with video applications . . . . . . . . . . . . . . . . . . . . . . . . . . . . . . . . . . . . . . . . . . . . . . . . . . . . . . . . |
227 |
Importing video and working with video clips . . . . . . . . . . . . . . . . . . . . . . . . . . . . . . . . . . . . . . . . . . . |
228 |
Previewing video . . . . . . . . . . . . . . . . . . . . . . . . . . . . . . . . . . . . . . . . . . . . . . . . . . . . . . . . . . . . . . . . . . . . . . . |
229 |
Chapter 13: Creating surround sound |
|
Surround sound basics . . . . . . . . . . . . . . . . . . . . . . . . . . . . . . . . . . . . . . . . . . . . . . . . . . . . . . . . . . . . . . . . . . |
232 |
Setting track pan and volume for surround mixes . . . . . . . . . . . . . . . . . . . . . . . . . . . . . . . . . . . . . . . . |
233 |
Previewing and exporting surround mixes . . . . . . . . . . . . . . . . . . . . . . . . . . . . . . . . . . . . . . . . . . . . . . . |
236 |

v
Chapter 14: Saving and exporting |
|
Saving and exporting files . . . . . . . . . . . . . . . . . . . . . . . . . . . . . . . . . . . . . . . . . . . . . . . . . . . . . . . . . . . . . . . |
240 |
Audio file formats . . . . . . . . . . . . . . . . . . . . . . . . . . . . . . . . . . . . . . . . . . . . . . . . . . . . . . . . . . . . . . . . . . . . . . . |
244 |
Video file formats . . . . . . . . . . . . . . . . . . . . . . . . . . . . . . . . . . . . . . . . . . . . . . . . . . . . . . . . . . . . . . . . . . . . . . . |
252 |
Adding file information . . . . . . . . . . . . . . . . . . . . . . . . . . . . . . . . . . . . . . . . . . . . . . . . . . . . . . . . . . . . . . . . . |
253 |
Chapter 15: Automating tasks |
|
Favorites . . . . . . . . . . . . . . . . . . . . . . . . . . . . . . . . . . . . . . . . . . . . . . . . . . . . . . . . . . . . . . . . . . . . . . . . . . . . . . . . |
256 |
Normalizing groups of files . . . . . . . . . . . . . . . . . . . . . . . . . . . . . . . . . . . . . . . . . . . . . . . . . . . . . . . . . . . . . . |
258 |
Batch processing files . . . . . . . . . . . . . . . . . . . . . . . . . . . . . . . . . . . . . . . . . . . . . . . . . . . . . . . . . . . . . . . . . . . |
259 |
Scripts . . . . . . . . . . . . . . . . . . . . . . . . . . . . . . . . . . . . . . . . . . . . . . . . . . . . . . . . . . . . . . . . . . . . . . . . . . . . . . . . . . |
261 |
Chapter 16: Building audio CDs |
|
Assembling CDs . . . . . . . . . . . . . . . . . . . . . . . . . . . . . . . . . . . . . . . . . . . . . . . . . . . . . . . . . . . . . . . . . . . . . . . . |
264 |
Writing CDs . . . . . . . . . . . . . . . . . . . . . . . . . . . . . . . . . . . . . . . . . . . . . . . . . . . . . . . . . . . . . . . . . . . . . . . . . . . . . |
267 |
Chapter 17: Keyboard shortcuts |
|
Finding and customizing shortcuts . . . . . . . . . . . . . . . . . . . . . . . . . . . . . . . . . . . . . . . . . . . . . . . . . . . . . . |
269 |
Default keyboard shortcuts . . . . . . . . . . . . . . . . . . . . . . . . . . . . . . . . . . . . . . . . . . . . . . . . . . . . . . . . . . . . . |
270 |
Chapter 18: Digital audio glossary |
|
Common audio terms . . . . . . . . . . . . . . . . . . . . . . . . . . . . . . . . . . . . . . . . . . . . . . . . . . . . . . . . . . . . . . . . . . . |
273 |
Index . . . . . . . . . . . . . . . . . . . . . . . . . . . . . . . . . . . . . . . . . . . . . . . . . . . . . . . . . . . . . . . . . . . . . . . . . . . . . . . . . . 280

1
Chapter 1: Getting started
Before you begin working with your software, take a few moments to read an overview of installation, online Help, and the many resources available to users. You have access to instructional videos, plug-ins, templates, user communities, and much more.
Installation
Requirements
To review complete system requirements and recommendations for your Adobe® software, see the Read Me file on the installation disc.
Install the software
1Close any other Adobe applications open on your computer.
2Insert the installation disc into the disc drive, and follow the on-screen instructions.
Note: For more information, see the Read Me file on the installation disc.
Activate the software
If you have a single-user retail license for your Adobe software, you will be asked to activate your software; this is a simple, anonymous process that you must complete within 30 days of starting the software.
For more information on product activation, see the Read Me file on your installation disc, or visit the Adobe website at www.adobe.com/go/activation.
1If the Activation dialog box isn’t already open, choose Help > Activate.
2Follow the on-screen instructions.
Note: If you want to install the software on a different computer, you must first deactivate it on your computer. Choose Help > Deactivate.
Register
Register your product to receive complimentary installation support, notifications of updates, and other services.
To register, follow the on-screen instructions in the Registration dialog box, which appears after you install and activate the software.
 If you postpone registration, you can register at any time by choosing Help > Registration.
Read Me
The installation disc contains the Read Me file for your software. (This file is also copied to the application folder during product installation.) Open the file to read important information about topics such as the following:
• System requirements

ADOBE AUDITION 3.0 2
User Guide
•Installation (including uninstalling the software)
•Activation and registration
•Font installation
•Troubleshooting
•Customer support
•Legal notices
Resources
Adobe Help resources
Documentation for your Adobe software is available in a variety of formats.
In-product and LiveDocs Help
In-product Help provides access to all documentation and instructional content available at the time the software ships. It is available through the Help menu in your Adobe software.
LiveDocs Help includes all the content from in-product Help, plus updates and links to additional instructional content available on the web. Find LiveDocs Help for your product in the Adobe Help Resource Center, at www.adobe.com/go/documentation.
Think of Help, both in the product and on the web, as a hub for accessing additional content and communities of users. The most complete and up-to-date version of Help is always on the web.
Adobe PDF documentation
The in-product Help is also available as a PDF that is optimized for printing. Other documents, such as installation guides and white papers, may also be provided as PDFs.
All PDF documentation is available through the Adobe Help Resource Center, at www.adobe.com/go/documentation. To see the PDF documentation included with your software, look in the Documents folder on the installation or content DVD.
Printed documentation
Printed user guides are available for purchase in the Adobe Store at www.adobe.com/go/store, where you can also find books published by Adobe publishing partners.
Extras
You have access to a wide variety of resources that help you make the most of your Adobe software. Some of these resources are installed on your computer during the setup process; additional helpful samples and documents are included on the installation or content disc. Unique extras are also offered online by the Adobe Exchange community.
ADOBE AUDITION 3.0 3
User Guide
Installed resources
During software installation, a number of plug-ins and presets are added to the application folder. Plug-ins provide effects for audio processing and VST instruments for MIDI sequencing. Presets include a collection of effect settings optimized for specific sonic results. If you don’t want to create an effect from scratch, start with presets for inspiration.
Content on CD and DVD
On the installation disc, the Documentation folder contains a PDF version of Help, technical information, and other documents such as reference guides and specialized feature information.
In addition to the installation disc, Adobe Audition® includes the Loopology DVD. This disc provides thousands of royalty-free loops, plus ready-made music beds and professional sample sessions.
Adobe Exchange
For more free content, visit www.adobe.com/go/exchange, an online community where users download and share thousands of free actions, extensions, plug-ins, and other content for use with Adobe products.
Adobe Design Center
Adobe Design Center offers articles, inspiration, and instruction from industry experts, top designers, and Adobe publishing partners. New content is added monthly.
You can find hundreds of tutorials for design products and learn tips and techniques through videos, HTML tutorials, and sample book chapters.
New ideas are the heart of Think Tank, Dialog Box, and Gallery:
•Think Tank articles consider how today’s designers engage with technology and what their experiences mean for design, design tools, and society.
•In Dialog Box, experts share new ideas in motion graphics and digital design.
•The Gallery showcases how artists communicate design in motion.
ADOBE AUDITION 3.0 4
User Guide
Visit Adobe Design Center at www.adobe.com/designcenter.
Adobe Developer Center
Adobe Developer Center provides samples, tutorials, articles, and community resources for developers who build rich Internet applications, websites, mobile content, and other projects using Adobe products. The Developer Center also contains resources for developers who develop plug-ins for Adobe products.
In addition to sample code and tutorials, you'll find RSS feeds, online seminars, SDKs, scripting guides, and other technical resources.
Visit Adobe Developer Center at www.adobe.com/go/developer.
Customer support
Visit the Adobe Support website, at www.adobe.com/support, to find troubleshooting information for your product and to learn about free and paid technical support options. Click the Training link for access to Adobe Press books, a variety of training resources, Adobe software certification programs, and more.
Downloads
Visit www.adobe.com/go/downloads to find free updates, tryouts, and other useful software. In addition, the Adobe Store (at www.adobe.com/go/store) provides access to thousands of plug-ins from third-party developers, helping you to automate tasks, customize workflows, create specialized professional effects, and more.
Adobe Labs
Adobe Labs gives you the opportunity to experience and evaluate new and emerging technologies and products from Adobe.
At Adobe Labs, you have access to resources such as these:
• Prerelease software and technologies

ADOBE AUDITION 3.0 5
User Guide
•Code samples and best practices to accelerate your learning
•Early versions of product and technical documentation
•Forums, wiki-based content, and other collaborative resources to help you interact with like-minded developers
Adobe Labs fosters a collaborative software development process. In this environment, customers quickly become productive with new products and technologies. Adobe Labs is also a forum for early feedback, which the Adobe development teams use to create software that meets the needs and expectations of the community.
Visit Adobe Labs at www.adobe.com/go/labs.
User communities
User communities feature forums, blogs, and other avenues for users to share technologies, tools, and information. Users can ask questions and find out how others are getting the most out of their software. User-to-user forums are available in English, French, German, and Japanese; blogs are posted in a wide range of languages.
To participate in forums or blogs, visit www.adobe.com/communities.
New features
What’s new
Record and mix
Adobe Audition 3.0 is a powerful tracking and mixing application. Mix faster with new automatic crossfades, clip fade handles, and automation-editing improvements. Take full advantage of the latest hardware with multicore processor support and an optimized mixing engine.
VST plug-in manager Quickly enable or disable specific VST plug-ins, optimizing performance. (See “Enable VST effects” on page 110.)
Auto crossfades and clip fade handles Simply overlap clips to crossfade them, and adjust fade curves with on-clip handles. (See “Fade or crossfade clips in a track” on page 197.)
Improved multitrack editing Efficiently edit sessions with these key enhancements:
•Collectively trim and fade grouped clips. (See “Grouping clips” on page 192.)
•Ripple-delete ranges of clips, instantly removing time gaps. (See “Trimming and extending clips” on page 195.)
•Adjust selected ranges of automation points. (See “Edit automation envelopes” on page 207.)
•Duplicate the contents of entire tracks, including clips, effects, and automation. (See “Duplicate a track” on page 184.)
•Simultaneously view all input and output levels to comprehensively monitor a mix. (See “Monitor levels” on page 63.)
XML session support Save sessions to XML format and other shared standards for multitrack applications. (See “Save multitrack sessions” on page 241.)
Mix down directly to Edit View Quickly output a session directly to Edit View, without first exporting a file. (See “Create a single audio clip from multiple clips” on page 201.)
ADOBE AUDITION 3.0 6
User Guide
Video previews for surround mixes Watch a preview in the Video panel while adjusting mixes in the Surround Encoder. (See “Previewing video” on page 229.)
Create and arrange
Adobe Audition 3.0 offers powerful and extensive looping capabilities, as well as support for VST instruments, making it easy to create and arrange great-sounding music. Improved processing, including the high-quality Radius time-stretching engine from iZotope and numerous new effects, gives you infinite creative options.
MIDI tracks and piano-roll editor Import, record, and edit MIDI, and output it through VST instruments or hardware synthesizers. (See Composing with MIDI.)
New effects Explore creative sonic possibilities with Convolution Reverb, Analog Delay, Guitar Suite, and other new effects. (See Effects reference.)
Radius time-stretching from iZotope Access industry-standard algorithms in the updated Stretch effect, as well as the File Info and Audio Clip Looping dialog boxes.
Bitmap audio images Export spectral graphs for detailed editing in an image-editor like Adobe Photoshop®. Or, import visually-oriented graphics as source material for experimental sound designs. (See “Spectral Bitmap Image (.bmp)” on page 250 and “Import a bitmap image as audio” on page 44.)
Improved CD ripping Automatically import track information from your favorite CD database. (See “Extract CD tracks with the Extract Audio From CD command” on page 51.)
Enhanced file sorting Sort files by track number, or by the date they were opened or created. (See “Change how files appear in the Files panel” on page 49.)
Customizable workspaces Tint panels and dialog boxes to suit your working style. Add favorite commands to the shortcut bar. (See “Change interface brightness or tint” on page 29 and “Display the shortcut bar” on page 27.)
Edit and master
Adobe Audition 3.0 includes a full set of editing, restoration, and mastering tools that give you unprecedented flexibility and control. Comprehensive waveform-editing tools combined with innovative spectral frequency brushes let you edit with power and precision. The new Mastering effect, phase correction tools, and Top/Tail view make Adobe Audition 3.0 the ideal audio editing and mastering environment.
Spot Healing Brush Quickly brush over artifacts to seamlessly remove them. (See “Select artifacts and repair them automatically” on page 74.)
Effects Paintbrush Create free-form selections, and layer brush strokes to determine the intensity of effects. (See “Select spectral ranges” on page 73.)
Marquee pan and phase selections Process discrete stereo information such as center-panned vocals in Spectral Pan Display or out-of-phase audio in Spectral Phase Display. (See “Select spectral ranges” on page 73.)
Play spectral selections Play back selected frequency, pan, and phase ranges to precisely restore and process audio. (See “Play audio linearly” on page 60.)
On-clip fade and gain controls Visually adjust selections or entire files. (See “Visually fading and changing amplitude” on page 78.)
Top/Tail View Fine-tune loop transitions by simultaneously viewing the beginning and end of files. (See “View the top and tail of an audio file” on page 71.)
Mastering effect Optimize audio for maximum impact with a series of professional processors. (See “Mastering effect” on page 161.)

ADOBE AUDITION 3.0 7
User Guide
Adaptive noise reduction Quickly correct a wide range of variable broadband noise. (See “Adaptive Noise Reduction effect” on page 141.)
Graphic Panner Visually adjust the stereo field to enhance spatial perception. (See “Graphic Panner effect” on page 165.)
Play lists Organize and play marker ranges for live performance and broadcast. (See “Creating play lists” on page 85.)
Efficient file opening and saving Specify default formats for Open and Save As dialog boxes, and quickly save groups of files to one format. (See “System preferences” on page 34 and “Save a group of audio files to one format” on page 240.)
8
Chapter 2: Digital audio fundamentals
Understanding sound
Sound fundamentals
Sound starts with vibrations in the air, like those produced by guitar strings, vocal cords, or speaker cones. These vibrations push nearby air molecules together, raising the air pressure slightly. The air molecules under pressure then push on the air molecules surrounding them, which push on the next set of molecules, and so on. As high-pressure areas move through the air, they leave low-pressure areas behind them. When these waves of pressure changes reach us, they vibrate the receptors in our ears, and we hear the vibrations as sound.
When you see a visual waveform that represents audio, it reflects these waves of air pressure. The zero line in the waveform is the pressure of air at rest. When the line swings up to a peak, it represents higher pressure; when the line swings down to a trough, it represents lower pressure.
C
A 0
B
A sound wave represented as a visual waveform
A. Zero line B. Low-pressure area C. High-pressure area
Waveform measurements
Several measurements describe waveforms:
Amplitude Reflects the change in pressure from the peak of the waveform to the trough. High-amplitude waveforms are loud; low-amplitude waveforms are quiet.
Cycle Describes a single, repeated sequence of pressure changes, from zero pressure, to high pressure, to low pressure, and back to zero.
Frequency Measured in hertz (Hz), describes the number of cycles per second. (For example, a 1000-Hz waveform has 1000 cycles per second.) The higher the frequency, the higher the musical pitch.
Phase Measured in 360 degrees, indicates the position of a waveform in a cycle. Zero degrees is the start point, followed by 90º at high pressure, 180º at the halfway point, 270º at low pressure, and 360º at the end point.
Wavelength Measured in units such as inches or centimeters, is the distance between two points with the same degree of phase. As frequency increases, wavelength decreases.

ADOBE AUDITION 3.0 9
User Guide
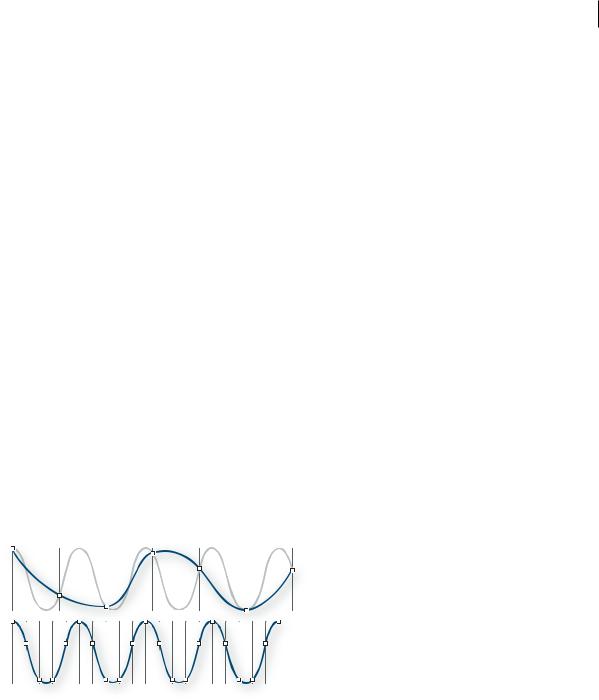
A A
C
A single cycle at left; a complete, 20-Hz waveform at right
A. Wavelength B. Degree of phase C. Amplitude D. One second
How sound waves interact
When two or more sound waves meet, they add to and subtract from each other. If their peaks and troughs are perfectly in phase, they reinforce each other, resulting in a waveform that has higher amplitude than either individual waveform.
In-phase waves reinforce each other.
If the peaks and troughs of two waveforms are perfectly out of phase, they cancel each other out, resulting in no waveform at all.
Out-of-phase waves cancel each other out.
In most cases, however, waves are out of phase in varying amounts, resulting in a combined waveform that is more complex than individual waveforms. A complex waveform that represents music, voice, noise, and other sounds, for example, combines the waveforms from each sound together.
Because of its unique physical structure, a single instrument can create extremely complex waves. That’s why a violin  and a trumpet sound different even when playing the same note.
Two simple waves combine to create a complex wave.
ADOBE AUDITION 3.0 10
User Guide
Digitizing audio
Comparing analog and digital audio
In analog and digital audio, sound is transmitted and stored very differently.
Analog audio: positive and negative voltage
A microphone converts the pressure waves of sound into voltage changes in a wire: high pressure becomes positive voltage, and low pressure becomes negative voltage. When these voltage changes travel down a microphone wire, they can be recorded onto tape as changes in magnetic strength or onto vinyl records as changes in groove size. A speaker works like a microphone in reverse, taking the voltage signals from an audio recording and vibrating to recreate the pressure wave.
Digital audio: zeroes and ones
Unlike analog storage media such as magnetic tape or vinyl records, computers store audio information digitally as a series of zeroes and ones. In digital storage, the original waveform is broken up into individual snapshots called samples. This process is typically known as digitizing or sampling the audio, but it is sometimes called analog-to- digital conversion.
When you record from a microphone into a computer, for example, analog-to-digital converters transform the analog signal into digital samples that computers can store and process.
Sample rate
Sample rate indicates the number of digital snapshots taken of an audio signal each second. This rate determines the frequency range of an audio file. The higher the sample rate, the closer the shape of the digital waveform is to that of the original analog waveform. Low sample rates limit the range of frequencies that can be recorded, which can result in a recording that poorly represents the original sound.
A
B
Two sample rates
A. Low sample rate that distorts the original sound wave. B. High sample rate that perfectly reproduces the original sound wave.
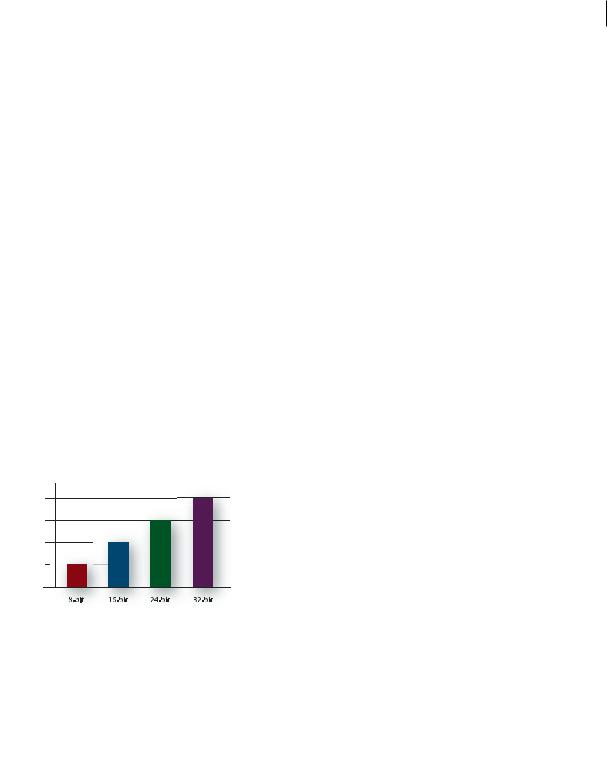
To reproduce a given frequency, the sample rate must be at least twice that frequency. (See “Nyquist frequency” on page 277.) For example, CDs have a sample rate of 44,100 samples per second, so they can reproduce frequencies up to 22,050 Hz, which is beyond the limit of human hearing, 20,000 Hz.
Here are the most common sample rates for digital audio:
ADOBE AUDITION 3.0 11
User Guide
Sample rate |
Quality level |
Frequency range |
|
|
|
11,025 Hz |
Poor AM radio (low-end multimedia) |
0–5,512 Hz |
|
|
|
22,050 Hz |
Near FM radio (high-end multimedia) |
0–11,025 Hz |
|
|
|
32,000 Hz |
Better than FM radio (standard broadcast rate) |
0–16,000 Hz |
|
|
|
44,100 Hz |
CD |
0–22,050 Hz |
|
|
|
48,000 Hz |
Standard DVD |
0–24,000 Hz |
|
|
|
96,000 Hz |
High-end DVD |
0–48,000 Hz |
|
|
|
Bit depth
Just as sample rate determines frequency range, bit depth determines dynamic range. When a sound wave is sampled, each sample is assigned the amplitude value closest to the original wave’s amplitude. Higher bit depth provides more possible amplitude values, producing greater dynamic range, a lower noise floor, and higher fidelity:
Bit depth |
Quality level |
Amplitude values |
Dynamic range |
|
|
|
|
8-bit |
Telephony |
256 |
48 dB |
|
|
|
|
16-bit |
CD |
65,536 |
96 dB |
|
|
|
|
24-bit |
DVD |
16,777,216 |
144 dB |
|
|
|
|
32-bit |
Best |
4,294,967,296 |
192 dB |
|
|
|
|
192 dB
144 dB
96 dB
48 dB
0 dB
Higher bit depths provide greater dynamic range.
Audio file contents and size
An audio file on your hard drive, such as a WAV file, consists of a small header indicating sample rate and bit depth, and then a long series of numbers, one for each sample. These files can be very large. For example, at 44,100 samples per second and 16 bits per sample, a file requires 86 KB per second—about 5 MB per minute. That figure doubles to 10 MB per minute for a stereo CD, which has two channels.
In contrast to a digital audio file, a MIDI file might be as small as 10 KB per minute, so you can store up to 100  minutes of MIDI per megabyte. For more information, see “Understanding MIDI data and VST instruments” on page 213.

ADOBE AUDITION 3.0 12
User Guide
How Adobe Audition digitizes audio
When you record audio in Adobe Audition, the sound card starts the recording process and specifies what sample rate and bit depth to use. Through Line In or Microphone In ports, the sound card receives analog audio and digitally samples it at the specified rate. Adobe Audition stores each sample in sequence until you stop recording.
When you play a file in Adobe Audition, the process happens in reverse. Adobe Audition sends a series of digital samples to the sound card. The card reconstructs the original waveform and sends it as an analog signal through Line Out ports to your speakers.
To summarize, the process of digitizing audio starts with a pressure wave in the air. A microphone converts this pressure wave into voltage changes. A sound card converts these voltage changes into digital samples. After analog sound becomes digital audio, Adobe Audition can record, edit, process, and mix it—the possibilities are limited only by your imagination.
13
Chapter 3: Workflow and workspace
Workflow
Workflow overview
Adobe Audition provides three distinct views, each optimized for unique audio workflows:
•In Edit View, you modify individual audio files, optimizing them for radio broadcast, the Internet, and audio CDs.
•In Multitrack View, you layer multiple audio files, mixing them together to create sophisticated musical compositions and video soundtracks.
•In CD View, you assemble audio files and convert them into tracks on audio CDs.
With the integrated environment of Adobe Audition, you can move seamlessly between these views, simultaneously editing and mixing files to create polished, professional audio. This integrated environment extends to Adobe video applications, where you can easily incorporate Adobe Audition into comprehensive video-editing workflows.
See also
“Comparing Edit View and Multitrack View” on page 20
Editing workflow
1 |
2 |
3 |
4 |
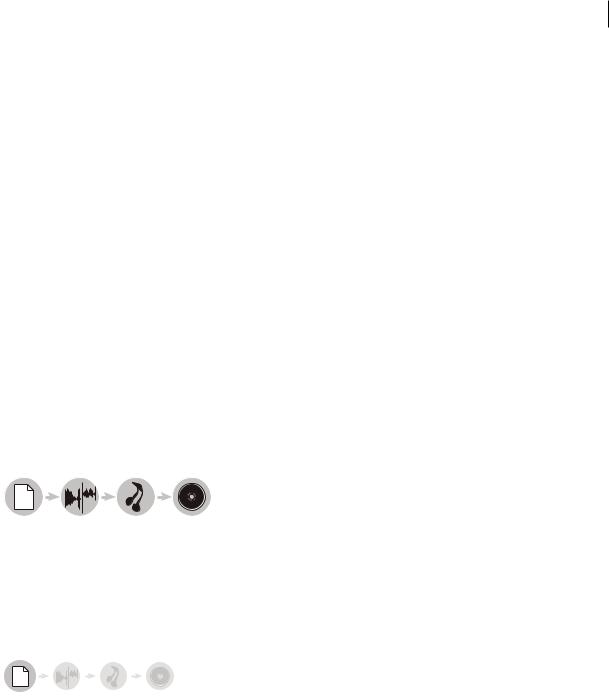
1. Open file 2. Edit audio 3. Apply effects 4. Save changes
In Edit View, you edit, restore, and enhance individual audio files, such as voiceovers, old vinyl recordings, and more. Any saved changes are permanent, making Edit View a great choice for mastering and finalizing files. (See “Editing audio files” on page 65.)
Open or create a file
Open an existing audio file that you want to modify. Alternatively, create a blank file that you’ll record or paste audio into. (See “Opening audio files in Edit View” on page 43.)
ADOBE AUDITION 3.0 14
User Guide
Creating a new file
Edit audio
In the Main panel, trim or extend a file by deleting or generating audio. To create a sonic collage, combine pasted audio from multiple files. Then, select noise or other audio you want to process with effects. (See “Selecting audio” on page 72.)
Editing audio in the Main panel
Apply effects
Apply process effects individually, or apply groups of VST effects in the Mastering Rack. In the rack, you can edit and reorder effects until you achieve the perfect results. (See “Applying effects in Edit View” on page 106.)
ADOBE AUDITION 3.0 15
User Guide
Applying groups of effects in the Mastering Rack
Save your changes
Save the polished, final file to disk, or automatically insert it in CD View or a multitrack session. (See “Saving and exporting files” on page 240 and Building audio CDs.)
Saving a file to disk
Multitrack workflow
|
|
|
|
|
|
|
|
|
|
|
|
|
|
|
|
|
+3 |
|
|
|
|
|
|
|
|
|
|
|
|
|
|
|
|
|
|
|
|
|
|
|
0 |
|
|
|
|
|
|
|
|
|
|
|
|
|
|
|
|
|
|
|
|
|
6 |
|
|
|
|
|
1 |
|
|
2 |
3 |
|
|
|
4 |
|
|
5 |
|
|
|
6 |
|||||||
1. Open session |
2. Insert or record files |
3. Arrange clips |
4. Apply effects |
5. Mix tracks 6. Export |
||||||||||||||||||
In Multitrack View, you layer multiple audio files to create stereo or surround-sound mixes. The edits and effects you apply aren’t permanent; if a mix doesn’t sound good next week, or even next year, simply change mix settings. (See “About multitrack sessions” on page 179.)
ADOBE AUDITION 3.0 16
User Guide
Open or create a session
+3 0
-6
From the File menu, choose Open Session or New Session. When you create a new session, you specify the sample rate for audio clips the session will contain. (See “Opening and adding to sessions in Multitrack View” on page 46.)
To see how professional sessions are structured, open one of the sample sessions on the Adobe Audition Loopology  DVD.
DVD.
Creating a new session
Insert or record files
+3 0
-6
Insert audio, video, and MIDI files into tracks, or record new audio and MIDI while playing along with existing tracks. To build a particularly flexible session, insert audio loops—you can choose from over 5000 on the Adobe Audition Loopology DVD. ( See “Insert an audio file into a session” on page 47 and “Record audio clips in Multitrack View” on page 57.)
Inserting from the Files panel
ADOBE AUDITION 3.0 17
User Guide
Arrange clips in the timeline
+3 0
-6
In the Main panel, arrange and edit clips in the timeline. In Multitrack View, edits are impermanent for maximum flexibility. But if you want to permanently edit a clip, simply double-click it to enter Edit View. (See “Arranging clips” on page 191 and “Editing clips” on page 195.)
Arranging and editing clips in the Main panel
Apply effects
+3 0
-6
Apply effects in the Effects Rack, where you can edit, group, and reorder effects on each track. At any future time, you can update or remove effects to address the needs of different audio projects. (See “Applying effects in Multitrack View” on page 107.)
Applying effects in the Effects Rack

ADOBE AUDITION 3.0 18
User Guide
Route and mix tracks
+3
0
-6
In the Mixer or Main panel, output audio tracks directly to the Master track for standard mixes. As you build more complex mixes, combine related tracks in buses, and use sends to output individual tracks to multiple destinations. Then automate effect and mix settings over time, creating a dynamic, evolving mix that highlights different musical passages. (See “Track routing and EQ controls” on page 185 and “Automating track settings” on page 204.)
Routing and mixing tracks in the Mixer
Export
+3 0
-6
Export your finished mix to a file, which you can automatically insert in Edit View for mastering or CD View for archiving and distributing. (See “Export a session to an audio file” on page 242 and Building audio CDs.)
ADOBE AUDITION 3.0 19
User Guide
Exporting a mix to an audio file
Viewing, zooming, and navigating audio
Basic components of Edit, Multitrack, and CD View
The workspace differs in Edit View, Multitrack View, and CD View. However, all three views have similar basic components, such as view buttons, the Main panel, and the status bar.
A
B
C
D
E
F
G
Basic components of Edit, Multitrack, and CD View (Multitrack View shown)
A. View buttons B. Menu bar C. Toolbar D. Shortcut bar E. Main panel F. Various other panels G. Status bar

ADOBE AUDITION 3.0 20
User Guide
See also
“Comparing Edit View and Multitrack View” on page 20
“About CD View” on page 264
Comparing Edit View and Multitrack View
Adobe Audition provides different views for editing audio files and creating multitrack mixes. To edit individual files, use Edit View. To mix multiple files and integrate them with MIDI and video, use Multitrack View.
Edit View and Multitrack View use different editing methods, and each has unique advantages. Edit View uses a destructive method, which changes audio data, permanently altering saved files. Such permanent changes are preferable when converting sample rate and bit depth, mastering, or batch processing. Multitrack View uses a nondestructive method, which is impermanent and instantaneous, requiring more processing power, but increasing flexibility. This flexibility is preferable when gradually building and reevaluating a multilayered musical composition or video soundtrack.
You can combine destructive and nondestructive editing to suit the needs of a project. If a multitrack clip requires destructive editing, for example, simply double-click it to enter Edit View. Likewise, if an edited waveform contains recent changes that you dislike, use the Undo command to revert to previous states—destructive edits aren’t applied until you save a file.
For more information about Edit View, see “Editing audio files” on page 65; for more information about Multitrack View, see Mixing multitrack sessions.
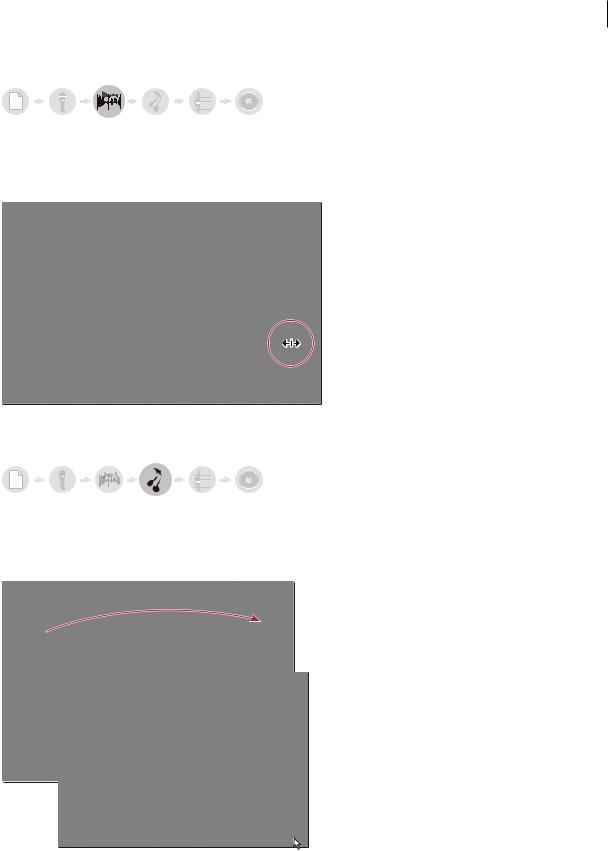
Switch views
Do one of the following:
•From the View menu, choose Edit View, Multitrack View, or CD View.
•Click the Edit View  , Multitrack View
  , or CD View button
  in the toolbar.
•In Multitrack View, double-click an audio clip to open it in Edit View. Alternatively, double-click a file in the Files panel. Or, select an audio clip in either the Files panel or the Main panel, and then click the Edit File button  in the Files panel.
See also
“Comparing Edit View and Multitrack View” on page 20
“Keys for opening views” on page 270
Zooming audio
Zooming adjusts the view of the timeline display in the Main panel. The ideal zoom level depends on your current task. For example, you can zoom in to see details in an audio file or multitrack session, or you can zoom out to get an overview.
Adobe Audition provides several ways to zoom. You can either click buttons in the Zoom panel, or drag scroll bars and rulers.

ADOBE AUDITION 3.0 21
User Guide
B
A
C
Zooming methods
A. Click buttons in Zoom panel B. Drag scroll bars C. Right-click and drag rulers
See also
“Keys for playing and zooming audio” on page 270
Zoom with the Zoom panel
1To display the Zoom panel, choose Window > Zoom Controls.
2Do any of the following:
•Click the Zoom In Vertically button  to increase the vertical resolution in Edit View or show fewer tracks in Multitrack View.
•Click the Zoom In Horizontally button  to zoom in on the center of the visible waveform or session.
•Click the Zoom To Selection button  to zoom in on the currently selected range.
•Click the Zoom In To Right Edge Of Selection button  to zoom in on the right boundary of the currently selected range.
•Click the Zoom In To Left Edge Of Selection button  to zoom in on the left boundary of the currently selected range.
•Click the Zoom Out Horizontally button  to zoom out from the center of the visible waveform or session.
•Click the Zoom Out Full Both Axes button  to display the entire audio file in Edit View or session in Multitrack View.
•Click the Zoom Out Vertically button  to decrease the vertical resolution in Edit View or show more tracks in Multitrack View.
Zoom with a scroll bar or ruler
In the Main panel, do any of the following
•Move the pointer to either edge of a horizontal or vertical scroll bar. When the pointer becomes a magnifying glass with arrows  , drag left or right, or up or down.
•Right-click and drag in the horizontal ruler to zoom into a specific time range. The magnifying glass icon appears, creating a selection that shows you the range that will fill the Main panel.
•(Edit View only) Right-click and drag in the vertical ruler to zoom into a specific amplitude range. The magnifying glass icon appears, creating a selection of the range that will fill the Main panel.
To zoom with the mouse wheel, place the pointer over the appropriate scroll bar or ruler, and roll the wheel. (In Edit  View, this zoom method also works when the pointer is over the waveform.) You can set the percentage of this zoom on the General tab of the Preferences dialog box. (See “General preferences” on page 33.)
Navigate with a scroll bar or ruler
At higher zoom levels, you may need to scroll to see different audio content in the Main panel.

ADOBE AUDITION 3.0 22
User Guide
To change the placement of a horizontal scroll bar, right-click it, and choose Above Display or Below Display. This  sets the position of the scroll bar for only the current view (Edit View or Multitrack View).
A
B
C
D
Scrolling devices
A. Horizontal scroll bar B. Vertical scroll bar (Multitrack View only) C. Vertical ruler (Edit View only) D. Horizontal ruler
•To scroll through time, drag the horizontal scroll bar, or drag left or right in the horizontal ruler.
•To scroll through audio amplitudes in Edit View, drag up or down in the vertical ruler.
•To scroll through tracks in Multitrack View, drag the vertical scroll bar.
 To scroll through tracks with the mouse wheel, place the pointer over the track display, and roll the wheel.
See also
“Navigate with the Selection/View panel” on page 22
Navigate with the Selection/View panel
The Selection/View panel shows the start, end, and length of the current selection and view in the Main panel. The panel displays this information in the current time format, such as Decimal or Bars And Beats. (See “To change the time display format” on page 55.)
Selection/View Controls panel
1To display the Selection/View panel, choose Window > Selection/View Controls.
2(Optional) Enter new values into the Begin, End, or Length boxes to change the selection or view.
See also
“Monitoring time during recording and playback” on page 54
“Dock, group, or float panels” on page 23

ADOBE AUDITION 3.0 23
User Guide
Customizing workspaces
About workspaces
Adobe video and audio applications provide a consistent, customizable workspace. Although each application has its own set of panels (such as Tools, Properties, Timeline, and so on), you move and group panels in the same way across products.
The main window of a program is the application window. Panels are organized in this window in an arrangement called a workspace. The default workspace contains groups of panels as well as panels that stand alone.
You customize a workspace by arranging panels in the layout that best suits your working style. You can create and save several custom workspaces for different tasks—for example, one for editing and one for previewing.
You can drag panels to new locations, move panels into or out of a group, place panels alongside each other, and undock a panel so that it floats in a new window above the application window. As you rearrange panels, the other panels resize automatically to fit the window.
You can use floating windows to create a workspace more like those in previous versions of Adobe applications, or to  place panels on multiple monitors.
B C
A
Example workspace
A. Application window B. Grouped panels C. Individual panel
For a video about the Adobe workspace, see www.adobe.com/go/vid0249.
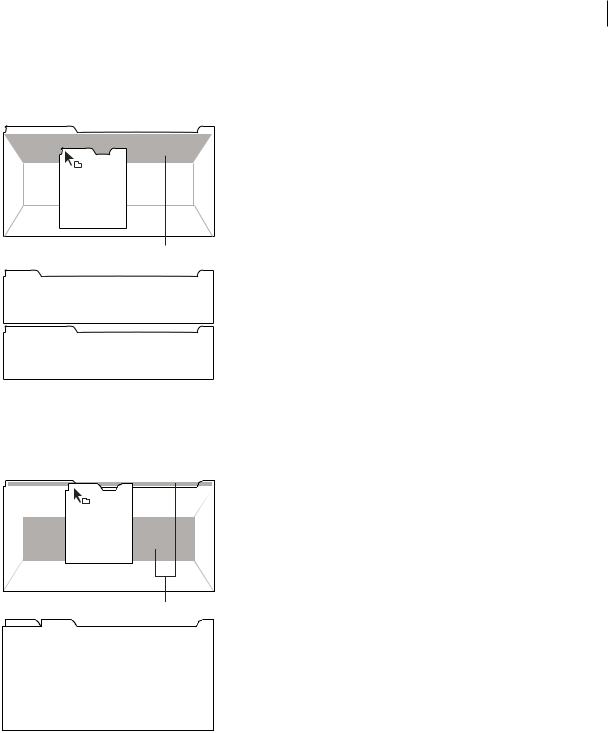
Dock, group, or float panels
You can dock panels together, move panels into or out of a group, and undock a panel so that it floats in a new window above the application window. As you drag a panel, drop zones—areas onto which you can move the panel— become highlighted. The drop zone you choose determines where the panel is inserted, and whether it docks or groups with other panels.
ADOBE AUDITION 3.0 24
User Guide
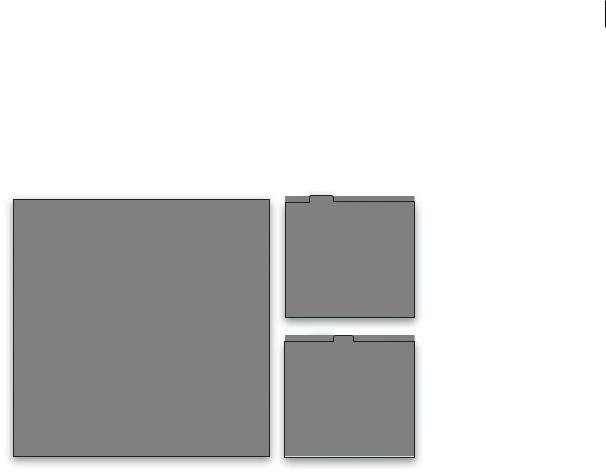
Docking zones
Docking zones exist along the edges of a panel, group, or window. Docking a panel places it adjacent to the existing group, resizing all groups to accommodate the new panel.
A
B
C
Dragging panel (A) onto docking zone (B) to dock it (C)
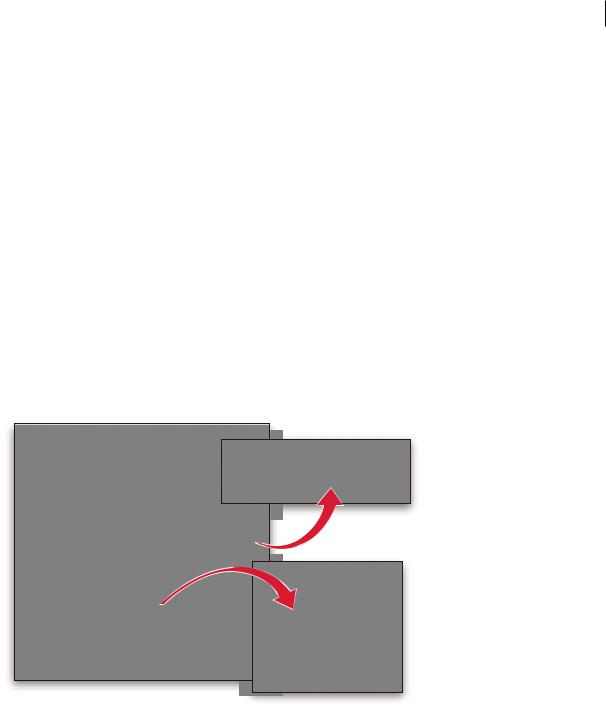
Grouping zones
Grouping zones exist in the middle of a panel or group, and along the tab area of panels. Grouping a panel stacks it with other panels.
A
B
C
Dragging panel (A) onto grouping zone (B) to group it with existing panels (C)
Dock or group panels
1If the panel you want to dock or group is not visible, choose it from the Window menu.
2Do one of the following:
• To move an individual panel, drag the gripper area in the upper-left corner of a panel’s tab onto the desired drop zone.
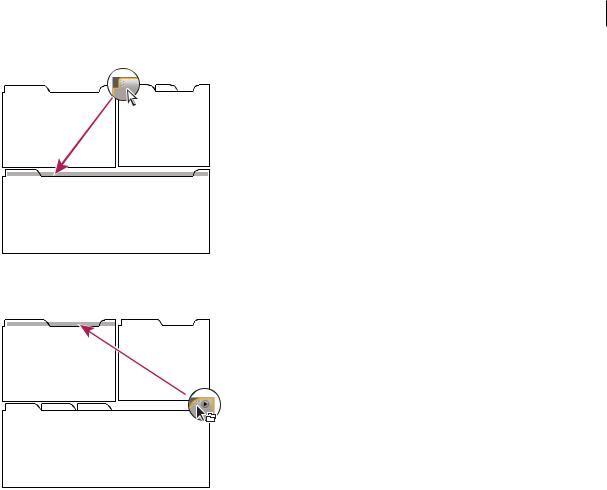
ADOBE AUDITION 3.0 25
User Guide
Drag panel gripper to move one panel
• To move an entire group, drag the group gripper at the upper-right corner onto the desired drop zone.
Drag group gripper to move entire group
The application docks or groups the panel, according to the type of drop zone.
Undock a panel in a floating window
When you undock a panel in a floating window, you can add panels to the window or otherwise modify it, as you do the application window. You can use floating windows to make use of a secondary monitor, or to create a workspace like those in earlier versions of Adobe applications.
Select the panel you want to undock (if it’s not visible, choose it from the Window menu), and then do one of the following:
•Choose Undock Panel or Undock Frame from the panel menu. Undock Frame undocks the panel group.
•Hold down Ctrl (Windows®) or Command (Mac OS®), and drag the panel or group from its current location. When you release the mouse button, the panel or group appears in a new floating window.
•Drag the panel or group outside the application window. (If the application window is maximized, drag the panel to the Windows task bar.)
Resize panel groups
When you position the pointer over dividers between panel groups, resize icons appear. When you drag these icons, all groups that share the divider are resized. For example, suppose your workspace contains three panel groups stacked vertically. If you drag the divider between the bottom two groups, they are resized, but the topmost group doesn’t change.
Loading...