


 Loading...
Adobe Illustrator Help |
|
Using Help |
|
|
|
Using Help | Contents | Index |
Back |
1 |
Using Help
About online Help
Adobe Systems, Inc. provides complete documentation in the Adobe PDF Help system. The Help system includes information on all the tools, commands, and features for both Windows and Mac OS. The PDF format is designed for easy navigation online, and support for third-party screen readers compatible with Windows.The Help can also be printed as a desktop reference.
Navigating in Help
The Help will open in an Acrobat window with the bookmark pane open. If the bookmark pane is not open choose Window > Bookmarks. You can also navigate using the navigation bar, the index, or search the document.
At the top and bottom of each page is a navigation bar. Click Using Help to return to this introduction. Clicking Contents, or Index will take you to that section.
The Next Page  and the Previous Page
  arrows let you move through the pages sequentially. Click Back to return to the last page you viewed. You can also use the navigation arrows in the Acrobat toolbar.
Using bookmarks, the table of contents, the index, and Find
The contents of Help are shown as bookmarks in the bookmark pane. To view subtopics, click the plus sign next to a bookmark. Each bookmark is a hyperlink to the associated section of the Help document.
To go to the information, click its bookmark. As the information is displayed in the document pane, its bookmark is highlighted.
You can turn highlighting on or off by selecting the Highlight Current Bookmark option from the bookmark pane menu.
To find a topic using the table of contents:
1Click Contents in the navigation bar at the top or bottom of any page.
2Click a topic on the Contents page to move to the first page of that topic.
3In the bookmark pane, expand the topic to see its subtopics.
To find a topic using the index:
1Click Index in the navigation bar at the top or bottom of any page.
2Click the appropriate letter at the top of the page.
You can also expand the Index bookmark, and click the letter in the bookmark pane.
3Locate your entry, and click the page number link to view the information.
4To view multiple entries, click Back to return to the same place in the index.
Using Help | Contents | Index |
Back |
1 |

Adobe Illustrator Help |
|
Using Help |
|
|
|
Using Help | Contents | Index |
Back |
2 |
To find a topic using the Find command:
1Choose Edit > Find.
2Enter a word or a phrase in the text box, and click OK.
Acrobat will search the document, starting from the current page, and display the first occurrence of the word or phrase you are searching for.
3 To find the next occurrence, choose Edit > Find Again.
Printing the Help file
Although the Help has been optimized for on-screen viewing, you can print pages you select, or the entire file.
To print, choose Print from the File menu, or click the printer icon in the Acrobat toolbar.
Using Help | Contents | Index |
Back |
2 |
Adobe Illustrator Help |
|
Contents |
|
|
|
Using Help | Contents | Index |
Back |
3 |
Contents
Looking at the Work Area 4
Setting Up Artwork in Illustrator 25
Drawing 47
Working with Objects 91
Transforming and Distorting Shapes 113
Applying Color 152
Producing Consistent Color 174
Using Transparency, Gradients, and Patterns 191
Using Layers 215
Using Appearance Attributes, Styles, and Effects 228
Working with Bitmap Images 237
Using Type 250
Creating Templates for Data-Driven Graphics 285
Preparing Graphics for the Web 292
Saving and Exporting 320
Printing 332
Producing Color Separations 345
Automating Tasks 364
Using Graphs 375
Macintosh Shortcuts 395
Windows Shortcuts 399
Legal Notices 403
Using Help | Contents | Index |
Back |
3 |

Adobe Illustrator Help |
Looking at the Work Area |
|
|
|
|
Using Help | Contents | Index |
Back |
4 |
Looking at the Work Area
Using the tools
The first time you start Illustrator, the toolbox appears on the left side of the screen. The tools in the toolbox let you create, select, and manipulate objects in Illustrator.
When you select most tools, the mouse pointer matches the tool’s icon. For example, choosing the paintbrush tool changes the pointer to a paintbrush. You can also change a tool pointer to a precision pointer, such as a cross hair  , for greater precision when aligning or working with detailed artwork.
To move the toolbox:
Drag the toolbox by the top bar.
To show or hide the toolbox:
To show or hide the toolbox, choose Window > Tools. When the toolbox is showing, a check mark appears before the name.
To display hidden tools on-screen:
1Press a tool in the toolbox that has hidden tools underneath it. (Tools that have hidden tools are identified by a triangle in the lower right corner.)
2When the toolbar of hidden tools appears, hold down the mouse button and drag to the arrow at the end of the toolbar. The toolbar detaches from the toolbox.
To close a detached toolbar:
Click the close box.
To change the pointer to a precision pointer:
Do one of the following:
•While the tool is selected, press Caps Lock on the keyboard.
•Choose Edit > Preferences > General (Windows and Mac OS 9) or Illustrator > Preferences > General (Mac OS X), select Use Precise Cursors, and click OK.
Using palettes
Adobe Illustrator includes a number of palettes to help you monitor and modify your work. By default, these palettes appear stacked together in several groups. You can also dock palettes so that you can move them together.
Showing and hiding palettes
You can display and hide palettes as you work.
Using Help | Contents | Index |
Back |
4 |

Adobe Illustrator Help |
Looking at the Work Area |
|
|
|
|
Using Help | Contents | Index |
Back |
5 |
To show or hide a palette:
Do one of the following:
•Choose Window > (window name). A check mark appears before a window that is currently open.
•Press Tab to hide or show all palettes and the toolbox.
•Press Shift+Tab to hide or show all palettes except for the toolbox.
Changing the palette display
You can rearrange your palettes to make better use of your work area by using the following techniques:
•To make a palette appear at the front of its group, click the palette’s tab.
•To move an entire palette group, drag its title bar.
•To rearrange or separate a palette group, drag a palette’s tab. Dragging a palette outside of an existing group creates a new palette window.
•To move a palette to another group, drag the palette’s tab to that group.
•To dock palettes so that you can move them together, drag a palette’s tab to the bottom of another palette.
•To move an entire docked palette group, drag its title bar.
•To display a palette menu, position the pointer on the triangle  in the upper right corner of the palette and hold down the mouse button.
•To change the size of a resizable palette, drag the lower right corner of the palette (Windows) or drag the size box at the lower right corner of the palette (Mac OS).
Note: A few palettes, such as the Color palette, cannot be resized by dragging.
•To collapse a group to the palette titles only, click the minimize/maximize box (Windows) or click the zoom box (Mac OS). You can still open the palette menu from a collapsed palette.
•To cycle through the available sizes for a palette—the default size, size with hidden options showing, size as resized by dragging, and palette titles only—double-click the palette’s tab.
For maximum performance, hide all palettes except those that are necessary for your work.
Using Help | Contents | Index |
Back |
5 |
Adobe Illustrator Help |
Looking at the Work Area |
|
|
|
|
Using Help | Contents | Index |
Back |
6 |
Toolbox overview (1 of 5)
|
|
|
|
|
|
|
|
|
|
|
|
|
|
|
|
|
|
|
|
|
|
|
|
|
|
|
|
|
|
|
|
|
|
|
|
|
|
|
|
|
|
|
|
|
|
|
|
|
|
|
|
|
|
|
|
|
|
|
|
|
|
|
|
|
|
|
|
|
|
|
|
|
|
|
|
|
|
|
|
|
|
|
|
|
|
|
|
|
|
|
|
|
|
|
|
|
|
|
|
|
|
|
|
|
|
|
|
|
|
|
|
|
|
|
|
|
|
|
|
|
|
|
|
|
|
|
|
|
|
|
|
|
|
|
|
|
|
|
|
|
|
|
|
|
|
|
|
|
|
|
|
|
|
|
|
|
|
|
|
|
|
|
|
|
|
|
|
|
|
|
|
|
|
|
|
|
|
|
|
|
|
|
|
|
|
|
|
|
|
|
|
|
|
|
|
|
|
|
|
|
|
|
|
|
|
|
|
|
|
|
|
|
|
|
|
|
|
|
|
|
|
|
|
|
|
|
|
|
|
|
|
|
|
|
|
|
|
|
|
|
|
|
|
|
|
|
|
|
|
|
|
|
|
|
|
|
|
|
|
|
|
|
|
|
|
|
|
|
|
|
|
|
|
|
|
|
|
|
|
|
|
|
|
|
|
|
|
|
|
|
|
|
|
|
|
|
|
|
|
|
|
|
|
|
|
|
|
|
|
|
|
|
|
|
The selection tool |
Thedirect-selection |
The group- |
The magic wand |
|||||||||||||||||||||||||||||||
(V) selects entire |
tool (A) selects |
selection tool |
tool (Y) selects |
|||||||||||||||||||||||||||||||
objects. |
points or path |
selects objects and |
objects of similar |
|||||||||||||||||||||||||||||||
|
|
|
segments within |
groups within |
attributes. |
|||||||||||||||||||||||||||||
|
|
|
objects. |
groups. |
|
|
|
|
|
|
|
|
|
|
|
|
|
|
|
|
|
|
|
|||||||||||
|
|
|
|
|
|
|
|
|
|
|
|
|
|
|
|
|
|
|
|
|
|
|
|
|
|
|
|
|
|
|
|
|
|
|
|
|
|
|
|
|
|
|
|
|
|
|
|
|
|
|
|
|
|
|
|
|
|
|
|
|
|
|
|
|
|
|
|
|
|
|
|
|
|
|
|
|
|
|
|
|
|
|
|
|
|
|
|
|
|
|
|
|
|
|
|
|
|
|
|
|
|
|
|
|
|
|
|
|
|
|
|
|
|
|
|
|
|
|
|
|
|
|
|
|
|
|
|
|
|
|
|
|
|
|
|
|
|
|
|
|
|
|
|
|
|
|
|
|
|
|
|
|
|
|
|
|
|
|
|
|
|
|
|
|
|
|
|
|
|
|
|
|
|
|
|
|
|
|
|
|
|
|
|
|
|
|
|
|
|
|
|
|
|
|
|
|
|
|
|
|
|
|
|
|
|
|
|
|
|
|
|
|
|
|
|
|
|
|
|
|
|
|
|
|
|
|
|
|
|
|
|
|
|
|
|
|
|
|
|
|
|
|
|
|
|
|
|
|
|
|
|
|
|
|
|
|
|
|
|
|
|
|
|
|
|
|
|
|
|
|
|
|
|
|
|
|
|
|
|
|
|
|
|
|
|
|
|
|
|
|
|
|
|
|
|
|
|
|
|
|
|
|
|
|
|
|
|
|
|
|
|
|
|
|
|
|
|
|
|
|
|
|
|
|
|
|
|
|
|
|
|
|
|
|
|
|
|
|
|
|
|
|
|
|
|
|
|
|
|
|
|
|
|
|
|
|
|
|
|
|
|
|
|
|
|
|
|
|
|
|
|
|
|
|
|
|
|
|
|
|
|
|
|
|
The direct-select |
The lasso tool |
||||||||||||||
lasso tool (Q) selects |
selects entire |
||||||||||||||
points or path |
objects. |
||||||||||||||
segments within |
|
|
|
||||||||||||
objects. |
|
|
|
||||||||||||
|
|
|
|
|
|
|
|
|
|
|
|
|
|
|
|
|
|
|
|
|
|
|
|
|
|
|
|
|
|
|
|
|
|
|
|
|
|
|
|
|
|
|
|
|
|
|
|
|
|
|
|
|
|
|
|
|
|
|
|
|
|
|
|
|
|
|
|
|
|
|
|
|
|
|
|
|
|
|
|
|
|
|
|
|
|
|
|
|
|
|
|
|
|
|
|
|
|
|
|
|
|
|
|
|
|
|
|
|
|
|
|
|
|
|
|
|
|
|
|
|
|
|
|
|
|
|
|
The pen tool (P) |
The add-anchor- |
|||||||||||
draws straight and |
point tool (+) adds |
|||||||||||
curved lines to create |
anchor points to |
|||||||||||
objects. |
paths. |
|||||||||||
|
|
|
|
|
|
|
|
|
|
|
|
|
|
|
|
|
|
|
|
|
|
|
|
|
|
|
|
|
|
|
|
|
|
|
|
|
|
|
|
|
|
|
|
|
|
|
|
|
|
|
|
|
|
|
|
|
|
|
|
|
|
|
|
|
|
|
|
|
|
|
|
|
|
|
|
|
|
|
|
|
|
|
|
|
|
|
|
|
|
|
|
|
|
|
|
|
|
|
|
|
|
|
|
The delete-anchor- |
The convert- |
The type tool (T) |
The area type tool |
point tool (-) deletes |
anchor-point tool |
creates individual |
changes closed |
anchor points from |
(Shift+C) changes |
type and type |
paths to type |
paths. |
smooth points to |
containers and lets |
containers and lets |
|
corner points and |
you enter and edit |
you enter and edit |
|
vice versa. |
type. |
type within them. |
Using Help | Contents | Index |
Back |
6 |
Adobe Illustrator Help |
|
|
|
|
|
|
|
|
|
|
Looking at the Work Area |
||||||||||||||||||
|
|
|
|
|
|
|
|
|
|
|
|
|
|
|
|
|
|
|
|
|
|
|
|
|
|
|
|
|
|
Using Help | Contents | Index |
|
|
|
|
|
|
|
|
|
|
|
Back |
7 |
||||||||||||||||
|
|
|
|
|
|
|
|
|
|
|
|
|
|
|
|
|
|
|
|
|
|
|
|
|
|
|
|
|
|
|
|
|
|
|
|
|
|
|
|
|
|
|
|
|
|
|
|
|
|
|
|
|
|
|
|
|
|
|
|
|
|
|
|
|
|
|
|
|
|
|
|
|
|
|
|
|
|
|
|
|
|
|
|
|
|
|
|
|
|
|
|
|
|
|
|
|
|
|
|
|
|
|
|
|
|
|
|
|
|
|
|
|
|
|
|
|
|
|
|
|
|
|
|
|
|
|
|
|
|
|
|
|
|
|
|
|
|
|
|
|
|
|
|
|
|
|
|
|
|
|
|
|
|
|
|
|
|
|
|
|
|
|
|
|
|
|
|
|
|
|
|
|
|
|
|
|
|
|
|
|
|
|
|
|
|
|
|
|
|
|
|
|
|
|
|
|
|
|
|
|
|
|
|
|
|
|
|
|
|
|
|
|
|
|
|
|
|
|
|
|
|
|
|
|
|
|
|
|
|
|
|
|
|
|
|
|
|
|
|
|
|
|
|
|
|
|
|
|
|
|
|
|
|
|
|
|
|
|
|
|
|
|
|
|
|
|
|
|
|
|
|
|
|
|
|
|
|
|
|
|
|
|
|
|
|
|
|
|
|
|
|
|
|
|
|
|
|
|
|
|
|
|
|
|
|
|
|
|
|
|
|
|
|
|
|
|
|
|
|
|
|
|
|
|
|
|
|
|
|
|
|
|
|
|
|
|
|
|
|
|
|
|
|
|
|
|
|
|
|
|
|
|
|
|
|
|
|
|
|
|
|
|
|
|
|
|
|
|
|
|
|
|
|
|
|
|
|
|
|
|
|
|
|
|
|
|
|
|
|
|
|
|
|
|
|
|
|
|
|
|
|
|
|
|
|
|
|
|
|
|
|
|
|
|
|
|
|
|
|
|
|
|
|
|
|
|
|
|
|
|
|
|
|
|
|
|
|
|
|
|
|
|
|
|
|
|
|
|
|
The path-type tool changes paths to type paths, and lets you enter and edit type on them.
The vertical type tool creates vertical type and vertical type containers and lets you enter and edit vertical type.
The vertical areatype tool changes closed paths to vertical type containers and lets you enter and edit type within them.
The vertical pathtype tool changes paths to vertical type paths and lets you enter and edit type on them.
Toolbox overview (2 of 5)
The line tool (\) draws individual straight line segments.
|
|
|
|
|
|
|
|
|
|
|
|
|
|
|
|
|
|
|
|
|
|
|
|
|
|
|
|
|
|
|
|
|
|
|
|
|
|
|
|
|
|
|
|
|
|
|
|
|
|
|
|
|
|
|
|
|
|
|
|
|
|
|
|
|
|
|
|
|
|
|
|
|
|
|
|
|
|
|
|
|
|
|
|
|
|
|
|
|
|
|
|
|
|
|
|
|
|
|
|
|
|
|
|
|
|
|
|
|
|
|
|
|
|
|
|
|
|
|
|
|
|
|
|
|
|
|
|
|
|
|
|
|
|
|
|
|
|
|
|
|
|
|
|
|
|
|
|
|
|
|
|
|
|
|
|
|
|
|
|
|
|
The arc tool draws |
The spiral tool |
The grid tool draws |
|||||||||||||||
individual concave or |
draws clockwise and |
rectangular grids. |
|||||||||||||||
convex curve |
counterclockwise |
|
|
|
|
|
|
|
|||||||||
segments. |
spirals. |
|
|
|
|
|
|
|
|||||||||
|
|
|
|
|
|
|
|
|
|
|
|
|
|
|
|
|
|
|
|
|
|
|
|
|
|
|
|
|
|
|
|
|
|
|
|
|
|
|
|
|
|
|
|
|
|
|
|
|
|
|
|
|
|
|
|
|
|
|
|
|
|
|
|
|
|
|
|
|
|
|
|
|
|
|
|
|
|
|
|
|
|
|
|
|
|
|
|
|
|
|
|
|
|
|
|
|
|
|
|
|
|
|
|
|
|
|
|
|
|
|
|
|
|
|
|
|
|
|
|
|
|
|
|
|
|
|
|
|
|
|
|
|
|
|
|
|
|
|
|
|
|
|
|
|
|
|
|
|
|
|
|
|
|
|
|
|
|
|
|
|
|
|
|
|
|
|
|
|
|
|
|
|
|
|
|
|
|
|
|
|
|
|
|
|
|
|
|
|
|
The polar grid tool |
The rectangle |
The rounded- |
The ellipse tool (L) |
|
draws circular chart |
tool (M) draws |
rectangle tool |
draws circles and |
|
grids. |
squares and |
draws squares and |
ovals. |
|
|
|
rectangles. |
rectangles with |
|
|
|
|
rounded corners. |
|
Using Help | Contents | Index |
Back |
7 |

Adobe Illustrator Help |
|
|
|
|
Looking at the Work Area |
|||||||
|
|
|
|
|
|
|
|
|
|
|
|
|
Using Help | Contents | Index |
|
|
|
|
|
Back |
8 |
|||||
|
|
|
|
|
|
|
|
|
|
|
|
|
|
|
|
|
|
|
|
|
|
|
|
|
|
|
|
|
|
|
|
|
|
|
|
|
|
|
The polygon tool |
The star tool draws |
The flare tool |
|||||
draws regular, multi- |
stars |
creates lens-flare or |
|||||
sided shapes. |
|
|
|
solar-flare-like |
|||
|
|
|
|
|
effects. |
||
|
|
|
|
|
|
|
|
|
|
|
|
|
|
|
|
|
|
|
|
|
|
|
|
The pencil tool (N) |
The smooth tool |
The erase tool |
draws and edits |
smooths bezier |
erases paths and |
freehand lines. |
paths. |
anchor points from |
|
|
the artwork. |
Toolbox overview (3 of 5)
The paintbrush tool (B) draws freehand and calligraphic lines, as well as art and patterns on paths.
The rotate tool (R) rotates objects around a fixed point.
The reflect tool (O)
flips objects over a fixed axis.
The twist tool twirls objects around a fixed point.
|
|
|
|
|
|
|
|
|
|
|
|
|
|
|
|
|
|
|
|
|
|
|
|
|
|
|
|
|
|
|
|
The scale tool (S) |
The shear tool |
||||||
resizes objects |
skews objects |
||||||
around a fixed point. |
around a fixed point. |
||||||
Using Help | Contents | Index |
Back |
8 |

Adobe Illustrator Help |
|
|
|
|
Looking at the Work Area |
||||||||||||||
|
|
|
|
|
|
|
|
|
|
|
|
|
|
|
|
|
|
|
|
Using Help | Contents | Index |
|
|
|
|
|
Back |
9 |
||||||||||||
|
|
|
|
|
|
|
|
|
|
|
|
|
|
|
|
|
|
|
|
|
|
|
|
|
|
|
|
|
|
|
|
|
|
|
|
|
|
|
|
|
|
|
|
|
|
|
|
|
|
|
|
|
|
|
|
|
|
|
|
|
|
|
|
|
|
|
|
|
|
|
|
|
|
|
|
|
|
|
|
|
|
|
|
|
|
|
|
|
|
|
|
|
|
|
|
|
|
|
|
|
|
|
|
|
|
|
|
|
|
|
|
|
|
|
|
|
|
|
|
|
|
|
|
|
|
|
|
|
|
|
|
|
|
|
|
|
|
|
|
|
|
|
|
|
|
|
|
|
|
|
|
|
|
|
|
|
|
|
|
|
|
|
|
|
|
|
|
|
|
|
|
|
|
|
|
|
|
|
|
The reshape tool smooths or changes a path while retaining the path’s overall shape.
The bloat tool inflates an object.
The free transform tool (E) scales, rotates, or skews a selection.
The warp tool (Shift+R) molds objects with the movement of the cursor (like molding clay, for example).
The scallop tool adds many curved details to the outline of an object.
The symbol sprayer tool (Shift+S) places multiple symbol instances as a set on the artboard.
The twirl tool creates swirling distortions within an object.
The crystallize tool adds many spiked details to the outline of an object.
The symbol shifter tool moves symbol instances.
The pucker tool deflates an object.
The wrinkle tool adds wrinkle-like details to the outline of an object.
The symbol scruncher tool moves symbol instances away from each other.
Using Help | Contents | Index |
Back |
9 |
Adobe Illustrator Help |
Looking at the Work Area |
|
|
|
|
Using Help | Contents | Index |
Back |
10 |
Toolbox overview (4 of 5)
The symbol sizer tool resizes symbol instances.
|
|
|
|
|
|
|
|
|
|
|
|
|
|
|
|
|
|
|
|
|
|
|
|
|
|
|
|
|
|
|
|
|
|
|
|
|
|
|
|
|
|
|
|
|
|
|
|
|
|
|
|
|
|
|
|
|
|
|
|
|
|
|
|
|
|
|
|
|
|
|
|
|
|
|
|
|
|
|
|
|
|
|
|
|
|
|
|
|
|
|
|
|
|
|
|
|
|
|
|
|
|
|
|
|
|
|
|
The symbol spinner |
The symbol stainer |
The symbol |
||||||||||||||||||||||||
tool rotates symbol |
tool colorizes |
screener tool |
||||||||||||||||||||||||
instances. |
symbol instances. |
applies opacity to |
||||||||||||||||||||||||
|
|
|
|
|
|
|
|
|
|
|
|
|
|
|
|
|
|
|
|
|
symbol instances. |
|||||
|
|
|
|
|
|
|
|
|
|
|
|
|
|
|
|
|
|
|
|
|
|
|
|
|
|
|
|
|
|
|
|
|
|
|
|
|
|
|
|
|
|
|
|
|
|
|
|
|
|
|
|
|
|
|
|
|
|
|
|
|
|
|
|
|
|
|
|
|
|
|
|
|
|
|
|
|
|
|
|
|
|
|
|
|
|
|
|
|
|
|
|
|
|
|
|
|
|
|
|
|
|
|
|
|
|
|
|
|
|
|
|
|
|
|
|
|
|
|
|
|
|
|
|
|
|
|
|
|
|
|
|
|
|
|
|
|
|
|
|
|
|
|
|
|
|
|
|
|
|
|
|
|
|
|
|
|
|
|
|
|
|
|
|
|
|
|
|
|
|
|
|
|
|
|
|
|
|
|
|
|
|
|
|
|
|
|
|
|
|
|
|
|
|
|
|
|
|
|
|
|
|
|
|
|
|
|
|
|
|
|
|
|
|
|
|
|
|
|
|
|
|
|
|
|
|
|
|
|
|
|
|
|
|
|
|
|
|
|
|
|
|
|
|
|
|
|
|
|
|
|
|
|
|
|
|
|
|
|
|
|
|
|
|
|
|
|
|
|
|
|
|
|
|
|
|
|
|
|
|
|
|
|
|
|
|
|
|
|
|
|
|
|
|
|
|
|
|
|
|
|
|
|
|
|
|
|
|
|
|
|
|
|
|
|
|
|
|
|
|
|
|
|
|
|
|
|
|
|
|
|
|
|
|
|
|
|
|
|
|
|
|
|
|
|
|
|
|
|
|
|
|
|
|
|
|
|
|
|
|
|
|
|
|
|
|
|
|
|
|
|
|
|
|
|
|
|
|
The symbol styler |
The column graph |
The stacked column |
The bar graph tool |
|||||||||||||||||||
tool applies the |
tool (J) positions |
graph tool stacks |
positions columns |
|||||||||||||||||||
selected style to |
columns vertically. |
columns on top of |
horizontally. |
|||||||||||||||||||
symbol instances. |
|
|
|
|
|
one another. |
|
|
|
|
||||||||||||
|
|
|
|
|
|
|
|
|
|
|
|
|
|
|
|
|
|
|
|
|
|
|
|
|
|
|
|
|
|
|
|
|
|
|
|
|
|
|
|
|
|
|
|
|
|
|
|
|
|
|
|
|
|
|
|
|
|
|
|
|
|
|
|
|
|
|
|
|
|
|
|
|
|
|
|
|
|
|
|
|
|
|
|
|
|
|
|
|
|
|
|
|
|
|
|
|
|
|
|
|
|
|
|
|
|
|
|
|
|
|
|
|
|
|
|
|
|
|
|
|
|
|
|
|
|
|
|
|
|
|
|
|
|
|
|
|
|
|
|
|
|
|
|
|
|
|
|
|
|
|
|
|
|
|
|
|
|
|
|
|
|
|
|
|
|
|
|
|
|
|
|
|
|
|
|
|
|
|
|
|
|
|
|
|
|
|
|
|
|
|
|
|
|
|
|
|
|
|
|
|
|
|
|
|
|
|
|
|
|
|
|
|
|
|
|
|
|
|
|
|
|
|
|
|
|
|
|
|
|
|
|
|
|
|
|
|
|
|
|
|
|
|
|
|
|
|
|
|
|
|
|
|
The stacked bar |
The line graph tool |
graph tool stacks |
shows the trend of |
columns and |
one or more subjects |
positions them |
over time. |
horizontally. |
|
The area graph tool emphasizes totals as well as changes in values.
The scatter graph tool plots data as paired sets of x and y coordinates.
Using Help | Contents | Index |
Back |
10 |
Adobe Illustrator Help |
Looking at the Work Area |
|
|
|
|
Using Help | Contents | Index |
Back |
11 |
|
|
|
|
|
|
|
|
|
|
|
|
The pie graph tool |
The radar graph |
The mesh tool (U) |
The gradient |
||||||||
creates a circle graph |
tool uses a circle to |
creates and edits |
tool (G) adjusts the |
||||||||
with wedges |
compare sets of |
meshes and mesh |
beginning and |
||||||||
showing relative |
values at given |
envelopes. |
ending points and |
||||||||
percentages of the |
points in time or in |
|
|
|
angle of gradients |
||||||
compared values. |
particular categories. |
|
|
|
within objects. |
||||||
Toolbox overview (5 of 5)
|
|
|
|
|
|
|
|
|
|
|
|
|
|
|
|
|
|
|
|
|
|
|
|
|
|
|
|
|
|
|
|
|
|
|
|
|
|
|
|
|
|
|
|
|
|
|
|
|
|
|
|
|
|
|
|
|
|
|
|
|
|
|
|
|
|
|
|
|
|
|
|
|
|
|
|
|
|
|
|
|
|
|
|
|
|
|
|
|
|
|
|
|
|
|
|
|
|
|
|
|
|
|
|
|
|
|
|
|
|
|
|
|
|
|
|
|
|
|
|
|
|
|
|
|
|
|
|
|
|
|
|
|
|
|
|
|
|
|
|
|
|
|
|
|
|
|
|
|
|
|
|
|
|
|
|
|
|
|
|
|
|
|
|
|
|
|
|
|
|
|
|
|
|
|
|
|
|
|
|
|
|
|
|
|
|
|
|
|
|
|
|
|
|
|
|
|
|
|
|
|
|
|
|
|
|
|
|
|
|
|
|
|
|
|
|
|
|
|
|
|
|
|
|
|
|
|
|
|
|
|
|
|
|
|
|
|
|
|
|
|
|
|
|
|
|
|
|
|
|
|
|
|
|
|
|
|
|
|
|
|
|
|
|
|
|
|
|
|
|
|
|
|
|
|
|
|
|
|
|
|
|
|
|
|
|
|
|
|
|
|
|
|
|
|
|
The paint bucket |
The measure tool |
The blend tool (W) |
|||||||||||||||||||||||||
The eyedropper |
|||||||||||||||||||||||||||||||||||
tool (I) samples color |
tool (K) fills objects |
measures the |
creates a blend |
||||||||||||||||||||||||||||||||
or type attributes |
with the current |
distance between |
between the color |
||||||||||||||||||||||||||||||||
from objects. |
paint or type |
two points. |
and shape of |
||||||||||||||||||||||||||||||||
|
|
|
|
|
|
|
|
attributes. |
|
|
|
|
|
|
|
|
|
|
multiple objects. |
||||||||||||||||
|
|
|
|
|
|
|
|
|
|
|
|
|
|
|
|
|
|
|
|
|
|
|
|
|
|
|
|
|
|
|
|
|
|
|
|
|
|
|
|
|
|
|
|
|
|
|
|
|
|
|
|
|
|
|
|
|
|
|
|
|
|
|
|
|
|
|
|
|
|
|
|
|
|
|
|
|
|
|
|
|
|
|
|
|
|
|
|
|
|
|
|
|
|
|
|
|
|
|
|
|
|
|
|
|
|
|
|
|
|
|
|
|
|
|
|
|
|
|
|
|
|
|
|
|
|
|
|
|
|
|
|
|
|
|
|
|
|
|
|
|
|
|
|
|
|
|
|
|
|
|
|
|
|
|
|
|
|
|
|
|
|
|
|
|
|
|
|
|
|
|
|
|
|
|
|
|
|
|
|
|
|
|
|
|
|
|
|
|
|
|
|
|
|
|
|
|
|
|
|
|
|
|
|
|
|
|
|
|
|
|
|
|
|
|
|
|
|
|
|
|
|
|
|
|
|
|
|
|
|
|
|
|
|
|
|
|
|
|
|
|
|
|
|
|
|
|
|
|
|
|
|
|
|
|
|
|
|
|
|
|
|
|
|
|
|
|
|
|
|
|
|
|
|
|
|
|
|
|
|
|
|
|
|
|
|
|
|
|
|
|
|
|
|
|
|
|
|
|
|
|
|
|
|
|
|
|
|
|
|
|
|
|
|
|
|
|
|
|
|
|
|
|
|
|
|
|
|
|
|
|
|
|
|
|
|
|
|
|
|
|
|
|
|
|
|
|
|
|
|
|
|
|
|
|
|
|
|
|
|
|
|
|
|
|
|
|
|
|
|
|
|
|
|
|
|
|
|
|
|
|
|
|
|
|
|
|
|
|
|
|
|
|
|
|
|
|
|
|
|
|
|
|
|
|
|
|
|
|
|
|
|
|
|
|
|
|
|
|
|
|
|
|
|
|
|
|
|
|
|
|
|
|
|
|
|
|
|
|
|
|
|
|
|
|
|
|
|
|
|
|
|
|
|
|
|
|
|
|
|
|
|
|
|
|
|
|
|
|
|
|
|
|
|
|
|
|
|
|
|
|
|
|
|
|
|
|
|
|
|
|
|
|
|
|
|
|
|
|
|
|
|
|
|
|
|
|
|
|
|
|
|
|
|
|
|
|
|
|
|
|
|
|
|
|
|
|
|
|
|
|
|
|
|
|
|
|
|
|
|
|
|
|
|
|
|
|
|
|
|
|
|
|
|
|
|
|
|
|
|
|
|
|
|
|
|
|
|
|
|
|
|
|
|
|
|
|
|
|
|
|
|
|
|
|
|
|
|
|
|
|
|
|
|
|
|
|
|
|
|
|
|
|
|
|
|
|
|
|
|
|
|
The auto trace tool |
The slice tool |
The slice select tool |
The scissors tool (C) |
traces the outlines of |
(Shift+K) creates |
selects Web slices. |
cuts paths at |
objects in raster |
Web slices. |
|
specified points. |
images. |
|
|
|
Using Help | Contents | Index |
Back |
11 |
Adobe Illustrator Help |
|
|
|
|
|
|
|
|
|
|
|
Looking at the Work Area |
||||||||||||||||||||||||||||||||
|
|
|
|
|
|
|
|
|
|
|
|
|
|
|
|
|
|
|
|
|
|
|
|
|
|
|
|
|
|
|
|
|
|
|
|
|
|
|
|
|
|
|
|
|
Using Help | Contents | Index |
|
|
|
|
|
|
|
|
|
|
|
|
|
|
Back |
12 |
||||||||||||||||||||||||||||
|
|
|
|
|
|
|
|
|
|
|
|
|
|
|
|
|
|
|
|
|
|
|
|
|
|
|
|
|
|
|
|
|
|
|
|
|
|
|
|
|
|
|
|
|
|
|
|
|
|
|
|
|
|
|
|
|
|
|
|
|
|
|
|
|
|
|
|
|
|
|
|
|
|
|
|
|
|
|
|
|
|
|
|
|
|
|
|
|
|
|
|
|
|
|
|
|
|
|
|
|
|
|
|
|
|
|
|
|
|
|
|
|
|
|
|
|
|
|
|
|
|
|
|
|
|
|
|
|
|
|
|
|
|
|
|
|
|
|
|
|
|
|
|
|
|
|
|
|
|
|
|
|
|
|
|
|
|
|
|
|
|
|
|
|
|
|
|
|
|
|
|
|
|
|
|
|
|
|
|
|
|
|
|
|
|
|
|
|
|
|
|
|
|
|
|
|
|
|
|
|
|
|
|
|
|
|
|
|
|
|
|
|
|
|
|
|
|
|
|
|
|
|
|
|
|
|
|
|
|
|
|
|
|
|
|
|
|
|
|
|
|
|
|
|
|
|
|
|
|
|
|
|
|
|
|
|
|
|
|
|
|
|
|
|
|
|
|
|
|
|
|
|
|
|
|
|
|
|
|
|
|
|
|
|
|
|
|
|
|
|
|
|
|
|
|
|
|
|
|
|
|
|
|
|
|
|
|
|
|
|
|
|
|
|
|
|
|
|
|
|
|
|
|
|
|
|
|
|
|
|
|
|
|
|
|
|
|
|
|
|
|
|
|
|
|
|
|
|
|
|
|
|
|
|
|
|
|
|
|
|
|
|
|
|
|
|
|
|
|
|
|
|
|
|
|
|
|
|
|
|
|
|
|
|
|
|
|
|
|
|
|
|
|
|
|
|
|
|
|
|
|
|
|
|
|
|
|
|
|
|
|
|
|
|
|
|
|
|
|
|
|
|
|
|
|
|
|
|
|
|
|
|
|
|
|
|
|
|
|
|
|
|
|
|
|
|
|
|
|
|
|
|
|
|
|
|
|
|
|
|
|
|
|
|
|
|
|
|
|
|
|
|
|
|
|
|
|
|
|
|
|
|
|
|
|
|
|
|
|
|
|
|
|
|
|
|
|
|
|
|
|
|
|
|
|
|
|
|
|
|
|
|
|
|
|
|
|
|
|
|
|
|
|
|
|
|
|
|
|
|
|
|
|
|
|
|
|
|
|
|
|
|
|
|
|
|
|
|
|
|
|
|
|
|
|
|
|
|
|
|
|
|
|
|
|
|
|
|
|
|
|
|
|
|
|
|
|
|
|
|
|
|
|
|
|
|
|
|
|
|
|
|
|
|
|
|
|
|
|
|
|
|
|
|
|
|
|
|
|
|
|
|
|
|
|
|
|
|
|
|
|
|
|
|
|
|
|
|
|
|
|
|
|
|
|
|
|
|
|
|
|
|
|
|
|
|
|
|
|
|
|
|
|
|
|
|
|
|
|
|
|
|
|
|
|
|
|
|
|
|
|
|
|
|
The knife tool cuts |
The hand tool (H) |
objects and paths. |
moves the Illustrator |
|
artboard within the |
|
illustration window. |
The page tool |
The zoom tool (Z) |
adjusts the page grid |
increases and |
to control where |
decreases the view |
artwork appears on |
magnification in the |
the printed page. |
illustration window. |
Using the Info palette
The Info palette provides information on the area beneath the pointer and on selected objects. Depending on the tool you’re using, you can use the Info palette to measure size, distance, and angle of rotation. In most cases when a tool is in use, the Info palette displays the x and y coordinates of the pointer’s position in the artwork by using the units of measurement you specify.The unit of measure is determined by the unit of measure set in the Document Setup or Units & Undo Preferences dialog box.
The Info palette also displays color information for the fill and stroke of selected objects, and the names of patterns, gradients, or tints applied to the objects.
To display the Info palette:
Choose Window > Info. The Info palette displays the following information, depending on the tool or command you select:
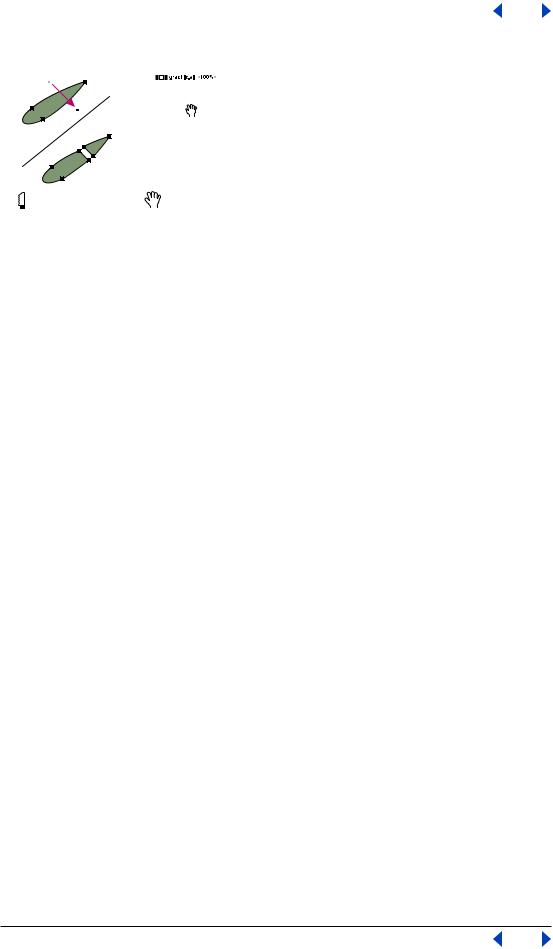
•When using a selection tool, the x and y coordinates of the pointer are displayed. If an object is selected, the width (W), height (H), and x, y coordinates of the object are also displayed.
•When using a zoom tool, the magnification factor and the x and y coordinates are displayed after you release the mouse button.
•When using a pen tool or gradient tool, or when you move a selection, the change in x (W), the change in y (H), the distance (D), and the angle  as you drag are displayed.
•When using the scale tool, the percentage change in width (W) and height (H) and the new width (W) and height (H) are displayed after the scale is finished.
•When using the rotate or reflect tools, the coordinates of the object’s center and the angle of rotation  or reflection
  are displayed.
•When using the shear tool, the coordinates of the object’s center, the angle of shear axis  , and the amount of shear
  are displayed.
•When using the paintbrush tool, the x and y coordinates and the name of the current brush are displayed.
Using Help | Contents | Index |
Back |
12 |

Adobe Illustrator Help |
Looking at the Work Area |
|
|
|
|
Using Help | Contents | Index |
Back |
13 |
To show or hide options in the Info palette:
Choose Show Options or Hide Options from the Info palette menu. When you show options, the following information appears:
•Values for the fill and stroke colors of the selected object.
•Hexadecimal values for the fill and stroke colors of the selected object, if the color mode is RGB or Web safe.
•The name of any pattern, gradient, or tint applied to the selected object.
Note: If you select multiple objects, the Info palette displays only the information that is the same for all selected objects.
Using context menus
In addition to the menus that appear at the top of your screen, Adobe Illustrator contains a number of context-sensitive menus that relate to the document or the selection. You can use context menus as a quick way to choose commonly used commands.
To display context menus:
1Position the pointer over the document or an object in the document.
2Do one of the following:
•In Windows, click with the right mouse button.
•In Mac OS, press Control and hold down the mouse button.
Viewing artwork
Adobe Illustrator gives you great flexibility in viewing your artwork.You can view different areas of the artwork at different magnifications, use simplified views for tasks such as editing paths, and preview how your artwork will appear in a Web browser or in print.
If you are using Illustrator’s color management features, you can also display an online preview of how your document’s colors will appear on a particular type of monitor or output device. (See “Soft-proofing colors” on page 185.)
Setting up windows and views
You can open additional windows to display several views at once, so that you can quickly switch between view modes or magnifications. For example, you can set one view highly magnified for doing close-up work on some objects and create another view less magnified for laying out those objects on the page.
To change the screen mode for illustration windows:
Click a screen mode button in the toolbox:
•The left button  displays artwork in a standard window, with a menu bar at the top and scroll bars on the sides.
•The center button  displays artwork in a full-screen window with a menu bar but with no title bar or scroll bars.
•The right button  displays artwork in a full-screen window, but with no title bar, menu bar, or scroll bars.
Using Help | Contents | Index |
Back |
13 |

Adobe Illustrator Help |
Looking at the Work Area |
|
|
|
|
Using Help | Contents | Index |
Back |
14 |
To open a new window:
Choose Window > New Window.
A new window of the same size appears on top of the previously active window. The two windows are identical except for their window numbers. The new window is now the active window.
To close windows:
Do one of the following:
•Choose File > Close to close the active window.
•Press Alt (Windows) or Option (Mac OS) and choose File > Close to close all document windows.
To arrange multiple windows (Windows only):
Do one of the following:
•Choose Window > Cascade to display windows stacked and cascading from the top left to the bottom right of the screen.
•Choose Window > Tile to display windows edge to edge.
•Choose Window > Arrange Icons to arrange minimized windows within the program window.
To create a view:
1Set up the view that you want.
2Choose View > New View.
3Enter a name for the new view, and click OK.
The view names, along with keyboard shortcuts for choosing them, appear at the bottom of the View menu. To retrieve a view, select the name of the view you want to use. It is possible to create and store up to 25 views for each document.
To rename or delete a view:
1Choose View > Edit Views.
2Select the view you want to edit, and rename it or click Delete.
To scroll the view with the hand tool:
1Select the hand tool  .
.
2Move the pointer onto the artwork, and drag in the direction in which you want the artwork to move.
 To switch to the hand tool when using another tool, hold down the spacebar.
Viewing artwork as paths
Adobe Illustrator sets the view so that all artwork is previewed in color.You can also set the view so that your artwork is displayed only as paths with all paint attributes hidden. Viewing artwork without paint attributes speeds up the time it takes to redraw the screen when working with complex artwork.
Using Help | Contents | Index |
Back |
14 |
Adobe Illustrator Help |
Looking at the Work Area |
|
|
|
|
Using Help | Contents | Index |
Back |
15 |
To view the artwork in color or as path outlines:
Choose a viewing option:
•Choose View > Preview to display the artwork as close as possible to how it will be printed, drawn with as much color, shading, and detail as your monitor is capable of displaying.
•Choose View > Outline to display the artwork as paths, hiding each object’s paint attributes.Working in this view speeds up the redraw time when working with complex artwork.
Use the New Window command to preview in one window while editing in Outline view in another.
Viewing artwork as pixels
In Pixel Preview mode, you can preview how your artwork will appear when it is rasterized and viewed in a Web browser. (For more information, see “Working in pixel preview mode” on page 292.)
Viewing how colors will overprint
Overprint Preview mode provides an “ink preview” that approximates how blending, transparency, and overprinting will appear in color-separated output. (For more information on overprinting, see “Step 2: Select overprint options for overlapping colors” on page 346.)
To preview how colors will overprint and blend:
Choose View > Overprint Preview.
Magnifying and reducing the view
The zoom-in and zoom-out tools and commands let you magnify or reduce the display of any area in the file up to 64 times actual size. Zooming in and out does not change the actual size of the file, only the magnification at which you see it. See “Scaling” on
page 115.
You see the current magnification level at the top and the bottom left of the window.
To zoom in:
Do one of the following:
•Select the zoom tool  . The pointer becomes a magnifying glass with a plus sign in its center. Click at the center of the area you want to magnify. Each click magnifies the view to the next preset percentage. When the file has reached its maximum magnification level of 6400%, the magnifying glass appears blank.
•Choose View > Zoom In. Each click magnifies the view to the next preset percentage. When the file has reached its maximum magnification level of 6400%, the command is dimmed.
•When no objects are selected, click the right mouse button (Windows) or Ctrl-click (Mac OS) and select the Zoom In command from the context menu.
•Enter a magnification level in the Zoom text box at the lower left of the window.
•Select a magnification level from the Zoom pop-up menu at the lower left of the window.
Using Help | Contents | Index |
Back |
15 |

Adobe Illustrator Help |
Looking at the Work Area |
|
|
|
|
Using Help | Contents | Index |
Back |
16 |
To zoom out:
Do one of the following:
•Select the zoom tool while holding down Alt (Windows) or Option (Mac OS). The pointer becomes a magnifying glass with a minus sign in its center. Click the center of the area you want to reduce. Each click reduces the view to the previous preset percentage. When the file has reached its maximum reduction level of 3.13%, the magnifying glass appears blank.
•Choose View > Zoom Out. Each click reduces the view to the previous preset percentage.When the file reaches its maximum reduction level of 3.13%, the command is dimmed.
•When no objects are selected, click the right mouse button (Windows) or Ctrl-click (Mac OS) and select the Zoom Out command from the context menu.
•Enter a reduction level in the Zoom text box at the lower left of the window.
•Select a magnification level from the Zoom pop-up menu at the lower left of the window.
To choose the zoom-in tool while using another tool, press Ctrl+spacebar (Windows) or Command+spacebar (Mac OS). To choose the zoom-out tool while using another
tool, press Ctrl+Alt+spacebar (Windows) or Command+Option+spacebar (Mac OS).
To magnify by dragging:
1Select the zoom-in tool  .
.
2Drag a dotted rectangle, called a marquee, around the area you want to magnify. To move the marquee around the artwork, begin dragging a marquee and then hold down the spacebar while dragging the marquee to a new location.
To display a file at 100%:
Choose View > Actual Size, or double-click the zoom tool.
To change the view to fit the screen:
Choose View > Fit In Window, or double-click the hand tool.
Using the Navigator palette
The Navigator palette lets you quickly change the view of your artwork using a thumbnail display.
To display the Navigator palette:
Choose Window > Navigator.
Note: The Navigator palette may take a long time to display when the document contains a large quantity of artwork.
To display only artwork inside the boundaries of the Artboard:
1Choose Window > Navigator.
2Choose View Artboard Only from the pop-up menu in the Navigator palette. Any objects outside the border of the Artboard are removed from the Navigator palette thumbnail display. (See “Viewing artwork” on page 13.)
Using Help | Contents | Index |
Back |
16 |

Adobe Illustrator Help |
Looking at the Work Area |
|
|
|
|
Using Help | Contents | Index |
Back |
17 |
To magnify or reduce the view using the Navigator palette:
Do one of the following:
•Click the zoom in or zoom out button at the bottom of the Navigator palette.
•Drag the zoom slider at the bottom of the palette.
•Enter the percentage of magnification or reduction you want in the zoom text box of the Navigator palette, and press Enter or Return.
•Hold down Ctrl (Windows) or Command (Mac OS), and drag over the area of the Navigator palette’s thumbnail that you want to magnify.
To move the view of an image using the Navigator palette:
Do one of the following:
•Drag the view box, which represents the boundaries of the illustration window.
•Click in the thumbnail of the image. The new view includes the area you click.
To change the color of the Navigator palette view box:
1 Choose Palette Options from the Navigator palette menu.
2 Choose a color:
• To use a preset color, choose an option for Color.
• To specify a different color, double-click the color box or choose Custom, and choose a color.
3 Click OK.
Using the status bar
At the bottom left edge of the Illustrator window is the status bar. The status bar contains the Zoom pop-up menu and the Status pop-up menu. The Status menu can display information about any of the following topics:
•The current tool in use.
•The date and time.
•The amount of virtual memory (Windows) or free RAM memory (Mac OS) available for your open file.
•The number of undos and redos available.
•The document color profile. For information on color profiles, see “About color management” on page 174.
To specify the type of information to display in the Status pop-up menu:
Select the type of information from the pop-up menu.
Previewing placed EPS images
Placing images from other applications can slow previewing and printing operations in Illustrator. You can improve performance by turning off the Show Transparency Interactions option in the Links Palette Options dialog box.
Using Help | Contents | Index |
Back |
17 |

Adobe Illustrator Help |
Looking at the Work Area |
|
|
|
|
Using Help | Contents | Index |
Back |
18 |
You can turn off previewing of placed images when you need to work quickly. You can then turn previewing back on when you want to view the finished art.
To determine how placed EPS images appear:
1Choose Edit > Preferences > Files & Clipboard.
2Select the Use Low Resolution Proxy for Linked EPS option to view a bitmap proxy of the placed image. Deselect the option to view a high-resolution vector image.
To set Outline view for placed EPS images:
1Choose File > Document Setup. Choose Artboard from the pop-up menu at the top left of the Document Setup dialog box.
2Select Show Images in Outline to specify that placed images should display a preview image when seen in Outline view and click OK. (See “Opening and placing artwork” on page 33.)
To display transparency interactions with linked images:
1If necessary, choose Window > Links.
2From the Links palette menu, choose Palette Options.
3Select Show Transparency Interactions and click OK.
Using plug-in modules
Plug-in modules are software programs developed by Adobe Systems, and by other software developers in conjunction with Adobe Systems, to add features to Adobe Illustrator. A number of special effects plug-ins come with your program and are automatically installed in the Plug-ins folder.
If you change the location of the Plug-ins folder, or if you want to use a different folder as your plug-ins folder, you must use the Plug-ins Preferences command to tell Illustrator about the new location of the plug-ins.
You can also use plug-ins from Adobe Photoshop versions 3.0 to 5.5. In addition, you can use any commercial plug-in designed for use with Photoshop or Illustrator.
To avoid duplicating your plug-in filters between the two programs, make a shortcut (Windows) or an alias (Mac OS) to your Photoshop plug-in filters in your Illustrator
Plug-ins folder. Note that Illustrator 10.0 does not support plug-ins from Photoshop 6.0.
To specify the location of plug-in modules:
1 Do one of the following:
•In Windows or Mac OS, choose Edit > Preferences > Plug-ins & Scratch Disks.
•In Mac OS X, choose Illustrator > Preferences > Plug-ins & Scratch Disks.
2Click Choose and select the folder containing the plug-in modules, then click OK.
3Quit Illustrator, and then start it again for the plug-in modules to take effect.
To install an Adobe Systems plug-in module:
If an installer is provided, use it to install the plug-in module. Otherwise, drag a copy of the module to the Plug-ins folder inside the Adobe Illustrator folder.
Using Help | Contents | Index |
Back |
18 |

Adobe Illustrator Help |
Looking at the Work Area |
|
|
|
|
Using Help | Contents | Index |
Back |
19 |
To install a third-party plug-in module:
Follow the installation instructions that came with the plug-in module.
Developing plug-in modules for Adobe Illustrator
The open architecture of the Adobe Illustrator program allows developers outside of Adobe to create features that are accessible from within Adobe Illustrator. If you are interested in creating plug-in modules compatible with Adobe Illustrator, see the Adobe Systems U.S. Web site at http://www.adobe.com.
Customizing shortcuts
Illustrator provides a set of standard keyboard shortcuts for commands and tools. Illustrator also ships with alternative sets of keyboard shortcuts, including shortcuts for previous versions and for other programs.
You can switch between sets of shortcuts, change individual shortcuts within a set, and define your own sets of shortcuts.
To view, manage, or print sets of keyboard shortcuts:
1Choose Edit > Keyboard Shortcuts.
2Choose a set of shortcuts from the Set menu at the top of the Keyboard Shortcuts dialog box.
3Choose a shortcut type (Menu Commands or Tools) from the menu above the shortcut display.
4Do any of the following:
•To apply the displayed set of shortcuts, click OK.
•To delete the displayed set of shortcuts, click Delete. You can’t delete the set named Illustrator Factory Defaults.
•To export the displayed set of shortcuts into a text file, click Export Text. In the Save Keyset File dialog box, enter a file name for the current keyset that you are saving, and click Save. You can use this text file to print out a copy of your keyboard shortcuts.
To define new shortcuts or sets of shortcuts:
1Choose Edit > Keyboard Shortcuts.
2Choose a set of shortcuts from the Set menu at the top of the Keyboard Shortcuts dialog box.
3Choose a shortcut type (Menu Commands or Tools) from the menu above the shortcut display.
4In the Shortcut column of the scroll list, select the shortcut you want to modify (palette shortcuts are at the end of the scroll list).
5Enter a new shortcut. When you begin entering changes, the name in the Set menu changes to [Custom].
Using Help | Contents | Index |
Back |
19 |

Adobe Illustrator Help |
Looking at the Work Area |
|
|
|
|
Using Help | Contents | Index |
Back |
20 |
If the shortcut is already assigned to another command or tool in the set, an alert informs you that another command or tool has the shortcut. Click away from the selection to assign the shortcut to the new command or tool, and to erase the previously assigned shortcut. Once you have reassigned a shortcut, you can click Undo to undo the change, or click Go To to go to the other command or tool and assign it a new shortcut.
6In the Symbol column, enter the symbol that will appear on the menu or tool tip for the command or tool. You can use any of the characters that are allowed in the Shortcut column.
7When you have finished changing shortcuts and symbols, do one of the following:
•To create a new set that includes the modifications, click OK or Save, and then save the shortcuts as a file. Enter a name for the new set in the Name text box, and click OK. The new file set will appear in the pop-up menu under the new name.
•To discard all changes and exit the dialog box, click Cancel.
•To discard the last saved change without closing the dialog box, click Undo.
To clear shortcuts and symbols from a command or tool:
1In the Keyboard Shortcuts dialog box, select the command or tool name whose shortcut and symbol you want to delete.
2Click Clear.
To delete an entire set of shortcuts:
1Choose Edit > Keyboard Shortcuts.
2In the Set pop-up menu, choose the shortcut set that you want to delete.
3Click Delete and then OK to exit the dialog box.
Setting preferences
Numerous program settings are stored in the Adobe Illustrator preference file:
•In Windows, this file is called AI Prefs. In Windows 98 and ME, it is located in the Windows\Application Data\Adobe\Adobe Illustrator 10 folder. In Windows NT, this file is located in WinNT\Profiles\user name\Application Data\Adobe Illustrator 10 folder. In Windows 2000 and XP it is in the Documents and Settings\username\Application Data\Adobe\Adobe Illustrator 10 folder.
•In Mac OS, the preferences file is called Adobe Illustrator 10.0 Prefs. In Mac OS 9.x, it is located in the System Folder\Preferences\Adobe Illustrator 10.0 folder. In Mac OS X, it is located in the Mac OS X\Users\Home\Library\Preferences\Adobe Illustrator 10 folder.
The settings stored in the preference file include display options, separation setup information, tool options, ruler units, and options for exporting information. Most of these options are set in panels of the Preferences dialog box.
To find an explanation of a particular preference option or set of options, refer to the index.
To open the Preferences dialog box:
Choose the desired preference panel from the Edit > Preferences submenu or the Illustrator 10 menu (Mac OS X only).
Using Help | Contents | Index |
Back |
20 |
Adobe Illustrator Help |
Looking at the Work Area |
|
|
|
|
Using Help | Contents | Index |
Back |
21 |
To switch to a different preference panel:
Choose an option from the menu at the top left of the Preferences dialog box.You can also click Next to display the next panel, or click Prev to display the previous panel.
Using tool tips
The tool tips feature lets you display the name of tools, or buttons and controls in palettes.
To identify a tool or control:
Position the pointer over a tool or control and pause. A tool tip appears showing the name and keyboard shortcut (if any) for the item.
If tool tips don’t appear, the preference for displaying them may be turned off.
To display tool tips:
1Choose Edit > Preferences > General (Windows and Mac OS 9) or Illustrator > Preferences > General (Mac OS X).
2Select Show Tool Tips, and click OK.
Note: Tool tips are not available in most dialog boxes.
Using Web resources
If you have an Internet connection, you can access additional resources for learning Illustrator located on the Adobe Systems home page on the World Wide Web. These resources are continually updated.
To access Adobe’s home page for your region:
1Open Adobe’s U.S. home page at www.adobe.com.
2From the Adobe worldwide menu, choose your geographical region. Adobe’s home page is customized for 20 different geographical regions.
Using the Illustrator product section of the Adobe Web site
The Illustrator product section of the Adobe Web site provides a central source for registered Illustrator users to access the latest Web content for Illustrator. Here you’ll find the following:
•Step-by-step tutorials
•Quick tips that provide fast answers to common problems
•Updates, patches, and plug-ins
•Illustrator Top Issues, containing the latest Illustrator technical support solutions
•Technical guides
•A searchable database of answers to technical questions
•Links to user forums
To use the Illustrator product section of the Adobe Web site:
1Go to the Adobe home page and search for Illustrator.
2Register your copy of Illustrator.
Using Help | Contents | Index |
Back |
21 |
Adobe Illustrator Help |
Looking at the Work Area |
|
|
|
|
Using Help | Contents | Index |
Back |
22 |
3 Once you have completed the registration process, follow the link back to Illustrator.
Using Adobe Online
Adobe Online provides access to the latest tutorials, quicktips and other Web content for Illustrator and other Adobe products. Using Adobe Online, you can also download and view the current version of the Illustrator Top Issues document containing the latest Illustrator technical support solutions.
When you set up an Internet connection to Adobe Online, Adobe can either notify you whenever new information is available through the Downloadables feature or automatically download that information to your hard disk. If you choose not to use Adobe’s automatic download feature, you can still view and download new files whenever they are available using the Downloadables command in the Help menu.
To use Adobe Online:
1 In Illustrator, choose Help > Adobe Online, or click the icon at the top of the toolbox.
Adobe Online icon
Note: You must have an Internet connection to access Adobe Online. Adobe Online will launch your browser using your default Internet configuration.
2 If prompted, set preferences, and then click Go Online. General preferences affect how Adobe Online interacts with all Adobe products installed on your system, and Application preferences affect how Adobe Online interacts with Illustrator. To see an explanation of each preference option, click Setup and follow the prompts. You also can set up an automatic refresh using the Update Options.
Note: You can also set Adobe Online preferences by choosing Edit > Preferences > Online Settings (Windows and Mac OS 9) or Illustrator > Preferences > Online Settings (Mac OS X).
To view Illustrator customer support and technical issues:
Choose Help > Top Issues. The customer support page within the Adobe Web site opens.
To view and download information:
1 In Illustrator, choose Help > Downloadables.
2 Select a View Option:
• Select Show Only New Files to view only the files that are new since the last time you viewed downloadable files or were notified of them.
• Select Show All Files to view all the files on Adobe’s Web site that are currently available for download.
3 Select Download Options:
•Select Auto Install Downloaded Components if you want Adobe to start the component’s installer (if available) as soon as the download is complete. You can then follow the prompts to install the files.
Using Help | Contents | Index |
Back |
22 |

Adobe Illustrator Help |
Looking at the Work Area |
|
|
|
|
Using Help | Contents | Index |
Back |
23 |
•Select Download in Background if you want to continue working in Illustrator and other applications while the file downloads.
•Select Notify When Download Complete if you want Adobe to display a message when the files have been transferred to your computer.
4To view a list of files, open the Downloadables folder and any other folder listed.
5To see a description of a file, position the mouse cursor over a filename and view its description in the Item Description section.
6To see the location where a file will be installed if downloaded, select a file and view its location in the Download Directory section. To change the location, click the Folder button  .
.
7To download a file, select it and click Download.
8To close the Downloadables dialog box, click Done.
To view Adobe press releases and announcements:
Choose Help > Corporate News. The press and announcements page within the Adobe Web site opens.
To register your copy of Adobe Illustrator:
1Choose Help > Registration.
2Select a registration option and click Continue; then follow the prompts to register.
To open other sites within the Adobe Web site:
Choose Help > Adobe Links, and choose a link topic from the menu. The associated Web page opens.
Other learning resources
Other learning resources are available but are not included with your application.
Classroom in a Book Is the official training series for Adobe graphics and publishing software. This book is developed by experts at Adobe and published by Adobe Press.
The Adobe Illustrator Classroom in a Book includes lessons about using Illustrator. For information on purchasing Adobe Illustrator Classroom in a Book, visit the Adobe Web site at www.adobe.com, or contact your local book distributor.
Adobe Press books Adobe Press provides a variety of books for beginners and professionals alike. Topics covered include color management, commercial printing, and creating quality online publications in HTML and PDF. For a list of available publications, visit the Adobe Web site at www.adobe.com, or contact your local book distributor.
The Adobe Certified Training Provider Program Offers users, instructors, and training centers the opportunity to demonstrate their product proficiency and promote their software skills as Adobe Certified Training Providers. Certification is available for several different geographical regions. Visit the Adobe Solutions Network: Certified Training Provider Program Web site at www.adobe.com to learn how you can become certified.
Using Help | Contents | Index |
Back |
23 |

Adobe Illustrator Help |
Looking at the Work Area |
|
|
|
|
Using Help | Contents | Index |
Back |
24 |
Customer Support
When you register your product, you may be entitled to technical support for up to 90 days from the date of your first call. Terms may vary depending on the country of residence. For more information, refer to the technical support card provided with the Illustrator documentation.
Customer Support on Adobe Online
Adobe Online provides access to FAQs (Frequently Asked Questions) and troubleshooting information that provides solutions to common problems.
Additional customer support resources
Adobe Systems provides several forms of automated technical support:
•See the ReadMe and ReadMe First! files installed with the program for information that became available after this guide went to press.
•Explore the extensive customer support information on Adobe’s World Wide Web site (www.adobe.com). To access Adobe’s Web site from Illustrator, choose Help > Adobe Online or click the icon at the top of the toolbox. See “Using Web resources” on
page 21.
•Read the Top Issues PDF that is available from the Help menu.
Using Help | Contents | Index |
Back |
24 |
Adobe Illustrator Help |
Setting Up Artwork in Illustrator |
|
|
|
|
Using Help | Contents | Index |
Back |
25 |
Setting Up Artwork in Illustrator
About vector graphics and bitmap images
Computer graphics fall into two main categories—vector graphics and bitmap images. Understanding the difference between the two helps as you create, edit, and import artwork.
In Illustrator the type of graphic image can have important effects on your workflow. For example, some file formats only support bitmap images and others only vector graphics. Graphic image types are particularly important when importing or exporting graphic images to and from Illustrator. Linked bitmap images cannot be edited in Illustrator. Graphic formats also affect how commands and filters can be applied to images; some filters in Illustrator will only work with bitmap images.
Vector graphics
Drawing programs such as Adobe Illustrator create vector graphics, made of lines and curves defined by mathematical objects called vectors. Vectors describe graphics according to their geometric characteristics. For example, a bicycle tire in a vector graphic is made up of a mathematical definition of a circle drawn with a certain radius, set at a specific location, and filled with a specific color. You can move, resize, or change the color of the tire without losing the quality of the graphic.
A vector graphic is resolution-independent—that is, it can be scaled to any size and printed on any output device at any resolution without losing its detail or clarity. As a result, vector graphics are the best choice for type (especially small type) and bold graphics that must retain crisp lines when scaled to various sizes—for example, logos.
Because computer monitors represent images by displaying them on a grid, both vector and bitmap images are displayed as pixels on-screen.
3:1
24:1
Vector graphics are good for reproducing crisp outlines, as in logos or illustrations. They can be printed or displayed at any resolution without losing detail.
Using Help | Contents | Index |
Back |
25 |
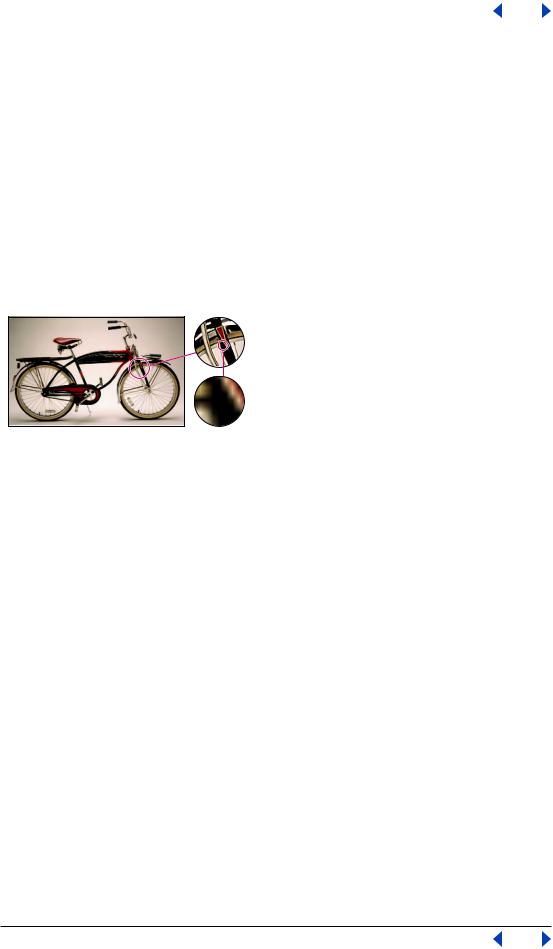
Adobe Illustrator Help |
Setting Up Artwork in Illustrator |
|
|
|
|
Using Help | Contents | Index |
Back |
26 |
Bitmap images
Paint and image-editing software, such as Adobe Photoshop, generate bitmap images, also called raster images. The images use a grid (also known as a bitmap or raster) of small squares, known as pixels, to represent graphics. Each pixel in a bitmap image has a specific location and color value assigned to it. For example, a bicycle tire in a bitmap image is made up of a collection of pixels in that location, with each pixel part of a mosaic that gives the appearance of a tire. When working with bitmap images, you edit pixels rather than objects or shapes.
Bitmap images are the most common electronic medium for continuous-tone images, such as photographs or images created in painting programs, because they can represent subtle gradations of shades and color. Bitmap images are resolution dependent—that is, they represent a fixed number of pixels. As a result, they can appear jagged and lose detail if they are scaled on-screen or if they are printed at a higher resolution than they were created for.
3:1
24:1
Bitmap images are good for reproducing subtle gradations of color, as in photographs. They can have jagged edges when printed at too large a size or displayed at too high a magnification.
About resolution in bitmap images
Resolution is the number of dots or pixels per linear unit used to reproduce artwork and images. Output devices display images as groups of pixels. The resolution of vector graphics, such as Illustrator artwork, depends on the device used to display the artwork. The resolution of bitmap images, such as digital photographs, depends on both the display device and the inherent resolution of the bitmap image.
Pixel dimensions The number of pixels along the height and width of a bitmap image. The display size of an image on-screen is determined by the pixel dimensions of the image plus the size and setting of the monitor.The file size of an image is proportional to its pixel dimensions.
A typical 21-inch monitor displays 1152 pixels horizontally and 870 vertically. An image with pixel dimensions of 1152 by 870 would fill this small screen.
Image resolution The number of pixels displayed per unit of printed length in an image, usually measured in pixels per inch (ppi). An image with a high resolution contains more, and therefore smaller, pixels than an image of the same printed dimensions with a low resolution. For example, a 1-inch-by-1-inch image with a resolution of 72 ppi contains a total of 5184 pixels (72 pixels wide x 72 pixels high = 5184). The same 1-inch-by-1-inch image with a resolution of 300 ppi would contain a total of 90,000 pixels.
Using Help | Contents | Index |
Back |
26 |

Adobe Illustrator Help |
Setting Up Artwork in Illustrator |
|
|
|
|
Using Help | Contents | Index |
Back |
27 |
Because they use more pixels to represent each unit of area, higher-resolution images usually reproduce more detail and subtler color transitions than lower-resolution images when printed. However, increasing the resolution of an image scanned or created at a lower resolution only spreads the original pixel information across a greater number of pixels and rarely improves image quality.
To determine the image resolution to use, consider the medium of final distribution for the image. If you’re producing an image for online display, the image resolution only needs to match the typical monitor resolution (72 or 96 ppi). However, using too low a resolution for a printed image results in pixelation—output with large, coarse-looking pixels. Using too high a resolution (pixels smaller than what the output device can produce) increases the file size and slows the printing of the image.
Note: The Printing & Export panel of the Document Setup dialog box lets you define the output resolution for vector drawings. In Illustrator, output resolution refers to the number of line segments the PostScript® interpreter uses to approximate a curve (it is not the same as image resolution). (See “Changing the path output resolution” on page 337.)
Monitor resolution The number of pixels or dots displayed per unit of length on the monitor, usually measured in dots per inch (dpi). Monitor resolution depends on the size of the monitor plus its pixel setting. A PC or Mac OS monitor can range from 60 to 133 dpi. Understanding monitor resolution helps explain why the display size of an image onscreen often differs from its printed size.
Printer resolution The number of ink dots per inch (dpi) produced by an imagesetter or laser printer. For best results, use an image resolution that is proportional to, but not the same as, printer resolution. Most laser printers have output resolutions of 600 dpi to 1200 dpi and produce good results with images from 72 ppi to 185 ppi.
High-end imagesetters can print at 1200 dpi or higher and produce good results with images from 200 ppi to 350 ppi.
Screen frequency The number of printer dots or halftone cells per inch used to print grayscale images or color separations. Also known as screen ruling or line screen, screen frequency is measured in lines per inch (lpi)—or lines of cells per inch in a halftone screen.
The relationship between image resolution and screen frequency determines the quality of detail in the printed image. To produce a halftone image of the highest quality, you generally use an image resolution that is from 1.5 to at most 2 times the screen frequency. But with some images and output devices, a lower resolution can produce good results.
Note: Some imagesetters and 600-dpi laser printers use screening technologies other than halftoning. If you are printing an image on a nonhalftone printer, consult your service provider or your printer documentation for the recommended image resolutions.
About the work area
In Adobe Illustrator, the work area occupies the entire space within the Illustrator window and includes more than just the printable page containing your artwork. The printable and non-printable areas are represented by a series of solid and dotted lines between the outermost edge of the window and the printable area of the page.
Imageable area The imageable area is bounded by the innermost dotted lines and represents the portion of the page on which the selected printer can print. Many printers cannot print to the edge of the paper.
Using Help | Contents | Index |
Back |
27 |
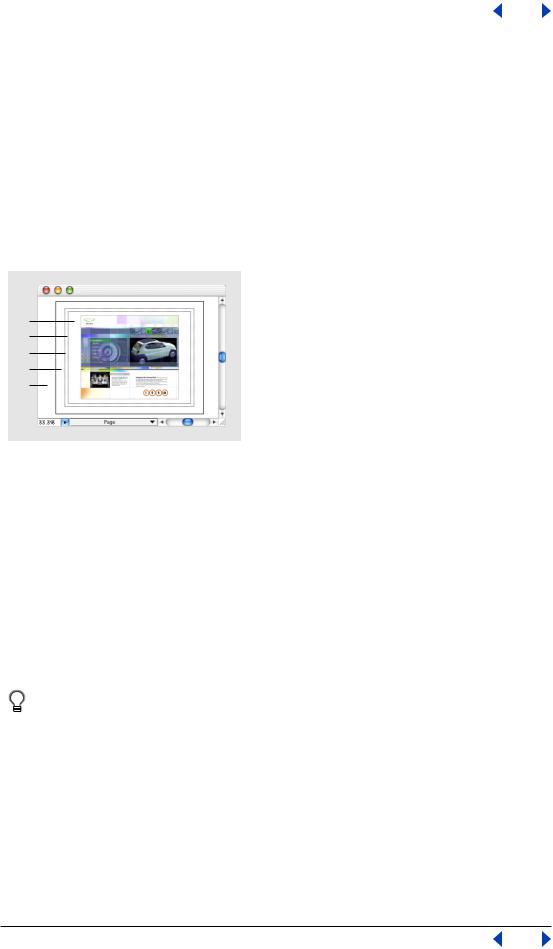
Adobe Illustrator Help |
Setting Up Artwork in Illustrator |
|
|
|
|
Using Help | Contents | Index |
Back |
28 |
Nonimageable area The nonimageable area is between the two sets of dotted lines representing any nonprintable margin of the page.
Edge of the page The page edge is indicated by the outermost set of dotted lines.
Artboard The artboard is bounded by solid lines and represents the entire region that can contain printable artwork. By default, the artboard is the same size as the page, but it can be enlarged or reduced.The U.S. default artboard is 8.5" x 11", but it can be set as large as 227" x 227". You can choose to show or hide the artboard.
Scratch area The scratch area is the area outside the artboard that extends to the edge of the 227-inch square window. The scratch area represents a space on which you can create, edit, and store elements of artwork before moving them onto the artboard. Objects placed onto the scratch area are visible on-screen, but they do not print.
A
B
C
D
E
Illustrator’s work area
A. Imageable area B. Nonimageable area C. Edge of the page D. Artboard E. Scratch area
Setting up the work area
Once you have created a document, you can then set up your work area to organize your work and streamline the workflow. For example, you can change the size of the artboard, tile your workspace, or move your page boundaries.
To open a new file:
1Choose File > New, and then enter a name in the Name text box.
2Select the CMYK or RGB color mode. (See “Color modes and models” on page 152.)
3If necessary, specify a height and width for the artboard.
To create a new document without opening the New Document dialog box, press Ctrl+Alt+N (Windows) or Command+Option+N (Mac OS). The new, untitled
document has the settings last used.
To open an existing file:
1Choose File > Open.
2Select the name of the file you want to open, and click Open.
To close a file and quit Illustrator:
1Choose File > Exit (Windows) or File > Quit (Mac OS).
2If the file has not yet been saved or named, the Save dialog box appears.To save the file, enter a name in the Name text box (if necessary) and then click OK.
Using Help | Contents | Index |
Back |
28 |

Adobe Illustrator Help |
Setting Up Artwork in Illustrator |
|
|
|
|
Using Help | Contents | Index |
Back |
29 |
To show or hide the artboard:
To show the artboard, choose View > Show Artboard; to hide the artboard, choose View > Hide Artboard.
To change the size of the artboard:
1Choose File > Document Setup. Then choose Artboard from the pop-up menu at the top left of the Document Setup dialog box.
2Do one of the following:
•Choose a preset size from the Size pop-up menu.
•Choose Custom from the Size pop-up menu, and enter the dimensions you want in the text boxes, up to 227 inches by 227 inches. You can change the units in the document (and therefore of the artboard size) by choosing a different unit from the Edit > Preferences > Units & Undo dialog box (Windows and Mac OS 9) or the Illustrator > Preferences > Units & Undo dialog box (Mac OS X).
•Select Use Print Setup (Windows) or Use Page Setup (Mac OS) to set the size of the artboard to match the page size set in the Print Setup (Windows) or Page Setup
(Mac OS) dialog box. The size of the artboard then changes anytime you choose a new page size in the Print/Page Setup dialog box.
3 Click OK.
Note: The artboard displays the maximum printable area but does not define the size of the printed page. The printable area of the page is derived from the printer driver and ppd of the printing device. You can only change page size settings if your printer will accept custom page sizes.
To change the size of the page:
Choose File > Print Setup (Windows) or File > Page Setup (Mac OS) and select a page type in the dialog box.
Note: The imageable area and page size are not limitations when printing to imagesetters that handle large media. Imagesetters can typically print to the edge of the page. The page size used by an imagesetter may be larger than the page size specified in Illustrator, enabling you to print bleeds, for example, that run past the edge of the page.
To change the color of the page:
1Choose File > Document Setup.
2Select Transparency from the pop-up menu.
3Select Simulate Paper, and then click the top color swatch and select a new color from the color picker.
4Click OK.
Tiling artwork and adjusting page boundaries
The artboard’s dimensions do not necessarily match the paper sizes used by printers. As a result, when you print a file, the program divides the artboard into one or more rectangles that correspond to the page size available on your printer. Dividing the artboard to fit a printer’s available page size is called tiling. Tiling is also used when you set up your file to view and print multiple pages.
Using Help | Contents | Index |
Back |
29 |

Adobe Illustrator Help |
Setting Up Artwork in Illustrator |
|
|
|
|
Using Help | Contents | Index |
Back |
30 |
You can also adjust the placement of the printable area of the page to control how artwork is printed.
Working with tiled artwork
As you work with tiled artwork, be sure to consider how the artwork relates to the boundaries of the page grid and to the total dimensions of the artboard. For example, if the artwork is tiled onto six pages, part of the artwork will print on a separate sheet of paper that corresponds to page 6. If you specify printing only from pages 1 to 5, the part of the artwork that is on page 6 won’t print.
If you have set up the file to view and print multiple pages, the file is tiled onto pages numbered from left to right and from top to bottom, starting with page 1. (The first page is always page 1; there is no way to change the page 1 designation in Adobe Illustrator.) These page numbers appear on-screen for your reference only; they do not print. The numbers enable you to print all of the pages in the file or specify particular pages to print.
The page or set of pages is aligned with the upper left corner of the artboard by default. However, you can reposition pages on the artboard by using the page tool. (See “Moving the page boundaries” on page 31.)
To see whether the tiling format is visible on-screen:
Choose View > Show Page Tiling or View > Hide Page Tiling.
To change the page tiling options:
1Choose File > Document Setup. Then choose Artboard from the pop-up menu at the top left of the Document Setup dialog box.
2Choose from the following options:
•Single Full Page (the default) to view and print one page.
•Tile Full Pages to view and print multiple pages containing separate pieces of artwork. For example, you can use this option to print a two-page brochure.
To view and print multiple pages, the artboard size set in the Document Setup dialog box must be large enough to fit more than one full page at a time.
Note: With the Tile Full Pages option, any artwork that extends past the imageable area of a given page is not printed.
•Tile Imageable Areas to view and print a single piece of artwork that is too large to fit on one page. For example, you could use this option to print artwork for a large poster onto several sheets of standard-size paper for proofing.
When you print a file by using this option, the artwork is divided among the imageable areas of the pages.
3 Click OK.
Adjusting the bounding box when tiling pages
The program may print blank pages if the artwork is tiled so that the editing bounding box intersects pages that do not contain any artwork. The bounding box is a border that defines the boundaries of your artwork, and can be used to move and transform the artwork. For information about editing artwork with the bounding box, see “Using the bounding box” on page 99.
Using Help | Contents | Index |
Back |
30 |
Loading...