


Adobe PageMaker 6.5
Foundation Level
Training Manual
Corporate Edition
C C T G L O B A L . C O M

© 1995-2001 Cheltenham Computer Training Crescent House
24 Lansdown Crescent Lane Cheltenham Gloucestershire
GL50 2LD, UK
Tel: +44 (0)1242 227200
Fax: +44 (0)1242 253200 Email: info@cctglobal.com
Internet: http://www.cctglobal.com
All trademarks acknowledged. E&OE.
© Cheltenham Computer Training 1995-2001 No part of this document may be copied without written permission from Cheltenham Computer Training unless produced under the terms of a courseware site license agreement with Cheltenham Computer Training.
All reasonable precautions have been taken in the preparation of this document, including both technical and nontechnical proofing. Cheltenham Computer Training and all staff assume no responsibility for any errors or omissions. No warranties are made, expressed or implied with regard to these notes. Cheltenham Computer Training shall not be responsible for any direct, incidental or consequential damages arising from the use of any material contained in this document. If you find any errors in these training modules, please inform Cheltenham Computer Training. Whilst every effort is made to eradicate typing or technical mistakes, we apologize for any errors you may detect. All courses are updated on a regular basis, so your feedback is both valued by us and will help us to maintain the highest possible standards.
Sample versions of courseware from Cheltenham Computer Training
(Normally supplied in Adobe Acrobat format)
If the version of courseware that you are viewing is marked as NOT FOR TRAINING, SAMPLE, or similar, then it cannot be used as part of a training course, and is made available purely for content and style review. This is to give you the opportunity to preview our courseware, prior to making a purchasing decision. Sample versions may not be re-sold to a third party.
For current license information
Cheltenham Computer Training reserves the right to alter the licensing conditions at any time, without prior notice. No terms or conditions will affect your rights as defined under UK law. Please see the site license agreement available at: www.cctglobal.com/agreement
Courseware Release Version 5.0

INTRODUCTION TO PAGEMAKER ...................................................................................................... |
1 |
WHAT IS PAGEMAKER 6.5? ........................................................................................................................ |
2 |
What is PageMaker?.............................................................................................................................. |
2 |
Types of output....................................................................................................................................... |
2 |
Adobe PageMaker website..................................................................................................................... |
2 |
PAGEMAKER EXTENSIONS.......................................................................................................................... |
3 |
Extensions.............................................................................................................................................. |
3 |
Using Publication files .......................................................................................................................... |
3 |
Using Template files .............................................................................................................................. |
3 |
GENERAL PREFERENCES ............................................................................................................................. |
4 |
Using General Preferences.................................................................................................................... |
4 |
Setting Measurement ............................................................................................................................. |
5 |
Setting the Vertical Ruler....................................................................................................................... |
5 |
Setting the Graphics Display ................................................................................................................. |
5 |
Setting the Control Palette..................................................................................................................... |
5 |
Setting the Save Option.......................................................................................................................... |
6 |
Applying Guides..................................................................................................................................... |
6 |
REVIEW QUESTIONS.................................................................................................................................... |
7 |
PAGEMAKER INTERFACE ..................................................................................................................... |
9 |
WORK ENVIRONMENT .............................................................................................................................. |
10 |
Using the PageMaker Environment..................................................................................................... |
10 |
Using Blank Pages............................................................................................................................... |
11 |
Using the Pasteboard .......................................................................................................................... |
11 |
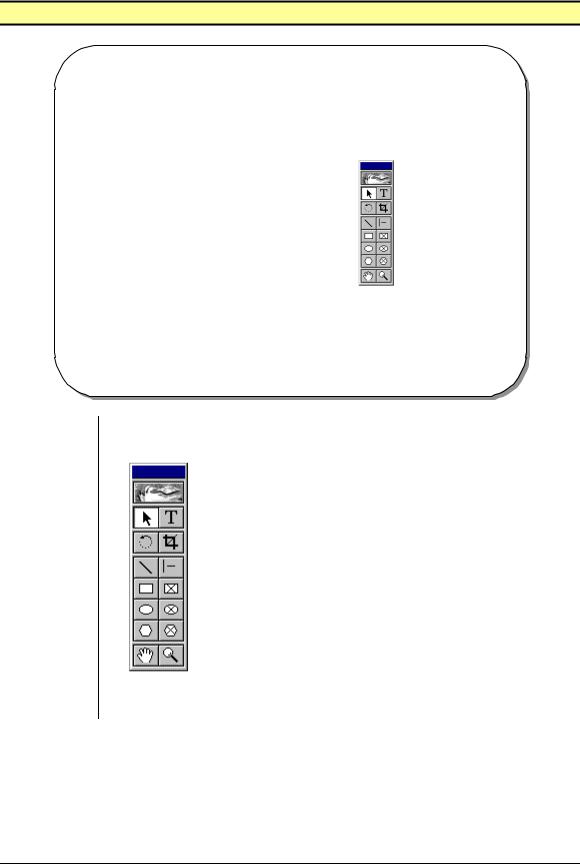
TOOLBOX.................................................................................................................................................. |
12 |
Using the Toolbox................................................................................................................................ |
12 |
COLORS PALETTE ..................................................................................................................................... |
13 |
Using the Colors Palette...................................................................................................................... |
13 |
CONTROL PALETTE ................................................................................................................................... |
15 |
Using the Control Palette .................................................................................................................... |
15 |
Using the Character View.................................................................................................................... |
15 |
Using the Paragraph View .................................................................................................................. |
16 |
Using the Object View ......................................................................................................................... |
17 |
RULERS/GUIDES ....................................................................................................................................... |
18 |
Using Rulers ........................................................................................................................................ |
18 |
To Change the Ruler Measurements.................................................................................................... |
18 |
Using the Zero Point Option................................................................................................................ |
18 |
Using Guides ....................................................................................................................................... |
19 |
To add a Guide .................................................................................................................................... |
19 |
To remove a Guide............................................................................................................................... |
19 |
Applying the Snap to Option................................................................................................................ |
19 |
REVIEW QUESTIONS.................................................................................................................................. |
20 |
DOCUMENTS............................................................................................................................................ |
21 |
NEW DOCUMENTS..................................................................................................................................... |
22 |
Creating New Documents .................................................................................................................... |
22 |
Using the Document Setup dialog box................................................................................................. |
23 |
Applying Page Size .............................................................................................................................. |
23 |
Applying Dimensions ........................................................................................................................... |
23 |
Applying Orientation ........................................................................................................................... |
23 |
Applying Options ................................................................................................................................. |
24 |
Applying Number of Pages .................................................................................................................. |
24 |
Applying Start Page #.......................................................................................................................... |
24 |
Applying the Margins .......................................................................................................................... |
24 |
FOR USE AT THE LICENSED SITE(S) ONLY |
|
Cheltenham Computer Training 1995-2001 - www.cctglobal.com |
|

Changing the Document Setup ............................................................................................................ |
25 |
MASTER PAGES......................................................................................................................................... |
26 |
Setting Up Master Pages ..................................................................................................................... |
26 |
To Display the Master Page content.................................................................................................... |
27 |
SAVING DOCUMENTS................................................................................................................................ |
28 |
Using the Save and Save As commands............................................................................................... |
28 |
File Types ............................................................................................................................................ |
30 |
OPENING DOCUMENTS.............................................................................................................................. |
31 |
Using the Open command.................................................................................................................... |
31 |
Using the Open As option .................................................................................................................... |
32 |
PANOSE Font Matching...................................................................................................................... |
32 |
Using the Cannot Find dialog box....................................................................................................... |
32 |
CLOSING DOCUMENTS .............................................................................................................................. |
33 |
Using the Close command ................................................................................................................... |
33 |
REVIEW QUESTIONS.................................................................................................................................. |
34 |
TOOLS ........................................................................................................................................................ |
35 |
BASIC TOOLS ............................................................................................................................................ |
36 |
Using the Pointer Tool......................................................................................................................... |
36 |
Using the Text Tool.............................................................................................................................. |
36 |
Using the Rotating Tool....................................................................................................................... |
36 |
Using the Cropping Tool ..................................................................................................................... |
36 |
DRAWING TOOLS ...................................................................................................................................... |
37 |
Using Drawing Tools........................................................................................................................... |
37 |
Using the Line Tool ............................................................................................................................. |
37 |
Using the Constrained Line Tool......................................................................................................... |
37 |
Using the Rectangle Tool..................................................................................................................... |
38 |
Using the Rectangle Frame Tool ......................................................................................................... |
38 |
Using the Ellipse Tool ......................................................................................................................... |
38 |
Using the Ellipse Frame Tool.............................................................................................................. |
38 |
Using the Polygon Tool ....................................................................................................................... |
38 |
Using the Polygon Frame Tool............................................................................................................ |
38 |
VISUAL TOOLS.......................................................................................................................................... |
39 |
Using Visual Tools............................................................................................................................... |
39 |
Using the Hand Tool............................................................................................................................ |
39 |
To move your page............................................................................................................................... |
39 |
Using the Zoom Tool ........................................................................................................................... |
39 |
To magnify part of a page by dragging ............................................................................................... |
40 |
To zoom in and out while using another tool....................................................................................... |
40 |
MODIFYING TOOLS ................................................................................................................................... |
41 |
Using the Preferences dialog box........................................................................................................ |
41 |
Using the Character Specifications dialog box ................................................................................... |
42 |
Using the Custom Stroke dialog box.................................................................................................... |
42 |
Using the Rounded Corners dialog box............................................................................................... |
43 |
Using the Fill and Stroke dialog box ................................................................................................... |
44 |
Using the Frame Options dialog box................................................................................................... |
45 |
Using the Polygon Settings dialog box ................................................................................................ |
46 |
REVIEW QUESTIONS.................................................................................................................................. |
47 |
COLORS AND FILLS............................................................................................................................... |
49 |
CUSTOM COLORS...................................................................................................................................... |
50 |
Using the Define Colors dialog box..................................................................................................... |
50 |
Creating Colors ................................................................................................................................... |
51 |
Editing Colors...................................................................................................................................... |
51 |
Removing Colors ................................................................................................................................. |
51 |
COLOR OPTIONS DIALOG BOX.................................................................................................................. |
52 |
FOR USE AT THE LICENSED SITE(S) ONLY |
|
Cheltenham Computer Training 1995-2001 - www.cctglobal.com |
|

Using the Color Options dialog box .................................................................................................... |
52 |
Applying a Color Name ....................................................................................................................... |
53 |
Applying Color Type............................................................................................................................ |
53 |
Applying a Color Model ...................................................................................................................... |
54 |
Applying a Color Field ........................................................................................................................ |
54 |
Previewing Colors ............................................................................................................................... |
54 |
COLORS PALETTE ..................................................................................................................................... |
55 |
Using the Stroke Button ....................................................................................................................... |
55 |
Using the Fill Button ........................................................................................................................... |
56 |
Using the Both Button.......................................................................................................................... |
56 |
Applying the Tint Percentage .............................................................................................................. |
56 |
Using the Color Icon ........................................................................................................................... |
56 |
Using the Color Model Icon ................................................................................................................ |
57 |
Using the Color Type Icon................................................................................................................... |
57 |
Using the EPS Color Icon.................................................................................................................... |
57 |
Using the Color-Level Tint Icon .......................................................................................................... |
57 |
Using the CMS Display........................................................................................................................ |
57 |
Using the New Color Button................................................................................................................ |
57 |
Using the Trash Button........................................................................................................................ |
57 |
REVIEW QUESTIONS.................................................................................................................................. |
58 |
TEXT........................................................................................................................................................... |
59 |
BLOCKS VS. FRAMES................................................................................................................................ |
60 |
Using Text Blocks ................................................................................................................................ |
60 |
To Create a Text Block ........................................................................................................................ |
60 |
To Resize a Text Block......................................................................................................................... |
61 |
Overset Text Icon................................................................................................................................. |
61 |
Using Text Frames............................................................................................................................... |
62 |
To Create a Text Frame....................................................................................................................... |
62 |
To Resize a Text Frame ....................................................................................................................... |
63 |
Overset Text Icon................................................................................................................................. |
63 |
INPUTTING TEXT....................................................................................................................................... |
64 |
Inputting text into a Text Block............................................................................................................ |
64 |
Inputting text into a Text Frame .......................................................................................................... |
65 |
PLACING TEXT.......................................................................................................................................... |
66 |
Using the Place dialog box.................................................................................................................. |
66 |
Choosing File Name ............................................................................................................................ |
68 |
Choosing File Types ............................................................................................................................ |
68 |
Kind field ............................................................................................................................................. |
68 |
Size field............................................................................................................................................... |
68 |
Last Modified field............................................................................................................................... |
68 |
Setting Place ........................................................................................................................................ |
69 |
Setting Options..................................................................................................................................... |
69 |
Text-Only Import Filters...................................................................................................................... |
70 |
EDITING TEXT........................................................................................................................................... |
71 |
To Highlight Text in a Text frame or text block with the mouse .......................................................... |
71 |
To Highlight Text in a Text frame or text block with the keyboard...................................................... |
72 |
Adding and Removing text ................................................................................................................... |
72 |
Copying, Cutting and Pasting text ....................................................................................................... |
72 |
To Copy Text........................................................................................................................................ |
72 |
To Paste the copied Text...................................................................................................................... |
72 |
To Cut Text and Paste.......................................................................................................................... |
73 |
To Paste the cut Text............................................................................................................................ |
73 |
TEXT CONTROL PALETTE.......................................................................................................................... |
74 |
Using the Character View.................................................................................................................... |
74 |
Using the Paragraph View .................................................................................................................. |
74 |
FOR USE AT THE LICENSED SITE(S) ONLY |
|
Cheltenham Computer Training 1995-2001 - www.cctglobal.com |
|

CHARACTER SPECIFICATIONS DIALOG BOX.............................................................................................. |
75 |
Using the Character Specifications dialog box ................................................................................... |
75 |
To display the Character Specifications dialog box ............................................................................ |
75 |
Choosing Font Names.......................................................................................................................... |
75 |
Setting Font Size .................................................................................................................................. |
76 |
Setting Leading .................................................................................................................................... |
76 |
Setting Horizontal Scale ...................................................................................................................... |
76 |
Setting text Color ................................................................................................................................. |
76 |
Setting Color Tint ................................................................................................................................ |
76 |
Setting Type Style................................................................................................................................. |
77 |
Setting Position.................................................................................................................................... |
78 |
Setting Case ......................................................................................................................................... |
78 |
Setting Track........................................................................................................................................ |
78 |
Setting Line End................................................................................................................................... |
78 |
REVIEW QUESTIONS.................................................................................................................................. |
79 |
PICTURES.................................................................................................................................................. |
81 |
PLACING PICTURES ................................................................................................................................... |
82 |
Using the Place dialog box.................................................................................................................. |
82 |
Choosing File Types ............................................................................................................................ |
83 |
Kind Field ............................................................................................................................................ |
83 |
Size Field ............................................................................................................................................. |
83 |
Last Modified Field.............................................................................................................................. |
83 |
Setting Place ........................................................................................................................................ |
83 |
Linking and Embedding Pictures......................................................................................................... |
84 |
Retaining Cropping Data..................................................................................................................... |
84 |
MODIFYING PICTURE ................................................................................................................................ |
85 |
Using the Object View ......................................................................................................................... |
85 |
Positioning pictures on page ............................................................................................................... |
85 |
Setting the Frame Size ......................................................................................................................... |
86 |
Setting the picture Scale ...................................................................................................................... |
86 |
Rotating picture ................................................................................................................................... |
86 |
Skewing picture.................................................................................................................................... |
86 |
Flipping pictures.................................................................................................................................. |
86 |
To Copy a Picture................................................................................................................................ |
87 |
To Paste the copied picture ................................................................................................................. |
87 |
To Cut a picture................................................................................................................................... |
87 |
To Past the cut picture......................................................................................................................... |
87 |
Wrapping Text around pictures ........................................................................................................... |
87 |
Colorizing pictures .............................................................................................................................. |
87 |
To Colorize a bitmap ........................................................................................................................... |
87 |
CROPPING ................................................................................................................................................. |
88 |
Cropping pictures ................................................................................................................................ |
88 |
Positioning pictures in Frame ............................................................................................................. |
89 |
REVIEW QUESTIONS.................................................................................................................................. |
90 |
OBJECTS.................................................................................................................................................... |
91 |
SELECTING OBJECTS................................................................................................................................. |
92 |
Selecting single Object with the Pointer Tool...................................................................................... |
92 |
Selecting multiple Objects with the Pointer Tool................................................................................. |
93 |
Selecting Objects with the Marquee Box ............................................................................................. |
94 |
GROUPED OBJECTS ................................................................................................................................... |
95 |
Grouping Objects................................................................................................................................. |
95 |
Ungrouping Objects............................................................................................................................. |
95 |
MOVING OBJECTS..................................................................................................................................... |
96 |
Moving objects using the Mouse.......................................................................................................... |
96 |
FOR USE AT THE LICENSED SITE(S) ONLY |
|
Cheltenham Computer Training 1995-2001 - www.cctglobal.com |
|

Moving objects using the Control Palette............................................................................................ |
97 |
Removing Objects ................................................................................................................................ |
97 |
ALIGNING OBJECTS................................................................................................................................... |
98 |
Using the Align Objects dialog box ..................................................................................................... |
98 |
Setting the Align Icons ......................................................................................................................... |
99 |
Setting the Distribute Icons.................................................................................................................. |
99 |
Using the Alignment Preview ............................................................................................................ |
100 |
ARRANGING OBJECTS ............................................................................................................................. |
101 |
Using the Arrange menu.................................................................................................................... |
101 |
Using Send to Back............................................................................................................................ |
102 |
Using Send Backward........................................................................................................................ |
102 |
Using Bring To Front ........................................................................................................................ |
102 |
Using Bring Forward ........................................................................................................................ |
103 |
REVIEW QUESTIONS................................................................................................................................ |
104 |
OUTPUT ................................................................................................................................................... |
105 |
PRINTING YOUR WORK........................................................................................................................... |
106 |
Using the Print dialog box................................................................................................................. |
106 |
PRINT DOCUMENT .................................................................................................................................. |
107 |
Setting Print Document options......................................................................................................... |
107 |
Selecting a Printer ............................................................................................................................. |
107 |
Printing multiple Copies.................................................................................................................... |
108 |
Collating pages.................................................................................................................................. |
108 |
Reversing pages................................................................................................................................. |
108 |
Setting Pages ..................................................................................................................................... |
108 |
Printing Page Ranges ........................................................................................................................ |
109 |
Setting Non-Printing option............................................................................................................... |
109 |
To create a Non-printing object......................................................................................................... |
109 |
To hide or display non-printing objects in your publication: ............................................................ |
109 |
Printing Blank Pages......................................................................................................................... |
109 |
Orientation Options / Icons ............................................................................................................... |
110 |
PRINT PAPER........................................................................................................................................... |
111 |
Setting Print Paper options................................................................................................................ |
111 |
Choosing Paper Sizes ........................................................................................................................ |
112 |
Choosing Paper Source ..................................................................................................................... |
112 |
Printing Printer’s Marks ................................................................................................................... |
112 |
Printing Page Information................................................................................................................. |
112 |
Tiling Pages....................................................................................................................................... |
113 |
Scaling Pages..................................................................................................................................... |
113 |
Printing Thumbnails .......................................................................................................................... |
113 |
To Print Thumbnail proofs ................................................................................................................ |
114 |
Using Fit Preview .............................................................................................................................. |
114 |
PRINT OPTIONS ....................................................................................................................................... |
116 |
Setting Print Options ......................................................................................................................... |
116 |
Sending Image Data .......................................................................................................................... |
117 |
PRINT COLOR.......................................................................................................................................... |
118 |
Setting Print Color options................................................................................................................ |
118 |
Composite Printing............................................................................................................................ |
119 |
Black and White Printing................................................................................................................... |
119 |
PRINT FEATURES..................................................................................................................................... |
120 |
Setting Print Features options ........................................................................................................... |
120 |
REVIEW QUESTIONS................................................................................................................................ |
122 |
FOR USE AT THE LICENSED SITE(S) ONLY
Cheltenham Computer Training 1995-2001 - www.cctglobal.com

Introduction to PageMaker |
1 |
PageMaker 6.5 Foundation |
2001 Cheltenham Computer Training |
Introduction to PageMaker
When you |
• |
Use Publication files |
|
have |
• |
Use Template files |
|
completed |
• |
Use General Preferences |
|
this learning |
• |
Set the Measurement In |
|
module you |
• |
Set the Vertical ruler |
|
will have |
• Set the Graphics Display |
||
seen how to: |
|||
• |
Set the Control Palette |
||
|
• Set the Save Options |
||
|
• |
Apply Guides |
|
FOR USE AT THE LICENSED SITE(S) ONLY
Cheltenham Computer Training 1995-2001 - www.cctglobal.com
2 |
Introduction to PageMaker |
2001 Cheltenham Computer Training |
PageMaker 6.5 Foundation |
What is PageMaker 6.5?
What is PageMaker 6.5?
PageMaker is a page layout application
What is PageMaker?
© Cheltenham Computer Training 2001 |
Adobe PageMaker 6.5 - Slide No 2 |
•This course will teach you the fundamentals of PageMaker 6.5. It is a page layout application. You can use PageMaker to create complex multi-page publications such as Text Books, Magazines and Novels, or single page publications such as a personal letter or a simple business card.
Types of |
|
• PageMaker 6.5 publications can be outputted to high-end or low-end |
output |
|
printers, saved as HTML files, and may even be saved as PDF files for |
|
|
placement in other applications. |
Adobe |
|
• If you don’t already have PageMaker 6.5 you can download a Demo |
|
||
PageMaker |
|
Version from the Adobe website at http://www.adobe.com and use it |
website |
|
for 30 days before having to purchase it. This is a great opportunity to |
|
|
learn the program and see if you like it, before investing in it. |
FOR USE AT THE LICENSED SITE(S) ONLY
Cheltenham Computer Training 1995-2001 - www.cctglobal.com
Introduction to PageMaker |
3 |
PageMaker 6.5 Foundation |
2001 Cheltenham Computer Training |
PageMaker Extensions
PageMaker Extensions
•PageMaker uses two kind of Extensions:
.P65 (Publication files)
.T65 (Template files )
Extensions
Using Publication files
Using Template files
© Cheltenham Computer Training 2001 |
Adobe PageMaker 6.5 - Slide No 3 |
•PageMaker uses two kind of extensions, .P65 and .T65
•The .P65 extension represents PageMaker Publication files, which all of your work will be saved as this file type by default. PageMaker publication files are displayed in windows by the following icon:
Note: The PageMaker extensions and icons also make it easier to distinguish PageMaker files from other applications files.
•The .T65 extension represents PageMaker Template files. These are used to save you time when using the same layout as the publications over again. You might consider creating a template to use as your starting point at the beginning of every production cycle, saving time and ensuring consistency.
Note: Templates have the .T65 extension. The only real difference between a template and a publication is when you open the former; you open a copy rather than the original.
FOR USE AT THE LICENSED SITE(S) ONLY
Cheltenham Computer Training 1995-2001 - www.cctglobal.com
4 |
Introduction to PageMaker |
2001 Cheltenham Computer Training |
PageMaker 6.5 Foundation |
General Preferences
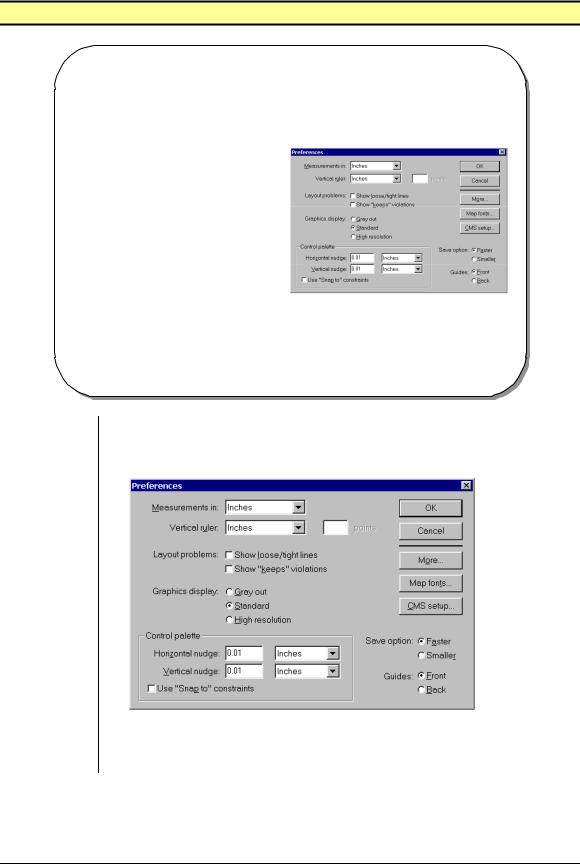
General Preferences
•This dialog box allows you to create defaults for how PageMaker will treat the content in your publications such as your text, save your files, move items, measure items, and display guides .
Using
General
Preferences
© Cheltenham Computer Training 2001 |
Adobe PageMaker 6.5 - Slide No 4 |
•From the main menu, choose File > Preferences > General to open the
General Preferences dialog box.
OR press the Ctrl + K key combination:
•This dialog box allows you to create defaults for how PageMaker will treat the content in your publications such as your text, save your files, move items, measure items, and display guides.
FOR USE AT THE LICENSED SITE(S) ONLY
Cheltenham Computer Training 1995-2001 - www.cctglobal.com

Introduction to PageMaker |
5 |
PageMaker 6.5 Foundation |
2001 Cheltenham Computer Training |
Setting
Measurement
Setting the
Vertical Ruler
Setting the
Graphics
Display
Setting the
Control
Palette
•While the default Measurement system is inches, you can change the measurement units to picas, millimeters, and ciceros:
•The Vertical Ruler default setting is inches, however you can change the vertical ruler units to picas, millimeters, and ciceros:
•The Preferences dialog box allows you to choose the Graphic Display options for your placed graphics:
Gray out – Can be useful if you want to concentrate on the text elements in your publication and speed your screen redraw. Unfortunately, you cannot selectively gray out graphics. It’s all or nothing. With advent layers this option might be obsolete. If you want to hide graphics, place them on their own layer and hide that layer as needed.
Standard – The view you work in most of the time. Standard view enables your screen to redraw faster by displaying the low-resolution screen-only image. As long as your links are up to date, the lowresolution image is only for the screen. When you print, the real graphic is sent to the printer for highresolution output. You can adjust the resolution PageMaker uses for Standard display in the More Preferences dialog box.
High-resolution – Will draw the screen image from the actual graphic file, be it embedded or linked. If your graphic file is more than a few megabytes in size, this process can take an eternity.
Note: For best print quality, use the High Resolution setting when you are ready to print.
•The Control palette settings allow you to make adjustments to how the Horizontal and Vertical nudges, and the ‘Snap to’ constraints will work in the Control palette. The Control palette is simply a compact and convenient way of making changes to your publication:
FOR USE AT THE LICENSED SITE(S) ONLY
Cheltenham Computer Training 1995-2001 - www.cctglobal.com

6 |
Introduction to PageMaker |
2001 Cheltenham Computer Training |
PageMaker 6.5 Foundation |
Setting the |
• The Save option allows you to select the saving option appropriate for |
Save Option |
you. The default setting is Faster: |
|
|
Applying |
• You can determine whether the Guides appear in front of or behind |
Guides |
objects. Click the Guides radio button for Front or Back: |
•You can also change the location of the guides with out going to the General Preferences dialog box, to do this:
From the main menu, choose the View > Send Guides to Back
OR choose the View > Bring Guides to Front
Note: To select an object that is overlapped by a guide, press the Ctrl key while clicking the object. It is best to keep all your guides in front.
FOR USE AT THE LICENSED SITE(S) ONLY
Cheltenham Computer Training 1995-2001 - www.cctglobal.com

Introduction to PageMaker |
7 |
PageMaker 6.5 Foundation |
2001 Cheltenham Computer Training |
Review Questions
Review Questions
|
© Cheltenham Computer Training 2001 |
Adobe PageMaker 6.5 - Slide No 5 |
||
How would |
|
• |
Use Publication files? |
|
|
|
|||
you: |
|
• |
Use Template files? |
|
|
|
• |
Use General Preferences? |
|
|
|
• Set the Measurement In? |
|
|
|
|
• Set the Vertical ruler? |
|
|
|
|
• Set the Graphics Display? |
|
|
|
|
• Set the Control Palette? |
|
|
|
|
• Set the Save Options? |
|
|
|
|
• |
Apply Guides? |
|
FOR USE AT THE LICENSED SITE(S) ONLY
Cheltenham Computer Training 1995-2001 - www.cctglobal.com

PageMaker Interface |
9 |
PageMaker 6.5 Foundation |
2001 Cheltenham Computer Training |
PageMaker Interface
When you |
• |
Use the PageMaker Environment |
|
have |
• |
Use Blank Pages |
|
completed |
• |
Use the Pasteboard |
|
this learning |
• |
Use the Toolbox |
|
module you |
• |
Use the Colors Palette |
|
will have |
• Use the Control Palette |
||
seen how to: |
|||
• |
Use the Character View |
||
|
• Use the Paragraph View |
||
|
• Use the Object View |
||
|
• |
Use Rulers |
|
|
• Use the Zero Point Option |
||
|
• |
Use Guides |
|
|
• Apply the Snap to Option |
||
FOR USE AT THE LICENSED SITE(S) ONLY
Cheltenham Computer Training 1995-2001 - www.cctglobal.com
10 |
PageMaker Interface |
2001 Cheltenham Computer Training |
PageMaker 6.5 Foundation |
Work Environment
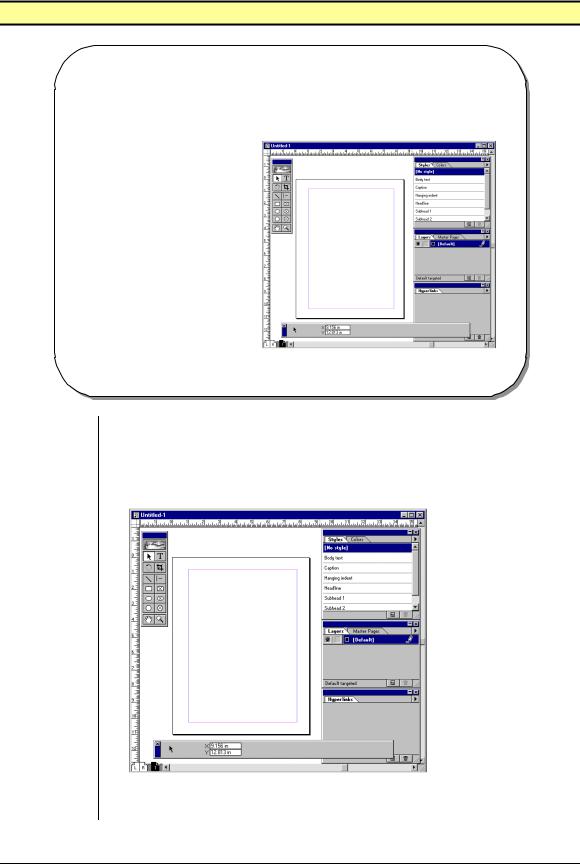
Work Environment
•The PageMaker environment will display a New Publication window, a Blank Page, a Master Page, and Current Page icons, horizontal and vertical Scroll Bars, Rulers, the Control palette, the Toolbox, and other palettes.
© Cheltenham Computer Training 2001 |
Adobe PageMaker 6.5 - Slide No 6 |
Using the
PageMaker
Environment
•The PageMaker environment will display a New Publication window, a Blank Page, a Master Page, and Current Page icons, horizontal and vertical Scroll Bars, Rulers, the Control palette, the Toolbox, and other palettes such as Styles, Colors, Layers, Master Pages, and Hyperlinks:
Note: Palettes always display in front of your work window, and remain opened until you close them.
FOR USE AT THE LICENSED SITE(S) ONLY
Cheltenham Computer Training 1995-2001 - www.cctglobal.com
PageMaker Interface |
11 |
PageMaker 6.5 Foundation |
2001 Cheltenham Computer Training |
Using Blank
Pages
Using the
Pasteboard
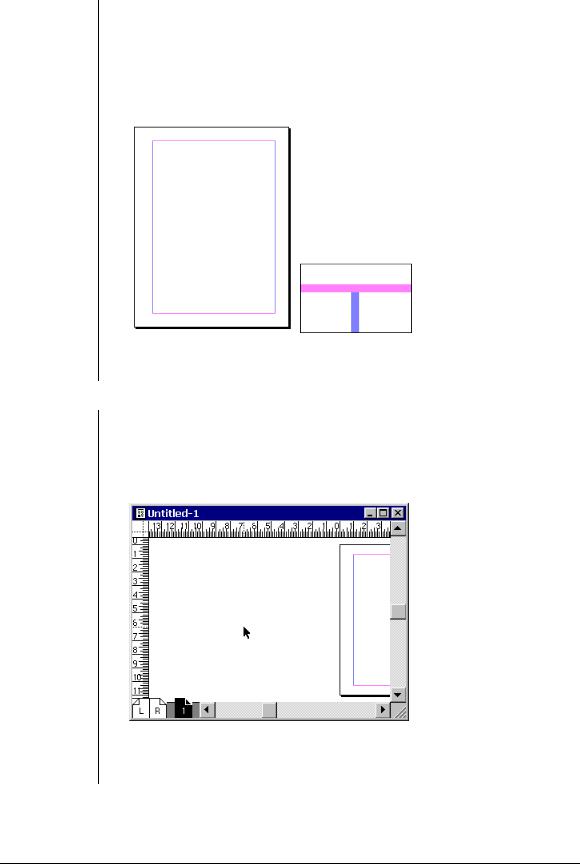
•When starting with a new document, you will see a blank page with/without Margin Guides set to a size specified in the Page Setup dialog box. A rectangle with a black key line and a drop shadow represents the page. If you set page margins for your page they will be represented by a bright magenta colored keyline which will be smaller than your page size, and two darker colored Column Guides on the left and right side of the page:
Note: If you set all of your page margins to zero, the margin guides and column guides will become the keyline of the page.
•The Pasteboard is the non-printing area outside the blank page. The function of the pasteboard in PageMaker is the same as the traditional pasteboard, simply select objects and move them onto the pasteboard for use on other pages. You can leave items on the pasteboard until you are ready to use them:
Note: If you go to another page in your document, the items on the pasteboard will still stay in place, and they will always be visible unless you delete them.
FOR USE AT THE LICENSED SITE(S) ONLY
Cheltenham Computer Training 1995-2001 - www.cctglobal.com
12 |
PageMaker Interface |
2001 Cheltenham Computer Training |
PageMaker 6.5 Foundation |
Toolbox
Toolbox
•The PageMaker Toolbox enables you to access the basic tools you need to perform various actions in the publication window.
© Cheltenham Computer Training 2001 Adobe PageMaker 6.5 - Slide No 7
Using the |
• The PageMaker Tool palette enables you to access the basic tools |
Toolbox |
you need to perform various actions in the publication window: |
Note: For more information on the Tool Palette, see the Basic Tools chapter.
FOR USE AT THE LICENSED SITE(S) ONLY
Cheltenham Computer Training 1995-2001 - www.cctglobal.com
PageMaker Interface |
13 |
PageMaker 6.5 Foundation |
2001 Cheltenham Computer Training |
Colors Palette
Colors Palette
•The Colors palette is used to make quick color changes to your publication.
•By default every Colors palette must contain the following colors : None, Paper, Black, and Registration.
© Cheltenham Computer Training 2001 Adobe PageMaker 6.5 - Slide No 8
Using the |
• From the main menu, choose Window > Show Colors Palette |
Colors |
|
Palette |
|
|
|
|
|
FOR USE AT THE LICENSED SITE(S) ONLY
Cheltenham Computer Training 1995-2001 - www.cctglobal.com

14 |
PageMaker Interface |
2001 Cheltenham Computer Training |
PageMaker 6.5 Foundation |
•The Colors palette contains the following colors by default: None, Paper, Black, and Registration.
None: Apply this color to objects you want to be transparent-that is when you want the color of a background object to show through the selected object.
Paper: This is the color of the paper you are working on; technically, it is no ink at all.
Black: This is the default color for text.
Registration: This is not really a color at all, but more of a designation, used when you are printing separations
Process colors: These are cyan, magenta, and yellow. These colors are denoted by the process colors symbol  .
.
RGB colors: These are red, green, and blue, denoted by the RGB symbol  .
.
FOR USE AT THE LICENSED SITE(S) ONLY
Cheltenham Computer Training 1995-2001 - www.cctglobal.com
PageMaker Interface |
15 |
PageMaker 6.5 Foundation |
2001 Cheltenham Computer Training |
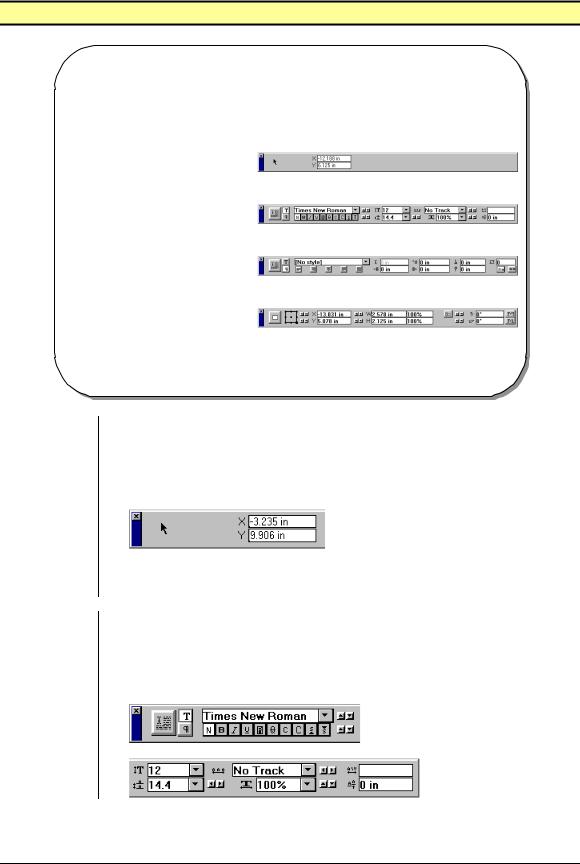
Control Palette
Control Palette
•The Control palette gives you a one-stop shop, enabling you to change several formatting options in one place rather than making repeat trips to the Type menu.
Empty Control Palette
Character Control Palette
Paragraph Control Palette
Object Control Palette
© Cheltenham Computer Training 2001 |
Adobe PageMaker 6.5 - Slide No 9 |
Using the
Control
Palette
Using the
Character
View
•The Control palette gives you a one-stop shop, enabling you to change several formatting options in one place rather than making repeat trips to the Type menu.
•From the main menu, choose Window > Show Control Palette
OR press the Ctrl + ‘ key combination
•The X and Y coordinates displays the horizontal and vertical distances of the selected object from the current zero point.
•In the Character View, click one of the font options in the Control palette. You can view the Characters by using the toggling button to choose the Apply button, Type style, Case, Position, Type Size, Leading, Expert tracking, Horizontal Scale, Kerning, and Baseline Shift:
FOR USE AT THE LICENSED SITE(S) ONLY
Cheltenham Computer Training 1995-2001 - www.cctglobal.com
16 |
PageMaker Interface |
2001 Cheltenham Computer Training |
PageMaker 6.5 Foundation |
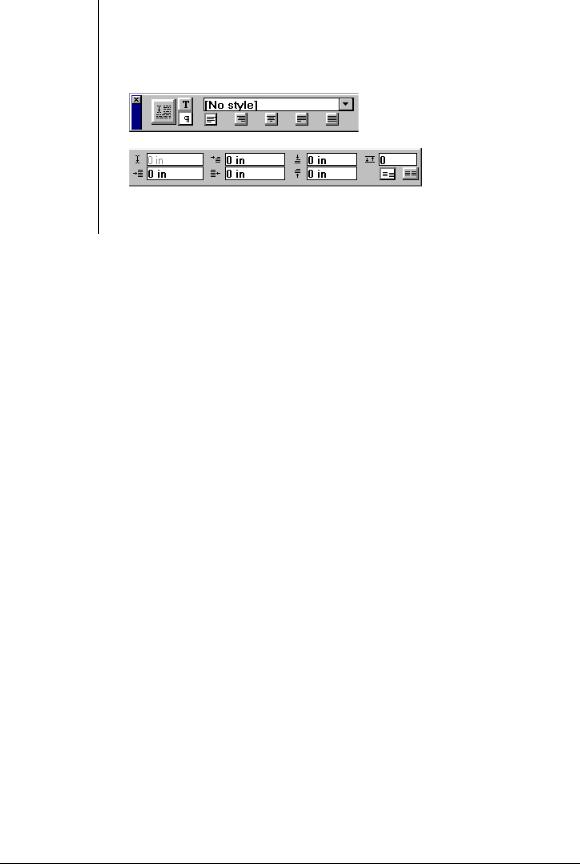
Using the
Paragraph
View
•The Paragraph View of the Control palette offers many of the same options as the Character View. Such as, Apply button, Character/Paragraph buttons Alignment, Style, Cursor position indicator, First line indent, Right indent, Left indent, Add space above paragraph, Grid options, Add space after paragraph:
Note: To toggle between the character and paragraph views of the Control palette, press the Ctrl + Shift + ‘ key combination.
FOR USE AT THE LICENSED SITE(S) ONLY
Cheltenham Computer Training 1995-2001 - www.cctglobal.com
PageMaker Interface |
17 |
PageMaker 6.5 Foundation |
2001 Cheltenham Computer Training |
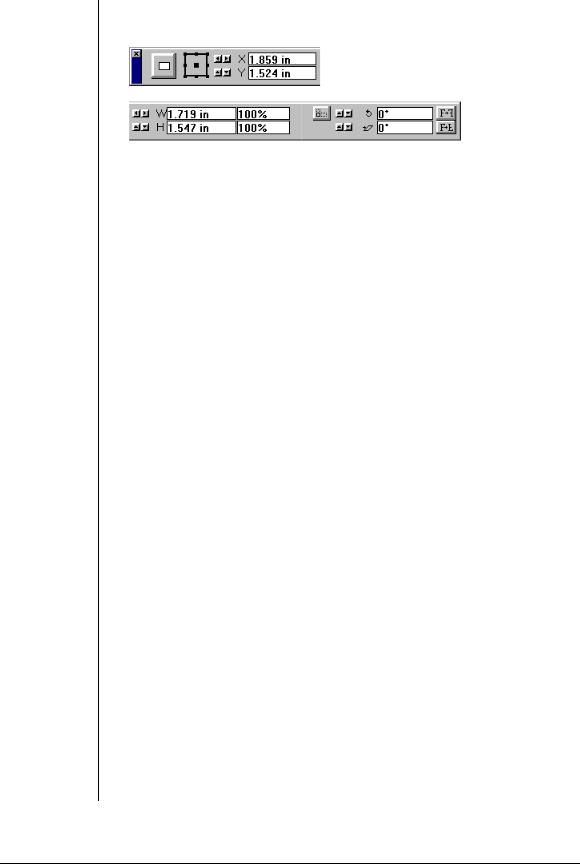
Using the
Object View
•When drawing/selecting objects, the Control palette will change depending on the object type:
Apply button: Apply changes to objects using numeric values you enter.
Proxy: Represents the selected object. Click to set a reference point, or the point you are manipulating on the object.
Nudge buttons: Use to resize, click to move, or transform an object incrementally. Press Shift while nudging to increase the nudge increment by ten.
Position pointer: Displays the X and Y coordinate values of the reference point or pointer, relative to the current rulers.
Sizing options: Specifies the width and height of the selected object or cropping rectangle. Nudge amount 0.01 inches.
Percent scaling option: Specifies the percentage change from the original size.
Scaling option: Click to use scaling option to resize an imported graphic.
Cropping option: Click to use the cropping tool to crop imported graphics.
Proportional-scaling option: Specifies whether you change an object’s height or width independently, or maintaining its original proportions.
Printer-resolution-scaling option: Constrains the scaling of imported 1-bit bitmap graphics so that they are compatible with the target printer specified in the Document Setup dialog box.
Skewing options: Skews objects horizontally –85 to 85 degrees in relation to the selected reference point.
Rotating option: Rotates the object around the reference point.
Horizontal reflecting point: Reflect the object vertically, and then rotate the object 180 degrees so it appears to be reflected horizontally.
Vertical-reflecting button: Reflects the object vertically.
FOR USE AT THE LICENSED SITE(S) ONLY
Cheltenham Computer Training 1995-2001 - www.cctglobal.com
18 |
PageMaker Interface |
2001 Cheltenham Computer Training |
PageMaker 6.5 Foundation |
Rulers/Guides
Rulers/Guides
•Rulers can be toggled on and off by choosing View > Show/Hide Rulers
OR by pressing the Ctrl + R key combination.
© Cheltenham Computer Training 2001 Adobe PageMaker 6.5 - Slide No 10
Using Rulers |
|
• Rulers can be toggled on and off by choosing View > Show/Hide |
|
|
Rulers |
|
|
OR by pressing the Ctrl + R key combination. Most of the time you |
|
|
will need them on. You can change the measurement system the |
|
|
ruler displays by going to the General Preferences. |
To Change the |
|
• From the main menu, choose File > Preferences > General |
|
||
Ruler |
|
OR press the Ctrl + K key combination: |
Measurements |
|
|
|
|
|
Using the
Zero Point
Option
•The Zero Point is the reference point by which you can refer to an object’s location on the page or pasteboard. Unless you change it, the zero point reflects the top left of your page or, if you are working with facing pages, the point at which the two pages meet:
FOR USE AT THE LICENSED SITE(S) ONLY
Cheltenham Computer Training 1995-2001 - www.cctglobal.com
PageMaker Interface |
19 |
PageMaker 6.5 Foundation |
2001 Cheltenham Computer Training |
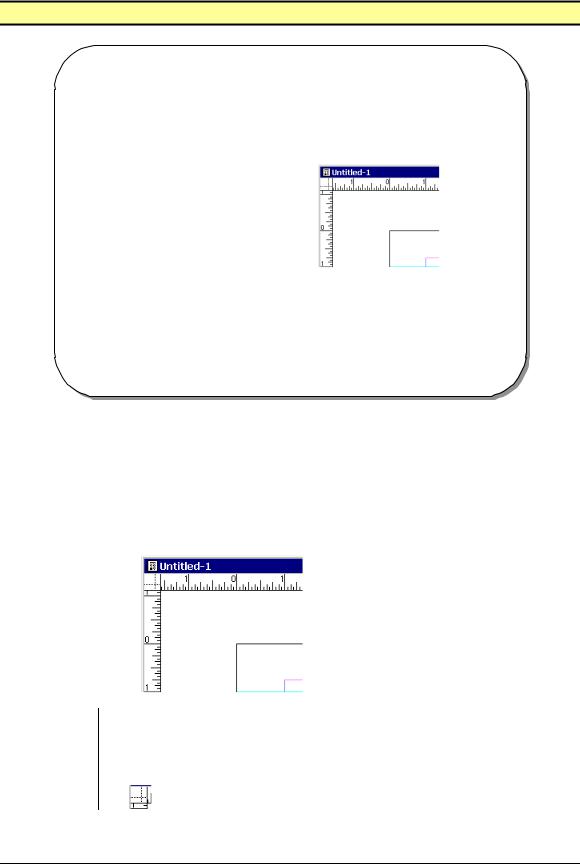
Using Guides • Guides are used to help you place objects precisely on your page. These ruler guides help you align objects along the same plane, and like the margin and column guides, they do not print:
To add a |
• Drag a guide from the left or the top ruler onto the page: |
Guide |
|
|
|
To remove a |
|
• Grab and drag a guide outside of the work area. |
Guide |
|
Note: You can have up to 120 ruler guides per page. |
|
|
|
Applying the |
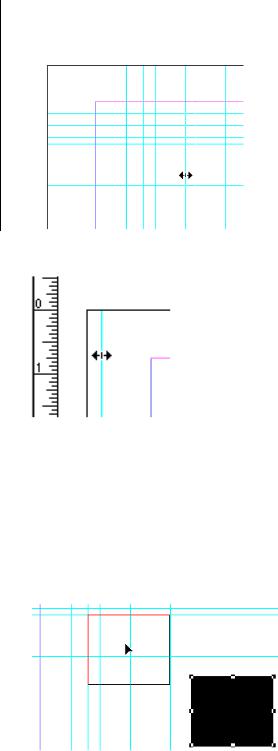
|
• When the Snap to Guides option is on choose View > Snap to |
|
||
Snap to |
|
Guides |
Option |
|
OR press the Ctrl + Shift + ; key combination. |
|
|
• You may find the movement of an object constrained by the snapping, |
|
|
preventing you from moving it incrementally nearer to a guide. In such |
|
|
cases, you should turn off Snap to Guides: |
|
|
|
|
|
|
FOR USE AT THE LICENSED SITE(S) ONLY
Cheltenham Computer Training 1995-2001 - www.cctglobal.com

20 |
PageMaker Interface |
2001 Cheltenham Computer Training |
PageMaker 6.5 Foundation |
Review Questions
Review Questions
|
© Cheltenham Computer Training 2001 |
Adobe PageMaker 6.5 - Slide No 11 |
||
How would |
|
• |
Use the PageMaker Environment? |
|
|
|
|||
you: |
|
• |
Use Blank Pages? |
|
|
|
• |
Use the Pasteboard? |
|
|
|
• |
Use the Toolbox? |
|
|
|
• Use the Colors Palette? |
|
|
|
|
• Use the Control Palette? |
|
|
|
|
• Use the Character View? |
|
|
|
|
• Use the Paragraph View? |
|
|
|
|
• Use the Object View? |
|
|
|
|
• |
Use Rulers? |
|
|
|
• Use the Zero Point Option? |
|
|
|
|
• |
Use Guides? |
|
|
|
• Apply the Snap to Option? |
|
|
FOR USE AT THE LICENSED SITE(S) ONLY
Cheltenham Computer Training 1995-2001 - www.cctglobal.com

Documents |
21 |
PageMaker 6.5 Foundation |
2001 Cheltenham Computer Training |
Documents
When you |
• |
Create New Documents |
|
have |
• |
Use the Document Setup dialog box |
|
completed |
• |
Apply Page Size |
|
this learning |
• |
Apply Dimensions |
|
module you |
• |
Apply Orientation |
|
will have |
• |
Apply Options |
|
seen how to: |
|||
• |
Apply Number of Pages |
||
|
• Apply Start Page # |
||
|
• |
Apply the Margins |
|
|
• Change the Document Setup |
||
|
• |
Setup Master Pages |
|
|
• Use the Save and Save As commands |
||
|
• Use the Open command |
||
|
• Use the Open As option |
||
|
• Use the Cannot Find dialog box |
||
|
• Use the Close command |
||
FOR USE AT THE LICENSED SITE(S) ONLY
Cheltenham Computer Training 1995-2001 - www.cctglobal.com
22 |
Documents |
2001 Cheltenham Computer Training |
PageMaker 6.5 Foundation |
New Documents
New Documents
•Creating a New Document allows you to set up the publication page with specified settings.
•You can define such things as the size of the page, the size of the margins, and even the orientation of the page.
© Cheltenham Computer Training 2001 |
Adobe PageMaker 6.5 - Slide No 12 |
Creating New
Documents
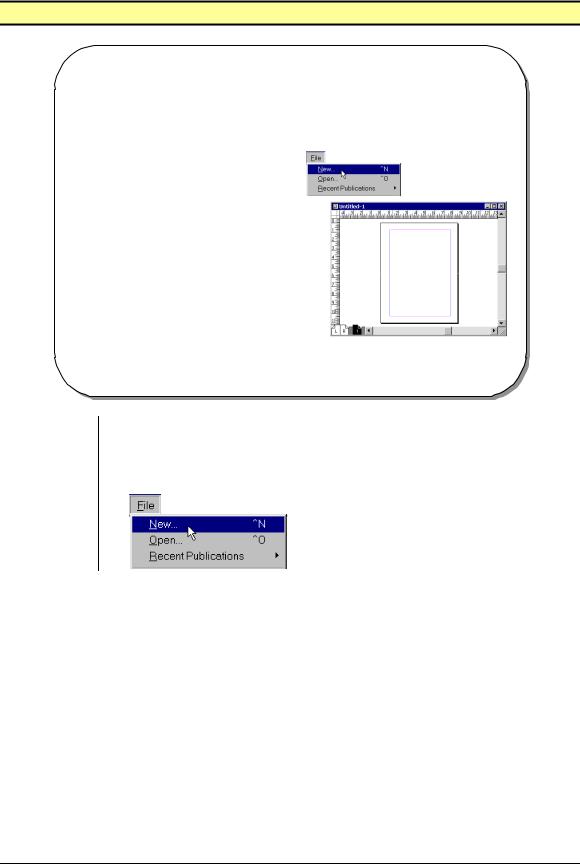
•Creating a New Document allows you to set up the publication page with specified settings. You can define such things as the size of the page, the size of the margins, and even the orientation of the page.
•From the main menu, choose File > New to create a new document:
FOR USE AT THE LICENSED SITE(S) ONLY
Cheltenham Computer Training 1995-2001 - www.cctglobal.com
 Loading...