


 Loading...
ADOBE® FLASH® CS3 PROFESSIONAL
USER GUIDE

© 2007 Adobe Systems Incorporated. All rights reserved.
Using Adobe® Flash® CS3 Professional for Windows® and Mac OS
If this guide is distributed with software that includes an end user agreement, this guide, as well as the software described in it, is furnished under license and may be used or copied only in accordance with the terms of such license. Except as permitted by any such license, no part of this guide may be reproduced, stored in a retrieval system, or transmitted, in any form or by any means, electronic, mechanical, recording, or otherwise, without the prior written permission of Adobe Systems Incorporated. Please note that the content in this guide is protected under copyright law even if it is not distributed with software that includes an end user license agreement.
The content of this guide is furnished for informational use only, is subject to change without notice, and should not be construed as a commitment by Adobe Systems Incorporated. Adobe Systems Incorporated assumes no responsibility or liability for any errors or inaccuracies that may appear in the informational content contained in this guide.
Please remember that existing artwork or images that you may want to include in your project may be protected under copyright law. The unauthorized incorporation of such material into your new work could be a violation of the rights of the copyright owner. Please be sure to obtain any permission required from the copyright owner.
Any references to company names in sample templates are for demonstration purposes only and are not intended to refer to any actual organization.
Adobe, the Adobe logo, Adobe Premiere, ActionScript, ColdFusion, Director, Fireworks, Flash, Flash Lite, FreeHand, Illustrator, and Photoshop are either registered trademarks or trademarks of Adobe Systems Incorporated in the United States and/or other countries.
Microsoft and Windows are either registered trademarks or trademarks of Microsoft Corporation in the United States and/or other countries. Macintosh is a trademark of Apple Inc. registered in the U.S. and other countries. All other trademarks are the property of their respective owners.
This product includes software developed by the Apache Software Foundation (www.apache.org). MPEG Layer-3 audio compression technology licensed by Fraunhofer IIS and Thomson Multimedia (http://www.iis.fhg.de/amm/). You cannot use the mp3 compressed audio within the Software for real time or live broadcasts. If you require an mp3 decoder for real time or live broadcasts, you are responsible for obtaining this mp3 technology license. Speech compression and decompression technology licensed from Nellymoser, Inc. (www.nellymoser.com) Flash CS3 video is powered by On2 TrueMotion video technology. © 1992-2005 On2 Technologies, Inc. All Rights Reserved. http://www.on2.com. This product includes software developed by the OpenSymphony Group (http://www.opensymphony.com/)
Sorenson Spark™ video compression and decompression technology licensed from Sorenson Media, Inc.
Adobe Systems Incorporated, 345 Park Avenue, San Jose, California 95110, USA.
Notice to U.S. Government End Users: The Software and Documentation are “Commercial Items,” as that term is defined at 48 C.F.R. §2.101, consisting of “Commercial Computer Software” and “Commercial Computer Software Documentation,” as such terms are used in 48 C.F.R. §12.212 or 48 C.F.R. §227.7202, as applicable. Consistent with 48 C.F.R. §12.212 or 48 C.F.R. §§227.7202-1 through 227.7202-4, as applicable, the Commercial Computer Software and Commercial Computer Software Documentation are being licensed to U.S. Government end users (a) only as Commercial Items and (b) with only those rights as are granted to all other end users pursuant to the terms and conditions herein. Unpublished-rights reserved under the copyright laws of the United States. Adobe agrees to comply with all applicable equal opportunity laws including, if appropriate, the provisions of Executive Order 11246, as amended, Section 402 of the Vietnam Era Veterans Readjustment Assistance Act of 1974 (38 USC 4212), and Section 503 of the Rehabilitation Act of 1973, as amended, and the regulations at 41 CFR Parts 60-1 through 60-60, 60-250, and 60-741. The affirmative action clause and regulations contained in the preceding sentence shall be incorporated by reference.

iii
Contents |
|
Chapter 1: Getting started |
|
Installation . . . . . . . . . . . . . . . . . . . . . . . . . . . . . . . . . . . . . . . . . . . . . . . . . . . . . . . . . . . . . . . . . . . . . . . . . . . . . |
. . 1 |
Using Help . . . . . . . . . . . . . . . . . . . . . . . . . . . . . . . . . . . . . . . . . . . . . . . . . . . . . . . . . . . . . . . . . . . . . . . . . . . . . . |
. . 2 |
Resources . . . . . . . . . . . . . . . . . . . . . . . . . . . . . . . . . . . . . . . . . . . . . . . . . . . . . . . . . . . . . . . . . . . . . . . . . . . . . . |
. . 6 |
What’s new . . . . . . . . . . . . . . . . . . . . . . . . . . . . . . . . . . . . . . . . . . . . . . . . . . . . . . . . . . . . . . . . . . . . . . . . . . . . . |
. 12 |
Chapter 2: Workspace |
|
Flash workflow and workspace . . . . . . . . . . . . . . . . . . . . . . . . . . . . . . . . . . . . . . . . . . . . . . . . . . . . . . . . . . |
. 15 |
Using the Stage and Tools panel . . . . . . . . . . . . . . . . . . . . . . . . . . . . . . . . . . . . . . . . . . . . . . . . . . . . . . . . . |
. 23 |
The Timeline . . . . . . . . . . . . . . . . . . . . . . . . . . . . . . . . . . . . . . . . . . . . . . . . . . . . . . . . . . . . . . . . . . . . . . . . . . . . |
. 33 |
Using Flash authoring panels . . . . . . . . . . . . . . . . . . . . . . . . . . . . . . . . . . . . . . . . . . . . . . . . . . . . . . . . . . . . |
. 40 |
Accessibility in the Flash workspace . . . . . . . . . . . . . . . . . . . . . . . . . . . . . . . . . . . . . . . . . . . . . . . . . . . . . |
. 44 |
Undo, redo, and history . . . . . . . . . . . . . . . . . . . . . . . . . . . . . . . . . . . . . . . . . . . . . . . . . . . . . . . . . . . . . . . . . |
. 48 |
Automating tasks with the Commands menu . . . . . . . . . . . . . . . . . . . . . . . . . . . . . . . . . . . . . . . . . . . . |
. 50 |
Chapter 3: Creating and managing documents |
|
Working with Flash documents . . . . . . . . . . . . . . . . . . . . . . . . . . . . . . . . . . . . . . . . . . . . . . . . . . . . . . . . . . |
. 52 |
Creating and previewing mobile content with Adobe Device Central . . . . . . . . . . . . . . . . . . . . . |
. 56 |
Working with projects . . . . . . . . . . . . . . . . . . . . . . . . . . . . . . . . . . . . . . . . . . . . . . . . . . . . . . . . . . . . . . . . . . . |
. 61 |
Adding media to the library . . . . . . . . . . . . . . . . . . . . . . . . . . . . . . . . . . . . . . . . . . . . . . . . . . . . . . . . . . . . . |
. 65 |
Working with timelines . . . . . . . . . . . . . . . . . . . . . . . . . . . . . . . . . . . . . . . . . . . . . . . . . . . . . . . . . . . . . . . . . |
. 69 |
Working with scenes . . . . . . . . . . . . . . . . . . . . . . . . . . . . . . . . . . . . . . . . . . . . . . . . . . . . . . . . . . . . . . . . . . . . |
. 75 |
Find and Replace . . . . . . . . . . . . . . . . . . . . . . . . . . . . . . . . . . . . . . . . . . . . . . . . . . . . . . . . . . . . . . . . . . . . . . . |
. 77 |
Templates . . . . . . . . . . . . . . . . . . . . . . . . . . . . . . . . . . . . . . . . . . . . . . . . . . . . . . . . . . . . . . . . . . . . . . . . . . . . . . |
. 80 |
Chapter 4: Adobe Version Cue |
|
Working with Adobe Version Cue . . . . . . . . . . . . . . . . . . . . . . . . . . . . . . . . . . . . . . . . . . . . . . . . . . . . . . . . |
. 83 |
Working with the Version Cue Server . . . . . . . . . . . . . . . . . . . . . . . . . . . . . . . . . . . . . . . . . . . . . . . . . . . . |
. 90 |
Working with Version Cue projects . . . . . . . . . . . . . . . . . . . . . . . . . . . . . . . . . . . . . . . . . . . . . . . . . . . . . . |
. 95 |
Working with files in Version Cue . . . . . . . . . . . . . . . . . . . . . . . . . . . . . . . . . . . . . . . . . . . . . . . . . . . . . . . . |
101 |
Version Cue versions . . . . . . . . . . . . . . . . . . . . . . . . . . . . . . . . . . . . . . . . . . . . . . . . . . . . . . . . . . . . . . . . . . . . |
109 |
Editing and synchronizing offline files . . . . . . . . . . . . . . . . . . . . . . . . . . . . . . . . . . . . . . . . . . . . . . . . . . . |
112 |
Version Cue Server Administration . . . . . . . . . . . . . . . . . . . . . . . . . . . . . . . . . . . . . . . . . . . . . . . . . . . . . . . |
114 |
Version Cue PDF reviews . . . . . . . . . . . . . . . . . . . . . . . . . . . . . . . . . . . . . . . . . . . . . . . . . . . . . . . . . . . . . . . . |
125 |
Chapter 5: Using imported artwork |
|
Placing artwork into Flash . . . . . . . . . . . . . . . . . . . . . . . . . . . . . . . . . . . . . . . . . . . . . . . . . . . . . . . . . . . . . . . |
133 |
Working with Illustrator AI files . . . . . . . . . . . . . . . . . . . . . . . . . . . . . . . . . . . . . . . . . . . . . . . . . . . . . . . . . . |
140 |
Working with Photoshop PSD files . . . . . . . . . . . . . . . . . . . . . . . . . . . . . . . . . . . . . . . . . . . . . . . . . . . . . . . |
148 |
Imported bitmaps . . . . . . . . . . . . . . . . . . . . . . . . . . . . . . . . . . . . . . . . . . . . . . . . . . . . . . . . . . . . . . . . . . . . . . |
156 |

iv
Chapter 6: Drawing |
|
Drawing Basics . . . . . . . . . . . . . . . . . . . . . . . . . . . . . . . . . . . . . . . . . . . . . . . . . . . . . . . . . . . . . . . . . . . . . . . . . . |
160 |
Using Flash drawing and painting tools . . . . . . . . . . . . . . . . . . . . . . . . . . . . . . . . . . . . . . . . . . . . . . . . . . |
165 |
Drawing with the Pen tool . . . . . . . . . . . . . . . . . . . . . . . . . . . . . . . . . . . . . . . . . . . . . . . . . . . . . . . . . . . . . . . |
173 |
Reshaping lines and shape outlines . . . . . . . . . . . . . . . . . . . . . . . . . . . . . . . . . . . . . . . . . . . . . . . . . . . . . . |
178 |
Snapping . . . . . . . . . . . . . . . . . . . . . . . . . . . . . . . . . . . . . . . . . . . . . . . . . . . . . . . . . . . . . . . . . . . . . . . . . . . . . . . |
181 |
Chapter 7: Working with color, strokes, and fills |
|
Working with color . . . . . . . . . . . . . . . . . . . . . . . . . . . . . . . . . . . . . . . . . . . . . . . . . . . . . . . . . . . . . . . . . . . . . . |
184 |
Modifying color palettes . . . . . . . . . . . . . . . . . . . . . . . . . . . . . . . . . . . . . . . . . . . . . . . . . . . . . . . . . . . . . . . . |
186 |
Strokes, fills, and gradients . . . . . . . . . . . . . . . . . . . . . . . . . . . . . . . . . . . . . . . . . . . . . . . . . . . . . . . . . . . . . . |
187 |
Chapter 8: Working with graphic objects |
|
About graphic objects . . . . . . . . . . . . . . . . . . . . . . . . . . . . . . . . . . . . . . . . . . . . . . . . . . . . . . . . . . . . . . . . . . |
196 |
Selecting objects . . . . . . . . . . . . . . . . . . . . . . . . . . . . . . . . . . . . . . . . . . . . . . . . . . . . . . . . . . . . . . . . . . . . . . . |
197 |
Moving, copying, and deleting objects . . . . . . . . . . . . . . . . . . . . . . . . . . . . . . . . . . . . . . . . . . . . . . . . . . |
199 |
Arranging objects . . . . . . . . . . . . . . . . . . . . . . . . . . . . . . . . . . . . . . . . . . . . . . . . . . . . . . . . . . . . . . . . . . . . . . . |
201 |
Transforming objects . . . . . . . . . . . . . . . . . . . . . . . . . . . . . . . . . . . . . . . . . . . . . . . . . . . . . . . . . . . . . . . . . . . |
203 |
Chapter 9: Using symbols, instances, and library assets |
|
Working with symbols . . . . . . . . . . . . . . . . . . . . . . . . . . . . . . . . . . . . . . . . . . . . . . . . . . . . . . . . . . . . . . . . . . |
208 |
Working with symbol instances . . . . . . . . . . . . . . . . . . . . . . . . . . . . . . . . . . . . . . . . . . . . . . . . . . . . . . . . . |
213 |
Library assets . . . . . . . . . . . . . . . . . . . . . . . . . . . . . . . . . . . . . . . . . . . . . . . . . . . . . . . . . . . . . . . . . . . . . . . . . . . |
217 |
Using shared library assets . . . . . . . . . . . . . . . . . . . . . . . . . . . . . . . . . . . . . . . . . . . . . . . . . . . . . . . . . . . . . . |
219 |
Working with button symbols . . . . . . . . . . . . . . . . . . . . . . . . . . . . . . . . . . . . . . . . . . . . . . . . . . . . . . . . . . . |
221 |
Scaling and caching symbols . . . . . . . . . . . . . . . . . . . . . . . . . . . . . . . . . . . . . . . . . . . . . . . . . . . . . . . . . . . . |
223 |
Symbols and ActionScript . . . . . . . . . . . . . . . . . . . . . . . . . . . . . . . . . . . . . . . . . . . . . . . . . . . . . . . . . . . . . . . |
225 |
Chapter 10: Creating animation |
|
Animation basics . . . . . . . . . . . . . . . . . . . . . . . . . . . . . . . . . . . . . . . . . . . . . . . . . . . . . . . . . . . . . . . . . . . . . . . |
229 |
Using Timeline effects . . . . . . . . . . . . . . . . . . . . . . . . . . . . . . . . . . . . . . . . . . . . . . . . . . . . . . . . . . . . . . . . . . . |
237 |
Tweened animation . . . . . . . . . . . . . . . . . . . . . . . . . . . . . . . . . . . . . . . . . . . . . . . . . . . . . . . . . . . . . . . . . . . . . |
240 |
Chapter 11: Special effects |
|
About filters . . . . . . . . . . . . . . . . . . . . . . . . . . . . . . . . . . . . . . . . . . . . . . . . . . . . . . . . . . . . . . . . . . . . . . . . . . . . |
250 |
About blend modes . . . . . . . . . . . . . . . . . . . . . . . . . . . . . . . . . . . . . . . . . . . . . . . . . . . . . . . . . . . . . . . . . . . . . |
257 |
Chapter 12: Working with text |
|
Text and fonts in Flash . . . . . . . . . . . . . . . . . . . . . . . . . . . . . . . . . . . . . . . . . . . . . . . . . . . . . . . . . . . . . . . . . . |
261 |
Creating text . . . . . . . . . . . . . . . . . . . . . . . . . . . . . . . . . . . . . . . . . . . . . . . . . . . . . . . . . . . . . . . . . . . . . . . . . . . . |
265 |
Setting text attributes . . . . . . . . . . . . . . . . . . . . . . . . . . . . . . . . . . . . . . . . . . . . . . . . . . . . . . . . . . . . . . . . . . . |
272 |
Chapter 13: Creating multilanguage text |
|
Creating multilanguage text . . . . . . . . . . . . . . . . . . . . . . . . . . . . . . . . . . . . . . . . . . . . . . . . . . . . . . . . . . . . |
276 |
Encoding text formats . . . . . . . . . . . . . . . . . . . . . . . . . . . . . . . . . . . . . . . . . . . . . . . . . . . . . . . . . . . . . . . . . . |
280 |
Authoring multilanguage text . . . . . . . . . . . . . . . . . . . . . . . . . . . . . . . . . . . . . . . . . . . . . . . . . . . . . . . . . . . |
282 |
XML file format . . . . . . . . . . . . . . . . . . . . . . . . . . . . . . . . . . . . . . . . . . . . . . . . . . . . . . . . . . . . . . . . . . . . . . . . . |
286 |
Multilanguage text and ActionScript . . . . . . . . . . . . . . . . . . . . . . . . . . . . . . . . . . . . . . . . . . . . . . . . . . . . |
289 |

v
Chapter 14: Working with sound |
|
Using sounds in Flash . . . . . . . . . . . . . . . . . . . . . . . . . . . . . . . . . . . . . . . . . . . . . . . . . . . . . . . . . . . . . . . . . . . |
292 |
Exporting Sounds . . . . . . . . . . . . . . . . . . . . . . . . . . . . . . . . . . . . . . . . . . . . . . . . . . . . . . . . . . . . . . . . . . . . . . . |
296 |
Sound and ActionScript . . . . . . . . . . . . . . . . . . . . . . . . . . . . . . . . . . . . . . . . . . . . . . . . . . . . . . . . . . . . . . . . |
299 |
Chapter 15: Working with video |
|
Creating and publishing Flash Video . . . . . . . . . . . . . . . . . . . . . . . . . . . . . . . . . . . . . . . . . . . . . . . . . . . . . |
301 |
Importing and modifying Flash Video files . . . . . . . . . . . . . . . . . . . . . . . . . . . . . . . . . . . . . . . . . . . . . . . |
302 |
About digital video and Flash . . . . . . . . . . . . . . . . . . . . . . . . . . . . . . . . . . . . . . . . . . . . . . . . . . . . . . . . . . . |
310 |
Encoding video . . . . . . . . . . . . . . . . . . . . . . . . . . . . . . . . . . . . . . . . . . . . . . . . . . . . . . . . . . . . . . . . . . . . . . . . . |
313 |
Working with Premiere Pro and After Effects . . . . . . . . . . . . . . . . . . . . . . . . . . . . . . . . . . . . . . . . . . . . . |
317 |
Using ActionScript to play external Flash Video . . . . . . . . . . . . . . . . . . . . . . . . . . . . . . . . . . . . . . . . . . |
321 |
Chapter 16: Creating e-learning content |
|
Getting started with Flash e-learning . . . . . . . . . . . . . . . . . . . . . . . . . . . . . . . . . . . . . . . . . . . . . . . . . . . . |
326 |
Including a Flash learning interaction in a document . . . . . . . . . . . . . . . . . . . . . . . . . . . . . . . . . . . . . |
327 |
Adding, naming, and registering assets . . . . . . . . . . . . . . . . . . . . . . . . . . . . . . . . . . . . . . . . . . . . . . . . . |
335 |
Configuring learning interactions . . . . . . . . . . . . . . . . . . . . . . . . . . . . . . . . . . . . . . . . . . . . . . . . . . . . . . . |
338 |
Changing the appearance of a learning interaction . . . . . . . . . . . . . . . . . . . . . . . . . . . . . . . . . . . . . . |
346 |
Tracking to AICCor SCORM-compliant learning management systems . . . . . . . . . . . . . . . . . . . |
348 |
Extending learning interaction scripts . . . . . . . . . . . . . . . . . . . . . . . . . . . . . . . . . . . . . . . . . . . . . . . . . . . |
350 |
Chapter 17: Creating accessible content |
|
About accessible content . . . . . . . . . . . . . . . . . . . . . . . . . . . . . . . . . . . . . . . . . . . . . . . . . . . . . . . . . . . . . . . |
353 |
Using Flash to enter accessibility information for screen readers . . . . . . . . . . . . . . . . . . . . . . . . . . |
356 |
Specifying advanced accessibility options for screen readers . . . . . . . . . . . . . . . . . . . . . . . . . . . . . |
361 |
Creating accessibility with ActionScript . . . . . . . . . . . . . . . . . . . . . . . . . . . . . . . . . . . . . . . . . . . . . . . . . . |
363 |
Chapter 18: Working with screens |
|
Screen-based documents and the screen authoring environment . . . . . . . . . . . . . . . . . . . . . . . . |
367 |
Working with screens . . . . . . . . . . . . . . . . . . . . . . . . . . . . . . . . . . . . . . . . . . . . . . . . . . . . . . . . . . . . . . . . . . . |
369 |
Adding content to screens . . . . . . . . . . . . . . . . . . . . . . . . . . . . . . . . . . . . . . . . . . . . . . . . . . . . . . . . . . . . . . |
374 |
Chapter 19: ActionScript |
|
Working with ActionScript . . . . . . . . . . . . . . . . . . . . . . . . . . . . . . . . . . . . . . . . . . . . . . . . . . . . . . . . . . . . . . |
381 |
Script Assist mode and behaviors . . . . . . . . . . . . . . . . . . . . . . . . . . . . . . . . . . . . . . . . . . . . . . . . . . . . . . . . |
387 |
Writing and managing scripts . . . . . . . . . . . . . . . . . . . . . . . . . . . . . . . . . . . . . . . . . . . . . . . . . . . . . . . . . . . |
390 |
Debugging ActionScript 1.0 and 2.0 . . . . . . . . . . . . . . . . . . . . . . . . . . . . . . . . . . . . . . . . . . . . . . . . . . . . . |
401 |
Debugging ActionScript 3.0 . . . . . . . . . . . . . . . . . . . . . . . . . . . . . . . . . . . . . . . . . . . . . . . . . . . . . . . . . . . . . |
411 |
ActionScript publish settings . . . . . . . . . . . . . . . . . . . . . . . . . . . . . . . . . . . . . . . . . . . . . . . . . . . . . . . . . . . . |
414 |
Chapter 20: Publishing Flash content |
|
Publishing Flash documents . . . . . . . . . . . . . . . . . . . . . . . . . . . . . . . . . . . . . . . . . . . . . . . . . . . . . . . . . . . . . |
419 |
Using Flash Player . . . . . . . . . . . . . . . . . . . . . . . . . . . . . . . . . . . . . . . . . . . . . . . . . . . . . . . . . . . . . . . . . . . . . . . |
420 |
Developing applications for mobile devices . . . . . . . . . . . . . . . . . . . . . . . . . . . . . . . . . . . . . . . . . . . . . . |
432 |
Configuring a web server for Flash . . . . . . . . . . . . . . . . . . . . . . . . . . . . . . . . . . . . . . . . . . . . . . . . . . . . . . . |
433 |
Flash security features . . . . . . . . . . . . . . . . . . . . . . . . . . . . . . . . . . . . . . . . . . . . . . . . . . . . . . . . . . . . . . . . . . . |
434 |
Using publish profiles . . . . . . . . . . . . . . . . . . . . . . . . . . . . . . . . . . . . . . . . . . . . . . . . . . . . . . . . . . . . . . . . . . . |
435 |

vi
HTML publishing templates . . . . . . . . . . . . . . . . . . . . . . . . . . . . . . . . . . . . . . . . . . . . . . . . . . . . . . . . . . . . . |
436 |
Editing Flash HTML settings . . . . . . . . . . . . . . . . . . . . . . . . . . . . . . . . . . . . . . . . . . . . . . . . . . . . . . . . . . . . . |
440 |
Chapter 21: Exporting from Flash |
|
About exporting from Flash . . . . . . . . . . . . . . . . . . . . . . . . . . . . . . . . . . . . . . . . . . . . . . . . . . . . . . . . . . . . . |
448 |
Exporting Flash content, images, and video . . . . . . . . . . . . . . . . . . . . . . . . . . . . . . . . . . . . . . . . . . . . . . |
448 |
Chapter 22: Printing with Flash |
|
Printing from the Flash authoring tool . . . . . . . . . . . . . . . . . . . . . . . . . . . . . . . . . . . . . . . . . . . . . . . . . . . |
456 |
Chapter 23: Best practices |
|
Structuring FLA files . . . . . . . . . . . . . . . . . . . . . . . . . . . . . . . . . . . . . . . . . . . . . . . . . . . . . . . . . . . . . . . . . . . . |
465 |
Organizing ActionScript in an application . . . . . . . . . . . . . . . . . . . . . . . . . . . . . . . . . . . . . . . . . . . . . . . . |
467 |
Behaviors conventions . . . . . . . . . . . . . . . . . . . . . . . . . . . . . . . . . . . . . . . . . . . . . . . . . . . . . . . . . . . . . . . . . . |
468 |
Video conventions . . . . . . . . . . . . . . . . . . . . . . . . . . . . . . . . . . . . . . . . . . . . . . . . . . . . . . . . . . . . . . . . . . . . . . |
470 |
Projects and version control guidelines . . . . . . . . . . . . . . . . . . . . . . . . . . . . . . . . . . . . . . . . . . . . . . . . . . |
473 |
Flash application authoring guidelines . . . . . . . . . . . . . . . . . . . . . . . . . . . . . . . . . . . . . . . . . . . . . . . . . . |
474 |
Accessibility guidelines . . . . . . . . . . . . . . . . . . . . . . . . . . . . . . . . . . . . . . . . . . . . . . . . . . . . . . . . . . . . . . . . . |
479 |
Advertising with Flash . . . . . . . . . . . . . . . . . . . . . . . . . . . . . . . . . . . . . . . . . . . . . . . . . . . . . . . . . . . . . . . . . . |
483 |
Optimizing FLA files for SWF output . . . . . . . . . . . . . . . . . . . . . . . . . . . . . . . . . . . . . . . . . . . . . . . . . . . . . |
485 |
Tips for creating content for mobile devices . . . . . . . . . . . . . . . . . . . . . . . . . . . . . . . . . . . . . . . . . . . . . . |
494 |
Index . . . . . . . . . . . . . . . . . . . . . . . . . . . . . . . . . . . . . . . . . . . . . . . . . . . . . . . . . . . . . . . . . . . . . . . . . . . . . . . . . . |
502 |

1
Chapter 1: Getting started
If you haven’t installed your new software, begin by reading some information on installation and other preliminaries. Before you begin working with your software, take a few moments to read an overview of Adobe® Help and of the many resources available to users. You have access to instructional videos, plug-ins, templates, user communities, seminars, tutorials, RSS feeds, and much more.
Installation
Requirements
To review complete system requirements and recommendations for your Adobe® software, see the Read Me file on the installation disc.
Install the software
1Close any other Adobe applications open on your computer.
2Insert the installation disc into the disc drive, and follow the on-screen instructions.
Note: For more information, see the Read Me file on the installation disc.
Activate the software
If you have a single-user retail license for your Adobe software, you will be asked to activate your software; this is a simple, anonymous process that you must complete within 30 days of starting the software.
For more information on product activation, see the Read Me file on your installation disc, or visit the Adobe website at www.adobe.com/go/activation.
1If the Activation dialog box isn’t already open, choose Help > Activate.
2Follow the on-screen instructions.
Note: If you want to install the software on a different computer, you must first deactivate it on your computer. Choose Help > Deactivate.
Register
Register your product to receive complimentary installation support, notifications of updates, and other services.
To register, follow the on-screen instructions in the Registration dialog box, which appears after you install and activate the software.
 If you postpone registration, you can register at any time by choosing Help > Registration.
Change or reinstall Flash Player
1Close your browser.
2Remove any currently installed version of the player.

FLASH CS3 2
User Guide
For instructions, see TechNote 14157 on the Adobe® Flash® Support Center at www.adobe.com/go/tn_14157.
3 To begin installation, run one of the following in your Players folder:
•For the ActiveX control for Windows® (Internet Explorer or AOL), run the Install Flash Player 9 AX.exe file.
•For the plug-in for Windows (CompuServe, Firefox, Mozilla, Netscape, or Opera), run the Install Flash Player 9.exe file.
•For the plug-in for Macintosh® (AOL, CompuServe, Firefox, Internet Explorer for Macintosh, Netscape, Opera, or Safari), run Install Flash Player 9 (Mac OS 9.x) or Install Flash Player 9 OS X (Mac OS X.x).
Note: To verify installation in Netscape, select Help > About Plug-ins from within the browser.
Using Help
About Flash Help
The Flash Help panel (Help > Flash Help) contains the full set of user-assistance information provided with Flash. To view a Help topic, click its title in the table of contents. Above the topic, you can see its relative location in the hierarchy of topics.
You can hide the table of contents. To display it again, click the Table of Contents button  . When you search Help, the returned topics take the place of the table of contents. To redisplay the table of contents, click Clear.
The Help panel also displays context-sensitive reference information that you access from the Actions panel.
Adobe Help resources
Documentation for your Adobe software is available in a variety of formats.
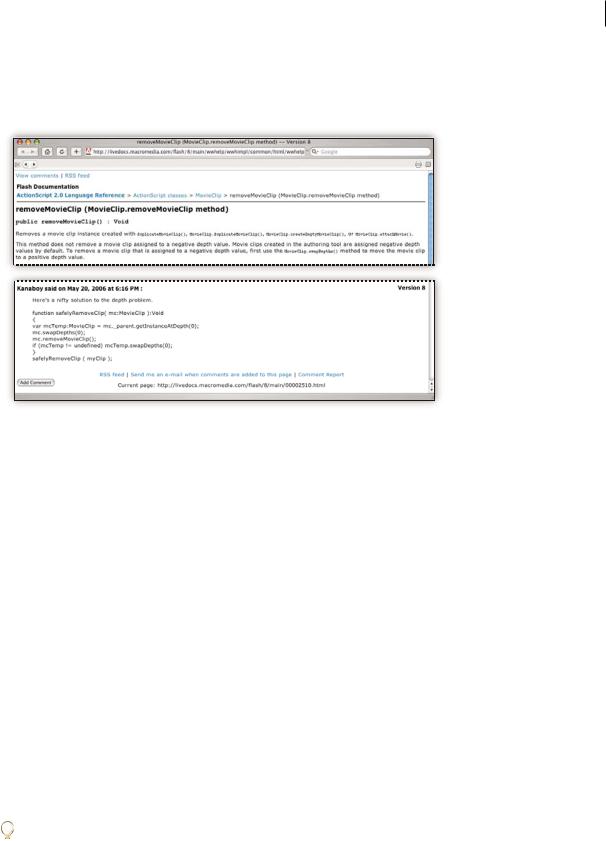
In-product and LiveDocs Help
In-product Help provides access to all documentation and instructional content available at the time the software ships. It is available through the Help menu in your Adobe software.
FLASH CS3 3
User Guide
LiveDocs Help includes all the content from in-product Help, plus updates and links to additional instructional content available on the web. For some products, you can also add comments to the topics in LiveDocs Help. Find LiveDocs Help for your product in the Adobe Help Resource Center, at www.adobe.com/go/documentation.
Most versions of in-product and LiveDocs Help let you search across the Help systems of multiple products. Topics may also contain links to relevant content on the web or to topics in the Help of another product.
Think of Help, both in the product and on the web, as a hub for accessing additional content and communities of users. The most complete and up-to-date version of Help is always on the web.
Adobe PDF documentation
The in-product Help is also available as a PDF that is optimized for printing. Other documents, such as installation guides and white papers, may also be provided as PDFs.
All PDF documentation is available through the Adobe Help Resource Center, at www.adobe.com/go/documentation. To see the PDF documentation included with your software, look in the Documents folder on the installation or content DVD.
Printed documentation
Printed editions of the in-product Help are available for purchase in the Adobe Store, at www.adobe.com/go/store. You can also find books published by Adobe publishing partners in the Adobe Store.
A printed workflow guide is included with all Adobe Creative Suite® 3 products, and stand-alone Adobe products may include a printed getting started guide.
Searching Flash Help
Flash can search all Flash Help systems or a single Help system (such as Using Flash).
 You can also search the text of a single topic: Click in the topic to give it focus and press Ctrl+F (Windows) or
  Command+F (Macintosh).

FLASH CS3 4
User Guide
You can search Flash Help for a combination of words and phrases:
Single-word searches Return a list of help pages that contain the specified word. For example, if you type timeline in the search text field, Flash returns a list of help pages that contain the word timeline or Timeline.
Multiple-word searches Return a list of help pages that each contain all of the search terms you enter. In this case, the word and is implicit in the search. For example, if you type movie clip in the search text field, Flash returns a list of pages that contain both movie and clip—that is, clip movie, movie clip,movie...clip, and so on.
Explicit AND/OR searches Use the words AND or OR to refine the search results. For example, if you type timeline AND keyframe in the search text field, Flash returns a list of help pages that contain both timeline and keyframe. If you type timeline OR tween in the search text field, Flash returns a list of help pages that contain timeline and pages that contain tween. The words AND and OR must be all capital letters and must be in English, even if you are searching a non-English version of Flash Help.
Exact phrase searches Use quotation marks to return only pages that contain the specific phrase you enter. For example, if you type “motion tween” in the search text field, Flash returns a list of help pages that contain the phrase motion tween, but not pages that contain separate instances of motion and tween.
Exact phrase with explicit AND/OR searches Use a combination of quotation marks and the words AND or OR to further refine your searches. For example, if you type “motion tween” AND “ActionScript” in the search field, Flash returns a list of pages that contain both the phrase motion tween and the word ActionScript.
Access context-sensitive Help from the Actions panel
1 To select an item for reference, do any of the following:
• Select an item in the Actions panel toolbox pane (on the left side of the Actions panel).
• Select an ActionScript term in the Actions panel in the Script pane.
• Place the insertion point before an ActionScript term in the Actions panel in the Script pane.
2 To open the Help panel reference page for the selected item, do one of the following:
•Press F1.
•Right-click the item and select View Help.
•Click Help  above the Script pane.
Choosing the right Help documents
Flash Help contains many documents. The following list describes each document’s purpose and contents:
•Using Flash contains an introduction to what Flash is, what you can do with it, and how the Flash user interface works. It also contains detailed information about using all of the tools and features in the Flash authoring tool.
•Programming ActionScript 3.0 provides a detailed description of the ActionScript 3.0 language, intended for beginning and experienced scripters. Programming ActionScript 3.0 explains the basic concepts of writing code, including how to use logic to write code that makes decisions, how to make your Flash projects respond to user actions, and how to write code to perform the most common tasks in Flash. ActionScript 3.0 is faster and more appropriate for computationally intensive applications than ActionScript 2.0, and is somewhat more complex than ActionScript 2.0.
FLASH CS3 5
User Guide
•The ActionScript 3.0 Language and Components Reference includes dictionary-style entries for all of the actions, methods, and properties in the ActionScript 3.0 application programming interface (API), as well as the APIs for the ActionScript 3.0 components included with Flash. This reference is a fast way to find specific ActionScript terms to accomplish specific tasks. Each entry includes details of the term’s syntax and functionality, and code examples.
•Using ActionScript 3.0 Components contains information on using and configuring ActionScript 3.0 components in a Flash document. Components are reusable user interface elements such as buttons, menus, and so on, that you can use in your own projects without having to create and script them yourself. Some components do not have a visual presence, but instead help you store and manage data for your application. This document also contains information about creating your own reusable components with ActionScript 3.0.
•Learning ActionScript 2.0 in Adobe Flash provides a detailed description of the ActionScript 2.0 language, intended for both new and more experienced scripters. Learning ActionScript 2.0 in Adobe Flash describes the basic concepts of writing code, including which scripts you can use in Flash, when to use each type, how to use logic to write code that makes decisions, how to make your Flash projects respond to user actions, and how to write specific code to perform the most common tasks in Flash.
•The ActionScript 2.0 Language Reference includes dictionary-style entries for all of the actions, methods, and properties in the ActionScript 2.0 application programming interface (API). This reference is a fast way to find specific ActionScript terms to accomplish specific tasks. Each entry includes details of the term’s syntax and functionality, as well as code examples.
•Using ActionScript 2.0 Components contains information on using and configuring components in a Flash document. Components are reusable user interface elements such as buttons, menus, and so on, that you can use in your own projects without having to create and script them yourself. Some components do not have a visual presence, but instead help you store and manage data for your application. These documents also contain information about creating your own reusable components with ActionScript.
•ActionScript 2.0 Components Language Reference includes dictionary-style entries for all of the methods and properties that are available to each component included with Flash. You control the behavior of components with these APIs. After you understand the basics of how to use components, this reference is a fast way to find specific APIs that can help you accomplish specific tasks.
•Extending Flash describes how to add functionality and automation to the Flash authoring tool with custom JavaScript APIs created for that purpose.
•Getting Started with Flash Lite 2.x provides an introduction to the process of developing content with Adobe® Flash® Lite™ 2.x for delivery on mobile phones and devices. Flash Lite 2.x supports a subset of ActionScript 2.0.
•Developing Flash Lite 2.x Applications provides techniques and guidelines for creating content and applications for Flash Lite 2.x, the most current version of Adobe® Flash® Player designed for mobile phones and other devices. Because Flash Lite 2.x supports different features than the desktop version of Flash Player, techniques for creating content for Flash Lite are different from techniques for creating Flash desktop content.
•Introduction to Flash Lite 2.x ActionScript describes in detail the ActionScript features available in Flash Lite 2.x and explains how to accomplish common scripting tasks when using Flash Lite 2.x.
•Flash Lite 2.x ActionScript Language Reference provides dictionary-style entries for all of the actions, methods, and properties available in Flash Lite 2.x. Each entry includes the details of the term’s syntax and functionality, as well as sample code.
•Getting Started with Flash Lite 1.x provides an introduction to the process of developing content with Flash Lite 1.x for delivery on mobile phones and devices. Flash Lite 1.x supports a subset of ActionScript 1.0.
FLASH CS3 6
User Guide
•Developing Flash Lite 1.x Applications provides techniques and guidelines for creating content and applications for Flash Lite 1.x, the first version of Flash Player designed for mobile phones and other devices. Because Flash Lite 1.x supports different features than the desktop version of Flash Player, techniques for creating content for Flash Lite 1.x are different from techniques for creating Flash desktop content.
•Learning Flash Lite 1.x ActionScript describes in detail the ActionScript features available in Flash Lite 1.0 and 1.1 and explains how to perform common scripting tasks when using Flash Lite 1.x.
•Flash Lite 1.x ActionScript Language Reference provides dictionary-style entries for all of the actions, methods, and properties available in Flash Lite 1.0 and 1.1. Each entry includes the details of the term’s syntax and functionality, as well as sample code.
Resources
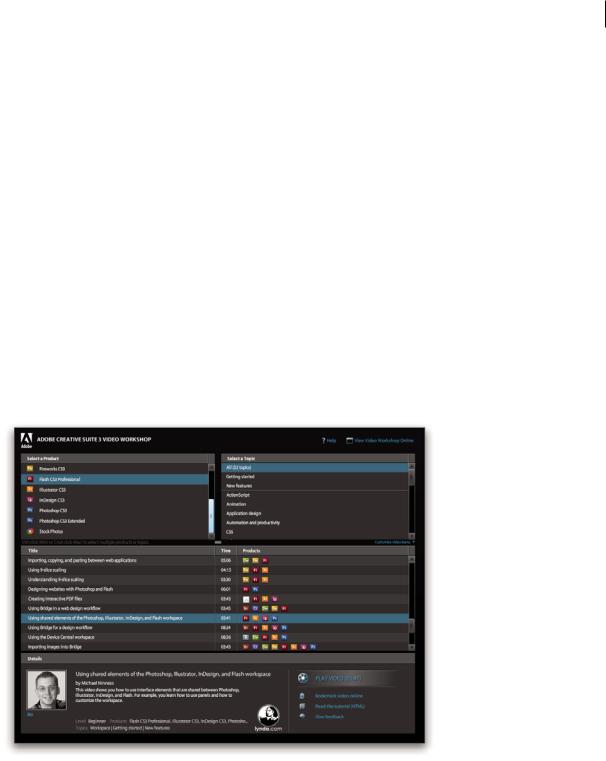
Adobe Video Workshop
The Adobe Creative Suite 3 Video Workshop offers over 200 training videos covering a wide range of subjects for print, web, and video professionals.
You can use the Adobe Video Workshop to learn about any Creative Suite 3 product. Many videos show you how to use Adobe applications together.
FLASH CS3 7
User Guide
When you start the Adobe Video Workshop, you choose the products you want to learn and the subjects you want to view. You can see details about each video to focus and direct your learning.
Community of presenters
With this release, Adobe Systems invited the community of its users to share their expertise and insights. Adobe and lynda.com present tutorials, tips, and tricks from leading designers and developers such as Joseph Lowery, Katrin Eismann, and Chris Georgenes. You can see and hear Adobe experts such as Lynn Grillo, Greg Rewis, and Russell Brown. In all, over 30 product experts share their knowledge.
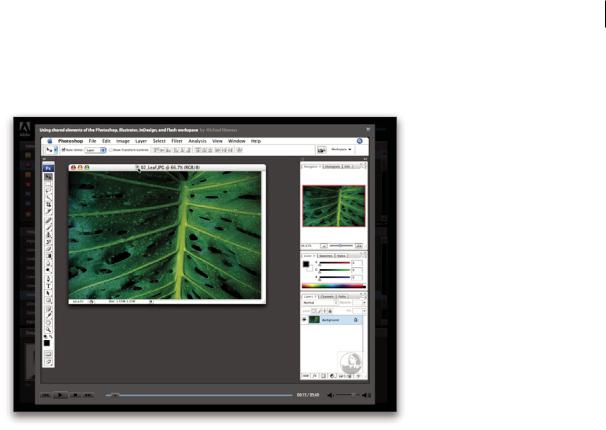
Tutorials and source files
The Adobe Video Workshop includes training for novices and experienced users. You’ll also find videos on new features and key techniques. Each video covers a single subject and typically runs about 3-5 minutes. Most videos come with an illustrated tutorial and source files, so you can print detailed steps and try the tutorial on your own.
Using Adobe Video Workshop
You can access Adobe Video Workshop using the DVD included with your Creative Suite 3 product. It’s also available online at www.adobe.com/go/learn_videotutorials. Adobe will regularly add new videos to the online Video Workshop, so check in to see what’s new.
Flash CS3 Professional videos
Adobe Video Workshop covers a wide range of subjects for Adobe Flash® CS3 Professional, including these:
•Drawing with the Pen tool
•Creating animations using motion tweens
•Creating and animating masks
•Getting started with ActionScript 3.0

FLASH CS3 8
User Guide
• Using the Flash Video Encoder
Videos also show you how to use Flash CS3 with other Adobe components:
•Using symbols effectively between Illustrator® and Flash
•Understanding the Fireworks® and Flash workflow
•Designing websites with Flash and Photoshop
•Creating mobile content in Flash
To access Adobe Creative Suite 3 video tutorials, visit Adobe Video Workshop at
www.adobe.com/go/learn_videotutorials.
Extras
You have access to a wide variety of resources that will help you make the most of your Adobe software. Some of these resources are installed on your computer during the setup process; additional helpful samples and documents are included on the installation or content disc. Unique extras are also offered online by the Adobe Exchange community, at www.adobe.com/go/exchange.
Installed resources
During software installation, a number of resources are placed in your application folder. To view those files, navigate to the application folder on your computer.
•Windows®: [startup drive]\Program Files\Adobe\[Adobe application]
•Mac OS®: [startup drive]/Applications/[Adobe application]
The application folder may contain the following resources:
Plug-ins Plug-in modules are small software programs that extend or add features to your software. Once installed, plug-in modules appear as options in the Import or Export menu; as file formats in the Open, Save As, and Export Original dialog boxes; or as filters in the Filter submenus. For example, a number of special effects plug-ins are automatically installed in the Plug-ins folder inside the Photoshop CS3 folder.
Presets Presets include a wide variety of useful tools, preferences, effects, and images. Product presets include brushes, swatches, color groups, symbols, custom shapes, graphic and layer styles, patterns, textures, actions, workspaces, and more. Preset content can be found throughout the user interface. Some presets (for example, Photoshop Brush libraries) become available only when you select the corresponding tool. If you don’t want to create an effect or image from scratch, go to the preset libraries for inspiration.
Templates Template files can be opened and viewed from Adobe Bridge CS3, opened from the Welcome Screen, or opened directly from the File menu. Depending on the product, template files range from letterheads, newsletters,

FLASH CS3 9
User Guide
and websites to DVD menus and video buttons. Each template file is professionally constructed and represents a best-use example of product features. Templates can be a valuable resource when you need to jump-start a project.
Your |
Inves |
tment |
Guide |
|
|
|
|
|
||||||
Are you |
leaving |
|
|
|
|
|
||||||||
|
money on |
|
|
|
|
|
||||||||
|
|
|
the table? |
|
|
|
|
|
||||||
|
|
|
|
|
|
|
|
|
|
|
|
|||
Typi non |
|
|
|
|
|
|
|
|
|
|
|
|
|
|
|
habent cla |
ritatem insitam; est usus l |
|
|
|
|
|
|||||||
claritatem. |
|
|
egentis in iis qui facit |
|
||||||||||
legunt |
|
Investigationes demons |
|
eoru |
||||||||||
|
saepius. Claritas est |
|
|
|
|
traverunt lectores l |
|
|||||||
|
|
|
|
|
etiam processus. |
|
|
|
egere me lius quo |
|||||
|
CORE |
|
|
|
|
|
|
|
|
|
|
|
|
|
|
|
INVESTMENT |
SPECTRUM |
|
|
|
|
|
||||||
|
Vel illum dol |
|
|
|
|
|
|
|
||||||
|
et iusto odio |
ore eu feugiat |
nulla facilisis at vero |
|
|
|
||||||||
|
dignissim qui. |
eros et accumsan |
|
|||||||||||
|
|
|
|
|
|
|
|
|
||||||
|
RETIREMENT SAVING |
PLAN |
|
|
|
|
|
|
||||||
|
Vel illum dol |
|
|
|
|
|
|
|
|
|
||||
et iusto odio |
ore eu feugiat |
nulla facilisis at vero |
|
|
|
|
||||||||
dignissim qui. |
eros et accumsan |
|
||||||||||||
|
|
|
|
|
|
|
|
|||||||
01 |
|
|
|
|
|
|
|
|
|
|
|
|
PelletirInc |
|
|
|
|
|
|
|
|
|
|
|
|
01 |
|||
Vel: |
Ad : |
Vulputate: |
Best 100 places to see on the planet in your lifetime
ET 
Samples Sample files include more complicated designs and are a great way to see new features in action. These files demonstrate the range of creative possibilities available to you.
Fonts Several OpenType® fonts and font families are included with your Creative Suite product. Fonts are copied to your computer during installation:
•Windows: [startup drive]\Windows\Fonts
•Mac OS X: [startup drive]/Library/Fonts
For information about installing fonts, see the Read Me file on the installation DVD.
DVD content
The installation or content DVD included with your product contains additional resources for use with your software. The Goodies folder contains product-specific files such as templates, images, presets, actions, plug-ins, and effects, along with subfolders for Fonts and Stock Photography. The Documentation folder contains a PDF version of the Help, technical information, and other documents such as specimen sheets, reference guides, and specialized feature information.
Adobe Exchange
For more free content, visit www.adobe.com/go/exchange, an online community where users download and share thousands of free actions, extensions, plug-ins, and other content for use with Adobe products.
Bridge Home
Bridge Home, a new destination in Adobe Bridge CS3, provides up-to-date information on all your Adobe Creative Suite 3 software in one convenient location. Start Adobe Bridge, then click the Bridge Home icon at the top of the Favorites panel to access the latest tips, news, and resources for your Creative Suite tools.

FLASH CS3 10
User Guide
Note: Bridge Home may not be available in all languages.
Adobe Design Center
Adobe Design Center offers articles, inspiration, and instruction from industry experts, top designers and Adobe publishing partners. New content is added monthly.
You can find hundreds of tutorials for design products and learn tips and techniques through videos, HTML tutorials, and sample book chapters.
FLASH CS3 11
User Guide
New ideas are the heart of Think Tank, Dialog Box, and Gallery:
•Think Tank articles consider how today’s designers engage with technology and what their experiences mean for design, design tools, and society.
•In Dialog Box, experts share new ideas in motion graphics and digital design.
•The Gallery showcases how artists communicate design in motion.
Visit Adobe Design Center at www.adobe.com/designcenter.
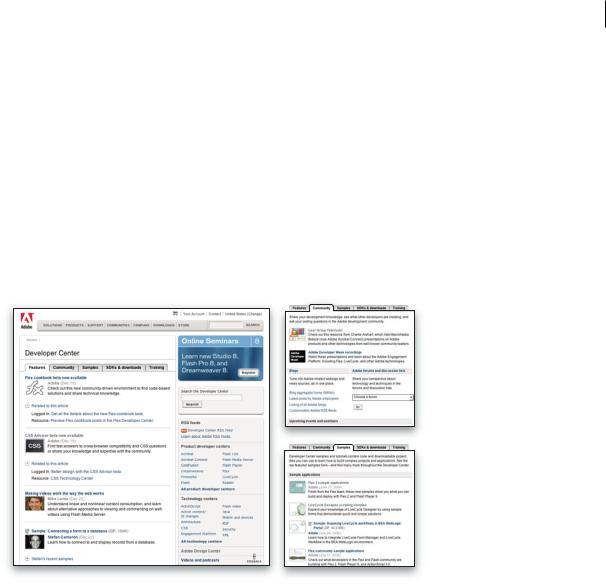
Adobe Developer Center
Adobe Developer Center provides samples, tutorials, articles, and community resources for developers who build rich Internet applications, websites, mobile content, and other projects using Adobe products. The Developer Center also contains resources for developers who develop plug-ins for Adobe products.
In addition to sample code and tutorials, you'll find RSS feeds, online seminars, SDKs, scripting guides, and other technical resources.
Visit Adobe Developer Center at www.adobe.com/go/developer.
Customer support
Visit the Adobe Support website, at www.adobe.com/support, to find troubleshooting information for your product and to learn about free and paid technical support options. Follow the Training link for access to Adobe Press books, a variety of training resources, Adobe software certification programs, and more.
Downloads
Visit www.adobe.com/go/downloads to find free updates, tryouts, and other useful software. In addition, the Adobe Store (at www.adobe.com/go/store) provides access to thousands of plug-ins from third-party developers, helping you to automate tasks, customize workflows, create specialized professional effects, and more.

FLASH CS3 12
User Guide
Adobe Labs
Adobe Labs gives you the opportunity to experience and evaluate new and emerging technologies and products from Adobe.
At Adobe Labs, you have access to resources such as these:
•Prerelease software and technologies
•Code samples and best practices to accelerate your learning
•Early versions of product and technical documentation
•Forums, wiki-based content, and other collaborative resources to help you interact with like-minded developers
Adobe Labs fosters a collaborative software development process. In this environment, customers quickly become productive with new products and technologies. Adobe Labs is also a forum for early feedback, which the Adobe development teams use to create software that meets the needs and expectations of the community.
Visit Adobe Labs at www.adobe.com/go/labs.
User communities
User communities feature forums, blogs, and other avenues for users to share technologies, tools, and information. Users can ask questions and find out how others are getting the most out of their software. User-to-user forums are available in English, French, German, and Japanese; blogs are posted in a wide range of languages.
To participate in forums or blogs, visit www.adobe.com/communities.
What’s new
New features
The following features are new to Adobe® Flash® CS3 Professional.
CS3 Interface
The Flash user interface is updated to share a common interface with other Adobe Creative Suite CS3 components. A consistent appearance across all Adobe software helps users work more easily with multiple applications. See “Workspace” on page 15.
Adobe Bridge and Version Cue
Organize and browse Flash and other creative assets using Adobe Bridge, an independent file-management system that you can launch from within Flash. Through Adobe Bridge, you can automate workflows across Adobe Creative Suite components, apply consistent color settings across Adobe software, and access version control features and online stock photo purchase services. A Welcome screen provides centralized control of settings, as well as ongoing access to tips and tutorials in Adobe Design Center. See “Adobe Version Cue” on page 83.
Bitmap Symbol Library Item dialog box
The Bitmap Symbol Library Item dialog box has been enlarged to provide a larger preview of the bitmap. See “Using symbols, instances, and library assets” on page 208.

FLASH CS3 13
User Guide
Multicolored bounding boxes
You can change the selection color of specific types of elements to identify each element easily. See “Get information about instances on the Stage” on page 216.
Adobe Device Central
A new way to test content created with Adobe products on emulated mobile devices, Device Central lets you select a target device from the beginning of the development process, and gives you a clear idea of what a device’s limitations are. See “Developing applications for mobile devices” on page 432.
Active content detections
To eliminate the need to first activate Flash Player so that users can interact with Flash content, Flash publishes HTML templates that you can use to embed Flash SWF files. Using these templates, embedded SWF files are activated seamlessly without the need for an additional mouse click or other user activation. See “Publishing Flash documents” on page 419.
9-slice onstage preview
Because 9-slice scaling now provides onstage preview, you can see changes and adjustments to 9-slice scaled movie clips on stage. See “About 9-slice scaling and movie clip symbols” on page 223.
Filter copy and paste
You can now copy and paste graphic filter settings from one instance to another. See “Apply filters” on page 251.
Copy and paste motion
Copy and paste motion lets you copy a motion tween and paste (or apply) the frames, tween, and symbol information to another object. When pasting the motion tween to another object, you can choose to paste all properties associated with the motion tween, or choose specific properties to apply to the other object. See “Copy and paste a motion tween” on page 233.
Copy motion as ActionScript 3.0
In addition to copying the properties of one motion tween and applying those properties to another object, you can copy the properties that define a motion tween in the Timeline as ActionScript 3.0 and apply that motion to another symbol, either in the Actions panel or in the source files (such as class files) for a Flash document that uses ActionScript 3.0. See “Copy motion as ActionScript” on page 234.
Pen tool enhancements
The Pen tool has been improved.
•The Pen tool now behaves similarly to the Illustrator Pen tool to provide a more consistent user experience across Adobe software
•The cubic-to-quadratic conversion is now more efficient, resulting in better accuracy and fewer points.
See “Drawing with the Pen tool” on page 173.
Adobe Photoshop import
You can now import Adobe Photoshop PSD files directly into Flash documents. Most Photoshop data types are supported, and several import options are provided so that you can find the best balance of image fidelity and editability within Flash. See “Import Photoshop PSD files” on page 150.

FLASH CS3 14
User Guide
Adobe Illustrator import
You can now import Adobe Illustrator AI files directly into Flash documents. Most Illustrator data types are supported, and several import options are provided so that you can find the best balance of image fidelity and editability within Flash. See “Import Adobe Illustrator files” on page 141.
Primitive Rectangle and Oval drawing tools
New Rectangle and Oval drawing tools let you create rectangles and ovals whose properties (such as stroke or corner radius) you can edit at any time in the Property inspector. See “Draw rectangles and ovals” on page 167.
Enhanced Quicktime video support
QuickTime export is intended for users who want to distribute Flash content, such as animation, in the QuickTime video format. This release improves the quality of the exported QuickTime video file, which you can distribute as streaming video or on a DVD, or import into a video-editing application such as Adobe® Premiere Pro®. See “Exporting QuickTime” on page 454.
Save and load cue points for Flash video
Save and load functionality has been added to the Cue Points tab to allow you to save the cue points added to one file and apply them to another. You can generate a cue points XML file based on known time codes and import it into the encoder before encoding, eliminating the need to manually add each cue point through the Flash Video Encoder user interface. See Flash Video Encoder Help.
Script Assist mode for ActionScript 3.0
Script Assist mode has been updated to include support for ActionScript 3.0. See “Script Assist mode and behaviors” on page 387.
Improvements in ActionScript
Flash has a new, improved version of ActionScript. ActionScript 3.0 offers a robust programming model familiar to developers with a basic knowledge of object-oriented programming. ActionScript 3.0 facilitates the creation of highly complex applications with large data sets and object-oriented, reusable code bases. While ActionScript 3.0 is not required for content that runs in Adobe Flash Player 9, it allows performance improvements that are available only with the new ActionScript Virtual Machine (AVM2). ActionScript 3.0 code can execute up to ten times faster than legacy ActionScript code.
The older version of ActionScript Virtual Machine, AVM1, executes ActionScript 1.0 and ActionScript 2.0 code. Flash Player 9 supports AVM1 for backward compatibility with existing and legacy content.
To learn about ActionScript 3.0, see Programming ActionScript 3.0.
15
Chapter 2: Workspace
The Adobe® Flash® CS3 Professional workspace includes tools and panels that help you create and navigate your documents. Understanding these tools will help you maximize the application’s capabilities.
Flash workflow and workspace
General Flash workflow
To build a Flash application, you typically perform the following basic steps:
Plan the application.
Decide which basic tasks the application will perform.
Add media elements.
Create and import media elements, such as images, video, sound, text.
Arrange the elements.
Arrange the media elements on the Stage and in the Timeline to define when and how they appear in your application.
Apply special effects.
Apply graphic filters (such as blurs, glows, and bevels), blends, and other special effects as you see fit.
Use ActionScript to control behavior.
Write ActionScript code to control how the media elements behave, including how the elements respond to user interactions.
Test and publish your application.
Test to verify that your application is working as you intended, and find and fix any bugs you encounter. You should test the application throughout the creation process. Publish your FLA file as a SWF file that can be displayed in a web page and played back with Flash Player.
Depending on your project and your working style, you might use these steps in a different order.
For video tutorials about the Flash workflow, see the following:
•Flash workflow: www.adobe.com/go/vid0132
•Creating your first interactive Flash file: www.adobe.com/go/vid0118
For a text tutorial about creating an application, see Create an Application on the Flash Tutorials page at www.adobe.com/go/learn_fl_tutorials.

FLASH CS3 16
User Guide
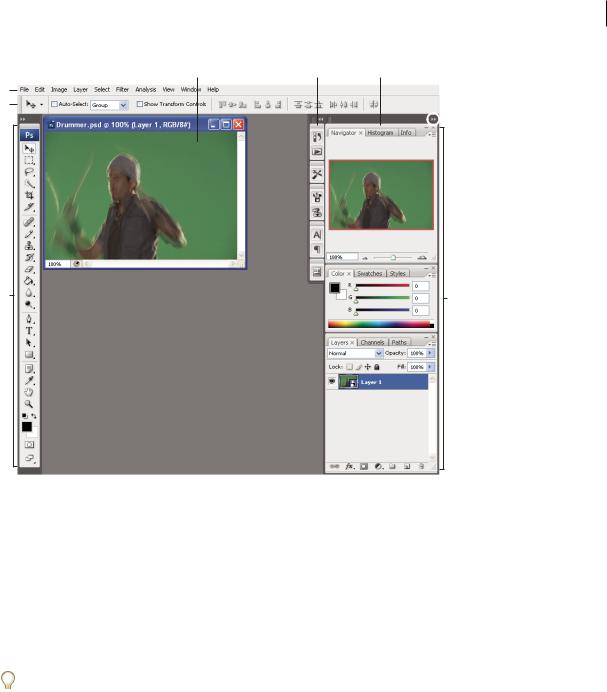
Workspace overview
You create and manipulate your documents and files using various elements such as panels, bars, and windows. Any arrangement of these elements is called a workspace. When you first start an Adobe Creative Suite component, you see the default workspace, which you can customize for the tasks you perform there. For instance, you can create one workspace for editing and another for viewing, save them, and switch between them as you work.
 You can restore the default workspace at any time by choosing the default option on the Window > Workspace menu.
Although default workspaces vary across Flash, Illustrator, InCopy, InDesign, and Photoshop, you manipulate the elements much the same way in all of them. The Photoshop default workspace is typical:
•The menu bar across the top organizes commands under menus.
•The Tools panel (called the Tools palette in Photoshop) contains tools for creating and editing images, artwork, page elements, and so on. Related tools are grouped together.
•The Control panel (called the options bar in Photoshop) displays options for the currently selected tool. (Flash has no Control panel.)
•The Document window (called the Stage in Flash) displays the file you’re working on.
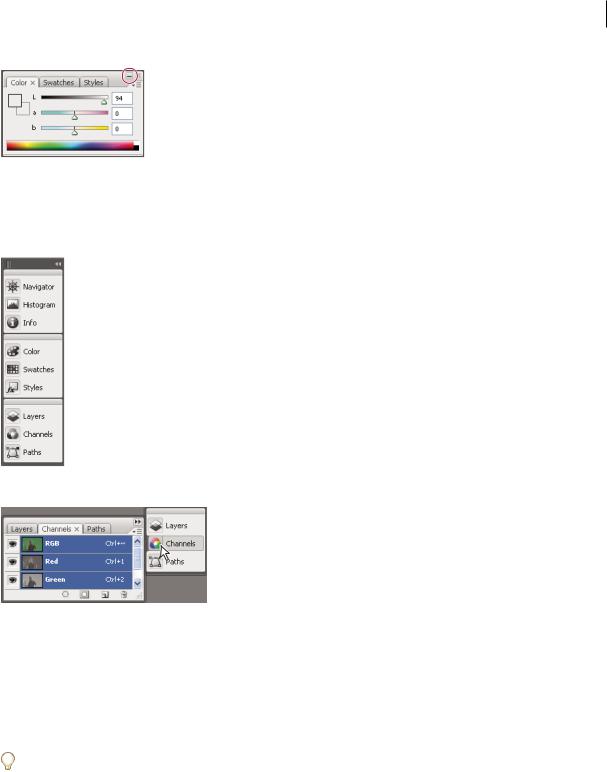
•Panels (called palettes in Photoshop) help you monitor and modify your work. Examples include the Timeline in Flash and the Layers palette in Photoshop. Certain panels are displayed by default, but you can add any panel by selecting it from the Window menu. Many panels have menus with panel-specific options. Panels can be grouped, stacked, or docked.
FLASH CS3 17
User Guide
A B C
D
E
 G
G
F |
H |
|
Default Photoshop workspace
A. Document window B. Dock of panels collapsed to icons C. Panel title bar D. Menu bar E. Options bar F. Tools palette G. Collapse To Icons button H. Three palette (panel) groups in vertical dock
For a video on understanding the workspace, see www.adobe.com/go/vid0187.
Hide or show all panels
•(Illustrator, InCopy, InDesign, Photoshop) To hide or show all panels, including the Tools panel and options bar or Control panel, press Tab.
•(Illustrator, InCopy, InDesign, Photoshop) To hide or show all panels except the Tools panel and options bar or Control panel, press Shift+Tab.
 You can temporarily display panels hidden by these techniques by moving the pointer to the edge of the application
  window (Windows) or to the edge of the monitor (Mac OS) and hovering over the strip that appears.
• (Flash) To hide or show all panels, press F4.
Display panel menu options
Position the pointer on the panel menu icon  in the upper-right corner of the panel, and press the mouse button.
(Illustrator) Adjust panel brightness
In User Interface preferences, move the Brightness slider. This control affects all panels, including the Control panel.
FLASH CS3 18
User Guide
Reconfigure the Tools panel
You can display the tools in the Tools panel in a single column, or side by side in two columns.
 In InDesign, you also can switch from single-column to double-column display by setting an option in Interface
  preferences.
Click the double arrow at the top of the Tools panel.
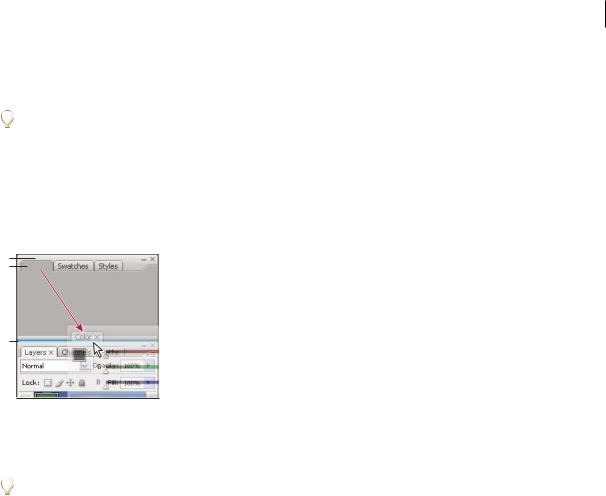
Customize the workspace
To create a custom workspace, move and manipulate panels (called palettes in Photoshop and in Adobe Creative Suite 2 components).
A
B
C
Narrow blue drop zone indicates Color panel will be docked on its own above Layers panel group.
A. Title bar B. Tab C. Drop zone
You can save custom workspaces and switch among them.
 In Photoshop, you can change the font size of the text in the options bar, palettes, and tool tips. Choose a size from
  the UI Font Size menu in General preferences.
Note: For a video on customizing the workspace in Illustrator, see www.adobe.com/go/vid0032. For a video on customizing the workspace in InDesign, see www.adobe.com/go/vid0065.
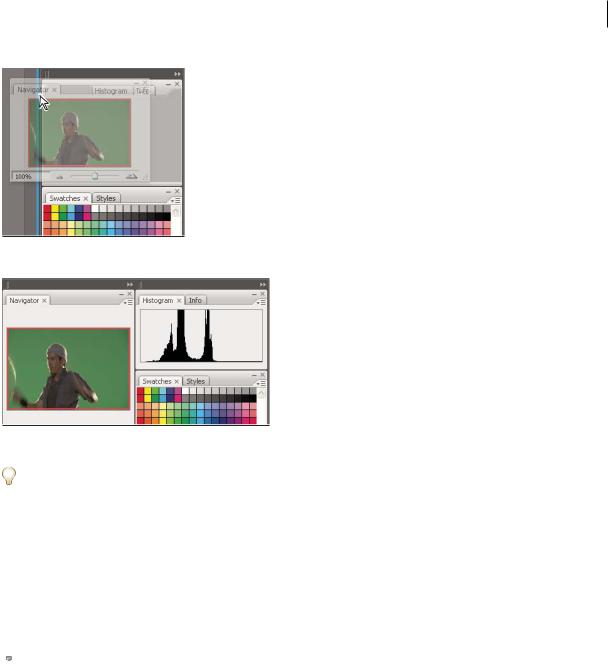
Dock and undock panels
A dock is a collection of panels or panel groups displayed together, generally in a vertical orientation. You dock and undock panels by moving them into and out of a dock.
Note: Docking is not the same as stacking. A stack is a collection of free-floating panels or panel groups, joined top to bottom.
•To dock a panel, drag it by its tab into the dock, at the top, bottom, or in between other panels.
•To dock a panel group, drag it by its title bar (the solid empty bar above the tabs) into the dock.
•To remove a panel or panel group, drag it out of the dock by its tab or title bar. You can drag it into another dock or make it free-floating.
FLASH CS3 19
User Guide
Navigator panel being dragged out to new dock, indicated by blue vertical highlight
Navigator panel now in its own dock
 To prevent panels from filling all space in a dock, drag the bottom edge of the dock up so it no longer meets the edge
  of the workspace.
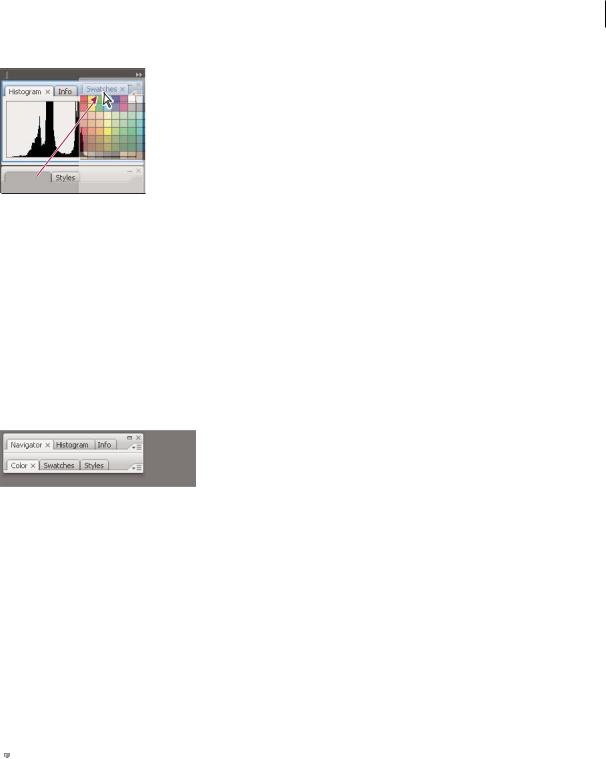
Move panels
As you move panels, you see blue highlighted drop zones, areas where you can move the panel. For example, you can move a panel up or down in a dock by dragging it to the narrow blue drop zone above or below another panel. If you drag to an area that is not a drop zone, the panel floats freely in the workspace.
•To move a panel, drag it by its tab.
•To move a panel group or a stack of free-floating panels, drag the title bar.
 Press Ctrl (Windows) or Control (Mac OS) while moving a panel to prevent it from docking.
Add and remove docks and panels
If you remove all panels from a dock, the dock disappears. You can create new docks by moving panels to drop zones next to existing docks or at the edges of the workspace.
•To remove a panel, click its close icon (the X at the upper-right corner of the tab), or deselect it from the Window menu.
•To add a panel, select it from the Window menu and dock it wherever you wish.
Manipulate panel groups
• To move a panel into a group, drag the panel’s tab to the highlighted drop zone at the top of the group.
FLASH CS3 20
User Guide
Adding a panel to a panel group
•To rearrange panels in a group, drag a panel’s tab to a new location in the group.
•To remove a panel from a group so that it floats freely, drag the panel by its tab outside the group.
•To make a panel appear at the front of its group, click its tab.
•To move grouped panels together, drag their title bar (above the tabs).
Stack free-floating panels
When you drag a panel out of its dock but not into a drop zone, the panel floats freely, allowing you to position it anywhere in the workspace. Panels may also float in the workspace when first selected from the Window menu. You can stack free-floating panels or panel groups together so that they move as a unit when you drag the topmost title bar. (Panels that are part of a dock cannot be stacked or moved as a unit in this way.)
Free-floating stacked panels
•To stack free-floating panels, drag a panel by its tab to the drop zone at the bottom of another panel.
•To change the stacking order, drag a panel up or down by its tab.
Note: Be sure to release the tab over the narrow drop zone between panels, rather than the broad drop zone in a title bar.
• To remove a panel or panel group from the stack, so that it floats by itself, drag it out by its tab or title bar.
Resize or minimize panels
•To resize a panel, drag any side of the panel or drag the size box at its lower-right corner. Some panels, such as the Color panel in Photoshop, cannot be resized by dragging.
•To change the width of all the panels in a dock, drag the gripper  at the top left of the dock.
•To minimize a panel, panel group, or stack of panels, click the Minimize button in its title bar.
 You can open a panel menu even when the panel is minimized.
FLASH CS3 21
User Guide
Minimize button
Manipulate panels collapsed to icons
Collapse panels to icons to reduce clutter on the workspace. (In some cases, panels are collapsed to icons in the default workspace.) Click a panel icon to expand the panel. You can expand only one panel or panel group at a time.
Panels collapsed to icons
Panels expanded from icons
•To collapse or expand all panels in a dock, click the double arrow at the top of the dock.
•To resize panel icons so that you see only the icons (and not the labels), drag the gripper  at the top of the dock toward the icons until the text disappears. (To display the icon text again, drag the gripper away from the panels.)
•To expand a single panel icon, click it.
•To collapse an expanded panel back to its icon, click its tab, its icon, or the double arrow in the panel’s title bar.
 If you select Auto-Collapse Icon Panels from the Interface or User Interface Options preferences, an expanded panel
  icon will collapse automatically when you click away from it.
•To add a panel or panel group to an icon dock, drag it in by its tab or title bar. (Panels are automatically collapsed to icons when added to an icon dock.)
•To move a panel icon (or panel icon group), drag the bar that appears above the icon. You can drag panel icons up and down in the dock, into other docks (where they appear in the panel style of that dock), or outside the dock (where they appear as free-floating, expanded panels).

FLASH CS3 22
User Guide
Save, delete, and switch between workspaces
By saving the current size and position of panels as a named workspace, you can restore that workspace even if you move or close a panel. The names of saved workspaces appear in the Window > Workspace menu.
In Photoshop, the saved workspace can include a specific keyboard shortcut set and menu set.
Save a custom workspace
1 With the workspace in the configuration you want to save, do one of the following:
•(Photoshop, Illustrator, InDesign) Choose Window > Workspace > Save Workspace.
•(Flash) Choose Window > Workspace > Save Current, or choose Save Current from the Workspace menu in the Edit bar.
•(Photoshop) Choose Save Workspace from the Workspace menu in the options bar.
2Type a name for the workspace.
3(Photoshop) Under Capture, select one or more options:
Palette Locations Saves the current palette locations.
Keyboard Shortcuts Saves the current set of keyboard shortcuts.
Menus Saves the current set of menus.
4 Click OK.
Display or switch between workspaces
Flash, Illustrator, InDesign, and Photoshop include preset workspaces designed to make certain tasks easier.
•Choose Window > Workspace, and select a workspace.
•(Photoshop) Select a workspace from the Workspace menu in the options bar.
•(Flash) Select a workspace from the Workspace menu in the Edit bar.
(InDesign and Photoshop) Assign keyboard shortcuts to each workspace to navigate among them quickly.
Delete a custom workspace
•(Illustrator) Choose Window > Workspace > Manage Workspaces, select the workspace, and then click the Delete icon.
•(InDesign) Choose Window > Workspace > Delete Workspace, select the workspace, and then click Delete.
•(Flash) Choose Manage from the Workspace menu in the Edit bar, select the workspace, and then click Delete. Alternatively, choose Window > Workspace > Manage, select the workspace, and then click Delete.
•(Photoshop) Choose Delete Workspace from the Workspace menu in the options bar. Alternatively, choose Window > Workspace > Delete Workspace, select the workspace, and then click Delete.
(Photoshop) Start with the last or default palette locations
When you start Photoshop, palettes can either appear in their original default locations, or appear as you last used them.
In Interface preferences:
•To display palettes in their last locations on startup, select Remember Palette Locations.
•To display palettes in their default locations on startup, deselect Remember Palette Locations.
FLASH CS3 23
User Guide
Using the Stage and Tools panel
Welcome screen overview
When Flash is running with no documents open, the Welcome screen appears. The Welcome screen contains the following four areas:
Open a Recent Item Lets you open your most recent documents (click the Open icon).
Create New Lists Flash file types, such as Flash documents and ActionScript™ files.
Create from Template Lists the templates most commonly used to create Flash documents.
Extend Links to the Flash Exchange website, where you can download helper applications, extensions, and related information.
The Welcome screen also offers quick access to Help resources. You can take a tour of Flash, learn about documentation resources, and find Adobe Authorized Training facilities.
•To hide the Welcome screen, select Don’t Show Again.
•To show the Welcome screen, select Edit > Preferences (Windows) or select Flash > Preferences (Macintosh), and select Show Welcome screen in the General category.
Using the Stage
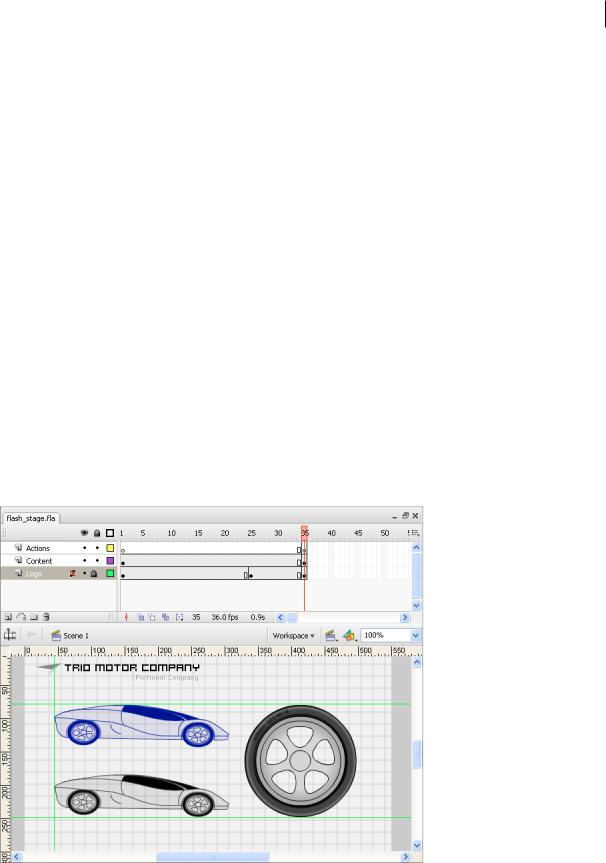
The Stage is the rectangular area where you place graphic content when creating Flash documents. The Stage in the authoring environment represents the rectangular space in Flash Player or in a web browser window where your document appears during playback. To change the view of the Stage as you work, zoom in and out. To help you position items on the Stage, you can use the grid, guides, and rulers.
The Timeline and Stage with content

FLASH CS3 24
User Guide
For a video tutorial about the Flash interface, see www.adobe.com/go/vid0116.
Zoom the Stage
To view the entire Stage on the screen, or to view a particular area of your drawing at high magnification, change the magnification level. The maximum magnification depends on the resolution of your monitor and the document size. The minimum value for zooming out on the Stage is 8%. The maximum value for zooming in on the Stage is 2000%.
•To zoom in on an element, select the Zoom tool  in the Tools panel, and click the element. To switch the Zoom tool between zooming in or out, use the Enlarge
  or Reduce
  modifiers (in the options area of the Tools panel when the Zoom tool is selected) or Alt-click (Windows) or Option-click (Macintosh).
•To zoom in so that a specific area of your drawing fills the window, drag a rectangular selection on the Stage with the Zoom tool.
•To zoom in on or out of the entire Stage, select View > Zoom In or View > Zoom Out.
•To zoom in or out by a specified percentage, select View > Magnification, and select a percentage from the submenu or select a percentage from the Zoom control at the upper-right corner of the Timeline.
•To scale the Stage so that it fits completely in the application window, select View > Magnification > Fit in Window.
•To show the contents of the current frame, select View > Magnification > Show All, or select Show All from the Zoom control at the upper-right side of the application window. If the scene is empty, the entire Stage appears.
•To show the entire Stage, select View > Magnification > Show Frame or select Show Frame from the Zoom control at the upper-right corner of the Timeline.
•To show the workspace surrounding the Stage, or to view elements in a scene that are partly or completely outside of the Stage area, select View > Pasteboard. The pasteboard appears in light gray. For example, to have a bird fly into a frame, initially position the bird outside of the Stage in the pasteboard and animate it into the Stage area.
Move the view of the Stage
When the Stage is magnified, you may not be able to see all of it. To change the view without having to change the magnification, use the Hand tool to move the Stage.
In the Tools panel, select the Hand tool and drag the Stage. To temporarily switch between another tool and the Hand tool, hold down the Spacebar and click the tool in the Tools panel.
Use rulers
When rulers show, they appear along the top and left sides of the document. You can change the unit of measure used in the rulers from the default of pixels to another unit. When you move an element on the Stage with the rulers displayed, lines indicating the element’s dimensions appear on the rulers.
•To show or hide rulers, select View > Rulers.
•To specify the rulers’ unit of measure for a document, select Modify > Document, and select a unit from the Ruler Units menu.
See also
“Snapping” on page 181
Loading...