

Page 1

Page 2

Page 3

CONTENT
Safety Informations 4
Features 9
Accessories 10
Output and control elements 11
Remote control 14
The rechargeble battery 17
Connecting the Player to other componets 19
Basic operations 20
System setup 32
Specifications 37
Troubleshooting 38
Glossary 39
English
3
Page 4

SAFETY INFORMATION
The lightning flash with an arrowhead symbol within an equilateral triangle is
intended to alert the user of the presence of uninsulated
"dangerous voltage" within the product's enclosure that may be of sufficient
magnitude to constitute a risk of electric shock to persons.
The exclamation point within an equilateral triangle is intended toalert the
user of the presence of important operating and
English
WARNING: DO NOT EXPOSE THIS APPLIANCE TO RAIN OR MOISTURE, DUE TO THE
HIGH RISK OF FIRE OR ELECTRIC SHOCK, DO NOT OPEN THE CABINET DANGEROUS HIGH VOLTAGES ARE PRESENT INSIDE THE ENCLOSURE. ONLY QUALIFIED
SERVICE PERSONNEL SHOULD ATTEMPT THIS. CAUTION: DURING PLAYBACK, THE
DISC SPINS AT HIGH SPEED, SO DO NOT LIFT OR MOVE THE PLAYER, DOING SO
MAY DAMAGE THE DISC.
CAUTION:This Digital Video Disc Player employs a Laser System. Make sure the device is
shut down prior to opening player lid.Visible laser radiation when open and interlocks defeated.Use of controls or adjustments or performance of procedures other than those specified
herein may result in hazardous radiation exposure.
The lightning flash with an arrowhead symbol within an equilateral triangle is intended to
alert the user of the presence of uninsulated "dangerous voltage" within the product's enclosure that may be of sufficient magnitude to constitute a risk of electric shock to persons. The
exclamation point within an equilateral triangle is intended to alert the user of the presence
of important operating and maintenance (servicing) instructions in the literature accompanying the appliance.
DO NOT STARE INTOBEAM.
To ensure proper use of this product, please read this owner's manual carefully and retain
for future reference. Should the unit require maintenance, contact an authorized service
location, or contact us.Only qualified service personnel should remove the cover.
maintenance (servicing) instructions in the literature accompanying the appliance.
THIS DEVICE COMPLIES WITH PART 15 OF THE FCC RULES. OPERATION IS SUBJECT TO THE FOLLOWING TWO CONDITIONS: (1)THIS
DEVICE MAY NOT CAUSE HARMFUL INTERFERENCE, AND (2) THIS
DEVICE MUST ACCEPT ANY INTERFERENCE RECEIVED. INCLUDING
INTERFERENCE THAT MAY CAUSE UNDESIRED OPERATION.
4
Page 5

SAFETY INFORMATION
FCC NOTICE: This equipment has been tested and found to comply with the limits for a
Class B digital device. Pursuant with the FCC Rules, Part 15. These limits are designed to
provide reasonable protection against harmful interference in a residential installation.
This equipment generates,uses and can radiate radio frequency energy and,if not installed
and used in accordance with the instructions, may cause harmful interference to radio communication, However,this is no guarantee that interference will not occur in a particular installation.If this equipment does cause harmful interference to radio or television reception,
which can be determined by turning the equipment off and on,the user is encouraged to try
to correct the interference by one of the following measures:
• Reorient or relocate the receiving antenna.
• Increase the separation between the equipment and receiver.
• Connect the equipment into an outlet on a circuit different from that to which the
receiver is connected.
• Consult the dealer or an experienced radio/TV technician for help.
FCC Caution:To assure continued compliance,(example-use only shielded interface cables
when connecting to computer or peripheral devices).Any changes or modifications not expressly approved by the party responsible for compliance could void the user's authority to
operate this equipment.
BATTERYWARNING:
The DVD player contains a NiMH battery pack. There is a risk of fire and burns if the battery
pack is handled improperly. Do not disassemble, crush, puncture, short external contacts, or
dispose of in fire or water. Do not attempt to open or service the battery pack. Replace only
with the battery pack designated for this product. Discard used batteries according to the
manufacturer's instructions.
CAUTION: Use of controls or adjustments or performance of procedures other than those
specified herein may result in hazardous radiation exposure.
Please carefully study this manual and always keep it available. There are, however, some
installation and operation precautions which you should be aware of.
1. Read Instructions - All the safety and operating instructions should be read before
the product is operated.
2. Retain Instructions - The safety and operating instructions should be retained for
future reference.
3. Heed Warnings - All warnings on the product and in the operating instructions should
be adhered to.
4. Follow Instructions - All operating and use instructions should be followed.
5. Cleaning - Unplug this product from the wall outlet before cleaning. Do not use liquid
cleaners or aerosol cleaners. Use a damp cloth for cleaning.
6. Attachments - Do not use attachments not recommended by the product m a -
nufacturer as they may cause hazards.
English
5
Page 6

SAFETY INFORMATION
7. Water and Moisture - Do not use this product near water for example, near a bath
tub, wash bowl, kitchen sink, or laundry tub; in a wet basement; or near a swimming
pool; and the like.
8. Accessories - Do not place this product on an unstable cart, stand, tripod, b r a cket, or table. The product may fall, causing serious injury to a child or adult, and serious damage to the product. Use only with a cart, stand, tripod, bracket, or table reco mme nded by the manufacturer, or sold with the product. Any mounting of the p r oduct should
follow the manufacturer's instructions, and should use a mounting accessory recommended by the manufacturer.
9. A product and cart combination should be moved with care. Quick stops, excessive
force, and uneven surfaces may cause the product and cart combination to overturn.
English
10. Ventilation - Slots and openings in the cabinet are provided for ventilation and to
ensure reliable operation of the product and to protect it from overheating, and these
openings must not be blocked or covered. The openings should never be blocked by
placing the product on a bed, sofa, rug, or other similar surface. This product should
not be placed in a built-in installation such as a bookcase or rack unless proper
ventilation is provided or the manufacturer's instructions have been adhered to.
11. Power Sources - This product should be operated only from the type of power source indicated on the marking label. If you are not sure of the type of power supply to
your home, consult your product dealer or local power company. For products intended to operate from battery power, or other sources, refer to the operating instructions.
12. Grounding or Polarization - This product may be equipped with a polarized alternating-current line plug (a plug having one blade wider than the other). This plug will fit
into the power outlet only one way. This is a safety feature. If you are unable to
insert the plug fully into the outlet, try reversing the plug. If the plug should still fail to
fit, contact your electrician to replace your obsolete outlet. Do not defeat the safety
purpose of the polarized plug. Alternate Warnings - This product is equipped with a
three-wire grounding-type plug, a plug having a third (grounding) pin. This plug will
only fit into a grounding-type power outlet. This is a safety feature, If you are unable
to insert the plug into the outlet, contact your electrician to replace your obsolete
outlet. Do not defeat the safety purpose of the grounding-type plug.
13. Power-Cord Protection - Power-supply cords should be routed so that they are not
likely to be walked on or pinched by items placed upon or against them, paying particular attention to cords at plugs, convenience receptacles, and the point where they
exit from the product.
14. Protective Attachment Plug - The product is equipped with an attachment plug having overload protection. This is a safety feature. See Instruction Manual for replacement or resetting of protective device. If replacement of the plug is required, be sure
the service technician has used a replacement plug specified by the manufacturer
that has the same overload protection as the original plug.
6
Page 7

SAFETY INFORMATION
15. Outdoor Antenna Grounding - If an outside antenna or cable system is connected to
the product, be sure the antenna or cable system is grounded so as to provide some
protection against voltage surges and built-up static charges. Article 810 of the National Electrical Code, ANSI/NFPA 70, provides information with regard to proper
grounding of the mast and supporting structure, grounding of the lead-in wire to an
antenna discharge unit, size or grounding conductors, location of antenna-discharge
unit, connection to grounding electrodes, and requirements for the groundin
telectrode.
16. Lightning - For added protection for this product during a lightning storm, or when it
is left unattended and unused for long periods of time, unplug it from the wall outlet
and disconnect the antenna or cable system. This will prevent damage to the p r o duct due to lightning and power-line surges.
17. Power Lines - An outside antenna system should not be located in the vicinity of
overhead power lines or other electric light or power circuits, or where it can fall into
such power lines or circuits. When installing an outside antenna system, extreme
care should be taken to keep from touching such power lines or circuits as contact
with them might be fatal.
18. Overloading - Do not overload wall outlets, extension cords, or integral convenience
receptacles as this can result in a risk of fire or electric shock.
19. Object and Liquid Entry - Never push objects of any kind into this product through
openings as they may touch dangerous voltage points or short-out parts that could
result in a fire or electric shock.Never spill liquid of any kind on the product.
20. Servicing - Do not attempt to service this product yourself as opening or removing
covers may expose you to dangerous voltage or other hazards. Refer all servicing to
qualified service personnel.
21. amage Requiring Service - Unplug this product from the wall outlet and refer servicing to qualified service personnel under the following conditions:
a. When the power-supply cord or plug is damaged.
b. If liquid has been spilled, or objects have fallen into the product.
c. If the product has been exposed to rain or water.
d. If the product does not operate normally by following the operating instructions. Ad-
just only those controls that are covered by the operating instructions as an improper
adjustment of other controls may result in damage and will often require extensive
work by a qualified technician to restore the product to its normal operation.
e. If the product has been dropped or damaged in any way, and
f. When the product exhibits a distinct change in performance this indicates a need for
service.
22. Replacement Parts - When replacement parts are required, be sure the service
technician has used replacement parts specified by the manufacturer or have the
same characteristics as the original part. Unauthorized substitutions may result in
fire, electric shock, or other hazards.
English
7
Page 8

SAFETY INFORMATION
23. Safety Check - Upon completion of any service or repairs to this product, ask the
service technician to perform safety checks to determine that the product is in p r o per operating condition.
24. Wall or Ceiling Mounting - The product should be mounted to a wall or ceiling only
as recommended by the manufacturer.
25. Heat - The product should be situated away from heat sources such as radiators,
heat registers, stoves or other products (including amplifiers) that produce heat.
26. Rechargeable battery - Charge voltage cannot be below 12V.
English
8
Page 9

FEATURES
• Portable DVD-Player and DVB-T TV (integrated)
• 9,2 inch 16:9 TFT display (resolution 800 x 480)
• Play DVD, VCD, SVCD, MPEG-1 and MPEG-2 Video, MPEG-4
• Video, AUDIO-CD, JPEG, Kodak Picture CD
• Integrated card reader for SD, MMC and MS memories
• USB 1.1 port for external storage
• DVB-T receiver with automatic channel scan, EPG and Teletext
• Removable Li-Ion battery
• Video In and Out
• Can be used as a digital picture frame (power supply use recommended
English
9
Page 10
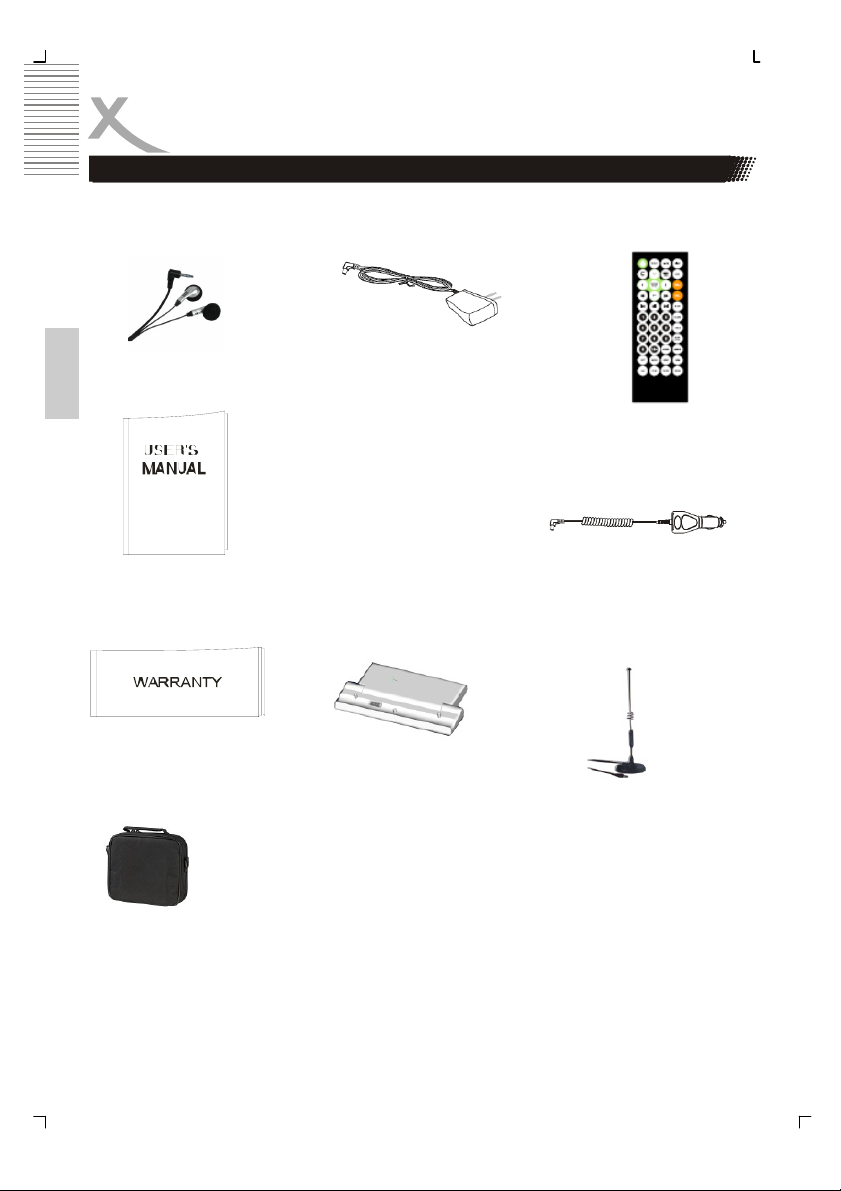
ACCESSORIES
Package Contents
When opening the package of this Portable-DVD player please make sure that the
following accessories are included:
AC-DC power adapter
headphones
English
Remote control ink. batte-
ries
User manual
Warranty card
transportation bag
10
Car power supply cable
Battary Pack
Antenna
Page 11

OUTPUTS AND CONTROL ELEMENTS
Front panel
English
1. LCD Display
2. Speaker
3. Control keys
4. IR receiver window
Back panel
1. VOL+ / VOL– : Press to increase /
reduce the volume or a value in the
menu.
2. MENU: Press to display the TFT´s
menu.
3. AV: Press to switch the video input
mode between DVD / DVB-T and
AUX
4. Tuner Port: Connect antenna to this
player
5. Power LED Indicator
• Red: When CD / MP3/ DVD discs are
played
• Blinking green: when the player turns
off and the battery is charging
• Off: The main unit is turned off
5. Disc Cover
6. Fixing holes
7. Screw hole
8. Battery Connector
11
Page 12

OUTPUTS AND CONTROL ELEMENTS
Control keys
1. DVD / DVB-T : Press to select DVD or DVB-T mode.
2. / (UP / DOWN) : Press to move the cursor up / down.
3. SETUP: Press to access the DVD Setup Menu to modify the DVD player settings
English
when the player is in DVD mode; Press to access the DVB-T Setup Menu to modify
the DVB-T settings when the player is in DVB-T mode.
4. STOP: Press this button to stop playback. Press this button for 1.5 second to turn
off the unit.
5. (PREVIOUS) : Press to go to the previous track or chapter.
6. (PLAY / ENTER) Press to begin playback; Press to pause Playback during
playing, press again to resume playback. Press to confirm the items or settings
7. (NEXT) : press to go to the next track to chapter.
Left side of the player
1. DC 12V IN: Connecting the AC-DC
adapter or car adapter to DC IN jack.
2. Memory Socket: Inserting the
memory card ( SD / MMC / MS) to
the memory socket of player
3. Headphone Jack : Plugging the
headphone in the HP1 or HP2 jack
of player
4. USB Socket: Connecting USB
storage to the player.
12
5. AV Out: This is used in combination
with the audio / video input devices
6. AV In : This is used in combination
with the audio/ video output devices
7. Coaxial: This is uased in combination with the digital audio input devices
Page 13

OUTPUTS AND CONTROL ELEMENTS
Right side of the player
1. Power Switch: Slide power
switch to position „ON“, then
the player turns on. Slide
power switch to position
„OFF“, then the player turns
off.
Part names of the battery
1. Battery support: Pull out the support to the proper position in order to let the unit
stand when battery is installed.
2. Fixing pole
3. Battery socket
4. Screw
5. Handle
English
13
Page 14
REMOTE CONTROL
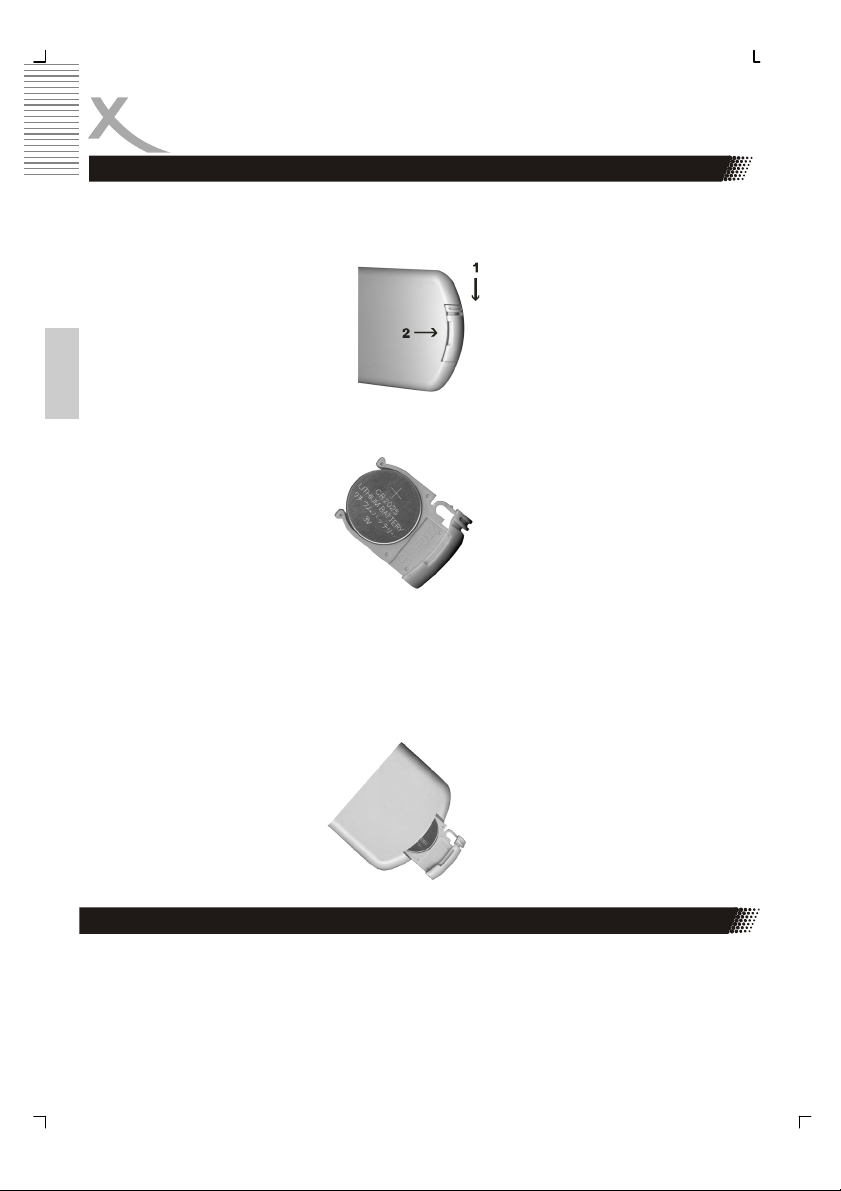
Introduction of the remote control
1. Open the battery drawer
Hold in addition the equipment by point 1 (see picture) and push the cover into the
direction 2 (see picture).
English
2. Please insert the battery into the drawer.
3. Push the drawer back into the remote control
Pay attention when inserting the battery to the correct polarity (/-).
Operation of the DVD Players with the remote control
Always direct the remote control toward the sensor field of the DVD Players
14
Page 15
REMOTE CONTROL
English
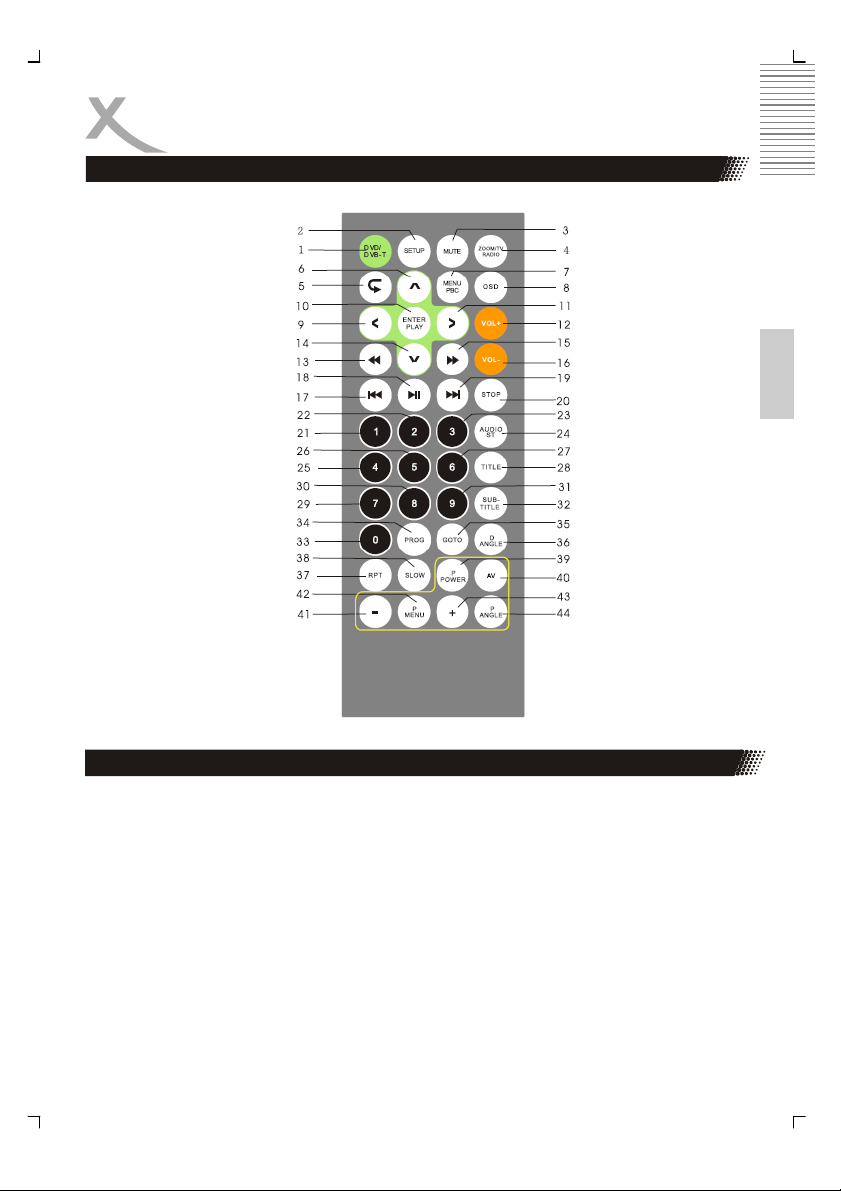
Button discription of remote control
1. DVD / DVB-T : Select DVD / DVB-T mode
2. SETUP: Access the OSD setup menu
3. MUTE: Turn the sound on or off
4. TV / RADIO: Select TV / Radio mode
5. RECALL: return to the disc´s root menu
6. : Move the cursor up
7. MENU PBC: Display the root menu of disc
8. OSD: Display the information of disc ( title, chapter, track, time,etc..)
9. : Move the cursor left
10. ENTER: Confirm the items or settings
11. : Move the cursor right
12. VOL+: Increase the volume
13. BACKWARD: Press to fast backward playback
15
Page 16

REMOTE CONTROL
Button discription of remote control
14. : Move the cursor down
15. FORWARD: Press to fast forward playback
16. VOL- : Decrease the volume
17. PREV: Go to the previous track or chapter
18. PLAY / PAUSE : Press to play or pause the CD or DVD
19. NEXT : Go to the next track or chapter
20. STOP : Press to stop playback
21. 23,25-27,29-31,33 : Select track numbers directly
24. AUDIO ST : DVD: select the audio language
VCD or CD : Select the audio channel
28. TITLE : Display the DVD title
English
32. SUBTITLE : select and turn on subtitle
34. PROGRAM : Program the palyback sequnce
35. GOTO : Start playback at a selected track, chapter or time
36. D ANGLE ( DVD only) : Press to select the disc's angle
37. REPEAT : Repeat the track, chapter or the enter disc
38. SLOW : Press to reduce the speed of playback
39. P POWER : Turn the screen on or off
40. AV : Press to switch the video input mode between DVD/ DVB-T and AUX
41. - : Press to decrease the value of selected items when in the TFT´s setup menu
42. P MENU : Press P MENU continuously to select the Brightness, Contrast, Colours,
Sharpness, Screen mode, Screen on/off.
43. + : Press to increase the value of selected items when in the TFT´s setup menu
44. P ANGLE : Switch screen normal or reverse
16
Page 17

THE RECHARGEABLE BATTERY
Precautions
• Please fully charge the battery unit before using it for the first time.
• When the battery unit is recharged in a hot environment, it may not become fully
recharged.
• It´ s normal that the battery unit temperature is about 20°C higher than the
surrounding temperature during a recharge.
Battery storage
• Please store the battery in a proper temperature environment (15°C to 25°C). To
avoid damage do not store the battery in environments with higher or lower
temperatures.
• Please recharge the battery once per year if it is not used for a long time.
Battery life
• The battery unit can be used for about 300 cycles of recharging and operation.
However, this depends on the specific operating conditions
Using the battery
.
English
•
The picture may be unstable if the battery power is too low
• Please recharge the battery when the main unit is powered off. Otherwise the battery
recharge will takes about 5 to 6 hours.
• The moment the battery power is depleted, OSD shows „WARNING LOW
BATTERY“
• Please remove the battery unit from the main unit when it is not going to be used for
a long period of time
17
Page 18
THE RECHARGEABLE BATTERY
Installing the battery
Please install the battery unit as following:
1. Attach the battery unit to the main unit
2. Pull up the battery until the battery unit is locked to
the main unit
3. Then the power LED indicator is light on .
Removing the battery
Please remove the battery unit as following:
English
1. Turn off the main unit
2. Press the battery lock key and pulldown the battery unit,
then the battery is removed
Note:
• Before installing and removing the battery, it is required
Recharging the battery by using AC-DC adapter
Please recharge the battery unit as explained in the following:
1. Install the battery
2. Connect AC-DC adapter to the player
• When charging, the charge LED indicator lights up.
( Red)
• When the battery is full, the LED indictor is green
• The charing time is around 5 to 6 hours (player is
powerd off)
Note:
• Please place the battery on a level, flat surface for
recharging
• Failure to do so many cause the battery short circuit
Caution
• The temperature during recharging affects the recharging efficiency.
• Recharging is most efficient between temperatures from 0°C to 45°C.
• To protect the battery unit, do not recharge a fully charged battery unit repeatedly.
Repeated overcharging of the battery may deteriorate the battery performance.
• When the battery unit is hot, it may take longer to recharge or it may be not be
possible to recharge altogether. Wait for the battery unit to cool down before you try
again to recharge
18
Page 19

CONNECTING THE PLAYER TO OTHER
COMPONENTS
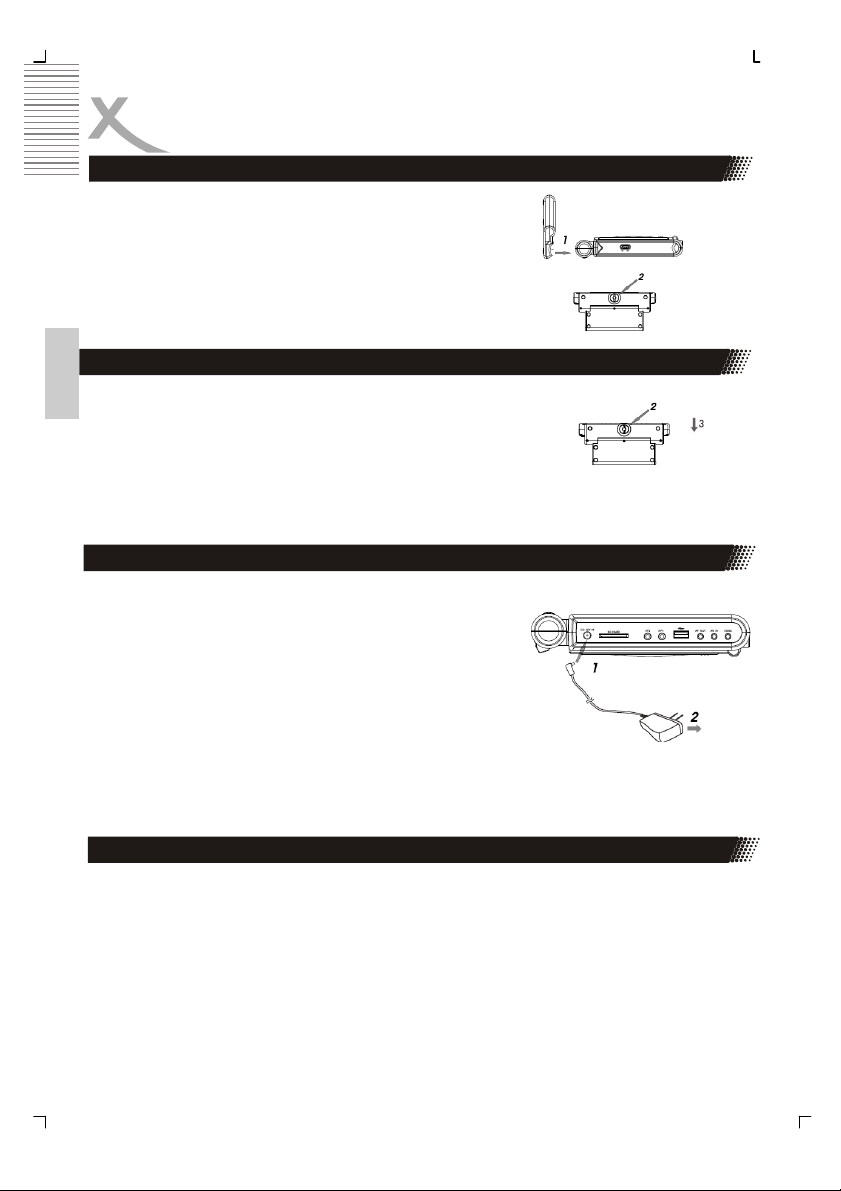
Using the AC-DC adapter
Connect the power cord to the DC IN jack as shown
in the illustration.
Note:
• AC-DC adapter specifiction : 12V/1.5A.
Please use the adapter that is the standartd
accessory of the main unit.
Using the earphone
•
Connect the earphone plug secrely to the
earphone jack on the main unit
• Using +/- to adjust the volume
Note :
• Please do not play DTS disc. It will produ-
ce some strong noises.
• Insert the earphones plug securely, otherweise
sound will not be heard.
English
Connecting to USB storage
1. Please connect the USB device to the
USB terminal of the main unit.
2. The main unit will read the contents of
the USB storage device automatically.
Note:
• The USB terminal of the main unit
supports USB1.1 only.
• The main unit can read the contents of
USB storage when there is no disc in the
main unit
.
19
Page 20

CONNECTING THE PLAYER TO OTHER
COMPONENTS
Connecting to a memory card (SD/MMC/MS)
1. Please insert the memory card to the memory
card socket of the main unit.
2. The main unit will read the contents of the
memory card automatically.
Note:
• Please insert the memory card in correct
direction (see picture).
• The main unit can only read the contents of
English
Connecting to a TV set
memory card if there is no disc inserted in the
main unit.
Before connecting turn off the player and the external devices
Output the signals from the
player´s AV out to a TV
set.
Red
Black
Viedo /audio cable
Yellow
White
To video input jack
(yellow)
To audio input jack
(white)
To audio input jack
(red)
Note:
• Please set the main unit to AV output mode.
20
Signal Flow
Page 21

CONNECTING THE PLAYER TO OTHER
COMPONENTS
Connecting to a digital amplifier that has not Dolby Digital / DTS / MPEG compatible
Black
Video / audio cable
Signal flow
To digital audio
input jack
White
Audio in
Yellow
Red
Video in
TV
Output the digital signals from the player´s digital output to a digital amplifier that is no
Dolby / DTS / MPEG compatible.
Note:
• Carefully ckeck the player´s digital output settings before connecting the player to an
amplifier which is not Dolby Digital / DTS / MPEG compatible
Do not play DVDs when the audio setting are not correct. Or may cause strong noise and
demange your speakers.
English
21
Page 22

CONNECTING THE PLAYER TO OTHER
COMPONENTS
Connecting to a Dolby Digital / DTS / MPEG decoder or an ampifier with built-in decoder compatible
Black
English
Front speaker (left)
Surround speaker (left)
With this player, you can enjoy powerful Dolby Digital, DTS or MPEG sound. Output the
digital signals from the player´s digital output to a decoder or amplifier with build –in
decoder.
Note:
Optical digital cable
Front speaker (right) Subwoofer
Center speaker
Surround speaker (right)
Signal flow
• For a compatible decoder or amplifier, 5 Speackers ( front left / right / center /
surround left / right ) and a subwoofer are requiered to enjoy Dolby Digital / 5.1–
Channel soud.
• Before connecting, make sure to turn off the power of this DVD player, amplifier and
TV.
22
Page 23

CONNECTING THE PLAYER TO OTHER
COMPONENTS
Connecting to a Audio / Video player system
Black
Signal flow
Red
White
To Audio Output jacks
Note:
• Please set the main unit to AV input mode
Video / audio cable
Yellow
To Video Output jacks
Connect to AV system
video output
English
Video out
AV system
Audio out
23
Page 24

BASIC OPERATIONS
Playing Discs
English
1. Install the battery or plug the AC-DC cord to DC IN jack .
2. Turn on the player
3. Slide the disc cover and put in the disc
4. Loading disc, the disc type will be showm on the screen.
5. Press PLAY to start playback.
Note:
• Please place the disc carefully
• Do not play poor quality discs to prevent damage from the lens.
Removing discs
1. Press STOP to stop playback
2. Take out the disc.
24
Page 25

BASIC OPERATIONS
Adjusting picture ( Brightness / Contrast / Color / Sharpness / Screen on / off
Press P MENU to cycle though th TFT´s menu as brightness, contrast, color, sharpness,
screen mode, screen on / off.
You can set a mode suitable for the subject picture.
1. Press +/- to adjust the value of selected items
2. Press AV to switch from AV IN mode to DVD mode
3. The DVD´s screen is closed when in AV IN mode .
Note:
Press +/- to adjust the volume directly when the unit is not in menu mode
English
25
Page 26

BASIC OPERATIONS
Stopping playback
1. Press STOP to stop playback. The unit automatically
memorizes the stopping point.
2. Press PLAY to resume playback.
3. Press STOP again to fully stop playback of the disc.
Note:
• Some kind of discs do not support the resuming of
playback after first stopping.
Pausing playback
English
1. Press PLAY/PAUSE to pause the playback of a disc.
2. Press PLAY/PAUSE to resume playback.
Fast-forwarding / Fast-reversing
1. Press REV on the remote control for 1.5 seconds to
scan backward at 2x-4x-8x-20x times of normal speed.
2. Press FWD on the remote control for 1.5 seconds to
scan forward at 2x-4x-8x-20x times of normal speed.
Note :
• There is no sound during fast-forward / fast-reverse.
REV
STOP
PLAY
PLAY
FWD
Slow and frame-by frame playback
1. Press SLOW on the remote control to start slow
playback. Each pressing of this button will after the
speed to 1/2,1/3,1/4,1/5,1/6 and 1/7 of normal playback.
Note:
• No sound during frame-by-frame playback
• For CD/MP3, this function is not available.
26
SLOW
Page 27

BASIC OPERATIONS
Repeat playback
A-B playback repeat mode
1. Press REPEAT to set the starting point of a segment.
The screen will show “Repeat A-“
2. Press REPEAT again to set the stop point of a
segment. The main unit will start repeat playback of
the segment from A to B.
3. Press REPEAT again to resume normal playback
status.
Repeat playback of titles, chapters or tracks
1. While playback of a disc press REPEAT to select the
title, chapter or track for repeat playback.
Searching the disc
1. Press GOTO.
2. Use the cursor and ENTER to select the proper item
for selection of playing time, title, chapter or track.
3. Press ENTER again to confirm your selection.
4. Press GOTO to resume normal playback.
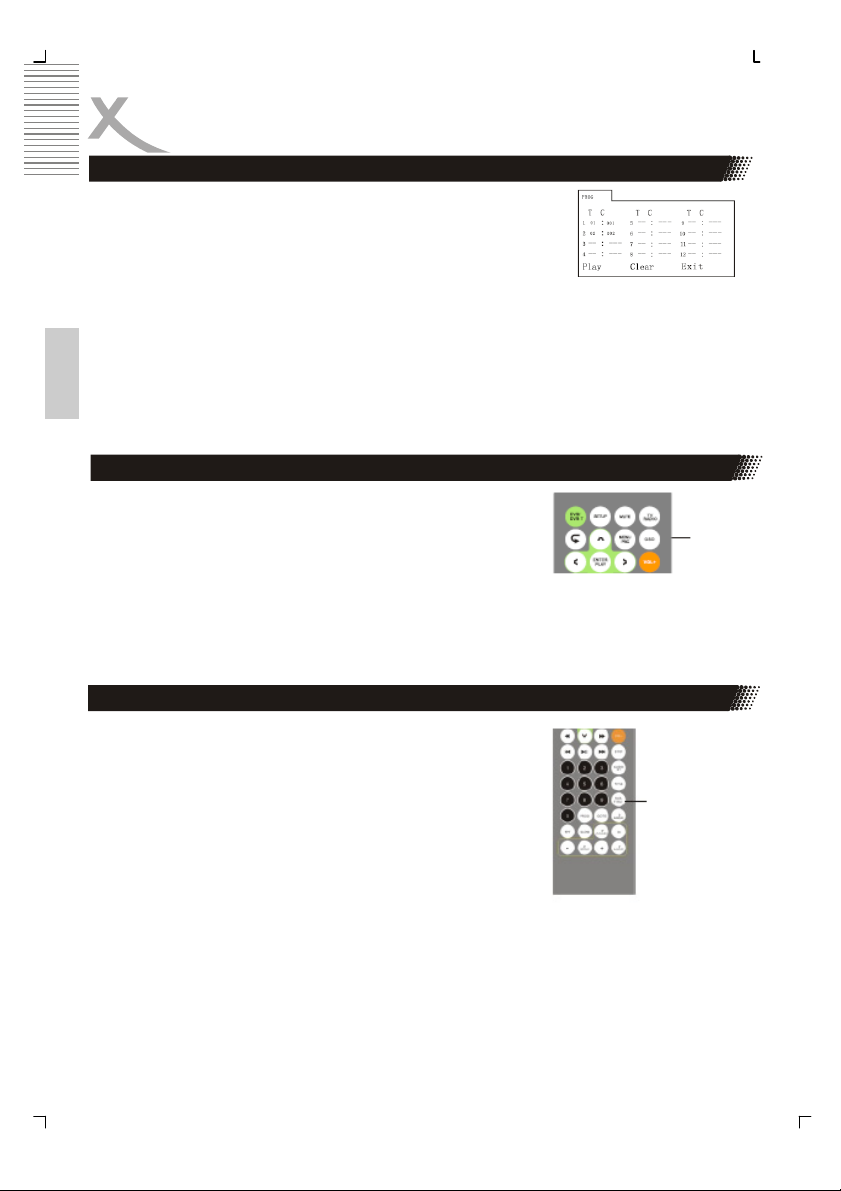
Searching the disc
The unit can play a program list as shown in the
following example:
Press PROGRAM to display the program menu.
Note:
• T is for input of the title number. C is for input of the
chapter number of a DVD.
• T is for input of the track number of a CD/VCD.
Note:
• Some discs may not offer title, chapter or track
numbers.
• Use the direction buttons ∧ /∨ / < / > to select
your prepped list (see picture).
REPEAT
English
GOTO
Program
27
Page 28
BASIC OPERATIONS
Searching the disc
3. Use the direction buttons to move the cursor to the
“PLAY” icon, and press ENTER to start playback of the
list order.
4. Press PLAY/PAUSE or select the “EXIT” icon and the
5. press ENTER to exit the program list.
Note:
1. The program list will be canceled when the main unit is
powered off or the disc will be ejected.
2. Some discs may not allow for some program functions.
3. The player cannot start playback of the list if you select
English
an item that it is not part of the playing disc.
Using OSD
1. Press OSD to display disc type, current title, current
chapter and the playing time. Press again to display
the current subtitle language, the current audio
language and the current angle number (during
playback of a disc).
2. Press OSD for the 3td time to deactivate the
information display.
Selecting subtitles
1. Press SUBTITLE to select the subtitle of a disc
(during DVD playback).
OSD
28
SUBTITLE
Page 29

BASIC OPERATIONS
Selecting audio settings
1. Press AUDIO to select the audio language of a disc
(during DVD playback).
2. Press AUDIO to select the audio channel of a disc
(during VCD or CD playback)
Selecting angles
This function allows for selecting different filming angles
stored on the DVD media during playback.
1. Press ANGLE to select the playback angle
when playing a DVD disc.
Note:
This function is only available on certain DVD media.
Playback of MP3 and JPEG discs
1. Use the direction buttons </∧/∨/> to move the
cursor to the directory file, MP3 icon or JPEG
icon.
2. Select the MP3 icon and press ENTER for
playback of MP3 files; select the JPEG icon and
press ENTER for playback of JPEG files.
3. Select a file and press ENTER to start playback.
4. Press PLAY/PAUSE to pause playback. Press
again to resume playback.
5. Press A-B to start repeat playback of an A-B
segment.
AUDIO
English
D ANGLE
Directory
File
MP3 icon
JPEG icon
29
Page 30

BASIC OPERATIONS
Playback of the files stored in the USB storage
1. Make sure that there is no disc inserted, connect the
USB storage device to the USB socket of the main unit
and turn on the DVD Player. The files will be read
automatically.
2. “READ USB” will be shown on the screen and the files
will be displayed when the unit has finished reading.
3. Operation is the same as with playback of MP3 files.
4. Please remove the USB storage device if you don’t
want to use the USB mode any longer.
5. This unit supports playback of MP3, JPEG, and
English
MPEG4 files.
Note:
• The supported USB format is USB1.1.
• Playback of USB files can only be supported if there is
no disc inserted in the player.
Playback of the files sored in the Memory card
1. Make sure that there is no disc inserted, insert a
card (SD, MMC, MS) into the memory card
socket and turn on the DVD Player. The files will
be read automatically.
2. “READ CARD” will be shown on the screen and
the files will be displayed when the unit has
finished reading.
Note:
• Playback of memory card files can only be
supported if there is no disc inserted in the
player.
30
Page 31

BASIC OPERATIONS
Using DVB-T
1. Press „Yes“ when using DVB-T for the first time.
2. Press </∧/∨/> , ENTER to set “Country” , “OSD
Language”, “Time Zone” properly as the local
situation, then press “Next” to go on.
3. Press “Yes” to start auto scan
4. The TV and radio program will be listed on the
screen if the antenna reveives signal. Press ∧/∨ to
choose a program, then press ENTER to play
5. Press SETUP to enter DVB-T setup menu. Use </
∧/∨/> , ENTER to set “Channel Guide” “System
Confing” and “Installation”.
English
31
Page 32

SYSTEM SETUP
Selecting a TV system
Please select the proper video signal system
according to your TV set.
• NTSC: Please select this item for NTSC
system TV sets.
• PAL: Please select this item for PAL system
TV sets.
• Default: PAL
Note:
• The picture may appear “grey” if the setting is
English
Setting screen saver
not suitable for the TV set
This function will save the LCD life if the unit is in stop
or no disc mode for over 1 minute.
• ON: Screen saver enabled.
• OFF: Screen saver disabled.
• Default: ON
Screen sever ON
OFF
Selecting a TV scale
•
16:9: Please select this item when connecting
this unit to a 16:9 TV set.
• 4:3 LB: Please select this item when
connecting this unit to a normal TV set.
• 4:3 PS: Please select this item when
connecting this unit to a normal TV set.
Note:
• Picture scale depends also on supported
disc format
32
TV Type
4:3 PS
4:3 LB
16:9
Page 33

SYSTEM SETUP
Setting parent lock
1. Default setting: 0000
2. After unlocking you can set a new
parental lockand the parental lock level.
Password - - - - -
Setting parent lock level
With this function the user can select a custom
parental lock for removing scenes being too
violent or containing sex scenes that are not
suitable for children.
• There are 8 levels: normal and children.
• By selecting “normal” the lock function is
disabled.
• Default: 8 ADULT
Note:
• The parent lock level can not be set if the
parental lock is locked.
Default settings
To restore the factory settings please select this
item and press ENTER
.
Screen saver
Default Restore
1 Kid save
2 G
3 PG
4 PG13
5 PG-R
6 R
7 NC-17
8 Adult
English
33
Page 34

SYSTEM SETUP
Selecting languages
Selecting a OSD language
In the OSD language selection menu you can use
the direction buttons ∧/∨ to move the cursor to the
desired language and press ENTER to confirm your
selection.
Selecting an audio language
In the audio language selection menu you can use
the direction buttons ∧/∨ to move the cursor to the
English
desired language and press ENTER to confirm your
selection.
Selecting a sub-title language
In the subtitle language selection menu you can use
the direction buttons ∧/∨ to move the cursor to the
desired language and press ENTER to confirm your
selection.
Selecting a menu language
In the menu language selection menu you can use
the direction buttons Up/Down to move the cursor to
the desired language and press ENTER to confirm
your selection..
Note:
• If your desired language cannot be
supported, the actual language will be the
disc standard language.
• Default language: English
34
Page 35

SYSTEM SETUP
Selecting digital audio output
SPDIF / OFF: switching off digital audio output
•
• SPDIF / RAW: please set the audio output to RAW
if you have a Dolby digital 5.1 or DTS cable
amplifirer .
• SPDIF /PCJM: please set the audio output to PCM
if you have a 2-channel Dolby digital amplifier
• Default: SPDIF / PCM
Adjusting the key
When you enter the KEY menu, you can use the
cursor keys ∧/∨ to adjust the desired tone and
press ENTER.
Adjusting the brightness
When you are in Video Setup, you can enter the
Brightness menu and move the cursor keys ∧/∨ to
the desired brightness, then press ENTER.
English
Adjusting the contrast
When you are un VIDEO SETUP, you can enter the
Contrast menu and move the courser keys ∧/∨ to
the deiered contrast, then press ENTER.
35
Page 36

SYSTEM SETUP
Adjusting the hue
When you are in VIDEO SETUP, you can enter the
hue menu and move the coursor keys ∧/∨ to the
desired hue, then press ENTER
Adjusting the saturation
When you are in VIDEO SETUP, you can enter the
English
satuation menu and move the cursor keys ∧/∨ to
the desired saturation, then press ENTER .
Adjusting the sharpness
When you are in Video Setup, you can enter the
Sharpness menu and move he cursor keys ∧/∨
the desired sharpness, then press ENTER
36
Page 37

SPECIFICATIONS
Genaral Information
Dimensions (WxHxD) 25,2 x 19,9 x 3,8 cm (without battery)
25,2 x 21,4 x 6,2 cm (incl. battery)
Net weight ( inkl. battery) 1,6 Kg
Power inlet 9,5V DC, 3A
100-240V AC 50/60Hz with power supply
Power consumption < 10 W / StandBy < 10 mA
Battery Lithium-Ion Battery 2200 mAh
TV type PAL / NTSC (playback only)
Display
Dimension 9,2” = 23,6 cm (16:9)
Resolution 800 x 480
Interfaces
Video Video in/out, USB 1.1, Card reader
Audio Line in/out, Headphone jack
DC 12 V In
Operating conditions Temperature 0 - 40° C
English
Humidity 5 - 90% (non condensing)
37
Page 38

TROUBLESHOOTING
PROBLEM POSSIBLE CAUSE SOLUTION
No disc
playback
English
No TV
picture.
No sound
over
speakers.
No sound
over TV or
amplifier.
Different
volume for
DVD/CD
discs.
No playback
of 8 cm
discs.
Disc error.
Disc is dirty or
scratched.
Area code error.
Maybe cables are not
connected correctly.
Setting error.
Earphones may be
plugged in.
Cables maybe not
connected correctly.
Discs can be
recorded on different
volume levels.
8cm disc are not
supported.
Insert disc properly (label
facing up).
Insert a functional disc.
Select a correct area code
disc.
Check the cable
connections.
Check the settings of the
DVD Player and the TV
set.
Remove the earphones.
Check the cable
connections.
Adjust volume level on
DVD player.
Do not use these kind of
discs on this unit.
38
Page 39

GLOSSARY
CD
A CD (Compact Disc) is a metal-coated plastic disc. It has a diameter of 12 cm and a
thickness of about 1,2 mm. It was developed by Sony and Philips in 1985. The advantages
are digital storage of music enabling very natural sound reproduction. Beyond this, the data
is stored more compact, the handling is easy. The long lifetime of the media and the fact that
usage does not decrease quality made the CD the ideal storage media.
In the meantime, 12 different storage media have been developed from the first CD. The
mostly used are CD-DA (Compact Disc - Digital Audio) , CD-ROM (Compact Disc - Read
Only Memory), and the DVD (Digital Versatile Disc).
One can store about 74 to 80 minutes of music on a CD (-DA). This is equal to 650 to 700
MB
Signal transmission is performed touchless with a laser beam. The CD is being read from the
middle to the outer side. The data or music is recorded in a spiral from the middle to the
outer side.
A CD has pits and lands, the distance is about 1,6 mm. The laser light created by a laser
diode passes different mirrors and prisms and then is focused by a lens to a laser beam.
This laser beam scans the data spiral of the CD. On the pits, the laser beam is reflected in
another direction and is detected by a photocell. The photocell transmits the signal to a
microprocessor, which converts the digital data to an audio signal. The rest is done by the
sound system.
CVBS
Composite Video Interface. The video signal is transmitted via a single signal line. CVBS
should only be used, if your playback device does not offer other interfaces for connection
with you Xoro TV set, as CVBS due to technical reasons delivers worst quality of all
available interfaces (please also refer to YUV, S-Video, SCART and RGB). The CVBS
interface can easily be identified from the yellow colour of the RCA jack.
DivX TM
DivX TM is a new high quality video codec, which is based on MPEG-4 standard and
combined with MP3 audio. Originally, the DivX TM-Codec was a Microsoft codec (MPEG-4
v3). The official codec only used ASF format (no AVI) or WMV format with Windows Media
Encoder 7. The official codec had a bitrate limit, which was removed on DivX TM.
On the next stage of development, the codec was developed completely new and is now
100% MPEG-4 compliant. The new codec was called DivX TM 4/5 and can be obtained for
free at www.divx.com. This codec is also compatible to videos encoded with the old DivX TM
codec (DivX TM 3.11). Today, DivX is just a brand name for the MPEG-4 encoder/player
from DivX TM Networks that lives from the fame of early DivX TM days.
.
DTS®
DTS® is a coding standard similar to Dolby Digital®. DTS Digital Surround® is a
multichannel surround system from Digital Theatre Systems. Similar to Dolby Digital® it uses
up to 5.1 channels. Different from Dolby, the data rate can be far above 1 Mbit/sec so the
sound is not compresses as strong as in Dolby Digital® resulting in a higher sound quality.
The frequency range is from 20Hz to 20kHz at 20Bit, but the subwoofer channel only
transmits frequencies below 80Hz. The coding system also is called CAC.
English
39
Page 40

GLOSSARY
DVD
The DVD (Digital Versatile Disk) was introduced in 1995 and is a storage media with a large
capacity.
While a standard CD can store 650 MB of data, the DVD can store up to 9 GB. Especially
when it comes to video playback, a large storage capacity is important. Beyond its high
capacity, the consumer enjoys high quality video and audio. A DVD can store up to 8
different audio streams, so in best case, the movie can be watched in 8 different languages.
Photo-CD (JPEG CD)
A Photo-CD is a storage system for image storage on a CD-ROM in a platform independent
English
multi resolution structure (support of different resolutions and file formats, e.g. JPEG, BMP,
etc). As a single camera film dies not fill a complete CD, more films can be added to the CD
at a later time. A CD-ROM drive must be multisession enabled to load images from a PhotoCD.
GUI
Graphic User Interface. See OSD.
HDCD
Pacific Microsonics has developed a digital audio technology using the full potential of a CD.
The HDCD process (High Definition Compatible Digital) is a patented coding and decoding
process transporting the complete details of a high resolution “master recording” to a CD.
There were several attempts to improve the sound quality of CD's, but none, which could be
compared to HDCD process.
HUE
HUE settings affect the color balance of the picture
Kodak Picture CD®
The KODAK Picture CD® is the ideal media for allropund photographers. All pictures are
stored at an excellent resolution of 1024 x 1536 pixel. On the KODAK Picture CD®, the
images of your camera filmstrip are stored. It is not possible to add pictures at a later point
of time.
Note: There also are "Kodak Foto CD’s®“ available. As they have a proprietary file format,
your DVD player cannot playback these media.
Contrast
Means the range of luminance between the brightest and the darkest pixel, which can be
displayed.
MP3
MPEG 1 Layer 3 Codec, or short MP3, was developed in 1987 by Fraunhofer Institut für
Integrierte Schaltungen and was e revolution in audio compression. In 1992 it became part
of MPEG-1 video format. As MP3 offered high quality audio at incredible small filesize, it
became a standard. With this codec one can compress audiofiles to about 1 MB / minute.
40
Page 41

GLOSSARY
NTSC
Widespread TV standard, especially in US and Asia. 525 (480 viewable) Lines and 60 Hz
refresh rate. Describes the way the video information (brightness, colour, refresh rate etc.) is
transmitted. Within Europe, this video standard only appears on imported media (like US
DVDs).
OSD
The OSD (On Screen Display) is all the menus and options shown on the screen.
PAL
European TV standard. PAL stands for Phase Alternation Line; refresh rate: 50 Hz, vertical
line resolution: 625 Lines, 576 visible lines. Describes the way the video information
(brightness, color, refresh rate etc.) is transmitted.
PBC
PBC stands for playback control. This function can be used to show a menu on Video CD's
(if contained on the VCD). One can move in this menu with the arrow keys and select the
desired function with “enter”.
S/PDIF
S/PDIF (Sony/Philips Digital Interface) is a digital transmission standard for audio data. S/
PDIF can transmit audiofiles from one source to another without having to leave the digital
transmission, which would result in worse quality.
S-Video
Describes the way video signals are transmitted. With S-Video, luminance and colour
information are transmitted separately. S-Video interface can easily be identified by its 4ports in a round connector.
Aspect ratio: 4:3 and 16:9
Full Frame refers to programs developed for TV display with an aspect ratio of 4:3.
Widescreen refers to programs developed for screens with an aspect ratio of 16:9.
If a widescreen program is displayed on a 4:3 screen, the picture will have black borders on
top and bottom.
Super Video CD (SVCD)
SVCD stands for Super Video CD. SVCD's are very similar to VCD's, one can store 35 - 60
minutes of high quality video with up to 2 Stereo audiotracks and 4 different subtitles. All
Xoro DVD players can play SVCD's.
Video CD (VCD)
VCD stands for "Video Compact Disc". VCD's are similar to normal CDs. They contain
movies with sound. A VCD can store 74 to 80 minutes of video with stereo sound. For the
storage of audio and video, MPEG-1 is used. All Xoro DVD players can play VCD's.
YPbPr
please refer to YUV
English
41
 Loading...