


 Loading...
9000801718
*914775167* 914775167 |
921217 |
|
|
||
Ø Montageanleitung |
|
ô Montaj kılavuzu |
Ú Installation instructions |
|
Ù Οδηγίες εγκατάστασης |
â Istruzioni per il montaggio |
ó Monteringsanvisning |
|
Û Instrucciones de montaje |
ê Monteringsveiledning |
|
ì Instruções de montagem |
|
Ý Asennusohje |
é Installatievoorschrift |
|
× Monteringsvejledning |
Þ Notice de montage
|
|
|
|
|
|
|
|
|
|


|
|
|
|
|
|
|
|
|

|

de
Ø
Möbel vorbereiten
■Nur ein fachgerechter Einbau nach dieser Montageanleitung garantiert einen sicheren Gebrauch. Bei Schäden durch falschen Einbau haftet der Monteur.
■Einbaumöbel müssen bis 90 °C temperaturbeständig sein, angrenzende Möbelfronten bis 70 °C.
■Alle Ausschnittarbeiten an Möbel und Arbeitsplatte vor dem Einsetzen der Geräte durchführen. Späne entfernen, die Funktion von elektrischen Bauteilen kann beeinträchtigt werden.
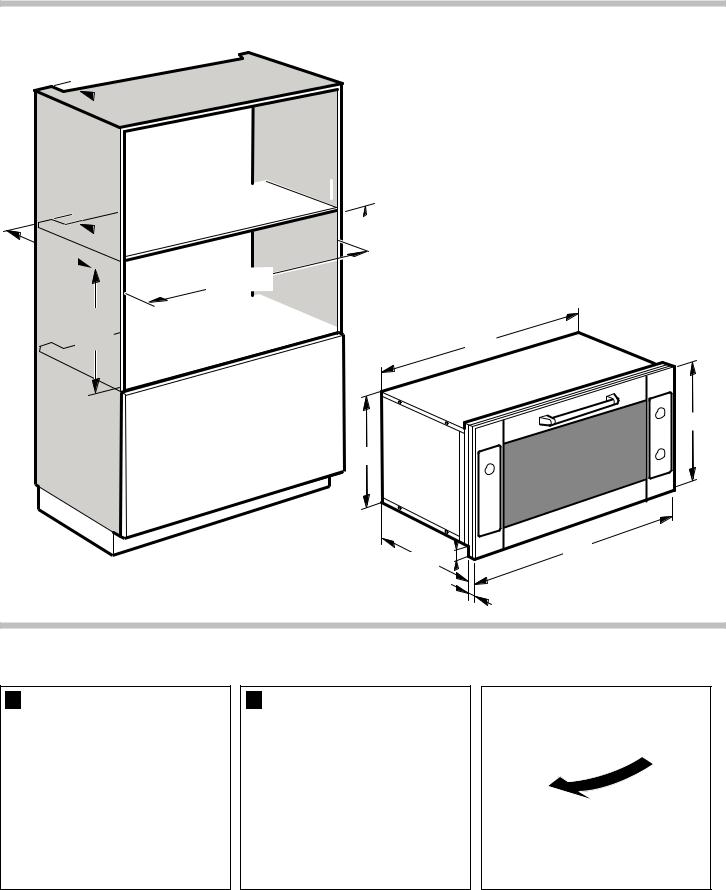
Gerät unter Arbeitsplatte - Bild 1
Der Zwischenboden des Umbauschrankes benötigt einen Lüftungsausschnitt.
Wird der Einbau-Backofen unter einem Kochfeld eingebaut, beachten Sie die Montageanweisung des Kochfeldes.
Gerät im Hochschrank - Bild 2
Der Einbau des Gerätes ist auch im Hochschrank möglich.
Zur Belüftung des Backofens muss der Zwischenboden einen Spalt zur Anstellwand aufweisen.
Gerät vorbereiten
Bevor das Gerät installiert werden kann, müssen die Gerätetür und die Bedienblende demontiert werden.
Gerätetür aushängen - Bild 3
:Verletzungsgefahr!
Wenn die Scharniere ungesichert sind, schnappen sie mit großer Kraft zu. Achten Sie darauf, dass die Sperrhebel beim Aushängen der Backofentür ganz hochgeklappt sind.
1.Backofentür ganz öffnen.
2.Die beiden Sperrhebel links und rechts hochklappen. Achten Sie darauf, dass Sie die Backofentür nicht schließen wenn die Sperrhebel hochgeklappt sind. Die Scharniere können verbogen werden und es können Emailschäden entstehen.
3.Backofentür schräg stellen. Mit beiden Händen links und rechts anfassen. Noch etwas weiter schließen und herausziehen.
Bedienblenden abnehmen - Bild 4
1.Bedientasten und Drehwähler abziehen.
2.Schrauben der Bedienblenden lösen.
3.Bedienblenden gerade nach vorne abziehen.
Gerät anschließen
Das Gerät entspricht der Schutzklasse 1 und darf nur mit Schutzleiter-Anschluss betrieben werden.
Bei allen Montagearbeiten muss das Gerät spannungslos sein.
Das Gerät darf nur mit der mitgelieferten Anschlussleitung angeschlossen werden.
Der Berührungsschutz muss durch den Einbau gewährleistet sein.
Nur ein konzessionierter Fachmann darf das Gerät anschließen. Für ihn gelten die Bestimmungen des regionalen Elektrizitätsversorgers.
Anschlussleitung ohne Schutzkontakt-Stecker
In der Installation muss ein allpoliger Trennschalter mit mindestens 3 mm Kontaktöffnung vorhanden sein. Phaseund Neutral- (“Null-“) Leiter in der Anschlussdose identifizieren. Bei Falschanschluss kann das Gerät beschädigt werden.
Anschluss an Nennspannung 220-240V. Die Adern der Netzanschlussleitung entsprechend der Farbcodierung anschließen: grün-gelb = Schutzleiter <, blau = (Null) Neutral-Leiter, braun = Phase (Ausenleiter).
Gerät montieren - Bild 5
1.Gerät ganz einschieben und mittig ausrichten. Hinweis: Anschlusskabel nicht knicken.
2.Gerät mit 4 Schrauben befestigen.
3.Bedienblende aufstecken und anschrauben.
4.Bedientasten und Drehwähler aufstecken.
Ausbau
Gerät spannungslos machen. Befestigungsschrauben lösen. Gerät leicht anheben und ganz herausziehen.
Gerätetür einhängen - Bild 6
1.Achten Sie beim Einhängen der Backofentür darauf, dass die Kerbe unten an den Scharnieren in den Schlitz einrastet.
2.Die beiden Sperrhebel links und rechts wieder nach unten legen und die Backofentür schließen.
:Verletzungsgefahr!
Wenn die Backofentür unabsichtlich herausfällt oder ein Scharnier zuschnappt, nicht ins Scharnier greifen. Rufen Sie den Kundendienst.
en
Ú
Preparing the kitchen units
■Safe use of this appliance can only be guaranteed if it has been installed professionally in accordance with these installation instructions. The installer is liable for damages incurred as a result of incorrect installation.
■Fitted units must be heat-resistant up to 90 °C, and neighbouring unit fronts up to 70 °C.
■Carry out all cut-out work on the kitchen unit and worktop before fitting the appliances. Remove any shavings or the function of the electrical components may be impaired.
Oven under the work surface - Fig. 1
There must be a ventilation cut-out made in the intermediate floor of the surround unit.
If a fitted oven is to be built in under a hob, pay attention to the hob installation instructions.
Appliance in a tall unit - Fig. 2
The appliance may also be installed in a tall unit.
There must be a gap between the intermediate floor and the mounting wall in order to provide ventilation to the oven.
Preparing the appliance
Before the appliance can be installed, the appliance door and the control panel must be removed.
Removing the appliance door - fig. 3
:Risk of injury!
Whenever the hinges are not locked, they snap shut with great force. Ensure that the locking levers are always fully folded up when detaching the oven door.
1.Open the oven door completely.
2.Fold up the two locking levers up on the left and right-hand sides. Make sure that you do not close the oven door while the locking levers are folded up. The hinges may become bent which may cause damage to the enamel.
3.Close the oven door halfway. With both hands, grip the door on the left and right-hand sides. Close the door a little more and pull it out.
Removing the control panels - fig. 4
1.Detach the control buttons and rotary selector.
2.Undo the screws for the control panels.
3.Pull the control panels off forwards.
Connecting the appliance to the power supply
The appliance corresponds to protection class I and may only be operated with a protective earth connection.
The appliance must be disconnected from the power supply for all installation work.
The appliance must only be connected with the power cable provided.
Contact protection must be ensured by the installation.
Only allow a licenced professional to connect the appliance. He is subject to the regulations of the local electricity provider.
Power cable without a plug with earthing contact
An all-pole isolating switch with at least a 3 mm contact gap must be fitted in the installation. Identify the phase and neutral conductors in the socket. Incorrect connection may cause damage to the appliance.
Connection to nominal voltage 220-240V. Connect the wires of the mains power cable according to the colour coding: green/
yellow = PE conductor <, blue = neutral conductor, brown = phase (external conductor).
Fitting the appliance Fig. 5
1.Fully insert the appliance and centre it. Note: Do not kink the connecting cable.
2.Secure the appliance using 4 screws.
3.Position the control panel and screw in place.

4.Push the control buttons and rotary selector in place on their spindles.
Removal
Disconnect the appliance from the power supply. Undo the securing screws. Raise the appliance slightly and pull it out completely.
Fitting the appliance door - fig. 6
1.When hooking in the oven door, ensure that the notch on the bottom of the hinge locks into the slot.
2.Fold down both locking levers on the left and right again and close the oven door.
:Risk of injury!
Do not reach into the hinge if the oven door falls out unintentionally or a hinge snaps closed. Call the aftersales service.
it
â
Preparazione dei mobili
■L'utilizzo sicuro viene garantito solo se il montaggio è stato effettuato in modo corretto secondo le presenti istruzioni. In caso di danni dovuti a un montaggio scorretto la responsabilità ricade su chi ha montato l'apparecchio.
■I mobili da incasso devono essere termostabili fino a una temperatura pari a 90 °C e i mobili contigui fino a 70 °C.
■Completare tutti i lavori di taglio sui mobili e il piano di lavoro prima dell'inserimento degli apparecchi. Rimuovere i trucioli in quanto possono pregiudicare il funzionamento dei componenti elettrici.
Apparecchio sotto la piastra di lavoro - Figura 1
Il doppiofondo del mobile necessita di fessura di ventilazione.
Se si colloca il forno da incasso sotto un piano di cottura, attenersi alle istruzioni di montaggio del piano di cottura.
Apparecchio in un pensile alto - Figura 2
L'apparecchio può essere montato anche in pensili alti.
Per la ventilazione del forno, lasciare una fessura nel doppiofondo adiacente al muro.
Preparazione dell'apparecchio
Prima di installare l'apparecchio è necessario smontare la porta dell'apparecchio e il pannello comandi.
Smontaggio della porta dell'apparecchio - Figura 3
:Pericolo di lesioni!
Se le cerniere non sono bloccate, scattano con una forza maggiore. Mentre si sgancia la porta del forno, prestare attenzione a che le leve di bloccaggio siano aperte.
1.Aprire completamente la porta del forno.
2.Aprire le due leve di bloccaggio a destra e a sinistra. Quando le leve di bloccaggio sono aperte, prestare attenzione a non chiudere la porta del forno. Le cerniere potrebbero venire piegate causando il danneggiamento dello smalto.
3.Mettere la porta del forno trasversalmente. Afferrarla con entrambe le mani a destra e a sinistra. Chiuderla leggermente e rimuoverla.
Rimozione del pannello comandi - Figura 4
1.Rimuovere i tasti di comando e il selettore.
2.Allentare le viti del pannello comandi.
3.Estrarre il pannello comandi tirandolo in avanti.
Allacciamento dell'apparecchio
L'apparecchio appartiene alla classe di protezione 1 ed è in grado di funzionare solo se dotato di un conduttore di terra.
Durante tutte le operazioni di montaggio l'apparecchio deve essere senza tensione.
Allacciare l'apparecchio esclusivamente mediante il cavo fornito in dotazione.
La protezione da contatto deve essere garantita tramite il montaggio.
L'allacciamento dell'apparecchio può essere effettuato solo da un tecnico autorizzato. che dovrà rispettare le disposizioni dell'azienda regionale erogatrice dell'energia elettrica.
Cavo di alimentazione senza spina con messa a terra
L'impianto deve possedere un sezionatore universale con un'apertura di contatto di almeno 3 mm. Nell'elemento femmina, individuare un conduttore di fase e uno neutro (“zero”). Un
allacciamento scorretto dell'apparecchio può comportarne il danneggiamento.
Collegamento alla rete elettrica di 220-240V. Collegare i fili del cavo di collegamento alla rete elettrica rispettando i colori: verde giallo = conduttore di terra <, blu = (zero) conduttore neutro, marrone = fase (conduttore esterno).
Montaggio dell'apparecchio Figura 5
1.Inserire l'apparecchio fino in fondo e centrarlo. Avvertenza: Non comprimere il cavo di allacciamento.
2.Fissare l'apparecchio con le 4 viti.
3.Posizionare e avvitare il pannello comandi.
4.Posizionare i tasti di comando e il selettore.
Smontaggio
Scollegare l'apparecchio. Svitare le viti di fissaggio. Sollevare leggermente l'apparecchio ed estrarlo completamente.
Montaggio della porta dell'apparecchio - Figura 6
1.Durante il rimontaggio della porta del forno prestare attenzione a che le tacche inferiori sulla cerniera si innestino nella fessura.
2.Riposizionare verso il basso entrambe le leve di bloccaggio, destra e sinistra, e chiudere la porta del forno.
:Pericolo di lesioni!
Se la porta del forno cade inavvertitamente o se scatta una cerniera, non toccarla. Rivolgersi al servizio di assistenza tecnica.
es
Û
Preparar los muebles
■Solo un montaje profesional conforme a estas instrucciones garantiza un uso seguro. En caso de daños debido a un montaje erróneo, la responsabilidad será del instalador.
■Los muebles empotrados deben ser capaces de resistir una temperatura de hasta 90 °C; los frontales de los muebles limítrofes hasta 70 °C.
■Realizar todos los trabajos de corte en los muebles y en la encimera antes de montar los aparatos. Retirar las virutas, ya que el funcionamiento de los componentes eléctricos puede verse afectado.
Aparato debajo de la placa de cocción -Figura 1
El soporte intermedio del armario desmontable requiere una abertura de ventilación.
Prestar atención a las instrucciones de montaje de la placa de cocción antes de montar el horno.
Aparato montado en un armario en alto. Figura 2
También es posible montar el aparato en un armario en alto.
El fondo intermedio del horno debe presentar una separación de 45 mm con respecto a la pared para la ventilación del aparato.
Preparar el aparato
Antes de poder instalar el aparato se deben desmontar la puerta y la pantalla de mando.
Desmontar la puerta del aparato - Figura 3
:¡Peligro de lesiones!
Si las bisagras no están bloqueadas, podrían cerrarse de golpe. Observar que las palancas de bloqueo estén completamente levantadas al descolgar la puerta del horno.
1.Abrir por completo la puerta del horno.
2.Levantar las dos palancas de bloqueo, la del lado izquierdo y la del derecho. Si las palancas de bloqueo están levantadas, vigilar de que la puerta del horno no se cierre. Podrían doblarse las bisagras y producirse daños en el esmalte.
3.Inclinar la puerta del horno. Agarrarla con ambas manos por el lado izquierdo y derecho. Cerrar un poco más y extraerla.
Extraer las pantallas de mando - Figura 4
1.Retirar las teclas de manejo y mando giratorio.
2.Soltar los tornillos de las pantallas de mando.
3.Extraer las pantallas de mando en línea recta hacia fuera.
Conectar el aparato
El aparato pertenece a la clase de protección 1 y solo puede utilizarse conectado a una conexión con conductor de toma a tierra.
El aparato debe estar sin tensión para poder realizar los trabajos de montaje.
Loading...