


MODEL
OPERATION MANUAL

Safety Warning on Internal Fax/Modem
∙Never install telephone wiring during a lightning storm.
∙Never install a modular jack in a wet location unless the jack is specifically designed for wet locations.
∙Never touch uninsulated telephone wires or terminals unless the telephone line has been disconnected at the network interface.
∙Use caution when installing or modifying telephone cables.
∙Avoid using the modem over a telephone line during an electrical storm. Electronic shock and main unit damage from lightning is possible.
∙This Fax/Modem is designed for use with analog telephone systems only. Use with digital telephone systems, often found in offices and hotels, may cause permanent damage. You need to be sure the line you are connecting to is an analog line. Please check with the facilities manager before communicating.
FOR YOUR RECORDS….
For your assistance in reporting this product in case of loss or theft, please record the model number and serial number (located on the bottom of the unit) below. Please retain this information.
Model Number __________________
Serial Number ___________________
Date of Purchase_________________
Place of Purchase ________________

License Agreement
YOU SHOULD CAREFULLY READ THE FOLLOWING BEFORE USING THE SOFTWARE. THIS IS A LEGAL DOCUMENT WHICH CONSTITUTES YOUR AGREEMENT AS END USER FOR THE USE OF THE SOFTWARE. BY INSTALLING, USING OR COPYING THE SOFTWARE, YOU INDICATE YOUR ACCEPTANCE OF THIS LIMITED USE SOFTWARE LICENSE.
IF YOU DO NOT AGREE TO THE TERMS OF THIS AGREEMENT, PROMPTLY RETURN THE PRODUCT AND THE ACCOMPANYING ITEMS WITH YOUR SALES RECEIPT TO YOUR VENDOR.
LIMITED USE SOFTWARE LICENSE
In consideration of the license fee, which is a part of the price you paid for this product, Sharp Corporation, as Licensor, grants you, the Licensee, a non-exclusive software license to use the software("the Software") and related documentation supplied with the product.
The terms of this license are as follows.
1.You are not allowed to use the Software on two or more personal computers at any one time.
2.This license does not constitute a sale of the original Software or any copy thereof. As Licensee, you own the physical media on which the Software is recorded. Sharp Corporation retains title to and ownership of the Software and Sharp Corporation retains title to and ownership of the instruction manual relating to the Software, regardless of the form or media in or on which the original and other copies may exist.
3.You are required to protect the copyright of the Software. You may be held legally responsible for any copyright infringement that is caused or encouraged by your failure to abide by the terms of this license.
4.You may NOT modify or alter the Software. Any portion of the Software that is merged into or used in conjunction with other software will continue to be the property of Sharp Corporation and will be subject to the terms of this license.
5.You may only make copies of the Software for archival purposes. Such a copy must contain the same copyright notice and proprietary marking as the original Software. You may not copy the Software onto any public network.
6.You may not dispose of the Software by way of rental, lease or license and you may not distribute or otherwise make the Software or documentation available to any third party without the prior written consent of the Licensor.
7.You may not transfer to another person your rights to copy and use the Software without the prior written consent of the Licensor which however cannot be unreasonably withheld. Any authorized transferee of the Software shall be bound by the same terms and conditions of this license and, in such case your license is automatically terminated. You must transfer to such an authorized transferee the Software together with all copies thereof and the relevant documentation and under no circumstances are you allowed to retain in your possession or control any copy of the Software or of the documentation. In no event may you transfer, assign, rent, sell, or otherwise dispose of the Software on a temporary or permanent basis except as expressly provide.
1

8.This license is effective until terminated. This license will terminate automatically without notice from the Licensor if you fail to comply with any provision of this Agreement. Upon termination you will destroy the Software together with all copies and modifications in any form.
9.You may not export or re-export the Software or any copy in violation of any applicable laws or regulations.
10.The Software has been tested and the documentation has been reviewed. However, THE LICENSOR MAKES NO WARRANTY OR REPRESENTATION INCLUDING THE IMPLIED WARRANTIES OF MERCHANTABILITY AND FITNESS FOR USE, ALL OF WHICH ARE EXCLUDED. Some states/countries do not allow exclusion of implied warranties so the above disclaimer may not apply to you in such states and countries.
11.The Licensor's sole liability and your exclusive remedy shall be repair or replacement of the non-conforming Software which is returned to the Licensor with a copy of your receipt. This is void if failure of the Software has resulted from accident, abuse or misapplication.
12.The Licensor will not be liable or in any way responsible for any incidental or consequential economic or property damage in connection with the Software or its documentation. Some states/countries do not allow the exclusion of incidental or consequential damages so the above exclusion may not apply to you in such states and countries.
THIS LICENSE GIVES YOU SPECIFIC LEGAL RIGHTS. YOU MAY ALSO HAVE OTHER RIGHTS WHICH VARY FROM COUNTRY TO COUNTRY.
2

Notices
∙SHARP strongly recommends that you keep separate written records of all important data. Data may be lost or altered under certain circumstances. Therefore, SHARP assumes no responsibility for data lost or otherwise rendered unusable as a result of improper use, repairs, defects, battery replacement/failure, software error, or any other cause.
∙SHARP assumes no responsibility, directly or indirectly, for financial losses or claims from third parties resulting from the use of this product and any of its functions, such as stolen credit card numbers, loss or alternation of stored data, etc.
∙Information provided in this manual is subject to change without notice.
+Explanation in this manual covers the HC-4000/4100 and 4500 models, but the illustrations used are based on the HC-4000/4100.
+Unless otherwise specified, the information in this manual applies to all three models.
+One of the models or certain accessories described in this manual may not be available in your country when you purchase this product. Check with your local SHARP dealer concerning availability.
+The HC-4000/HC-4100/HC-4500 will be referred to as the "unit" throughout this manual.
+The HC-4000, HC-4100 and HC-4500 comes with 4MB, 8MB, and 16MB of memory respectively. While the HC-4000 and HC-4100 are grayscale models, the HC-4500 is a color model. See the “Specifications” section for details on differences between the models.
Trademarks
All company and/or product names are trademarks and/or registered trademarks of their respective holders.
∙Microsoft, MS-DOS, MS, Windows, Windows NT and PowerPoint are either registered trademarks or trademarks of Microsoft Corporation in the U.S.A. and/or other countries.
3

Contents
INTRODUCTION ................................................. |
6 |
What the HC-4000/HC-4100/HC-4500 can do ................... |
6 |
Checking the contents........................................................ |
6 |
About this manual ............................................................. |
7 |
Conventions used............................................................... |
7 |
Caring for your unit ........................................................... |
8 |
GETTING STARTED ........................................ |
10 |
Part names and functions ................................................. |
10 |
Installing the batteries ..................................................... |
13 |
Setting up the unit ........................................................... |
19 |
HARDWARE ..................................................... |
21 |
Replacing the batteries..................................................... |
21 |
Charging the battery pack (For HC-4500 users) ............... |
26 |
Resetting the unit............................................................. |
29 |
Connecting the unit to your PC ........................................ |
30 |
Using the infrared port for file transfer ........................... |
32 |
Using the internal fax/modem.......................................... |
33 |
Using a PC Card.............................................................. |
34 |
SOFTWARE ...................................................... |
36 |
Image Editor.................................................................... |
36 |
Voice Recorder ................................................................ |
40 |
Data exchange with other device via IR ........................... |
47 |
4

COMMON QUESTIONS & ANSWERS ............. |
53 |
TROUBLESHOOTING ...................................... |
57 |
APPENDIX ........................................................ |
59 |
Hardware specifications ................................................... |
59 |
Character conversion tables ............................................. |
61 |
INDEX................................................................ |
65 |
5

INTRODUCTION
What the HC-4000/HC-4100/HC-4500 can do
The HC-4000/HC-4100/HC-4500 is a handheld PC using the Microsoft® Windows® CE 2.0 operating system, which is very similar to the Microsoft® Windows® 95 and Windows® NT® 4.0 operating systems. You can use the unit to perform many of the PC operations you are already familiar with, such as accessing e-mail, writing letters, managing expenses, and keeping track of appointments and contacts.
The Microsoft® Windows® CE 2.0 operating system comes standard with the following applications:
∙Pocket Word
∙Pocket Excel
∙Pocket PowerPoint®
∙Windows CE Services 2.0
∙Pocket Internet Explorer
∙Pocket OutlookTM (Contacts/Calendar/Tasks/Inbox)
Additional applications from SHARP in this unit make your mobile life even more comfortable:
∙Image Editor (to edit images)
∙Voice Recorder (to record audio notes)
∙IR Data exchange with SHARP ZR series units
Checking the contents
Please check the contents carefully. The package should include the following:
HC-4000/HC-4100 |
HC-4500 |
||
∙ |
Serial cable |
∙ |
Serial cable |
∙ |
Modular phone cable |
∙ |
Modular phone cable |
∙ |
CD-ROM and manual from Microsoft |
∙ |
CD-ROM and manual from Microsoft |
∙ |
CD-ROM from SHARP |
∙ |
CD-ROM from SHARP |
∙ |
Two AA (LR6) alkaline batteries |
∙ |
AC adaptor (EA-58A) |
∙ |
CR2032 lithium backup battery |
∙ |
Ni-MH Rechargeable Battery Pack |
∙ |
Operation manual |
|
(HC-BN01) |
|
|
∙ |
CR2032 lithium backup battery |
|
|
∙ |
Operation manual |
If there are problems with any of these contents, please contact your SHARP dealer.
6

About this manual
This manual helps you get started using the unit as soon as possible. It consists of the following sections and an index:
INTRODUCTION
Introduces you to this unit and how to use this manual.
GETTING STARTED
Quickly walks you through setting up the unit.
HARDWARE
Explains the hardware features of this unit and its general operation.
SOFTWARE
Describes the bundled software applications from SHARP.
COMMON QUESTIONS AND ANSWERS
Lists common questions you may have, and the answers.
TROUBLESHOOTING
Covers possible remedies to problems you may encounter while setting up and using the unit.
APPENDIX
Specifications and other information about the unit.
This manual assumes that you are already familiar with Microsoft Windows 95 or Windows NT 4.0. If necessary, refer to the appropriate Microsoft documentation.
Conventions used
The following keyboard and symbol conventions are used in this manual:
BOLD capitalized notations indicate buttons on the display that you tap with the stylus, or keys on the keyboard that you press with a finger.
Letters and numbers to be entered are shown in italics, for example Lunch at 12:00 indicates that "Lunch at 12:00" should be entered from the keyboard.
Names written with initial capitals are names of applications and accessories.
7

Caring for your unit
This unit contains sophisticated circuitry and a glass display panel which can be damaged if not cared for properly. The following precautions should ensure your unit gives you many years of reliable use.
∙Keep your unit away from extreme heat. Do not leave it on the dashboard of a car or near a heater. Do not leave it in any place that is extremely damp or dusty.
∙Do not drop your unit or subject it to severe impact. Bending the body can damage the circuitry. Do not use extreme force when pressing the display or keys.
∙Do not use sharp objects or your fingernails to touch the display screen. We recommend you use only the supplied stylus to tap or write on the screen.
8
∙Hard, sharp objects can scratch your unit, so ensure it is closed and/or protected when carried with other objects.
∙Do not use solvents to clean your unit. Use only a soft dry cloth.
∙Do not carry your unit in your back pocket as it may break when you sit down. The display is made of glass and is particularly fragile.
∙Since this product is not waterproof, do not use it or store it where fluids, for example water, can splash onto it. Raindrops, water spray, juice, coffee, steam, perspiration, etc. may also cause malfunction.
9
GETTING STARTED
This section helps you get started the first time you use the unit.
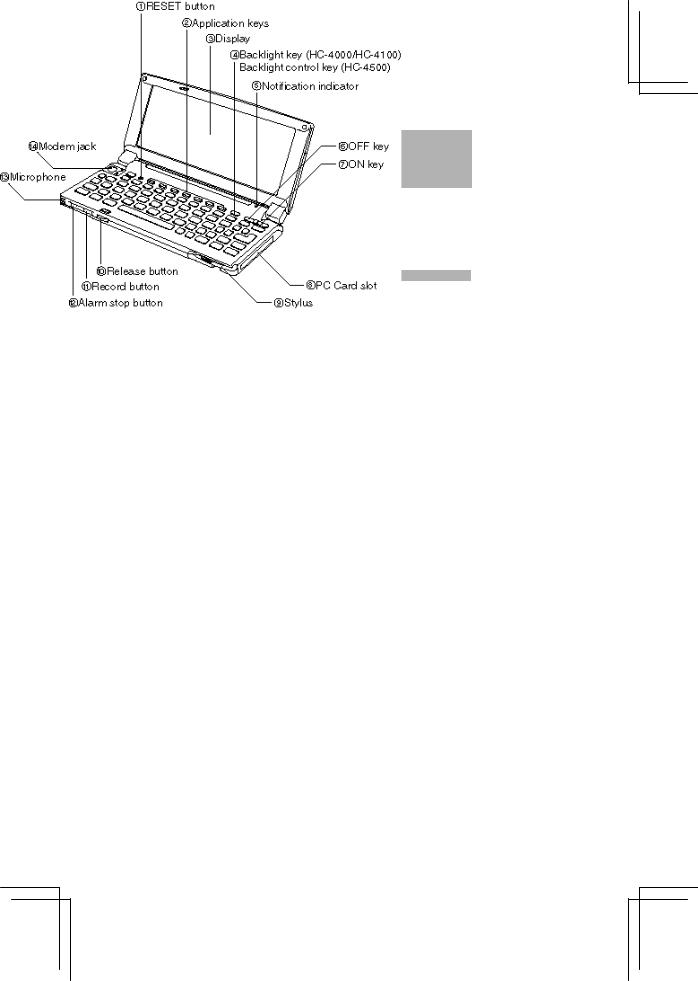
Part names and functions
10

 RESET button
Press to reset and initialize the unit.
 Application keys
Press to start the indicated application.
 Display
Shows information and also functions as a “touch panel” for selecting operations, data entry, etc.
 Backlight key (HC-4000/HC-4100)
Press to turn the backlight on or off.
Backlight Control Key (HC-4500)
Press to adjust the backlight. Pressing this key toggles backlight brightness between dim (the darkest setting) and normal (the brightness level set by the user).
 Notification indicator
Flashes red when a schedule alarm time is reached. Solid green when the modem or microphone is in use.
Solid amber when the Ni-MH Rechargeable Battery Pack (option in HC-4000/HC- 4100) is charging.
 OFF key
Press to turn off the unit.
 ON key
Press to turn on the unit.
 PC Card slot
For inserting a Type II PCMCIA card.
 Stylus
Use it to write on the display or navigate through the software.
 Release button
Press to open the unit.
 Record button
Press and keep holding for quick recording.
 Alarm stop button
Stop the schedule alarm and clear the Notification indicator.
 Microphone
For voice note or other recording.
 Modem jack
For fax and data communication.
11
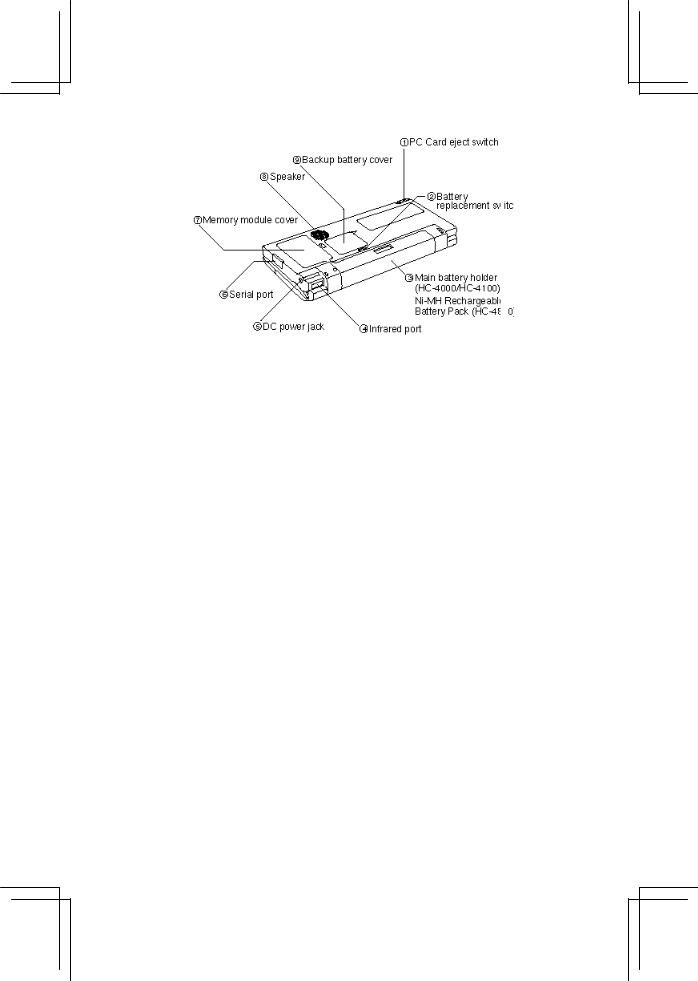
 PC Card eject switch
Slide to eject the inserted PC Card.
 Battery replacement switch
For replacing main batteries as well as the backup battery.
 Main battery holder (HC-4000/HC-4100)
Holds two AA (LR6) alkaline batteries, or can be replaced with the optional Ni-MH Rechargeable Battery Pack.
Ni-MH Rechargeable Battery Pack (HC-4500)
 Infrared port
For wireless communication with other handheld PCs, SHARP ZR series unit and infrared-capable notebook and desktop PCs, and printing to infrared-capable printers.
 DC power jack
For connecting to the AC adaptor included in HC-4500 package or the optional Docking Station Kit.
 Serial port
For connecting to a desktop PC for data transfer or to a printer for printing.
 Memory module cover
Open to replace the Memory module, if necessary.
 Speaker
 Backup battery cover
Open to replace the backup battery.
12
Installing the batteries
For HC-4000/HC-4100 users:
Before starting to use the unit, you must install the main batteries as well as the backup battery.
Caution:
∙Use only AA (LR6) alkaline batteries or the optional Ni-MH Rechargeable Battery Pack for the main batteries, and a CR2032 lithium battery for the backup battery. Using other types of batteries may result in loss of data.
∙Always have the main batteries installed before installing the backup battery.
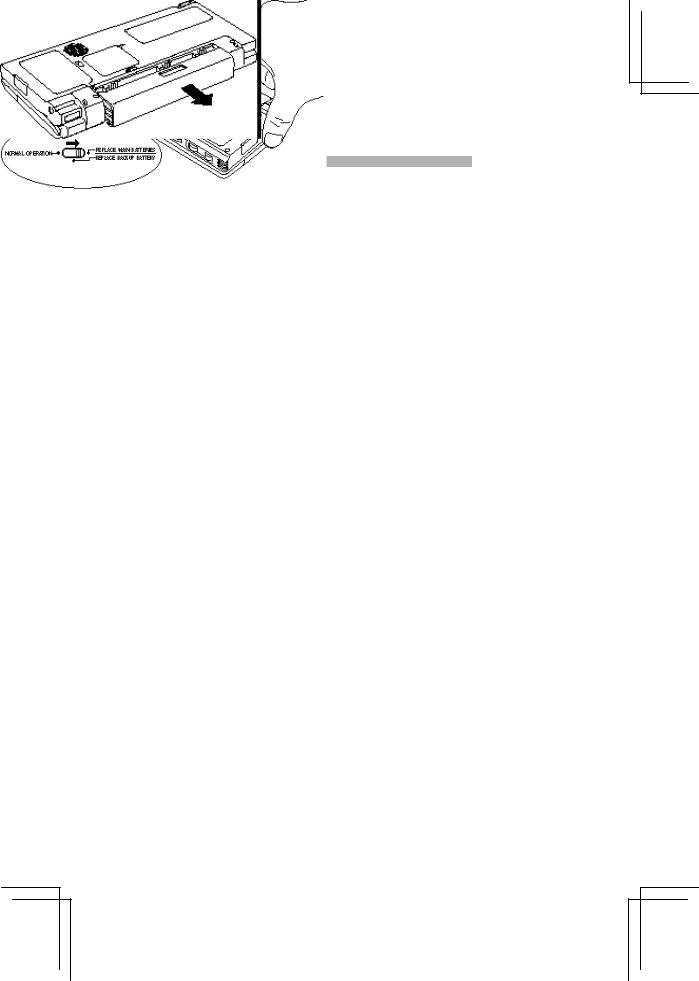
1.Slide the battery replacement switch to the REPLACE MAIN BATTERIES position. (When you release the switch, it may slip to the REPLACE BACKUP BATTERY position. This is not a problem.)
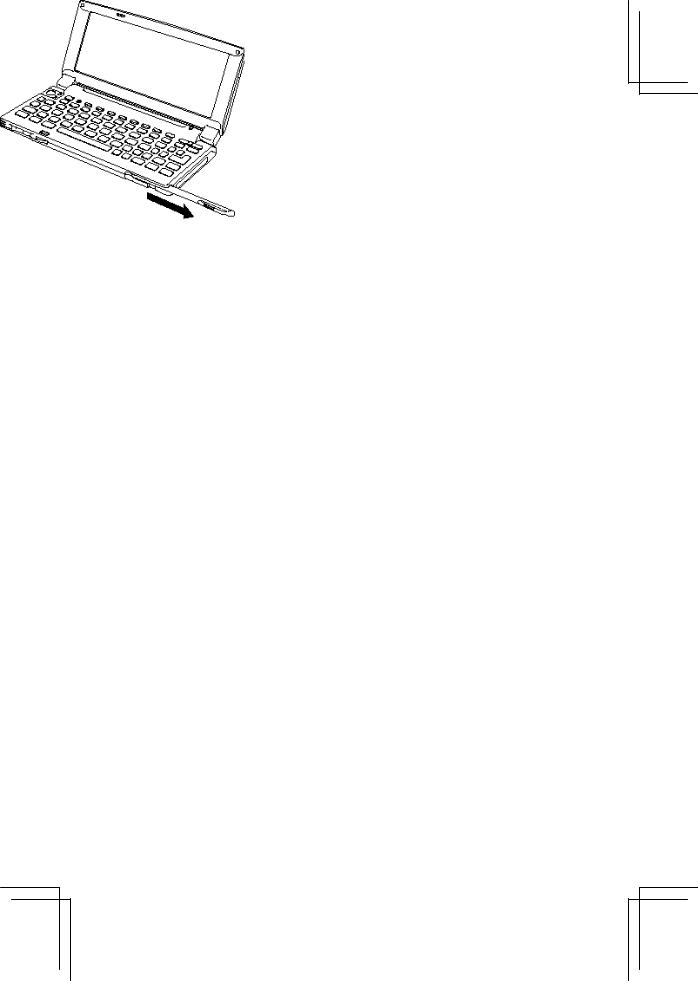
2.Pull out the battery holder.
13
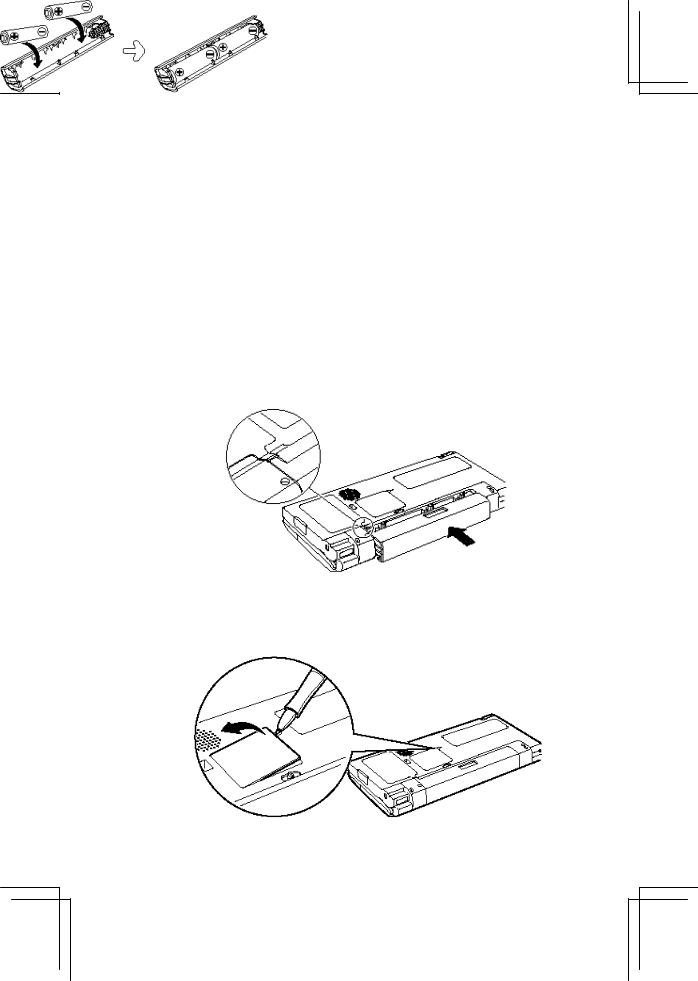
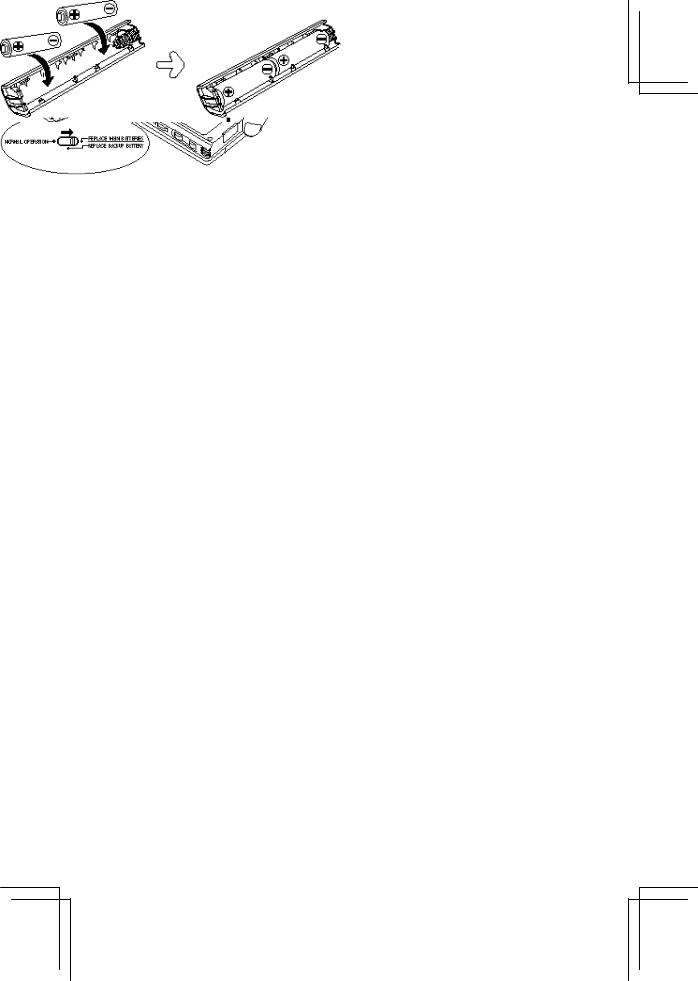
3.Insert the supplied AA (LR6) alkaline batteries into the battery holder, noting the directions indicated by the plus (+) and minus (-) signs inside the holder.
Caution:
If you need to place the main battery holder containing batteries on a table made of metal, make sure the batteries are not in direct contact with the table; otherwise a short circuit may occur, and the batteries may heat up and explode.
4.Reattach the battery holder to the unit, noting the position of the projecting part on the battery holder.
5.Check that the battery replacement switch is in the REPLACE BACKUP BATTERY position.
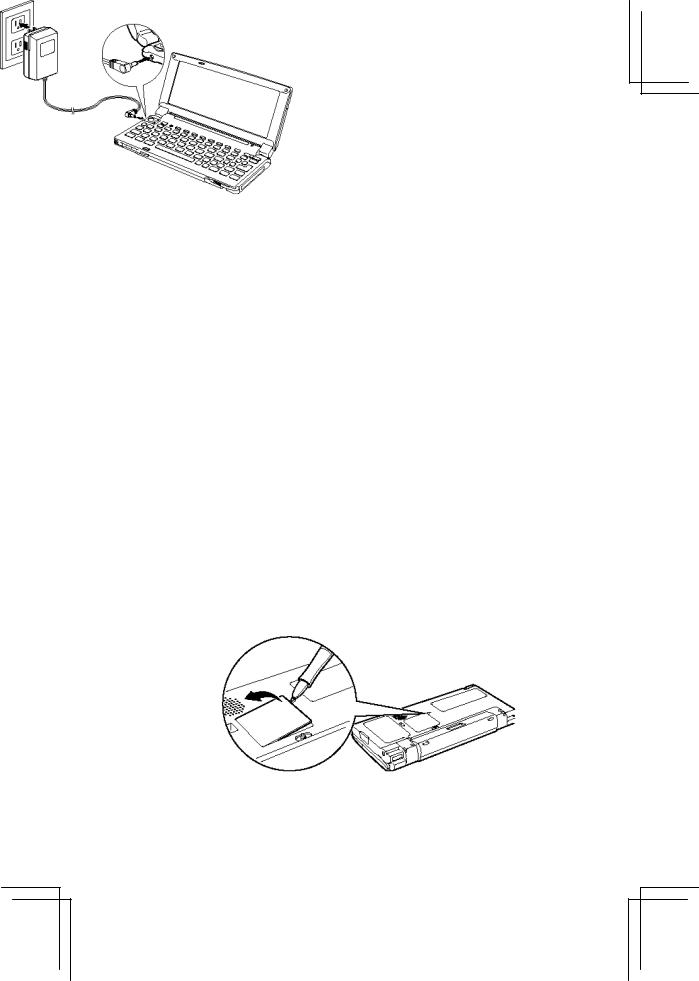
6.Use a ballpoint pen to open the backup battery cover. Do not use the stylus.
14

7.Insert the supplied CR2032 lithium battery with the plus (+) sign facing up.
8.Put the backup battery cover back in place and slide the battery replacement switch to the NORMAL OPERATION position.
Note:
∙You cannot slide the battery replacement switch to the NORMAL OPERATION position if the main battery holder is not completely inserted.
∙The unit operates only when the battery replacement switch is in the NORMAL OPERATION position.
Caution:
Avoid placing your finger in the space left when you remove the main battery holder. Your finger may become trapped when you close the unit.
15

For HC-4500 users:
You can use the supplied Ni-MH Rechargeable Battery Pack(HC-BN01) as the main battery, together with the supplied AC adaptor (EA-58A):
Note:
When shipped, the Ni-MH Rechargeable Battery Pack is not charged; therefore, you must charge it before use. The charging process takes about 3 hours.
Caution:
∙Use only the Ni-MH Rechargeable Battery Pack(HC-BN01) for the main battery and a CR2032 lithium battery for the backup battery. Using other types of batteries may result in loss of data.
∙Use the supplied AC adaptor (EA-58A) to charge the battery pack.
∙Always have the main battery installed and charged before installing the backup battery.
1.Slide the battery replacement switch to the REPLACE MAIN BATTERIES position. (When you release the switch, it may slip to the REPLACE BACKUP BATTERY position. This is not a problem.)
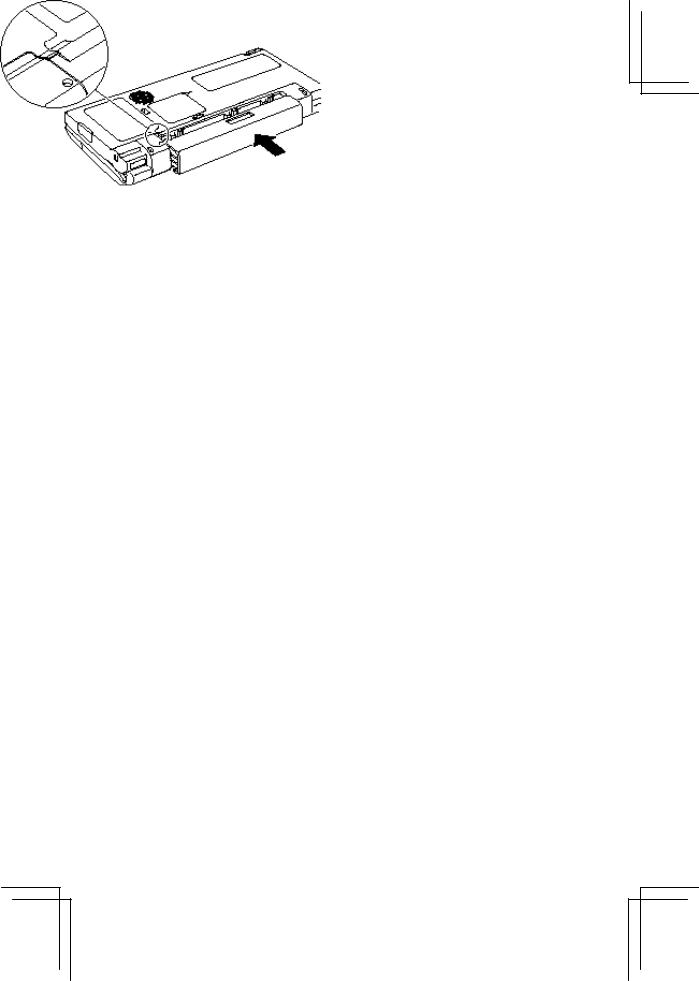
2.Attach the battery pack to the unit, noting the position of the two projecting parts on the battery pack.
Note:
Be careful not to bend or break the two projecting parts.
16
3.Slide the battery replacement switch to the NORMAL OPERATION position. If this proves difficult, check to make sure the battery pack is completely inserted.
4.Plug the supplied AC adaptor into an AC outlet, and then connect the AC adaptor plug to your unit. Your unit should now start charging and the Notification indicator on the unit become amber.
Note:
Make sure your unit is turned off. You cannot charge the installed battery pack while the unit is turned on.
The actual shape of the AC adaptor plug may differ depending on the country of purchase.
5.The charging process takes about 3 hours. When the Notification indicator goes off, the battery pack is fully charge. Disconnect the AC adaptor from the AC outlet as well as the unit.
6.Slide the battery replacement switch to the REPLACE BACKUP BATTERY position.
7.Use a ballpoint pen to open the backup battery cover. Do not use th stylus.
17

8.Insert the supplied CR2032 lithium battery with the plus (+) sign facing up.
9.Put the backup battery cover back in place and slide the battery replacement switch to the NORMAL OPERATION position.
Note:
∙You cannot slide the battery replacement switch to the NORMAL OPERATION position if the battery pack is not completely inserted.
∙The unit operates only when the battery replacement switch is in the NORMAL OPERATION position.
Caution:
Avoid placing your finger in the space left when you remove the battery pack. Your finger may become trapped when you close the unit.
18
Setting up the unit
1.Press the release button and open the unit.
2.Press the ON key to turn on the unit.
Note:
The first time you use the unit after purchase, it may take approx. 8 seconds for the display to come on after pressing the ON key.
3.Adjust the display contrast. HC-4000/HC-4100 users:
While holding down the  key, press the
  key to darken the background, or the
  key to lighten it.
HC-4500 users:
While holding down the  key, press the
  key to darken the background, or the
  key to lighten it.
Note:
The first time you use the unit after purchase, its screen may appear to be too dark or too light. This is not a malfunction. Follow the steps above to adjust the contrast.
19
4.Remove the stylus from the unit.
When the H/PC Setup Wizard Introduction appears, follow the instructions and adjust the screen calibration, time zone setting, time and date, and your name and address.
About the backlight illumination (For HC-4000/HC-4100 users)
If necessary, press the Backlight key to turn on the backlight for better viewing. The backlight feature turns off automatically after a certain amount of time of inactivity (which by default is 1 minute for battery power or 2 minutes for external power source). This interval may be adjusted using the Display applet in the Control Panel.
Note:
The unit automatically goes into a sleep mode if you do not operate the unit for a set time period (the default setting is 3 minutes). To activate the unit again, press the ON key.
About the backlight control key (For HC-4500 users)
When your turn on the unit, the backlight is usually on. You can change the brightness of the backlight. While holding down the Alt key, press the ] key to increase the brightness, or the [ key to decrease it. Pressing the Backlight Control key turns the backlight to dim; pressing the key again returns the backlight to normal. If the batteries are low or very low, however, then the backlight is always dim and pressing the Backlight Control key cannot change it. When you enter data using the keyboard or from the touch panel, the backlight always return to normal. In the Backlight Properties window (accessible from Backlight applet in Control Panel), you can set the backlight to automatically dim on battery power or external power.
The Backlight Control key does not work when the power is turn off (suspend mode).
20
HARDWARE
This section describes how to use the various hardware features of the unit.
Replacing the batteries
When the batteries are low, your unit displays warning messages prompting you to replace the batteries as soon as possible. You can also check the battery power by
double-tapping the power status icon  if it appears on the task bar.
Caution:
Be sure to back up data of the unit to, for example, your desktop PC, before replacing the main batteries or the backup battery.
For HC-4000/HC-4100 users:
Replacing the main batteries
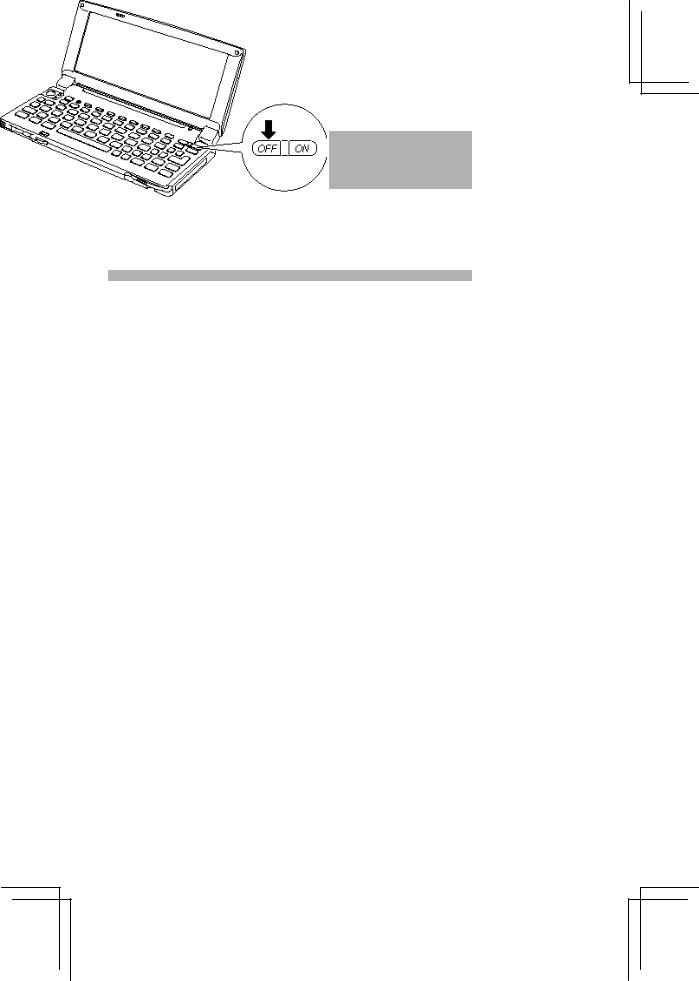
1.Turn off the unit.
21
2.Slide the battery replacement switch to the REPLACE MAIN BATTERIES position.
3.Pull out the battery holder and remove the old batteries. Discard them properly.
4.Insert two new AA (LR6) alkaline batteries into the battery holder, noting the directions indicated by the plus (+) and minus (-) signs inside the holder.
Caution:
If you need to place the main battery holder containing batteries on a table made of metal, make sure the batteries are not in direct contact with the table; otherwise a short circuit may occur, and the batteries may heat up and explode.
22
5.Reattach the battery holder to the unit, noting the position of the projecting part on the battery holder.
6.Slide the battery replacement switch back to the NORMAL OPERATION position.
If this proves difficult, check to make sure the main battery holder is completely inserted.
Note:
The unit operates only when the battery replacement switch is in the NORMAL OPERATION position.
7.After battery replacement, turn on the unit and make sure no warning message appears.
Caution:
Avoid placing your finger in the space left when you remove the main battery holder. Your finger may become trapped when you close the unit.
23
 Loading...