


 Loading...
Sharp MX-3501N, MX-4500N, MX-4501N, MX-2300N, MX-2700N Manual
...MODEL: MX-2300N MX-3500N
MX-2700N MX-3501N
MX-4500N
MX-4501N
DIGITAL FULL COLOUR MULTIFUNCTIONAL SYSTEM
Troubleshooting
In the unlikely event of you experiencing a problem with this product, please refer to this manual before requesting service.
The contents of this manual are grouped by situation.
The chapters of the manual appear on the cover.
REMOVING MISFEEDS
COPYING
PRINTING
SCANNING
DOCUMENT FILING
INSTALLATION
OTHER PROBLEMS
Problems Related to Machine Operation
Problems Related to Paper Feeding and Output Problems Related to Quality / Print Results
Problems Related to Peripheral Device
Other Problems Illustration of the machine
Keep this manual close at hand for reference whenever needed.

ABOUT THIS MANUAL
This manual provides solutions to possible problems in a question and answer format. The questions are grouped into the chapters "REMOVING MISFEEDS", "COPYING", "PRINTING", "SCANNING", "DOCUMENT FILING", "INSTALLATION", and "OTHER PROBLEMS". Locate the question that relates to your problem and use the answer to help correct the situation. If you are unable to solve a problem using this manual, please contact your dealer or nearest authorised service representative.
Conventions used in this manual
•System settings
Descriptions of system settings similar to the following example appear in this manual.
Example: System Settings (Administrator) > "Copy Settings" > "Rotation Copy Setting" > 
This is an abbreviated description of the procedure for selecting the setting. ">" indicates a level in the settings and  indicates the state of the setting after it has been enabled. Use these descriptions as a quick manual to help you configure the
settings.
For detailed explanations of the system settings, see the System Settings Guide.
•References to other sections
Some of the explanations in this manual refer to other pages. Refer to these pages as well to help solve your problem. Example: Illustration of the machine (A) (page 36)
Please note
•For information on installing the drivers and software cited in this manual, please refer to the separate Software Setup Guide.
•For information on your operating system, please refer to your operating system manual or the online Help function.
•The explanations of screens and procedures in this manual are primarily for Windows® XP in Windows® environments, and Mac OS X v10.3.9 in Macintosh environments. The screens may vary depending on the version of the operating system.
•Wherever "MX-xxxx" appears in this manual, please substitute your model name for "xxxx".
•Where this manual shows the "MX-2300/2700 series" or the "MX-3500/4500 series", the following models are indicated: MX-2300/2700 series: MX-2300N, MX-2700N
MX-3500/4500 series: MX-3500N, MX-3501N, MX-4500N, MX-4501N
•This manual contains references to the fax function. However, please note that the fax function is not available in some countries and regions.
•Considerable care has been taken in preparing this manual. If you have any comments or concerns about the manual, please contact your dealer or nearest authorised service representative.
•This product has undergone strict quality control and inspection procedures. In the unlikely event that a defect or other problem is discovered, please contact your dealer or nearest authorised service representative.
•Aside from instances provided for by law, SHARP is not responsible for failures occurring during the use of the product or its options, or failures due to incorrect operation of the product and its options, or other failures, or for any damage that occurs due to use of the product.
Warning
•Reproduction, adaptation or translation of the contents of the manual without prior written permission is prohibited, except as allowed under copyright laws.
•All information in this manual is subject to change without notice.
Illustrations and the operation panel and touch panel shown in this manual
The peripheral devices are generally optional, however, some models include certain peripheral devices as standard equipment. The explanations in this manual assume that a right tray and stand/2 x 500 sheet paper drawer are installed on the MX-2700N (equipped standard with an automatic document feeder).
To further explain certain functions and uses, some explanations assume that additional peripheral devices are installed.
The display screens, messages, and key names shown in the manual may differ from those on the actual machine due to product improvements and modifications.
1

MANUALS PROVIDED WITH THE MACHINE
This manual provides solutions to possible problems. For the detailed procedures for using the machine, see the following manuals.
Printed manuals
Manual name |
Contents |
|
|
|
|
Safety Guide |
This manual contains instructions for using the machine safely and lists the specifications of the machine |
|
and its peripheral devices. |
||
|
||
|
|
|
Software Setup |
This manual explains how to install the software and configure settings to use the machine as a printer or |
|
Guide |
scanner. |
|
|
|
|
|
This manual provides easy-to-understand explanations of all the functions of the machine in a single |
|
Quick Start Guide |
volume. |
|
|
Detailed explanations of each of the functions can be found in the manuals in PDF format. |
|
|
|
|
Troubleshooting |
This manual explains how to remove paper misfeeds and provides answers to frequently asked questions |
|
regarding the operation of the machine in each mode. Refer to this manual when you have difficulty using |
||
(This manual) |
||
the machine. |
||
|
||
|
|
|
|
This manual explains the basic procedures for using the fax function of the machine, and provides an |
|
Facsimile Quick |
overview of the features of the fax function, troubleshooting procedures, and specifications. |
|
Reference Guide |
For detailed information on using the fax function and the system settings for fax, see the "Facsimile |
|
|
Guide" in PDF format. |
|
|
|
Operation manuals in PDF format
The manuals in PDF format provide detailed explanations of the procedures for using the machine in each mode. To view the PDF manuals, download them from the hard drive in the machine. The procedure for downloading the manuals is explained in "How to download the manuals in PDF format" in the Quick Start Guide.
Manual name |
Contents |
|
|
|
|
User's Guide |
This manual provides information, such as basic operation procedures, how to load paper, and machine |
|
maintenance. |
||
|
||
|
|
|
Copier Guide |
This manual provides detailed explanations of the procedures for using the copy function. |
|
|
|
|
Printer Guide |
This manual provides detailed explanations of the procedures for using the printer function. |
|
|
|
|
Facsimile Guide |
This manual provides detailed explanations of the procedures for using the fax function and the "System |
|
Settings" that are related to fax. |
||
|
||
|
|
|
Scanner Guide |
This manual provides detailed explanations of the procedures for using the scanner function and the |
|
Internet fax function. |
||
|
||
|
|
|
Document Filing |
This manual provides detailed explanations of the procedures for using the document filing function. The |
|
document filing function allows you to save the document data of a copy or fax job, or the data of a print |
||
Guide |
||
job, as a file on the machine's hard drive. The file can be called up as needed. |
||
|
||
|
|
|
System Settings |
This manual explains the "System Settings", which are used to configure a variety of parameters to suit |
|
the aims and the needs of your workplace. Current settings can be displayed or printed out from the |
||
Guide |
||
"System Settings". |
||
|
||
|
|
2
REMOVING MISFEEDS
This chapter explains what to do when a paper misfeed occurs in the machine.
Removing misfeeds
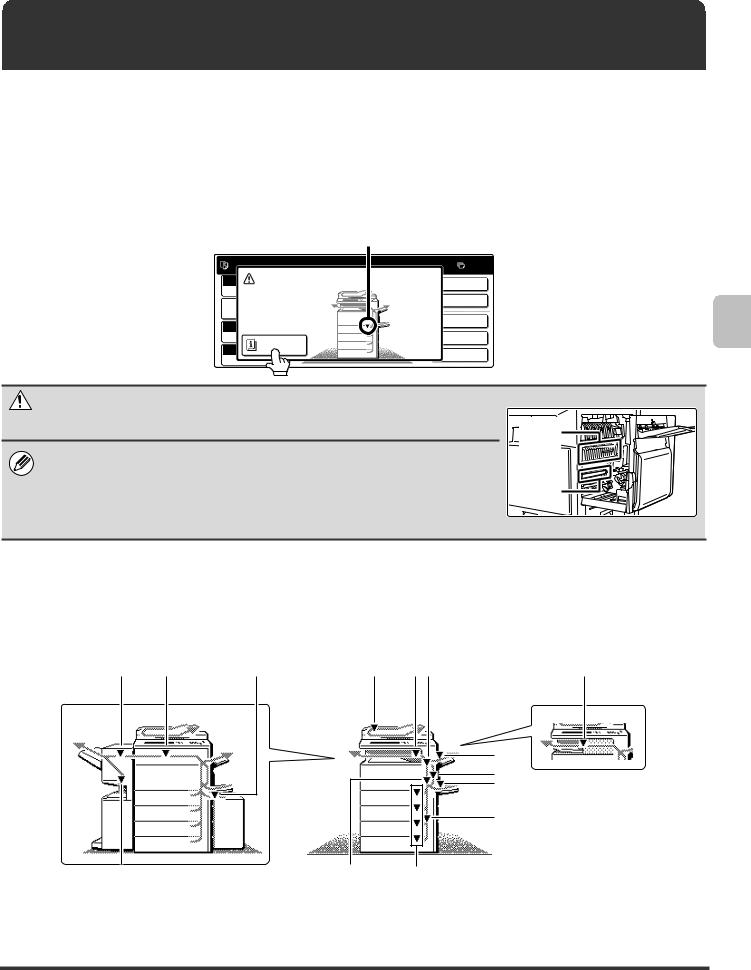
When a paper misfeed occurs, "A misfeed has occurred." appears in the touch panel and printing stops. In this event, touch the [Information] key in the touch panel. When the key is touched, instructions for removing the misfeed will appear. Follow the instructions. (The approximate locations of possible misfeeds are indicated by blinking  marks as shown below.)
Misfeed location
A misfeed has occurred. |
0 |
|
|
Turning M/C off now causes data loss. |
Sided Copy |
Job |
Output |
|
|
|
Special Modes |
Information |
File |
|
|
|
Quick File |
Caution |
|
|
The fusing unit is hot. Take care not to burn yourself when removing a misfeed. |
Fusing |
|
|
area |
|
• When removing misfed paper, do not touch or damage the transfer belt. |
|
|
• Carefully pull the paper out without tearing it. |
Transfer |
|
• A misfeed may have occurred inside the machine. Check carefully and remove the |
||
belt |
||
misfeed. |
|
|
• If the paper tears, be sure to remove all pieces from the machine. |
|
Paper misfeed illustrations
If you require more information when reading the instructions in the touch panel, see the paper misfeed illustrations on the following pages. Refer to the illustration below and then go to the appropriate illustration (1 to 14) for your situation.(1)-(4): page 4, (5)-(10): page 5, (11)-(14): page 6
(11) |
(12) |
(13) |
(1) |
(2)(3) |
(10) |
|
|
|
|
|
(4) |
|
|
|
|
|
(5) |
|
|
|
|
|
(6) |
|
|
|
|
|
(7) |
(14) |
|
|
(8) |
(9) |
|
3

(1) Original misfeed
Open the document feeder cover and remove the misfed originals.
Pull out the document feeder tray and remove the misfed paper.
Open the automatic document feeder. Rotate the transfer roller in the direction of the arrow and remove the original.
(When using the MX-3501N/4501N)
Open the document feeder cover and remove the misfed originals.
Open the automatic document feeder. Rotate the transfer roller in the direction of the arrow and remove the original.
Press switch A to release the cover lock and remove the
misfed original.
A After removing the original, be sure to attach the cover securely.
After removing the misfeed, open and close the automatic document feeder (or the document feeding area cover or document feeder tray) to clear the misfeed display from the touch panel.
(2) Paper misfeed in the output area
(3) Paper misfeed in the fusing unit
Rotate knob and remove the misfed paper.
If the misfed paper is inside the fusing area, turn down the fusing unit open tab to open the fusing unit and remove the misfed paper.
Rotate knob and remove the misfed paper.
 Caution
The fusing unit area is hot. Take care not to burn yourself. (Do not touch any metal parts.)
Unfused toner may remain on the paper that is removed. Take care that it does not soil your hands or clothing.
(4)Paper misfeed in the exit tray unit (right tray)
4

(5) Paper misfeed in the reversing unit
Open the Paper reversing section cover and remove the misfed paper.
(6) Paper misfeed in the bypass tray
(7) Paper misfeed in tray 1 to tray 4 (side)
The misfeed may have occurred inside the machine. Check carefully and remove it.
(8) Paper misfeed in the transport area
Lower the lever in the direction of the arrow to remove the misfed paper.
(9)Paper misfeed in tray 1 to tray 4 (in the tray)
Before pulling the tray out, open the right cover and
check if there is a paper
misfeed. If you pull the tray out without checking, you
may tear misfed paper and make it more difficult to
remove the pieces that remain in the machine.(7) Paper misfeed in tray 1 to tray 4 (side)
(10) Paper misfeed in the finisher
While pressing the lever over to the left, slide the finisher to the left until it stops.
Turn roller rotating knob in the direction of the arrow to remove the misfed paper.
Make sure that there is no misfed paper in the machine.
5
(11)Paper misfeed in the saddle stitch finisher (top)
Open the top cover and remove the misfed paper.
(12) Paper misfeed in the paper pass unit
Pull out the paper pass unit and remove the misfed paper.
Check the paper reversing section inside the tray and remove any misfed paper. *A misfeed has occurred inside the machine. Look inside to check.
(13) Paper misfeed in the large capacity tray
While holding the tray release lever, carefully slide the large capacity tray away from the main unit until it stops.
(14)Paper misfeed in the saddle stitch finisher (bottom)
While pulling the lever, slide the saddle stitch finisher to the left until it stops.
Turn knob until a blue indication is seen.
Open the finisher right cover and remove the misfed paper.
Rotate knob and remove the misfed paper.
6

COPYING
This chapter provides solutions to possible copying problems. See the following table of contents to locate the appropriate page for your question or problem.
Problems Related to Copying Operation
• Copying does not take place. . . . . . . . . . . . . . . . . . . . . . . . . . . . . . . . . . . . . . . . . . . . . . . . . . . . . . . . . . 7
• Auto selection of the colour mode does not take place. . . . . . . . . . . . . . . . . . . . . . . . . . . . . . . . . . . . . . 7
• Image rotation does not take place. . . . . . . . . . . . . . . . . . . . . . . . . . . . . . . . . . . . . . . . . . . . . . . . . . . . . 8
•Two-sided copying does not take place.. . . . . . . . . . . . . . . . . . . . . . . . . . . . . . . . . . . . . . . . . . . . . . . . . 8
•The paper size of a tray cannot be set.. . . . . . . . . . . . . . . . . . . . . . . . . . . . . . . . . . . . . . . . . . . . . . . . . . 8
Problems Related to Copy Results
• The image is too light or too dark.. . . . . . . . . . . . . . . . . . . . . . . . . . . . . . . . . . . . . . . . . . . . . . . . . . . . . . 9
• Colours are off. . . . . . . . . . . . . . . . . . . . . . . . . . . . . . . . . . . . . . . . . . . . . . . . . . . . . . . . . . . . . . . . . . . . . 9
• Part of the image is cut off. . . . . . . . . . . . . . . . . . . . . . . . . . . . . . . . . . . . . . . . . . . . . . . . . . . . . . . . . . . . 9
•Copies come out blank. . . . . . . . . . . . . . . . . . . . . . . . . . . . . . . . . . . . . . . . . . . . . . . . . . . . . . . . . . . . . . 9
•If you cannot find the item that you are looking for in the above table of contents, see "OTHER PROBLEMS" (page 27).
•If you are unable to solve a problem using the solutions in this manual, switch off the [POWER] key ( ) and the main power switch. Wait at least 10 seconds, and then switch on the main power switch and the [POWER] key (
 ) in that order.
*When the LINE indicator is lit or the DATA indicator is lit or blinking, do not switch off the main power switch or unplug the power plug. This may damage the hard drive or cause the data being stored or received to be lost.
Problems Related to Copying Operation
Problem |
|
Point to check |
Solution |
|
|
|
|
|
|
Copying does not take |
|
Have functions been disabled by the |
When user authentication is enabled, the functions that |
|
place. |
|
administrator? |
you can use may be restricted in your user settings. |
|
|
|
|
Check with your administrator. |
|
Auto selection of the |
|
|
|
|
|
Are you using one of the following types |
When the colour mode is set to "Auto", the machine |
||
colour mode does not |
|
of originals? |
detects whether the original is black and white or colour |
|
take place. |
|
Black & White is not selected |
when the [COLOUR START] key ( |
) is pressed. |
|
|
• Are there colours or colouring in the |
However, when an original similar to one of those at left |
|
|
|
paper? |
is used, automatic detection may not give the correct |
|
|
|
Colour is not selected |
result. In this event, specify the colour mode manually. |
|
|
|
• The colour in the original is very light. |
|
|
|
|
• The colour in the original is very dark, |
|
|
|
|
almost black. |
|
|
|
|
• Is only a very small area of the |
|
|
|
|
original coloured? |
|
|
|
|
|
|
|
7

Problem |
|
Point to check |
Solution |
|
|
|
|
|
|
Image rotation does |
|
Did you select the paper size or copy |
Copy using automatic paper selection and automatic |
|
not take place. |
|
ratio manually? |
ratio selection. |
|
|
|
|
|
|
|
|
Are you copying using settings that do |
Rotate copying can generally be combined with other |
|
|
|
not allow rotate copying? |
special modes, however, some combinations are not |
|
|
|
|
possible. If a prohibited combination is selected, a |
|
|
|
|
message will appear in the touch panel. |
|
|
|
|
|
|
|
|
Is "Rotation Copy Setting" disabled in |
Check with your administrator. |
|
|
|
the system settings (administrator)? |
If you are the administrator, enable "Rotation Copy |
|
|
|
|
Setting". |
|
|
|
|
System Settings (Administrator) > "Copy Settings" > |
|
|
|
|
"Rotation Copy Setting" > |
|
Two-sided copying |
|
|
|
|
|
Does the paper type setting of the |
Check "Tray Settings" in the system settings. If the |
||
does not take place. |
|
selected tray specify a type of paper that |
[Disable Duplex] checkbox is selected |
, two-sided |
|
|
cannot be used for two-sided copying? |
copying using that tray will not be possible. Change the |
|
|
|
|
paper type setting to a type that can be used for |
|
|
|
|
two-sided printing. |
|
|
|
|
System Settings > "Paper Tray Settings" > "Tray |
|
|
|
|
Settings" |
|
|
|
|
|
|
|
|
Are you using a special size or type of |
For the paper types and sizes that can be used for |
|
|
|
paper? |
two-sided copying, see "SPECIFICATIONS" in the |
|
|
|
|
Safety Guide. |
|
|
|
|
|
|
|
|
Are you copying using settings that do |
Two-sided copying can generally be combined with |
|
|
|
not allow two-sided copying? |
other special modes, however, some combinations are |
|
|
|
|
not possible. If a prohibited combination is selected, a |
|
|
|
|
message will appear in the touch panel. |
|
|
|
|
|
|
|
|
Have functions been disabled by the |
Some functions may have been disabled in the system |
|
|
|
administrator? |
settings (administrator). Check with your administrator. |
|
|
|
|
When user authentication is enabled, the functions that |
|
|
|
|
you can use may be restricted in your user settings. |
|
|
|
|
Check with your administrator. |
|
The paper size of a |
|
|
|
|
|
Have functions been disabled by the |
Some functions may have been disabled in the system |
||
tray cannot be set. |
|
administrator? |
settings (administrator). Check with your administrator. |
|
|
|
|
|
|
8
Problems Related to Copy Results
Problem |
|
Point to check |
Solution |
|
|
|
|
The image is too light |
|
Is the image too light or too dark? |
Select an appropriate exposure mode for the original |
or too dark. |
|
|
being copied and adjust the exposure level manually. |
|
|
|
|
|
|
Has an appropriate exposure mode for |
A satisfactory copy result can be obtained by selecting a |
|
|
the original type been selected? |
suitable exposure mode for the original type. Select one |
|
|
|
of the following modes depending on the original type. |
|
|
|
• Text |
|
|
|
Use this mode for regular text documents. |
|
|
|
• Text/Prtd.Photo |
|
|
|
This mode provides the best balance for copying an |
|
|
|
original which contains both text and printed |
|
|
|
photographs, such as a magazine or catalogue. |
|
|
|
• Text/Photo |
|
|
|
This mode provides the best balance for copying an |
|
|
|
original which contains both text and photographs, |
|
|
|
such as a text document with a photo pasted on. |
|
|
|
• Printed Photo |
|
|
|
This mode is best for copying printed photographs, |
|
|
|
such as photos in a magazine or catalogue. |
|
|
|
• Photo |
|
|
|
Use this mode to copy photos. |
|
|
|
• Map |
|
|
|
This mode is best for copying the light colour shading |
|
|
|
and fine text found on most maps. |
|
|
|
• Light original |
|
|
|
Use this mode for originals with light pencil writing. |
Colours are off. |
|
|
|
|
Did you perform "Registration |
Ask your administrator to perform "Registration |
|
|
|
Adjustment"? |
Adjustment". |
|
|
|
System Settings (Administrator) > "Device Control" > |
|
|
|
"Registration Adjustment" > "Auto Adjustment" |
|
|
|
If the colour tones are off, perform "Auto Colour |
|
|
|
Calibration". (If the colours are still off after calibration, |
|
|
|
repeating calibration may improve the results.) |
|
|
|
System Settings (Administrator) > "Copy Settings" > |
|
|
|
"Auto Colour Calibration" |
Part of the image is |
|
|
|
|
Has an appropriate ratio been selected |
Select an appropriate ratio setting. |
|
cut off. |
|
for the original size and paper size? |
|
|
|
|
|
|
|
Are you using an Inch (AB) paper size? |
When copying on an Inch (AB) paper size, specify the |
|
|
|
original size manually. |
Copies come out |
|
|
|
|
Is the original placed face up or face |
When using the document glass, the original must be |
|
blank. |
|
down correctly? |
placed face down. When using the automatic document |
|
|
|
feeder, the original must be placed face up. |
|
|
|
|
9

PRINTING
This chapter provides solutions to possible printing problems. See the following table of contents to locate the appropriate page for your question or problem.
Problems Related to Printing Operation
• Printing does not take place.. . . . . . . . . . . . . . . . . . . . . . . . . . . . . . . . . . . . . . . . . . . . . . . . . . . . . . . . . 10
• Colour printing does not take place. . . . . . . . . . . . . . . . . . . . . . . . . . . . . . . . . . . . . . . . . . . . . . . . . . . . 12
• Two-sided printing does not take place. . . . . . . . . . . . . . . . . . . . . . . . . . . . . . . . . . . . . . . . . . . . . . . . . 12
• A tray, finisher, or other peripheral device installed on the machine cannot be used. . . . . . . . . . . . . . 13
Problems Related to Print Results
• The image is grainy. . . . . . . . . . . . . . . . . . . . . . . . . . . . . . . . . . . . . . . . . . . . . . . . . . . . . . . . . . . . . . . . 13
• The image is too light or too dark.. . . . . . . . . . . . . . . . . . . . . . . . . . . . . . . . . . . . . . . . . . . . . . . . . . . . . 13
• Colours are off. . . . . . . . . . . . . . . . . . . . . . . . . . . . . . . . . . . . . . . . . . . . . . . . . . . . . . . . . . . . . . . . . . . . 13
• Text and lines are faint and difficult to see.. . . . . . . . . . . . . . . . . . . . . . . . . . . . . . . . . . . . . . . . . . . . . . 13
• Part of the image is cut off. . . . . . . . . . . . . . . . . . . . . . . . . . . . . . . . . . . . . . . . . . . . . . . . . . . . . . . . . . . 14
• The image is upside down. . . . . . . . . . . . . . . . . . . . . . . . . . . . . . . . . . . . . . . . . . . . . . . . . . . . . . . . . . . 14
• Many nonsense characters are printed. . . . . . . . . . . . . . . . . . . . . . . . . . . . . . . . . . . . . . . . . . . . . . . . . 15
•If you cannot find the item that you are looking for in the above table of contents, see "OTHER PROBLEMS" (page 27).
•If you are unable to solve a problem using the solutions in this manual, switch off the [POWER] key ( ) and the main power switch. Wait at least 10 seconds, and then switch on the main power switch and the [POWER] key (
 ) in that order.
*When the LINE indicator is lit or the DATA indicator is lit or blinking, do not switch off the main power switch or unplug the power plug. This may damage the hard drive or cause the data being stored or received to be lost.
Problems Related to Printing Operation
Problem |
|
Point to check |
Solution |
|
|
|
|
Printing does not take |
|
Is your computer connected correctly to |
Make sure that the cable is connected securely to the |
place. |
|
the machine? |
LAN connector or the USB connector on your computer |
|
|
|
and the machine. |
|
|
|
If you are on a network, check the connections at the |
|
|
|
hub as well. |
|
|
|
Illustration of the machine (L) and (M) (page 37) |
|
|
|
|
|
|
Is the machine connected to the same |
The machine must be connected to the same network |
|
|
network (LAN, etc.) as your computer? |
as your computer. |
|
|
|
If you do not know which network the machine is |
|
|
|
connected to, ask the network administrator. |
|
|
|
|
10

Problem |
|
Point to check |
Solution |
|
|
|
|
Printing does not take |
|
Is the IP address selected correctly? |
If the machine does not have a permanent IP address |
place. |
|
(Windows) |
(the machine receives an IP address from a DHCP |
|
|
|
server), printing will not be possible if the IP address |
|
|
|
changes. Print the "All Custom Setting List" in the |
|
|
|
system settings and check the IP address of the |
|
|
|
machine. If the IP address has changed, change the |
|
|
|
port setting in the printer driver. |
|
|
|
System Settings > "List Print (User)" > "All Custom |
|
|
|
Setting List" |
|
|
|
Software Setup Guide |
|
|
|
If the IP address changes frequently, it is recommended |
|
|
|
that a permanent IP address be assigned to the machine. |
|
|
|
System Settings (Administrator) > "Network Settings" |
|
|
|
> "IP Address Setting" |
|
|
|
|
|
|
Is AppleTalk active? |
In Mac OS X, click [Network] in [System Preferences] |
|
|
(Macintosh) |
and select "Built-in Ethernet" in "Show". Click the |
|
|
|
[AppleTalk] tab and make sure that [Make AppleTalk |
|
|
|
Active] is selected. |
|
|
|
In Mac OS 9.0 to 9.2.2, open the [Chooser] from the |
|
|
|
Apple menu and make sure that [Active] is selected. |
|
|
|
Printing is not possible if [Active] is not selected. |
|
|
|
Ask your administrator to check if "Enable EtherTalk" is |
|
|
|
enabled in the system settings (administrator). (The |
|
|
|
factory default setting is "Enable".) |
|
|
|
System Settings (Administrator) > "Network Settings" |
|
|
|
> "Enable EtherTalk" > |
|
|
|
|
|
|
Is "Connect via" set to [Ethernet] for |
Open [AppleTalk] from the [Control Panels] and make |
|
|
AppleTalk? |
sure that [Ethernet] is selected in the "Connect via" |
|
|
(Mac OS 9.0-9.2.2) |
menu. Printing is not possible if [Ethernet] is not selected. |
|
|
|
|
|
|
Is your computer in an unstable state? |
Printing is sometimes not possible when you run |
|
|
|
multiple applications at once or there is insufficient |
|
|
|
memory or hard drive space. Restart your computer. |
|
|
|
|
|
|
Is the machine specified correctly in the |
Make sure that the printer driver of the machine is |
|
|
software application that you are using |
selected in the Print window of the application. |
|
|
for printing? |
If the printer driver does not appear in the list of |
|
|
|
available printer drivers, it may not be installed correctly. |
|
|
|
Remove the printer driver and then install it once again. |
|
|
|
INSTALLATION (page 24) |
|
|
|
|
|
|
Are the network connection devices |
Make sure that the routers and other network |
|
|
operating normally? |
connection devices are operating correctly. If a device is |
|
|
|
not powered on or is in an error state, see the manual of |
|
|
|
the device to correct the problem. |
|
|
|
|
|
|
Is the I/O timeout setting too short? |
If the I/O timeout setting is too short, errors may occur |
|
|
|
while writing to the printer. Ask the administrator of the |
|
|
|
machine to configure an appropriate time in "I/O Timeout". |
|
|
|
System Settings (Administrator) > "Printer Settings" > |
|
|
|
"Interface Settings" > "I/O Timeout" |
|
|
|
|
11

Problem |
|
Point to check |
Solution |
|
|
|
|
|
|
Printing does not take |
|
Was a Notice Page printed? |
A Notice Page will be printed to indicate the cause of the |
|
place. |
|
|
problem if a print job cannot be performed as specified |
|
|
|
|
and the cause is not shown in the display. Read the |
|
|
|
|
printed page and take appropriate action. |
|
|
|
|
For example, a notice page will be printed in the |
|
|
|
|
following situations. |
|
|
|
|
• The print job is too large to fit in memory. |
|
|
|
|
• A function that has been prohibited by the |
|
|
|
|
administrator is specified. |
|
|
|
|
* By factory default, Notice Pages are not printed. |
|
|
|
|
|
|
|
|
Have functions been disabled by the |
When user authentication is enabled, the functions that |
|
|
|
administrator? |
you can use may be restricted in your user settings. |
|
|
|
|
Check with your administrator. |
|
Colour printing does |
|
|
|
|
|
Is the colour mode set to "Color"? |
Select "Automatic" or "Color" for the colour mode |
|
|
not take place. |
|
|
setting. |
|
|
|
|
The colour mode setting is configured as follows: |
|
|
|
|
Windows: |
|
|
|
|
On the [Color] tab of the printer driver. |
|
|
|
|
Macintosh: |
|
|
|
|
In the [Color] menu of the print window. |
|
|
|
|
(In Mac OS X v10.1.5, the [Color] tab of [Printer |
|
|
|
|
Features].) |
|
|
|
|
In Windows, [Black and White Print] can also be |
|
|
|
|
selected on the [Main] tab of the printer driver. If you |
|
|
|
|
wish to print in colour, make sure that the [Black and |
|
|
|
|
White Print] checkbox on the [Main] tab is not selected |
|
|
|
|
. |
|
|
|
|
|
|
|
|
Have functions been disabled by the |
When user authentication is enabled, the functions that |
|
|
|
administrator? |
you can use may be restricted in your user settings. |
|
|
|
|
Check with your administrator. |
|
Two-sided printing |
|
|
|
|
|
Does the paper type setting of the |
Check "Tray Settings" in the system settings. |
|
|
does not take place. |
|
selected tray specify a type of paper that |
If the [Disable Duplex] checkbox is selected |
, |
|
|
cannot be used for two-sided printing? |
two-sided printing using that tray will not be possible. |
|
|
|
|
Change the paper type setting to a type that can be |
|
|
|
|
used for two-sided printing. |
|
|
|
|
System Settings > "Paper Tray Settings" > "Tray |
|
|
|
|
Settings" |
|
|
|
|
|
|
|
|
Are you using a special size or type of |
For the paper types and sizes that can be used for |
|
|
|
paper? |
two-sided printing, see "SPECIFICATIONS" in the |
|
|
|
|
Safety Guide. |
|
|
|
|
|
|
|
|
Have functions been disabled by the |
Some functions may have been disabled in the system |
|
|
|
administrator? |
settings (administrator). Check with your administrator. |
|
|
|
|
When user authentication is enabled, the functions that |
|
|
|
|
you can use may be restricted in your user settings. |
|
|
|
|
Check with your administrator. |
|
|
|
|
|
|
12
Loading...