


Digital Cordless Telephone
SP-R5200
User’s Manual
Your battery is guaranteed for six months. When you purchase the unit, you should fully charge the battery before initial operation.
Printed in Korea
Code No.: GG68-00059A
U.K. 4/99. Rev.1.0
Downloaded from www.Manualslib.com manuals search engine

Safety Precautions and Important Notices
When using your telephone, these basic safety precautions should always be followed to reduce risk of fire, electric shock, and injury.
1.Never push objects of any kind into your telephone through case or cabinet openings. They may touch dangerous voltage points resulting in risk of fire or shock.
2.To reduce the risk of electric shock, do not disassemble your telephone. Take it to a qualified service technician when repair work is required. Opening or removing covers may expose you to dangerous voltage or other risks. Incorrect reassembly could cause electric shock when the unit is subsequently used.
3.Unplug this unit from the telephone jack and wall outlet, and refer servicing to qualified service personnel under the following conditions:
•When the power supply cord, plug, or adaptor is damaged or frayed.
•If liquid has been spilled into the product.
•If the product has been exposed to rain or water.
•If the product does not operate properly after instructions have been followed.
•If the product has been dropped, or the cabinet appears damaged.
•If the product exhibits a distinct change in performance.
2 Digital Cordless Telephone
4.Avoid using your telephone during a lightning storm. There may be a remote risk of electric shock from lightning. If possible, unplug the AC adaptor and telephone cord for the duration of the lightning storm.
5.Never dispose of batteries in a fire. There is a serious risk of explosion and / or the release of highly toxic chemicals. Dispose of used batteries in accordance with local regulations.
6.When going on holiday or not using the phone for a long period of time, please disconnect the mains power from the base and remove the batteries from the handset.
7.If the handset is not used for a long time and the battery becomes fully discharged, please recharge the handset for a minimum of 30 hours before using again.
8.If the battery is self-discharged because it has not been used, the operational life of the battery may be reduced. To recover the full storage capacity of the battery, recharge the battery for a minimum of 30 hours and use until it is fully discharged. This process needs to be repeated several times.
9.This unit requires rechargeable Ni-MH batteries. Do not use alkaline batteries.
Digital Cordless Telephone |
3 |
Downloaded from www.Manualslib.com manuals search engine

10.Clean the charge points with a dry cloth from time to time.
11.Ringer Equivalence Number (REN)-1.0.
The REN is a customer guide indicating approximately the maximum number of items of apparatus that should be connected simultaneously to the line. The sum of REN’s of the individual items should not exceed a total value of 4.
12.You can use this equipment to make 999, 112 emergency calls.
13.You can use this equipment on a telecommunication system that uses Loop Disconnect or DTMF signalling.
It is strongly recommended that the equipment is configured to use DTMF signalling for access to public or private emergency services. DTMF signalling also provides faster call setup.
14.If you are connected to a Private Branch Exchange, you may have to press a digit, for example “9”, to get an outside line. Then you dial as normal. If you need a pause, you should insert it after the digit and before the number you require.
4 Digital Cordless Telephone
15.You may sometimes experience problems in making calls. These difficulties can include:
•Line connection problems.
•Problems hearing the conversation on both ends of the line.
16.This equipment will NOT work at all if the mains or battery supply is removed.
17.You can connect the equipment to the telecommunication systems specified as long as you follow the instructions in this manual.
18.This equipment has been approved for use with the following facilities:
•Last Number Redial.
•Call Barring.
•Memory Dial.
Any other use will invalidate the approval of the equipment and it then ceases to comply with the standards against which approval was granted.
19. SAVE THESE INSTRUCTIONS.
Digital Cordless Telephone |
5 |
Downloaded from www.Manualslib.com manuals search engine

Table of Contents |
|
|
BEFORE USING |
|
|
Checking Parts ........................................................................................ |
8 |
|
Control Locations .................................................................................... |
9 |
|
Handset |
.............................................................................................. |
9 |
Base ................................................................................................. |
|
10 |
Connecting Lines ................................................................................... |
11 |
|
Installing Handset Batteries .................................................................... |
12 |
|
Charging the Handset ............................................................................ |
14 |
|
Using the Handset Carrying Clip ............................................................. |
15 |
|
To Attach the Carrying Clip................................................................... |
15 |
|
To Remove the Carrying Clip................................................................ |
15 |
|
Turning the Handset On/Off................................................................... |
16 |
|
LCD Window Icon Descriptions................................................................. |
17 |
|
Choosing |
Dial Mode................................................................................ |
17 |
BASIC OPERATION |
|
|
Making a Call ........................................................................................ |
18 |
|
Camp on Busy ....................................................................................... |
20 |
|
Receiving a Call ..................................................................................... |
21 |
|
Caller ID Display .................................................................................... |
22 |
|
Out of Range Indication ......................................................................... |
23 |
|
Battery Level Indicator .......................................................................... |
23 |
|
Adjusting Voice Volume .......................................................................... |
24 |
|
Choosing Ring Type ................................................................................ |
24 |
|
Adjusting Ring Volume............................................................................ |
25 |
|
Key Lock |
............................................................................................... |
26 |
INTERNAL PHONE BOOK |
|
|
Memory Dialing ..................................................................................... |
27 |
|
To Store (or Edit) Numbers In Memory ................................................ |
27 |
|
Using a Pause .................................................................................... |
28 |
|
To Dial a Number In Memor y ............................................................. |
28 |
|
To Search For a Number In Memory .................................................... |
28 |
|
To Erase All Numbers In Memor y ........................................................ |
29 |
|
6 |
Digital Cordless Telephone |
|
INTERNAL PHONE BOOK (continued) |
|
Call Log .................................................................................................. |
29 |
To View and Dial the Numbers ............................................................ |
29 |
To Erase All Numbers Received ........................................................... |
30 |
Last Number Redial ............................................................................... |
30 |
To View and Dial the Numbers ............................................................ |
30 |
To Erase All Numbers In Redial Memory .............................................. |
31 |
USEFUL FEATURES |
|
Call Time Display On/Off ....................................................................... |
32 |
Key Beep On/Off .................................................................................. |
32 |
Base Number Display On/Off ................................................................ |
33 |
Setting Ring Delay Time.......................................................................... |
34 |
Changing PIN ........................................................................................ |
35 |
Tone Dial Switchover .............................................................................. |
36 |
Registered Recall ................................................................................... |
37 |
Barring Calls .......................................................................................... |
37 |
To Set Call Barring Numbers ............................................................... |
38 |
To Deactivate a Specific Call Barring Number........................................ |
39 |
Reset ..................................................................................................... |
40 |
USING ON MULTI SYSTEM |
|
Registering New Handset with Base ........................................................ |
41 |
To Register a Handset ......................................................................... |
41 |
To Remove a Handset Registered To the Base Unit ............................... |
43 |
Paging................................................................................................... |
44 |
Intercom Between Handsets ................................................................... |
44 |
Call Transfer .......................................................................................... |
46 |
Operating with Additional Base Unit ....................................................... |
47 |
To Find the Base unit Automatically ..................................................... |
47 |
To Select the Base Unit Manually ........................................................ |
48 |
Troubleshooting ..................................................................................... |
49 |
Specifications ......................................................................................... |
50 |
Digital Cordless Telephone |
7 |
Downloaded from www.Manualslib.com manuals search engine

Checking Parts
Once you have unpacked your phone, check to make sure that you have all the parts shown below. If any piece is missing or broken, please call your dealer.
Base |
Handset |
Adaptor |
Line Cord |
Two AA Batteries |
User’s Manual |
(Rechargeable Ni-MH batteries)
Carrying Clip
8 Digital Cordless Telephone
Control Locations
Handset
Microphone
Antenna
Ear piece
LCD window
button
Makes, answers, or ends a call.
INT button
Activates intercom communications.
or  button
Scrolls through menus. Also adjusts volume.
C/R button
Clears characters from the display. Also performs a switch-hook operation such as call waiting.
button
Confirms the selection. Also powers on/off.
button
Redials the last number you dialed. Also adds a pause when storing a number in memory.
Rear Lamp
Carrying clip
Battery cover
Charging points
Digital Cordless Telephone |
9 |
Downloaded from www.Manualslib.com manuals search engine

Base
Paging button
Allows you to page the handset. Also used to register a new handset with the base.
Line lamp
Blinks when a call comes in and lights steadily when a call is in progress.
Base Bottom
DC POWER socket
Phone Line socket
10 Digital Cordless Telephone
Connecting Lines
1.Connect one end of the telephone line cord to the phone line socket on the bottom of the base unit, and the other end to a standard phone wall jack.
2.Connect the modular end of the power adapter to the DC power socket on the bottom of the base unit, and the other end to a standard AC wall outlet.
To AC wall outlet |
|
To phone wall jack |
|
|
|
3. Route the cords through the recessed channel as shown.
Digital Cordless Telephone |
11 |
Downloaded from www.Manualslib.com manuals search engine
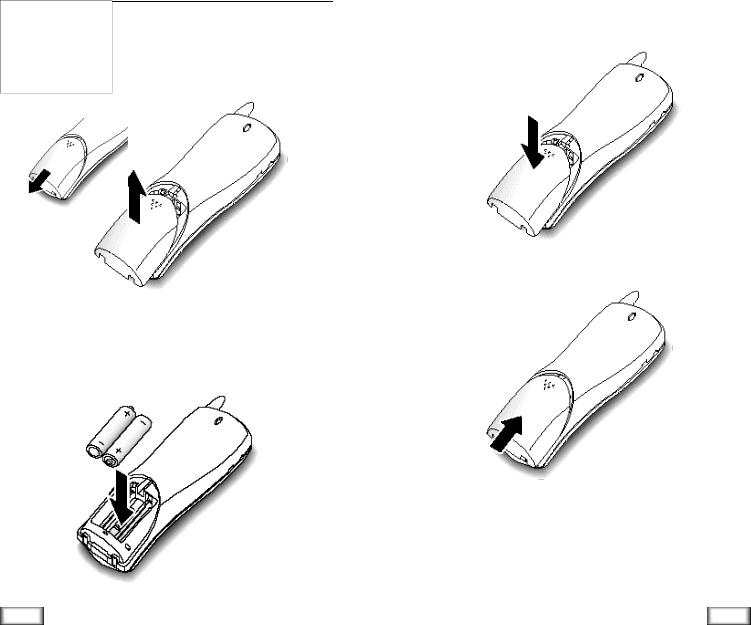
Installing Handset Batteries
The handset uses the two AA size rechargeable Ni-MH batteries supplied.
1.Slide the battery cover in the direction of the arrow, then lift it off.
2.Remove old batteries if any, then insert new batteries observing correct polarity ( + , - ). Reversing the orientation may damage the handset.
12 Digital Cordless Telephone
3.Replace the battery cover. Make sure that the cover is hooked in place.
4. Slide the cover up until it snaps shut.
Notes:
•The batteries need to be replaced if they do not recover their full storage capacity after recharging.
•When replacing batteries, always use good quality Ni-MH rechargeable AA size batteries. For details, see ‘Specifications’ on page 50. Never use other batteries or conventional alkaline batteries.
Digital Cordless Telephone |
13 |
Downloaded from www.Manualslib.com manuals search engine

Charging the Handset
Before initial operation, you should fully charge the handset for more than 30 hours.
To charge the handset, simply place it on the base unit. The handset can be charged either face up or face down.
Result: When the handset batteries are charging, the handset automatically turns on and the battery icon on the left corner of the display is scrolling.
The lamp comes on while charging.
14 Digital Cordless Telephone
Using the Handset Carrying Clip
The supplied handset carrying clip allows you to conveniently carry the handset with you. It clips easily to your belt, waist band, or shirt pocket.
To Attach the Carrying Clip
Attach the carrying clip to the back of the handset. The carrying clip fits into the grooves on the back of the handset as shown. Make sure that the carrying clip locks into place.
To Remove the Carrying Clip
Insert a coin or screw driver into the slot along the edge of one of its arms, and twist to release. Then lift it off.
Digital Cordless Telephone |
15 |
Downloaded from www.Manualslib.com manuals search engine
 Loading...