


 Loading...
SP-M205 SP-M225 SP-M255 SP-M275 SP-M305
LCD Projector
Owner’s Instructions
The color and the appearance of the product may differ from the illustrations in this manual. The specifications are subject to change without prior notice to improve performance.

Table Of Contents
MAJOR SAFETY PRECAUTIONS
Before You Start . . . . . . . . . . . . . . . . . . . . . . . . . . . . . . . . . . . . . . . . . . . 1-1
Care and Maintenance . . . . . . . . . . . . . . . . . . . . . . . . . . . . . . . . . . . . . . 1-2
Safety Precautions . . . . . . . . . . . . . . . . . . . . . . . . . . . . . . . . . . . . . . . . . 1-3
INSTALLATION AND CONNECTION
Package Contents . . . . . . . . . . . . . . . . . . . . . . . . . . . . . . . . . . . . . . . . . |
2-1 |
Installing the Projector . . . . . . . . . . . . . . . . . . . . . . . . . . . . . . . . . . . . . . |
2-2 |
Leveling with Adjustable Feet . . . . . . . . . . . . . . . . . . . . . . . . . . . . . . . |
2-3 |
Zoom and Focus Adjustment . . . . . . . . . . . . . . . . . . . . . . . . . . . . . . . . |
2-4 |
Screen Size and Projection Distance . . . . . . . . . . . . . . . . . . . . . . . . . |
2-5 |
Lamp Replacement . . . . . . . . . . . . . . . . . . . . . . . . . . . . . . . . . . . . . . . . . |
2-6 |
Rear Side . . . . . . . . . . . . . . . . . . . . . . . . . . . . . . . . . . . . . . . . . . . . . . . . . |
2-7 |
Supported Display Modes . . . . . . . . . . . . . . . . . . . . . . . . . . . . . . . . . . . |
2-8 |
Connecting the Power . . . . . . . . . . . . . . . . . . . . . . . . . . . . . . . . . . . . . . |
2-9 |
Connecting with a PC and Setting up the PC . . . . . . . . . . . . . . . . . . |
2-10 |
Connecting a PC using an HDMI/DVI cable . . . . . . . . . . . . . . . . . . . . |
2-11 |
Connecting an HDMI-Compatible Device . . . . . . . . . . . . . . . . . . . . . . |
2-12 |
Connecting an AV device using a D-Sub cable . . . . . . . . . . . . . . . . . |
2-13 |
Connecting an AV device with Component output . . . . . . . . . . . . . . |
2-14 |
Connecting using a Video cable . . . . . . . . . . . . . . . . . . . . . . . . . . . . . |
2-15 |
Connecting an External Speaker . . . . . . . . . . . . . . . . . . . . . . . . . . . . |
2-16 |
Connecting to a Network . . . . . . . . . . . . . . . . . . . . . . . . . . . . . . . . . . |
2-17 |
Kensington Lock slot . . . . . . . . . . . . . . . . . . . . . . . . . . . . . . . . . . . . . . |
2-18 |
USING
Product Features . . . . . . . . . . . . . . . . . . . . . . . . . . . . . . . . . . . . . . |
. . . . 3-1 |
Front, Upper . . . . . . . . . . . . . . . . . . . . . . . . . . . . . . . . . . . . . . . . . . |
. . . . 3-2 |
Remote Control . . . . . . . . . . . . . . . . . . . . . . . . . . . . . . . . . . . . . . . . |
. . . 3-3 |
LED Indications . . . . . . . . . . . . . . . . . . . . . . . . . . . . . . . . . . . . . . . . |
. . . 3-4 |
Using the Screen Adjustment Menu (OSD: On Screen Display) |
. . . . 3-5 |
Network Management . . . . . . . . . . . . . . . . . . . . . . . . . . . . . . . . . . . |
. . . 3-6 |
MEDIA PLAY FUNCTION
Connecting a USB Storage Device and Precautions . . . . . . . . . . . . . |
4-1 |
Documents . . . . . . . . . . . . . . . . . . . . . . . . . . . . . . . . . . . . . . . . . . . . . . . |
4-2 |
Photo . . . . . . . . . . . . . . . . . . . . . . . . . . . . . . . . . . . . . . . . . . . . . . . . . . . |
4-3 |
Music . . . . . . . . . . . . . . . . . . . . . . . . . . . . . . . . . . . . . . . . . . . . . . . . . . . |
4-4 |
Movie . . . . . . . . . . . . . . . . . . . . . . . . . . . . . . . . . . . . . . . . . . . . . . . . . . . . |
4-5 |
Settings . . . . . . . . . . . . . . . . . . . . . . . . . . . . . . . . . . . . . . . . . . . . . . . . . . |
4-6 |
Supported File Formats . . . . . . . . . . . . . . . . . . . . . . . . . . . . . . . . . . . . . |
4-7 |
TROUBLESHOOTING
Before Requesting Service . . . . . . . . . . . . . . . . . . . . . . . . . . . . . . . . . . |
5-1 |
MORE INFORMATION
Specifications . . . . . . . . . . . . . . . . . . . . . . . . . . . . . . . . . . . . . . . . . . . . . 6-1 RS232C Command Table . . . . . . . . . . . . . . . . . . . . . . . . . . . . . . . . . . . . 6-2 Contact SAMSUNG WORLDWIDE . . . . . . . . . . . . . . . . . . . . . . . . . . . . . 6-3 Correct Disposal - Europe only . . . . . . . . . . . . . . . . . . . . . . . . . . . . . . . 6-4

1 Major Safety Precautions
1-1 Before You Start
Icons used in this manual
ICON |
NAME |
MEANING |
|
|
|
|
Caution |
Indicates cases where the function may not work or the setting may be canceled. |
|
|
|
|
Note |
Indicates a hint or tip to operate a function. |
|
|
|
Using this Manual
•Make yourself fully aware of the safety precautions before using this product.
•The contents of this manual are subject to change without prior notice for performance improvement.
•If a problem occurs, refer to the 'Troubleshooting' section.
Copyright Notice
Copyright © 2010 Samsung Electronics Co., Ltd. All rights reserved.
The copyright of this manual is reserved by Samsung Electronics, Co., Ltd.
The contents of this manual may not be partially or in whole reproduced, distributed or used in any form without the written permission of Samsung Electronics, Co., Ltd.
Major Safety Precautions |
1-1 |
1-2 Care and Maintenance
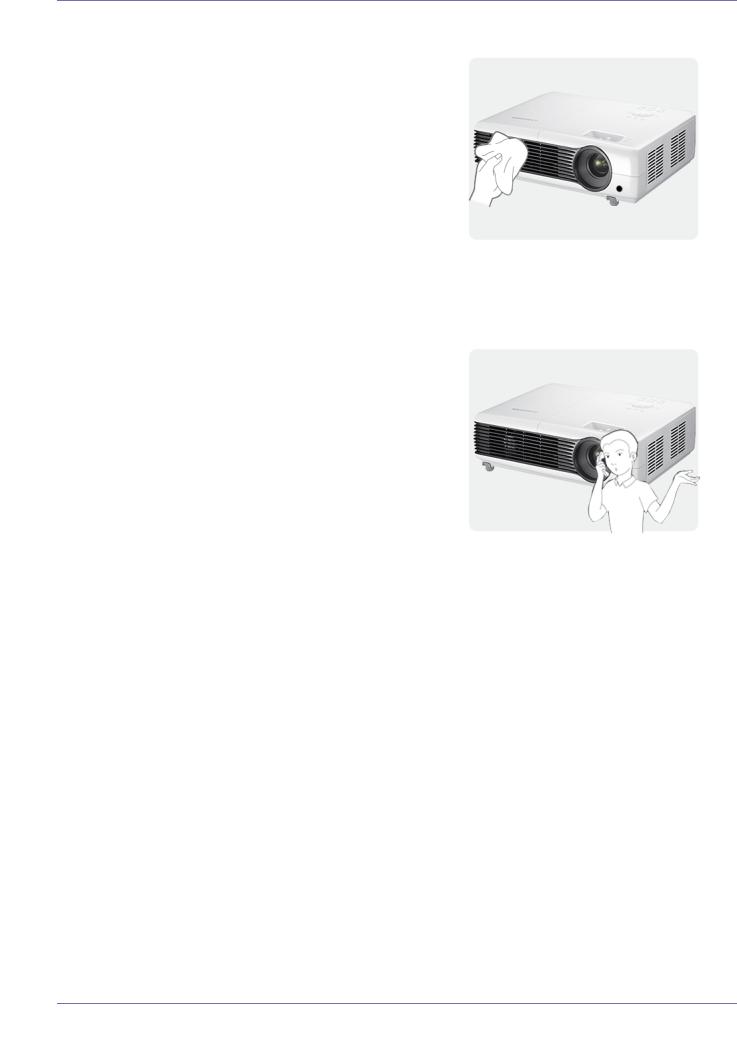
Cleaning the Surface and the Lens
Clean the projector using a soft dry cloth.
•Avoid cleaning the product with a flammable substance such as benzene or thinner.
•Avoid scratching the lens with your fingernails or a sharp object. This may result in scratches or damage to the product.
•Avoid cleaning the product with a wet cloth or by directly spraying water onto the product.
If water enters the product, it may result in fire, electric shock, or a problem with the product.
•A white stain may appear on the surface of the projector if water gets on it.
 The appearance and the color may differ depending on the model.
Cleaning Inside the Projector
For cleaning the interior of the projector, contact an authorized Samsung Service Center.
•Contact a Service Center if dust or other substances are inside the projector.
1-2 |
Major Safety Precautions |
1-3 Safety Precautions
Icons used for safety precautions
ICON |
NAME |
MEANING |
|
|
|
|
Warning |
Failing to follow the precautions marked with this sign may result in a serious injury or even |
|
a fatality. |
|
|
|
|
|
|
|
|
Caution |
Failing to follow the precautions marked with this sign may result in a personal injury or |
|
property damage. |
|
|
|
|
|
|
|
Meaning of Signs
Do not perform.
Do not disassemble.
Do not touch.
Must be followed.
The power plug must be unplugged from the wall outlet.
Must be grounded to prevent electric shock.
Power Related
 The following images are for your reference and may differ depending on models and countries. The appearance and the color may differ depending on models.
 Warning
Plug the power plug in firmly.
•Otherwise, it may result in fire.
Avoid using a damaged power cord or plug or a loose power outlet.
•Otherwise, it may result in electric shock or fire.
Avoid plugging in or unplugging the power supply with wet hands.
•Otherwise, it may result in electric shock.
Avoid connecting multiple electric appliances to a single wall outlet.
•Otherwise, it may result in fire due to overheating of the wall outlet.
Avoid bending or twisting the power cord excessively and avoid placing heavy objects on the cord.
•Otherwise, it may result in electric shock or fire due to a damaged power cord.
To move the product, turn the power off and unplug the power cord and any other wires connected to the product.
•Otherwise, it may result in electric shock or fire due to the damaged power cord.
Major Safety Precautions |
1-3 |
Make sure to connect the power cord to a grounded wall outlet (for insulation class 1 equipment only).
•Otherwise, it may result in electric shock or injury.
 Caution
When unplugging the power plug from the wall outlet, make sure to hold the power plug by the plug and not by the cord.
•Failing to do so may result in electric shock or fire.
Unplug the power plug before cleaning the product.
•There is a danger of electric shock or fire.
Connect the power plug to a wall outlet that can be easily reached.
•When a problem occurs with the product, you must unplug the power plug to cut the power off completely. You cannot cut the power off completely using only the power button on the product.
Installation Related
 Warning
Avoid installing the product in a location exposed to direct sunlight and installing the product near a heat source such as a fire or heater.
•This may shorten the product life cycle or cause fire.
When installing the product in a cabinet or shelf, take care so that the front end of the product is completely supported by the cabinet or shelf.
•Failing to do so may result in the product falling and resulting in damage to the product or injury.
•Make sure to use a cabinet or shelf suitable to the size of the product.
Keep the power cord away from heaters.
•The coating of the power cord may melt and cause electric shock or fire.
Do not turn the product on or off by plugging or unplugging the power plug. (Do not use the power plug as a power switch.)
Keep the power cord away from sources of heat.
Avoid installing the product in a badly-ven- tilated location such as inside a bookshelf or closet.
•Otherwise, it may result in fire due to internal overheating.
When installing the product on a console or shelf, make sure that the front of the product does not protrude out of the console or shelf.
•Otherwise, this may cause the product to fall off and result in a malfunction or injury.
When thunder or lighting occurs, unplug the power cord.
•Failing to do so may result in electric shock or fire.
1-3 |
Major Safety Precautions |
Do not install the product in a location exposed to dust, moisture (sauna), oil, smoke or water (rain drops) and do not install it in a vehicle.
•This may result in electric shock or fire.
 Caution
Take care not to block the vent with a table cloth or curtain.
•Otherwise, it may result in fire due to internal overheating.
When putting the product down, place it gently.
•Failing to do so may result in a problem with the product or injury.
Usage Related
Avoid inserting metal objects such as chopsticks, coins or hairpins, or inflammable objects into the product (the vents, ports, etc).
•If water or an alien substance enters the product, turn the power off, unplug the power cord and contact a service center.
•Otherwise, it may result in a problem with the product, electric shock or fire.
Do not disassemble, or attempt to fix or modify the product.
•When the product requires repairs, contact a Service Center.
Avoid using or placing inflammable spray or objects near the product.
•This may result in an explosion or fire.
Avoid placing a liquid container such as a vase, flowerpot, beverage, cosmetics or drugs, or a metal object over the product.
•If water or an alien substance enters the product, turn the power off, unplug the power cord and contact a service center.
•Otherwise, it may result in a problem with the product, electric shock or fire.
Do not install the product in areas with heavy dust.
Do not let the product drop while moving it.
•This may result in a problem with the product or injury.
Do not install the product at a height where children may reach it.
• If a child touches the product, the product may fall and this may result in injury.
Do not let children place objects such as toys or cookies on the product.
•If a child tries to reach for any of these objects, the product may fall and cause harm.
Do not look directly at the light of the lamp nor project the picture into someone's eyes.
•This is dangerous, especially for children.
When you remove batteries from the remote, be careful that they are not swallowed by children. Keep batteries out of the reach of children.
•If swallowed, see a doctor immediately.
Major Safety Precautions |
1-3 |
 Caution
If the product generates a strange noise, a burning smell, or smoke, unplug the power plug immediately and contact a service center.
•Failing to do so may result in electric shock or fire.
If the power plug pin or jack is exposed to dust, water or alien substances, clean it thoroughly.
•There is a danger of electric shock or fire.
When cleaning the product, disconnect the power cord and clean the product with a soft dry cloth.
•Avoid using chemicals such as wax, benzene, alcohol, thinner, mosquitorepellent, fragrance, lubrication or cleansing agent when cleaning the product.
This may result in the exterior being deformed or the print being removed.
When not using the product for a long time, such as leaving your home, unplug the power cord from the wall outlet.
•Otherwise, it may cause dust accumulation and result in fire caused by overheating or a short circuit or result in an electric shock.
If the product is installed in a location where the operating conditions vary considerably, a serious quality problem may occur due to the surrounding environment. In this case, install the product only after consulting our Call Center.
•Places exposed to microscopic dust, chemicals, too high or low temperature, high humidity, such as airports or stations where the product is continuously used for a long time etc..
If you drop the product or the case is damaged, turn the power off and unplug the power cord. Contact a service center.
•Failing to do so may result in fire or electric shock.
Make sure to place your remote control on a table or desk.
•If you step on the remote control, you may fall and hurt yourself or the product may be damaged.
If water or a foreign substance enters the product, turn the product off, unplug the power cord from a wall outlet, and contact a Service Center.
Do not use the product while it indicates a malfunction, such as no sound or no picture.
•Turn the product off immediately, unplug the power cord from a wall outlet, and contact a Service Center.
When a gas leak occurs, do not touch the product or the power plug and ventilate immediately.
•A spark may result in an explosion or fire.
•During a thunder or lighting storm, do not touch the power cord or antenna cable
Do not touch the lens on the product.
•This may cause damage to the lens.
Do not touch any outer part of the product with tools such as a knife or a hammer.
To clean dirt or stains on the front projection lens, use spray or a wet cloth dampened with neutral detergent and water.
Ask a Service Center to clean the interior of the projector at least once per year.
1-3 |
Major Safety Precautions |

To avoid burning yourself, do not touch the vents or lamp cover while operating or right after turning off the product.
Do not open any cover on the product.
•This would prove hazardous because of high-voltage current inside the product.
Be careful not to touch the ventilation hole while the projector is on as hot air comes out.
Do not place objects vulnerable to heat near the projector.
Take care not to lose the lens cover of the product.
•The lens could get damaged.
Do not clean the product using water spray or a wet cloth. Avoid using any chemicals such as detergents, industrial or automotive polish, abrasive, wax, benzene, alcohol on any plastic part of the product such as projector case, since this may cause damage.
Do not use any undesignated battery.
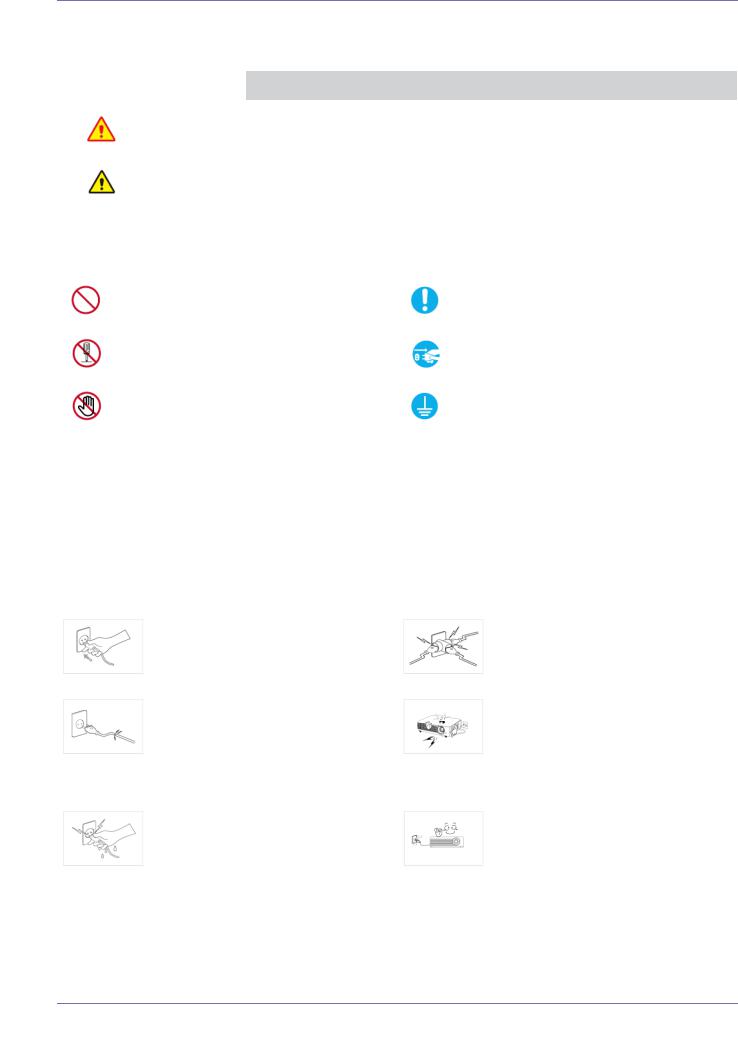
The ventilation hole is hot for some time though the projector is turned off. Keep you hands or body off the ventilation hole.
Be careful to keep your body away from the projector lamp. The lamp is hot.
(Children and those who have sensitive skin should be more careful.)
The lens cover protects the lens and should be used when the projector is turned off.
•To hide the screen while the projector is turned on, use the BLANK feature.
Major Safety Precautions |
1-3 |
2 Installation and Connection
2-1 Package Contents
 • Unpack the product and check if all of the contents listed below have been included.
•Store the packaging box in case you need to move the product at a later date.
Projector
CONTENTS
Quick Setup Guide |
Warranty Card (Not available |
User Manual |
Power Cord |
|
in all locations) |
|
|
|
|
|
|
Remote Control / 2 Battery |
Cleaning Cloth |
D-Sub Cable |
Lens cover |
( Not available in all loca- |
|
|
|
tions) |
|
|
|
|
|
|
|
4 Screws |
Projector case |
(For ceiling mount bracket.) |
|
|
|
A ceiling mount is not included and must be purchased separately. Use the included screws to attach the projector to the ceiling mount bracket.
2-1 |
Installation and Connection |
2-2 Installing the Projector
 Install the projector so that the beam from the projector is perpendicular to the screen.
•Place the projector so that the lens aims at the center of the screen. If the screen is not vertical, the picture on the screen may not appear rectangular.
•Do not install the screen in bright surroundings. If the surroundings are too bright, the picture on the screen will be washed out and not display clearly.
•When using the projector in bright surroundings, use curtains to block the light.
•You can install the projector in the following locations relative to the screen : <Front-Floor> / <Front-Ceiling> / <RearFloor> / <Rear-Ceiling>. To view the installation position settings, see below.
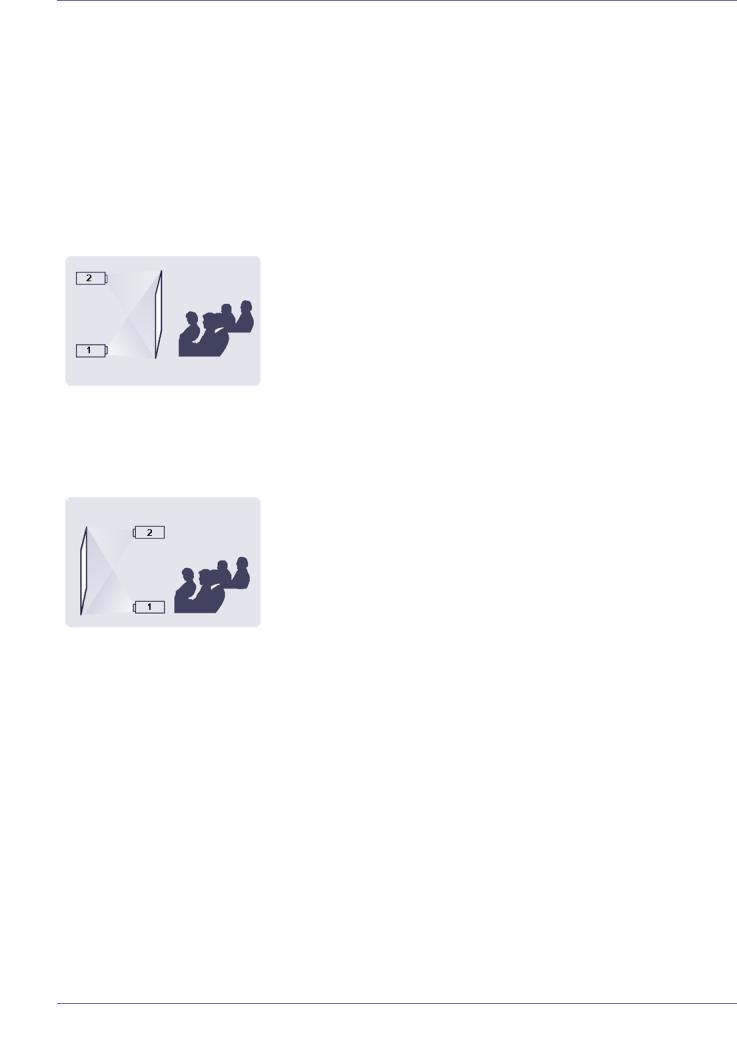
To adjust the picture when you install the projector behind the screen
Installing behind a semi-transparent screen.
When you install the projector behind a semi-transparent screen, you can use the menu to adjust the picture so that it displays correctly, depending on where you've located the projector, rearfloor (or low) or rear-ceiling.
1.For rear-floor, press :
Menu > Setup > Install > Rear-Floor
2.For rear-ceiling, press :
Menu > Setup > Install > Rear-Ceiling
To adjust the picture when you install the projector in the front of the screen
Installing the projector in front of the screen.
When you install the projector in front of a screen, you can use the menu to adjust the picture so that it displays correctly, depending on where you’ve located the projector, front-floor (or low) or front-ceiling.
1.For front-floor, press :
Menu > Setup > Install > Front-Floor
2.For front-ceiling, press :
Menu > Setup > Install > Front-Ceiling
Installation and Connection |
2-2 |

2-3 Leveling with Adjustable Feet
Press the PUSH buttons, as shown, to adjust the legs and level the projector.
 The projector can be adjusted to a height of up to 1.18 inches (30mm, about 12 °) from the reference point. If <Auto Keystone> is set to <On>, <V-Keystone> is adjusted automatically.
If fine tuning is required after auto-adjustment, use <V-Keystone>.
2-3 |
Installation and Connection |

2-4 Zoom and Focus Adjustment
Zoom Knob |
You can adjust the size of the image within the zoom range |
|
by manipulating the Zoom Knob. |
Focus Ring |
Focus the picture on the screen using the Focus Ring. |
 The size of your screen determines the distance you set your projector from the screen.
If you do not install your projector at the projection distance specified in the Screen Size and Projection Distance table in Section 2-5, you will not be able to adjust the focus correctly.
Installation and Connection |
2-4 |
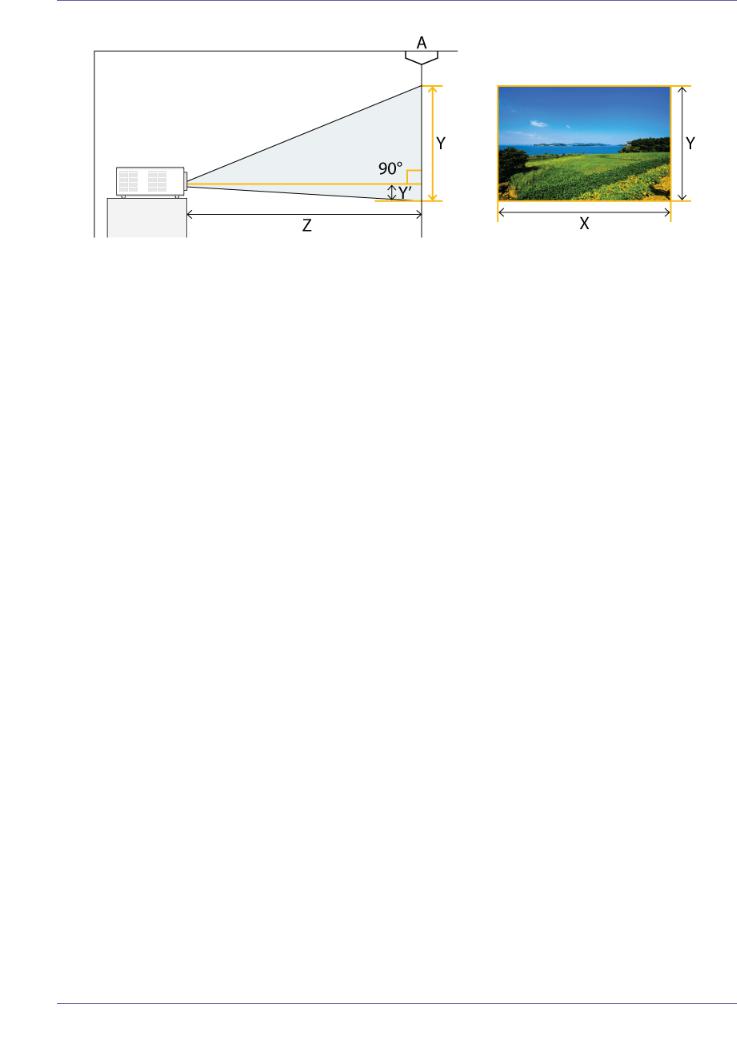
2-5 Screen Size and Projection Distance
A. Screen / Z. Throw Distance / Y’. Distance from Lens Center to Image Bottom
Install the projector on a flat, even surface and level the projector using the adjustable feet to obtain optimal picture quality. If images are not clear, adjust them using the Zoom Knob or Focus Ring, or move the projector forward and backward.
|
|
SCREEN SIZE |
|
|
|
THROW DISTANCE |
|
OFFSET |
|||
|
|
|
|
|
|
|
|
|
|
|
|
M (DIAGONAL) |
X (HORIZONTAL) |
Y (VERTICAL) |
Z (TELE) |
Z (WIDE) |
Y' |
|
|||||
|
|
|
|
|
|
|
|
|
|
|
|
INCHES |
CM |
INCHES |
CM |
INCHES |
CM |
INCHES |
CM |
INCHES |
CM |
INCHES |
CM |
|
|
|
|
|
|
|
|
|
|
|
|
30 |
76.2 |
24 |
60.9 |
18 |
45.7 |
42.7 |
108.4 |
35.5 |
90.1 |
2.6 |
6.3 |
|
|
|
|
|
|
|
|
|
|
|
|
40 |
101.6 |
32 |
81.3 |
24 |
61.0 |
57.0 |
144.7 |
47.4 |
120.3 |
3.3 |
8.4 |
|
|
|
|
|
|
|
|
|
|
|
|
50 |
127.0 |
40 |
101.6 |
30 |
76.2 |
71.2 |
180.8 |
59.2 |
150.4 |
4.1 |
10.5 |
|
|
|
|
|
|
|
|
|
|
|
|
60 |
152.4 |
48 |
121.9 |
36 |
91.4 |
85.4 |
217.0 |
71.0 |
180.4 |
5.0 |
12.6 |
|
|
|
|
|
|
|
|
|
|
|
|
70 |
177.8 |
56 |
142.2 |
42 |
106.7 |
99.7 |
253.1 |
82.9 |
210.5 |
5.8 |
14.7 |
|
|
|
|
|
|
|
|
|
|
|
|
80 |
203.2 |
64 |
162.6 |
48 |
121.9 |
113.9 |
289.4 |
94.7 |
240.6 |
6.6 |
16.8 |
|
|
|
|
|
|
|
|
|
|
|
|
90 |
228.6 |
72 |
182.9 |
54 |
137.2 |
128.2 |
325.6 |
106.6 |
270.7 |
7.4 |
18.9 |
|
|
|
|
|
|
|
|
|
|
|
|
100 |
254.0 |
80 |
203.2 |
60 |
152.4 |
142.4 |
361.7 |
118.4 |
300.7 |
8.3 |
21.0 |
|
|
|
|
|
|
|
|
|
|
|
|
110 |
279.4 |
88 |
223.5 |
66 |
167.6 |
156.6 |
397.8 |
130.2 |
330.8 |
9.1 |
23.1 |
|
|
|
|
|
|
|
|
|
|
|
|
120 |
304.8 |
96 |
243.8 |
72 |
182.9 |
170.9 |
434.0 |
142.1 |
360.8 |
9.9 |
25.2 |
|
|
|
|
|
|
|
|
|
|
|
|
130 |
330.2 |
104 |
264.2 |
78 |
198.1 |
185.1 |
470.3 |
153.9 |
391.0 |
10.8 |
27.3 |
|
|
|
|
|
|
|
|
|
|
|
|
140 |
355.6 |
112 |
284.5 |
84 |
213.4 |
199.4 |
506.4 |
165.8 |
421.1 |
11.6 |
29.4 |
|
|
|
|
|
|
|
|
|
|
|
|
150 |
381.0 |
120 |
304.8 |
90 |
228.6 |
213.6 |
542.5 |
177.6 |
451.1 |
12.4 |
31.5 |
|
|
|
|
|
|
|
|
|
|
|
|
160 |
406.4 |
128 |
325.1 |
96 |
243.8 |
227.8 |
578.7 |
189.4 |
481.1 |
13.2 |
33.6 |
|
|
|
|
|
|
|
|
|
|
|
|
170 |
431.8 |
136 |
345.4 |
102 |
259.1 |
242.1 |
614.8 |
201.3 |
511.2 |
14.1 |
35.7 |
|
|
|
|
|
|
|
|
|
|
|
|
180 |
457.2 |
144 |
365.8 |
108 |
274.3 |
256.3 |
651.1 |
213.1 |
541.4 |
14.9 |
37.8 |
|
|
|
|
|
|
|
|
|
|
|
|
190 |
482.6 |
152 |
386.1 |
114 |
289.6 |
270.6 |
687.3 |
225.0 |
571.4 |
15.7 |
39.9 |
|
|
|
|
|
|
|
|
|
|
|
|
200 |
508.0 |
160 |
406.4 |
120 |
304.8 |
284.8 |
723.4 |
236.8 |
601.5 |
16.5 |
42.0 |
|
|
|
|
|
|
|
|
|
|
|
|
210 |
533.4 |
168 |
426.7 |
126 |
320.0 |
299.0 |
759.5 |
248.6 |
631.5 |
17.4 |
44.1 |
|
|
|
|
|
|
|
|
|
|
|
|
220 |
558.8 |
176 |
447.0 |
132 |
335.3 |
313.3 |
795.7 |
260.5 |
661.6 |
18.2 |
46.2 |
|
|
|
|
|
|
|
|
|
|
|
|
230 |
584.2 |
184 |
467.4 |
138 |
350.5 |
327.5 |
832.0 |
272.3 |
691.8 |
19.0 |
48.3 |
|
|
|
|
|
|
|
|
|
|
|
|
2-5 |
Installation and Connection |

|
|
SCREEN SIZE |
|
|
|
THROW DISTANCE |
|
OFFSET |
|||
|
|
|
|
|
|
|
|
|
|
|
|
M (DIAGONAL) |
X (HORIZONTAL) |
Y (VERTICAL) |
Z (TELE) |
Z (WIDE) |
Y' |
|
|||||
|
|
|
|
|
|
|
|
|
|
|
|
INCHES |
CM |
INCHES |
CM |
INCHES |
CM |
INCHES |
CM |
INCHES |
CM |
INCHES |
CM |
|
|
|
|
|
|
|
|
|
|
|
|
240 |
609.6 |
192 |
487.7 |
144 |
365.8 |
341.8 |
868.1 |
284.2 |
721.8 |
19.9 |
50.4 |
|
|
|
|
|
|
|
|
|
|
|
|
250 |
635.0 |
200 |
508.0 |
150 |
381.0 |
356.0 |
904.2 |
296.0 |
751.8 |
20.7 |
52.5 |
|
|
|
|
|
|
|
|
|
|
|
|
260 |
660.4 |
208 |
528.3 |
156 |
396.2 |
370.2 |
940.4 |
307.8 |
781.9 |
21.5 |
54.6 |
|
|
|
|
|
|
|
|
|
|
|
|
270 |
685.8 |
216 |
548.6 |
162 |
411.5 |
384.5 |
976.5 |
319.7 |
811.9 |
22.3 |
56.7 |
|
|
|
|
|
|
|
|
|
|
|
|
280 |
711.2 |
224 |
569.0 |
168 |
426.7 |
398.7 |
1012.8 |
331.5 |
842.1 |
23.2 |
58.8 |
|
|
|
|
|
|
|
|
|
|
|
|
290 |
736.6 |
232 |
589.3 |
174 |
442.0 |
413.0 |
1049.0 |
343.4 |
872.2 |
24.0 |
60.9 |
|
|
|
|
|
|
|
|
|
|
|
|
300 |
762.0 |
240 |
609.6 |
180 |
457.2 |
427.2 |
1085.1 |
355.2 |
902.2 |
24.8 |
63.0 |
|
|
|
|
|
|
|
|
|
|
|
|
310 |
787.4 |
248 |
629.9 |
186 |
472.4 |
441.4 |
1121.2 |
367.0 |
932.3 |
25.6 |
65.1 |
|
|
|
|
|
|
|
|
|
|
|
|
320 |
812.8 |
256 |
650.2 |
192 |
487.6 |
455.7 |
1157.4 |
378.9 |
962.3 |
26.5 |
67.2 |
|
|
|
|
|
|
|
|
|
|
|
|
330 |
838.2 |
264 |
670.5 |
198 |
502.8 |
469.9 |
1193.5 |
390.7 |
992.3 |
27.3 |
69.3 |
|
|
|
|
|
|
|
|
|
|
|
|
340 |
863.6 |
272 |
690.8 |
204 |
518.0 |
484.2 |
1229.6 |
402.6 |
1022.4 |
28.1 |
71.4 |
|
|
|
|
|
|
|
|
|
|
|
|
350 |
889.0 |
280 |
711.1 |
210 |
533.2 |
498.4 |
1265.8 |
414.4 |
1052.4 |
29.0 |
73.5 |
|
|
|
|
|
|
|
|
|
|
|
|
360 |
914.4 |
288 |
731.4 |
216 |
548.4 |
512.6 |
1301.9 |
426.2 |
1082.5 |
29.8 |
75.6 |
|
|
|
|
|
|
|
|
|
|
|
|
370 |
939.8 |
296 |
751.7 |
222 |
563.6 |
526.9 |
1338.0 |
438.1 |
1112.5 |
30.6 |
77.7 |
|
|
|
|
|
|
|
|
|
|
|
|
380 |
965.2 |
304 |
772.0 |
228 |
578.8 |
541.1 |
1374.2 |
449.9 |
1142.6 |
31.4 |
79.8 |
|
|
|
|
|
|
|
|
|
|
|
|
390 |
990.6 |
312 |
792.3 |
234 |
594.0 |
555.4 |
1410.3 |
461.8 |
1172.6 |
32.3 |
81.9 |
|
|
|
|
|
|
|
|
|
|
|
|
400 |
1016.0 |
320 |
812.6 |
240 |
609.2 |
569.6 |
1446.4 |
473.6 |
1202.6 |
33.1 |
84.0 |
|
|
|
|
|
|
|
|
|
|
|
|
 This projector is designed to show images optimally on a 80 ~ 120 inch sized screen.
Installation and Connection |
2-5 |
2-6 Lamp Replacement
Cautions on Lamp Replacement
• The projector lamp is an expendable item. For best operating performance, replace the lamp according to the usage time. You can view the lamp usage time in the Information Display (INFO button).
• Replace the lamp with the one specified below only.
Model |
SP-M205 / SP-M225 |
SP-M255 / SP-M275 / SP-M305 |
|
|
|
Lamp Model Name |
DPL3311U |
DPL3321U |
|
|
|
- For inquiries on lamp purchase, please see 'Contact SAMSUNG WORLDWIDE' in section 6-3.
• Check that the power cord is unplugged before replacing the lamp.
• Because the lamp is a high temperature and high voltage product, wait at least one hour from the time you disconnect the power cord before replacing the lamp.
• The projector lamp is on the top of the projector.
• Do not leave the old lamp near flammable items or in reach of children. There is a danger of fire, burns, or injury.
• Remove dirt or foreign material around or inside the lamp unit using a proper vacuum device.
• When handling the lamp, avoid touching any part of it except for the handles. If you handle the lamp incorrectly, you can shorten the lamp’s lifetime and affect picture quality.
• When you change the lamp, put the projector on a flat surface.
• The projector has been designed so that the projector does not work if the lamp cover is not completely assembled after a lamp replacement. If the projector does not work properly, please check the operating status of the indicator LED.
Lamp contains Mercury. Dispose According to Local, State or Federal Laws.
Lamp Replacement Procedure
 • Because the lamp is a high temperature and high voltage product, wait at least one hour from the time that the power cord is disconnected before replacing it.
•The projector lamp is on the top of the projector.
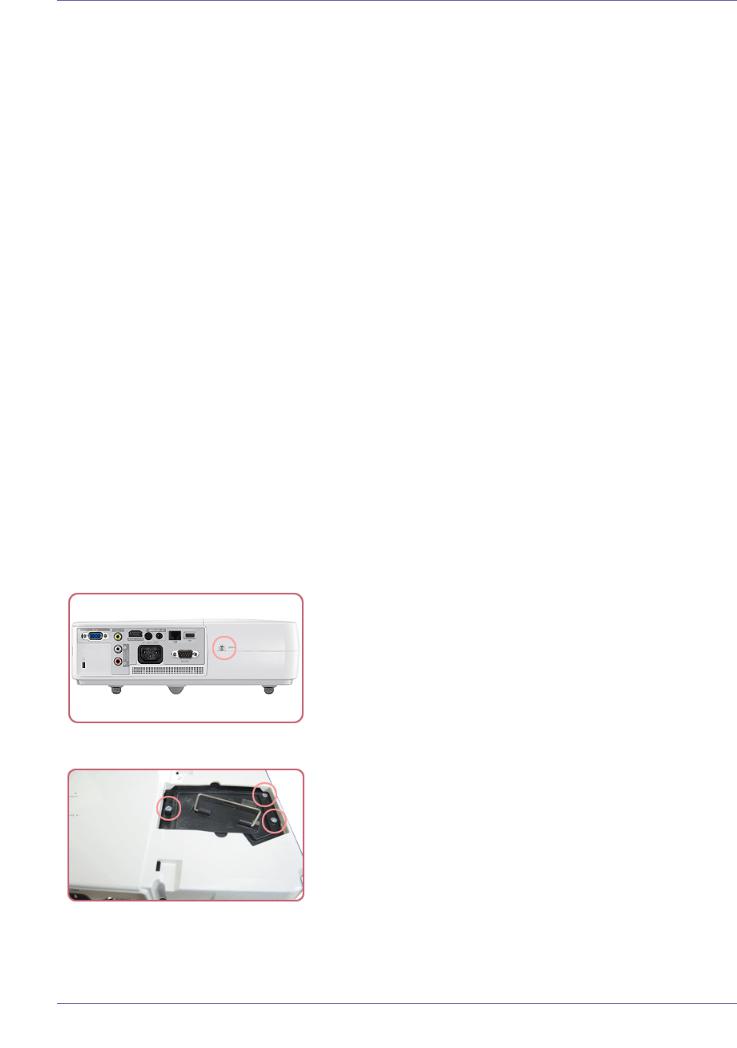
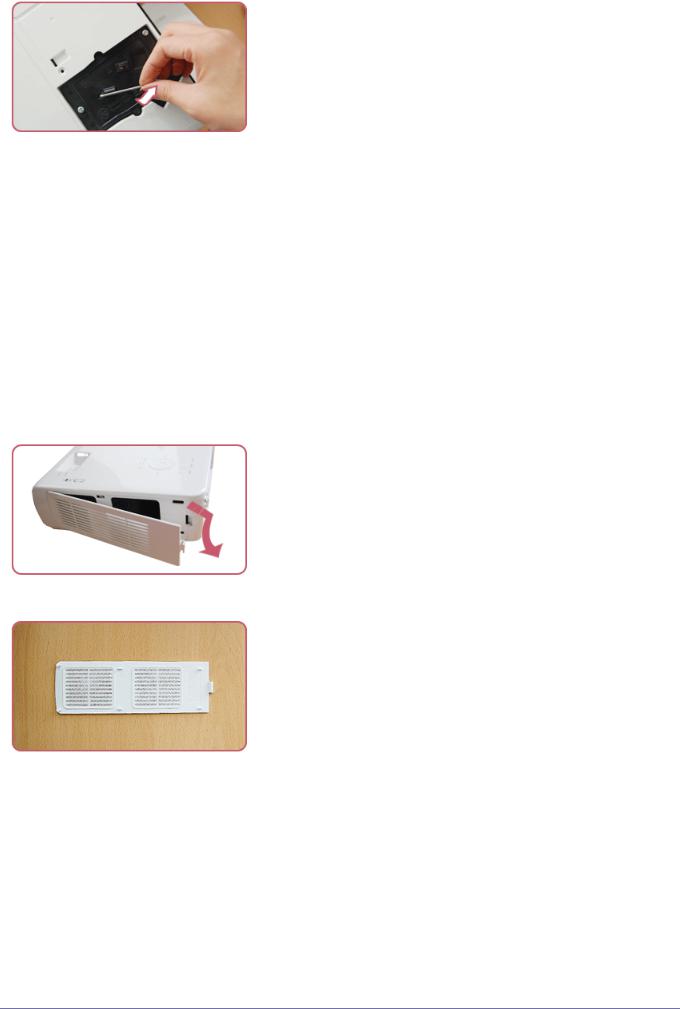
1.Remove the screw shown in the figure below, and then open the cover.
2. Wtih the cover open, remove the three (3) screws on the top of the projector as shown in the figure below.
3. To remove the lamp, hold and then pull the lamp handle as shown in the figure below.
2-6 |
Installation and Connection |
 Install a new lamp in the reverse order of removal.
Replacing and Cleaning the Filter
Precautions when replacing the projector filter:
•The filter is on the side of the projector.
•Turn off the power of the projector, and then disconnect the power cord after the projector has cooled sufficiently. Otherwise, its parts may be damaged due to internal heat.
•When you replace the filter, you may release some dust.
•For inquiries on replacement filter purchase, please see 'Contact SAMSUNG WORLDWIDE' in Chapter 6.
To replace or clean the filter, follow these steps:
1.Turn off the power of the projector, and then disconnect the power cord after the projector has cooled sufficiently.
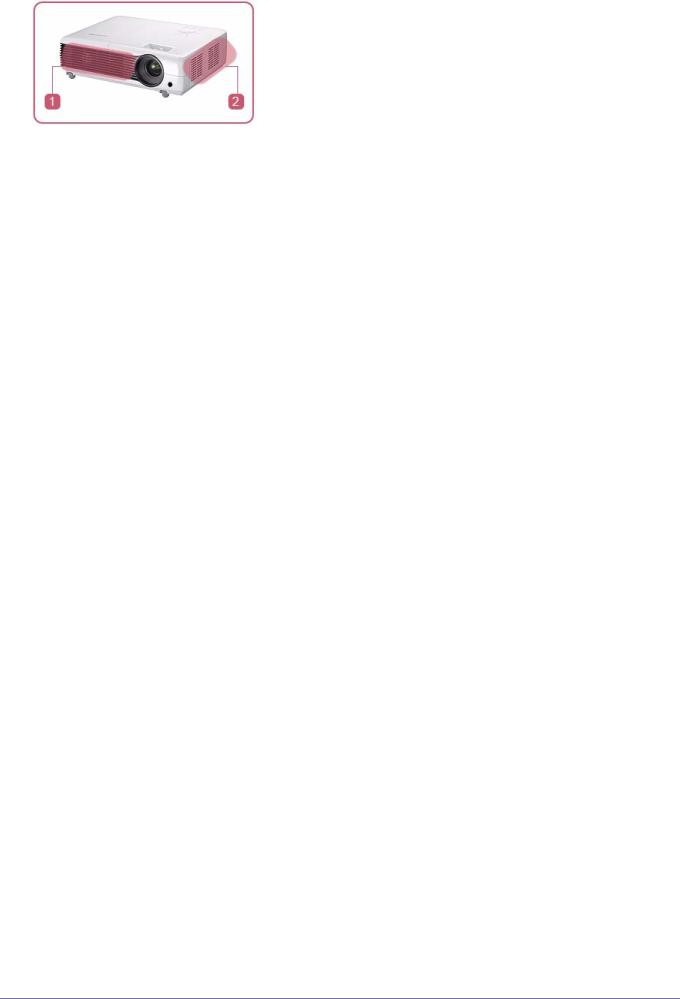
2.Open the filter cover.
3. Replace or clean the filter.
•When cleaning the filter, use a small vacuum cleaner designed for computers and small electronics products, or wash it under running water.
•After washing the filter under running water, make sure to dry it completely. The moisture may cause the filter to corrode.
•If dust cannot be separated from the filter or the filter is torn, it must be replaced.
•After cleaning or replacing the filter, run <Reset> -> <Reset Filter Time> in the <Setup> menu.
Ventilation openings
For the location of the ventilation openings, see the picture below:
•Do not block the ventilation openings. Blocking the ventilation openings can cause your projector to overheat and may cause it to fail.
Installation and Connection |
2-6 |
 Air outtake vent
 Air intake vent
2-6 |
Installation and Connection |

2-7 Rear Side
ICON |
NAME |
|
|
Kensington Lock slot
PC IN port
VIDEO IN port
AUDIO IN (L-AUDIO-R) port
HDMI/DVI IN port
Remote Control Signal Receiver
Power Input port
AUDIO OUT/  port
port
RS232C port
LAN port
USB port
Installation and Connection |
2-7 |
2-8 |
Supported Display Modes |
|
|
|
|
||
2-8-1. PC Timing (D-Sub/HDMI) |
|
|
|
|
|||
|
|
|
|
|
|
|
|
|
|
|
|
|
HORIZONTAL |
VERTICAL |
PIXEL |
|
FORMAT |
RESOLUTION |
|
FREQUENCY |
FREQUENCY |
FREQUENCY |
|
|
|
|
|
|
(KHZ) |
(HZ) |
(MHZ) |
|
|
|
|
|
|
|
|
|
IBM |
640 x 350 |
|
70Hz |
31.469 |
70.086 |
25.175 |
|
|
|
|
|
|
|
|
|
IBM |
640 x 480 |
|
60Hz |
31.469 |
59.940 |
25.175 |
|
|
|
|
|
|
|
|
|
IBM |
720 x 400 |
|
70Hz |
31.469 |
70.087 |
28.322 |
|
|
|
|
|
|
|
|
|
VESA |
640 x 480 |
|
60Hz |
31.469 |
59.940 |
25.175 |
|
|
|
|
|
|
|
|
|
MAC |
640 x 480 |
|
67Hz |
35.000 |
66.667 |
30.240 |
|
|
|
|
|
|
|
|
|
VESA |
640 x 480 |
|
70Hz |
35.000 |
70.000 |
28.560 |
|
|
|
|
|
|
|
|
|
VESA |
640 x 480 |
|
72Hz |
37.861 |
72.809 |
31.500 |
|
|
|
|
|
|
|
|
|
VESA |
640 x 480 |
|
75Hz |
37.500 |
75.000 |
31.500 |
|
|
|
|
|
|
|
|
|
VESA |
720 x 576 |
|
60Hz |
35.910 |
59.950 |
32.750 |
|
|
|
|
|
|
|
|
|
VESA |
800 x 600 |
|
56Hz |
35.156 |
56.250 |
36.000 |
|
|
|
|
|
|
|
|
|
VESA |
800 x 600 |
|
60Hz |
37.879 |
60.317 |
40.000 |
|
|
|
|
|
|
|
|
|
VESA |
800 x 600 |
|
70Hz |
43.750 |
70.000 |
45.500 |
|
|
|
|
|
|
|
|
|
VESA |
800 x 600 |
|
72Hz |
48.077 |
72.188 |
50.000 |
|
|
|
|
|
|
|
|
|
VESA |
800 x 600 |
|
75Hz |
46.875 |
75.000 |
49.500 |
|
|
|
|
|
|
|
|
|
MAC |
832 x 624 |
|
75Hz |
49.726 |
74.551 |
57.284 |
|
|
|
|
|
|
|
|
|
VESA |
1024 x 768 |
|
60Hz |
48.363 |
60.004 |
65.000 |
|
|
|
|
|
|
|
|
|
VESA |
1024 x 768 |
|
70Hz |
56.476 |
70.069 |
75.000 |
|
|
|
|
|
|
|
|
|
VESA |
1024 x 768 |
|
72Hz |
57.672 |
72.000 |
78.434 |
|
|
|
|
|
|
|
|
|
VESA |
1024 x 768 |
|
75Hz |
60.023 |
75.029 |
78.750 |
|
|
|
|
|
|
|
|
|
VESA |
1152 x 864 |
|
60Hz |
53.783 |
59.959 |
81.750 |
|
|
|
|
|
|
|
|
|
VESA |
1152 x 864 |
|
70Hz |
63.000 |
70.000 |
96.768 |
|
|
|
|
|
|
|
|
|
VESA |
1152 x 864 |
|
72Hz |
64.872 |
72.000 |
99.643 |
|
|
|
|
|
|
|
|
|
VESA |
1152 x 864 |
|
75Hz |
67.500 |
75.000 |
108.000 |
|
|
|
|
|
|
|
|
|
VESA |
1280 x 720 |
|
60Hz |
44.772 |
59.855 |
74.500 |
|
|
|
|
|
|
|
|
|
VESA |
1280 x 720 |
|
70Hz |
52.500 |
70.000 |
89.040 |
|
|
|
|
|
|
|
|
|
VESA |
1280 x 720 |
|
72Hz |
54.072 |
72.000 |
91.706 |
|
|
|
|
|
|
|
|
|
VESA |
1280 x 720 |
|
75Hz |
56.456 |
74.777 |
95.750 |
|
|
|
|
|
|
|
|
|
VESA |
1280 x 768 |
|
60Hz |
47.776 |
59.870 |
79.500 |
|
|
|
|
|
|
|
|
|
VESA |
1280 x 768 |
|
75Hz |
60.289 |
74.893 |
102.250 |
|
|
|
|
|
|
|
|
|
VESA |
1280 x 800 |
|
60Hz |
49.702 |
59.810 |
83.500 |
|
|
|
|
|
|
|
|
|
VESA |
1280 x 800 |
|
75Hz |
62.795 |
74.934 |
106.500 |
|
|
|
|
|
|
|
|
|
VESA |
1280 x 960 |
|
60Hz |
60.000 |
60.000 |
108.000 |
|
|
|
|
|
|
|
|
|
VESA |
1280 x 960 |
|
70Hz |
69.930 |
70.000 |
120.839 |
|
|
|
|
|
|
|
|
2-8 |
Installation and Connection |

|
|
|
|
HORIZONTAL |
VERTICAL |
PIXEL |
FORMAT |
RESOLUTION |
|
FREQUENCY |
FREQUENCY |
FREQUENCY |
|
|
|
|
|
(KHZ) |
(HZ) |
(MHZ) |
|
|
|
|
|
|
|
VESA |
1280 x 960 |
|
72Hz |
72.072 |
72.000 |
124.540 |
|
|
|
|
|
|
|
VESA |
1280 x 960 |
|
75Hz |
75.231 |
74.857 |
130.000 |
|
|
|
|
|
|
|
VESA |
1280 x 1024 |
|
60Hz |
63.981 |
60.020 |
108.000 |
|
|
|
|
|
|
|
VESA |
1280 x 1024 |
|
70Hz |
74.620 |
70.000 |
128.943 |
|
|
|
|
|
|
|
VESA |
1280 x 1024 |
|
72Hz |
76.824 |
72.000 |
132.752 |
|
|
|
|
|
|
|
VESA |
1280 x 1024 |
|
75Hz |
79.976 |
75.025 |
135.000 |
|
|
|
|
|
|
|
VESA |
1400 x 1050 |
|
60Hz |
65.317 |
59.978 |
121.750 |
|
|
|
|
|
|
|
VESA |
1440 x 900 |
|
60Hz |
55.935 |
59.887 |
106.500 |
|
|
|
|
|
|
|
VESA |
1440 x 900 |
|
75Hz |
70.635 |
74.984 |
136.750 |
|
|
|
|
|
|
|
VESA |
1600 x 1200 |
|
60Hz |
75.000 |
60.000 |
162.000 |
|
|
|
|
|
|
|
 All resolutions higher or lower than 1024x768 are converted to 1024x768 by the Scaler chip inside the projector. If the resolution of the signal output by the PC matches the real resolution (1024x768) of the projector, the screen quality is optimal.
2-8-2. AV Timing (D-Sub)
FORMAT |
|
RESOLUTION |
SCAN |
|
|
|
|
|
|
BT.601 SMPTE 267M |
480i |
|
59.94Hz |
Interlaced |
|
|
|
|
|
BT.1358 SMPTE 293M |
480p |
|
59.94Hz |
Progressive |
|
|
|
|
|
BT.601 |
576i |
|
50Hz |
Interlaced |
|
|
|
|
|
BT.1358 |
576p |
|
50Hz |
Progressive |
|
|
|
|
|
SMPTE 296M |
720p |
|
59.94Hz/60Hz |
Progressive |
|
|
|
|
|
|
720p |
|
50Hz |
Progressive |
|
|
|
|
|
BT.709 SMPTE 274M |
1080i |
|
59.94Hz/60Hz |
Interlaced |
|
|
|
|
|
|
1080i |
|
50Hz |
Interlaced |
|
|
|
|
|
2-8-3. AV Timing (HDMI)
|
|
|
|
HORIZONTAL |
VERTICAL |
PIXEL |
FORMAT |
RESOLUTION |
SCAN |
FREQUENCY |
FREQUENCY |
FREQUENCY |
|
|
|
|
|
(KHZ) |
(HZ) |
(MHZ) |
|
|
|
|
|
|
|
EIA-861 |
Format1 |
640 x 480 |
Progressive |
59.940 |
31.469 |
25.175 |
|
|
|
|
|
|
|
EIA-861 |
Format1 |
640 x 480 |
Progressive |
60.000 |
31.500 |
25.200 |
|
|
|
|
|
|
|
EIA-861 |
Format2,3 |
720 x 480 |
Progressive |
59.940 |
31.469 |
27.000 |
|
|
|
|
|
|
|
EIA-861 |
Format2,3 |
720 x 480 |
Progressive |
60.000 |
31.500 |
27.027 |
|
|
|
|
|
|
|
EIA-861 |
Format4 |
1280 x 720 |
Progressive |
59.939 |
44.955 |
74.175 |
|
|
|
|
|
|
|
EIA-861 |
Format4 |
1280 x 720 |
Progressive |
60.000 |
45.000 |
74.250 |
|
|
|
|
|
|
|
EIA-861 |
Format5 |
1920 x 1080 |
Interlaced |
59.939 |
33.716 |
74.175 |
|
|
|
|
|
|
|
Installation and Connection |
2-8 |

|
|
|
|
HORIZONTAL |
VERTICAL |
PIXEL |
FORMAT |
RESOLUTION |
SCAN |
FREQUENCY |
FREQUENCY |
FREQUENCY |
|
|
|
|
|
(KHZ) |
(HZ) |
(MHZ) |
|
|
|
|
|
|
|
EIA-861 |
Format5 |
1920 x 1080 |
Interlaced |
60.000 |
33.750 |
74.250 |
|
|
|
|
|
|
|
EIA-861 |
Format17,18 |
720 x 576 |
Progressive |
50.000 |
31.250 |
27.000 |
|
|
|
|
|
|
|
EIA-861 |
Format19 |
1280 x 720 |
Progressive |
50.000 |
37.500 |
74.250 |
|
|
|
|
|
|
|
EIA-861 |
Format20 |
1920 x 1080 |
Interlaced |
50.000 |
28.125 |
74.250 |
|
|
|
|
|
|
|
2-8-4. AV Timing (VIDEO)
NTSC, NTSC 4.43, PAL, PAL60, PAL-N, PAL-M, SECAM
Your projector supports the standard video formats listed above through its video inputs. No adjustments are necessary.
2-8 |
Installation and Connection |
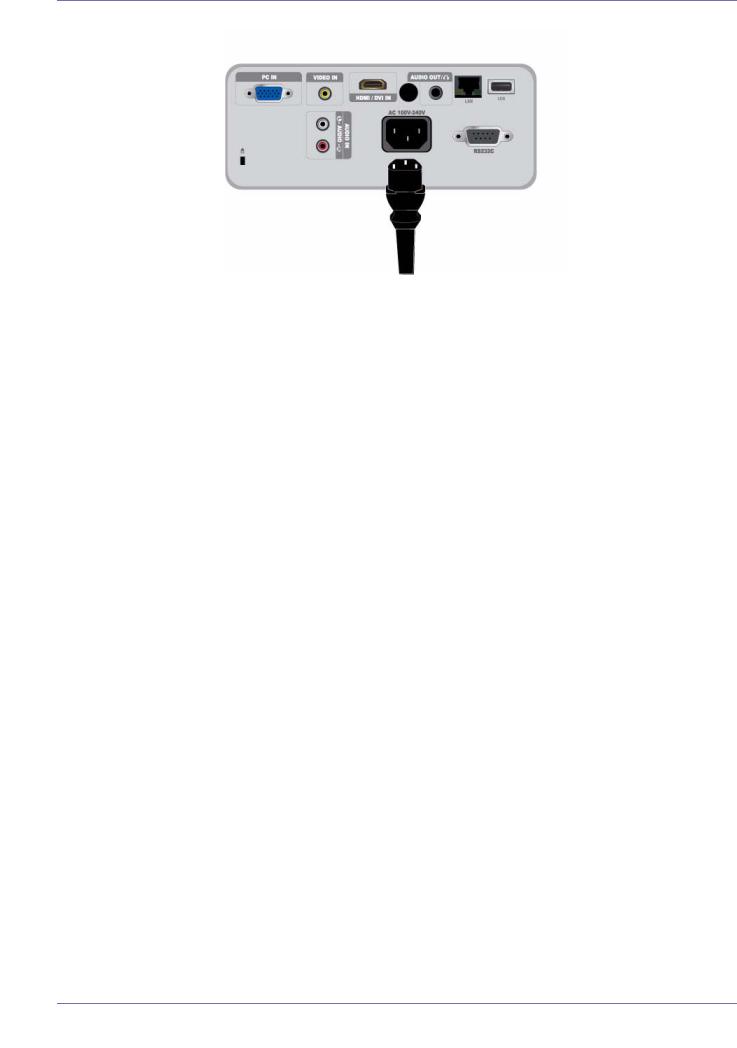
2-9 Connecting the Power
1. Plug the power cord into the power terminal on the rear side of the projector.
Installation and Connection |
2-9 |
2-10 Connecting with a PC and Setting up the PC
2-10-1. Setting up the PC Environment
Check the following items before connecting your PC to your projector.
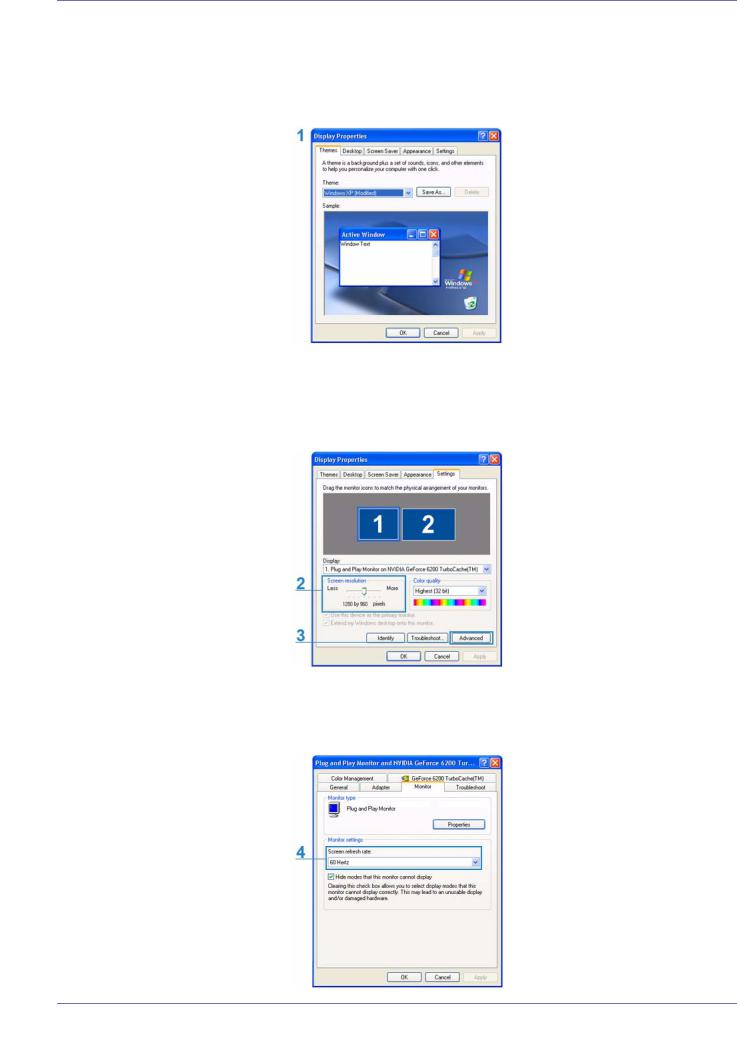
1.Click the right mouse button on the Windows desktop, and then click [Properties]. The <Display Properties> dialog appears.
2.Click the [Settings] tab, and then set the <Screen resolution>. The optimal resolution for the projector is 1024 x 768. For other resolutions supported by the projector, see the PC Timing Display Mode table in section 2-8.
 You do not have to change the <Color quality> setup.
3. Press the [Advanced] button. Another property window appears.
4.Click the [Monitor] tab and set the <Screen refresh rate>. For the refresh rate that matches the resolution you’ve chosen, see the refresh rate (60 Hz, 70 Hz, etc.) next to your selected resolution in the PC Timing Display Mode table in section 2-8.
 Setting the refresh rate sets both the vertical and horizontal frequencies.
2-10 |
Installation and Connection |
5.Click the [OK] button to close the window, and then click the [OK] button on the <Display Properties> window to close that window.
6.Shut down the PC and connect it to the projector.
 The setup process might vary depending on your type of computer or version of Windows. (For example, [Properties] appears instead of [Properties (R)] as shown in 1.)
This projector supports 32 bit color quality (per pixel) when it is used as a PC monitor.
Projected images may differ from the images on your monitor depending on the monitor manufacturer or Windows version.
When connecting the projector to a PC, make sure that the PC setup complies with the display settings supported by this projector. If it does not, you may have signal problems.
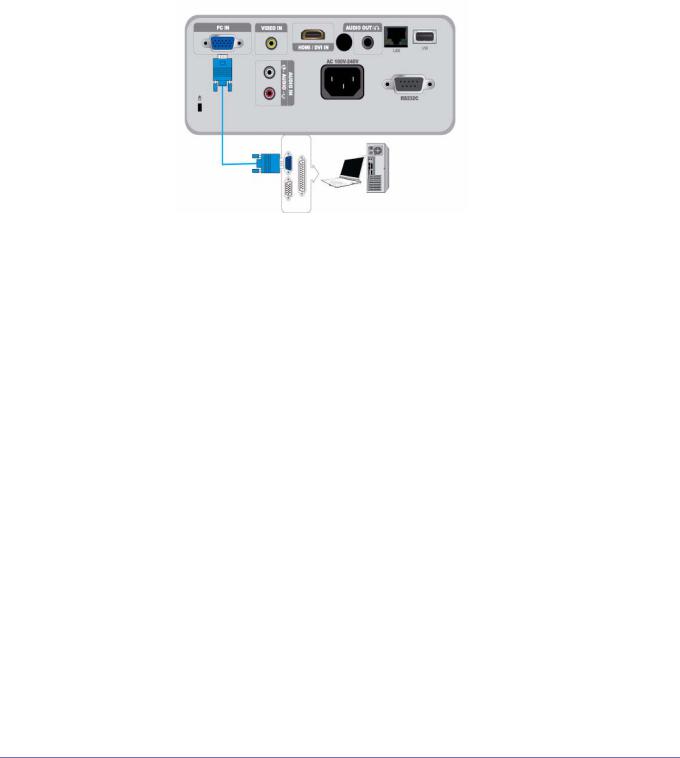
2-10-2. Connecting with a PC
Make sure that your PC and projector are turned off.
1.Connect the [PC IN] port on the rear side of the projector to the PC video out (D-sub) port of the PC using a PC video cable.
2.Plug in the power cords of the projector and the PC.
 This product supports plug and play. If you use Windows XP, you do not need to set up the driver on your PC.
Using the Projector
1.Turn on the projector, and then press the [SOURCE] button to select <PC>.
If the <PC> Mode is not available, make sure the PC video cable is properly connected.
2.Turn on the PC, and then set the PC Environment (screen resolution, etc.) if necessary.
3.Adjust the screen.
Installation and Connection |
2-10 |
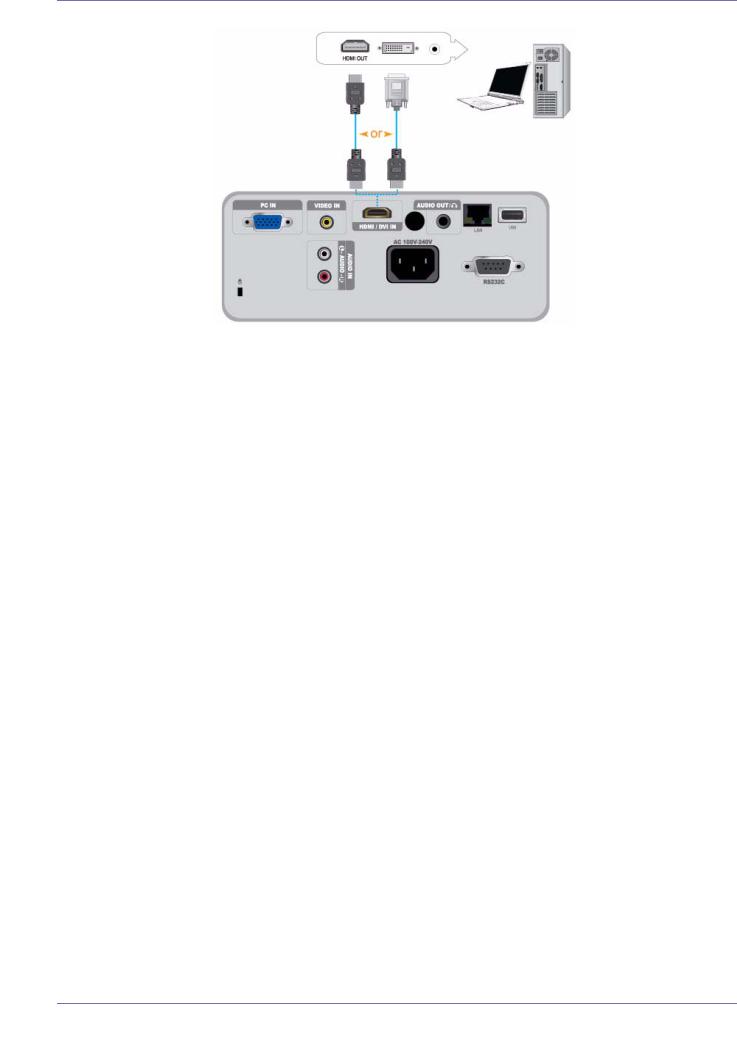
2-11 Connecting a PC using an HDMI/DVI cable
Make sure that your PC and projector are turned off.
1.Connect the [HDMI/DVI IN] terminal of the projector to the HDMI or DVI terminal of your PC using a HDMI/HDMI or HDMI/DVI cable (Not supplied).
-If you are connecting to the HDMI terminal of your PC, use an HDMI/HDMI cable (Not supplied).
-For the supported resolutions and refresh rates, see PC Timing (D-Sub/HDMI) in Section 2-8, "Supported Display Modes".
2-11 |
Installation and Connection |
Loading...