


 Loading...
FRIDGE/FREEZER
SR-28/29, SR-32/33
SR-38/39, SR-42/43
Instruction Manual
TEMPCONTROL

Safety Precautions
GB
Before using your fridge/freezer, read the safety precautions below and the instructions in the rest of the manual. Keep the Instruction Manual in a handy place for future reference and remember to hand it over to the subsequent owner, if you ever sell the appliance.
DO NOT expose the fridge/ freezer to direct sunlight. DO NOT install it next to a
source of heat (oven, radiator). If you must install the fridge/ freezer near a source of heat, ensure that there is sufficient insulation between the two appliances.
To maintain the efficiency of your fridge/freezer, DO NOT leave the doors open for any longer than necessary.
Make sure that the doors are carefully pushed closed at all times.
DO NOT allow water to splash or run on to the back of the fridge/ freezer.
Water impairs the insulation of the electrical parts and may cause an electric short circuit or risk of electric shock.
DO NOT store volatile chemicals, such as ether and benzene, in the fridge/freezer. Besides damaging the food, the fumes can build up and cause an explosion.
DO NOT use flammable sprays, such as lacquer or paint, near the fridge/freezer.
2

Thank you for purchasing a
SAMSUNG fridge/freezer.
Please take the time to read these instructions, as they will enable
you to take full advantage of your new appliance.
Contents
SAFETY PRECAUTIONS .............................................................................................. |
2 |
|
BECOMING FAMILIAR WITH YOUR NEW FRIDGE/FREEZER |
|
|
■ |
Main Features................................................................................................ |
4 |
■ |
Model Specifications...................................................................................... |
4 |
INSTALLING YOUR NEW FRIDGE/FREEZER |
|
|
■ Choosing Where to Install Your Fridge/Freezer ............................................ |
5 |
|
■ |
Earthing the Fridge/Freezer........................................................................... |
5 |
■ Preparing Your Fridge/Freezer for Use ......................................................... |
6 |
|
■ |
Adjusting the Feet.......................................................................................... |
6 |
■ |
Arranging the Accessories............................................................................. |
7 |
USING YOUR REFRIGERATOR |
|
|
■ Controlling the Refrigerator Temperature...................................................... |
8 |
|
■ |
Storing Food .................................................................................................. |
8 |
■ Using the Chiller Compartment (Types A/B/E/F Only) .................................. |
9 |
|
■ Using the Vegetable Bin ................................................................................ |
9 |
|
USING YOUR FREEZER |
|
|
■ Controlling the Freezer Temperature ............................................................ |
10 |
|
■ |
Freezing Food ............................................................................................... |
10 |
■ |
Making Ice Cubes.......................................................................................... |
11 |
LOOKING AFTER YOUR FRIDGE/FREEZER |
|
|
■ |
Cleaning the Fridge/Freezer.......................................................................... |
12 |
■ Changing the Light Bulb(s) ............................................................................ |
13 |
|
■ |
Problems and Solutions................................................................................. |
14 |
VIEW OF YOUR FRIDGE/FREEZER ............................................................................. |
15 |
|
3
Main Features
GB
Your fridge/freezer is fitted with several useful features, to help you store food as efficiently and as hygienically as possible.
Feature |
Description |
|
|
Auto-defrost |
When sufficient frost has accumulated in the fridge/freezer, the auto-defrost feature |
|
starts up automatically. The frost is thawed and the thaw water is collected in an |
|
evaporation tray, which allows it to evaporate. |
|
This operation is fully automatic and requires no intervention by you. |
|
|
Bio-deodoriser |
This integrated ventilation system helps remove unwanted smells from the refrigerator, |
(types A, B and F only) |
by moving the air in such a way that smells cannot collect and contaminate the food. |
|
The bio-deodoriser is located at the back of the refrigerator. |
|
|
Chiller compartment |
The chiller compartment freezes only the surface of the food to help: |
(types A, B, E and F only) |
Preserve the taste of the food |
|
Prolong the freshness |
|
|
Adjustable shelves |
The accessories inside your fridge/freezer can be placed in the positions that best suit |
and containers |
your requirements and the food to be stored. The specially large compartments in the |
|
bottom of the door are very practical when chilling bottles of drinks for example. |
|
|
Model Specifications
Model Number: ––––––––––––
Type: ––––––––––––
Date of Purchase: ––––––––––––
Important
These appliances are intended for household use only. If you wish to use them for industrial or commercial purposes, you must check that you comply with all applicable standards and regulations.
The instructions in this booklet apply to several models and types. The main differences between the models concern whether you have:
A chiller compartment (types A, B, E and F only)
A bio-deodoriser (types A, B and F only)
Crystal or wire shelves (crystal for types A, B and C, wire for types D, E and F)
One or two light bulbs to light the refrigerator (one for types B, C, D and E and two for types A and F)
Type |
Models |
|
|
|
|
A, F |
SR-29NXA, NXB, RXB |
SR-39NXA, NXB |
|
SR-33NXA, NXB, RXB |
SR-43NXA, NXB |
|
|
|
B, C, D, E |
SR-28NMA, NMB, RMB |
SR-38NMA, NMB |
|
SR-32NMA, NMB, RMB |
SR-42NMA, NMB |
|
|
|
The illustrations correspond to type A; there may, therefore, be slight differences between them and your actual model.
4
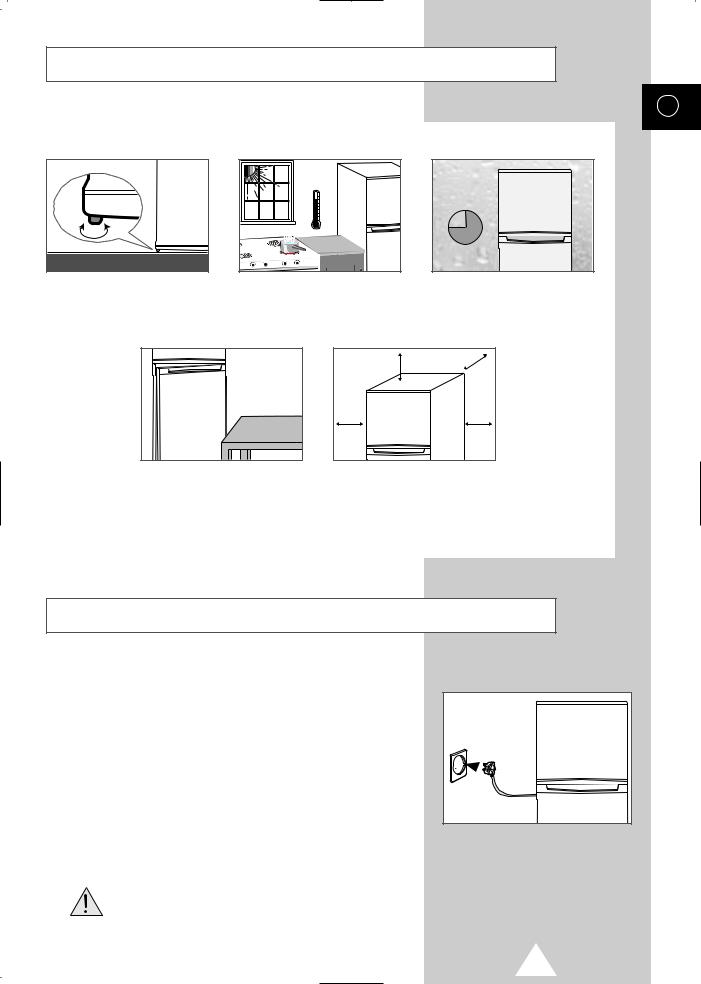
Choosing Where to Install Your Fridge/Freezer
GB
Various factors must be taken into account when choosing where to install your fridge/freezer.
Install the fridge/freezer on a stable, flat surface. Adjust the feet if necessary,
page 6 for further details
30° 86°F
75%
H
Avoid locations in direct sunlight or |
Avoid |
by |
near to heaters, radiators, ovens or |
draughts or |
|
cookers. |
|
|
300 mm |
12” |
50 mm |
|
2” |
|||
|
|
||
50 mm |
|
50 mm |
|
2” |
|
2” |
Make sure that you can open the doors freely and without hindrance.
Allow the following clearances around the fridge/freezer:
50 mm (2 inches) on all sides
300 mm (12 inches) above the fridge/freezer
Earthing the Fridge/Freezer
For the personal safety of you and your family, your fridge/freezer must be:
Plugged into its own individual wall outlet with the correct voltage and frequency, as indicated inside the refrigerator door
Properly earthed (do not ground the fridge/freezer with a telephone line, gas pipe, and so on)
To minimise the possibility of electric shocks from the appliance, the wall outlet must also be earthed; have it checked by a qualified electrician. If it is not earthed, it is your personal responsibility and obligation to have it replaced with a properly earthed outlet, or use a different power point.
If the power cord becomes damaged:
Immediately unplug it from the wall outlet
Have it repaired by a qualified electrician
5
Loading...