


DVD Micro Theatre |
MCD109 |
user manual
manual del usuario
manual do usuário
México
Es necesario que lea cuidadosamente su instructivo de manejo.
PRECAUCIÓN - ADVERTENCIA
No abrir, riesgo de choque eléctrico
ATENCIÓN
Verifique que el voltaje de alimentación sea el requerido para su aparato
Para evitar el riesgo de choque eléctrico, no quite la tapa.
En caso de requerir servicio, dirijase al personal calificado.
Descripción: |
Minisistema de Audio |
Modelo : |
MCD109/ 55 |
Alimentación: |
110–127 / 220–240V~; 50/60 Hz |
Consumo: |
30 W |
Importador: |
Philips Mexicana, S.A. de C.V. |
Domicilio: |
Av. La Palma No.6 |
|
Col. San Fernando La Herradura |
|
Huixquilucan |
Localidad y Tel: |
Edo. de México C.P. 52784 |
|
Tel.52 69 90 00 |
Exportador: |
Philips Electronics HK, Ltd. |
País de Origen: |
China |
Nº de Serie: |
______________________________ |
LEA CUIDADOSAMENTE ESTE INSTRUCTIVO
ANTES DE USAR SU APARATO.
AVISO IMPORTANTE
Philips Mexicana, S.A. de C.V. no se hace responsable por daños o desperfectos causados por:
–Maltrato, descuido o mal uso, presencia de insectos o roedores (cucarachas, ratones etc.).
–Cuando el aparato no haya sido operarado de acuerdo con el instructivo del uso, fuera de los valores nominales y tolerancias de las tensiones (voltaje), frecuencia (ciclaje) de alimentación eléctrica y las características que deben reunir las instalaciones auxiliares.
–Por fenómenos naturales tales como: temblores, inundaciones, incendios, descargas eléctricas, rayos etc. o delitos causados por terceros (choques asaltos, riñas, etc.).
2

Index
Manufactured under license from Dolby |
|
|
Laboratories. |
English ------------------------------------------------ |
4 |
"Dolby", "Pro-logic" and the double-D symbol are trademarks of Dolby Laboratories.
MANUFACTURED UNDER LICENSE FROM DIGITAL THEATER SYSTEMS, INC. US PAT. NO 5,451,942,5,956,674, 5,974,380, 5,978,762 AND OTHER WORLDWIDE
PATENTS ISSUED AND PENDING. "DTS" AND "DTS DIGITAL SURROUND" ARE RESISTERED TRADEMARKS OF DIGITAL THEATER SYSTEMS, INC. COPYRIGHT 1996, 2000 DIGITAL THEATER SYSTEMS, INC. ALL RIGHTS RESERVED.
CAUTION
Use of controls or adjustments or performance of procedures other than herein may result in hazardous radiation exposure or other unsafe operation.
ATENCIÓN
El uso de mando o ajustes o la ejecucción de métodos que no sean los aquí descritos puede ocasionar peligro de exposición a radiación.
AVISO
A utilização de comandos ou ajustes ou a execução de procedimentos de forma diferente daquela aqui indicada poderá resultar numa exposição perigosa a radiações ou noutra operação arriscada.
Español --------------------------------------------- |
31 |
Português ------------------------------------------ |
58 |
CONSUMERS SHOULD NOTE THAT NOT ALL HIGH DEFINITION TELEVSION SETS ARE FULLY COMPATIBLE WITH THIS PRODUCT AND MAY CAUSE ARTIFACTS TO BE DISPLAYED INTHE PICTURE. IN CASE OF 525 OR 625 PROGRESSIVE SCAN PICTURE PROBLEMS, IT IS RECOMMENDEDTHAT THE USER SWITCHTHE CONNECTIN TOTHE ‘STANDARD DEFINITION’ OUTPUT. IF THERE ARE QUESTIONS REGARDING OURTV SET COMPATIBILITY WITH THIS MODEL 525p AND 625p DVD PLAYER, PLEASE CONTACT OUR CUSTOMER SERVICE CENTER.
This product incorporates copyright protection technology that is protected by method claims of certain U.S. patents and other intellectual property rights owned by Macrovision Corporation and other rights owners. Use of this copyright protection technology must be authorized by Macrovision Corporation, and is intended for home and other limited viewing uses only unless otherwise authorized by Macrovision Corporation. Reserve engineering or disassembly is prohibited.
Português Español English
3

English
Contents
General Information |
|
Features .................................................................. |
5 |
Supplied accessories ............................................ |
5 |
Environment information ................................... |
5 |
Installation .............................................................. |
5 |
Maintenance .......................................................... |
5 |
Connections |
|
Connecting the right speaker ............................ |
6 |
Connecting a TV set ............................................ |
7 |
Connecting the power cord .............................. |
7 |
Connecting additional |
|
equippments.......................................................................... |
8 |
Functional Overview |
|
Controls on the system ...................................... |
9 |
Remote control ........................................... |
10~11 |
Getting Started |
|
Step 1: Using the Remote Control ................. |
12 |
Step 2: Setting up the TV ........................... |
12~14 |
Selecting the color system that matches |
|
your TV set |
|
Setting up Progressive Scan feature |
|
To deactivate Progressive manually |
|
Step 3: Setting language preference ................ |
14 |
Setting the OSD Language |
|
Setting the Audio, Subtitle and Disc Menu |
|
language |
|
Basic Functions |
|
Switching the system on/off ............................. |
15 |
Power saving automatic standby ..................... |
15 |
Volume control ................................................... |
15 |
Sound Control .................................................... |
15 |
DBB (Dynamic Bass Boost) |
|
DSC (Digital Sound Control) |
|
Disc Operations |
|
Playable Discs ...................................................... |
16 |
Region Codes ...................................................... |
16 |
Playing discs ......................................................... |
17 |
Using the Disc Menu.......................................... |
17 |
Using PBC feature (available for 2.0-version |
|
VCD only) |
|
Resuming playback............................................... |
17 |
Selecting and searching .............................. |
17~18 |
Selecting a different track/chapter |
|
Fast forwarding/reversing |
|
GOTO |
|
Different play modes: |
|
REPEAT, SHUFFLE and REPEAT A-B .............. |
18 |
REPEAT |
|
SHUFFLE |
|
REPEAT A-B |
|
Programming favourite tracks ......................... |
19 |
Display information ............................................ |
19 |
Playing in slow motion ...................................... |
19 |
ZOOM .................................................................. |
20 |
AUDIO ................................................................. |
20 |
SUBTITLE (DVD only) ...................................... |
20 |
Camera angle (DVD only) ................................ |
20 |
Playing a title (DVD only) ................................. |
20 |
Playing MP3/WMA/JPEG disc .......................... |
21 |
Playing Kodak Picture disc ................................ |
21 |
DVD MENU Operations |
|
Using the menu bar ........................................... |
22 |
Using the setup menu (user preference |
|
settings) ........... ............................................. |
23~25 |
TV Display |
|
Screen Saver |
|
Night Mode |
|
Test Tone |
|
Changing the password |
|
Restricting playback by setting parental level |
|
Rating explanations |
|
OSD language (Menu Language) |
|
Default |
|
Specifications ........................................... |
26 |
Troubleshooting ............................. |
27~29 |
Glossary......................................................... |
30 |
4

General Information
IMPORTANT!
PLEASE NOTE THAT THE VOLTAGE SELECTOR LOCATED AT THE REAR OF THIS SYSTEM IS PRESET AT 220V FROM THE FACTORY. FOR COUNTRIES THAT OPERATE AT 110V-127V, PLEASE ADJUST TO 110V-127V BEFORE YOU SWITCH ON THE SYSTEM.
Features
Your DVD MICRO THEATRE System with 2.0- channel full analog amplifier creates the same dynamic sound qualities that you find in full fledged cinemas and incorporates some of the best features in home theater technology. Other features include:
Additional Component Connections
Lets you connect other audio and audio/visual components to the DVD micro system.
Night Mode
Selects Dynamic ON or OFF cyclically
Parental Control (Rating Level)
Lets you set a ratings level so that your children cannot watch a DVD that has a rating higher than you set.
Supplied accessories
–Remote control with one CR2025 battery
–Two speakers
–AC power cord
–DIN cable
–Composite video cable (yellow)
–User Manual and Quick Start Guide
If any item is damaged or missing, contact your retailer or Philips.
Environmental information
All unnecessary packaging has been omitted.We have tried to make the packaging easy to separate into three materials: cardboard (box), polystyrene foam (buffer) and polyethylene (bags, protective foam sheet).
Your system consists of materials which can be recycled and reused if disassembled by a specialised company. Please observe the local regulations regarding the disposal of packaging materials, exhausted batteries and old equipment.
Installation
●Place the player on a flat, hard, and stable surface
●In a cabinet, allow about 10cm (4 inches) of free space all around the player for adequate ventilation.
●Do not expose your player to extreme temperatures or humidity.
●The apparatus shall not be exposed to dripping or splashing and that no objects filled with liquid such as vase shall be placed on the apparatus.
●No naked flame sources, such as lighted candles, shall be placed on the apparatus.
●The ventilation should not be impeded by covering the ventilation openings with items, such as newpapers, table-cloths, curtains, et.
Maintenance
● When a disc becomes dirty, clean it with a cleaning cloth. Wipe the disc from the center out, in a straight line.
●Do not expose the player, batteries or discs to humidity, rain, sand or excessive heat (caused by heating
equipment or direct sunlight). Always keep the disc tray closed to avoid dust on the lens.
●Do not use solvents such as benzene, thinner, commercially available cleaners, or anti-static spray intended for colour discs.
●The lens may cloud over when the player is suddenly moved from cold to warm surroundings, making it impossible to play a disc. Leave the player in the warm environment until the moisture evaporates.
English
5
English
Connections
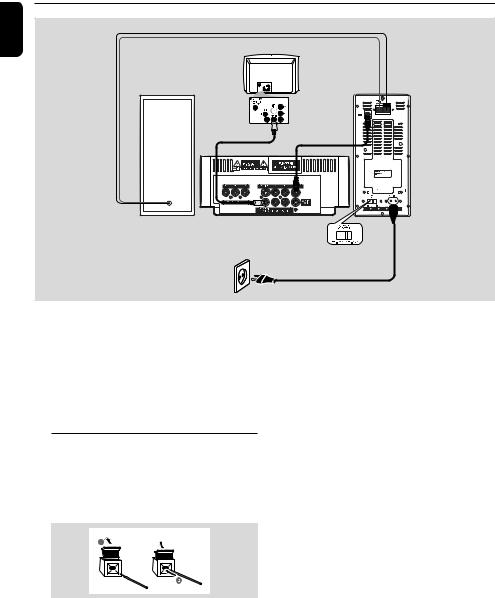
Speaker wires
TV
Right speaker |
Left speaker |
Video cable
DIN cable
DVD player
Voltage selector
AC power cord
IMPORTANT!
–The type plate is located at the bottom of the system.
–Before connecting the AC power cord to the wall outlet, ensure that all other connections have been made.
–Never make or change any connections with the power switched on.
Connecting the right speaker
Connect the supplied wires of the right speaker to SPEAKER RIGHT on the left speaker, red wire to red jack ( “+”), black wire to black jack (“-”).
Fully insert the stripped portion of the speaker wire into the terminal as shown.
Notes:
–Ensure that the speaker wires are correctly connected. Improper connections may damage the system due to short-circuit.
–For optimal sound performance, use the supplied speakers.
–Do not connect more than one speaker to any one pair of +/- speaker jacks.
–Do not connect speakers with an impedance lower than the speakers supplied. Please refer to the SPECIFICATIONS section of this manual.
6
Connections
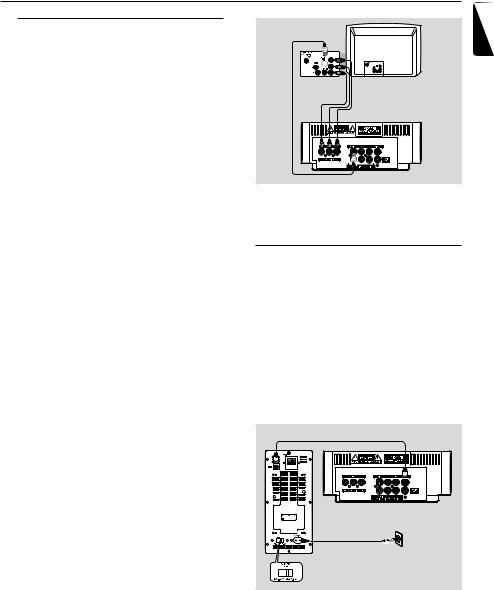
Connecting a TV set
You must connect a TV to your DVD micro system in order to view the playback of DVD/ VCD and picture disc.
IMPORTANT!
–There are various ways to connect the system to a TV.You only need to make one of the best connections, depending on the capabilities of your TV system.
–S-Video or Component Video connection provides higher picture quality. These options must be available on your TV set.
–Connect the system directly to theTV set.
●Connect the COMPOSITE VIDEO jack to the video input jack on the TV using a video cable (yellow).
OR
Option 1
Connect the S-VIDEO output jack to the S- Video input jack on the TV using an S-Video cable (not supplied).
OR
Option 2
Use the component video cables (red/blue/ green, not supplied) to connect the DVD micro system’s COMPONENT VIDEO OUT video output jacks to the corresponding component video input jacks (or labeled as Pr/Cr Pb/Cb Y or YUV) on the TV.
IMPORTANT!
–The progressive scan video quality is only possible when usingY Pb Pr and a progressive scan TV is required. (Proceed to “Setting up the TV for detailed Progressive Scan setup.)
Option 1
Option 2
Note:
– To avoid magnetic interference, do not position the speakers too close to your TV.
Connecting the power cord
IMPORTANT!
–If your system is equipped with a Voltage Selector, set the VOLTAGE SELECTOR (located on the back of the left speaker) to match the local power line.
–Never make or change any connection with the power switched on.
–The DVD player can only be operated after the supplied DIN cable is connected.
DIN cable |
1 |
|
DVD player |
Left speaker |
|
|
2 |
AC power cord |
|
Voltage selector |
|
1Connect the supplied DIN cable to DVD player’s DIN jack and the left speaker’s DIN jack.
2Connect the supplied AC power cord to the left speaker’s AC MAINS and the wall socket.
English
7

English
Connections
Connecting additional equippments
IMPORTANT!
–Some discs are copy-protected.You cannot record the disc through a VCR or digital recording device.
–When making connections, make sure the colour of the cable plugs matches the colour of jacks.
–Always refer to the owner’s manual of the other equipment for complete connection and usage details.
|
|
AUDIO OUT |
|
|
L |
|
|
R |
|
|
A |
|
Television |
|
|
(for example) |
|
|
B |
C |
AUDIO IN |
VIDEO IN |
|
|
|
|
L |
|
|
R |
|
|
|
VCR |
CD Recorder |
|
(for example) |
|
|
(for example) |
|
|
|
Viewing and listening to the playback of other equipment A
●Using the audio cables (red/white, not supplied) Connect the system’s AUX IN (R/L) jacks to the AUDIO OUT jacks on the other audio/visual device (such as a TV,VCR, Laser Disc player or cassette deck).
Before starting operation, press AUX on the remote repeatedly in order to activate the input source (AUX).
Recording (digital) C
●Connect the system’s COAXIAL OUT (digital out) jack to the DIGITAL IN jack on a digital recording device (DTS-Digital Theater System compatible, with a Dolby Digital decoder, for example).
Before operation, set COAXIAL OUTPUT according to the audio connection.
Using the VCR for recording DVDs B
●Connect one of the system's COMPOSITE VIDEO jacks to the corresponding VIDEO IN jack, and LINE OUT (R/L) jacks to the AUDIO IN jacks on the VCR.This will allow you to make analogue stereo (two channel, right and left) recordings.
8

Functional Overview
English
1 |
7 |
2 |
8 |
|
9
3
|
|
0 |
4 |
0 |
! |
|
|
|
5 |
|
|
6 |
|
|
Controls on the system
1 DBB
–enables or disables bass enhancement.
2 DSC
–selects different types of preset sound equalizer settings (CLASSIC, POP, ROCK or JAZZ).
3 à / á
–fast searches backward/forward in a disc at different speeds.
4 STANDBY-ON B
–switches the system on or to standby mode.
5 ÉÅ
–starts or interrupts disc playback
SOURCE
–selects the respective sound source: DVD or AUX.
¡ / ™
–press to skip to the previous/next chapter/title/ track.
9
–stops disc playback or erases a program.
6 iR Sensor
–point the remote control towards this sensor.
7 OPEN/CLOSEç
–opens or closes the disc door.
8 PROGRAM
–For VCD/CD only: program the favourite tracks
9 MODE
–selects various repeat play modes (For VCD with PBC feature, PBC must be turned off.)
0 VOLUME +/-
–adjusts the volume upward/downward.
! Display
–shows the current status of the DVD player.
9
English
Functional Overview
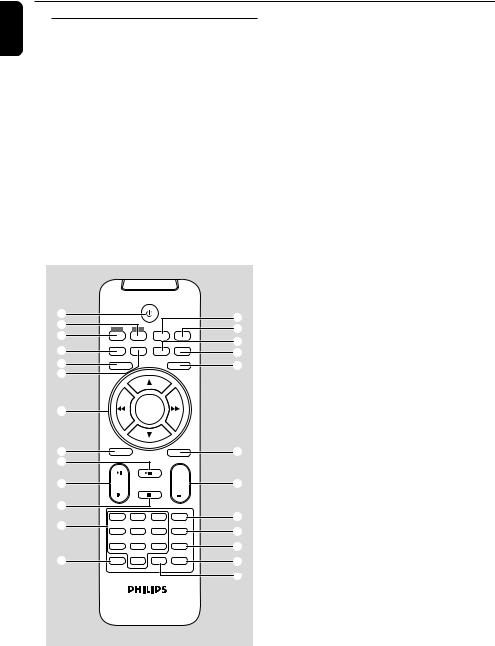
Remote control
1 B
–switches the system on/ off.
2 AUX
–selects a connected external source
3 DISC
–selects disc playing
4 SUBTITLE
–selects a subtitle language.
5 SYSTEM MENU
–enters or exits the system menu.
6 REPEAT
–selects variations of continuous playback (For VCD with PBC feature, PBC must be turned off.)
1 |
|
|
|
|
$ |
|
2 |
|
|
|
|
||
DISC |
AUX |
DISPLAY |
SLOW |
% |
||
3 |
||||||
|
|
OSD |
|
^ |
||
|
SUBTITLE REPEAT A-B |
SHUFFLE |
||||
4 |
SYSTEM MENU |
|
|
DISC MENU |
& |
|
5 |
|
|
|
|||
|
|
|
|
* |
||
6 |
|
|
|
|
|
|
7 |
|
|
OK |
|
|
|
|
AUDIO |
|
|
MUTE |
|
|
8 |
|
|
|
|
( |
|
9 |
|
|
|
|
|
|
|
|
|
|
+ |
|
|
0 |
|
|
|
VOL |
) |
|
! |
|
|
|
|
|
|
|
1 |
2 |
3 |
GOTO |
¡ |
|
@ |
4 |
5 |
6 |
ZOOM |
™ |
|
|
||||||
|
7 |
8 |
9 |
DSC |
£ |
|
# |
PROG |
0 |
ANGLE |
DBB |
≤ |
|
∞
7 OK
–confirms a selection. 4 / 3 / à / á
–selects an item in a menu.
–moves an enlarged picture down/up/left/right.
8 AUDIO
for VCD
–sets Left vocal, Right vocal, Mono left, Mono right or Stereo sound mode.
for DVD
–selects an audio language.
9 ÉÅ
–starts or interrupts disc playback.
0 ¡ / ™
–Disc: skips to the previous/next chapter/title/ track
–For JPEG: selects different zooming rates
! 9
–stops disc playback or erases a program.
@ Numeric Keypad (0-9)
–inputs a track/title/chapter number of the disc.
# PROG
–For VCD/CD only: program the favourite tracks
$ DISPLAY (OSD)
–displays disc playback time during playback
% SLOW
–selects different slow playback modes for a VCD/ SVCD/DVD.
^ A-B
–repeats playback of a specific section within a chapter of DVD or a track.
& SHUFFLE
–For VCD/CD only: selects to playback in random order (For VCD with PBC feature, PBC must be turned off.)
* DISC MENU
–DVD/VCD: enters or exits the disc contents menu (For VCD with PBC feature, PBC must be turned on.)
–MP3/WMA/JPEG: switches on or off the album/ picture menu.
10
 Loading...