


Philips
Medication Dispenser
User Manual

Table of Contents
Contents
Contents
Introduction. . . . . . . . . . . . . . . . . . . . . . . . . . . |
. . |
. |
. |
. |
|
.1. . . . . . |
Welcome. . . . . . . . . . . . . . . . . . . . . . . . . . . . . . . . . |
. . |
. |
. |
. |
. |
.1 . . . . . . . |
What’s in the Box. . . . . . . . . . . . . . . . . . . . . . . . . . . . |
. . . |
. |
. |
. |
|
. 3. . . . . . . |
Philips Medication Dispenser. . . . . . . . . . . . . . . . . . . . . . . . . . |
. . . |
. . |
. |
. |
. |
. 5 |
Keypad.. . . . . . . . . . . . . . . . . . . . . . . . . . . . . . . . . . . . . . . . . . . . . . . . . . . . . |
. . . . . |
. |
. . |
. . |
|
. 5 |
At a Glance.. . . . . . . . . . . . . . . . . . . . . . . . . . . . . . . . . . . . . . . . . . . . . . . . . |
. . . . . |
. |
. . |
. . |
|
. 6 |
Frequently Asked Questions.. . . . . . . . . . . . . . . . . . . . . . . . . . . . . . . . . . . |
. . . . . |
. |
. . |
. . |
|
. 8 |
Preparing and Loading Medication . . . . . . . . . . . . . . . . . . . . . |
. . . . |
. |
. |
. . |
|
. 9 |
Determine How Many Days of Medication to Load.. . . . . . . . . . . . . . . |
. . . . . |
. |
. . |
. . |
|
. 9 |
Prepare Medication. . . . . . . . . . . . . . . . . . . . . . . . . . . . |
. . |
. |
. |
. |
. |
10. . . . . . . . |
Loading Medication. . . . . . . . . . . . . . . . . . . . . . . . . . . . |
. . |
. |
. |
. |
. |
12. . . . . . . . |
Frequently Asked Questions.. . . . . . . . . . . . . . . . . . . . . . . . . . . . . . . . . . . . |
. . . . |
. . |
. |
. . |
|
14 |
Table of Contents
Dispensing Medication . . . . . . . . . . . . . . . . . . . . . . . . . . . . . . . . . . . . |
. . |
|
. 15 |
||
Medication and Reminder Messages. . . . . . . . . . . . . . . . . . . . . . . |
. |
. |
15. . . . . . . . . . |
||
Normal Operation.. . . . . . . . . . . . . . . . . . . . . . . . . . . . . . . . . . . . . . . . . . . . . . . . . |
. . . |
|
. 16 |
||
Missed Doses. . . . . . . . . . . . . . . . . . . . . . . . . . . . . . . . . . |
. . |
|
. 17. . . . . . . . . . |
||
Early Dose. . . . . . . . . . . . . . . . . . . . . . . . . . . . . . . . . . . . |
. |
. |
17. . . . . . . . . . |
||
Frequently Asked Questions.. . . . . . . . . . . . . . . . . . . . . . . . . . . . . . . . . . . . . . . . . |
. . . |
|
. 18 |
||
Changing Medication and Delivery Schedule. . . . . . . . . . . . . . . . . . |
. . |
|
. 19 |
||
Guidelines . . |
. . . . . . . . . . . . . . . . . . . . . . . . . . . . . . . . . . |
. |
. |
19. . . . . . . . . . |
|
Review Feature.. . . . . . . . . . . . . . . . . . . . . . . . . . . . . . . . . . . . . . . . . . . . . . . . . . . . |
. . . |
. |
19 |
||
Frequently Asked Questions.. . . . . . . . . . . . . . . . . . . . . . . . . . . . . . . . . . . . . . . . . |
. . . |
. |
20 |
||
Monitoring and Response. . . . . . . . . . . . . . . . . . . . . . . |
. |
|
.21. . . . . . . . . |
||
Caregiver Alerts .. . . . . . . . . . . . . . . . . . . . . . . . . . . . . . . . . . . . . . . . . . . . . . . . . . . |
. . . |
. |
21 |
||
Almost Empty Alerts .. . . . . . . . . . . . . . . . . . . . . . . . . . . . . . . . . . . . . . . . . . . . . . . |
. . . |
. |
22 |
||
Daily Check-In. . . . . . . . . . . . . . . . . . . . . . . . . . . . . . . . . . |
. |
. |
22. . . . . . . . . . |
||
Online Monitoring Report. . . . . . . . . . . . . . . . . . . . . . . . . . . . |
. |
. |
22. . . . . . . . . . |
||
Frequently Asked Questions.. . . . . . . . . . . . . . . . . . . . . . . . . . . . . . . . . . . . . . . . . |
. . . |
. |
23 |
||
Additional Features. . . . . . . . . . . . . . . . . . . . . . . . . . |
. |
. |
25. . . . . . . . . |
||
Status . . . . . . . . . . . . . . . . . . . . . . . . . . . . . . . . . . . . . . |
. . |
|
. 25. . . . . . . . . |
||
Adjusting Settings.. . . . . . . . . . . . . . . . . . . . . . . . . . . . . . . . . . . . . . . . . . . . . . . . . . |
. . . |
. |
27 |
||
Demonstration Program.. . . . . . . . . . . . . . . . . . . . . . . . . . . . . . . . . . . . . . . . . . . . |
. . . |
. |
28 |
||
Frequently Asked Questions.. . . . . . . . . . . . . . . . . . . . . . . . . . . . . . . . . . . . . . . . . |
. . . |
. |
30 |
||
Installation. |
. . . . . . . . . . . . . . . . . . . . . . . . . . . . . . . . . . . . . . . . . . . . . |
. . |
|
. 31 |
|
Subscriber Activation.. . . . . . . . . . . . . . . . . . . . . . . . . . . . . . . . . . . . . . . . . . . . . . . |
. . . |
. |
31 |
||
Setup . . |
. . . . . . . . . . . . . . . . . . . . . . . . . . . . . . . . . . . . |
. . |
|
. 32. . . . . . . . . |
|
Scheduling .. . . |
. . . . . . . . . . . . . . . . . . . . . . . . . . . . . . . . . . . . . . . . . . . . . . . . . . . . . |
. . . |
. |
35 |
|
Frequently Asked Questions.. . . . . . . . . . . . . . . . . . . . . . . . . . . . . . . . . . . . . . . . . |
. . . |
. |
36 |
||
Special Installations. . . . . . . . . . . . |
. . . . . . . . . . |
. . |
. . . |
. |
37. . . . . . . |
Voice-over-IP (VoIP) and DSL Phone Service. . |
. . . . . . . . . . . |
. . |
. . . . |
. |
37. . . . . . . . |
Philips Lifeline Medical Alert Service.. . . . . . |
. . . . . . . . . . . |
. . |
. . . . |
. |
37. . . . . . . . |
Answering Machines. . . . . . . . . . . . . . . |
. . . . . . . . . . . |
. . |
. . . . |
. |
38. . . . . . . . |
Set Date and Time (no phone line).. . . . . . . . . . |
. . . . . . . . . . . . . . . . . . |
. . . |
. . . . . . . |
. |
39 |
Adjust Volume (no phone line). . . . . . . . . |
. . . . . . . . . . . . |
. . |
. . . . |
|
.39. . . . . . . |
Manual Scheduling (no phone line). . . . . . . |
. . . . . . . . . . . . |
. . |
. . . . |
|
. 40. . . . . . . . |
Maintenance. . |
. . . . . . . . . . . . . . . . . . . . . . . |
. . . . . . |
. |
43. . . . . . . |
Ordering Supplies |
. . . . . . . . . . . . . . . . . . . . . . . . . . |
. . . . . . . |
. |
.43. . . . . . . |
Cleaning.. . . . . . . . |
. . . . . . . . . . . . . . . . . . . . . . . . . . . . . . . . . . . . . . . . . |
. . . . . . . . . . . . |
. |
43 |
Returns. . . . . . |
. . . . . . . . . . . . . . . . . . . . . . . . . . |
. . . . . . . |
. |
43. . . . . . . . |
Dispenser Service. |
. . . . . . . . . . . . . . . . . . . . . . . . . |
. . . . . . . |
. |
.43. . . . . . . |
Reference. . |
. . . . . . . . . . . . . . |
. . . . . . . . . . . . . . . . |
. |
45. . . . . . . |
Safety Information. . . . . . . . . . . . . . |
. . . . . . . . . . . . . . . . . . . |
. |
.45. . . . . . . |
|
Resetting the Philips Medication Dispenser. |
. . . . . . . . . . . . . . . . . . . |
. |
.46. . . . . . . |
|
Caregiver Alerts .. . . . . . . . . . . . . . . . . . . . . . . |
. . . . . . . . . . . . . . . . . . . . . . . . . . . . . . |
. . |
47 |
|
Troubleshooting. . . . . . . . . . . . . . . . |
. . . . . . . . . . . . . . . . . . |
. |
. 48. . . . . . . |
|
Regulatory Compliance . . . . . . . . |
. . . . |
. . . . . . . . |
. . . . . . |
. . . . |
. . . |
. |
. . . |
. 49 |
FCC and Canadian ACTA Regulations. |
. . . |
. . . . . . |
. . . . . |
. . . |
. . |
. |
. . |
. 49. . . . . . . . |
Requirements for the United States. . |
. . . |
. . . . . . |
. . . . . |
. . . |
. . |
. |
. . |
. 49. . . . . . . . |
Requirements for Canada .. . . . . . . . . . . |
. . . . |
. . . . . . . . . . |
. . . . . . . . |
. . . . . |
. . . |
. . |
. . . |
. 52 |
Table of Contents

Important
 Information

•Accuracy in loading the Philips Medication Dispenser is critical. Double-check each cup prior to loading, and follow the loading instructions announced and displayed on the dispenser..
•Do not load lifesaving medication into the dispenser (e.g., nitroglycerine), because you may not be able to access it quickly in an emergency situation..
•Check the expiration date of your medication before loading. Do not load medication that is due to expire within 40 days..
•If you have an 800# block on your phone, disable the block or allow access to the
Support Center’s toll-free number so the dispenser can perform its daily check-in..
•If you have voicemail service, clear voice messages daily so the dispenser can perform its daily check-in..
•The dispenser must be placed in an indoor living area.
•Place the dispenser on a hard, flat surface.
•Do not place the dispenser on a radiator or other heated surface.
•Do not plug the dispenser into an electrical outlet that is controlled by a wall switch, because someone could accidentally switch off the power..
•To reduce the risk of electrical shock or fire, do not place the dispenser in or near water or other liquids..
•Do not spray cleaners directly onto the dispenser because moisture could get inside and cause damage..
•The dispenser has a rechargeable battery. You should occasionally check the battery’s status (please refer to the instructions on page 25).. If the battery status is below 80%, please contact the Support Center for assistance..
For assistance, call the Support Center at 1-888-632-3261..

Introduction

Welcome
Thank you for selecting the Philips Medication Dispenser..
The Philips Medication Dispenser can help simplify taking medication properly
Taking medications at the right times and in the correct amounts is critical for health, wellness, and safety.. It takes organization and sticking to a schedule.. But the more medications prescribed, the greater the challenge.. And in some situations, managing it all can get so overwhelming for the patient – and the caregiver – that it threatens
the independence of both.. But you’ve found an answer! The dispenser can help make taking medication properly as simple as pushing a button..
Peace of mind and independence for caregivers and patients
The caregiver still has an important role to play, but the dispenser reduces the need for intrusive and time-consuming daily visits and reminder phone calls.. Whether the caregiver is family, a friend or a healthcare provider, the Philips Medication Dispenser makes it possible for them to prepare and set up medication a week or more in advance.. The dispenser takes it from there, with audible voice prompts that cue the patient when it’s time to push the button and take the scheduled medication.. Further simplifying the role of the caregiver, the system is remotely monitored via phone
line.. If the patient misses a dose or there is a problem with the system, the dispenser automatically places an alert call to the caregiver.. And with the online reporting feature, the caregiver can also check in anytime to make sure that everything is going well..
Introduction |
1 |
Easy installation and total support
Typically, a professional installer will set up the Philips Medication Dispenser.. He/she will select an appropriate location in the home and program the medication schedule.. The caregiver should be there so the installer can answer questions and provide helpful advice..
If you are installing the dispenser yourself, please refer to the instructions starting on page 31.. We’ve designed this User’s Manual to make it easy to understand the Philips Medication Dispenser.. But if you have any questions, please don’t hesitate to call.. The Support Center is available 24/7 to provide assistance.. They’ll help make sure that the dispenser is programmed and functioning correctly.. After installation, if needed, they will help set up service and repair appointments or next-day delivery of a replacement system.. What’s more, a Support Specialist can help take care of changes to medications and schedules, and provide backup coverage for the patient in case the caregiver can’t be reached.. No matter what, we’ll be there for you..
Again, thank you for choosing the Philips Medication Dispenser!
2 |
For assistance, call the Support Center at 1-888-632-3261.. |
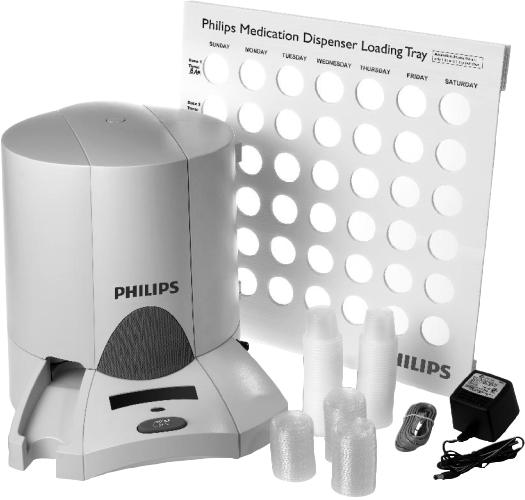
What’s in the Box
•Philips Medication Dispenser
•Medication loading tray
•Medication cups and lids
•Door lock keys (2)
•Telephone cable
•AC power adapter
•Caregiver Quick Reference Guide (to be left with the dispenser for easy reference)
•Quick Guide to CaregiverAlerts (small card for caregivers to take home with them)
•SpecialTelephone Service Considerations pamphlet
Introduction |
3 |
4 |
For assistance, call the Support Center at 1-888-632-3261.. |
Philips Medication Dispenser
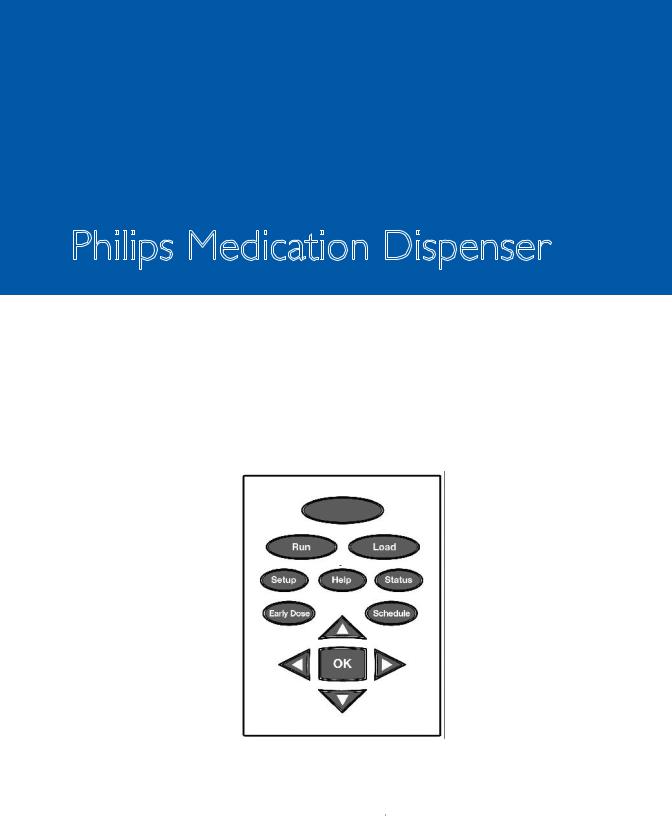
Keypad
|
|
|
|
|
|
|
|
|
|
Help |
|
|
|||
|
|
|
|
|
|
|
|
|
|
|
|
||||
|
|
|
|
|
|
|
|
|
|
Press “Help” to access information about |
|||||
|
|
|
|
|
|
|
|
|
|
the dispenser or to unload medication cups.. |
|||||
Run |
|
|
|
|
|
|
|
|
|
|
|
|
|
Load |
|
|
|
|
|
|
|
|
|
|
|
|
|
||||
Press “Run” to resume |
|
|
|
|
|
|
|
|
|
|
Press “Load” to load |
||||
normal operation after |
|
|
|
|
|
|
|
|
|
|
medication.. Also, press |
||||
you have used other |
|
|
|
|
|
|
|
|
|
|
“Load” to review or |
||||
keypad features.. |
|
|
|
|
|
|
|
|
|
|
change medication that |
||||
|
|
|
|
|
|
|
|
|
|||||||
|
|
|
|
|
|
|
|
|
|
|
|
|
|
|
has already been loaded |
Setup |
|
|
|
|
|
|
|
|
|
|
|
|
into the dispenser.. |
||
|
|
|
|
|
|
|
|
|
|
|
|||||
|
|
|
|
|
|
|
|
|
|
|
|||||
Press “Setup” to |
|
|
|
|
|
|
|
|
|
|
|
||||
|
|
|
|
|
|
|
|
|
|
|
|||||
adjust the time, display |
|
|
|
|
|
|
|
|
|
|
Status |
||||
|
|
|
|
|
|
|
|
|
|||||||
brightness or speaker |
|
|
|
|
|
|
|
|
|
|
Press “Status” to get |
||||
volume.. |
|
|
|
|
|
|
|
|
|
|
information about missed |
||||
|
|
|
|
|
|
|
|
|
|
|
|
|
|
|
doses, the amount of |
Early Dose |
|
|
|
|
|
|
|
|
|
|
|
medication remaining |
|||
|
|
|
|
|
|
|
|
|
|
||||||
Press “Early Dose” to |
|
|
|
|
|
|
|
|
|
|
in the dispenser or the |
||||
take medicine out of |
|
|
|
|
|
|
|
|
|
|
battery status.. |
||||
the dispenser ahead of |
|
|
|
|
|
|
|
|
|
|
|
||||
schedule.. |
|
|
|
|
|
|
|
|
|
|
Schedule |
||||
|
|
|
|
|
|
|
|
|
|
||||||
|
|
|
|
|
|
|
|
|
|
|
|
|
|
|
Press “Schedule” to start |
OK |
|
|
|
|
|
|
|
|
|
|
|
the automatic scheduling |
|||
|
|
|
|
|
|
|
|
|
|
||||||
Press “OK” to accept |
Arrow keys |
|
|
|
|
|
procedure.. |
||||||||
|
|
|
|
||||||||||||
or to enter a current |
Use the arrow keys to select |
|
|
||||||||||||
selection.. |
|
|
|||||||||||||
options as presented on the |
|
|
|||||||||||||
|
|
|
|
|
|
|
|||||||||
|
|
|
|
|
display.. The selected option |
|
|
||||||||
|
|
|
|
|
will blink.. |
|
|
||||||||
Introduction |
|
|
|
|
|
|
|
|
|
5 |
|||||
At a Glance
Medication |
|
|
|
|
|
|
Speaker |
|
|
|
|
|
|
|
|||
|
|
|
|
|
|
|
||
Dispensing |
|
|
|
|
|
|
Door Key |
|
Area |
|
|
|
|
|
|
|
|
|
|
|
|
|
|
|
||
Indicator |
|
|
|
|
|
|
Display |
|
|
|
|
|
|
|
|||
|
|
|
|
|
|
|
||
|
|
|
|
|
|
|
||
Light |
|
|
|
|
|
|
|
|
Red
Button
6 |
For assistance, call the Support Center at 1-888-632-3261.. |

Cylinder
Keypad |
Rechargeable |
Missed |
|
Battery |
Dose Bin |
Warning: Always keep the door closed and locked, and store the key in a safe place..
Introduction |
7 |
Frequently Asked Questions
Will the Philips Medication Dispenser work during a power outage?
Yes. The dispenser has a rechargeable battery that will provide up to 18 hours of backup power during a power outage.. If the power has been out for 10 hours and there is an emergency situation (such as a hurricane or snowstorm) where the power may not be restored for hours or days, please call the Support Center for assistance.. NOTE: If you have a phone system that does not operate during a power outage, the dispenser’s automatic monitoring service will be disabled..
Will the dispenser work if the patient doesn’t have a landline phone?
Yes. The dispenser will work without a telephone line connection, but this will disable the monitoring service and outbound caregiver alert calls..
Can two people in the same home use the dispenser?
No.. Because medications are so important, each person in the home should have his or her own Philips Medication Dispenser to avoid errors with medications..
What if medications change?
Please refer to page 19 for instructions on changing medications.. Caregivers may also call the Support Center for assistance at 1-888-632-3261..
Where do I find the serial number of the dispenser?
The serial number is printed on the label adhered to the side of the dispenser, inside the door. You can also view the serial number by pressing the“Help” key and selecting “S/N..”
Can the Support Center turn on the dispenser?
No.. The dispenser can only be turned on using the power switch located on the back of the dispenser..
Can the Support Center unlock and open the door of the dispenser?
No. You must use the supplied key to unlock and open the door of the dispenser.
8 |
For assistance, call the Support Center at 1-888-632-3261.. |

Preparing and Loading

Medication
Determine How Many Days of Medication to Load
Before you get started:
•Gather all medications and have the medication and reminder schedule in front of you..
•Talk to the patient’s doctor or pharmacist about getting all medication refills on the same 30-day cycle..
•If possible, get prescriptions refilled at the same pharmacy.
1.Most caregivers choose to load 7-10 days’ worth of medication. The amount of medication you choose to load may depend upon:
•Frequency of caregiver visits – If you visit the patient weekly, it may make sense to load one week’s worth of medication at a time..
•Date of the patient’s next doctor appointment – Since prescriptions frequently change, load medication for only a couple days beyond the appointment.. This will allow time to fill new prescriptions and also minimize the number of medication cups that will have to be changed..
Preparing and Loading Medication |
9 |
2.The Philips Medication Dispenser holds up to a 40-day supply of medication. The number of days that can be loaded depends upon the number of doses taken per day. For example,if the patient requires 3 doses per day,you can load up to 20 days’ worth of medicine into the dispenser.
Medication doses per day |
Maximum # of days that can be loaded |
1 |
40 |
2 |
30 |
3 |
20 |
4 |
10 |
5 |
10 |
6 |
10 |
3.Once you have determined how many days to load,make sure that you have enough medication to cover the time period. This will depend upon the number of pills that are taken each day. For example,if the patient takes 2 pills a day and you want to load 7 days’ worth of medication,then you will need 14 pills.
# of pills per day x # of days to load = number of pills required
Prepare Medication
•Important: Load only capsules or pills into the medication cups.. Do not use liquid medication..
•Only use cups and lids ordered through Philips.
•Make sure the cups and lids are not stuck together.
•Do not overload cups. Make sure the lids can be attached securely after loading.
•Be careful to avoid crushing or folding the cups when applying the lids.
•Make sure lids are secure.
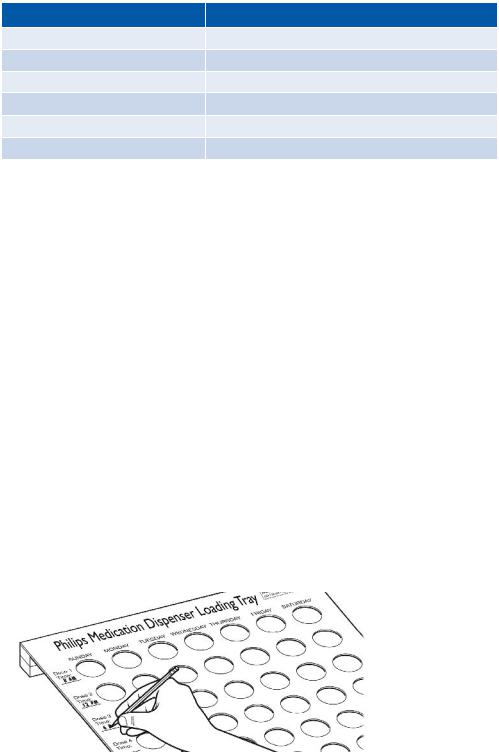
1.Place the loading tray on a table or countertop. With a pencil,mark the time for each dose along the left side of the tray. There can be up to 6 different dose times.
10 |
For assistance, call the Support Center at 1-888-632-3261.. |

2.Place empty cups into the loading tray at the corresponding dosage times for each day of the week. If there are fewer than 6 doses a day,there will be holes left open.
3.If this is the first time the dispenser is being loaded,remove the cups that correspond with doses already taken that day. These will not be loaded into the dispenser.
4.Load medication into the cups. When you are done,each cup should contain the correct combination of medication to be taken at a particular time.
5. Snap lids onto the medication cups.
Preparing and Loading Medication |
11 |
Helpful Hint: Use a permanent marker to write the day and time for each dose on the lid of the cup.. This is helpful if cups are unloaded to make medication changes or if you dispense doses early..
The medication cups can now be loaded into the dispenser.. After a week’s worth of medication has been loaded, repeat the process above to prepare medication cups for
the remaining days or weeks..
Loading Medication
•Accuracy in loading the dispenser is critical. Double-check each cup prior to loading, and follow the loading instructions announced and displayed on the dispenser..
•Always load a complete day’s worth of medication EXCEPT when loading the dispenser for the first time. When loading for the first time, you will be instructed to load only the medications remaining for the day..
•Load cups upside down in the order that they are to be taken. In other words, the 1st dose of the day is loaded first, the 2nd dose is loaded second, etc.
1. Turn the key clockwise to open the door.
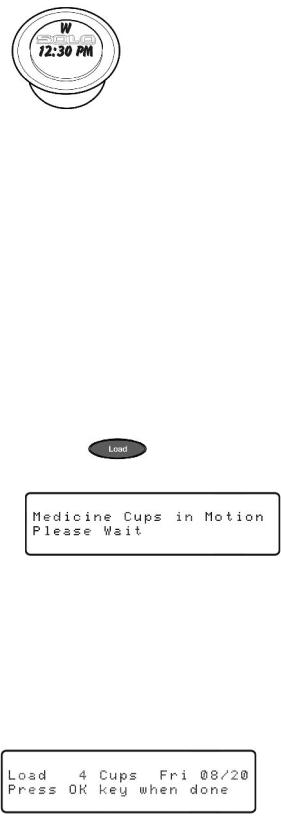
2. Press the key. You will hear and see the cylinders being rotated,and the display will show:
3.It can take up to two minutes for the dispenser to correctly position the cylinders. Once complete,“Please load‘x’ medicine cups” will be announced.
NOTE: If you do not have medication to load, do not press the “OK” key.. Instead, press the “Run” key to exit..
You will be asked to load the appropriate number of cups for the date displayed. Remember, if this is your first time loading, you will be asked to load only the remaining medication for the first day.
|
|
|
|
|
“OK” will be blinking.. |
|
|
|
|
|
|
|
Number of medication |
|
The day for which you |
||
|
cups to load |
|
are loading medication |
||
12 |
|
For assistance, call the Support Center at 1-888-632-3261.. |
|||

4.Load medication cups for the day/date displayed on the dispenser. Make sure to load the cups upside down in the order that they are to be taken. In other words,the 1st dose of the day is loaded first,the 2nd dose is loaded second,etc.
3rd dose
2nd dose
1st dose
Medication is loaded on a day-by-day basis.. After one day’s worth of medication is loaded, the cylinders will rotate before the next day’s medication is loaded..
5.When you have loaded all the cups for that day,press the“OK” key to continue. The display will show:
“Continue” will be blinking..
6.To continue loading medication,press the“OK” key. Repeat the steps above until all medications are loaded.
•Always load a complete day’s worth of medication.
•If you are loading more than 10 days’ worth of medication, the cylinders will contain medication cups loaded for a previous day.. This is completely normal.. Load the new day’s medication cups on top of those already in the cylinder..
7.To exit and stop loading medication,press the right or left arrow key until“Quit” is blinking and then press the“OK” key.
NOTE: If you accidentally select “Continue” instead of “Quit,” simply press the “Run” key to exit..
Preparing and Loading Medication |
13 |

After the medication has been loaded, the dispenser will begin normal operation.. The display will show:
If you do not see a similar display in between dose times, you may have to press the “Run” key..
Frequently Asked Questions
What if I accidentally select“Continue” when I meant to quit loading the medication?
Simply press the “Run” key.. The dispenser will exit the loading process and resume normal operation..
What if I can’t fit all the pills I need into the medication cup?
Please contact the Support Center for assistance..
14 |
For assistance, call the Support Center at 1-888-632-3261.. |
 Loading...