


Model No. KX-TGE662/KX-TGE663/KX-TGE664
KX-TG854SK/KX-TG855SK
KX-TGE674/KX-TGE675/KX-TG865SK
Quick Guide
Connections
Base unit
1 Connect the AC adaptor to the unit by pressing the plug firmly. 2 Fasten the cord by hooking it.
3 Connect the AC adaptor to the power outlet.
4Connect the telephone line cord to the unit, then to the single-line telephone jack (RJ11C) until you hear a click. 5 A DSL/ADSL filter (not supplied) is required if you have a DSL/ADSL service.
Note:
L Use only the supplied Panasonic AC adaptor PNLV226.

 1 4
1 4


2 4


5
3
Charger
1 Connect the AC adaptor to the power outlet.
 1
1
Printed in Malaysia |
PNQW5465ZA PP1117AM0 |

Battery installation/Battery charging
Charge for about 7 hours.
 4
4
3 |
2 |
|
|
2 |
|
1 |
|
1 |
Note:
L USE ONLY rechargeable Ni-MH batteries AAA (R03) size (1).
L Do NOT use alkaline/manganese/Ni-Cd batteries.
L Confirm correct polarities (S, T).
L Follow the directions on the display to set up the unit.
L Confirm “Charging” is displayed (2).
Removing the battery
1 


 2
2


– 2 –
Operating tips
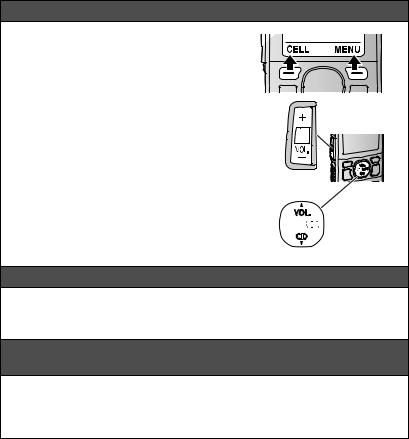
Soft keys
By pressing a soft key, you can select the feature shown directly above it on the display. Pay attention to the display to see what functions the soft keys are assigned during operation.
Volume key
Press {+} or {-} repeatedly when:
−adjusting the ringer volume.
−adjusting the receiver or speaker volume while
talking.
Navigator key
−{^}, {V}, {<}, or {>}: Scroll through various lists and items.
−VOL. (Volume: {^} or {V}): Adjust the receiver or speaker volume while talking.
−{<} k: View the phonebook entry.
−{>} REDIAL: View the redial list.
−{V} CID (Caller ID): View the caller list.
{^}
{<} 


 {>}
{>}
{V}
Date and time (Handset)
1{MENU}(1)1
2Enter the current month, date, and year. s {OK}
3Enter the current hour and minute (12-hour clock format).
4*: Select “AM” or “PM”. s {SAVE} s {OFF}
Recording your greeting message of the answering system for the landline (Handset)
You can record your own greeting message instead of using a pre-recorded greeting message.
1{MENU}(3)2 s {r}: “Yes” s {SELECT}
2After a beep sounds, hold the handset about 20 cm (8 inches) away and speak clearly into the microphone (2 minutes max.).
3Press {STOP} to stop recording. s {OFF}
– 3 –

Link to cell
You can connect your base unit and cellular phone using Bluetooth® wireless technology, so that you can make or answer cellular calls using your phone system. For more details, please visit our Web site: http://shop.panasonic.com/bluetooth-phone
L Locate your cellular phone near the base unit. If the cellular phone is too close to the base unit during a cellular call, you may hear noise. For best performance, we recommend placing the cellular phone between 0.6 m to 3 m (2 feet to 10 feet) away from the base unit.
1
2
1 Cellular line
2 Cellular line service providers
Pairing a Bluetooth cellular phone
1Base unit:
Press and hold {CELL 1} or {CELL 2} for about 5 seconds.
L After the corresponding CELL indicator on the base unit starts flashing, the rest of the procedure must be completed within 5 minutes.
2Your cellular phone:
While the corresponding CELL indicator is flashing, follow the instructions of your cellular phone to enter the pairing mode.
L Depending on your cellular phone, it may ask you to enter the Bluetooth PIN (default:
“0000”).
L If your cellular phone prompts you to confirm the passkey, tap {OK} or otherwise to accept the pairing request.
3Base unit:
Wait until a long beep sounds.
L It may take more than 10 seconds to complete pairing.
L When the corresponding CELL indicator lights up, the cellular phone is connected to the base unit. You are ready to make cellular calls.
Note:
L Make sure that your cellular phone is set to connect to this product automatically. Refer to your cellular phone’s operating instructions.
Trademarks
L The Bluetooth® word mark and logos are registered trademarks owned by Bluetooth SIG, Inc., and any use of such marks by Panasonic Corporation is under license.
L All other trademarks identified herein are the property of their respective owners.
– 4 –
 Loading...