


 s0004_e_Advanced.book Page 1 Tuesday, September 27, 2005 4:15 PM
Basic operations
Things to know before shooting
Selecting the right mode for shooting conditions
Various shooting functions
Focusing functions
Exposure, image and color
Playback
Customizing the settings/functions of your camera
Printing
Transferring images to a computer
Appendix
Information
Accessories
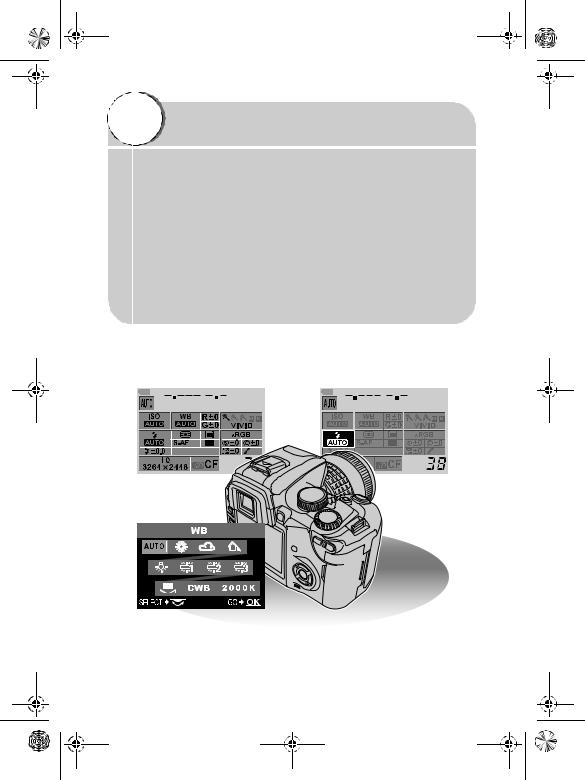
zThank you for purchasing an Olympus digital camera. Before you start to use your new camera, please read these instructions carefully to enjoy optimum performance and a longer service life.
zThis manual explains advanced techniques such as shooting and playback functions, customizing functions or settings and transferring recorded images to a computer, etc.
zWe recommend that you take test shots to get accustomed to your camera before taking important photographs.
zThe screen and camera illustrations shown in this manual were produced during the development stages and may differ from the actual product.

 s0004_e_Advanced.book Page 2 Tuesday, September 27, 2005 4:15 PM
How to use this manual
This manual includes a table of contents, index and menu list to help you easily locate the information you need.
Searching the table of contents |
g P. 4 |
|
|
All section titles and chapter headings are listed in the table of contents so that you can quickly find the information you need. There is a chapter containing information you need to know before using your camera for the first time, a chapter that describes basic shooting procedures, etc.
For example
When you want to play back the images you have just taken.
J Go to Chapter 7 Playback and look for the page
titled "Single-frame playback |
........98". |
Searching the index |
g P. 214 |
|
|
Terms used in this manual (such as the names of functions) are listed in alphabetical order. When you come across a term that you are not familiar with or about which you want to learn more, you can search the index to find the relevant page. Camera part names and monitor indications are listed at the end of the manual.
For example
If you want to know more about the term "HQ"
J Go to the index at the end of this manual and look under H for "HQ.......29".
Searching the list of menus |
g P. 183 |
|
|
The camera's menus are listed in a tree structure. When you come across a menu whose name is unfamiliar on the menu screen, you can find the relevant pages for this menu function in the menu list.
For example
When you want to know how to make settings for WB in the menu screen
J Go through the menus until you find WB and look for the reference page number.
For information on how to read the instructions in this manual, refer to "How to read the instruction pages" (P. 3).
2
 s0004_e_Advanced.book Page 3 Tuesday, September 27, 2005 4:15 PM
How to read the instruction pages
Step through the menus in the order of (gP. 23).
This represents the arrow pad.
This represents the control dial.
Shows alternative setting procedures.
This sample page is only for your reference. It may differ from the actual page in this manual.
Indications used in this manual
|
|
Important information on factors which may lead to a malfunction or |
|
|
operational problems. Also warns of operations that should be |
|
|
absolutely avoided. |
|
|
|
TIPS |
|
Useful information and hints that will help you get the most out of your |
|
|
camera. |
|
|
|
g |
|
Reference pages describing details or related information. |
|
|
|
3
 s0004_e_Advanced.book Page 4 Tuesday, September 27, 2005 4:15 PM
Table of Contents
How to use this manual . . . . . . . . . . . . . . . . . . . . . . . . . . . . . . . . . . . . . . . . . . . . . 2 How to read the instruction pages . . . . . . . . . . . . . . . . . . . . . . . . . . . . . . . . . . . . . 3 Safety precautions . . . . . . . . . . . . . . . . . . . . . . . . . . . . . . . . . . . . . . . . . . . . . . . . 10
1 Basic operations
How to use the mode dial. . . . . . . . . . . . . . . . . . . . . . . . . . . . . . . . . . . . . . . . . . . 18 Easy shooting modes . . . . . . . . . . . . . . . . . . . . . . . . . . . . . . . . . . . . . . . . . . 18 Advanced shooting modes . . . . . . . . . . . . . . . . . . . . . . . . . . . . . . . . . . . . . . 19 Control panel screen and function settings . . . . . . . . . . . . . . . . . . . . . . . . . . . . . 20 Control panel screen display. . . . . . . . . . . . . . . . . . . . . . . . . . . . . . . . . . . . . 20 How to make function settings . . . . . . . . . . . . . . . . . . . . . . . . . . . . . . . . . . . 20
2 Things to know before shooting
How to use card media. . . . . . . . . . . . . . . . . . . . . . . . . . . . . . . . . . . . . . . . . . . . . 26 Selecting the card type . . . . . . . . . . . . . . . . . . . . . . . . . . . . . . . . . . . . . . . . . 26 Formatting the card. . . . . . . . . . . . . . . . . . . . . . . . . . . . . . . . . . . . . . . . . . . . 26 If correct focus cannot be obtained . . . . . . . . . . . . . . . . . . . . . . . . . . . . . . . . . . . 27
How to use focus lock
(if the subject is not positioned in the center of the frame) . . . . . . . . . . . . . . 27 Selecting the record mode . . . . . . . . . . . . . . . . . . . . . . . . . . . . . . . . . . . . . . . . . . 29 Types of record modes . . . . . . . . . . . . . . . . . . . . . . . . . . . . . . . . . . . . . . . . . 29 How to select the record mode . . . . . . . . . . . . . . . . . . . . . . . . . . . . . . . . . . . 30 Setting the number of pixels and compression rate . . . . . . . . . . . . . . . . . . . 30
3 Selecting the right mode for shooting conditions
Shooting modes . . . . . . . . . . . . . . . . . . . . . . . . . . . . . . . . . . . . . . . . . . . . . . . . . . 33 Easy shooting modes . . . . . . . . . . . . . . . . . . . . . . . . . . . . . . . . . . . . . . . . . . . . . . 34 Advanced shooting modes . . . . . . . . . . . . . . . . . . . . . . . . . . . . . . . . . . . . . . . . . . 39 P: Program shooting . . . . . . . . . . . . . . . . . . . . . . . . . . . . . . . . . . . . . . . . . . 39 A: Aperture priority shooting . . . . . . . . . . . . . . . . . . . . . . . . . . . . . . . . . . . . 41 S: Shutter priority shooting . . . . . . . . . . . . . . . . . . . . . . . . . . . . . . . . . . . . . 43 M: Manual shooting . . . . . . . . . . . . . . . . . . . . . . . . . . . . . . . . . . . . . . . . . . . 45
Preview function . . . . . . . . . . . . . . . . . . . . . . . . . . . . . . . . . . . . . . . . . . . . . . . . . . 47
4 Various shooting functions
Auto bracketing . . . . . . . . . . . . . . . . . . . . . . . . . . . . . . . . . . . . . . . . . . . . . . . . . . 49 Flash shooting . . . . . . . . . . . . . . . . . . . . . . . . . . . . . . . . . . . . . . . . . . . . . . . . . . . 50 Flash mode . . . . . . . . . . . . . . . . . . . . . . . . . . . . . . . . . . . . . . . . . . . . . . . . . . 50 Manual flash . . . . . . . . . . . . . . . . . . . . . . . . . . . . . . . . . . . . . . . . . . . . . . . . . 52 Setting the flash mode . . . . . . . . . . . . . . . . . . . . . . . . . . . . . . . . . . . . . . . . . 54 Using the built-in flash. . . . . . . . . . . . . . . . . . . . . . . . . . . . . . . . . . . . . . . . . . 55 Flash intensity control . . . . . . . . . . . . . . . . . . . . . . . . . . . . . . . . . . . . . . . . . . 56 Flash bracketing . . . . . . . . . . . . . . . . . . . . . . . . . . . . . . . . . . . . . . . . . . . . . . 57 External electronic flashes (optional) . . . . . . . . . . . . . . . . . . . . . . . . . . . . . . 57 Using the external electronic flash . . . . . . . . . . . . . . . . . . . . . . . . . . . . . . . . 58 Super FP flash . . . . . . . . . . . . . . . . . . . . . . . . . . . . . . . . . . . . . . . . . . . . . . . 60 Using commercially available flashes . . . . . . . . . . . . . . . . . . . . . . . . . . . . . . 60 Non-specified commercial flashes . . . . . . . . . . . . . . . . . . . . . . . . . . . . . . . . 61 Single-frame shooting/sequential shooting . . . . . . . . . . . . . . . . . . . . . . . . . . . . . 62 Self-timer shooting . . . . . . . . . . . . . . . . . . . . . . . . . . . . . . . . . . . . . . . . . . . . . . . . 63 Remote control shooting . . . . . . . . . . . . . . . . . . . . . . . . . . . . . . . . . . . . . . . . . . . 65
4
 s0004_e_Advanced.book Page 5 Tuesday, September 27, 2005 4:15 PM
Table of Contents
5 Focusing functions
AF frame selection . . . . . . . . . . . . . . . . . . . . . . . . . . . . . . . . . . . . . . . . . . . . . . . . 69 Focus mode . . . . . . . . . . . . . . . . . . . . . . . . . . . . . . . . . . . . . . . . . . . . . . . . . . . . . 70 S-AF (single AF) shooting . . . . . . . . . . . . . . . . . . . . . . . . . . . . . . . . . . . . . . . 71 Simultaneous use of S-AF mode and MF mode (S-AF+MF) . . . . . . . . . . . . 71 C-AF (continuous AF) shooting. . . . . . . . . . . . . . . . . . . . . . . . . . . . . . . . . . . 72 Simultaneous use of C-AF mode and MF mode (C-AF+MF) . . . . . . . . . . . . 72 Manual focus (MF) . . . . . . . . . . . . . . . . . . . . . . . . . . . . . . . . . . . . . . . . . . . . 73 MF bracketing. . . . . . . . . . . . . . . . . . . . . . . . . . . . . . . . . . . . . . . . . . . . . . . . . . . . 74
AF illuminator . . . . . . . . . . . . . . . . . . . . . . . . . . . . . . . . . . . . . . . . . . . . . . . . . . . . 75 Shutter release priority . . . . . . . . . . . . . . . . . . . . . . . . . . . . . . . . . . . . . . . . . . . . . 75
6 Exposure, image and color
Metering mode — Changing the metering system . . . . . . . . . . . . . . . . . . . . . . . . 77 Exposure compensation — Varying the image brightness. . . . . . . . . . . . . . . . . . 79 AE lock — Locking the exposure . . . . . . . . . . . . . . . . . . . . . . . . . . . . . . . . . . . . . 81 ISO — Setting the desired sensitivity to light . . . . . . . . . . . . . . . . . . . . . . . . . . . . 82 AE bracketing . . . . . . . . . . . . . . . . . . . . . . . . . . . . . . . . . . . . . . . . . . . . . . . . . . . . 83 White balance — Adjusting the color tone . . . . . . . . . . . . . . . . . . . . . . . . . . . . . . 85
Setting the auto/preset white balance . . . . . . . . . . . . . . . . . . . . . . . . . . . . . . 87 Setting the custom white balance . . . . . . . . . . . . . . . . . . . . . . . . . . . . . . . . . 89 Setting the one-touch white balance . . . . . . . . . . . . . . . . . . . . . . . . . . . . . . . 90 WB Compensation . . . . . . . . . . . . . . . . . . . . . . . . . . . . . . . . . . . . . . . . . . . . 91 WB bracketing. . . . . . . . . . . . . . . . . . . . . . . . . . . . . . . . . . . . . . . . . . . . . . . . 92
Picture mode . . . . . . . . . . . . . . . . . . . . . . . . . . . . . . . . . . . . . . . . . . . . . . . . . . . . 93 Gradation . . . . . . . . . . . . . . . . . . . . . . . . . . . . . . . . . . . . . . . . . . . . . . . . . . . . . . . 94 Shading compensation. . . . . . . . . . . . . . . . . . . . . . . . . . . . . . . . . . . . . . . . . . . . . 94 Noise reduction . . . . . . . . . . . . . . . . . . . . . . . . . . . . . . . . . . . . . . . . . . . . . . . . . . 95 Color space . . . . . . . . . . . . . . . . . . . . . . . . . . . . . . . . . . . . . . . . . . . . . . . . . . . . . 96 Anti-shock. . . . . . . . . . . . . . . . . . . . . . . . . . . . . . . . . . . . . . . . . . . . . . . . . . . . . . . 96
7 Playback
Single-frame playback . . . . . . . . . . . . . . . . . . . . . . . . . . . . . . . . . . . . . . . . . . . . . 98 Close-up playback . . . . . . . . . . . . . . . . . . . . . . . . . . . . . . . . . . . . . . . . . . . . . . . . 99 Light box display. . . . . . . . . . . . . . . . . . . . . . . . . . . . . . . . . . . . . . . . . . . . . . . . . 100 Index display . . . . . . . . . . . . . . . . . . . . . . . . . . . . . . . . . . . . . . . . . . . . . . . . . . . 101 Calendar display. . . . . . . . . . . . . . . . . . . . . . . . . . . . . . . . . . . . . . . . . . . . . . . . . 102 Information display . . . . . . . . . . . . . . . . . . . . . . . . . . . . . . . . . . . . . . . . . . . . . . . 103 Slideshow . . . . . . . . . . . . . . . . . . . . . . . . . . . . . . . . . . . . . . . . . . . . . . . . . . . . . . 106 Rotating images . . . . . . . . . . . . . . . . . . . . . . . . . . . . . . . . . . . . . . . . . . . . . . . . . 107 Playback on TV . . . . . . . . . . . . . . . . . . . . . . . . . . . . . . . . . . . . . . . . . . . . . . . . . 108 Editing still images . . . . . . . . . . . . . . . . . . . . . . . . . . . . . . . . . . . . . . . . . . . . . . . 109 Copying images . . . . . . . . . . . . . . . . . . . . . . . . . . . . . . . . . . . . . . . . . . . . . . . . . 113 Protecting images — Preventing accidental erasure . . . . . . . . . . . . . . . . . . . . . 114 Erasing images. . . . . . . . . . . . . . . . . . . . . . . . . . . . . . . . . . . . . . . . . . . . . . . . . . 115
Single-frame erase . . . . . . . . . . . . . . . . . . . . . . . . . . . . . . . . . . . . . . . . . . . 115 All-frame erase . . . . . . . . . . . . . . . . . . . . . . . . . . . . . . . . . . . . . . . . . . . . . . 115 Erasing selected frames . . . . . . . . . . . . . . . . . . . . . . . . . . . . . . . . . . . . . . . 116
5
 s0004_e_Advanced.book Page 6 Tuesday, September 27, 2005 4:15 PM
Table of Contents
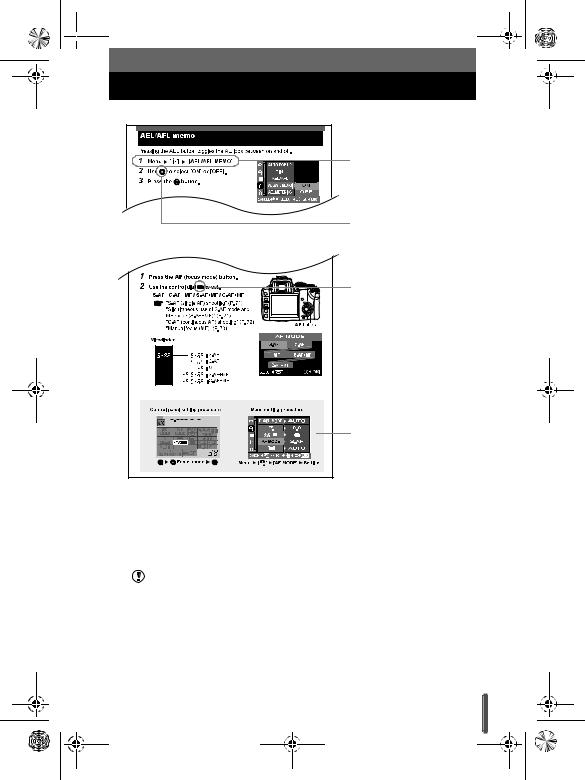
8 Customizing the settings/functions of your camera
Custom reset setting . . . . . . . . . . . . . . . . . . . . . . . . . . . . . . . . . . . . . . . . . . . . . 118 AEL/AFL mode . . . . . . . . . . . . . . . . . . . . . . . . . . . . . . . . . . . . . . . . . . . . . . . . . . 121 AEL/AFL memo . . . . . . . . . . . . . . . . . . . . . . . . . . . . . . . . . . . . . . . . . . . . . . . . . 123 AEL metering . . . . . . . . . . . . . . . . . . . . . . . . . . . . . . . . . . . . . . . . . . . . . . . . . . . 123 EV step. . . . . . . . . . . . . . . . . . . . . . . . . . . . . . . . . . . . . . . . . . . . . . . . . . . . . . . . 123 ISO step . . . . . . . . . . . . . . . . . . . . . . . . . . . . . . . . . . . . . . . . . . . . . . . . . . . . . . . 124 ISO boost . . . . . . . . . . . . . . . . . . . . . . . . . . . . . . . . . . . . . . . . . . . . . . . . . . . . . . 124 ISO limit . . . . . . . . . . . . . . . . . . . . . . . . . . . . . . . . . . . . . . . . . . . . . . . . . . . . . . . 124 Compensating all WB. . . . . . . . . . . . . . . . . . . . . . . . . . . . . . . . . . . . . . . . . . . . . 125 Manual flash . . . . . . . . . . . . . . . . . . . . . . . . . . . . . . . . . . . . . . . . . . . . . . . . . . . . 125 Speed synchronization . . . . . . . . . . . . . . . . . . . . . . . . . . . . . . . . . . . . . . . . . . . . 126 Auto flash popup . . . . . . . . . . . . . . . . . . . . . . . . . . . . . . . . . . . . . . . . . . . . . . . . 126 Customizing the control dial’s function . . . . . . . . . . . . . . . . . . . . . . . . . . . . . . . . 127 Vbutton function. . . . . . . . . . . . . . . . . . . . . . . . . . . . . . . . . . . . . . . . . . . . . . . 128 My Mode setting . . . . . . . . . . . . . . . . . . . . . . . . . . . . . . . . . . . . . . . . . . . . . . . . . 128 Reset lens . . . . . . . . . . . . . . . . . . . . . . . . . . . . . . . . . . . . . . . . . . . . . . . . . . . . . 129 Focus ring. . . . . . . . . . . . . . . . . . . . . . . . . . . . . . . . . . . . . . . . . . . . . . . . . . . . . . 129 Priority setting. . . . . . . . . . . . . . . . . . . . . . . . . . . . . . . . . . . . . . . . . . . . . . . . . . . 129 Quick erase . . . . . . . . . . . . . . . . . . . . . . . . . . . . . . . . . . . . . . . . . . . . . . . . . . . . 130 Erasing RAW and JPEG files . . . . . . . . . . . . . . . . . . . . . . . . . . . . . . . . . . . . . . . 130 File name . . . . . . . . . . . . . . . . . . . . . . . . . . . . . . . . . . . . . . . . . . . . . . . . . . . . . . 131 Rename file . . . . . . . . . . . . . . . . . . . . . . . . . . . . . . . . . . . . . . . . . . . . . . . . . . . . 132 Rec view - Checking the picture immediately after shooting . . . . . . . . . . . . . . . 132 Setting the warning tone. . . . . . . . . . . . . . . . . . . . . . . . . . . . . . . . . . . . . . . . . . . 133 Monitor brightness adjustment . . . . . . . . . . . . . . . . . . . . . . . . . . . . . . . . . . . . . . 133 Sleep timer . . . . . . . . . . . . . . . . . . . . . . . . . . . . . . . . . . . . . . . . . . . . . . . . . . . . . 133 USB mode . . . . . . . . . . . . . . . . . . . . . . . . . . . . . . . . . . . . . . . . . . . . . . . . . . . . . 134 Changing the display language . . . . . . . . . . . . . . . . . . . . . . . . . . . . . . . . . . . . . 135 Selecting the video signal type before TV connection . . . . . . . . . . . . . . . . . . . . 135 Button timer . . . . . . . . . . . . . . . . . . . . . . . . . . . . . . . . . . . . . . . . . . . . . . . . . . . . 136 Auto power off . . . . . . . . . . . . . . . . . . . . . . . . . . . . . . . . . . . . . . . . . . . . . . . . . . 136 Start-up screen. . . . . . . . . . . . . . . . . . . . . . . . . . . . . . . . . . . . . . . . . . . . . . . . . . 137 Changing monitor color . . . . . . . . . . . . . . . . . . . . . . . . . . . . . . . . . . . . . . . . . . . 137 Firmware . . . . . . . . . . . . . . . . . . . . . . . . . . . . . . . . . . . . . . . . . . . . . . . . . . . . . . 137 Setting the date/time . . . . . . . . . . . . . . . . . . . . . . . . . . . . . . . . . . . . . . . . . . . . . 138
9 Printing
Print reservation (DPOF) . . . . . . . . . . . . . . . . . . . . . . . . . . . . . . . . . . . . . . . . . . 140 Flowchart for print reservation . . . . . . . . . . . . . . . . . . . . . . . . . . . . . . . . . . 141 Selecting the print reservation mode . . . . . . . . . . . . . . . . . . . . . . . . . . . . . 142 Selecting pictures you want to print . . . . . . . . . . . . . . . . . . . . . . . . . . . . . . 142 Setting printing data . . . . . . . . . . . . . . . . . . . . . . . . . . . . . . . . . . . . . . . . . . 142 Confirming your print setting . . . . . . . . . . . . . . . . . . . . . . . . . . . . . . . . . . . . 143 Resetting print reservation . . . . . . . . . . . . . . . . . . . . . . . . . . . . . . . . . . . . . 143
6
 s0004_e_Advanced.book Page 7 Tuesday, September 27, 2005 4:15 PM
Table of Contents
Direct printing (PictBridge) . . . . . . . . . . . . . . . . . . . . . . . . . . . . . . . . . . . . . . . . . 145 Connecting the camera to a printer. . . . . . . . . . . . . . . . . . . . . . . . . . . . . . . 146 Easy printing . . . . . . . . . . . . . . . . . . . . . . . . . . . . . . . . . . . . . . . . . . . . . . . . 147 Flowchart for custom printing . . . . . . . . . . . . . . . . . . . . . . . . . . . . . . . . . . . 147 Selecting the print mode . . . . . . . . . . . . . . . . . . . . . . . . . . . . . . . . . . . . . . . 148 Setting the print paper items . . . . . . . . . . . . . . . . . . . . . . . . . . . . . . . . . . . . 149 Selecting pictures you want to print . . . . . . . . . . . . . . . . . . . . . . . . . . . . . . 149 Setting printing data . . . . . . . . . . . . . . . . . . . . . . . . . . . . . . . . . . . . . . . . . . 150 Printing . . . . . . . . . . . . . . . . . . . . . . . . . . . . . . . . . . . . . . . . . . . . . . . . . . . . 150 If an error code is displayed . . . . . . . . . . . . . . . . . . . . . . . . . . . . . . . . . . . . 151
10 Transferring images to a computer
Flowchart . . . . . . . . . . . . . . . . . . . . . . . . . . . . . . . . . . . . . . . . . . . . . . . . . . . . . . 153 Using the provided OLYMPUS Master software . . . . . . . . . . . . . . . . . . . . . . . . 154 What is OLYMPUS Master? . . . . . . . . . . . . . . . . . . . . . . . . . . . . . . . . . . . . 154 Installing OLYMPUS Master . . . . . . . . . . . . . . . . . . . . . . . . . . . . . . . . . . . . 155 Connecting the camera to a computer . . . . . . . . . . . . . . . . . . . . . . . . . . . . . . . . 159 Starting OLYMPUS Master . . . . . . . . . . . . . . . . . . . . . . . . . . . . . . . . . . . . . . . . 161 Displaying the camera’s images on your computer . . . . . . . . . . . . . . . . . . . . . . 162 Downloading images to save on your computer . . . . . . . . . . . . . . . . . . . . . 162 Disconnecting the camera from your computer . . . . . . . . . . . . . . . . . . . . . 163 Viewing still images . . . . . . . . . . . . . . . . . . . . . . . . . . . . . . . . . . . . . . . . . . . . . . 164 Printing images. . . . . . . . . . . . . . . . . . . . . . . . . . . . . . . . . . . . . . . . . . . . . . . . . . 165 Transferring images to your computer without using OLYMPUS Master. . . . . . 166
11 Appendix
If you encounter problems . . . . . . . . . . . . . . . . . . . . . . . . . . . . . . . . . . . . . . . . . 168 Error codes . . . . . . . . . . . . . . . . . . . . . . . . . . . . . . . . . . . . . . . . . . . . . . . . . 168 Troubleshooting . . . . . . . . . . . . . . . . . . . . . . . . . . . . . . . . . . . . . . . . . . . . . 169 Camera maintenance . . . . . . . . . . . . . . . . . . . . . . . . . . . . . . . . . . . . . . . . . . . . . 174 Cleaning and storing the camera . . . . . . . . . . . . . . . . . . . . . . . . . . . . . . . . 174 Cleaning mode — Removing dust on the CCD. . . . . . . . . . . . . . . . . . . . . . 175 Pixel mapping — Checking the image processing functions . . . . . . . . . . . 176 Glossary . . . . . . . . . . . . . . . . . . . . . . . . . . . . . . . . . . . . . . . . . . . . . . . . . . . . . . . 177
12 Information
Menu directory . . . . . . . . . . . . . . . . . . . . . . . . . . . . . . . . . . . . . . . . . . . . . . . . . . 183 Available functions by shooting mode . . . . . . . . . . . . . . . . . . . . . . . . . . . . . . . . 187 Names of parts . . . . . . . . . . . . . . . . . . . . . . . . . . . . . . . . . . . . . . . . . . . . . . . . . . 190 Camera . . . . . . . . . . . . . . . . . . . . . . . . . . . . . . . . . . . . . . . . . . . . . . . . . . . . 190 Viewfinder indications . . . . . . . . . . . . . . . . . . . . . . . . . . . . . . . . . . . . . . . . . 192 Monitor indications (only for playback) . . . . . . . . . . . . . . . . . . . . . . . . . . . . 193 Control panel screen . . . . . . . . . . . . . . . . . . . . . . . . . . . . . . . . . . . . . . . . . . 194 Information . . . . . . . . . . . . . . . . . . . . . . . . . . . . . . . . . . . . . . . . . . . . . . . . . . . . . 196 Specifications . . . . . . . . . . . . . . . . . . . . . . . . . . . . . . . . . . . . . . . . . . . . . . . 196
7

 s0004_e_Advanced.book Page 8 Tuesday, September 27, 2005 4:15 PM
Table of Contents
13 Accessories
BLM-1 Li-ion Battery / BCM-2 Li-ion Battery Charger . . . . . . . . . . . . . . . . . . . . 199 How to use the LBH-1 Lithium Battery Holder . . . . . . . . . . . . . . . . . . . . . . . . . . 206 ZUIKO DIGITAL interchangeable lenses . . . . . . . . . . . . . . . . . . . . . . . . . . . . . . 208 ZUIKO DIGITAL 14-45mm f3.5-5.6. . . . . . . . . . . . . . . . . . . . . . . . . . . . . . . 210 ZUIKO DIGITAL 17.5-45mm f3.5-5.6 . . . . . . . . . . . . . . . . . . . . . . . . . . . . . 212
Index . . . . . . . . . . . . . . . . . . . . . . . . . . . . . . . . . . . . . . . . . . . . . . . . . 214
8

 s0004_e_Advanced.book Page 9 Tuesday, September 27, 2005 4:15 PM
For customers in North and South America
For customers in USA
Declaration of Conformity
Model Number |
: E-500 |
||||
Trade Name |
: OLYMPUS |
||||
Responsible Party |
: |
|
|
|
|
|
|
|
|
||
Address |
: Two Corporate Center Drive, |
P.O. |
Box 9058, Melville, NY |
||
|
11747-9058 U.S.A. |
||||
Telephone Number |
: 1-631-844-5000 |
|
|
|
|
Tested To Comply With FCC Standards
FOR HOME OR OFFICE USE
This device complies with Part 15 of the FCC rules. Operation is subject to the following two conditions:
(1)This device may not cause harmful interference.
(2)This device must accept any interference received, including interference that may cause undesired operation.
For customers in Canada
This Class B digital apparatus meets all requirements of the Canadian InterferenceCausing Equipment Regulations.
For customers in Europe
“CE” mark indicates that this product complies with the European requirements for safety, health, environment and customer protection. “CE” mark cameras are intended for sales in Europe.
This symbol [crossed-out wheeled bin WEEE Annex IV] indicates
separate collection of waste electrical and electronic equipment in the EU countries.
Please do not throw the equipment into the domestic refuse.
Please use the return and collection systems available in your country for the disposal of this product.
This product and bundled accessories conform to WEEE standards.
Trademarks
•IBM is a registered trademark of International Business Machines Corporation.
•Microsoft and Windows are registered trademarks of Microsoft Corporation.
•Macintosh is a trademark of Apple Computer, Inc.
•xD-Picture Card™ is a trademark.
•All other company and product names are registered trademarks and/or trademarks of their respective owners.
•The standards for camera file systems referred to in this manual are the “Design Rule for Camera File System/DCF” standards stipulated by the Japan Electronics and Information Technology Industries Association (JEITA).
9

 s0004_e_Advanced.book Page 10 Tuesday, September 27, 2005 4:15 PM
Safety precautions
CAUTION
RISK OF ELECTRIC SHOCK
DO NOT OPEN
CAUTION: TO REDUCE THE RISK OF ELECTRICAL SHOCK, DO NOT
REMOVE COVER (OR BACK). NO USER-SERVICEABLE PARTS INSIDE.
REFER SERVICING TO QUALIFIED OLYMPUS SERVICE PERSONNEL.
Lightning flash with an arrowhead, enclosed in a triangle, alerts you to the presence of uninsulated voltage points inside the product which could cause a serious electrical shock.
An exclamation mark enclosed in a triangle alerts you to important operating and maintenance instructions in the documentation provided with the product.
WARNING!
TO AVOID THE RISK OF FIRE OR ELECTRICAL SHOCK, NEVER EXPOSE THIS PRODUCT TO WATER OR OPERATE IN A HIGH HUMIDITY ENVIRONMENT.
General Precautions
Read All Instructions — Before you use the product, read all operating instructions.
Save These Instructions — Save all safety and operating instructions for future reference.
Heed Warnings — Read carefully and follow all warning labels on the product and those described in the instructions.
Follow Instructions — Follow all instructions provided with this product. Cleaning — Use only a damp cloth for cleaning. Never use any type of liquid
or aerosol cleaner, or any type of organic solvent to clean this product. Attachments — For your safety, and to avoid damaging the product, use only
accessories recommended by Olympus.
Water and Moisture — Never use this product around water (near a bathtub, kitchen sink, laundry tub, wet basement, swimming pool or in the rain).
Location — To avoid damage to the product and prevent personal injury, never place this product on an unstable stand, tripod, bracket, table or cart. Mount only on a stable tripod, stand, or bracket. Follow the instructions that describe how to safely mount the product, and use only the mounting devices recommended by the manufacturer.
Power Sources — Connect this product only to the power source described on the product label. If you are not sure about the type of power supply in your home, consult your local power company. Refer to your operating instructions for information on using the product with a battery.
Foreign Objects, Liquid Spillage — To avoid personal injury caused by fire or electrical shock from contact with internal high voltage points, never insert a metal object into the product. Avoid using the product where there is a danger of spillage.
10
 s0004_e_Advanced.book Page 11 Tuesday, September 27, 2005 4:15 PM
Safety precautions
Heat — Never use or store this product near any heat source such as a radiator, heat register, stove, or any type of equipment or appliance that generates heat, including stereo amplifiers.
Servicing — Refer all servicing to qualified personnel. Attempting to remove the covers or disassemble the product, could expose you to dangerous high voltage points.
Damage Requiring Service — If you notice any of the conditions described below, refer servicing to qualified service personnel:
a)Liquid has been spilled onto the product or some other object has fallen into the product.
b)The product has been exposed to water.
c)The product does not operate normally despite following operating instructions. Adjust only the controls described in the operating instructions as improper adjustment of other controls could damage the product and require extensive repair work by a qualified technician.
d)The product has been dropped or damaged in any way.
e)The product exhibits a distinct change in performance.
Replacement Parts — When replacement parts are required, make sure that the service center uses only parts with the same characteristics as the originals, as recommended by the manufacturer. Unauthorized substitution of parts could result in fire, electrical shock, or create other hazards.
Safety Check — Upon completion of servicing or repairs, ask the service technician to perform safety checks to determine that the product is in good working order.
Handling the Camera
DANGER |
If the product is used without observing the information given |
|
under this symbol, serious injury or death may result. |
||
|
WARNING If the product is used without observing the information given under this symbol, injury or death may result.
If the product is used without observing the information given CAUTION under this symbol, minor personal injury, damage to the
equipment, or the loss of valuable data may result.
 WARNING
zDo not use the camera in areas exposed to flammable or explosive gases.
A fire or explosion may result.
zDo not use the flash on people (infants, small children, etc.) at close range.
When you fire the flash, you must be at least 1 m (3 ft) away from the faces of your subjects. Firing the flash too close to the subject’s eyes could cause a momentary loss of vision.
11

 s0004_e_Advanced.book Page 12 Tuesday, September 27, 2005 4:15 PM
Safety precautions
zKeep young children and infants away from the camera.
If not, the following dangerous situations may occur:
•Becoming entangled in the camera strap or power cords, causing strangulation. If this happens, follow the doctor’s instructions.
•Accidentally swallowing the battery or other small parts.
•Accidentally firing the flash into their own eyes or those of another child.
•Accidentally being injured by the moving parts of the camera.
zDo not use or store the camera in dusty or humid places.
Using or storing the camera in dusty or humid places may result in a fire or electric shock.
zDo not cover the flash with a hand while firing.
Do not cover the flash or touch it after it has just been fired sequentially. It may be hot and cause minor burns.
zDo not take apart or modify the camera.
Never attempt to disassemble the camera. The internal circuits contain high voltage points which could cause serious burns or electrical shock.
zDo not let water or foreign objects inside the camera.
A fire or electric shock may result. If the camera is accidentally dropped in water, or if liquid is spilled into the camera, stop using it, allow it to dry, and then remove the battery. Contact the nearest authorized Olympus service center.
zDo not touch the battery or the battery charger while battery charging is in progress.
Wait until charging is complete and the battery has cooled.
The battery and battery charger become hot while charging. At these times, they may cause minor burns.
zDo not use a non-specified battery and/or charger.
Use of a non-designated battery and/or re-charger may lead to camera or battery failure as well as other unexpected accidents. Any accidents resulting from use of non-designated equipment will not be compensated.
 CAUTION
zStop using the camera immediately if you notice any unusual odors, noise, or smoke around it.
If you notice any unusual odors, noise, or smoke around the camera during operation, switch it off immediately — and remove the battery. Allow the camera to sit idle for a few minutes to cool. Take the camera outdoors, away from flammable objects, and carefully remove the battery. Never remove the battery with bare hands. Contact the nearest Olympus service center immediately.
zDo not use the camera with wet hands.
Damage or electric shock may result. Also, do not connect or disconnect the power plug with wet hands.
zBe careful with the strap when you carry the camera.
It could easily catch on stray objects — and cause serious damage.
zDo not leave the camera in areas subject to extremely high temperature.
Doing so may cause parts to deteriorate and, in some circumstances, cause the camera to catch fire.
12

 s0004_e_Advanced.book Page 13 Tuesday, September 27, 2005 4:15 PM
Safety precautions
zWhen the camera contains metal parts, overheating can result in a low-temperature burn. Pay attention to the following:
•When used for a long period, the camera will get hot. If you hold on to the camera in this state, a low-temperature burn may be caused.
•In places subject to extremely cold temperatures, the temperature of the camera’s body may be lower than the environmental temperature. If possible, wear gloves when handling the camera in cold temperatures.
zDo not damage the power cable.
Do not pull on the charger’s cable or add another cable to it. Be sure to connect or disconnect the charger’s cable while holding the power plug. If the following cases occur, stop using and contact an Olympus dealer or authorized customer support center.
•The power plug or cable produces heat, burning smell, or smoke.
•The power plug or cable is cracked or broken. The contact is bad on the power plug.
Battery handling precautions
Follow these important guidelines to prevent the battery from leaking, overheating, burning, exploding, or causing electrical shocks or burns.
 DANGER
zNever heat or incinerate the battery.
zDo not connect the (+) and (-) terminals to each other using metal objects.
zDo not carry or store the battery where it may come into contact with metal objects such as jewelry, pins, fasteners, etc.
zNever store the battery where it will be exposed to direct sunlight, or subjected to high temperatures in a hot vehicle, near a heat source, etc.
zNever attempt to disassemble the battery or modify it in any way, such as by soldering.
Doing so may break the terminals or cause battery fluid to splash, resulting in potential fire, explosion, battery leakage, overheating or other damage.
zIf battery fluid gets in your eyes, loss of eyesight may result.
If battery fluid gets in your eyes, do not rub them. Flush them immediately with clear, cold running water and seek medical attention straight away.
 WARNING
zKeep the battery dry at all times. Never allow it to come into contact with fresh or salt water.
zDo not touch or hold the battery with wet hands.
zIf the rechargeable battery does not recharge within the specified time, stop charging it and do not use it.
If you do not, fire, explosion, ignition or overheating may result.
zDo not use the battery if it is cracked or broken.
Doing so may cause explosion or overheating.
zNever subject the battery to strong shocks or continuous vibration.
Doing so may cause explosion or overheating.
13
 s0004_e_Advanced.book Page 14 Tuesday, September 27, 2005 4:15 PM
Safety precautions
zNever attempt to modify the battery compartment on the camera, never insert anything (other than the specified battery) into the compartment.
zIf the battery leaks, becomes discolored or deformed, or appears abnormal in any way during operation, stop using the camera immediately.
Contact your dealer or an authorized Olympus service center. Continued use may result in fire or electric shock.
zIf the battery leaks fluid onto your clothing or skin, remove the clothing and flush the affected area with clean, running cold water immediately. If the fluid burns your skin, seek medical attention immediately.
 CAUTION
zDo not remove the battery from the camera immediately after operating the camera on battery power for a long time.
Doing so may cause burns.
zRemove the battery from the camera if it is not going to be used for a long time.
Otherwise, battery leakage or overheating may cause a fire or injury.
Handling and storage precautions
Camera
zTo protect the high-precision technology contained in this product, never leave the camera in the places listed below, no matter if in use or storage:
•Places where temperatures and/or humidity are high or go through extreme changes. Direct sunlight, beaches, locked cars, or near other heat sources (stove, radiator, etc.) or humidifiers.
•In sandy or dusty environments.
•Near flammable items or explosives.
•In wet places, such as bathrooms or in the rain.
•In places subject to strong vibrations.
zNever drop the camera or subject it to severe shocks or vibrations.
zDo not leave the camera pointed directly at the sun. This may cause lens damage, color failure, ghosting on the CCD, or may possibly start a fire.
zCondensation may form inside the camera when there is a sudden extreme change in temperature (such as when moving from indoors to outdoors). Acclimatize the camera to the temperature (e.g. by putting the camera into a plastic bag) before use.
zIf the camera has not been used for a long time, mold may form or the camera may malfunction. Before using the camera, check that the camera works properly.
zDo not touch electric contacts on cameras and interchangeable lenses. Remember to attach the cap when removing the lens.
14

s0004_e_Advanced.book Page 15 Tuesday, September 27, 2005 4:15 PM
Safety precautions
zDo not place the camera near anything that could be affected by magnetism (e.g. credit card, floppy disk, etc.). Doing so may destroy the data on these items.
LCD monitor
zDo not push the monitor forcibly; otherwise the image may become fuzzy, resulting in a playback mode failure or damage to the monitor. If the monitor is damaged, be careful not to get any of the liquid crystals from the monitor in your mouth. If liquid crystals get on your limbs or clothes, wash them off.
zA strip of light may appear on the top/bottom of the monitor. This is not a malfunction.
zWhen a subject is viewed diagonally in the camera, the edges may appear to zigzag on the monitor. This is not a malfunction; It will be less noticeable in playback mode.
zIn places subject to low temperatures, the LCD monitor may take a long time to turn on or its color may change temporarily. When using the camera in extremely cold places, it is a good idea to occasionally place it in a warm place. A LCD monitor exhibiting poor performance due to low temperatures will recover in normal temperatures.
zThe LCD monitor is made with high-precision technology. However, black spots or bright spots of light may appear on the LCD monitor. These spots may not be uniform in color and brightness depending on their characteristics or the angle at which you are viewing the monitor. This is not a malfunction.
FCC Notice
zRadio and Television Interference
Change or modifications not expressly approved by the manufacturer may void the user's authority to operate this equipment. This equipment has been tested and found to comply with the limits for a Class B digital device, pursuant to Part 15 of the FCC Rules. These limits are designed to provide reasonable protection against harmful interference in a residential installation.
This equipment generates, uses, and can radiate radio frequency energy and, if not installed and used in accordance with the instructions, may cause harmful interference to radio communications.
However, there is no guarantee that interference will not occur in a particular installation. If this equipment does cause harmful interference to radio or television reception, which can be determined by turning the equipment off and on, the user is encouraged to try to correct the interference by one or more of the following measures:
•Adjust or relocate the receiving antenna.
•Increase the distance between the camera and receiver.
•Connect the equipment to an outlet on a circuit different from that to which the receiver is connected.
•Consult your dealer or an experienced radio/TV technician for help.
Only the OLYMPUS-supplied USB cables should be used to connect the camera to USB-enabled personal computers (PC).
Any unauthorized changes or modifications to this equipment would void the user's authority to operate.
15

s0004_e_Advanced.book Page 16 Tuesday, September 27, 2005 4:15 PM
Safety precautions
Legal and other notices
zOlympus makes no representations or warranties regarding any damages, or benefit expected by using this unit lawfully, or any request from a third person, which are caused by the inappropriate use of this product.
zOlympus makes no representations or warranties regarding any damages or any benefit expected by using this unit lawfully which are caused by erasing picture data.
Disclaimer of Warranty
zOlympus makes no representations or warranties, either expressed or implied, by or concerning any content of these written materials or software, and in no event shall be liable for any implied warranty of merchantability or fitness for any particular purpose or for any consequential, incidental or indirect damages (including but not limited to damages for loss of business profits, business interruption and loss of business information) arising from the use or inability to use these written materials or software or equipment. Some countries do not allow the exclusion or limitation of liability for consequential or incidental damages, so the above limitations may not apply to you.
zOlympus reserves all rights to this manual.
Warning
zUnauthorized photographing or use of copyrighted material may violate applicable copyright laws. Olympus assumes no responsibility for unauthorized photographing, use or other acts that infringe upon the rights of copyright owners.
16
s0004_e_Advanced.book Page 17 Tuesday, September 27, 2005 4:15 PM
1 Basic operations
This camera is equipped with a variety of easy shooting modes that automatically adjust focus and exposure as required, as well as automatically popping up the built-in flash when required.
A variety of advanced shooting modes are available, enabling you to take advantage of professional shooting techniques. Many functions can be set or adjusted with easy button operations while referring to the menus displayed on the largesize LCD monitor.
Now, let's take a closer look at how to use the functions and menus.

 s0004_e_Advanced.book Page 18 Tuesday, September 27, 2005 4:15 PM
How to use the mode dial
1
operations Basic
This camera has the following shooting modes, which can be switched using the mode dial.
Easy shooting modes
This camera features 6 creative modes and 15 scene modes that automatically optimize the exposure for the subject.
AUTO Full-auto shooting
Allows you to shoot using a lens aperture (f value) and shutter speed set by the camera. In low-light conditions, the flash automatically pops up and fires. This mode is recommended for normal shooting conditions.
i Portrait shooting
Suitable for shooting a portrait-style image of a person.gP. 34
l Landscape shooting
Suitable for shooting landscapes and other outdoor scenes.gP. 34
& Macro shooting
Suitable for taking close-up pictures (macro shooting). gP. 34
jSport shooting
Suitable for capturing fast-moving action without blurring. gP. 34
/ Night scene and portrait shooting
Suitable for shooting both the main subject and background at night. gP. 34
 Scene mode
15 different scene modes are available to suit a wide range of shooting situations. When the mode dial is set to this mode, the scene menu is displayed. gP. 35
18

 s0004_e_Advanced.book Page 19 Tuesday, September 27, 2005 4:15 PM
How to use the mode dial
Advanced shooting modes
The 4 shooting modes below will help you take advantage of a variety of advanced shooting techniques.
P Program shooting
Allows you to shoot using an aperture and shutter speed that the camera sets. gP. 39
A Aperture priority shooting
Allows you to set the aperture manually. The camera sets the shutter speed automatically. gP. 41
S Shutter priority shooting
Allows you to set the shutter speed manually. The camera sets the aperture automatically. gP. 43
M Manual shooting
Allows you to set the aperture and shutter speed manually. gP. 45
Automatic flash pop-up
When you use any of the shooting modes listed below in a low-light environment, the flash will automatically pop up.
•AUTO i & /
•Any of the following scene modes: BU
 g
g
1
operations Basic
19

 s0004_e_Advanced.book Page 20 Tuesday, September 27, 2005 4:15 PM
Control panel screen and function settings
Control panel screen display
1 |
1 |
When the power switch is set to ON, the |
Power switch |
|
|
||||
Basic |
|
control panel screen (shooting |
|
|
|
information) is displayed on the monitor. |
|
||
|
• If the control panel screen does not appear, |
|
||
operations |
|
press the INFO button. |
|
|
|
• When the mode dial is set to |
, the scene |
|
|
|
|
|
||
|
|
menu is displayed. gP. 35 |
|
|
|
|
|
|
INFO button |
Normal
2 Each time the INFO button is pressed, the display changes as follows:
|
|
|
|
|
|
|
|
|
|
|
|
|
|
|
|
|
|
|
|
|
|
|
|
|
|
|
|
|
|
|
|
|
|
|
|
|
|
|
|
|
|
|
|
|
|
|
|
|
|
|
|
|
|
|
|
|
|
|
|
|
|
|
|
|
|
|
|
|
|
|
|
|
|
|
|
|
|
|
|
|
|
|
|
|
|
|
|
|
|
|
|
|
|
|
|
|
|
|
|
|
|
|
|
|
|
|
|
|
|
|
|
|
|
|
|
|
|
|
|
|
|
|
|
|
|
|
|
|
|
|
|
|
|
|
|
|
|
|
|
|
|
|
|
|
|
|
|
|
|
|
|
|
|
|
|
|
|
|
|
|
|
|
|
|
|
|
|
|
|
|
|
|
|
|
|
|
|
|
|
|
|
|
|
|
|
|
|
|
|
|
|
|
|
|
|
|
|
|
|
|
|
|
|
|
|
|
|
|
|
|
|
|
|
|
|
|
|
|
|
|
|
|
|
|
|
|
|
|
|
|
|
|
|
|
|
|
|
|
|
|
|
|
Normal |
|
|
|
|
Detailed |
|
|
|
Off |
|||||||||||||||||
|
|
|
|
|
|
|
|
|
|
|
|
|
|
|
|
|
|
|
|
|
|
|
|
|
|
|
|
|
|
How to make function settings
This camera features a wide variety of shooting functions designed to suit a variety of different shooting conditions. You can also customize settings to make the camera easier for you to use.
There are three basic ways to make function settings with this camera. c Setting using direct buttons
d Setting on the control panel screen
e Setting on the menu
By mastering these operating methods, you’ll be able to make good use of the camera’s versatile functions. Available functions differ depending on the shooting mode.
20
s0004_e_Advanced.book Page 21 Tuesday, September 27, 2005 4:15 PM
Control panel screen and function settings
Setting using direct buttons
1 Press the button for the function you want to set (direct button).
•The direct menu is displayed.
Ex.) When setting white balance
2
Direct menu |
1 |
|
2 Use the control dial  to set.
•If you do not operate the control dial within a few seconds ("Button timer" g P. 136), the control panel screen will be restored and your setting will be confirmed. Your setting can also be confirmed by pressing the i button.
List of direct buttons
|
|
|
|
Direct buttons |
Function |
Ref. Page |
|
|
|
|
|
|
|
1 |
WB (White balance) button |
Sets white balance |
P. 85 |
|||
|
|
|
|
|
|
|
2 |
AF (Focus mode) button |
Sets focus mode |
P. 70 |
|||
|
|
|
|
|
|
|
3 |
ISO button |
Sets ISO sensitivity |
P. 82 |
|||
|
|
|
|
|
|
|
4 |
|
|
|
(AF frame selection) button |
Selects AF frame |
P. 69 |
|
|
|||||
|
|
|
|
|
|
|
5 |
|
|
|
(Metering) button |
Sets metering mode |
P. 77 |
|
|
|
|
|
|
|
6 |
</Y/j(Remote control/ |
Sets Remote control / |
P. 62, P. 63 |
|||
Selftimer/Drive) button |
Selftimer / Drive |
P. 65 |
||||
|
|
|
|
|
|
|
7 |
F(Exposure compensation) |
Sets exposure |
P. 79 |
|||
|
button |
compensation value |
|
|||
|
|
|
|
|
|
|
8 |
#(Flash) switch |
Sets flash mode |
P. 53 |
|||
|
|
|
|
|
|
|
1
operations Basic
21

s0004_e_Advanced.book Page 22 Tuesday, September 27, 2005 4:15 PM
Control panel screen and function settings
Setting on the control panel screen
1
operations Basic
1 Press the i button.
• The cursor on the control panel screen lights.
|
|
|
|
|
|
|
|
|
|
|
|
|
|
|
|
|
|
|
|
|
|
|
|
|
|
|
|
|
|
|
|
|
|
|
|
|
|
|
|
|
|
|
|
|
|
|
|
|
|
|
|
|
|
|
|
|
|
|
|
|
|
|
|
|
|
|
|
|
|
|
|
|
|
|
|
|
|
|
|
|
|
|
|
|
|
|
|
|
|
|
|
|
|
|
|
|
|
|
|
|
|
|
|
|
|
|
|
|
|
|
|
|
|
|
|
|
|
|
|
|
|
|
|
|
|
|
|
|
|
|
|
|
|
|
|
|
|
|
|
|
|
|
|
|
|
|
|
|
|
|
|
|
|
|
|
|
|
|
|
|
|
|
|
|
|
|
|
|
|
|
|
|
|
|
|
|
|
|
|
|
|
|
|
|
|
|
|
|
|
|
|
|
|
|
|
|
|
|
|
Control panel screen |
Cursor |
|||||||||||||||||||||||
|
|
|
|
|
|
|
|
|
|
|
|
|
||||||||||||
2 Use the arrow pad
 to move the cursor to the function you want to set.
Ex.) When setting white balance
4
|
|
|
|
|
1, 3 |
2 |
|
|
|||||||||||||||||||||
|
|
|
|
|
|
|
|
|
|
|
|
|
|
|
|
|
|
|
|
|
|
|
|
|
|
|
|
|
|
|
|
|
|
|
|
|
|
|
|
|
|
|
|
|
|
|
|
|
|
|
|
|
|
|
|
|
|
|
|
|
|
|
|
|
|
|
|
|
|
|
|
|
|
|
|
|
|
|
|
|
|
|
|
|
|
|
|
|
|
|
|
|
|
|
|
|
|
|
|
|
|
|
|
|
|
|
|
|
|
|
|
|
|
|
|
|
|
|
|
|
|
|
|
|
|
|
|
|
|
|
|
|
|
|
|
|
|
|
|
|
|
|
|
|
|
|
|
|
|
3 Press the i button.
• The direct menu is displayed.
Direct menu
4 Use the control dial  to set.
•You can also use the control dial to make settings on the control panel screen display after completing step 2.
•If you do not operate the control dial within a few seconds ("Button timer" g P. 136), the control panel screen will be restored and your setting will be confirmed. Your setting can also be confirmed by pressing the i button.
Control panel operation procedures
This manual shows the control panel operation procedures (until the direct menu is displayed) as below.
Ex.) When setting white balance
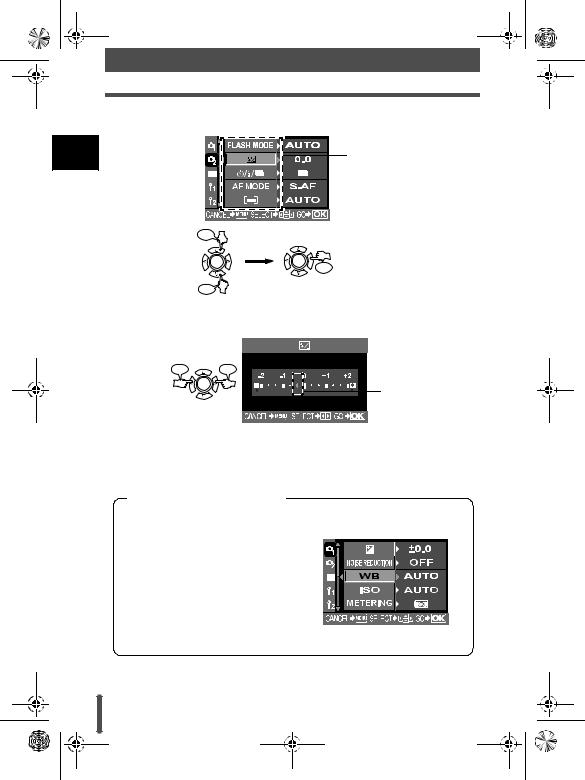
i  WB i
WB i
22
 s0004_e_Advanced.book Page 23 Tuesday, September 27, 2005 4:15 PM
Control panel screen and function settings
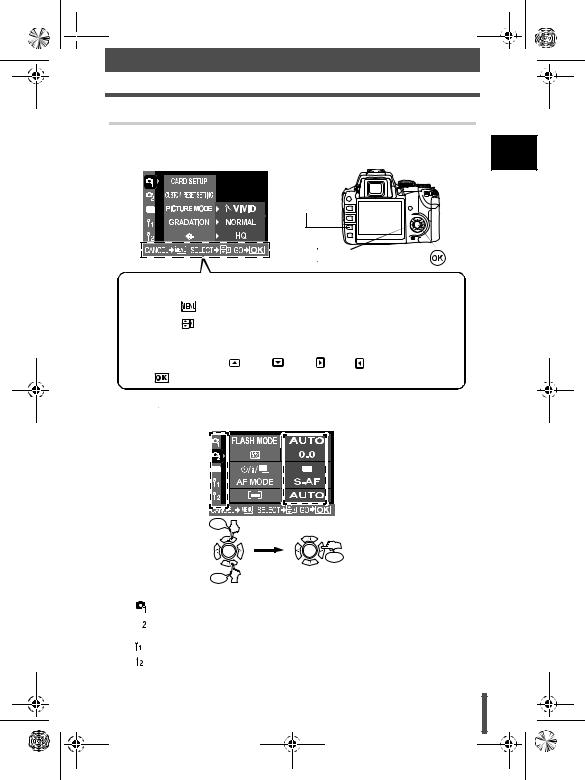
Setting on the menu
1 Press the MENU button.
• The menu is displayed on the monitor.
MENU button
 Arrow pad
Operation guide is displayed at the bottom of the screen.
CANCEL J |
: Press MENU to cancel the setting. |
||||||
SELECT J |
: Press dacto select the item. |
||||||
|
The illustration displayed corresponds to the arrow |
||||||
|
pad shown below. |
|
|
||||
|
|
|
: a : c |
|
: d |
|
: b |
|
|
|
|
||||
|
|
|
|
|
|
|
|
GO J |
: Press i to confirm your settings. |
||||||
2 Use 

 to select a tab.
• The functions are categorized under tabs.
|
|
|
|
|
|
|
|
|
|
|
|
|
|
|
|
|
The current setting is |
Tab |
|
|
|
|
|
|
|
|
|
|
|
|
|
|
|
|
displayed. |
|
|
|
|
|
|
|
|
|
|
|
|
1
operations Basic
Press
Press
Press
Moves to the functions under the tab you have selected.
Types of tabs
Sets shooting functions.
 Sets shooting functions. q Sets playback functions.
Customizes shooting functions.
Sets functions that allow you to use the camera efficiently.
23
s0004_e_Advanced.book Page 24 Tuesday, September 27, 2005 4:15 PM
Control panel screen and function settings
1
operations Basic
3 Select a function.
Function
Press
Goes to the selected function’s setting screen. (Some
 Press functions can be set on the menu.)
Press
4 Select a setting.
Press |
Press |
Setting
Setting screen
5 Press i repeatedly until the menu disappears.
• Normal shooting screen is restored.
Menu operation procedures
This manual shows the menu operation procedures as below.
Ex.) When setting white balance
Menu [  ] [WB] Setting
For the menu lists, refer to the menu directory (gP. 183).
24

 s0004_e_Advanced.book Page 25 Tuesday, September 27, 2005 4:15 PM
2 Things to know before shooting
The camera focuses automatically if you simply press the shutter button in the AUTO mode. However, sometimes you may come across a subject that is difficult to focus on. This chapter explains how to deal with those hard-to-focus subjects. Another important thing is to select the appropriate record mode before you start shooting. Remember that depending on what you are going to do with your shots later, you may find that the image looks grainy in large prints, the file size is too big for e-mail, etc. To avoid this kind of problem, always check the record mode before shooting.

s0004_e_Advanced.book Page 26 Tuesday, September 27, 2005 4:15 PM
How to use card media
2
shooting before know to Things
The camera is equipped with two card slots; you can use CompactFlash or Microdrive simultaneously with the xD-Picture Card.
Selecting the card type
Select the type of card you want to use (xD-Picture Card or CompactFlash).
1 |
Menu |
[ ] [CF/xD] |
2 |
Use |
to set. |
|
[CF] |
CompactFlash |
3 |
[xD] xD-Picture Card |
|
Press the i button. |
||
Formatting the card
Formatting prepares cards to receive data. Non-Olympus cards or cards formatted on a computer must be formatted with the camera before they can be used.
All data stored on the card, including protected images, is erased when the card is formatted. When formatting a used card, confirm there are no images that you still want to keep on the card.
1 |
Menu |
[ ] [CARD SETUP] |
2 |
Use |
to select [FORMAT]. Press the i |
3 |
button. |
|
Press acto select [YES]. Press the |
||
|
i button. |
|
• Formatting is performed.
26

 s0004_e_Advanced.book Page 27 Tuesday, September 27, 2005 4:15 PM
If correct focus cannot be obtained
The camera's auto-focus may not able to focus on the subject in the cases shown below (e.g. when the subject is not in the center of the frame, when the subject has lower contrast than its surroundings, etc.). If this happens, the easiest solution is to use focus lock.
Subjects that are difficult to focus on
The AF confirmation mark blinks.
The subject cannot be brought into focus.
|
|
|
|
|
|
|
|
|
|
|
|
|
|
|
|
Subject with low contrast Excessively bright light |
|
Subject with repeated |
|||||||||||||
|
|
|
|
|
|
in center of frame |
|
patterns |
|||||||
The AF mark stays lit, but the subject cannot be brought into focus.
2
shooting before know to Things
|
|
|
|
|
|
|
|
|
|
|
|
|
|
|
|
|
|
|
|
|
|
|
|
|
|
|
|
|
|
|
|
|
|
|
|
|
|
|
|
|
|
|
|
|
|
|
|
|
|
|
|
|
|
Subjects at different |
|
Fast-moving subject |
Subject not inside AF frame |
||||||||||||||
distances |
|
|
|
|
|
||||||||||||
How to use focus lock
(if the subject is not positioned in the center of the frame)
1 Position the AF frame on the |
Shutter button |
subject you want to focus on. |
|
AF frame |
|
Card access lamp
27

 s0004_e_Advanced.book Page 28 Tuesday, September 27, 2005 4:15 PM
If correct focus cannot be obtained
2 Press the shutter button halfway until the AF confirmation mark lights.
• The focus is locked. The AF confirmation
|
|
|
|
mark and the AF focusing frame light up in |
|
|
|
|
the viewfinder. |
|
2 |
|
|
|
|
|
|
• If the AF comfirmation mark blinks, press the |
|
|
|
|
|
|
|
|
|
|
shutter button halfway again. |
|
to Things |
• The control panel screen disappears. |
||
|
3 While keeping the shutter button |
|||
|
beforeknow |
|||
|
pressed halfway, re-compose your shot. |
|||
|
|
|
|
|
|
shooting |
4 Press the shutter button all the way. |
||
|
|
|
|
|
|
|
|
|
• The card access lamp blinks while the picture |
|
|
|
|
is being stored on the card. |
 Halfway down
AF confirmation mark
All the way down
If the subject has lower contrast than its surroundings
Focus (focus lock) on a high-contrast object the same distance away as the intended subject, recompose your shot and then take the picture. If the subject has no vertical lines, hold the camera vertically and adjust the focus using the focus lock function, then return the camera to the horizontal position to take the picture.
28

 s0004_e_Advanced.book Page 29 Tuesday, September 27, 2005 4:15 PM
Selecting the record mode
You can select a record mode in which to take pictures. Choose the record mode that’s best for your purpose (printing, editing on a PC, website editing, etc.). For details about record modes and number of pixels, refer to the table on P. 31.
Types of record modes
Record mode allows you to select a combination of pixel count and compression rate for the images you record. An image consists of pixels (dots). When you enlarge an image with a low pixel count, it will be displayed as a mosaic. If an image has a high pixel count, the file size (amount of data) will be larger and the number of storable still pictures will be lower. The higher the compression, the smaller the file size. However, the image will have less clarity when played back.
|
|
|
|
|
|
|
|
|
|
|
Image with a high pixel count |
|
||||
|
|
|
|
|
|
|
|
|
|
|
Image with a low pixel count |
|
||||
|
|
|
|
|
|
|
|
|
|
|
|
|||||
|
|
|
|
|
|
|
|
|
|
|
|
|||||
|
|
|
|
|
|
|
|
|
|
|
|
|||||
|
|
|
|
|
|
|
|
|
|
|
|
|||||
|
|
|
|
|
|
|
|
|
|
|
|
|
Image becomes clearer |
|||
|
|
|
|
|
|
|
|
|
|
|
|
|
||||
|
|
|
|
|
|
|
|
|
|
|
|
|
|
|
|
|
|
|
|
|
|
|
|
|
|
|
|
|
|
|
|
|
|
|
|
|
|
|
|
|
|
|
|
|
|
Quality (Compression) |
|
|||
|
|
Application |
Number of pixels |
|
|
|
|
|
|
|
|
|
||||
|
|
Non- |
|
Low |
High |
|
High |
High |
||||||||
|
|
|
|
|
|
|
|
compression |
compression |
compression |
compression |
compression |
||||
increases |
|
|
|
|
|
|
1/1 |
|
1/2.7 |
1/4 |
|
1/8 |
1/12 |
|||
Select for the |
|
3264x2448 |
TIFF |
|
SHQ |
|
|
HQ |
|
|||||||
|
|
|
|
|
|
|
|
|
|
|
|
|
|
|
|
|
|
|
|
|
3200x2400 |
|
|
|
|
|
|
|
|
|
|||
pixels |
|
print size |
|
2560x1920 |
|
|
|
|
|
|
|
|
|
|||
|
|
1600x1200 |
|
|
|
|
|
|
|
|
|
|||||
|
|
|
|
|
|
|
|
|
|
|
|
|||||
|
|
|
|
1280x960 |
|
– |
|
|
|
SQ |
|
|||||
of |
|
|
|
1024x768 |
|
|
|
|
|
|||||||
|
|
|
|
|
|
|
|
|
|
|
|
|
|
|
|
|
Number |
|
For small-sized |
|
640x480 |
|
|
|
|
|
|
|
|
|
|||
|
|
print and |
|
|
|
|
|
|
|
|
|
|
||||
|
|
website |
|
|
|
|
|
|
|
|
|
|
|
|
|
|
|
|
|
|
|
|
|
|
|
|
|
|
|
|
|
|
|
2
shooting before know to Things
29

s0004_e_Advanced.book Page 30 Tuesday, September 27, 2005 4:15 PM
Selecting the record mode
How to select the record mode
2
shooting before know to Things
1 |
Menu |
[ ] [D] |
2 |
Use |
to set. |
[RAW] / [TIFF] / [SHQ] / [HQ] / [SQ] / [RAW+SHQ] / [RAW+HQ] / [RAW+SQ]
3 Press the i button.
Setting the number of pixels and compression rate
1 |
Menu |
[ |
] |
[HQ] |
2 |
Menu |
[ |
] |
[SQ] |
Follow the steps depending on the record mode you have selected. |
||||
|
[HQ] |
|
|
|
|
1) Use |
|
to set the compression rate. |
|
[1/4] / [1/8] / [1/12]
[SQ]
1) Use  to set the number of pixels.
[3200x2400] / [2560x1920] / [1600x1200] / [1280x960] / [1024x768] / [640x480]
2) Use  to set the compression rate.
[1/2.7] / [1/4] / [1/8] / [1/12]
3 Press the i button.
30
 Loading...