


INSTRUCTIONS  2 MODE D'EMPLOI
  29
29
BEDIENUNGSANLEITUNG  57 INSTRUCCIONES
  85
85
 113
113
2 |
WARNING |
CONTENTS |
3 |
|
|
Read this manual carefully before using your camera.
Indicates circumstances under which mishandling resulting from ignoring this symbol could result in personal injury or property damage.
KEEP THE BATTERIES AWAY FROM FIRE. NEVER TRY TO DISASSEMBLE, RECHARGE, OR SHORT-CIRCUIT BATTERIES.
KEEP THE BATTERIES OUT OF THE REACH OF CHILDREN. IF A CHILD SWALLOWS A BATTERY, CONTACT A DOCTOR IMMEDIATELY.
NEVER ATTEMPT TO DISASSEMBLE THE CAMERA; IT CONTAINS A HIGHVOLTAGE CIRCUIT. IF THE INTERNAL PARTS OF THE CAMERA ARE EXPOSED DUE TO DROPPING OR DAMAGE, REMOVE THE BATTERIES IMMEDIATELY TO PREVENT FURTHER USAGE.
IN CASE OF MALFUNCTION, CONSULT YOUR NEAREST OLYMPUS DEALER OR OLYMPUS SERVICE CENTER.
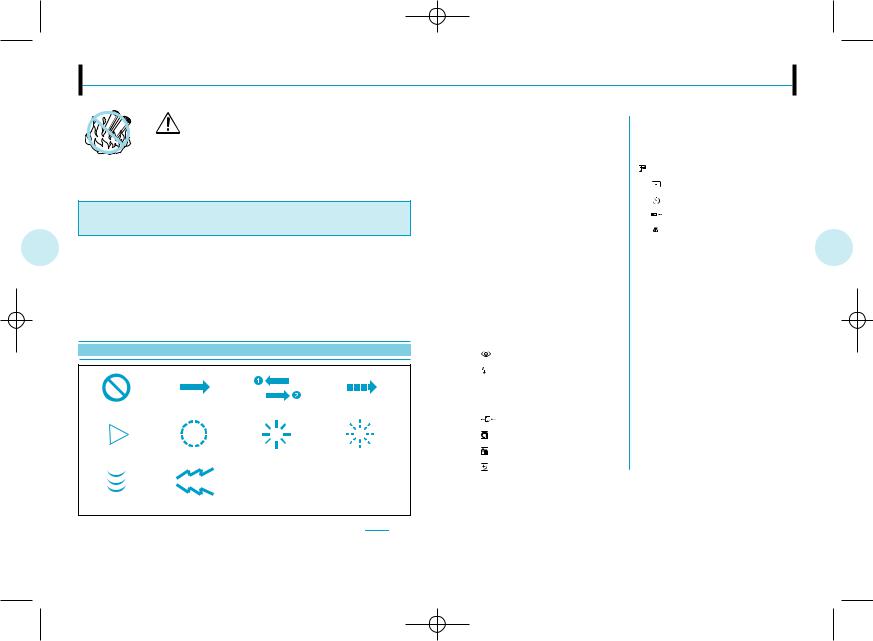
Symbols used in this manual:
Incorrect |
Manual operation |
Operation order |
Automatic operation |
Order |
Attention |
Indicator on |
Indicator blinking |
Depress halfway |
Beep |
|
|
Pay particular attention to items in this manual enclosed in boxes 
 .
.
Products shown in pictures and illustrations may be slightly different from the actual unit.
Names of parts |
|
|
Camera Body................................ |
4 |
|
Camera Body/LCD Panel .............. |
5 |
|
Viewfinder Display........................ |
6 |
|
Using the strap ................................ |
6 |
|
Diopter adjustment .......................... |
7 |
|
Loading and checking the batteries |
..7 |
|
Loading the film .............................. |
8 |
|
Taking pictures |
|
|
Programmed Auto (FULL AUTO) |
..9 |
|
Focus Lock ................................ |
10 |
|
Unloading the film .......................... |
10 |
|
Flash photography |
|
|
Setting the flash mode .............. |
11 |
|
Auto Flash .................................. |
12 |
|
[ |
] Red-Eye Reduction Flash .. |
13 |
[ |
] Fill-In Flash ........................ |
13 |
Exposure modes |
|
|
1. Direct Mode Select buttons ........ |
14 |
|
[ |
] Stop Action .................... |
14 |
[ |
] Portrait .............................. |
15 |
[ |
] Landscape.......................... |
15 |
[ |
] Night Scene ...................... |
16 |
2. Exposure mode button .............. |
16 |
|
[ A ] Aperture Preferred Auto .... |
17 |
|
[ L.T. ] Long Time .................... |
18 |
|
[ |
] Exposure Compensation ........ |
19 |
[ |
] Spot Metering .................. |
21 |
[ |
] Selftimer/ |
|
[ |
] Remote Control(Optional) .... |
22 |
[ |
] Macro Shooting ................ |
23 |
Restoring the Programmed Auto |
|
|
[FULL AUTO] mode ...................... |
23 |
|
Correcting the date and time .......... |
24 |
|
(Quartzdate models only) |
|
|
Printing the date/time .................... |
25 |
|
(Quartzdate models only) |
|
|
Care and storage ............................ |
26 |
|
Specifications ................................ |
27 |
|
Accessories (optional).................... |
28 |
|

4 |
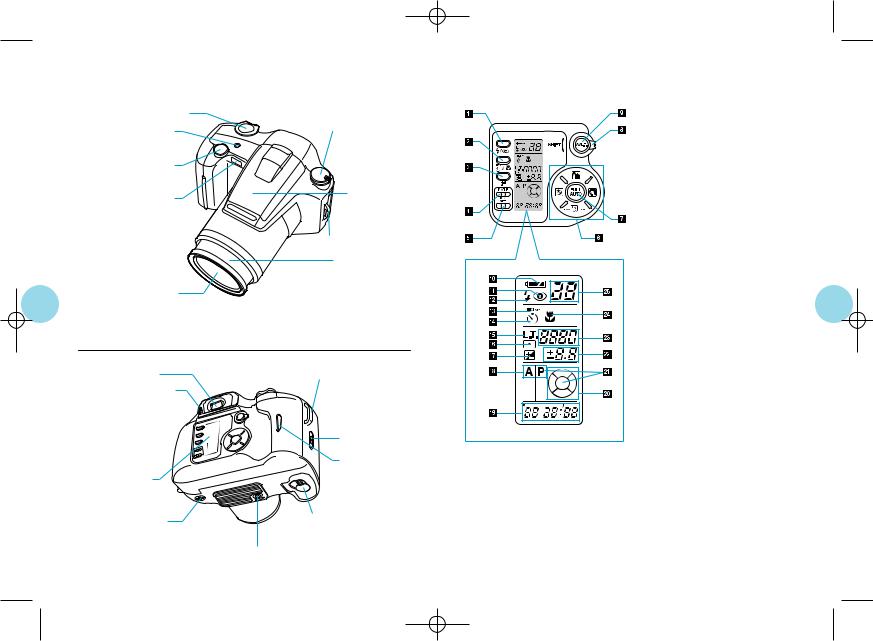
NAMES OF PARTS — Camera Body |
NAMES OF PARTS — Camera Body/LCD Panel |
5 |
|
|
Zoom button |
|
SPOT button |
Power switch/ |
|
flash release |
Shutter release button |
|
Selftimer indicator/ |
Flash |
|
|
remote control sensor |
|
|
Strap attachment stud |
|
Lens barrel |
 Lens
Lens
Always try to keep this clean. Dirt and stains can result in pictures that are unclear and out-of-focus. Wipe off any dirt or stains with a soft cloth.
Viewfinder
Diopter adjustment dial |
Strap attachment stud |
|
Back cover release
Film window
LCD panel
Mid-roll rewind button |
Battery compartment cover |
1 Flash mode button
2Selftimer/ remote control/ macro button
3 Exposure compensation button
4 DATE MODE button*
5 DATE SET button*
6 Direct Mode Select buttons
7FULL AUTO (programmed auto) button
8 Shift lever
9 Exposure mode button
0 Battery check
! Red-Eye Reduction Flash @ Fill-In Flash
# Remote Control $ Selftimer
% Long Time
^ Spot Metering
& Exposure Compensation * Exposure modes
( Date/time indicator* ) Mode status indicator
q Programmed Auto (FULL AUTO) w Aperture setting/
exposure compensation value e Shutter speed
r Macro Shooting t Exposure counter
* Quartzdate models only
Tripod socket

6 |
NAMES OF PARTS — Viewfinder Display |
DIOPTER ADJUSTMENT |
7 |
|
|
y Autofocus frame u Spot frame
i Flash
o Autofocus indicator
p Exposure compensation (overexposure/underexposure)
USING THE STRAP
Attach the strap as shown.
1
2
3 |
Secure the strap with the clasp.
Turn the diopter adjustment dial until the autofocus frame is clear.
If you are nearsighted, turn the dial up.
If you are farsighted, turn it down.
LOADING AND CHECKING THE BATTERIES
Use two 3 V lithium batteries (CR123A or DL123A).
1 |
1 |
|
2 |
|
3 |
Turn the dial 1on the battery compartment cover to  . Hold the notch 2with your fingertip. Open the cover 3.
Make sure the power switch is set to OFF before opening the battery compartment cover.
2 |
4 |
6 |
Insert the batteries 4correctly. Close the battery compartment cover 5. Turn the dial 6 to  to lock the cover.
3 |
7 |
Set the power switch 7 to ON to check the remaining battery power.
lights (turns off automatically). |
Batteries are OK. You can shoot. |
|
|
|
|
blinks and other indicators are |
Batteries are low and should be |
|
displayed normally. |
replaced with new ones. |
|
blinks and other indicators go out. |
Batteries are dead and should be |
|
replaced with new ones immediately. |
||
|
||
|
|

8 |
LOADING THE FILM |
TAKING PICTURES — Programmed Auto (FULL AUTO) |
9 |
|
|
1
Shutter curtain
Slide the back cover release upward to open the back cover.
2 |
|
2 |
1 |
Insert the film cartridge.
Be careful not to touch the shutter curtain.
3 |
Correct |
|
Incorrect |
Place the film between the positioning guides (A), aligning the film leader in the direction of the arrow.
4 |
5 |
Close the back cover. The film automatically advances to the first frame. Set the power switch to ON.
Make sure the exposure counter on the LCD panel reads “  ”.
”.
If “  ” blinks, reload the film.
1
Set the power switch to ON. The lens will extrude and the LCD panel will turn on.
Compose your shot. Press the “T” side of the zoom button for telephoto (120 mm) or the “W” side for wide angle (28 mm).
After about 30 seconds of inactivity, the LCD panel goes out.
Do not look at the sun or other strong light sources through the viewfinder.
2 |
Autofocus frame |
3 |
Position the autofocus frame  on your subject.
If the autofocus indicator blinks, the shutter cannot be released.
The distance to your subject is 0.6 (2.0 ft) m to infinity at the wide-angle side and 0.9 (3.0 ft) m to infinity at the telephoto side.
Press the shutter release button halfway to focus on the subject. After making sure that the camera beeps and the autofocus indicator lights in the viewfinder, press the shutter release button all the way to take the picture. After the shutter is released, the film automatically advances to the next frame.
10 |
TAKING PICTURES — Focus Lock |
FLASH PHOTOGRAPHY — Setting the Flash Mode |
11 |
|
|
If you want to position your main subject outside the center of the frame, follow the procedure below (focus lock).
1 |
Autofocus frame |
2 |
|
on
your subject and press the shutter release button halfway. The camera beeps, and the autofocus indicator lights in the viewfinder. The exposure is also locked at this time (AE lock).
keeping the shutter release button pressed halfway. Then press the shutter release button all the way.
UNLOADING THE FILM
The camera automatically rewinds the film when you reach the end of a roll. You can also rewind the film before it reaches the end.
Rewinding the film before the end of the roll
Make sure the motor has |
Press the mid-roll rewind |
stopped and that“ ”is blinking; |
button. Do not use an |
then open the back cover to |
instrument with a sharp tip. |
remove the film. |
|
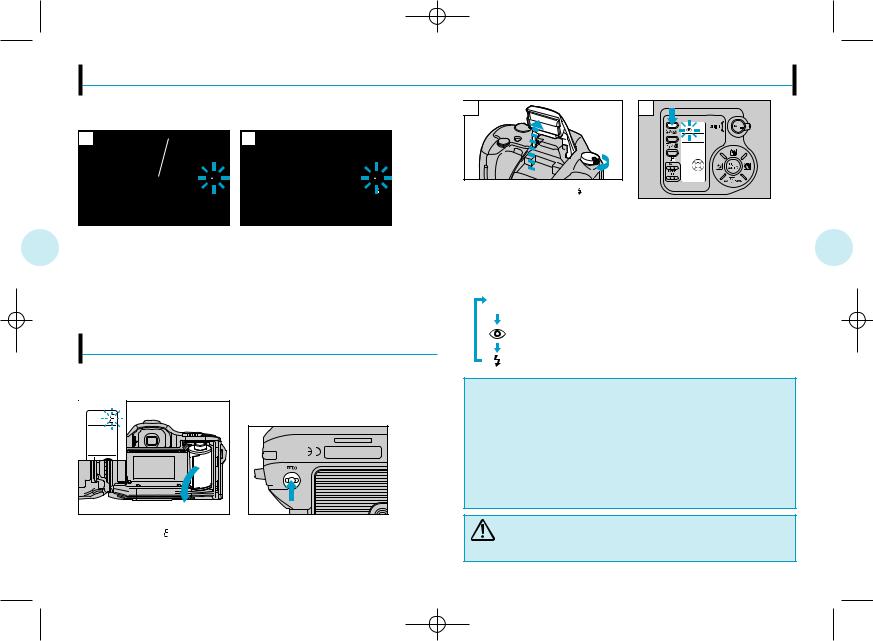
1
Set |
flip |
up |
|
will |
|
is |
fires |
automatically. |
|
2
Press the  /
/  button to select the flash mode. The selected mode is displayed on the LCD panel.
Mode display |
Flash mode |
Function |
|
|
|
|
|
No |
Auto Flash |
Automatically fires in the dark, with backlighting, or |
|
display |
under fluorescent lighting. |
||
|
|||
|
|
|
|
|
Red-Eye |
Significantly reduces the phenomenon of “red-eye” |
|
|
Reduction |
(when a subject’s eyes appear red in color |
|
|
Flash |
photography). |
|
|
Fill-In |
Fires regardless of available light. |
|
|
|
|
When  is blinking in the viewfinder, the flash is being recharged (for about 0.2 to 4 seconds with fresh batteries.) and the shutter cannot be released.
When the flash fires in the Programmed Auto (FULL AUTO) mode, the shutter speed is automatically set at 1/100-sec.
When the shutter release button is pressed halfway, the autofocus auxiliary light (flash) may flicker several times. Press the button fully for main flash activation.
If  is blinking in the viewfinder when the flash is not flipped up, use of the flash is recommended.
Do not fire the flash right in front of the eyes of people and animals.
Do not point the camera at a motorist and fire the flash.
12 |
FLASH PHOTOGRAPHY — Auto Flash |
FLASH PHOTOGRAPHY — Red-Eye Reduction Flash |
13 |
|
|
The flash automatically fires in the selected exposure mode when required (in the dark, with backlighting, or under fluorescent lighting).
If  lights in the viewfinder when the shutter release button is pressed halfway, the flash will fire.
Flash working range (with color negative film)
ISO |
Wide angle (W) |
Telephoto (T) |
|
at F4.9 |
at F6.8 |
|
|
|
100 |
3.7 m (12.1 ft) |
4.2 m (13.8 ft) |
200 |
5.3 m (17.4 ft) |
5.9 m (19.3 ft) |
400 |
7.4 m (24.3 ft) |
8.4 m (27.5 ft) |
|
|
|
The figures in this table apply to the Programmed Auto mode and lowlight conditions. When reversal film is used, the working range at the telephoto side will be reduced by about 30%.
In flash photography with this camera, the shutter speed is set to 1/100-sec. If you select the shutter speed higher than that, the flash won’t fire.
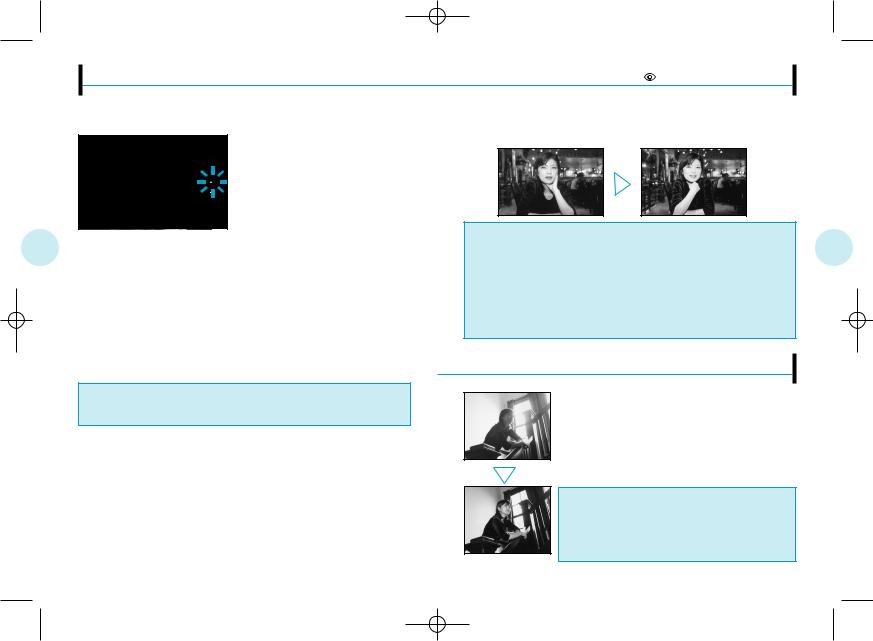
In this mode, the camera emits a series of pre-flashes before the main flash activates. This helps minimize the “red-eye” phenomenon (when a subject’s eyes are illuminated by the flash and appear red in a color photograph).
Hold the camera securely. It takes about 1 second until the shutter releases.
Red-eye reduction may not be effective when the subject:
1.Is not looking at the flash from right in front.
2.Is not watching the pre-flashes.
3.Is too far from the camera.
The effectiveness of red-eye reduction varies depending on the individual characteristics of each subject.
Do not use the flash in the Stop Action mode (p.14).
FLASH PHOTOGRAPHY —  Fill-In Flash
Use this mode when you want the flash to fire for each shot. The flash fires regardless of available light. Both the subject and background can be clearly shot.
This mode is less effective in extremely bright conditions.
The Fill-In Flash mode can be used with the Programmed Auto mode and Aperture Preferred Auto mode (p.17).
14 |
EXPOSURE MODES — 1. Direct Mode Select Buttons |
1. Direct Mode Select Buttons |
15 |
|
|
||
|
To make it easier to take clear, properly illuminated |
Portrait |
|
|
Use this mode to take a head-and-shoulders picture with a blurred |
|
|
|
photographs under a variety of conditions, four |
|
|
|
background. |
|
|
|
exposure modes optimized for the most common |
|
|
|
|
|
|
|
shooting conditions are available. |
|
|
How to select the exposure mode
Press the Direct Mode Select button that best suits the shooting conditions or desired effect.
|
|
Stop Action |
Use this mode to freeze moving subjects. |
|
||||||||
|
|
|
|
|
||||||||
|
|
Portrait |
Use this mode to take a head-and-shoulders |
|
||||||||
|
|
picture with a blurred background. |
|
|||||||||
|
|
|
|
|||||||||
|
|
Landscape |
Use this mode to take pictures with extended in- |
|
||||||||
|
|
focus backgrounds. |
|
|||||||||
|
|
|
|
|||||||||
|
|
Night Scene |
Use this mode to shoot a night scene without |
|
||||||||
|
|
artificially illuminating the subject. |
|
|||||||||
|
|
|
|
|||||||||
|
|
|
|
|
|
|
|
|
|
|
|
|
|
|
|
|
|
|
|
|
|
|
|
|
|
Stop Action |
Use this mode to freeze moving subjects. |
|||||||||||
|
|
|
|
|
|
|
|
|
|
|
|
|
|
|
|
|
|
|
|
|
|
|
|
|
|
|
|
|
|
|
|
|
|
|
|
|
|
|
|
|
|
|
|
|
|
|
|
|
|
|
|
|
|
|
|
|
|
|
|
|
|
|
|
|
|
|
|
|
|
|
|
|
|
|
|
|
|
|
|
|
|
|
|
|
|
|
|
|
|
|
The blurred background is particularly useful in telephoto shooting and when the background is distant. The flash is synchronized with the shutter up to 1/2000-sec. in this mode.
Press the  button. Compose your shot, and press the shutter release button.
The aperture is set wide-open.
Use of the flash makes the subject stand out.
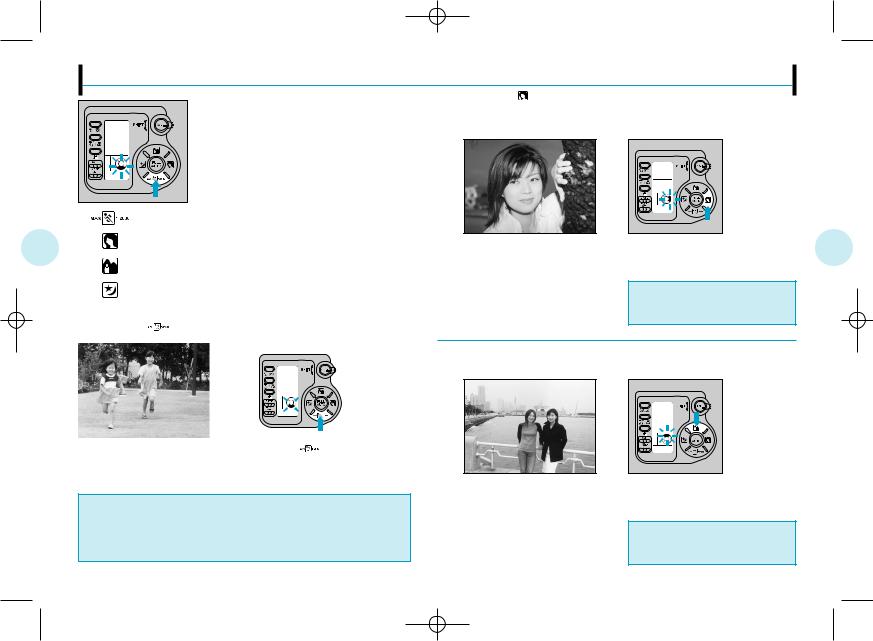
Landscape 
Use this mode to take pictures with extended in-focus backgrounds.
The shutter speed is automatically |
Press the |
button. Compose |
set higher to reduce the |
your shot, and press the shutter |
|
“movement” of a moving subject |
release button. |
|
(1/2000-sec. at max.). |
|
|
The camera continually adjusts focus on the subject as long as the shutter release button is pressed halfway. The camera beeps twice the first time the subject comes into focus.
When the subject is moving too fast, the shutter will not release.
Use the Auto Flash mode in flash photography.
This mode is useful for shooting landscapes or for shooting subjects in the foreground while keeping all surrounding objects (both near and far) in sharp focus.
Press the  button. Compose your shot, and press the shutter release button.
For optimum results, use this mode with the lens set to wideangle side.

16 |
1. Direct Mode Select Buttons |
2. Exposure Mode Button |
17 |
|
|
||
|
Night Scene |
Aperture Preferred Auto [A] |
|
|
|
Use this mode to shoot a night scene without artificially illuminating the subject.
The shutter speed is set at as slow as 4- sec. Use a tripod to keep the camera steady.
In this mode, you can shoot clear pictures at night without overilluminating the subject and blackening out the background.
When shooting subjects against a nighttime background, combine this mode with the
flash.
Do not use the flash when you are shooting night scenes only.
Press the  button. Compose your shot, and press the shutter release button.
EXPOSURE MODES — 2. Exposure Mode Button
For more versatile exposure control, you can use the Aperture Preferred Auto mode or Long Time mode.
Press the exposure mode button to select “A” (Aperture Preferred Auto) or “L.T.” (Long Time).
 P Programmed Auto
A Aperture Preferred Auto
 L.T. Long Time
By selecting the aperture on your own, you can control the blurring of the background. The shutter speed is controlled automatically.
Select a smaller aperture (larger value) for a sharper background.
Select a larger aperture (smaller value) for a blurred background.
2 |
1 |
Press the exposure mode button 1 to select “A” (Aperture Preferred Auto). Push the shift lever 2upward to stop down the aperture by 1 step. Push the lever 2 downward to return to a wide aperture.
If the shutter speed indicator blinks in the viewfinder when the shutter release button is pressed halfway, it means overexposure or underexposure. Change the aperture setting until the indicator stops blinking.

18 |
2. Exposure Mode Button |
EXPOSURE COMPENSATION [ ] |
19 |
|
|
Long Time [L.T.]
In this mode, you can deliberately make your picture brighter or darker as This mode is ideal for capturing pictures of fireworks and other bright lights at desired. Exposure compensation is possible up or down to ±2 EV by 0.5 step. night. You can select the shutter speed from 1-sec. to 60-sec. The aperture is
fixed at F8.
Use a tripod to keep the camera steady.
2 |
1 |
Press the exposure mode button 1 to |
|
|
|
|
|
|
|
|
|
|
|
enter the Long Time mode (“L.T.”). As |
|
|
|
|
|
you press the shift lever 2 downward, |
|
|
|
|
|
|
|
|
|
compensation) |
|
the shutter speed changes in the order of |
|
|
|
|
|
|
|
|
|
|
|
1, 2, 4, 8, 15, 30, and 60-sec. |
|
|
|
|
|
(When you push the shift lever upward, |
|
|
|
|
|
the shutter speed changes in the reverse |
|
|
|
|
|
order.) |
|
|
|
|
|
|
|
|
|
|
|
daylight (–2 EV compensation)
+ Compensation (to make the whole picture lighter)
Whitish subject Backlit subject Snow scene
– Compensation (to make the whole picture darker)
Blackish subject Subject with a black background
Subject in spotlight
20 |
SPOT METERING [ |
] |
21 |
|
|
|
While keeping the exposure |
|
1 |
2 |
|
compensation button 1 pressed, use the |
||
|
||
|
shift lever 2 to select the exposure |
|
|
compensation value. The exposure |
|
|
compensation value is displayed on the |
|
|
LCD panel only when the exposure |
|
|
compensation button is pressed. |
When the shutter release button is
pressed halfway, |
lights in the |
viewfinder. |
|
To cancel the Exposure Compensation mode, set the exposure compensation value back to ±.
In the Exposure Compensation mode, the flash strength will also be corrected.
When color negative film is used, pictures will be corrected when they are printed, which makes it difficult to see the effect of exposure compensation.
This mode accurately measures a small area such as a person’s face to enable you to shoot a picture with the brightness precisely adjusted to the subject.
Position the spot frame on the area where you want to measure the light. When there is an extreme difference in the brightness of the subject and background, use of the Spot Metering mode is recommended (in backlighting, for example).
Spot frame
1 |
Press the SPOT button. The  mark, aperture setting and shutter speed will be displayed on the LCD panel. The exposure determined by light metering will be locked.
2
Press the shutter release button all the way.
When the flash is flipped up or the Night Scene mode is engaged, the camera will not perform spot metering.
When the shutter releases, the Spot Metering mode is canceled.
To cancel the mode without taking a shot, press the SPOT button again.

22 |
SELFTIMER [ ]/ REMOTE CONTROL [ ](Optional) |
MACRO SHOOTING [ ] |
23 |
|
|
As you press the selftimer/ remote control/ macro button, the mode changes as follows:
No display
macro |
remote control |
selftimer |
When in the Selftimer mode
Secure the camera on a tripod or other support. Compose your shot in the viewfinder. Press the shutter release button halfway (the focus and exposure are locked at this time). Then press the shutter release button all the way. The selftimer indicator lights for about 10 seconds and then blinks for about 2 seconds. After this, the shutter will release.
The Selftimer mode is automatically disengaged after shutter release.
To cancel the selftimer after it has been activated, press the selftimer/ remoto control button again.
When in the Remote Control mode
|
Compose your shot in the |
|
viewfinder. Position the autofocus |
|
frame on your subject. To take a |
|
picture, point the remote control at |
|
the camera and press the button on |
|
the remote control. The camera |
Use the remote control in this range. |
starts beeping, and the shutter will |
release about 3 seconds later. |
Press the selftimer/ remote control button again to cancel the mode.
For more details on the remote control (including how to insert the battery), see the separate instructions provided for the remote control.
Close-up photography from 0.6 (2.0 ft) m to infinity is possible throughout the focal length.
1 |
2 |
Press the macro button to |
Compose your shot using the |
display . |
zoom button. |
When your subject is closer than 0.6 m (2.0 ft), the camera may be unable to focus on the subject although the autofocus indicator lights.
To cancel the Macro mode, press the macro button again to turn off  .
.
RESTORING THE PROGRAMMED AUTO [FULL AUTO] MODE
You can return to the Programmed Auto (FULL
AUTO) mode at the touch of a button.
Press the FULL AUTO button to display “P” on the LCD panel. Setting the power switch to OFF and then ON again also restores the Programmed Auto mode.
Setting in the Programmed Auto (FULL AUTO) mode
: Exposure mode |
Standard Program |
: Flash mode |
Auto Flash or Red-Eye Reduction Flash |
: Canceled modes |
Spot Metering, Macro, Exposure |
|
Compensation, Remote Control and |
|
Selftimer |
Setting the Programmed Auto mode with the exposure mode button only switches the flash mode to Auto Flash or Red-Eye Reduction Flash; all other modes remain the same except the exposure mode (“A”).
24 |
CORRECTING THE DATE AND TIME * Quartzdate models only |
25 |
|
PRINTING THE DATE/TIME * Quartzdate models only |
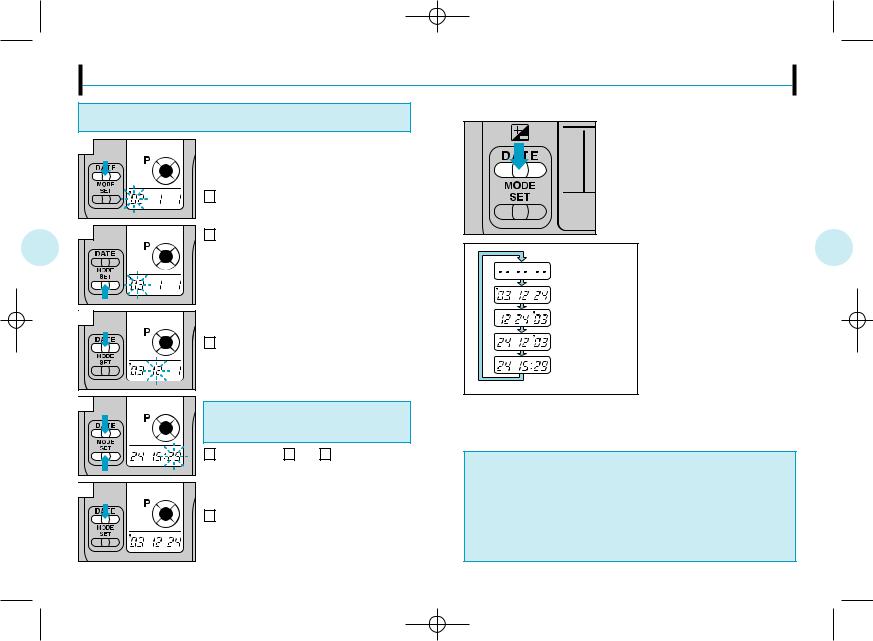
Be sure to correct the date and time after the batteries have been inserted or replaced.
1 |
To set the “year” indicator: |
|
|
|
|
|
1 |
Keep the MODE button pressed until the |
|
|
“year” indicator starts blinking. |
2 |
2 |
Press the SET button to adjust the “year” |
|
|
indicator. If you press the button once, the |
|
|
number on the display will advance by 1. If you |
|
|
keep the button pressed, the numbers will run in |
|
|
rapid succession. If you pass the intended |
|
|
number, keep pressing to return to that number. |
3 |
To set the “month” indicator: |
|
|
3 |
Press the MODE button once more to |
|
|
make the “month” indicator blink. Press |
|
|
the SET button to adjust the “month” |
|
|
indicator. |
4 |
As you press the MODE button, the blinking |
|
|
indicator changes in the order of “year”, |
|
|
“month”, “day”, “hour” and “minute”. |
|
|
4 |
Repeat Steps 2 and 3 to set “hour” |
|
|
and “minute”. |
5
5 When “minute” has been set, press the MODE button. None of the indicators will be blinking and date/time correction is now complete.
First select the date/time mode you want to print.
Press the MODE button. As you press it, the mode will switch in the order shown below.
Keep the mode you want to print displayed.
None
Year -month -day
Month -day -year
Day -month -year
Day -hour -minute
The date unit uses the same power source as the main unit. Be sure to correct the date and time after the batteries are replaced.
The date/time is imprinted in the lower right corner of the picture. If the date/time is superimposed on a bright color like white, orange, yellow, etc., it may be difficult to read.
The date/time may not be imprinted correctly on the frame(s) after the specified final exposure of the film.
When black-and-white film is used, the date/time may not be printed.
26 |
CARE AND STORAGE |
SPECIFICATIONS |
27 |
|
|
Do not leave the camera in any place exposed to excessive heat, humidity or direct sunlight — for example, in a car or on the beach.
Do not expose the camera to formalin or naphthalene.
If the camera gets wet, wipe it with a dry towel. The salt in seawater can be especially damaging.
Do not use organic solvents such as alcohol or paint thinner when cleaning the camera.
Do not leave the camera on or near a television, refrigerator or other appliance with a magnetic field.
Do not expose the camera to dust or sand as this could cause serious damage.
Do not shake or shock the camera.
Do not apply excessive force to the zoom lens.
Do not expose the camera to extreme heat (over 40oC/ 104oF) or to extreme cold (below –10oC/ 14oF). Low temperatures, even within this range may sometimes cause deterioration in battery performance, temporarily disabling the camera.
Avoid leaving the camera unused for long periods of time. This can cause mold to grow on the camera as well as other problems. Try to press the shutter release button and check the operation of the camera before use.
Some airport X-ray machines can damage the film in your camera. Try to avoid passing your camera through these machines. Give it to the security officer for manual inspection.
Do not touch the front surface of the flash after using the flash continuously in a short time as the flash may be hot.
Type: |
Fully automatic 35 mm autofocus single-lens reflex camera with built- |
|
in 28 mm ~ 120 mm zoom lens. |
Film format: |
35 mm standard DX-coded film (24 x 36 mm). |
Lens: |
Olympus lens (filter available, 52 mm filter diameter), 28 mm~ 120 |
|
mm, F4.9 ~ 6.8, 15 elements in 10 groups (4-gourp zoom |
|
construction), 1 ED lens included. |
Shutter: |
Electronic control system vertical focal plane shutter. Shutter speed |
|
— 1/2000-sec. ~ 4-sec. in Manual mode; 1 sec. ~ 60 sec. in Long |
|
Time Mode. |
Flash-shutter synchronization: |
|
|
Under 1/100-sec. (Full synchronization up to 1/2000-sec.with Super |
|
FP Activation in Portrait mode). |
Focusing: |
TTL phase-difference detection system (with autofocus beep). |
|
Auxiliary flash activation in low light — 6m (19.7ft) working distance |
|
(determined under Olympus test conditions). Focus lock possible. |
|
Focusing range — 0.6 m (2ft) ~ ∞ (infinity) in macro shooting; 0.6 m |
|
(2ft) ~ ∞ (infinity) at wide angle and 0.9 m (3ft) ~ ∞ (infinity) at |
|
telephoto in standard shooting. Provided with predictive autofocus (in |
|
Stop Action mode only). |
Viewfinder: |
Single-lens reflex system, magnification ratio 0.72 (at 50 mm). Finder |
|
view-field — 85% of actual view-field. |
Viewfinder information:
Autofocus frame, autofocus indicator, spot frame, flash indicator (also used as flash warning), overexposure/underexposure indicator (also used as exposure compensation indicator).
Diopter adjustment: –2 ~ +1. Light metering system:
|
TTL light metering system, ESP light metering, center-weighted |
|
average light metering and spot metering. |
Exposure compensation: ±2 EV (1/2 step). |
|
Exposure modes: |
Programmed AE (FULL AUTO, Stop Action, Portrait, Night Scene and |
|
Landscape), Aperture Preferred AE. and Long Time. |
Exposure counter: |
Progressive type displayed on LCD panel. |
Film speed range: |
Automatic setting with DX-coded film (ISO 25, 32, 50, 64, 100, 125, |
|
200, 250, 400, 500, 800 1000, 1600, 2000 or 3200). Other |
|
intermediate film speeds will be automatically set for next lower |
|
speed. |
Film loading: |
Automatic loading. (Automatically advances to first frame when |
|
camera back is closed.) |
Film advance: |
Automatic film winding. |
Film rewind: |
Automatic film rewind (automatic rewind activation at end of film, |
|
automatic rewind stop). Rewind possible at any point with rewind |
|
button. |
Selftimer: |
Electronic shutter with 12-sec. delay. |

28
Remote control(Optional):
Infrared remote control unit with 3-sec. delay.
Built-in IVP (Intelligent Variable-Power) flash system with Super FP Activation. Manually flipped up. Recycling time — Approx. 0.2 ~ 4 sec. (at normal temperature). Flash working range — 0.6 m ~ 3.7 m (2.0 ~ 12.1ft) at wide angle and 0.9 m ~ 4.2 m (3.0 ~ 13.8ft) at telephoto with ISO 100 color negative film; 0.6 m ~ 7.4 m (2.0 ~ 24.3ft) at wide angle and 0.9 m ~ 8.4 m (3.0 ~ 27.5ft) at telephoto with ISO 400 color negative film.
Auto Flash (automatic flash activation in low-light, back light and fluorescent light), Red-Eye Reduction Flash (same as auto otherwise), Fill-In (forced activation) and Super FP Activation.
Displayed on LCD panel.
Two 3 V lithium batteries (DL123A or CR123A).
125 (W) x 87 (H) x 124 (D) mm(4.9 x 3.4 x 4.9 in) (extruding protrusions). 650 g (22.9 oz)(without batteries).
Specifications for Date Unit |
* Quartzdate models only |
Data recording system: |
Imprinting from behind film. |
Types of data recording: |
(1) None. (2) Year-month-day. (3) Month-day-year. |
|
(4) Day-month-year. (5) Day-hour-minute. |
External display of recorded data: Continuous LCD panel display. |
|
Automatic calendar function: |
To year 2032. |
SPECIFICATIONS ARE SUBJECT TO CHANGE WITHOUT ANY NOTICE OR OBLIGATION ON THE PRODUCT OF THE MANUFACTURER. THE ACTUAL PRODUCT MAY DIFFER FROM ONES SHOWN IN THIS MANUAL.
ACCESSORIES (OPTIONAL)
Teleconverter |
Remote Control |
IS/L LENS E-1.3X |
RC-300C |
H.Q.TELECONVERTER |
|

MODE D'EMPLOI

|
|
|
|
|
|
|
|
|
30 |
|
AVERTISSEMENT |
TABLE DES MATIÈRES |
|
31 |
|
|
|
|
|||||
|
|
|
|||||
|
|
|
|
|
|||
|
|
|
Nous vous recommandons de lire attentivement ce mode d'emploi avant |
|
|
|
|
|
|
|
|
|
|
||
|
|
|
d'utiliser votre appareil. |
|
|
|
|
|
Ce symbole signale un mauvais emploi ou une |
|
|
Nom des commandes |
|
2. Touche de mode d'exposition |
....44 |
|||||||||||||||||
|
erreur de manipulation consécutifs au fait que vous |
Boîtier de l'appareil .................. |
32 |
[ A ] Automatique priorité |
|
|||||||||||||||||||
|
n'avez pas tenu compte du symbole et qui peuvent |
Boîtier de l'appareil/Écran |
|
|
ouverture .......................... |
45 |
||||||||||||||||||
|
entraîner un accident corporel ou matériel. |
|
|
d'affichage à cristaux liquides |
|
[ L.T. ] Longue pose |
46 |
|||||||||||||||||
|
|
|
|
|
|
|
|
|
|
|
|
|
|
|
|
|
|
|
||||||
CONSERVER LES PILES ÉLOIGNÉES DU FEU. NE JAMAIS ESSAYER |
(ACL) ........................................ |
33 |
[ |
] Compensation d'exposition |
..47 |
|||||||||||||||||||
DE DÉMONTER, RECHARGER NI COURT-CIRCUITER LES PILES. |
Affichage du viseur .................... |
34 |
[ |
] Mesure spot .................... |
49 |
|||||||||||||||||||
CONSERVER LES PILES HORS DE LA PORTÉE DES ENFANTS. |
|
|
................Utilisation de la courroie |
34 |
[ |
] Retardateur / |
|
|||||||||||||||||
CONTACTER IMMÉDIATEMENT UN MÉDECIN SI UN ENFANT |
|
|
Correction dioptrique...................... |
35 |
[ |
] Télécommande(en option) .... |
50 |
|||||||||||||||||
AVALE UNE PILE. |
|
|
|
|
|
|
|
|
|
|
|
|
|
|
|
|
Mise en place et contrôle des piles 35 |
[ |
] Prise de vue gros plan |
....51 |
||||
NE JAMAIS ESSAYER DE DÉMONTER L'APPAREIL; IL INCORPORE UN |
|
|
......................Chargement du film |
36 |
Retour au mode automatique |
|
||||||||||||||||||
CIRCUIT HAUTE TENSION. SI DES PIÈCES INTÉRIEURES DE L'APPAREIL |
Prise de vue |
|
programmé [FULL AUTO] ............ |
51 |
||||||||||||||||||||
ÉTAIENT MISES À DÉCOUVERT À LA SUITE D'UNE CHUTE OU D'AUTRES |
Automatique programmée |
|
Correction des données d'horodatage |
|
||||||||||||||||||||
DOMMAGES, RETIRER IMMÉDIATEMENT LES PILES POUR EMPÊCHER |
|
|
(FULL AUTO) |
37 |
(Modèles Quartzdate uniquement) |
52 |
||||||||||||||||||
TOUTE UTILISATION SUPPLÉMENTAIRE. |
|
|
|
|
|
|
|
|
|
|
||||||||||||||
|
|
|
|
|
|
|
|
|
|
Mémorisation de la mise au point |
38 |
Impression de la date et de l'heure |
||||||||||||
EN CAS DE DIFFICULTÉS, CONTACTER VOTRE REVENDEUR OU L'UN DES |
||||||||||||||||||||||||
Déchargement du film |
38 |
(horodatage) (Modèles Quartzdate |
||||||||||||||||||||||
CENTRES DE SERVICE OLYMPUS LE PLUS PROCHE. |
|
|
|
|
|
|
|
|
|
|
||||||||||||||
|
|
|
|
|
|
|
|
|
|
|
|
|
|
|
|
|
|
Photographie au flash |
|
uniquement) .................................. |
53 |
|||
|
|
|
|
|
|
|
|
|
|
|
|
|
|
|
|
|
|
|
||||||
Symboles utilisés dans ce mode d'emploi: |
|
|
Réglage du mode flash .............. |
39 |
Précautions et rangement .............. |
54 |
||||||||||||||||||
|
|
|
|
|
|
|
|
|
|
|
|
|
|
|
||||||||||
|
|
|
|
|
|
|
|
|
|
|
|
|
|
|
|
|
|
Flash automatique |
40 |
Fiche technique |
55 |
|||
|
|
|
|
|
|
|
|
|
|
|
|
|
|
|
|
|
|
|||||||
|
|
|
|
|
|
|
|
|
|
|
|
|
|
|
|
|
|
[ |
] Flash atténuant l'effet "yeux |
Accessoires (en option).................. |
56 |
|||
|
|
|
|
|
|
|
|
|
|
|
|
|
|
|
|
|
|
|||||||
Incorrect |
Ordre |
Ordre des opérations |
Fonction automatique |
|
............................rouges" |
41 |
|
|
|
|||||||||||||||
[ |
] Flash d'appoint .................. |
41 |
|
|
|
|||||||||||||||||||
|
|
|
|
|
|
|
|
|
|
|
|
|
|
|
|
|
|
Modes d'exposition |
|
|
|
|
||
|
|
|
|
|
|
|
|
|
|
|
|
|
|
|
|
|
|
|
|
|
|
|||
|
|
|
|
|
|
|
|
|
|
|
|
|
|
|
|
|
|
1. Touches d'accès direct aux modes |
42 |
|
|
|
||
|
|
|
|
|
|
|
|
|
|
|
|
|
|
|
|
|
|
|
|
|
||||
Réglage manuel |
Attention |
Voyant allumé |
Voyant clignotant |
[ |
......................] Stop Action |
42 |
|
|
|
|||||||||||||||
|
|
|
|
|
|
|
|
|
|
|
|
|
|
|
|
|
|
[ |
] Portrait .............................. |
43 |
|
|
|
|
|
|
|
|
|
|
|
|
|
|
|
|
|
|
|
|
|
|
[ |
] Paysage ............................ |
43 |
|
|
|
|
Presser à mi-course |
Signal sonore |
|
|
|
|
|
|
|
|
|
|
|
|
|
|
|
|
[ |
] Scène de nuit .................... |
44 |
|
|
|
|
|
|
|
|
|
|
|
|
|
|
|||||||||||||||
Porter une attention particulière aux recommandations encadrées comme ci-contre |
|
. |
|
|
|
|
|
|
|
|||||||||||||||
|
|
|
|
|
|
|
|
|||||||||||||||||
Les produits utilisés dans les photos ou illustrations peuvent être sensiblement différents de l'appareil que vous venez d'acquérir.
|
|
|
|
|
|
|
|
|
32 |
|
NOM DES COMMANDES - Boîtier de l'appareil |
Boîtier de l'appareil/Écran d'affichage à |
|
33 |
|
|
|
|
|||||
|
|
|
|||||
|
|
|
NOM DES COMMANDES - cristaux liquides (ACL) |
|
|
||
|
|
|
|
|
|
|
|
Touche de zoom |
Interrupteur |
Touche SPOT |
d'alimentation/sortie du flash |
|
Déclencheur
Flash
Voyant retardateur/
détecteur de télécommande
Anneau de fixation courroie
Barillet d'objectif
Objectif
Toujours essayer de maintenir ceci propre. Des saletés et des taches peuvent nuire à la netteté des photos. Essuyer toute saleté ou tache avec un chiffon doux.
Viseur
Anneau de fixation Molette de correction 


 courroie
dioptrique
|
Verrou du dos |
|
Fenêtre du film |
Écran ACL |
|
Touche de rembobinage |
Couvercle du logement piles |
d'un film non terminé |
|
|
Écrou de pied |
1 Touche de mode flash
2Touche Retardateur/ Télécommande/ Gros plan
3Touche Compensation d'exposition
4 Touche DATE MODE*
5 Touche DATE SET*
6 Touches d'accès direct aux modes
7Touche FULL AUTO (automatique programmé)
8 Levier de décalage
9 Touche de mode d'exposition
0 Contrôle piles
!Flash atténuant l'effet "yeux rouges"
@ Flash d'appoint
# Télécommande $ Retardateur
% Longue pose ^ Mesure Spot
& Compensation d'exposition * Modes d'exposition
( Indicateur date/heure*
) Indicateur du mode utilisé
qAutomatique programmé (FULL AUTO)
wRéglage d'ouverture/valeur de compensation d'exposition
e Vitesse d'obturation r Prise de vue gros plan t Compteur de vues
*Modèles Quartzdate uniquement

34 |
NOM DES COMMANDES - Affichage du viseur |
CORRECTION DIOPTRIQUE |
35 |
|
|
y Cadre de mise au point automatique
u Cadre de mesure Spot i Flash
o Indicateur de mise au point automatique
p Compensation d'exposition (surexposition/ sous-exposition)
UTILISATION DE LA COURROIE
Attacher la courroie comme indiqué.
1
2
3 |
Fixer la courroie avec le fermoir.
Tourner la molette de correction dioptrique jusqu'à ce que le cadre de mise au point automatique soit net.
Si vous êtes myope, tourner la molette vers le haut. Si vous êtes presbyte, la tourner vers le bas.
MISE EN PLACE ET CONTRÔLE DES PILES
Utiliser deux piles au lithium de 3 V (CR123A ou DL123A).
1 |
1 |
|
2 |
|
3 |
Tourner la molette 1 sur le couvercle du logement piles vers  . Tenir le cran 2 avec le bout du doigt. Ouvrir le couvercle 3.
Bien s'assurer que l'interrupteur d'alimentation est réglé sur OFF avant d'ouvrir le couvercle du logement piles.
2 |
4 |
6 |
Introduire correctement les piles 4. Fermer le couvercle du logement piles 5.. Tourner la molette 6 vers  pour verrouiller le couvercle.
3 |
7 |
|
Régler l'interrupteur d'alimentation |
|
|
7 sur ON pour contrôler l'énergie |
|
|
restante des piles. |
|
s'allume (s'éteint automatiquement). |
Les piles sont bonnes. Vous pouvez |
|
prendre des photos. |
||
|
||
clignote et les autres indicateurs |
Les piles sont faibles et doivent être |
|
sont affichés normalement. |
remplacées dès que possible. |
|
clignote et les autres indicateurs |
Les piles sont hors d'usage et doivent |
|
restent éteints. |
être remplacées immédiatement. |
 Loading...