


 Loading...
 INSTRUCTIONS

|
Table of contents |
|
|
Description of controls ............................................. |
3 |
|
Before you begin |
|
|
Loading the batteries............................................. |
6 |
|
Checking the batteries ........................................... |
7 |
|
Attaching the strap ................................................ |
8 |
|
Loading the film .................................................... |
9 |
|
Unloading the film ............................................... |
12 |
|
Simple point & shoot photography |
|
|
How to take pictures ............................................ |
14 |
|
Autoflash photography |
|
|
(1)Taking pictures in low light ............................ |
20 |
|
(2)Taking backlit subjects .................................... |
23 |
|
Advanced shooting techniques |
|
1 |
Macro photography .............................................. |
24 |
Focus lock |
............................................................ |
25 |
Selftimer............................................................... |
|
28 |
Continuous mode ................................................. |
30 |
|
Auto-zoom |
mode.................................................. |
31 |
Pre-focus |
mode .................................................... |
33 |
AUTO-S flash photography ................................. |
35 |
|
Flash OFF............................................................. |
37 |
|
FILL-IN flash ....................................................... |
38 |
|
MULTI flash ........................................................ |
39 |
|
Night scene flash photography ............................ |
41 |
|
How to use the soft case (optional) ........................... |
43 |
|
Care and storage ........................................................ |
44 |
|
Questions and answers............................................... |
46 |
|
Specifications............................................................. |
|
47 |
Thank you for purchasing the OLYMPUS Infinity Zoom 210. Please read this instruction manual carefully before using the camera. This camera will not operate unless the batteries are loaded and the power switch is set to ON.
Before taking important pictures, it is recommended that you shoot a roll of film just to familiarize yourself with the camera's features.
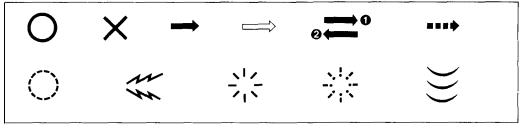
Symbols used in this manual
Correct |
Incorrect |
Operation |
Order |
Operation order |
Automatic operation |
Attention |
Operation sound |
Lamp on |
Lamp blinking |
Press lightly |
2
|
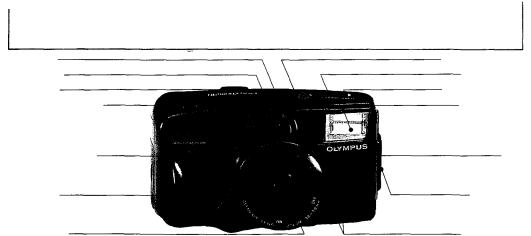
Description of controls |
LCD panel |
Selftimer indicator |
Light sensor |
Subject button |
Viewfinder |
Flash mode button |
Shutter release button |
Flash reflector |
Autofocus windows |
Lens |
Steady grip |
Strap eyelet |
3 |
Power switch |
Zoom buttons |
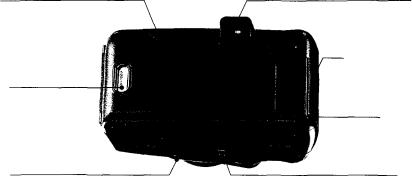
Back cover |
Viewfinder |
Battery compartment cover
Film window
Back cover release
Tripod socket |
Rewind button |
4
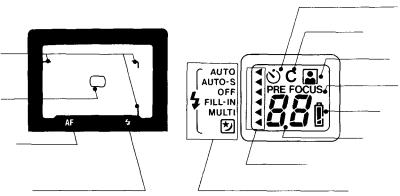
Viewfinder display |
LCD panel |
Close-up
correction marks
Autofocus frame
AF indicator (green)
Selftimer
Continuous mode
Auto-zoom
Pre-focus
Battery check indicator
Exposure counter
Flash mode selection indicator
5 |
Flash indicator (orange) |
Flash mode indicator |
|
|
Before you begin···
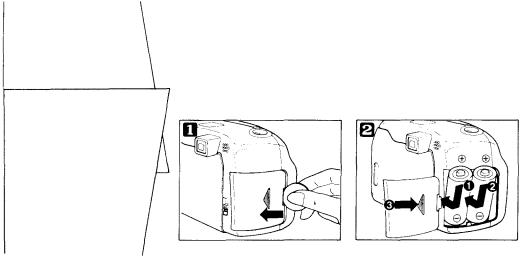
Loading the
batteries
 Insert a coin into the groove of the battery cover on the side of the grip and open the cover.
 Insert two 3V lithium batteries as shown and replace the cover.
Use Panasonic CR123A, Duracell DL123A, or equivalent.
*Do not mix different types of batteries or new and old batteries at the same time.
*Remove batteries if you do not plan to use the camera for an extended period of time (more than a year).
6
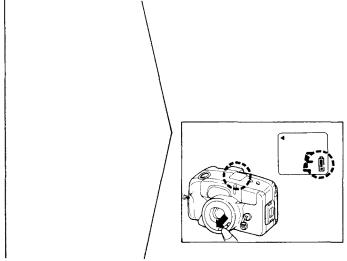
Checking the
batteries
Set the power switch to ON to check the batteries. The battery check indicator will be displayed for 12 seconds.
When "  " is displayed, batteries are OK.
If " " flashes, batteries are low, have spares handy.
If "  " is displayed continuously, batteries should be replaced immediately.
*When the battery power is low, the flash will take longer to recharge.
*Before replacing the batteries, set the power switch to OFF.
7
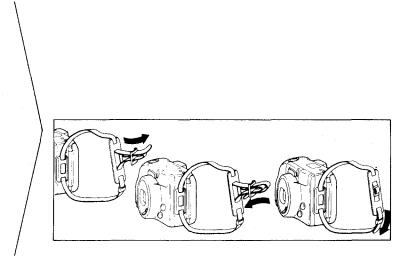
Attaching the strap
8
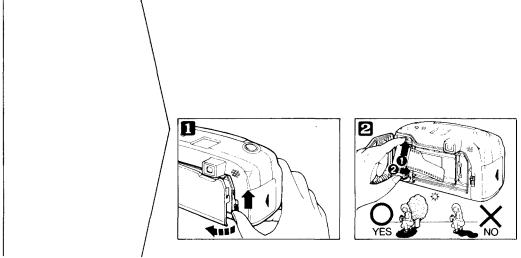
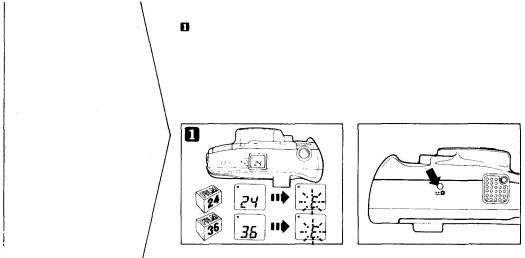
 Open the back cover by sliding the back cover release toward the top of the camera.
 Insert the film cartridge into the camera. Always avoid direct sunlight when loading the film.
Loading the film
This camera is designed to use DX-coded 35mm film, DX coding, used by virtually all major film manufacturers, allows the camera to identify and set the film speed automatically. If DX-coded film is unavailable, use ISO 100 film.
9

 Make sure the film lies flat.
 Align the film leader with the red film loading indicator.
Unless the film leader matches the film loading indicator, the film may not be loaded.
*Do not touch the lens inside the body with your fingers or the film leader.
10
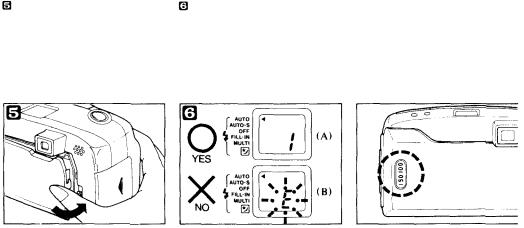
Close the back cover. The film |
Set the power switch to ON to make |
Use the |
window in the camera back |
automatically advances to the first |
sure that the exposure counter shows |
to check |
type of film loaded. |
frame. |
"1". |
|
|
|
If film is improperly loaded, the LCD |
|
|
|
panel will display a blinking "E". In |
|
|
|
this case, open the back cover, and |
|
|
|
realign the film leader. |
|
|
11
|
The camera automatically rewinds |
If you want to rewind the film before |
|
the film when you reach the end of a |
the end of the roll, press the rewind |
|
roll. The exposure counter on the LCD |
button with the tip of a ballpoint pen. |
|
panel counts down as the film is |
Do not use any device with a sharp |
|
rewinding. |
tip. |
Unloading the film |
* The final reading of the exposure counter |
|
before rewinding may be more than the |
|
|
|
number of exposures specified for the film. |
|
12

Once the film has been rewound, a |
Open the back cover, and remove |
blinking "E" will be displayed on the |
the film cartridge from the camera. |
LCD panel. Further operations are not |
Avoid direct sunlight when removing |
possible until the rewound film |
the film. |
cartridge is removed.
"Rewinding completed" indicator
When the power switch
is OFF, there will be no
indication on the LCD panel.
When the power switch is ON
13

Simple point & shoot photography
How to take pictures
When the power switch is ON, the LCD panel lights.
The LCD panel goes out after 4 to 5 minutes to minimize battery drain. The lens will then zoom to the wide-angle position. After 4 hours the power is automatically turned to OFF. To resume operation, set the power switch
 Set the power switch to ON.
*When the camera is not in use, always set the power switch to OFF so that the shutter cannot be activated accidentally.
 While looking through the viewfinder, aim the camera at your subject.
to OFF and then to ON again. |
14 |
Loading...