


DIGITAL VOICE RECORDER
DS-3500
INSTRUCTIONS
ENGLISH ....................................................... |
2 |
ČEŠTINA........................................................ |
20 |
DANSK........................................................... |
38 |
DEUTSCH...................................................... |
56 |
ESPAÑOL ...................................................... |
74 |
FRANÇAIS..................................................... |
92 |
NEDERLANDS ........................................... |
110 |
POLSKI......................................................... |
128 |
РУССКИЙ.................................................... |
146 |
SVENSKA.................................................... |
164 |
SV RU PL NL FR ES DE DA CS EN
2
EN Introduction
•Thank you for purchasing an Olympus Digital Voice Recorder. Please read these instructions for information about using the
product correctly and safely. Keep the instructions handy for future reference. To ensure successful recordings, we recommend that you test the record function and volume before use.
•This manual is a basic version. For further details, a complete advanced version of the manual* (PDF format) is available for
download at the OLYMPUS website. * Available in English, French or
German.
•The contents of this document may be changed in the future without advanced notice. Contact our Customer Support Center for the latest information relating to
product names and model numbers.
•The illustration of the screen and the recorder shown in this
manual may differ from the actual product. The utmost care has been taken to ensure the integrity of this document, but if you
find a questionable item, error or omission, please contact our Customer Support Center.
•Any liability for passive damages or damage of any kind occurred due to data loss incurred by a defect of the product, repair performed by the third party other than Olympus or an Olympus authorized service station, or any other reason is excluded.
Trademarks and registered trademarks
•Microsoft and Windows are registered trademarks of Microsoft Corporation.
•Macintosh is a trademark of Apple Inc.
•Intel is the registered trademark of Intel Corporation.
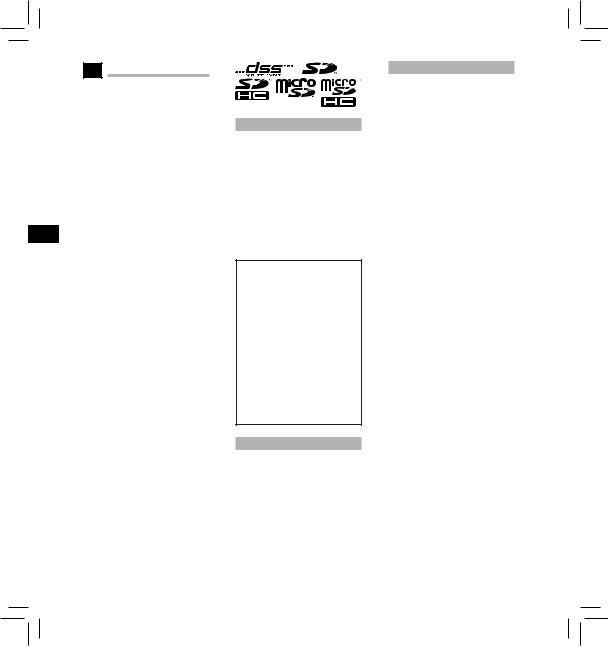
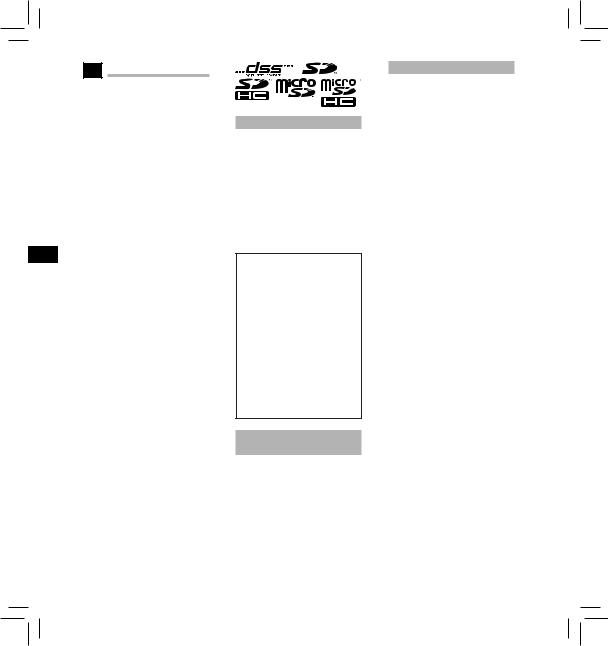
•SD and microSD are the trademarks of SD Card Association.
•SDHC and microSDHC are the trademarks of SD Card Association.
•MPEG Layer-3 audio coding
technology licensed from Fraunhofer IIS and Thomson.
Other product and brand names mentioned herein may be the trademarks or registered trademarks of their respective owners.
Safety precautions
Before using your new recorder, read this manual carefully to ensure that you know how to operate it safely and correctly. Keep this manual in an easily accessible location for future reference.
•The warning symbols indicate important safety related information. To protect yourself and others from personal injury or damage to property, it is essential that you always read the warnings and information provided.
fDanger
If the product is used without observing the information given under this symbol, serious injury or death may result.
fWarning
If the product is used without observing the information given under this symbol, injury or death may result.
fCaution
If the product is used without observing the information given under this symbol, minor personal injury, damage to the equipment, or loss of valuable data may result.
Convention used in this manual
•The word “card” is used to refer to the SD card and microSD card.
•The word “ODMS” is used to refer to the Olympus Dictation Management System in Windows environment.
•The word “DSS Player” is used to refer to the DSS Player for Mac in Apple Macintosh environment.
•This manual shows the English on screen display in the illustrations and explanations. You can
select the display language for this recorder. For details, see “Language(Lang)”.
Caution for usage environment
•To protect the high-precision technology contained in this product, never leave the recorder in the places listed below, no matter if in use or storage:
−Places where temperatures and/or humidity are high or go through extreme changes. Direct sunlight, beaches, locked cars, or near other heat sources (stove, radiator, etc.) or humidifiers.
−Near flammable items or explosives.
−In wet places, such as bathrooms or in the rain.
−In places prone to strong vibrations.
•Never drop the recorder or subject it to severe shocks or vibrations.
•The recorder may malfunction if it is used in a location where it is subject to a magnetic/
electromagnetic field, radio waves, or high voltage, such as near a
TV set, microwave, video game, loud speakers, large monitor unit, TV/radio tower, or transmission towers. In such cases, turn the recorder off and on again before further operation.
•Avoid recording or playing back near cellular phones or other wireless equipment, as they may cause interference and noise.
If you experience noise, move to another place, or move the recorder further away from such equipment.
•Do not use organic solvents such as alcohol and lacquer thinner to clean the unit.
Warning regarding data loss:
•Recorded content in memory may be destroyed or erased by operating mistakes, unit
malfunction, or during repair work. It is recommended to back up and save important content to other media such as a computer hard disk.
•Any liability for passive damages or damage of any kind occurred due to data loss incurred by a defect of the product, repair performed by the third party other than Olympus, an Olympus authorized service station or any other reason is excluded from the Olympus liability.

Handling the recorder
fWarning:
•Keep the recorder out of the reach of children and infants to prevent the following dangerous situation that could cause serious injury:
Always use and store the recorder out of the reach of young children and infants to prevent the following dangerous situations which could cause
serious injury:
1Accidentally swallowing the battery, cards or other small
parts.
2Accidentally being injured by the moving parts of the recorder.
•Do not disassemble, repair or modify the unit yourself.
•Use SD/SDHC, microSD/microSDHC memory cards only. Never use other types of cards.
If you accidentally insert another type of card into the recorder, contact an authorized distributor or service center. Do not try to remove the card by force.
•Do not operate the unit while operating a vehicle.
fCaution:
•Stop using the recorder immediately if you notice any unusual odors, noise, or smoke around it.
Never remove the battery with bare hands, which may cause a fire or burn your hands.
•Do not leave the recorder in places where it may be subject to extremely high temperatures.
Doing so may cause parts to deteriorate and, in some circumstances, cause the recorder to catch fire. Do not
use the charger or AC adapter if it is covered. This could cause overheating, resulting in fire.
•Handle the recorder with care to avoid getting a low-temperature burn.
−When the recorder contains metal parts, overheating can result in a low-temperature burn. Pay attention to the following:
−When used for a long period, the recorder will get hot. If you hold on to the recorder in this state, a lowtemperature burn may be caused.
−In places subject to extremely cold temperatures, the temperature
of the recorder’s body may be lower than the environmental temperature. If possible, wear gloves when handling the recorder in cold temperatures.
Battery handling precautions
fDanger:
•The recorder uses a special lithium ion battery from Olympus. Charge the battery with the specified AC adapter or charger. Do not use any other AC adapters or chargers.
•The battery should never be exposed to flame, heated, shortcircuited or disassembled.
•Never heat or incinerate battery.
•Take precautions when carrying or storing batteries to prevent them from coming into contact with any metal objects such as jewelry, pins, fasteners, etc.
•To prevent causing battery leaks or damaging their terminals, carefully follow all instructions regarding the use of batteries. Never attempt to disassemble a battery or modify it in any way, solder, etc.
•If battery fluid gets into your eyes, flush your eyes immediately with clear, cold running water and seek medical attention immediately.
fWarning:
•Keep batteries dry at all times.
•If rechargeable batteries have not been recharged within the
specified time, stop charging them and do not use them.
•Do not use a battery if it is cracked or broken.
•Never subject batteries to strong shocks or continuous vibration.
•If a battery leaks, becomes discolored or deformed, or becomes abnormal in any other way during operation, stop using the recorder.
•If a battery leaks fluid onto your clothing or skin, remove the clothing and flush the affected area with clean, running cold water immediately. If the fluid burns your skin, seek medical attention immediately.
•Keep batteries out of the reach of children.
•If you notice anything unusual when using this product such as abnormal noise, heat, smoke, or a
burning odor:
1remove the battery immediately while being careful not to burn
yourself, and;
2call your dealer or local Olympus representative for service.
fCaution:
•The bundled/included rechargeable battery is exclusively for use with Olympus digital voice recorder DS-3500.
−There is a risk of explosion if the battery is replaced with the incorrect battery type.
−Dispose of the used battery following the instructions.
−Please recycle batteries to help save our planet’s resources. When you throw away dead batteries, be sure to cover their terminals and always observe local laws and regulations.
•Always charge a rechargeable battery when using it for the first time, or if it has not been used for a long period.
•Rechargeable batteries have limited lifetime. When the operating time becomes shorter even if the rechargeable battery is fully charged, replace it with a new one.
LCD monitor
•The LCD used for the monitor is made with high-precision technology. However, black spots or bright spots of light
may appear on the LCD Monitor. Due to its characteristics or the angle at which you are viewing the monitor, the spot may not be uniform in color and brightness. This is not a malfunction.
Memory Card
fWarning:
•Do not touch the card contacts. This may damage the card.
•Do not place the card in locations with static electricity.
•Store the card in a location that is out of the reach of children. In case of accidental ingestion, consult a physician immediately.
EN
3
SV RU PL NL FR ES DE DA CS EN
Getting started |
|
||
Identification of parts |
|
||
|
9 |
1 |
|
|
0 |
2 |
|
|
|
||
|
|
3 |
|
|
$ |
4 |
|
|
! |
5 |
|
|
6 |
||
% |
@ |
||
7 |
|||
|
|
||
^ |
# |
|
|
|
|
|
& |
8 |
|
|
*( )
w q |
=- |
1SD card slot
2Built-in microphone
3NEW button
4REC button
5STOP button
6PLAY button
7REV button
8ERASE button
9Record indicator light
0Display (LCD panel) ! + (Volume) button
@ Fast Forward (9) button
# OK/MENU button
$ Programmable smart
(F1,F2,F3) buttons % Rewind (0) button ^ – (Volume) button & Built-in speaker
* Battery cover
( Battery cover release button
) POWER/HOLD switch
- EAR (Earphone) jack = MIC (Microphone) jack q USB connector
w Docking station connector
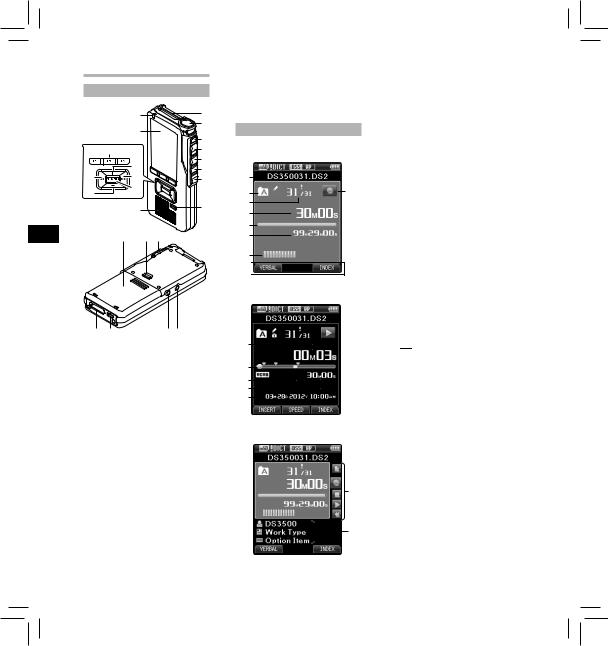
Display status indicators (LCD panel)
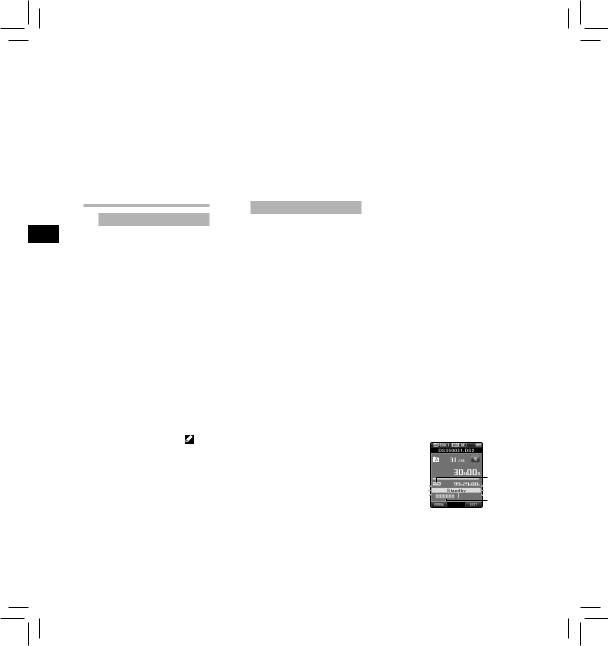
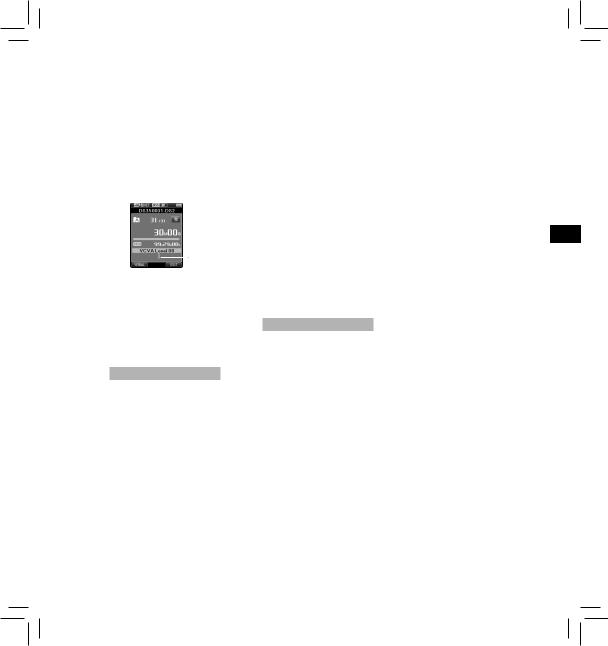
Display in the recording mode
1 |
|
2 |
9 |
3
4
5
6
7
8
Display in the playback mode
0
!
@
#
$
%
Display in the recording mode
^
&
1Current file name
2Current folder
3Current file number/Total number of recorded files in the folder
4Recording elapsed time
5Remaining memory bar indicator
6Remaining recording time
7Level meter indicator
8Button guide display
9Recorder status indicator
0Current playback time ! Index mark indicator @ Playback position bar
indicator
# Verbal comment indicator $ File length
% Recording date and time ^ Main button guide
You can display the Main Button Guide by using “Main Button Guide” of the customize functions of ODMS software.
&File information area
Current file’s information can be displayed by using the “Display” function in the ODMS software.
[ ]: SD card
[ ]: SD Card lock [
 ]: microSD card [
 ]: Microphone sensitivity
[ ]: Recording mode [
 ]: Battery
[ ]: VCVA (Variable Control Voice Actuator) [
 ]: Pending
[ ]: Encryption [
 ]: Priority
[ ]: File lock [
 ]: Author ID [
 ]: Work Type
[ ]: Option Item
4
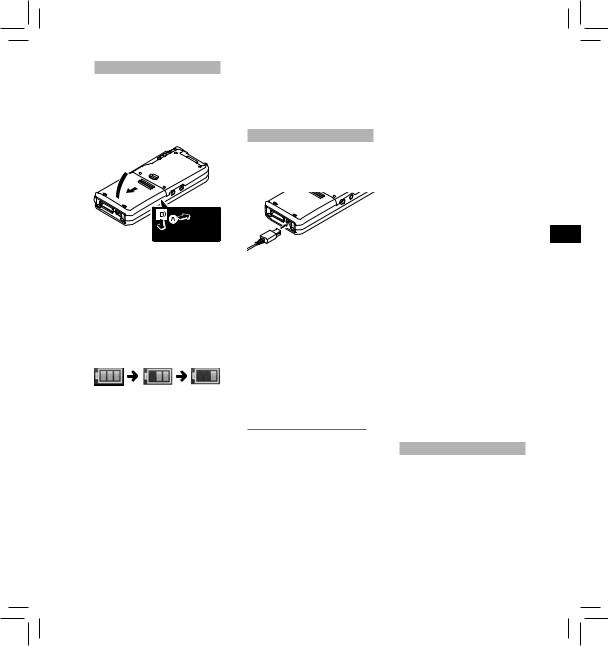
Inserting the battery
This recorder uses a lithium ion battery specified by Olympus (LI-42B). Do not use any other type of battery.
1Lightly press down on the battery cover release button, then open the battery cover, as shown in the illustration below.
3
 1
1
2
2Insert the battery observing the correct polarity as shown in the illustration, then close the battery cover.
•Insert the battery by sliding in direction Awhile pushing down in direction B.
Battery indicator:
The battery indicator on the display will decrease as the battery loses power.
•When this [ ] indicator appears on the display, charge the battery
as soon as possible. When the battery is too weak, [s] and [Battery Low] will appear on the display and the recorder will shut down.
Notes:
•Turn off the recorder before removing the battery. Removing the battery while the recorder is still in use may cause malfunctions, file corruption or file loss.
•Remove the battery if you are not going to use the recorder for an extended period of time.
•After removing the battery, it may become necessary to re-set the time and date if you leave the battery out of the recorder for more than 15 minutes or if you remove the battery right after loading it into the recorder.
Charging the battery
Fully charge the battery (approx. 2 hours 30 minutes) before use.
Connect the USB cable to the recorder.
Notes:
•Charge the battery frequently during the first period of use. The battery will perform better after several charge/discharge cycles.
•Models of batteries which are different from the included one may not be charged.
•Charging the battery via the USB cable connection may not be successful depending on the power capacity of the USB port in your PC. Use the AC adapter (optional) instead.
•Do not charge the recorder through a USB hub.
•Do not attach or remove the battery if the USB cable is connected.
Using the lithium ion battery
The included battery is exclusively for use with the Olympus voice recorder DS-3500. Do not use in combination with other electronic equipment.
Cautions concerning the battery:
Read the following instructions carefully when you use the battery.
Discharging:
Rechargeable batteries self-discharge while not in use. Charge it regularly before use.
Battery life:
Over time, the rechargeable battery may gradually wear down. When the operating time becomes shorter even if the rechargeable battery is fully charged under the specified condition, replace it with a new one.
Operating temperature:
Rechargeable batteries are chemical products. Battery efficiency may vary even when operating within the recommended temperature range. This is an inherent nature of these products.
Recommended temperature range of use:
During operation:
0°C - 42°C
Charging:
5°C - 35°C
Storage for a long period:
–20°C - 60°C
Using the battery outside the above temperature range may result in declining efficiency and shorter battery life.
Notes:
•When disposing the batteries, always observe the local laws and regulations. Contact your local recycling center for proper disposal methods.
•If battery is not fully discharged, protect it against short-circuiting (e.g. by taping the contacts) before disposal.
For customers in Germany:
Olympus has a contract with the GRS (Joint Battery Disposal Association) in Germany to ensure environmentally friendly disposal.
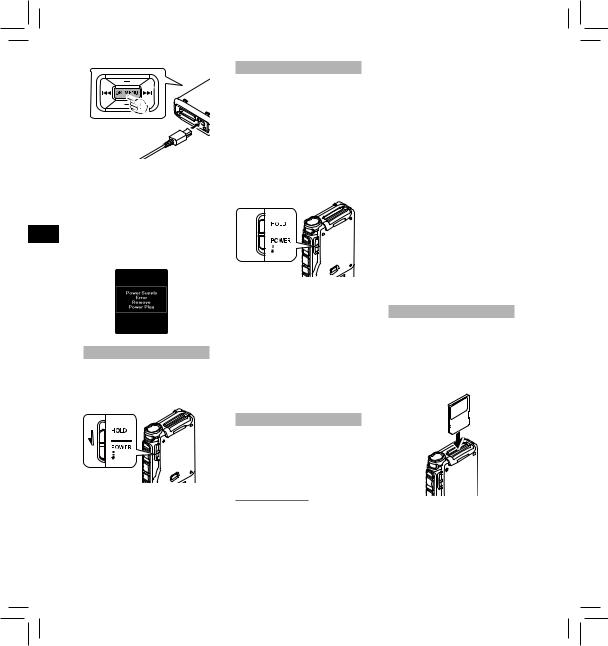
Power supply from USB cable
Use the USB cable when recording for extended period of time.
1Verify that the recorder is in stop mode.
2Connect the USB cable to the recorder while pressing the
OK/MENU button.
EN
5
SV RU PL NL FR ES DE DA CS EN
Detecting abnormal voltage:
If the recorder detects a DC power voltage outside the allowed voltage range (4.4-5.5V), then [Power Supply Error Remove Power Plug] will appear on the display, and all operation will stop. The recorder will not be operable if abnormal voltage is detected. Use an AC adapter compatible with the voltage standard of your environment (optional).
Turning on/off the power
Turning on the power:
While the recorder is turned off, slide the POWER/HOLD switch to the direction of the arrow.
Turning off the power:
Slide the POWER/HOLD switch to the direction of the arrow, and hold it for 0.5 seconds or longer.
HOLD
If you set the recorder to HOLD mode, the running conditions will be preserved, and all buttons will be disabled.
Set the recorder to HOLD mode: Slide the POWER/HOLD switch to the [HOLD] position.
After the recorder is set to HOLD mode, the [Hold] message will be displayed.
Exit HOLD mode:
Slide the POWER/HOLD switch to the Aposition.
A
Notes:
•If any button is pressed during HOLD mode, the clock will be displayed for 2 seconds, but the recorder will not be operable.
•If HOLD mode is entered during playback or recording mode, the recorder will not be operable but the playback/recording will continue (When playback has
ended or the recording has ended due to the remaining memory being used up, it will stop).
Memory card
This recorder uses two types of memory cards: a microSD card as internal memory, and an SD card as additional memory.
You can remove the content recorded in both the cards safely in case of malfunction of the recorder.
Compatible cards
The recorder supports memory card capacity from 512 MB up to 32 GB.
Cards compatibility
For a list of card compatible with the recorder, please visit the product homepage at the Olympus website
applicable to your region or contact your Olympus reseller where you purchased the product.
Notes:
•When initializing (formatting) a card, confirm that no necessary data is stored on the memory card beforehand. Initialization completely erases the existing data on the card.
•Cards formatted (initialized) by another device, like a computer, may not be recognized. Be sure to format them with this recorder before use.
•The card has a service life. When reaching the end of its life, writing or erasing data on the card will be disabled. In this case, replace the card.
•If you use a PC card adapter compatible with the card to save or delete some data on the card, the maximum recording time on the card may be decreased. To recover the original recording time, initialize/format the card in the recorder.
Inserting and ejecting a SD card
Inserting a SD card:
Insert the SD card fully into the card slot with the card facing the direction shown in the illustration below, until it clicks into place.
• Insert the card keeping it straight.
Card recognition
After inserting SD card, the message [Please Wait] will flash on the display while the recorder recognizes the SD card.
6
Ejecting a SD card:
Push the SD card inward to unlock it and let it come out of the slot.
•Hold the card straight and pull it out.
Notes
•Inserting the card the wrong way or at an angle could damage the contact area or cause the card to jam.
•If the card is not inserted all the way into the slot, data may not be written properly.
•When an unformatted card is inserted into the card slot, the recorder will automatically display the format menu options.
•Use only cards formatted with the recorder.
•Never remove the card while the recorder is operating, as this may damage the data.
•After pushing the card inward to eject it, releasing your finger too quickly may cause the card to be ejected unexpectedly.
•This recorder uses a microSD card as internal memory. The microSD card has been preloaded.
•The recorder may not properly recognize the card even when that card is compatible with it.
•The processing performance reduces in a card when you repeat writing and deleting. In this case, format the card.
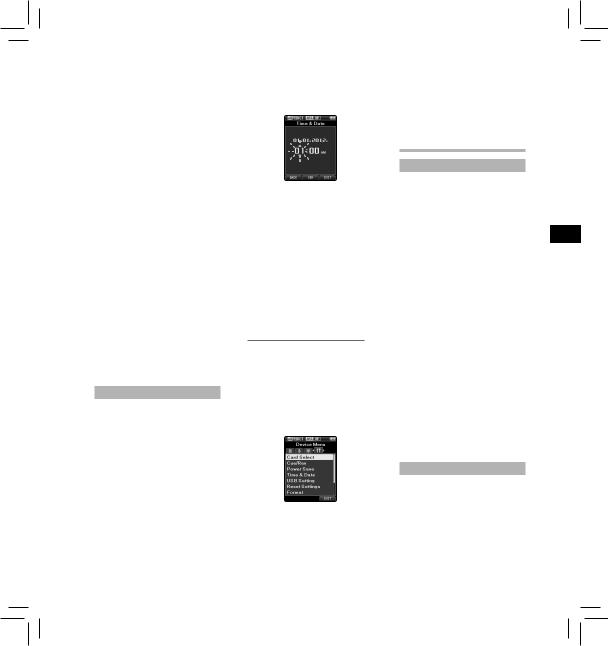
Setting time and date [Time & Date]
If you set the time and date beforehand, the information when the file is recorded is automatically stored for each file. Setting the time and date beforehand enables easier file management.
When you use the recorder for the first time after purchasing it, or when the battery has been inserted without the device being used for a long time, the [Set Time & Date] will appear.
•For further details, a complete advanced version of the manual* (PDF format) is available for download at the OLYMPUS website. * Available in English, French or
German.
1Press the 9or 0button to select the item to set.
Select the item from the “hour”, “minute”, “year”, “month” and “day” with a flashing point.
2Press the + or − button to set.
You can select between 12 and 24 hour display by pressing the F2 (24H) button while setting the hour and minute.
•You can select the order of the “Month”, “Day” and “Year” by pressing the F2 (D/M/Y) button while setting them.
3Press the OK/MENU button to complete the setting.
Note:
•You can set the time and date from your PC using ODMS and DSS Player software.
Changing the time and date:
If the current time and date is not correct, set it using the procedure below.
1While the recorder is in stop mode, press the OK/MENU button.
2Press the 9or 0button to select [Device Menu] tab.
•You can change the menu display by moving the settings tab cursor.
3Press the + or − button to select [Time & Date].
4Press the OK/MENU button.
•The following steps are the same as Step 1 through Step 3 of “Setting time and date [Time & Date]”.
5Press the F3 (EXIT) button to close the menu screen.
Basic operations
Recording
By default, the recorder has five folders, [A], [B], [C], [D], [E] and you can select a folder by pressing the F1 (FOLDER) button. These five folders can be selectively used to distinguish the kind of recording. Up to 200 messages can be recorded per folder.
Also, by default, the Recording Mode is [DSS Pro QP].
Record function*
Before starting recording over a previously recorded file, the RECORD function can be set to the following:
•Append: Attaches the new recording to the end of the previously recorded file.
•Overwrite (default): Overwrites and deletes part of the previously recorded file starting from the chosen position.
•Insert: The recorded file will be inserted in the middle of the previously recorded file, starting from the chosen recording position. The original file will be kept.
By default, the RECORD function is configured to record using the overwrite option.
Recording will start from the current position of the existing file.
*This function will not be available if an MP3 file has been selected.
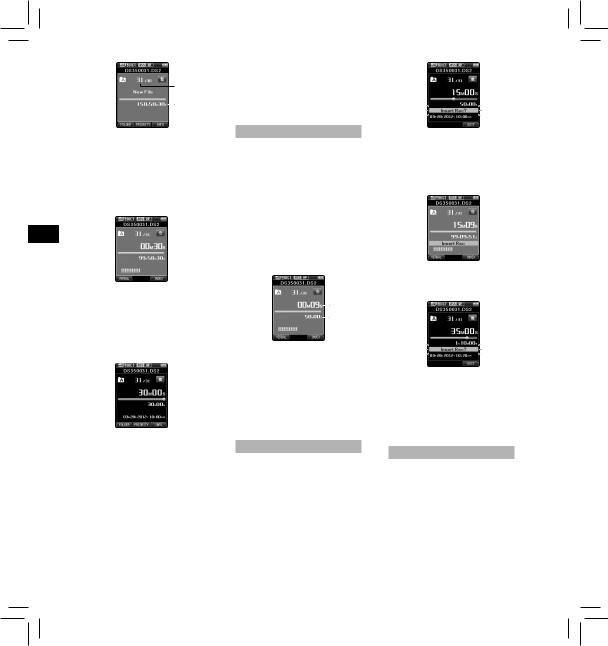
New recording
Create a new file to record in.
1Press the NEW button to create a new file.
•It is possible to select the Work Type from the work type list uploaded using the ODMS software.
EN
7
SV RU PL NL FR ES DE DA CS EN
a
b
aNew file number bRemaining recording time
2Press the REC button to start recording.
•The record indicator light turns on. Turn the microphone in the direction of the source to be recorded.
3Press the STOP button to stop recording.
•If you want to append additional recordings to the same file, press the REC button again (This
function will not be available if an MP3 file has been selected).
Notes:
•During recording, a beep will sound whenever the remaining recording time reaches 60, 30, and 10 seconds.
•When the remaining recording time is less than 30 minutes, the color of the remaining memory bar indicator will change.
•When the remaining recording time reaches 60 seconds, the record indicator light will start flashing. The light will flash faster when the remaining recording time decreases from 30 to 10 seconds.
•[Memory Full] or [Folder Full] will be displayed when the memory or folder capacity is full.
−Delete unnecessary files before recording any further or transfer dictation files to your PC.
−Change the recording media at [Card Select] setting or change to a card with free space.
Overwrite recording
You can overwrite a previously recorded file starting from any point within the file. When using overwriting, the overwritten part will be erased.
•This function will not be available if an MP3 file has been selected.
1Select and play the file you want to overwrite.
•Stop the playback at the point you want to start overwriting.
2Press the REC button to start overwriting.
• The record indicator light turns on.
a
b
aRecording elapsed time bTotal recording time of the
selected file
3Press the STOP button to stop overwriting.
Note:
•You cannot select a recording mode different from the one set onto the original file.
Insert recording
Additional recording can be inserted into previously recorded file.
•This function will not be available if an MP3 file has been selected.
1Select and play the file you want to insert an additional recording into.
2While playing the file, press the F1 (INSERT) button to insert an additional recording.
•[Insert Rec?] will appear on the display.
3Press the REC button to start inserting the additional recording.
•The record indicator light turns on. [Insert Rec] and the remaining recording time will alternate on the display.
4Press the STOP button to stop inserting the additional recording.
Notes:
•The recording’s time and date will be updated to the one of the latest recording inserted.
•You cannot select a recording mode different from the one set onto the original file.
Hands-free recording
The recorder can be used as a handsfree recording device. To set up the recorder for hands-free operation, connect the optional Olympus Foot Switch to the back of the docking station and place the recorder in the docking station (optional).
•For further details, a complete advanced version of the manual* (PDF format) is available for download at the OLYMPUS website. * Available in English, French or
German.
8
Recording monitor
It is possible to monitor your recording by listening to it even while the recording is in progress. In order to do so, insert the earphone plug into the earphone jack and use the + or – buttons to control the volume level.
Playback
1Select the file, then press the PLAY button to start playback.
2Press the + or – button to adjust the volume.
•The volume can be adjusted within a range from [00] to [30].
3Press the STOP button at any point you want to stop the playback.
Fast Forward (FF):
•Press the 9button once while in stop mode.
How to cancel: Press the STOP, PLAY or OK/MENU button.
Rewind (REW):
•Press the 0button once while in stop mode.
How to cancel: Press the STOP, PLAY or OK/MENU button.
Cue (Cue):
•Press and hold the 9button while in stop or playback mode. How to cancel: Release the button.
Review (Rev):
•Press and hold the 0button while in stop or playback mode.
How to cancel: Release the button.
•Press and hold the REV button. How to cancel: Release the button.
Playback Speed
•Press the F2 (SPEED) button during playback.
•The playback speed will change at each press of the F2 (SPEED) button.
Play (playback):
Playback at normal speed.
Slow Play (slow playback):
Playback speed slows down (-50%), and “Slow play” will be displayed.
Fast Play (fast playback):
Playback speed becomes faster (+50%), and “Fast play” will be displayed.
Notes:
•If you press the 9button once while fast-forwarding or twice while in stop mode, the recorder will stop at the end of the file (F.Skip).
•If you press the 0button once while rewinding or twice while in stop mode, the recorder will stop at the beginning of the file (B.Skip). If the 0button is pressed within 2 seconds, the recorder skips to the beginning of the previous file.
•If you press and hold the 9 button while fast forwarding (FF), the recorder will continue to skip forward.
•If you press and hold the 0 button while rewinding (REW), the recorder will continue to skip backward.
•The Cue and Review speed can be set from [Speed1] to [Speed5]. Cue and Review playback sound can be set to [On] or [Off].
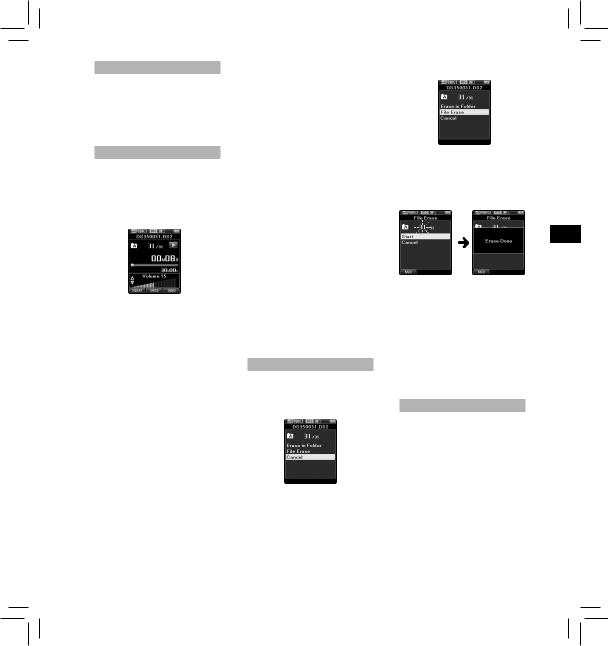
Erasing
Erasing files:
1 Select the file you want to erase.
2 Press the ERASE button.
3Press the + button to select [Erase in Folder] or [File Erase].
[Erase in Folder]:
All files in a folder can be erased simultaneously.
[File Erase]: Erase one file.
4 Press the OK/MENU button.
5Press the + button to select [Start], then press the OK/MENU button.
•The display changes to [Erase !] and erasing will start.
EN
•[Erase Done] is displayed when the file is erased. File numbers will be reassigned automatically.
Notes:
•An erased file cannot be restored.
•The erasing process may take up to 10 seconds. Do not interrupt this process or data may be damaged.
•Files cannot be erased in the following cases.
-Files are locked.
-Files stored on a locked SD card.
Partially erasing a file
Any unnecessary part of a file can be erased.
1Playback the file you would like to partially erase.
2Press the ERASE button at the point you want to start erasing.
•While playback continues, [Erase Start] will appear on the display.
• If you press the F2 ( ) button, playback will skip (F.Skip) to the end of the file and then stop. That will be set automatically as the ending point of the partial erase.
• If you press the F1 ( ) button, playback will skip back (B. Skip) and restart from the partial erase starting point.
9
Playback will continue until the end of the file or until the partial erase ending point is confirmed.
|
3 In the position you want to end |
|
|
partial erase, press the ERASE |
|
|
button again. |
|
|
• The erase starting point (time) |
|
|
set in step 2 and the ending |
|
|
point (time) set in this step will |
|
EN |
be displayed alternatively for 8 |
|
seconds. |
||
CS |
• If you let the playback continue |
|
until the end of the file, or in |
||
|
case of a Verbal comment before |
|
DA |
it, that will be considered the |
|
ending point of the partial erase. |
||
DE |
|
|
ES |
|
|
FR |
|
|
NL |
|
|
PL |
4 Press the ERASE button to confirm |
|
the erasure. |
||
|
||
RU |
• The display changes to [Partial |
|
erasing !] and erasing will start. |
||
|
• When [Partial erase completed.] |
|
SV |
appears on the display, partial |
|
erase is complete. |
||
|
Notes
•If the ERASE button is not pressed within 8 seconds after the [Start point] and [End point] are alternately displayed, the recorder will revert to stop status.
•An erased file cannot be restored.
•The erasing process may take up to 10 seconds. Do not interrupt this process or data may be damaged.
•Files cannot be partially erased in the following cases.
-MP3 file is selected.
-Files are locked.
-Partial erasing is not possible on parts of files with a Verbal comment on them.
-Files are inside a locked SD card.
Advanced operations
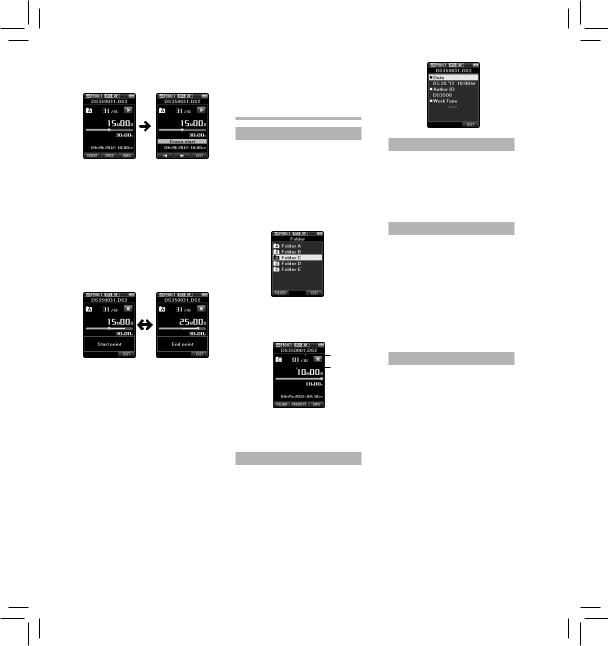
Selecting folders and files
Changing folders:
1While the recorder is in stop mode, press the F1 (FOLDER) button.
•The folder list screen will be displayed.
2Press the +, – or F1 (FOLDER) button to select the folder, then press the OK/MENU button.
Selecting a file:
1While the file is being displayed, press the 9, 0button.
a
b
aTotal number of recorded files in the folder
bCurrent file number
Displaying file information
The recorder can display a variety of information related to the current file.
1Select the file containing the information to display.
2Press the F3 (INFO) button.
•The following information will be displayed:
[Date] [Author ID] [Work Type]
Device lock function
Access to the recorder can be restricted by using the Device Lock function. Password authentication can be safer for your data in case the recorder is lost.
The password can be set by using the ODMS software.
Setting the Author ID and Work Type
Every file recorded on the recorder will include the Author ID and Work Type as part of its header information. To create multiple Author IDs and Work Types on the recorder, use the bundled ODMS software to create and upload a data list (list of Author IDs and Work Types) to the recorder. For more details, refer to the online help for ODMS software.
By default the Author ID is set to “DS3500”.
Verbal Comment
Verbal comments are useful to append vocal instructions while recording.
It is possible to search and playback Verbal comments using the ODMS and DSS Player software. Verbal comments are also useful to give instructions to transcriptionists.
•Verbal comments can be set on DS2 files only.
Setting a Verbal Comment
1While the recorder is in recording mode, press and hold the F1 (VERBAL) button.
•Data recorded while pressing the F1 (VERBAL) button will be recorded as Verbal Comment.
10
Locating a Verbal Comment
2When playing back a file, press and hold the 9or 0button.
•The recorder stops for 1 second when it reaches the Verbal Comment.
•The verbal comment part has a different color.
a
aVerbal Comment part
Clearing a Verbal Comment
1When playing a Verbal Comment, press the ERASE button.
2Press the + button to select [Clear], then press the OK/MENU button.
Notes:
•Up to 32 Verbal comments can be set within a file.
•When a file is locked or set to readonly, or when the SD card is locked, Verbal comments cannot be erased.
•When the recorder has been set to DSS Classic mode, it is not possible to record Verbal Comments.
Index marks
Index marks can be placed into a file during recording or playback. Index marks are used to provide a quick and easy way to identify important or significant parts within the file.
Setting an index mark
1While the recorder is in recording mode or in playback mode, press the
F3 (INDEX) button.
Locating an index mark
2While playing back a file, press and hold the 9or 0button.
•The recorder stops for 1 second when it reaches the index mark.
Clearing an index mark
1Select a file in which index marks you want to erase are contained.
2Press the 9or 0button to select the index mark to erase.
3While the index number appears for approximately 2 seconds on the display, press the ERASE button.
• The index mark is erased.
Notes:
•Up to 32 index marks can be set within a DS2 file.
•Up to 16 index marks can be set within MP3 and PCM files.
•When a file is locked or set to readonly, or when the SD card is locked, index mark cannot be erased.
•If the recorder has been set to DSS Classic mode, index marks are limited to a maximum of 16 for each file.
How to use the menu
Items in menus are categorized by tabs, so select a tab first and move to a desired item to quickly set it. You can set each menu item as follows.
7 1,4,6 2 3,5
1While the recorder is in stop mode, press the OK/MENU button.
•The menu will appear on the display.
2Press the 9or 0button to move to the tab that contains the item you want to set.
•You can change the menu display by moving the settings tab cursor.
EN
3Press the + or − button to move to the item you want to set.
•Move to the menu item you want to set.
4Press the OK/MENU button.
•Move to the setting of the selected item.
11
SV RU PL NL FR ES DE DA CS EN
5Press the + or – button to change the setting.
•Pressing the 0button without pressing the OK/MENU button will cancel the settings and return you to the previous screen.
6Press the OK/MENU button to complete the setting.
•You will be informed that the settings have been established via the screen.
7Press the F3 (EXIT) button to close the menu screen.
Menu items
 File Menu
Priority:
By default, the F2 button is programmed with the Priority function. The setting can also be performed from the menu.
You can set a priority level on each file recorded. You can select “High” or “Normal”. The default is Normal level. [Set]:
High level. [Cancel]:
Normal level.
•Each time the F2 (PRIORITY) button is pressed the Priority level will change (High/Normal).
Pending:
When you set [Pending] to the file, the file becomes “Pending file”. If “Download file” is set to “Finished file” by ODMS software, the [Pending] file is not transferred and only [Finished] file (edited file) will be transferred
to your PC. [Pending]:
Sets to a file of “Editing” and [ ] will appear on the display.
[Finished]:
Sets to a file of “already edited”.
File Lock:
The File lock function allows you to prevent important files from being accidentally erased.
[On]:
Locks the file and prevents it from being erased.
[ ] will appear on the display. [Off]:
Unlocks the file and allows it to be erased.
Work Type:
The Work Type information of the recorded or uploaded files can be edited with the menu settings of the recorder.
•For further details, a complete advanced version of the manual* (PDF format) is available for download at the OLYMPUS website. * Available in English, French or
German.
Information:
The recorder can display a variety of information related to the current file.
 Rec Menu
Mic Sense:
You can switch between two microphone sensitivities to meet recording needs: [Dictation] for oral dictation and [Conference] which is suited for situations like meetings
and conferences with a small number of people.
[Conference]:
High-sensitivity mode that records sounds in all directions.
[Dictation]:
Low-sensitivity mode suited for dictation.
•The setting status will appear on the display as [ ] or [
 ].
].
Rec Mode:
You can choose between different recording formats.
1 Select the recording format.
[DSS]:
DSS stands for Digital Speech Standard, a digital audio file format defined by a cooperative venture by Olympus and two other companies. DSS format files are easily editable and have a very light file size.
[PCM ST] (Stereo):
This is an uncompressed audio format which is used for music CDs and the like.
[MP3]:
MPEG is the international standard established by a working group of the ISO (International Organization for Standardization).
2Select the recording rate.
When [DSS] is selected:
[DSS Pro QP] (Quality Playback) or [DSS Pro SP] (Standard Playback)
When [PCM ST] is selected:
Recording rate will be fixed at 44.1 kHz/16 bit.
When [MP3] is selected: [256 kbps] or [128 kbps]
•Since the built-in microphone is monaural, even if you enable
[PCM ST] in [Rec Mode] the sound recorded through the built-in microphone will be monaural. In order to do stereo recording, an external stereo microphone will be necessary (optional).
•You cannot select the [DSS Pro QP] mode when setting the recorder to the DSS Classic mode.
For details, see “Recording” in the “Customizing the recorder”.
VCVA:
The VCVA feature extends recording time and conserves memory by stopping recording during silent periods, which helps the playback to be more efficient. When the microphone senses that sounds have reached a preset threshold volume level, the built-in Variable Control Voice Actuator (VCVA) starts recording automatically, and stops when the volume drops below the threshold level.
1 Select [On].
2Press the REC button to start recording.
•When the sound volume is lower than the preset actuation sound level, recording automatically stops after 1 second approximately, and [Standby] flashes on the display. The record indicator light turns on when recording starts and flashes when recording pauses.
a
b
aVCVA indicator
bLevel meter (varies according to the sound volume being recorded)
12
Adjust the start/stop actuation level:
While the recorder is in recording mode, press the 9or 0button to adjust the actuation level.
•The VCVA level can be set to any of 15 different values.
•The higher the value is, the more sensitive the recorder can react to sounds. At the highest value, even the faintest sound will activate recording.
•The VCVA actuation level can be adjusted according to the ambient (background) noise.
c
CStart level (moves to the right/ left according to the set level)
•The start/stop actuation level also varies depending on the selected microphone sensitivity mode.
•To ensure successful recordings, prior testing and adjustment of the start/stop actuation level is recommended.

 LCD/Sound Menu
Backlight:
By default, the display will remain lit for about 10 seconds when a button on the recorder is pressed.
1Select [Lighting Time], [Dim Light Time] or [Brightness].
2Select the options.
When [Lighting Time] is selected:
[5seconds] [10seconds] [30seconds] [1minute]:
Set the backlight duration.
When [Dim Light Time] is selected:
[30seconds] [1minute] [2minutes] [5minutes]
[Always On]:
Set the time after which the backlight dims.
When [Brightness] is selected:
[01] [02] [03]:
Sets the brightness of the backlight when lit.
LED:
You can set it so the record indicator light does not turn on.
[On]:
LED light will be set. [Off]:
LED light will be canceled.
Beep:
When the Beep is set to [On], the recorder will beep in case of error. [On]:
Beep is enabled. [Off]:
Beep is disabled.
Language (Lang):
You can set the language for the recorder’s user interface.
[Čeština] [Dansk] [Deutsch] [English] [Español] [Français] [Nederlands] [Polski] [Русский] [Svenska]:
•The languages available may vary depending on the country/region where the product is purchased.
 Device Menu
Card Select:
By default, the recording media is set to [SD Card] by the manufacturer.
•The recording media ([ ] or [
 ]) will appear on the display.
Cue/Rev:
The playback sound of Cue and Review operation and Cue and Review speed can be set.
1Select [Sound] or [Speed].
[Sound]:
Set the playback sound of Cue and Review to On or Off.
[Speed]:
Set the Cue and Review speed.
2Select the options.
When [Sound] is selected:
[On]:
Activate the playback sound of Cue and Review.
[Off]:
Disables this function.
When [Speed] is selected:
You can adjust the Cue and Review speed level from [Speed 1] to [Speed 5].
•Cue and Review speed level becomes faster as the numerical value becomes larger.
Power Save:
By default, the recorder will enter into Power Save mode if not used for more than 10 minutes.
[5minutes] [10minutes] [30minutes] [1hour]:
Set the length of time before the recorder will enter into Power Save mode.
[Off]: Disables this function.
•If any button is pressed, time count will restart.
Time & Date:
Setting the time and date beforehand enables easier file management.
For details, see “Setting time and date [Time & Date]”.
USB Class:
You can set the USB class of this recorder with a USB connection to [Composite] or [Storage Class]. [Composite]:
In the 3 classes of Storage, USB audio and human interface device, USB connection is possible. While connected via USB in [Composite], the recorder can be used as the USB speaker and the USB microphone in addition to storage class.
[Storage Class]:
USB connection is possible in only storage class.
Reset Settings:
To reset the menu settings to their default values use [Reset Settings] under [Device Menu], or use the ODMS and DSS Player software.
Format:
Cards that have been used in nonOlympus devices, or cards that are not recognized by the recorder, must be formatted before they can be used with the recorder.
•Formatting the card will erase all the stored data, including locked files.
For details, see “Formatting the card [Format]”.
EN
13

SV RU PL NL FR ES DE DA CS EN
Card Information:
Memory card capacity and remaining card space for the cards in use will be displayed on the recorder.
System Information:
System information about the recorder like the [Model], [Version] and [Serial No.] can be displayed.
•For further details, a complete advanced version of the manual* (PDF format) is available for download at the OLYMPUS website. * Available in English, French or
German.
Formatting the card [Format]
Cards that have been used in nonOlympus devices, or cards that are not recognized by the recorder, must be formatted before they can be used with the recorder.
1Select [Format] at the [Device Menu] screen, then press the
OK/MENU button.
2Press the + or – button to select [SD Card] or [microSD Card], then press the OK/MENU button.
3Press the + or – button to select [Start] option.
4Press the OK/MENU button to confirm [Start] selection.
5Press the + or – button again to select [Start] option.
6Press the OK/MENU button again to initiate the formatting process.
•[Format Done] displays when formatting ends.
Notes:
•The time required to format a card varies according to the capacity of the card to be formatted.
Do not interrupt the formatting process with the following actions. Doing so may damage the data or the card.
-Remove the card.
-Remove the battery.
•Formatting the card will erase all the stored data, including locked files.
•When an unformatted card is inserted, the format menu will be displayed automatically.
•Locked SD cards cannot be initialized.
•Memory cards will be formatted using quick format. Formatting the card will reset the information in file management, but the data inside the card may not be deleted completely. Be careful of data
leakage when disposing or handing of the card. We recommend that you physically destroy the card when disposing of it.
Customizing the recorder
You can customize various settings of the recorder using the ODMS software.
For more details, refer to the online help for ODMS software.
Common settings:
You can set the default values for each of the recorder’s Menu items.
Administrative settings:
General
Accessibility:
•You can customize / adjust / set / configure various settings related to user authorization, such as prohibiting both file erasure and Menu settings.
Splash Message:
•You can set the contents that appear in the message which is displayed during start-up.
Main Button Guide:
•You can enable the Main Button Guide, which shows the button functions on the display.
Alarm:
•You can set occasions for the recorder’s alarm or beep noise to sound.
Display
•You can select a default pattern for display from 4 patterns.
•The way information is displayed on the LCD display can be customized for three different areas.
–The upper part of the screen displays the recorder's basic
functions.
−The lower part of the screen can be used to display information on the file actually selected, like Author ID, Work Type and Option Item.
−The right part of the screen can be used to display the Main Button Guide indicators.
Device Security
You can customize / adjust / set / configure various settings related to the recorder’s device lock function.
PIN code:
• Password setting.
Device Lock:
•Device lock function On/Off.
•Settings related to the timing for setting the device lock.
•Changing the number of allowable input errors (mismatches) for the password.
Author List
You can customize / adjust / set / configure settings related to the Author.
14

Author List:
•Register multiple Author IDs (up to max. 10 items).
•Set the priority level for each Author ID.
•Select the Author ID you want to be used by default.
Author Selection:
•Choose to activate/deactivate the Author ID selection at the recorder start-up.
Work Type List
You can customize / adjust / set / configure settings related to the Work Type.
Work Type List:
•Register Work Types (up to max. 20 items).
•Set the option items for each Work Type (up to max.10 options).
•Select the Work Type you want to be used by default.
Worktype Selection:
•Choose to activate/deactivate the Work Type selection when the recorder is iv New mode.
Device Folders
You can customize / adjust / set / configure various settings related to the recorder’s folders.
Enabled:
•Change the number of usable folders.
Folder name:
• Change the folder name.
Worktype:
• Set the folder's work type.
AutoLock:
• Set the Auto Lock on a file to On/Off.
Encryption:
•Select a folder’s Encryption level. It is possible to set the Encryption level to [High] (256 bit), [Standard] (128 bit) or [No] (deactivates the function).
Password:
•Set the folder's Encryption Password.
Recording
You can customize / adjust / set / configure various settings related to the recorder’s Dictation files.
DSS Format:
•Select the recording format (DSS Pro/DSS Classic).
Record function:
•Select the recording mode (Overwrite/Append/Insert).
File download:
•Select the files you want to be transferred to the PC (All file/ Finished file).
Programmable Buttons
You can change the functions assigned to the Programmable Smart Buttons (F1, F2, F3 buttons) and the Main Buttons (NEW, REC, STOP, PLAY, REV buttons). You can also choose how to operate the REC button when recording.
Main Button functions:
• Select a combination of functions.
Programmable Buttons:
•Select the function to associate to the Programmable buttons (F1, F2, F3 buttons) for each mode (New, Stop, Recording, Playback mode).
Rec Mode:
•You can choose to record by pressing and holding the REC button. Choose [Yes] to activate this function.
Hands Free
You can customize / adjust / set / configure settings related to the Hands-Free operation with the Foot Switch (optional).
Managing files on your PC
ODMS and DSS Player software
The ODMS (Windows) and DSS Player (Macintosh) software is a fully featured software tool that provides a simple to use but sophisticated method for
managing your recordings. Some of the features of the ODMS and DSS Player software are:
•Customize functions on the recorder (ODMS only).
•Automatic start-up of the application by connecting the device.
•Automatic download of Dictation files by connecting the device.
•Backs up downloaded Dictation files (ODMS only).
•Automatic transmission of downloaded Dictation files to addresses specified through e-mail and FTP (ODMS only).
•Automatic transmission of transcribed documents through e-mail and FTP, as well as Dictation files and link management (ODMS only).
•Change the recorder’s menu settings.
•Direct recording and editing of existing Dictation files through Voice recorder’s button operation.
•Editing Instruction Comments and Verbal comments (ODMS only).
•Encrypt Dictation files within the folder by encrypting the folder itself (ODMS only).
•Support front and background voice recognition local and roaming profile (ODMS only).
•Allow voice recognition text editing
with audio playback for efficient transcription (ODMS only).
Make sure that your computer meets the minimum requirements listed below. Please check with your system administrator or your Olympus Professional Dealer.
Minimum requirement
ODMS software (Windows) Operating System:
For Stand-Alone:
Microsoft® Windows® XP: Professional / Home Edition SP3 x86 Professional / Home Edition SP2 x64 Microsoft® Windows Vista®: Ultimate / Enterprise / Business / Home Premium / Home Basic SP2 (both x86/64)
Microsoft® Windows 7®:
Ultimate / Enterprise / Professional / Home Premium (both x86/64)
For Workgroup:
Microsoft® Windows® XP: Professional SP3 x86 Professional SP2 x64 Microsoft® Windows Vista®:
Ultimate / Enterprise / Business SP2 (both x86/64)
Microsoft® Windows 7®:
Ultimate / Enterprise / Professional (both x86/64)
EN
15

SV RU PL NL FR ES DE DA CS EN
Microsoft® Windows® Server 2003 SP2 (both x86/64)
Microsoft® Windows® Server 2003 R2 SP2 (both x86/64)
Microsoft® Windows® Server 2008 SP2 (both x86/64)
Microsoft® Windows® Server 2008 R2 (both x86/64)
CPU:
Microsoft® Windows® XP / Vista / 7: 1 GHz or higher
Microsoft® Windows® Server 2003: 1 GHz or higher
Microsoft® Windows® Server 2008: 2 GHz or higher
RAM:
Microsoft® Windows® XP: 256 MB or more Microsoft® Windows Vista®: 1 GB or more
Microsoft® Windows 7®:
1 GB or more (32 bit) / 2 GB or more (64 bit)
Microsoft® Windows® Server 2003: 256 MB or more
Microsoft® Windows® Server 2008: 2 GB or more
Hard drive space:
2 GB or more
Browser:
Microsoft Internet Explorer 6.0 or later
Drive:
CD-ROM, CD-R, CD-RW, DVD-ROM drive
Display:
1024 x 768 pixels or more, 65,536 colors or more (16,770,000 colors or more is recommended)
USB port:
One or more free ports
Others:
With the Dictation Module, Transcription Module:
A Microsoft WDMor MMEcompliant and Windowscompatible sound device
DSS Player software (Macintosh)
Operating System:
Mac OS X 10.4.11 - 10.7
CPU:
PowerPC® G3 500 MHz or more, or Intel Core Solo/Duo 1.5 GHz or more
RAM:
256 MB or more (512 MB or more is recommended)
Hard drive space:
200 MB or more
Drive:
CD-ROM, CD-R, CD-RW, DVD-ROM drive
Browser:
Macintosh Safari 3.0.4 or later, mozilla Firefox 3.6.20 or later
Display:
1024 x 768 pixels or more, 32,000 colors or more
USB port:
One or more free ports
Others:
• Audio device
Notes:
•Even if the above conditions are satisfied, self-modified computers, self-upgraded OS or multiple OS environments are not supported.
•Macintosh version does not support voice recognition software.
•For information on the latest OS upgrades compatibility, visit the Olympus Web page at http://www.olympus-global. com/en/global/.
Other information
Troubleshooting
Symptom |
Probable cause |
Action |
|
|
The battery power is low. |
Charge the battery. |
|
Nothing appears on the |
|
|
|
The recorder is turned off. |
Turn the power on. |
||
display |
|
|
|
The recorder is currently in Power Save |
Press any button. |
||
|
|||
|
mode. |
||
|
|
||
Unable to use any buttons |
The recorder is in HOLD mode. |
Release the recorder from HOLD. |
|
|
The card does not have enough memory. |
Erase unnecessary files or insert another |
|
|
card. |
||
|
|
||
|
The card is unformatted. |
Format the card. |
|
Unable to record |
The maximum number of files has been |
Change to any other folder. |
|
|
reached. |
||
|
|
||
|
The file is locked. |
Unlock the file from the file menu. |
|
|
The SD card is locked. |
Unlock the SD card. |
|
|
The earphone is connected. |
Unplug the earphones to use the internal |
|
No playback tone heard |
speaker. |
||
|
|||
|
The volume level is set to [00]. |
Adjust the volume level. |
16

Symptom |
Probable cause |
Action |
|
Unable to erase |
The file is locked. |
Unlock the file from the file menu. |
|
The SD card is locked. |
Unlock the SD card. |
||
|
|||
|
The recorder was shaken during recording. |
——— |
|
|
|
|
|
Noise heard during playback |
The recorder was placed near a cell phone |
Avoid using the recorder near cell phones |
|
|
or fluorescent lamp while recording or |
||
|
or fluorescent lamps. |
||
|
during playback. |
||
|
|
||
Recording level too low |
The microphone sensitivity is too low. |
Set the microphone sensitivity to the |
|
conference mode and try again. |
|||
|
|
||
|
The maximum number of index marks (32) |
Erase unnecessary index marks. |
|
|
has been reached. |
||
|
|
||
Unable to set index marks |
The file is locked. |
Unlock the file from the file menu. |
|
|
|||
|
The SD card is locked. |
Unlock the SD card. |
|
Unable to set verbal |
The maximum number of verbal comments |
Erase unnecessary verbal comments. |
|
comments |
(32) has been reached. |
||
|
|||
Cannot find the recorded file |
Wrong recording media or folder. |
Switch to the correct recording media or |
|
folder. |
|||
|
|
||
Cannot find the transferred |
The transferred files are either not |
|
|
supported by this recorder or MP3 files |
The recorder can recognize only file format |
||
files |
recorded on devices other than Olympus |
supported by this recorder*. |
|
|
recorders. |
|
|
Cannot connect to a PC |
Sometimes a connection cannot be made |
You need to change the PC’s USB settings. |
|
with some PCs running Windows XP, Vista |
|||
See ODMS software online help for details. |
|||
|
or 7. |
||
|
|
*Supports file formats: DS2 (DSS Pro QP or DSS Pro SP), DSS (QP or SP), MP3 (256kbps or 128 kbps), PCM (44.1 kHz/16 bit) For MP3 files created using other Olympus recorders, support may be extended to other bitrates as well.
Accessories (optional)
sNoise-cancellation microphone: ME12 (Dictation microphone)
Used to get crisp recordings of your own voice by reducing the effects of ambient noise.
Recommended to improve the accuracy when using voicerecognition software.
sExternal microphone: ME15
A lavalier omni-directional microphone that clips to clothing. Used to record your own voice or people near you.
sPC transcription kit: AS-7000
The AS-7000 transcription kit provides you with a Foot
Switch, a headset and ODMS and DSS Player software for easy transcription of DSS recordings. In order to use the AS-7000 transcription kit, the docking station (CR15) will be necessary (optional).
sFoot Switch: RS31
Connect to the USB docking station with DS-3500 for handsfree transcription.
sTelephone pickup: TP8
Earphone type microphone can be plugged into your ear while phoning. The voice or
conversation over the phone can be clearly recorded.
sLithium ion battery: LI-42B
This lithium ion rechargeable battery is manufactured by Olympus. It is best paired with the LI-42C battery charger.
sAC adapter (5V): A517
In order to charge the battery, the docking station (CR15) will be necessary (optional).
sDocking Station: CR15
EN
17
SV RU PL NL FR ES DE DA CS EN
Specifications
General points:
4Recording format:
DS2 (Digital Speech Standard Pro) Linear PCM (Pulse Code Modulation) MP3 (MPEG-1 Audio Layer3)
4Recording media:
microSD, SD card (512 MB to 32 GB)
4Sampling frequency:
DS2 format:
[DSS Pro QP] |
|
16 kHz |
[DSS Pro SP] |
|
12 kHz |
Linear PCM format: |
|
|
|
|
|
[PCM ST] |
|
44.1 kHz |
MP3 format: |
|
|
|
|
|
[256kbps] |
|
44.1 kHz |
[128kbps] |
|
44.1 kHz |
4Speaker:
Built-in ø23 mm round dynamic speaker
4MIC/EAR jack:
ø3.5 mm mini-jack, impedance MIC 2 kΩ, EAR 8 Ω or more
4Maximum working output
(DC 3.7 V):
235 mW (8 Ω speaker)
4Maximum headphone output:
â150 mV (according to EN 50332-2)
4Input power requirement:
Battery: Lithium ion battery (LI-42B)
External power supply: AC adapter (A517) 5 V (optional)
4External dimensions:
114.5 mm × 49.8 mm × 17.5 mm (without protrusions)
4Weight:
107 g (Including battery)
4Operating temperature:
0°C - 42°C
Overall frequency response 4During recording mode
(Microphone jack):
DS2 format:
[DSS Pro QP] |
200 Hz to 7 kHz |
[DSS Pro SP] |
200 Hz to 5 kHz |
Linear PCM format:
[PCM ST] 50 Hz to 21 kHz
MP3 format:
[256kbps] 50 Hz to 20 kHz
[128kbps] 50 Hz to 17 kHz
4During recording mode
(Built-in microphone):
20 Hz to 20 kHz (However, when recording in the MP3 format, the upper limit value of the frequency response depends on each recording mode)
Guide to battery life
The following values are strictly references.
4During recording mode
(Built-in microphone):
DS2 format:
[DSS Pro QP] |
Approx. 18 h. |
|
[DSS Pro SP] |
Approx. 21 h. |
|
Linear PCM format: |
||
|
|
|
[PCM ST] |
Approx. 20 h. |
|
MP3 format: |
|
|
|
|
|
[256kbps] |
Approx. 20 h. |
|
[128kbps] |
Approx. 20 h. |
|
30 min. |
||
|
||
4During playback mode
(Earphone playback):
DS2 format:
[DSS Pro QP] |
Approx. 21 h. |
[DSS Pro SP] |
Approx. 21 h. |
Linear PCM format: |
|
|
|
[PCM ST] |
Approx. 19 h. |
MP3 format: |
|
|
|
[256kbps] |
Approx. 19 h. |
[128kbps] |
Approx. 20 h. |
Guide to recording times:
The following values are strictly references.
4DS2 format:
Memory |
[DSS Pro |
[DSS Pro |
size |
QP] |
SP] |
2GB |
149 h. |
306 h. |
4GB |
300 h. |
615 h. |
8GB |
604 h. |
1,237 h. |
4Linear PCM format:
Memory size |
[PCM ST] |
2GB |
3 h. |
4GB |
6 h. |
8GB |
12 h. 5 min. |
4MP3 format:
Memory [256kbps] [128kbps]
size
2GB |
16 h. |
33 h. |
|
30 min. |
|||
|
|
||
4GB |
33 h. |
66 h. |
|
30 min. |
|||
|
|
||
8GB |
66 h. |
133 h. |
|
30 min. |
|||
|
|
• The above are the standard times, and the available recording time will vary depending on the card.
• Available recording time may be shorter if many short recordings are made.
Maximum recording time per file:
•The maximum capacity for a single file is limited to approx. 4 GB for MP3.
•Regardless of the remaining memory amount, the longest sound recording time per file is restricted to the following value.
4DS2 format:
[DSS Pro QP] |
99 h. 59 min. |
[DSS Pro SP] |
99 h. 59 min. |
4Linear PCM format:
[PCM ST] |
Approx. 3 h. |
20 min. |
|
|
|
4MP3 format:
[256kbps] |
Approx. 37 h. |
|
10 min. |
||
|
||
[128kbps] |
Approx. 74 h. |
|
30 min. |
||
|
Specifications and design are subject to change without notice. Battery life is measured by Olympus. It varies greatly according to the conditions of use.
18
Technical assistance and support
The DS-3500 is part of the Olympus Professional Dictation System. Your certified professional dealer has been fully trained on the entire Olympus Professional Dictation range, including dictation, transcription devices and software. For technical assistance and guidance relating to installation and set up, please contact your professional dealer from whom you purchased the system.
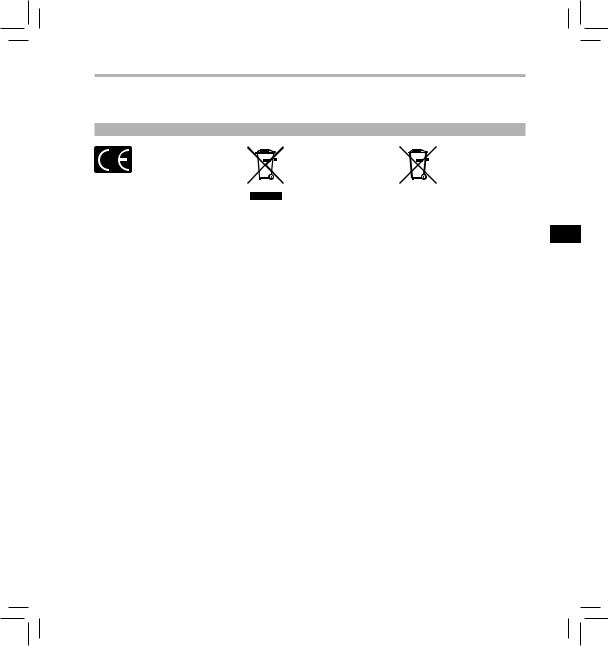
For customers in Europe:
“CE” mark indicates that this product complies with the European requirements for safety, health, environment and customer protection.
This symbol [crossed-
out wheeled bin WEEE Annex IV] indicates
separate collection of waste electrical and electronic equipment in the EU countries. Please
do not throw the equipment into the domestic refuse. Please use the return and collection systems available in your country for the disposal of this product.
Applicable Product: DS-3500
This symbol [crossed-
out wheeled bin Directive 2006/66/EC
Annex II] indicates separate collection of waste batteries in the
EU countries. Please do not throw the batteries into the domestic refuse. Please use the return and collection systems available in your country for the disposal of the waste batteries.
EN
19
SV RU PL NL FR ES DE DA CS EN
20
CS Úvod
•Děkujeme, že jste zakoupili digitální diktafon Olympus. Informace
o správném a bezpečném používání tohoto produktu naleznete v těchto pokynech k použití. Uschovejte si je pro budoucí použití. Aby bylo nahrávání úspěšné, doporučujeme před použitím diktafonu otestovat funkci nahrávání a úroveň hlasitosti.
•Tato příručka je základní verze. Další podrobnosti jsou k dispozici v úplné a rozšířené verzi příručky*
(formát PDF), kterou lze stáhnout na webových stránkách OLYMPUS.
* K dispozici v angličtině, francouzštině nebo němčině.
•Obsah tohoto dokumentu se může v budoucnosti bez předchozího upozornění změnit. Chcete-li získat nejnovější informace o názvech výrobků a číslech modelů, kontaktujte oddělení podpory zákazníků.
•Obrázky displeje a diktafonu v tomto návodu se mohou od vlastního produktu lišit. Správnosti obsahu tohoto dokumentu byla věnována maximální péče. Pokud přesto naleznete nesrovnalosti, chybu nebo chybějící informaci, kontaktujte oddělení podpory zákazníků.
•Společnost Olympus nenese odpovědnost za poškození nebo jakékoli škody vzniklé v důsledku ztráty dat způsobené poruchou produktu, opravy provedené jiným subjektem než společností Olympus nebo autorizovaným servisním střediskem Olympus nebo z jiných důvodů.
Ochranné známky a registrované ochranné známky
•Microsoft a Windows jsou registrované ochranné známky společnosti Microsoft Corporation.
•Macintosh je ochranná známka společnosti Apple Inc.
•Intel je registrovaná ochranná známka společnosti Intel Corporation.
•SD a microSD jsou ochranné známky společnosti SD Card Association.
•SDHC a microSDHC jsou ochranné známky společnosti SD Card Association.
•Technologie zvukového kódování MPEG Layer-3 licencovaná společností Fraunhofer IIS a Thomson
Ostatní značky a názvy výrobků uvedené v této příručce jsou ochrannými známkami nebo registrovanými ochrannými známkami příslušných vlastníků.
Bezpečnostní zásady
Před prvním použitím nového diktafonu si pozorně přečtěte tuto příručku, abyste se s ním naučili bezpečně a správně zacházet. Uschovejte tuto příručku na snadno přístupném místě pro budoucí použití.
•Varovné symboly upozorňují na důležité informace týkající se bezpečnosti. Abyste ochránili sebe a ostatní před zraněním nebo věcným poškozením, je důležité, abyste si vždy přečetli všechna předložená varování a informace.
fNebezpečí
Pokud je produkt používán bez uposlechnutí rad uvedených pod tímto symbolem, může dojít k vážnému zranění nebo úmrtí.
fVarování
Pokud je produkt používán bez uposlechnutí rad uvedených pod tímto symbolem, může dojít ke zranění nebo úmrtí.
fUpozornění
Pokud je produkt používán bez uposlechnutí rad uvedených pod tímto symbolem, může dojít k lehkému poranění osob, poškození zařízení či ztrátě cenných dat.
Smluvená označení použitá v tomto
návodu k obsluze
•Slovo »karta« označuje jak kartu SD, tak i kartu microSD.
•Slovo »ODMS« označuje Olympus Dictation Management System v operačním systému Windows.
•Slovo »DSS Player« označuje přehrávač DSS Player pro Mac v prostředí Apple Macintosh.
•Na obrázcích a popisech v této příručce je na displeji uvedena angličtina. Diktafon umožňuje nastavení jazyka displeje.
Podrobnosti viz »Language(Lang)«.
Upozornění na prostředí používání
•Abyste ochránili vysoce přesné součásti obsažené v tomto diktafonu, nikdy jej nepoužívejte ani neskladujte na níže uvedených místech:
−Místa s vysokou teplotou či vlhkostí nebo s prudkými změnami teploty či vlhkosti. Přímý sluneční svit, pláže, zavřená vozidla nebo místa
v blízkosti zdrojů tepla (sporák, radiátor atd.) či zvlhčovačů.
−V blízkosti hořlavých materiálů či výbušnin.
−Vlhká místa jako koupelna či v dešti.
−Místa se silnými vibracemi.
•Nikdy diktafon neupouštějte na zem ani nevystavujte silným nárazům či vibracím.
•Pokud je diktafon používán v místech s magnetickým/elektromagnetickým polem, rádiovým vlněním či vysokým napětím, například v blízkosti televizoru, mikrovlnné trouby, videoherního systému, reproduktorů, velkoplošného monitoru nebo
televizního, rádiového či jiného vysílače, může dojít k jeho selhání. V takovém případě diktafon před dalším používáním vypněte a znovu zapněte.
•Vyvarujte se nahrávání nebo přehrávání v blízkosti mobilních telefonů nebo jiných bezdrátových zařízení, která mohou způsobit interferenci a šum. Zaznamenáte-li rušení, přesuňte se jinam nebo diktafon umístěte dále od těchto zdrojů.
•K čištění přístroje nepoužívejte organická rozpouštědla, jako je alkohol nebo ředidlo.
Varování týkající se ztráty dat:
•Nahraný obsah paměti může být zničen nebo smazán v důsledku nesprávného ovládání přístroje, poruchy nebo v průběhu opravy. Doporučujeme zálohovat a uložit důležitý obsah na jiné médium, jako je např. pevný disk počítače.
•Jakákoli odpovědnost společnosti Olympus za pasivní škody nebo za jakoukoli škodu způsobenou ztrátou dat z důvodu závady produktu, opravy provedené někým jiným, než společností Olympus, autorizovaným střediskem Olympus nebo z jakéhokoli jiného důvodu je vyloučena.
Zacházení s diktafonem
fVarování:
•Uchovávejte diktafon mimo dosah dětí a miminek, aby se zabránilo následujícím nebezpečným situacím, které by mohly způsobit vážné zranění:
1Náhodné spolknutí baterie, karty či jiných malých
součástí. 2Náhodné poranění
pohyblivými součástmi diktafonu.
•Nerozebírejte, neopravujte ani neupravujte přístroj sami.
•Používejte pouze paměťové karty SD/SDHC, microSD/microSDHC. Nikdy nepoužívejte karty jiných typů.
Pokud do diktafonu omylem vložíte kartu jiného typu, navštivte autorizovaného dodavatele nebo servisní středisko. Nepokoušejte se vyjmout kartu silou.
•Nepoužívejte přístroj během řízení vozidla.
fUpozornění:
•Ihned přestaňte diktafon používat v případě, že začne vydávat neobvyklé zvuky, zápach nebo kouř.
Nikdy nevyjímejte baterie holýma rukama, mohlo by dojít k požáru nebo popálení vašich rukou.
•Neponechávejte diktafon na místech, kde by mohl být vystaven extrémně vysokým teplotám.
Mohlo by dojít k poškození některých součástí a v některých případech ke vznícení diktafonu. Nepoužívejte nabíječku nebo napájecí adaptér, jestliže jsou přikryté. Mohlo by dojít k přehřátí a k požáru.
•Zacházejte s diktafonem opatrně, abyste si nezpůsobili nízkoteplotní popáleniny.
− Pokud diktafon obsahuje kovové části, přehřátí může způsobit
nízkoteplotní popáleniny. Dbejte na následující upozornění:
−Při delším používání dojde k zahřátí diktafonu. Pokud budete v tomto stavu diktafon držet, můžete si způsobit nízkoteplotní popáleninu.
−V prostředích s extrémně nízkými teplotami může být teplota diktafonu nižší než teplota okolí. Pokud je to možné, používejte při manipulaci s diktafonem při nízkých teplotách rukavice.
Zásady manipulace s bateriemi
fNebezpečí:
•Tento diktafon používá speciální lithium-iontovou baterii od společnosti Olympus. Nabíjejte baterii pouze k tomu určenou nabíječkou nebo napájecím adaptérem. Nepoužívejte žádné jiné napájecí adaptéry ani nabíječky.
•Nevystavujte nikdy baterie ohni nebo horku, nezkratujte je ani nerozebírejte.
•Baterie nikdy nezahřívejte ani nespalujte.
•Při přenášení a uchovávání baterií dbejte na to, aby nepřišly do kontaktu s kovovými předměty, jako jsou šperky, špendlíky, sponky atd.
•Abyste zabránili vytečení baterií nebo poškození kontaktů, pečlivě se řiďte všemi pokyny k jejich používání. Nikdy se nepokoušejte baterii rozebírat nebo jakýmkoli způsobem upravovat, pájet apod.
•Pokud se vám kapalina z baterie dostane do očí, ihned je vypláchněte proudem čisté studené vody a okamžitě vyhledejte lékařskou pomoc.
fVarování:
•Baterie vždy udržujte v suchu.
•Pokud se dobíjecí baterie nenabijí během uvedené doby, přestaňte je nabíjet a nepoužívejte je.
•Nepoužívejte baterii, pokud je prasklá nebo poškozená.
•Nikdy baterie nevystavujte silným otřesům či dlouhodobým vibracím.
•Pokud baterie teče, změnila barvu, zdeformovala se nebo během používání došlo k jiným neobvyklým změnám, přestaňte diktafon používat.
•Pokud kapalina z baterie potřísní váš oděv nebo pokožku, svlékněte oblečení a ihned omyjte zasaženou oblast proudem čisté studené vody. Pokud kapalina způsobila na vaší pokožce popáleninu, ihned vyhledejte lékařskou pomoc.
•Uchovávejte baterii mimo dosah dětí.
•Zaznamenáte-li během používání tohoto produktu cokoli neobvyklého, např. neobvyklý zvuk, zahřátí, kouř nebo zápach
spáleniny:
1vyjměte ihned baterii, přičemž
dejte pozor, abyste se nepopálili; a 2kontaktujte svého prodejce
nebo nejbližší servisní středisko
Olympus.
fUpozornění:
•Přiložená/dodaná nabíjecí baterie je určena výhradně k použití s digitálním diktafonem Olympus DS-3500.
−Pokud je použit nesprávný typ baterie, může dojít k explozi.
−Použité baterie se zbavte podle pokynů.
−Baterie recyklujte a pomozte tak chránit přírodní zdroje naší planety. Budete-li nefunkční baterie vyhazovat, nezapomeňte zakrýt jejich kontakty a vždy dodržujte místní předpisy a nařízení.
•Před prvním použitím nebo vždy po delším období, kdy ji nepoužíváte, nabíjecí baterii dobijte.
•Nabíjecí baterie mají omezenou životnost. Pokud se doba provozu zkrátí i přesto, že je nabíjecí baterie plně nabitá, nahraďte ji novou.
Displej LCD
•Displej LCD je vyroben vysoce přesnou technologií. Přesto se mohou na LCD displeji objevit černé nebo jednobarevné svítící body. Podle charakteru bodu nebo úhlu, pod kterým se na obrazovku díváte, nemusí být barva a jas bodu jednotný. Nejedná se o závadu.
Paměťová karta
fVarování:
•Nedotýkejte se kontaktů karet. Mohlo by dojít k poškození karty.
•Nepokládejte kartu na místa s elektrostatickým polem.
•Kartu ukládejte na místo, které je mimo dosah dětí. V případě náhodného spolknutí karty okamžitě vyhledejte lékaře.
CS
21

SV RU PL NL FR ES DE DA CS EN
Začínáme
Popis částí
|
9 |
1 |
|
|
0 |
2 |
|
|
|
||
|
|
3 |
|
|
$ |
4 |
|
|
! |
5 |
|
|
6 |
||
% |
@ |
||
7 |
|||
|
|
^ |
# |
|
|
|
|
|
& |
8 |
|
|
*( )
w q |
=- |
1Otvor pro kartu SD
2Vestavěný mikrofon
3Tlačítko NEW (Nový)
4Tlačítko REC
5Tlačítko STOP
6Tlačítko PLAY
7Tlačítko REV
8Tlačítko ERASE (Vymazat)
9Indikátor nahrávání
0 Displej (panel LCD)
! Tlačítko + (Hlasitost)
@Tlačítko pro rychlé převíjení vpřed (9)
# Tlačítko OK / MENU (Nabídka)
$ Programovatelná
multifunkční tlačítka
(F1,F2,F3)
%Tlačítko převíjení vzad (0)
^ Tlačítko – (Hlasitost) & Vestavěný reproduktor * Kryt baterie
( Tlačítko uvolnění krytu baterie
) Spinač POWER/HOLD
- Zásuvka EAR (sluchátka) = Zásuvka MIC (mikrofon) q Konektor USB
w Konektor pro kolébku
Zobrazení kontrolek stavu (panel LCD)
Zobrazení v režimu nahrávání
1 |
|
2 |
9 |
3
4
5
6
7
8
Zobrazení v režimu přehrávání
0
!
@
#
$
%
Zobrazení v režimu nahrávání
^
&
1Název aktuálního souboru
2Aktuální složka
3Číslo aktuálního souboru/ Celkový počet nahraných souborů ve složce
4Uplynulý čas nahrávání
5Lišta s indikátorem zbývající paměti
6Zbývající čas nahrávání
7Indikátor měřiče hladiny
8Zobrazení průvodce tlačítky
9Indikátor stavu diktafonu
0Aktuální čas přehrávání ! Indikátor značky
@ Lišta s indikátorem stavu
přehrávání
# Indikátor mluvené
poznámky
$ Délka souboru
% Datum a čas nahrávání
^ Průvodce hlavními tlačítky
Průvodce hlavními tlačítky lze zobrazit pomocí » Průvodce hlavními tlačítky « přizpůsobitelných funkcí softwaru ODMS.
&Informace o souboru
Informace o aktuální souboru lze zobrazit pomocí funkce »Display« v softwaru ODMS.
[ ]: Karty SD
[

 ]: SD zámku karty [
 ]: Karta microSD
[ ]: Citlivost mikrofonu [
 ]: Režimu nahrávání [
 ]: Baterií
[ ]: Hlasové aktivace nahrávání (VCVA)
[ ]: Čekajících souborů [
 ]: Šifrování
[ ]: Priority
[ ]: zámku souboru [
 ]: ID mluvčího
[ ]: Typu nahrávky
[ ]: Volitelné položky
22
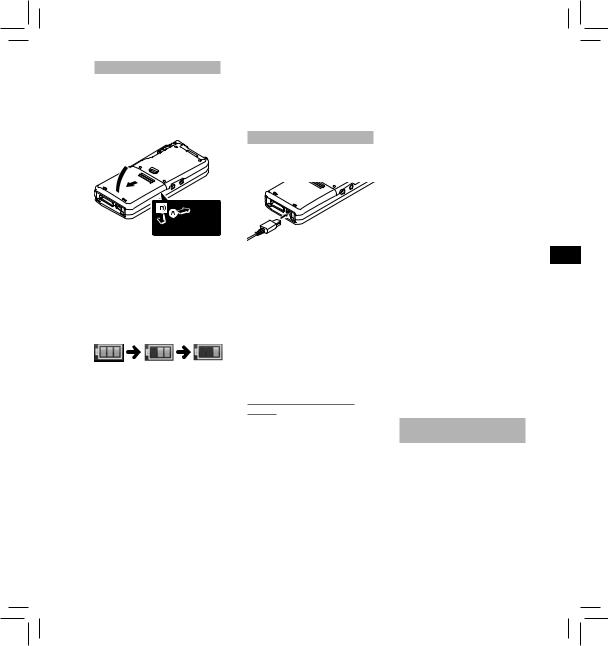
Vložení baterie
V tomto diktafonu je použita lithium-iontová baterie předepsaná společností Olympus (LI-42B). Nepoužívejte žádný jiný typ baterie.
1Lehce zatlačte na tlačítko uvolnění krytu baterie a otevřete kryt baterií (viz obrázek níže).
3
 1
1
2
2Vložte baterii a dbejte přitom na správnou polaritu (viz obrázek). Zavřete kryt baterie.
•Při vkládání posouvejte baterii ve směru Aa zároveň stlačujte dolů ve směru B.
Indikátor baterií:
Souběžně s vybíjením baterie slábne indikátor baterie na displeji.
•Když se na displeji zobrazí tento
indikátor [ ], co nejdříve nabijte
baterii. Pokud je baterie příliš vybitá, na displeji se zobrazí [s] a zpráva [Battery Low] a diktafon se vypne.
Poznámky:
•Před vyjmutím baterie vyjměte diktafon. V případě vyjmutí baterie během používání diktafonu může dojít k závadám, poškození nebo ztrátě souborů.
•Nebudete-li diktafon delší dobu používat, vyjměte baterii.
•Po vyjmutí baterie bude pravděpodobně třeba znovu nastavit čas a datum, ponecháte-li baterii mimo diktafon déle, než 15 minut, nebo pokud vyjmete
baterii bezprostředně po vložení do diktafonu.
Nabíjení baterie
Před použitím zcela nabijte baterii (přibližně 2 hodiny a 30 minut).
Připojte kabel USB k diktafonu.
Poznámky:
•Z počátku používání nabíjejte baterii pravidelně. Po opakovaném nabití/vybití se výkon baterie zlepší.
•Modely baterií, které se liší od přiložené, pravděpodobně nelze nabíjet.
•Nabíjení baterie prostřednictvím připojení kabelu USB nemusí být úspěšné v závislosti na kapacitě napájení portu USB ve vašem počítači. Místo toho použijte napájecí adaptér (volitelné).
•Nenabíjejte diktafon, je-li připojen rozbočovač USB.
•Pokud je připojen kabel USB, nevkládejte ani nevyjímejte baterii.
Používání lithium-iontové
baterie
Dodaná baterie je určena výhradně k použití s diktafonem Olympus DS-3500. Nepoužívejte v kombinaci s jiným elektronickým vybavením.
Zásady pro používání baterie:
Před používáním baterie si pečlivě přečtěte následující pokyny.
Vybíjení:
Dobíjecí baterie se automaticky vybijí, pokud se nepoužívají. Pravidelně je nabíjejte před každým použitím.
Životnost baterie:
Nabíjecí baterie se časem opotřebuje. Pokud se doba provozu zkrátí i přesto, že je nabíjecí baterie zcela nabitá za stanovených podmínek, nahraďte
ji novou.
Provozní teplota:
Nabíjecí baterie jsou chemické produkty. Výkonnost baterie se může měnit, i když jsou používány v doporučeném rozpětí provozních teplot.
Jedná se o přirozenou vlastnost těchto produktů.
Doporučené rozpětí provozních teplot:
Během provozu:
0°C - 42°C
Nabíjení:
5°C - 35°C
Skladování po delší dobu:
–20°C - 60°C
Při použití baterie mimo doporučené rozpětí provozních teplot může být její výkonnost a životnost snížena.
Poznámky:
•Při likvidaci dobíjecích baterií vždy dodržujte příslušné zákony a nařízení. Informace o správném způsobu likvidace obdržíte od místního recyklačního centra.
•Pokud není baterie zcela vybitá, před likvidací zabraňte zkratu (např. izolováním kontaktů pomocí pásky).
Pro zákazníky v Německu:
Společnost Olympus uzavřela smlouvu s německou společností GRS (asociace pro likvidaci baterií), aby zajistila likvidaci šetrnou k životnímu prostředí.
Napájení prostřednictvím napájecího
kabelu USB
Při dlouhodobém nahrávání používejte kabel USB.
1Zkontrolujte, zda se diktafon nachází v zastaveném režimu.
2Stiskněte a podržte tlačítko OK/MENU a připojte kabel USB k diktafonu.
CS
23
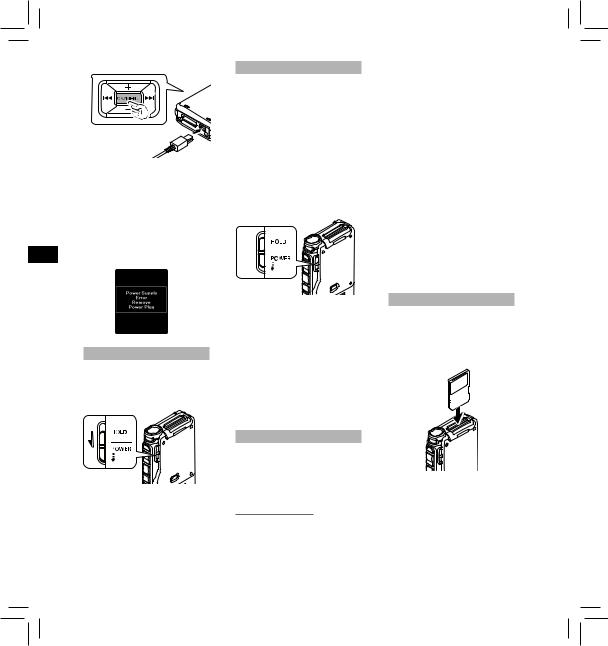
SV RU PL NL FR ES DE DA CS EN
Bylo zjištěno abnormální napětí:
Zjistí-li diktafon napětí o nižších nebo vyšších hodnotách, než je povoleno (4,4 až 5,5 V), na displeji se zobrazí zpráva [Power Supply Error Remove Power Plug] a veškerý provoz se zastaví. V případě zjištění abnormálního napětí nelze diktafon používat. Používejte síťový adaptér kompatibilní s napěťovým standardem vašeho prostředí (volitelné).
Zapnutí/vypnutí napájení
Zapnutí napájení:
Když je diktafon vypnutý, posuňte přepínač POWER/HOLD ve směru šipky.
Vypnutí napájení:
Posuňte přepínač POWER/HOLD ve směru šipky a podržte jej po dobu půl sekundy nebo déle.
Blokování tlačítek (HOLD)
Je-li diktafon nastaven na režim HOLD, zachovají se podmínky provozu a funkce tlačítek bude vypnuta.
Nastavení diktafonu do režimu blokování tlačítek (HOLD): Posuňte přepínač POWER/HOLD do polohy blokování tlačítek [HOLD].
Když se na displeji zobrazí zpráva [Hold] (blokování tlačítek), diktafon je nastaven do režimu blokování tlačítek (HOLD).
Ukončení režimu blokování tlačítek (HOLD):
Posuňte přepínač POWER/HOLD do polohy A.
A
Poznámky:
•Stisknete-li v režimu HOLD jakékoli tlačítko, rozsvítí se na 2 sekundy hodiny, ale diktafon neprovede požadovanou akci.
•Je-li režim HOLD nastaven v průběhu přehrávání nebo
nahrávání, ovládání diktafonu bude vypnuto, ale přehrávání nebo nahrávání se nezastaví. K zastavení dojde teprve tehdy, když se přehrávání dostane na konec souboru nebo když se (v případě nahrávání) zaplní paměť.
Paměťová karta
Tento diktafon používá dva typy paměťových karet: kartu microSD jako vnitřní paměť a kartu SD jako dodatečnou paměť. V případě poruchy diktafonu můžete bezpečně odebrat obsah zaznamenaný na obou kartách.
Kompatibilní karty
Tento diktafon podporuje paměťové karty kapacity od 512 MB do 32 GB.
Kompatibilita karet
Seznam karet kompatibilních s tímto diktafonem najdete na domovské stránce produktu na
serveru společnosti Olympus pro vaši
oblast nebo se obraťte na prodejce Olympus, u kterého jste tento produkt zakoupili.
Poznámky:
•Zajistěte, aby na kartě před inicializací (formátováním) nebyla uložena žádná důležitá data. Při inicializaci se z karty úplně smažou veškerá data.
•Karty, které byly zformátovány (inicializovány) v jiném zařízení, například v počítači, pravděpodobně nebudou rozpoznány. Před použitím je zformátujte v tomto diktafonu.
•Životnost karty je omezena. Po skončení životnosti karty již nebude možné na ni zapisovat ani z ní mazat data. V takovém případě kartu vyměňte.
•Pokud používáte k uložení či smazání dat adaptér karty PC kompatibilní s kartou, je možné, že se maximální doba záznamu zkrátí. Pokud chcete obnovit výchozí dobu záznamu, inicializujte/formátujte kartu v diktafonu.
Vložení a vysunutí karty SD
Vložení karty SD
Zorientujte kartu SD podle obrázku níže a zasuňte ji do příslušného otvoru tak, aby zacvakla na místo.
• Při vkládání držte kartu rovně.
Rozpoznání karty
Po vložení karty SD na displeji bude blikat zpráva [Please Wait], dokud diktafon kartu nerozpozná.
24
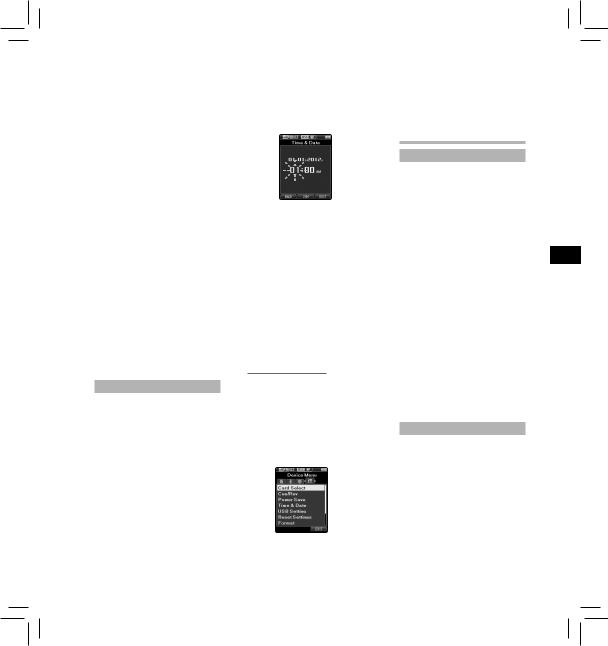
Vysunutí karty SD
Chcete-li kartu vyjmout, zatlačením dovnitř ji uvolněte a nechte vysunout z otvoru.
• Kartu držte rovně a vytáhněte ji.
Poznámky
•Vkládání karty špatným směrem nebo šikmo může vést k poškození kontaktní plochy nebo zaseknutí karty.
•Není-li karta zcela zasunuta do otvoru, nelze na ni řádně zapisovat data.
•Po vložení nezformátované karty do příslušného otvoru diktafon automaticky zobrazí možnosti nabídky formátování.
•Používejte pouze karty zformátované diktafonem.
•Nikdy nevyjímejte kartu, když je diktafon v provozu, protože by mohlo dojít k poškození dat.
•Po zatlačení karty dovnitř za účelem vyjmutí se může karta při příliš rychlém uvolnění prstů nečekaně vysunout.
•Tento diktafon využívá kartu microSD jako vnitřní paměť. Tento přístroj je dodáván s vloženou kartou microSD.
•Diktafon nemusí rozpoznat kartu správně, i když se jedná o kompatibilní kartu.
•Opakovaným zapisováním a vymazáváním se výkon zpracování na kartě snižuje. V takovém případě kartu zformátujte.
Nastavení času a data [Time & Date]
Nastavíte-li na začátku datum a čas, uloží se automaticky ke každému nahranému souboru informace
o čase, kdy byl nahrán. Počáteční nastavení data a času umožní snadnější správu souborů.
Při prvním použití diktafonu po zakoupení nebo po vložení baterie do přístroje, který nebyl delší dobu používán, se zobrazí zpráva [Set Time & Date].
•Další podrobnosti jsou k dispozici v úplné a rozšířené verzi příručky*
(formát PDF), kterou lze stáhnout na webových stránkách OLYMPUS.
* K dispozici v angličtině, francouzštině nebo němčině.
1Stiskněte tlačítko 9nebo 0 a vyberte položku, kterou chcete nastavit.
Blikajícím kurzorem vyberte položku z možností hodina („Hour“), minuta („Minute“), rok („Year“), měsíc („Month“) a den („Day“).
2 Nastavení proveďte pomocí tlačítka + nebo −.
Během nastavování hodin a minut můžete pomocí tlačítka F2 (24H) zvolit mezi 12hodinovým a 24hodinovým zobrazením.
•Během nastavení můžete stisknutím tlačítka F2 (D/M/Y) zvolit pořadí zobrazení měsíc („Month“), den („Day“) a rok („Year“).
3Stisknutím tlačítka OK/MENU dokončete nastavení.
Poznámka:
•Pomocí softwaru ODMS a DSS Player lze nastavit čas a datum z počítače.
Změna času a data:
Není-li nastavení aktuálního data a času správné, nastavte je pomocí níže uvedeného postupu.
1Je-li diktafon zastaven, stiskněte tlačítko OK/MENU.
2Stisknutím tlačítek 9nebo 0 vyberte kartu [Device Menu].
•Zobrazení nabídky lze změnit posunutím kursoru karty nastavení.
3Pomocí tlačítka + nebo − zvolte možnost [Time & Date].
4Stiskněte tlačítko OK/MENU.
•Následující kroky jsou stejné jako kroky 1 až 3 v části„Nastavení času a data [Time & Date]“.
5Stisknutím tlačítka F3 (EXIT) zavřete obrazovku s nabídkou.
Základní obsluha
Nahrávání
Diktafon nabízí pět složek: [A], [B], [C], [D], [E]. Složku lze vybrat stisknutím tlačítka F1 (FOLDER). Do těchto pěti složek můžete rozdělit nahrávky podle jejich druhu. Do každé složky lze nahrát až 200 zpráv. Přednastavený režim nahrávání je [DSS Pro QP] (Vynikající kvalita).
Funkce nahrávání*
Před zahájením nahrávání přes dříve nahraný soubor lze provést
následující nastavení funkce RECORD:
•Append: Připojí novou nahrávku na konec dříve nahraneho souboru.
•Overwrite (výchozí nastavení):
Přepíše a odstraní část dříve nahraného souboru od vybraného místa.
•Insert: Nahraný soubor bude vložen doprostřed dříve nahraného souboru od vybraného místa nahrávky. Původní soubor bude uchován.
Funkce RECORD je přednastavena tak, aby nahrávání proběhlo přepisováním.
Nahrávání bude zahájeno od aktuálního místa stávajícího souboru.
*Tato funkce nebude k dispozici, pokud byl vybrán soubor MP3.
Nová nahrávka
Vytvoření nové složky pro nahrávání.
1Stisknutím tlačítka NEW (Nový) vytvoříte nový soubor.
•Lze vybrat typ práce v seznamu typů práce odeslaném pomocí softwaru ODMS.
CS
25
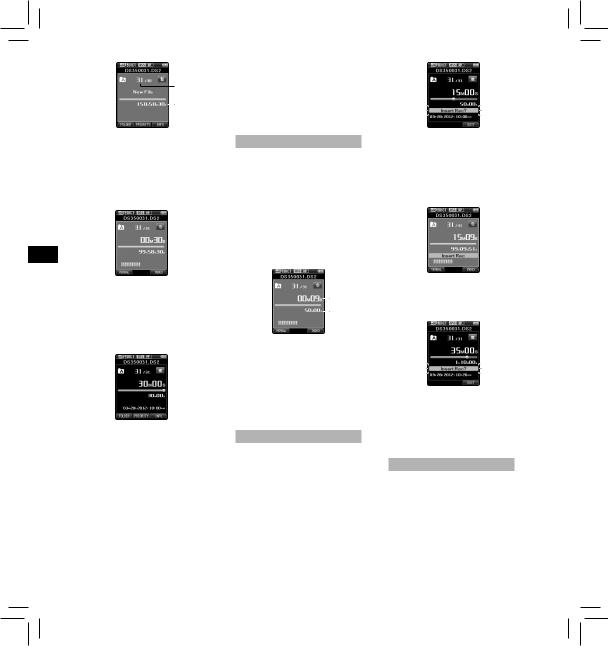
SV RU PL NL FR ES DE DA CS EN
a
b
aČíslo nového souboru bZbývající čas nahrávání
2Stisknutím tlačítka REC zahájíte nahrávání.
•Indikátor nahrávání se rozsvítí. Natočte mikrofon směrem
ke zdroji, z nějž má být zvuk nahráván.
3Stisknutím tlačítka STOP ukončíte nahrávání.
•Chcete-li přidat další nahrávky ke stejnému souboru, znovu stiskněte tlačítko REC (Nahravani) (Tato funkce nebude k dispozici, pokud byl vybrán soubor MP3).
Poznámky:
•V případě, že zbývající doba nahrávání dosáhne 60 sekund, 30 sekund a 10 sekund, ozve se pípnutí.
•Je-li zbývající doba nahrávání méně než 30 minut, změní se barva indikátoru zbývající paměti.
•Je-li zbývající doba nahrávání méně než 60 sekund, začne indikátor nahrávání blikat. Zkrátí-li se doba nahrávání z 30 na 10 sekund, indikátor bliká rychleji.
•Zaplní-li se kapacita paměti nebo složky, zobrazí se zpráva [Memory Full] (Plná paměť) nebo [Folder Full] (Plná složka).
−Před dalším nahráváním vymažte nepotřebné soubory nebo přeneste příslušné soubory do počítače.
−Změňte umístění nahrávky v nastavení [Card Select] (Volba karty) nebo přepněte na kartu, kde je více volného místa.
Přepsání nahrávky
Dříve nahraný soubor lze přepsat od kteréhokoli místa v souboru. Přepsaná část bude vymazána.
•Tato funkce nebude k dispozici, pokud byl vybrán soubor MP3.
1 Vyberte soubor, který chcete přepsat, a spusťte přehrávání.
•Zastavte přehrávání v místě, od kterého chcete zahájit přepisování.
2Stisknutím tlačítka REC zahájíte přepisování.
• Indikátor nahrávání se rozsvítí.
a
b
aUplynulý čas nahrávání bCelkový čas záznamu zvoleného
souboru
3Stisknutím tlačítka STOP zastavíte přepisování.
Poznámka:
•Nelze vybrat režim nahrávání odlišný od režimu nastaveném pro původní soubor.
Vložení nahrávky
Do nahraného souboru lze vložit další nahrávku.
•Tato funkce nebude k dispozici, pokud byl vybrán soubor MP3.
1Vyberte soubor, do kterého chcete vložit další nahrávku, a spusťte přehrávání.
2Stisknutím tlačítka F1 (INSERT) (Vložit) v průběhu nahrávání vložíte další nahrávku.
•Na displeji se zobrazí zpráva [Insert Rec?] (Vložit nahrávku?).
3Stisknutím tlačítka REC zahájíte vkládání dodatečné nahrávky.
•Indikátor nahrávání se rozsvítí. Na obrazovce se střídavě zobrazuje zpráva [Insert Rec] (Vložení nahrávky) a zbývající čas záznamu.
4Stisknutím tlačítka STOP zastavíte vkládání dodatečné nahrávky.
Poznámky:
•Čas záznamu a datum vytvoření se aktualizuje na hodnoty vložené nahrávky.
•Nelze vybrat režim nahrávání odlišný od režimu nastaveném pro původní soubor.
Nahrávání hands-free
Tento diktafon lze použít jako zařízení pro nahrávání hands-free. Chcete-li nakonfigurovat tento diktafon
pro používání hands-free, připojte volitelný spínač nožky Olympus na zadní straně kolébky a vložte diktafon do kolébky (volitelné).
•Další podrobnosti jsou k dispozici v úplné a rozšířené verzi příručky*
(formát PDF), kterou lze stáhnout na webových stránkách OLYMPUS.
* K dispozici v angličtině, francouzštině nebo němčině.
26
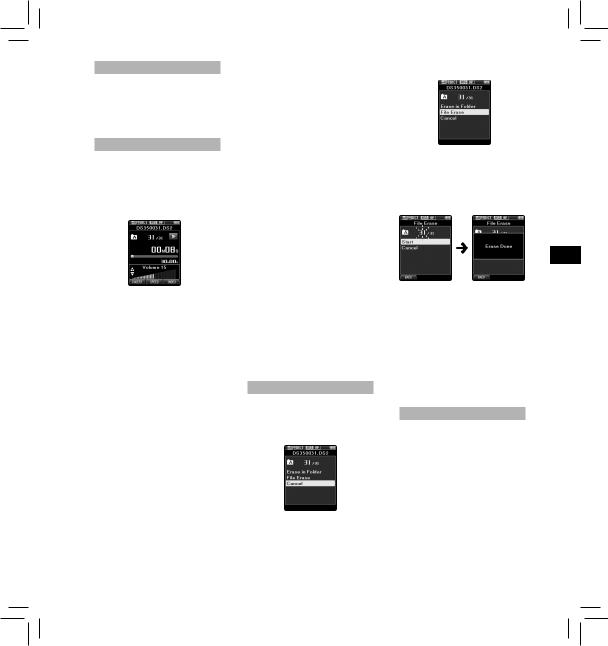
Sledování nahrávání
Je možné sledovat nahrávání poslechem, i když nahrávání právě probíhá. Chcete-li tuto možnost využít, připojte zástrčku sluchátek do zásuvky pro připojení sluchátek a pomocí tlačítek + nebo – nastavte hlasitost.
Přehrávání
1Vyberte soubor a potom stisknutím tlačítka PLAY spusťte nahrávání.
2Stisknutím tlačítka + nebo – upravíte hlasitost.
• Hlasitost lze nastavit na hodnotu v rozmezí [00] až [30].
3 Stisknutím tlačítka STOP zastavíte přehrávání v jakémkoli místě.
Rychlé převíjení vpřed (FF):
•Když je diktafon zastavený, stiskněte tlačítko 9.
Návrat do běžného režimu: Stisknutím tlačítek STOP, PLAY nebo
OK/MENU.
Převíjení vzad (REW):
•Když je diktafon zastavený, stiskněte tlačítko 0.
Návrat do běžného režimu: Stisknutím tlačítek STOP, PLAY nebo
OK/MENU.
Indexace záznamu (CUE):
•Když je diktafon zastavený nebo přehrává, stiskněte a podržte tlačítko 9.
Návrat do běžného režimu: Uvolněte tlačítko.
Prohlížení (REV):
•Když je diktafon zastavený nebo přehrává, stiskněte a podržte tlačítko 0.
Návrat do běžného režimu: Uvolněte tlačítko.
•Stiskněte a podržte tlačítko REV.
Návrat do běžného režimu: Uvolněte tlačítko.
Rychlost přehrávání
•Během přehrávání stiskněte tlačítko F2 (SPEED) (Rychlost).
•Opakovaným stisknutím tlačítka F2 (SPEED) se mění rychlost přehrávání.
Play (Přehrávání):
Přehrávání běžnou rychlostí.
Přehrát pomalu (Pomalé přehrávání):
Rychlost přehrávání se sníží
(-50 %) a zobrazí se zpráva »Slow play«.
Přehrát rychle (Rychlé přehrávání):
Rychlost přehrávání se zvýší (+ 50 %) a zobrazí se zpráva »Fast play«.
Poznámky:
•Pokud v průběhu rychlého převíjení dopředu stisknete jednou tlačítko 9(nebo dvakrát, pokud je diktafon zastavený), diktafon se zastaví na konci souboru (F.Skip).
•Pokud v průběhu rychlého převíjení dozadu stisknete jednou tlačítko 0 (nebo dvakrát, pokud je diktafon zastavený), diktafon se zastaví na začátku souboru (B.Skip). Pokud během dvou sekund stisknete dvakrát tlačítko 0, diktafon přeskočí na začátek předchozího souboru.
•Pokud v průběhu rychlého převíjení dopředu (FF) stisknete a podržíte tlačítko 9, diktafon bude soustavně přeskakovat dopředu.
•Pokud v průběhu rychlého převíjení dozadu (REW) stisknete a podržíte tlačítko 0, diktafon bude soustavně přeskakovat dozadu.
•Rychlost indexové značky a prohlížení lze nastavit od [Speed1] do [Speed5]. Zvuk přehrávání indexové značky a prohlížení lze nastavit na [On] nebo [Off].
Mazání
Mazání souborů:
1Vyberte soubor, který chcete vymazat.
2 Stiskněte tlačítko ERASE (Smazat).
3Stisknutím tlačítka + vyberte možnost [Erase in Folder] nebo [File Erase].
[Erase in Folder]:
Umožňuje vymazat všechny soubory ve složce najednou.
[File Erase]:
Umožňuje vymazat jeden soubor.
4 Stiskněte tlačítkoOK/MENU.
5Stiskněte tlačítko + a vyberte položku [Start]. Stiskněte tlačítko
OK/MENU.
•Na displeji se zobrazí zpráva [Erase !] (Smazat soubor) a mazání se spustí.
CS
•Po smazání souboru se zobrazí zpráva [Erase Done] (Soubor smazán). Čísla souborů se automaticky přeřadí.
Poznámky:
•Vymazaný soubor již nelze obnovit.
•Vymazání může trvat až 10 sekund. Tento proces nepřerušujte, protože by mohlo dojít k poškození dat.
•Soubory není možné smazat v následujících případech.
-Soubory jsou zamknuté.
-Soubory uložené na zamknuté kartě SD.
Částečné smazání souboru
Lze vymazat jakoukoli zbytečnou část souboru.
1Spusťte přehrávání souboru, který chcete částečně smazat.
2Stiskněte tlačítko ERASE v místě, od kterého chcete zahájit mazání.
•V průběhu přehrávání se na displeji zobrazí zpráva [Erase Start] (Částečné mazání).
• Stisknete-li tlačítko F2 ( ), přehrávání přeskočí dopředu (F.Skip) na konec souboru a potom se zastaví. Tento bod bude
automaticky nastaven jako koncový bod částečného vymazání.
• Stisknete-li tlačítko F1 ( ), přehrávání přeskočí dozadu (B. Skip) a bude znovu zahájeno od počátečního
bodu částečného vymazání.
27
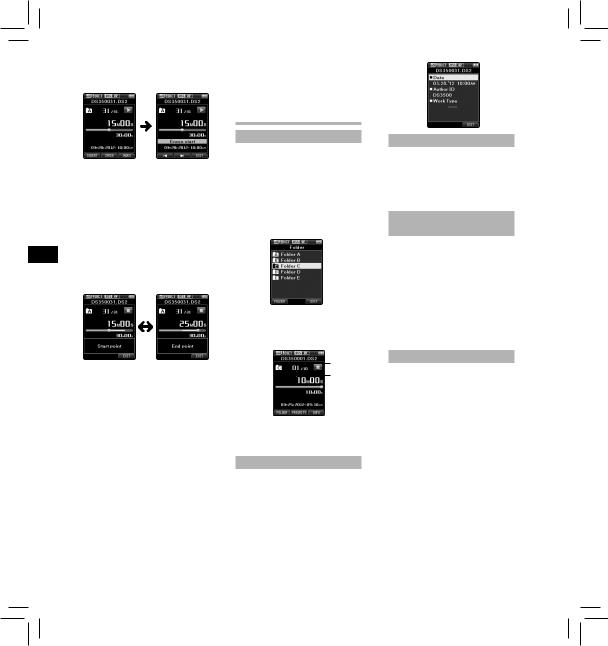
SV RU PL NL FR ES DE DA CS EN
Přehrávání bude pokračovat do konce souboru nebo do potvrzení koncového
vymazání.
3V pozici, na které má částečné vymazání být ukončeno, stiskněte tlačítko ERASE znovu.
•Na displeji se po dobu 8 sekund střídavě zobrazuje zpráva o místě (času) zahájení mazání zvoleném v bodě 2 a konečném bodě (času) mazání nastaveném v tomto bodě.
•Necháte-li nahrávku přehrát až do konce souboru nebo pokud se před koncem souboru nachází mluvená poznámka, bude to považováno za koncový bod částečného vymazání.
4Stisknutím tlačítka ERASE potvrďte vymazání.
•Na displeji se zobrazí zpráva [Partial erasing !] (Částečné mazání) a mazání se spustí.
•Jakmile se na displeji zobrazí zpráva [Partial erase completed.] (Soubor smazán), částečné mazání bylo dokončeno.
Poznámky
•Není-li do osmi sekund poté, kdy se na obrazovce střídavě zobrazují zprávy [Start point] (Počáteční bod) a [End point] (Konečný bod), stisknuto tlačítko ERASE (Smazat), vrátí se diktafon do stavu zastavení.
•Vymazaný soubor již nelze obnovit.
•Vymazání může trvat až 10 sekund. Tento proces nepřerušujte, protože by mohlo dojít k poškození dat.
•Soubory není možné částečně smazat v následujících případech.
-Je vybrán soubor MP3.
-Soubory jsou zamknuté.
-Částečné vymazání nelze provádět na částech souborů, které obsahují mluvenou poznámku.
-Soubory uložené na zamknuté kartě SD.
Pokročilá obsluha
Výběr složek a souborů
Změna složek:
1Je-li diktafon zastaven, stiskněte tlačítko F1 (FOLDER).
•Na displeji se zobrazí seznam složek.
2Stiskem tlačítka +, – nebo F1 (FOLDER) zvolte požadovanou složku, a poté stiskněte tlačítko
Výběr souboru:
1Během zobrazení souboru stiskněte tlačítko 9nebo 0.
a
b
aCelkový počet souborů ve složce bČíslo aktuálního souboru
Zobrazení informací o souboru
Diktafon dokáže zobrazit množství informací o aktuálním souboru.
1Vyberte soubor obsahující informace, které chcete zobrazit.
2Stiskněte tlačítko F3(INFO) (Informace).
•Zobrazí se následující informace: [Date] [Author ID] [Work Type]
Bezpečnostní zámek
Přístup k diktafonu lze omezit pomocí funkce zámku zařízení. V případě ztráty diktafonu může být pro vaše data bezpečnější ověřování heslem. Heslo lze nastavit pomocí softwaru ODMS.
Nastavení ID mluvčího a typu
nahrávky
Součástí hlavičky všech souborů nahraných do diktafonu je ID mluvčího a typ nahrávky. Seznam ID mluvčích a typů nahrávky v diktafonu vytvoříte pomocí dodaného softwaru ODMS. Nahrajte pomocí něj seznam dat (seznam ID mluvčích a typů nahrávky) do diktafonu. Další informace naleznete v nápovědě programu ODMS on-line.
ID mluvčího je přednastaveno na hodnotu “DS3500”.
Mluvená poznámka
Pomocí hlasových poznámek lze přidávat hlasové pokyny během nahrávání.
Pomocí softwaru ODMS a DSS Player lze vyhledávat a přehrávat mluvené poznámky. Mluvené poznámky mohou rovněž obsahovat užitečné pokyny pro osoby provádějící přepis.
•Mluvené poznámky lze nastavit pouze u souborů DS2.
Vložení mluvené poznámky
1Během nahrávání podržte stisknuté tlačítko F1 (VERBAL).
•Data nahraná se stisknutým tlačítkem F1 (VERBAL) budou zaznamenána jako mluvená poznámka.
28
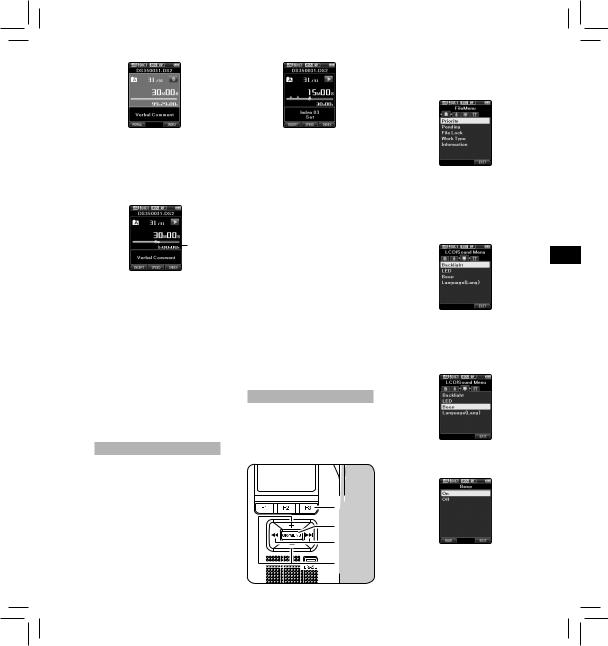
Vyhledání mluvené poznámky
2Při přehrávání souboru podržte stisknuté tlačítko 9nebo 0.
•Při nalezení mluvené poznámky se diktafon na 1 sekundu zastaví.
•Část s mluvenou poznámkou má jinou barvu.
a
aČást s mluvenou poznámkou
Odstranění mluvené poznámky
1Při přehrávání mluvené poznámky stiskněte tlačítko ERASE.
2Stiskněte tlačítko + a vyberte položku [Clear]. Stiskněte tlačítko
OK/MENU.
Poznámky:
•Do souboru je možné vložit až 32 mluvených poznámek.
•Pokud je soubor zamknut nebo je otevřen pouze pro čtení, nebo pokud je karta SD zamknutá, není možné mluvené poznámky mazat.
•Je-li diktafon v režimu DSS Classic, nelze nahrávat mluvené poznámky.
Indexové značky
Indexové značku mohou být do souboru umístěny během nahrávání nebo přehrávání. Indexové značky představují rychlý a snadný způsob, jak identifikovat důležité a významné pasáže souboru.
Vložení indexové značky
1Pokud je diktafon v režimu nahrávání či přehrávání, stiskněte tlačítko F3 (INDEX).
Vyhledání indexové značky
2Během přehrávání souboru podržte stisknuté tlačítko 9nebo 0.
•Při nalezení indexové značky se diktafon na 1 sekundu zastaví.
Odstranění indexové značky
1Vyberte soubor, který obsahuje značky, které chcete vymazat.
2Stisknutím tlačítka 9nebo 0 vyberte značku, kterou chcete vymazat.
3Jakmile se číslo indexu zobrazí na displeji (zůstane zobrazené přibližně 2 sekundy), stiskněte tlačítko ERASE (Smazat).
• Indexová značka je smazána.
Poznámky:
•V souboru DS2 lze nastavit až 32 značek.
•V souborech MP3 a PCM lze nastavit až 16 značek.
•Pokud je soubor zamknut nebo je otevřen pouze pro čtení, nebo pokud je karta SD zamknutá, není možné značky mazat.
•Je-li diktafon v režimu DSS Classic, je možné do souboru vložit nejvýše 16 značek.
Používání nabídky
Položky nabídek jsou roztříděny do několika karet. Chcete-li tedy rychle nastavit položku, nejprve zvolte kartu a následně přejděte k požadované položce. Následujícím způsobem můžete nastavit každou položku
7 1,4,6 2 3,5
1Je-li diktafon zastaven, stiskněte tlačítko OK/MENU.
• Na displeji se zobrazí nabídka.
2Stisknutím tlačítka 9nebo 0přejděte na kartu obsahující položku, kterou chcete nastavit.
•Zobrazení nabídky lze změnit posunutím kursoru karty nastavení.
3Stisknutím tlačítka + nebo – se přesuňte na položku, kterou chcete nastavit.
•Přesuňte se na položku nabídky, kterou chcete nastavit.
4Stiskněte tlačítko OK/MENU.
• Rozbalení zvolené položky.
CS
29

SV RU PL NL FR ES DE DA CS EN
5Stisknutím tlačítka + nebo – změňte nastavení.
•Stisknutím tlačítka 0(bez tlačítka OK/MENU) zrušíte nastavení a vrátíte se na předchozí obrazovku.
6Stisknutím tlačítka OK/MENU dokončete nastavení.
•Zpráva na obrazovce vás informuje o použití nastavení.
7Stisknutím tlačítka F3 (EXIT) zavřete obrazovku s nabídkou.
Položky nabídky
 File Menu
Priority:
Přiřazení priority v původním nastavení probíhá prostřednictvím tlačítka F2. Nastavení lze rovněž provést přes nabídku.
Prioritu můžete přiřadit ke každému nahranému souboru. Můžete vybrat »High« nebo »Normal«. Přednastavena je možnost »Normal«.
[Set] (Nastavit): Vysoká úroveň.
[Cancel] (Zrušit): Normální úroveň.
•Stiskem tlačítka F2 (PRIORITY) (Priorita) můžete měnit hodnotu priority (High/Normal) (Vysoká / Normální).
Pending:
Nastavíte-li soubor jako [Pending], ze souboru se stane »Čekající soubor«. Pokud je statut souboru »Stažený soubor« změněn na »Dokončený soubor« prostřednictvím softwaru ODMS, nepřenese se do počítače soubor [Pending], ale pouze soubor [Finished] (upravený soubor). [Pending]:
Nastaví soubor jako »Úpravy« a na displeji se zobrazí [ ].
].
[Finished]:
Nastaví soubor jako »již upraveno«.
File Lock:
Funkce zámku souboru umožňuje zabránit náhodnému smazání důležitých souborů.
[On]:
Uzamknutí souboru a zamezení jeho smazání.
Na displeji se zobrazí [ ]. [Off]:
Odemknutí souboru a povolení jeho vymazání.
Work Type:
Informace o typu práce nahraných nebo uložených souborů lze upravovat v nastavení nabídky diktafonu.
•Další podrobnosti jsou k dispozici v úplné a rozšířené verzi příručky*
(formát PDF), kterou lze stáhnout na webových stránkách OLYMPUS.
* K dispozici v angličtině, francouzštině nebo němčině.
Information:
Diktafon dokáže zobrazit množství informací o aktuálním souboru.
 Rec Menu
Mic Sense (Citlivost mikrofonu):
Vybírat můžete ze dvou režimů citlivosti mikrofonu: [Dictation] (Diktát) v případě diktátu a [Conference] (Konference) v případě schůzí a konferencí s malým počtem osob.
[Conference]:
Vysoce citlivý režim, při kterém jsou nahrávány zvuky ve všech směrech.
[Dictation]:
Režim s nízkou citlivostí vhodný pro diktování.
•Na displeji se zobrazí zvolená hodnota: [ ] nebo [
 ].
].
Rec Mode (Režim nahrávání):
Můžete vybrat mezi různými formáty nahrávání.
1 Zvolte formát nahrávání.
[DSS]:
DSS označuje Digital Speech Standard, formát digitálního zvukového souboru definovaný v rámci spolupráce společnosti Olympus a dvou dalších společností. Soubory formátu DSS lze snadno upravovat a jsou velmi malé.
[PCM ST] (Stereofonní):
Toto je nekomprimovaný zvukový formát, který se používá mimo jiné u hudebních disků CD.
[MP3]:
MPEG je mezinárodní standard, zavedený pracovní skupinou organizace ISO (International Organization for Standardization).
2Zvolte bitovou rychlost nahrávání.
Pokud je vybraná možnost [DSS]:
[DSS Pro QP] (Kvalitni přehravani) nebo [DSS Pro SP] (Standardni přehravani).
Pokud je vybraná možnost [PCM ST]:
Rychlost nahrávání bude pevná 44,1 kHz/16 bitů.
Pokud je vybraná možnost [MP3]: [256 kbps] nebo [128 kbps]
•Vzhledem k tomu, že zabudovaný mikrofon je monofonní, zvuk nahrávaný zabudovaným mikrofonem bude monofonní, i když aktivujete [PCM ST] v [Rec Mode]. Aby bylo možné nahrávat stereofonně, je nezbytné použít (volitelný) externí stereofonní mikrofon.
•Pokud je diktafon nastaven ve standardním režimu DSS, nelze zvolit režim vysoce kvalitního nahrávání (DSS Pro QP).
Podrobnosti viz »Nahrávání« v části »Přizpůsobení diktafonu«.
VCVA:
Funkce VCVA prodlužuje dobu nahrávání a šetří paměť zastavováním nahrávání během intervalů ticha, což pomáhá zvýšit efektivitu přehrávání. Funkce Hlasem aktivované nahrávání (VCVA) automaticky spustí nahrávání, když mikrofon zaznamená zvuk odpovídající přednastavené hodnotě hlasitosti, a ukončí jej, když poklesne pod přednastavenou hodnotu.
1 Vyberte [On].
2Stisknutím tlačítka REC zahájíte nahrávání.
•Pokud je hlasitost zvuku nižší než přednastavená hodnota hlasitosti, zastaví se automaticky nahrávání po cca 1 sekundě a na displeji se rozbliká symbol [Standby]. Indikátor nahrávání se rozsvítí, když je zahájeno nahrávání, a bliká, když je nahrávání pozastaveno.
a
b
aIndikátor hlasové aktivace nahrávání (VCVA)
bMěřič hladiny (mění se v závislosti na hlasitosti nahrávaného zvuku)
30
 Loading...