


DIGITAL CAMERA
FE-210/X-775
Basic
Manual
ENGLISH 2
FRANÇAIS 28
ESPAÑOL 54
PORTUGUÊS 80

Table of Contents |
|
Gather these items (box contents)...................................................... |
3 |
Insert the batteries................................................................................ |
4 |
Turn the camera on............................................................................... |
5 |
Set date and time .................................................................................. |
6 |
Select a Language ................................................................................ |
8 |
Take a picture........................................................................................ |
9 |
En Review your pictures.......................................................................... |
10 |
Basic Operation .................................................................................. |
11 |
Shooting Mode Buttons ......................................................................... |
11 |
Mode dial ............................................................................................... |
12 |
SCENE Modes....................................................................................... |
12 |
Macro Mode........................................................................................... |
13 |
Flash Modes .......................................................................................... |
13 |
Self-Timer .............................................................................................. |
14 |
Power Save Feature .............................................................................. |
14 |
Menus and Settings ............................................................................ |
15 |
Top Menu............................................................................................... |
15 |
Erase All Pictures .................................................................................. |
15 |
Connecting the Camera...................................................................... |
16 |
Playback on a TV................................................................................... |
16 |
Direct Printing (PictBridge) .................................................................... |
17 |
Transfer Images .................................................................................. |
18 |
OLYMPUS Master Software ............................................................... |
20 |
Specifications...................................................................................... |
21 |
Safety Precautions.............................................................................. |
22 |
Before using your camera, read this manual carefully to ensure correct use.
We recommend that you take test shots to get accustomed to your camera before taking important photographs.
Please observe the safety precautions at the end of this manual.
The images of the LCD screen and illustrations of the camera used in this manual may differ from the actual product.
2
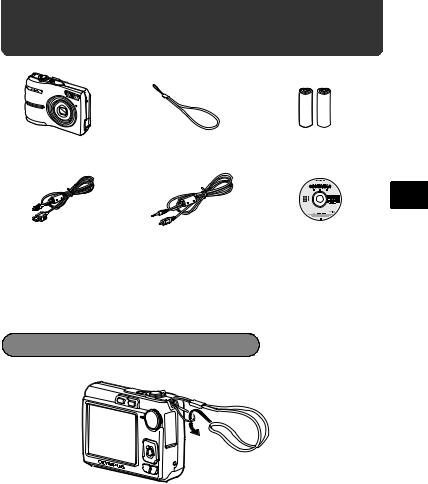
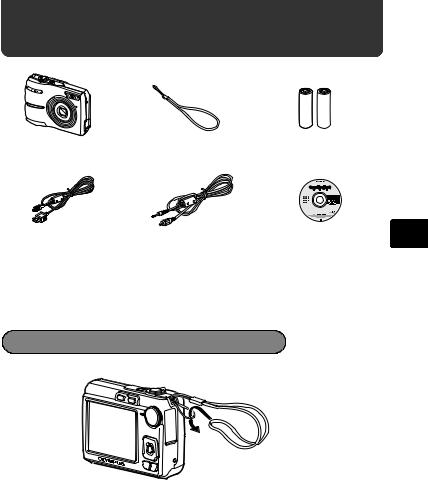
Gather these items (box contents)
Digital camera |
Strap |
AA batteries |
|
|
(2) |
En
USB cable |
Video cable |
|
OLYMPUS Master CD-ROM |
|
Other items |
• |
Basic Manual (this manual) |
|
|
• Advanced Manual |
|
|
|
• |
Warranty card |
Contents may vary depending on purchase location.
Attach the strap
( Pull the strap tight so that it does not come loose.
3
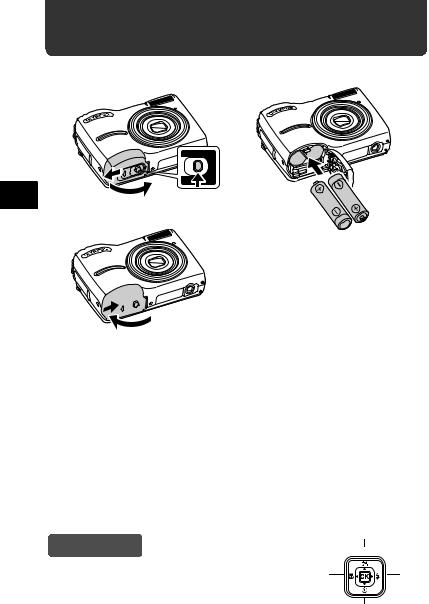
Insert the batteries
a. Insert the batteries into the camera.
En |
2 |
|
4 |
|
3 1 |
||
|
|
6
5
( Even when an optional xD-Picture Card™ (hereinafter called the card) is not inserted, you can take a picture. For details on inserting an optional card, please refer to Advanced Manual.
Hint
O
<
The directions of the arrow pad (ONXY) is indicated X |
Y |
with ONXYin this manual. |
|
|
N |
4
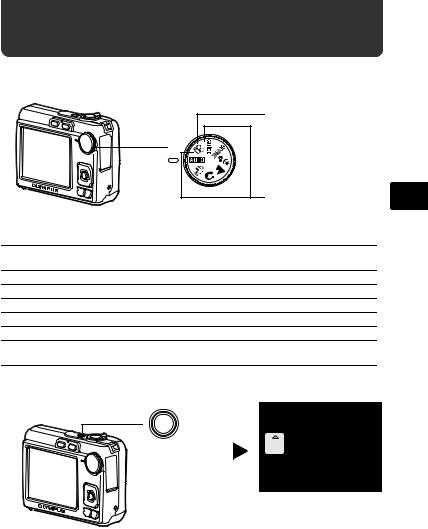
Turn the camera on
This explains how to turn on the camera in shooting mode.
a. Set the mode dial to h.
When shooting movies
|
Mode dial |
When shooting still pictures |
En |
|
|
|
|
Still picture shooting modes |
|
|
|
h |
This function allows you to shoot with the camera's automatic |
|
|
|
settings. |
|
|
h |
This function stabilizes images when taking pictures. |
|
|
B |
Suitable for taking pictures of people. |
|
|
E |
Suitable for taking pictures of landscapes. |
|
|
M |
Suitable for taking pictures of people at night. |
|
|
f |
Select from 10 scene modes according to the shooting conditions. |
|
|
g |
Use the shooting guide displayed on the screen to shoot pictures |
|
|
according to the situation.
b. Press the obutton.
X
Y M D T I M E
----.--.-- --:-- Y / M / D obutton 

CANCEL MENU
MENU
When the date and time have not yet been set, this screen will appear.
( To turn off the camera, press the obutton once again.
5

Set date and time
About the date and time setting screen
|
|
|
|
Y-M-D (Year-Month-Day) |
X |
|
|
|
Hour |
Y |
M |
D T I M E |
|
Minute |
|
|
|
|
|
----.--.-- --:-- |
Y / M / D |
Date formats (Y-M-D, M-D-Y, D-M-Y). |
||
En |
|
|
|
|
|
CANCEL |
MENU |
||
|
|
|
|
|
|
|
|
|
|
|
|
Cancel the setting |
||
a. Press the OF/<button and the NYbutton to select [Y].
( The first two digits of [Y] are fixed.
OF/<button |
|
X |
|
|
Y M D T I M E |
||
< |
|
|
|
|
|
|
2007.--.-- --:-- Y / M / D |
|
|
|
|
|
|
|
|
NYbutton |
|
CANCEL MENU |
|
|
|
||
b. Press the Y#button.
<
Y#button
c.Press the OF/<button and the NYbutton to select [M].
X
Y M D T I M E
2007.08.-- -- |
:-- |
Y / M / D |
d. Press the Y#button.
CANCEL MENU
MENU
6
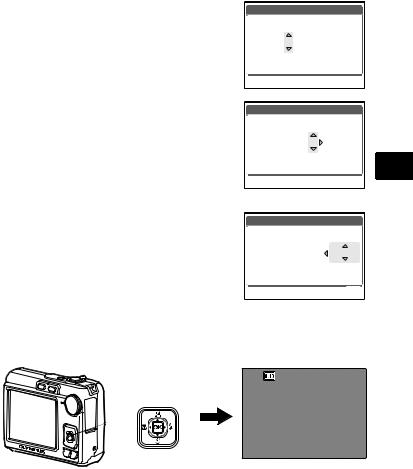
e.Press the OF/<button and the NYbutton to select [D].
f.Press the Y#button.
g.Press the OF/<button and the NYbutton to select “hour” and
“minute”.
( The time is displayed in the 24-hour format.
X
Y M D T I M E |
|
|
2007.08.26 --:-- |
Y / M / D |
|
|
|
|
CANCEL MENU |
|
|
X |
|
|
Y M D T I M E |
|
|
2007.08.26 12:30 |
Y / M / D |
|
|
|
En |
CANCEL MENU |
SET OK |
|
h.Press the Y#button.
i.Press the OF/<button and the NYbutton to select [Y/M/D].
X
Y M D T I M E |
|
2007.08.26 12:30 |
Y / M / D |
|
|
CANCEL MENU |
SET OK |
|
|
j. After all items have been set, press the H button.
( For a more accurate setting, you can press the H button when the time signal hits 00 seconds.
<
|
[ ] |
|
|
|
[IN] |
H button |
HQ 3072×2304 |
4 |
|
|
7
Select a Language
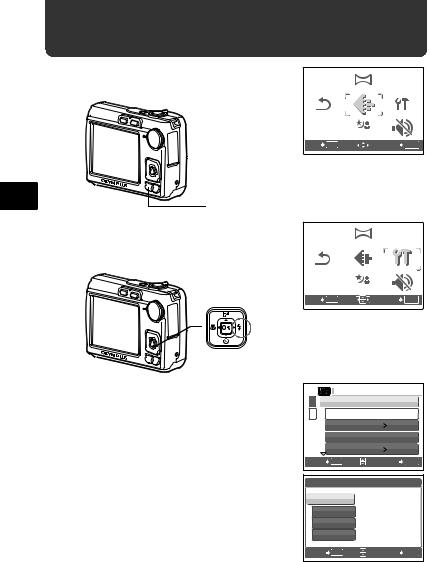
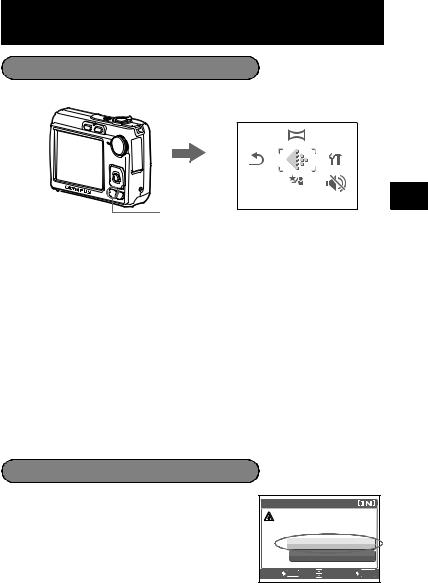
a.Press the MENU button to display the Top Menu.
En
MENU button
b.Press the Y#button to select [SETUP], and press the H button.
<
Y#button
PANORAMA
IMAGE
RESET QUALITY SETUP
SILENT
SCENE MODE
EXIT MENU |
SET OK |
PANORAMA
IMAGE
RESET QUALITY SETUP
SETUP
SILENT
SCENE MODE
EXIT MENU |
SET OK |
c.Press the OF/<button and the NYbutton to select [W], and press the H button.
d.Use arrow pad (ONXY) to select a language, and press the
H button.
( You can add other languages to your camera with the provided OLYMPUS Master software. Please refer to the Advanced Manual.
|
|
SETUP |
|
|
1 |
MEMORY FORMAT |
|
|
|
2 |
|
BACKUP |
|
|
|
|
W |
ENGLISH |
|
|
|
PIXEL MAPPING |
|
|
|
|
K/q |
NO |
|
BACK MENU |
SET |
OK |
||
W |
|
|
|
|
ENGLISH |
|
|
||
FRANCAIS |
|
|
||
ESPAÑOL |
|
|
||
PORTUGUES |
|
|
||
BACK |
MENU |
SET |
OK |
|
8
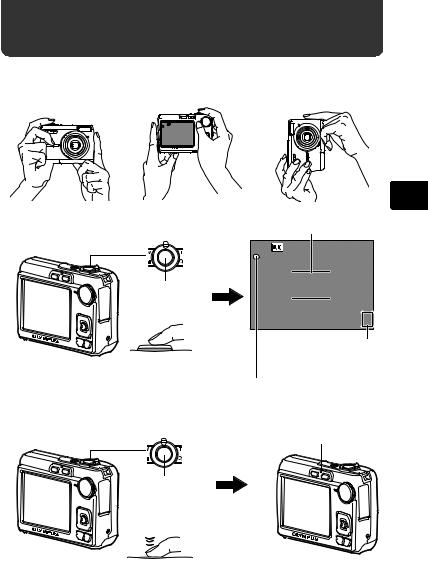
Take a picture
a. Hold the camera.
Horizontal grip |
|
|
|
Vertical grip |
|
|
|
|
|
|
|
|
|
|
|
|
|
[ ]
|
[IN] |
HQ 3072×2304 |
4 |
b. Focus.
Shutter button
Press halfway
c. Shoot.
Shutter button
Press completely
En
Place this mark over your subject.
 [ ]
[ ] 
|
[IN] |
HQ 3072×2304 |
4 |
The number of remaining still pictures you can store is displayed.
The green lamp indicates the focus and exposure are locked.
The card access lamp blinks.
9
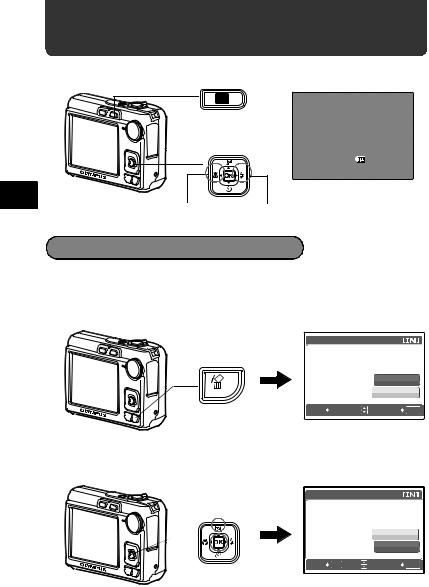
Review your pictures
a. Press the qbutton.
|
[IN] |
|
HQ |
qbutton |
3072×2304 |
|
0.0 |
Arrow pad |
|
< |
'07.08.26 12:30 |
|
100-0001 |
|
1 |
En
Previous picture Next picture
Erase pictures
a.Press the X&button and the Y#button to display the picture you want to erase.
b.Press the Sbutton.
|
E R A S E |
|
|
|
YES |
|
|
NO |
Sbutton |
BACK MENU |
SET OK |
c.Press the OF/<button to select [YES], and press the H button.
E R A S E
OF/<button
<
|
|
YES |
|
|
NO |
H button |
BACK MENU |
SET OK |
|
|
10
Basic Operation
Shooting Mode Buttons
While in shooting mode, use these buttons for quick access to some of the more commonly used features.
1 2
4 5 |
6 |
< |
En |
|
39 8 7
1Kbutton (Shooting)
Selects the shooting mode.
2qbutton (Playback)
Selects the playback mode.
3MENU button
Press this button to display the Top Menu.
4X&button (Macro Mode)
Use macro or super macro mode when taking close-up pictures such as of a flower.
5OF/<button (Exposure Compensatiion/Print)
Press this button in shooting mode to adjust to overexpose (+) or underexpose (-) a picture.
6Y#button (Flash Mode)
Select from 4 flash modes - FLASH AUTO, !REDEYE, #FILL IN, or $FLASH OFF.
7H button
Press to confirm settings.
8NYbutton (Self-timer)
Select the self-timer to delay the shot approximately 12 seconds from when the shutter button is pressed.
9Arrow pad (ONXY)
Selects scenes, playback pictures and menu items.
11

Mode dial
Set the desired mode and turn the camera on. You may select the desired mode before or during use.
En
h |
This function allows you to shoot with the camera's automatic settings. |
|
|
h |
This function stabilizes images when taking pictures. |
|
|
B |
Suitable for taking pictures of people. |
|
|
l |
Suitable for taking pictures of landscapes. |
|
|
M |
Suitable for taking pictures of people at night. |
|
|
SCENE |
Select from 10 scene modes according to the shooting conditions. |
n |
This function lets you record movies. |
|
|
GUIDE |
Use the shooting guide displayed on the screen to shoot pictures according |
to the situation. |
SCENE Modes
Select the shooting mode depending on an object.
1 Set the mode dial to SCENE, and select the other scene.
1 SPORT |
|
j |
|
N |
|
W |
|
R |
|
BACK MENU |
SET OK |
Mode dial |
Obutton |
<
H button |
Nbutton |
2 Press O/Nto select the scene modes and press H.
12

Shooting SCENE Modes
• CSPORT |
• SSUNSET |
• VCUISINE |
• NINDOOR |
• XFIREWORKS |
• dDOCUMENTS |
• WCANDLE |
• PBEHIND GLASS • iAUCTION |
|
• RSELF PORTRAIT |
|
|
Macro Mode
&This mode lets you take pictures as close as 10 cm (3.9 in.) to your subject. (Most
wide-angle side)
% Use this mode to take pictures as close as 5 cm (2.0 in.) to your subject. In %
mode, the position of the zoom lens is fixed.
En
1 Press X&repeatedly to select [&] or [%] and press H.
Flash Modes
1Press Y#repeatedly to select the flash mode and press H.
2Press the shutter button halfway.
When the flash is set to fire, the #mark lights.
3 Press the shutter button completely to take the picture.
Icon |
Flash Mode |
Description |
AUTO |
FLASH AUTO |
The flash fires automatically in low light or backlight |
|
conditions. |
|
|
|
|
! |
REDEYE |
This emits pre-flashes to reduce the occurrence of red- |
|
|
eye in your pictures. |
# |
FILL IN |
The flash fires regardless of the available light. |
$ |
FLASH OFF |
The flash does not fire even in low light conditions. |
|
|
|
13
Self-Timer
1Press NYto select [Y] and press H.
2Press the shutter button completely to take the picture.
Self-Timer Lamp
The self-timer lamp lights for approximately 10 seconds after the shutter button is pressed, then starts blinking. After blinking for approximately 2 seconds, the picture is taken.
Power Save Feature
En
To save battery power, the camera automatically enters sleep mode and stops operating if not used for approximately 3 minutes. Press the shutter button or zoom lever to reactivate the camera.
If the camera is not operated for 12 minutes after the camera enters sleep mode, it automatically retracts the lens and turns off. To resume operation, turn on the power again.
14
Menus and Settings
Top Menu
1 Press MENU to display the Top Menu.
Top Menu in shooting mode
PANORAMA
IMAGE
RESET |
QUALITY SETUP |
|
|
|
SCENE |
SILENT |
|
|
MODE |
En |
|
|
|
||
|
|
|
|
EXIT MENU |
|
SET OK |
|
|
|
|
|
MENU button
2Use the arrow pad (O/N/X/Y) to select menu items, and press H to set them.
PANORAMA
Panorama shooting lets you create a panoramic picture, using the OLYMPUS Master software from the provided CD-ROM. An Olympus xD-Picture Card is required for panorama shooting.
RESET
Return the changed shooting functions back to default settings.
IMAGE QUALITY
Set the image quality of the picture you will shoot according to its intended purpose.
SETUP
Set the date, time, language, and operation sound, etc.
SCENE (Scene mode)
Select the scene mode according to the subject and shooting and condition when the fmode is selected.
SILENT MODE
Mute operational sounds that occur during shooting and playback.
Erase All Pictures |
|
|
|
|
1 Press MENU in playback mode to display the Top |
|
|
|
|
Menu and select [ERASE] > [ALL ERASE]. |
ALL ERASE |
|
|
|
CAUTION ERASING ALL |
|
|||
2 Select [YES], and press H. |
|
|||
|
|
|
|
|
All the pictures are erased. |
|
YES |
|
|
|
|
|
|
|
|
|
NO |
|
|
|
BACK |
MENU |
SET |
OK |
15
Connecting the Camera
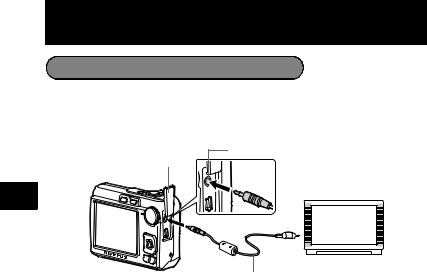
Playback on a TV
Use the video cable provided with the camera to playback recorded images on your TV. Both still pictures and movies can be played back.
1Make sure that the TV and camera are turned off. Connect the VIDEO OUT jack on the camera to the video input terminal on the TV using the video cable.
|
VIDEO OUT jack |
|
Connector Cover |
|
Connect to the TV’s video |
En |
input (yellow) terminal. |
|
Video Cable
2 Turn the TV on and set it to the video input mode.
For details of switching to video input, refer to your TV’s instruction manual.
3 Turn on the camera and then press qto enter playback mode.
The last picture taken is displayed on the TV. Use the arrow pad (O/N/X/Y) to select the picture you want to display.
16
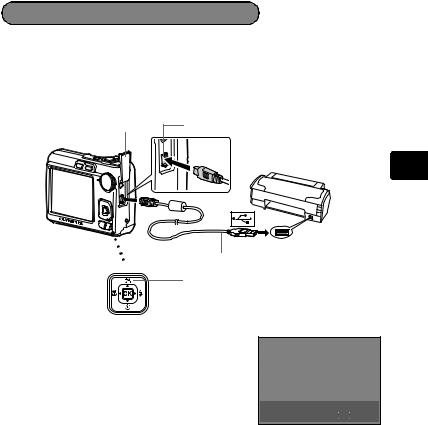
Direct Printing (PictBridge)
Using the provided USB cable, you may connect your camera directly to a PictBridge compatible printer to make prints. You can print a picture with simple operations.
1In playback mode, display the picture you want to print out on the monitor.
2Connect one end of the provided USB cable into the camera’s USB connector and the other end into the printer’s USB connector.
Connector Cover |
USB Connector |
En
USB Cable
<
OF/<button
3 Press OF/<.
Printing starts.
When printings finished, disconnect the USB cable from the camera with the picture selection screen displayed.
EASY PRINT START  <
<
PC/CUSTOM PRINT  OK
OK
17
Transfer Images
Install the software
1Insert the OLYMPUS Master CD-ROM.
2Windows: Click the “OLYMPUS Master 2”
button.
Macintosh: Double-click the “Setup” icon. 3 Simply follow the on-screen instructions.
En
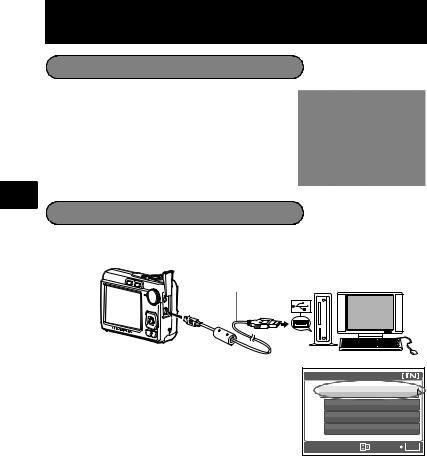
Connect the camera to the computer
1 Connect the camera and computer using the USB cable (included).
The monitor will turn on automatically.
|
USB Cable |
2 |
1 |
|
2 Select [PC] on the monitor, and press H.
Your PC will now recognize your camera as a removable storage drive.
USB |
|
PC |
|
EASY PRINT |
|
CUSTOM PRINT |
|
EXIT |
|
SET |
OK |
18

Transfer images to the computer
1With the camera now connected, open OLYMPUS Master.
2Click “Transfer Images”  on the browse window, and then click “From
Camera”  .
.
3Simply follow the on-screen instructions.
En
Tips
•For more detailed information regarding camera setup and usage, please refer to the camera’s “Advanced Manual” provided on CD-ROM.
•For additional assistance, refer to the “Help” file in the OLYMPUS Master software.
19

OLYMPUS Master Software
OLYMPUS Master Software: Use this software to download pictures from the camera, view, organize, retouch, e-mail and print your digital pictures and movies and more!
(System Requirements
|
OS |
Windows 2000 Professional/XP Home Edition/XP Professional/ |
|
|
Vista or Mac OS X (10.3 or later) |
||
|
|
||
En |
CPU |
Pentium III 500 MHz/Power PC G3 500 MHz/Intel Core Solo/Duo |
|
1.5GHz or faster |
|||
|
|||
|
RAM |
256 MB or more |
|
|
|
|
|
|
Hard Disk |
500 MB or more free space |
|
|
|
|
|
|
Connection |
USB port/IEEE 1394 port (FireWire) |
|
|
|
|
|
|
Monitor |
1024 × 768 pixels resolution or more with minimum 65,536 colors |
|
|
|
(Windows), 32,000 colors (Macintosh) |
|
|
Other |
Internet Explorer 6 or later (Windows) |
|
|
|
Safari 1.0 or later, QuickTime 6 or later (Macintosh) |
For the latest support information, visit the Olympus website (http://www.olympus.com/digital)
 User Registration
Register your camera when you install OLYMPUS Master to activate your warranty, receive notifications of software and camera firmware updates, and more.
20
Specifications
(Camera
Product type |
: Digital camera (for shooting and displaying) |
|
Recording system |
|
|
Still pictures |
: Digital recording, JPEG (in accordance with Design rule |
|
|
for Camera File system (DCF)) |
|
Applicable |
: Exif 2.2, Digital Print Order Format (DPOF), PRINT Image |
|
standards |
Matching III, PictBridge |
|
Movie |
: AVI Motion JPEG |
|
Memory |
: Internal memory |
|
|
xD-Picture Card (16 MB to 2 GB) (Type H/M, Standard) |
|
Number of effective |
: 7,100,000 pixels |
En |
pixels |
|
|
Image pickup device |
: 1/2.5" CCD (primary color filter), |
|
|
7,400,000 pixels (gross) |
|
Lens |
: Olympus lens 6.3 to 18.9 mm, f3.1 to 5.9 |
|
|
(equivalent to 38 to 114 mm on a 35 mm camera) |
|
Photometric system |
: Center-weighted metering |
|
Shutter speed |
: 4 to 1/2000 sec. |
|
Shooting range |
: 0.6 m (2.0 ft.) to ∞ (W), 1.0 m (3.3 ft.) to ∞ (T) (normal) |
|
|
0.1 m (0.3 ft.) to ∞ (W), 0.6 m (2.0 ft.) to ∞ |
(T) (macro |
|
mode) |
|
|
0.05 m (2.0 in.) to ∞ (super macro mode) |
|
Monitor |
: 2.5" TFT color LCD display, 154,000 pixels |
|
Outer connector |
: DC-IN jack, USB connector, VIDEO OUT jack |
|
Automatic calendar |
: 2000 up to 2099 |
|
system |
|
|
Operating environment |
|
|
Temperature |
: 0°C to 40°C (32°F to 104°F) (operation)/ |
|
|
-20°C to 60°C (-4°F to 140°F) (storage) |
|
Humidity |
: 30% to 90% (operation)/10% to 90% (storage) |
|
Power supply |
: AA batteries 2 each (Oxyride batteries/Alkaline battery/ |
|
|
NiMH battery) or specified AC adapter |
|
Dimensions |
: 90 mm (W) × 62.5 mm (H) × 30.5 mm (D) |
|
|
(3.5 × 2.5 × 1.2 in.) (excluding protrusions) |
|
Weight |
: 122 g (4.3 oz) (without battery and card) |
|
Please note that design and specification improvements may result in unannounced changes.
21

Safety Precautions
|
|
|
|
|
|
|
|
|
|
|
CAUTION |
|
|
|
|
|
|
RISK OF ELECTRIC SHOCK |
|
|
|
|
|
|
DO NOT OPEN |
|
|
|
|
|
|
|
|
|
|
|
CAUTION: TO REDUCE THE RISK OF ELECTRICAL SHOCK, DO NOT |
|
|||
|
|
REMOVE COVER (OR BACK). NO USER-SERVICEABLE PARTS INSIDE. |
|
|||
|
|
REFER SERVICING TO QUALIFIED OLYMPUS SERVICE PERSONNEL. |
|
|||
|
|
|
An exclamation mark enclosed in a triangle alerts you to important operating and |
|||
|
|
|
maintenance instructions in the documentation provided with the product. |
|||
En |
DANGER |
If the product is used without observing the information given under this symbol, serious |
||||
injury or death may result. |
||||||
|
WARNING |
If the product is used without observing the information given under this symbol, injury or |
||||
|
death may result. |
|||||
|
CAUTION |
If the product is used without observing the information given under this symbol, minor |
||||
|
personal injury, damage to the equipment, or loss of valuable data may result. |
|||||
WARNING!
TO AVOID THE RISK OF FIRE OR ELECTRICAL SHOCK, NEVER DISASSEMBLE, EXPOSE THIS PRODUCT TO WATER OR OPERATE IN A HIGH HUMIDITY ENVIRONMENT.
General Precautions
Read All Instructions — Before you use the product, read all operating instructions. Save all manuals and documentation for future reference.
Cleaning — Always unplug this product from the wall outlet before cleaning. Use only a damp cloth for cleaning. Never use any type of liquid or aerosol cleaner, or any type of organic solvent to clean this product.
Attachments — For your safety, and to avoid damaging the product, use only accessories recommended by Olympus.
Water and Moisture — For precautions on products with weatherproof designs, read the weatherproofing sections.
Location — To avoid damage to the product, mount the product securely on a stable tripod, stand, or bracket.
Power Source — Connect this product only to the power source described on the product label.
Lightning — If a lightning storm occurs while using an AC adapter, remove it from the wall outlet immediately.
Foreign Objects — To avoid personal injury, never insert a metal object into the product.
Heat — Never use or store this product near any heat source such as a radiator, heat register, stove, or any type of equipment or appliance that generates heat, including stereo amplifiers.
22

Safety Precautions
Handling the Camera
WARNING
( Do not use the camera near flammable or explosive gases. ( Do not use the flash on people (infants, small children, etc.) at
close range.
•You must be at least 1 m (3 ft.) away from the faces of your subjects. Firing the flash too close to the subject’s eyes could cause a momentary loss of vision.
( Keep young children and infants away from the camera. |
En |
|
• Always use and store the camera out of the reach of young children and |
||
|
||
infants to prevent the following dangerous situations which could cause |
|
|
serious injury: |
|
|
• Becoming entangled in the camera strap, causing strangulation. |
|
|
• Accidentally swallowing the battery, cards or other small parts. |
|
|
• Accidentally firing the flash into their own eyes or those of another child. |
|
|
• Accidentally being injured by the moving parts of the camera. |
|
|
( Do not look at the sun or strong lights with the camera. |
|
|
( Do not use or store the camera in dusty or humid places. |
|
|
( Do not cover the flash with a hand while firing. |
|
CAUTION
( Stop using the camera immediately if you notice any unusual odors, noise, or smoke around it.
•Never remove the batteries with bare hands, which may cause a fire or burn your hands.
( Never hold or operate the camera with wet hands.
( Do not leave the camera in places where it may be subject to extremely high temperatures.
•Doing so may cause parts to deteriorate and, in some circumstances, cause the camera to catch fire. Do not use the charger or AC adapter if it is covered (such as a blanket). This could cause overheating, resulting in fire.
( Handle the camera with care to avoid getting a low-temperature burn.
•When the camera contains metal parts, overheating can result in a lowtemperature burn. Pay attention to the following:
•When used for a long period, the camera will get hot. If you hold on to the camera in this state, a low-temperature burn may be caused.
•In places subject to extremely cold temperatures, the temperature of the camera’s body may be lower than the environmental temperature. If possible, wear gloves when handling the camera in cold temperatures.
( Be careful with the strap.
•Be careful with the strap when you carry the camera. It could easily catch on stray objects - and cause serious damage.
23

Safety Precautions
Battery Handling Precautions
Follow these important guidelines to prevent batteries from leaking, overheating, burning, exploding, or causing electrical shocks or burns.
DANGER
•Use only the Olympus brand NiMH batteries and fitting charger.
•Never heat or incinerate batteries.
•Take precautions when carrying or storing batteries to prevent them from
En coming into contact with any metal objects such as jewelry, pins, fasteners, etc.
•Never store batteries where they will be exposed to direct sunlight, or subjected to high temperatures in a hot vehicle, near a heat source, etc.
•To prevent causing battery leaks or damaging their terminals, carefully follow all instructions regarding the use of batteries. Never attempt to disassemble a battery or modify it in any way, by soldering, etc.
•If battery fluid gets into your eyes, flush your eyes immediately with clear, cold running water and seek medical attention immediately.
•Always store batteries out of the reach of small children. If a child accidentally swallows a battery, seek medical attention immediately.
WARNING
•Keep batteries dry at all times.
•To prevent batteries from leaking, overheating, or causing a fire or explosion, use only batteries recommended for use with this product.
•Never mix batteries (old and new batteries, charged and uncharged batteries, batteries of different manufacture or capacity, etc.).
•Do not charge alkaline or lithium batteries if they are not rechargeable.
•Insert the battery carefully as described in the operating instructions.
•Do not use batteries if their body is not covered by the insulating sheet or if the sheet is torn, as this may cause fluid leaks, fire, or injury.
24
Safety Precautions
CAUTION
•Do not remove batteries immediately after using the camera. Batteries may become hot during prolonged use.
•Always unload the battery from the camera before storing the camera for a long period.
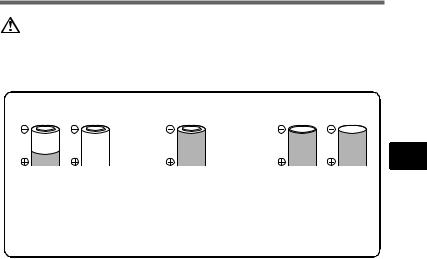
•The following AA batteries cannot be used.
Batteries whose bodies are only partially or not at all covered by an insulating sheet.
Batteries whose - terminals are raised, but not covered by an insulating sheet.
En
Batteries whose terminals are flat and not completely covered by an insulating sheet. (Such batteries cannot be used even if the - terminals are partially covered.)
•If NiMH batteries are not charged within the specified time, stop charging them and do not use them.
•Do not use a battery if it is cracked or broken.
•If a battery leaks, becomes discolored or deformed, or becomes abnormal in any other way during operation, stop using the camera.
•If a battery leaks fluid onto your clothing or skin, remove the clothing and flush the affected area with clean, running cold water immediately. If the fluid burns your skin, seek medical attention immediately.
•Never subject batteries to strong shocks or continuous vibration.
25

For customers in North and South America
|
For customers in USA |
|||||
|
Declaration of Conformity |
|||||
|
Model Number |
: FE-210/X-775 |
||||
|
Trade Name |
: OLYMPUS |
||||
|
Responsible Party : |
|
|
|
|
|
|
|
|
|
|
||
|
Address |
: 3500 Corporate |
Parkway, |
P.O. |
Box 610, Center Valley, |
|
|
|
PA 18034-0610, U.S.A. |
||||
|
Telephone Number: 484-896-5000 |
|||||
|
Tested To Comply With FCC Standards |
|||||
|
FOR HOME OR OFFICE USE |
|||||
|
This device complies with Part 15 of the FCC rules. Operation is subject to the following |
|||||
|
two conditions: |
|
|
|
|
|
En |
(1) This device may not cause harmful interference. |
|||||
(2) This device must accept any interference received, including interference that may |
||||||
|
cause undesired operation. |
|||||
For customers in Canada
This Class B digital apparatus meets all requirements of the Canadian InterferenceCausing Equipment Regulations.
Trademarks
•IBM is a registered trademark of International Business Machines Corporation.
•Microsoft and Windows are registered trademarks of Microsoft Corporation.
•Macintosh is a trademark of Apple Computer Inc.
•xD-Picture Card™ is a trademark.
•All other company and product names are registered trademarks and/or trademarks of their respective owners.
•The standards for camera file systems referred to in this manual are the “Design Rule for Camera File System/DCF” standards stipulated by the Japan Electronics and Information Technology Industries Association (JEITA).
26

Memo
27

|
Table des matières |
|
|
Réunissez ces éléments (contenu de la boîte) ................................ |
29 |
|
Insérez les batteries............................................................................ |
30 |
|
Allumez l’appareil photo .................................................................... |
31 |
|
Régler la date et l’heure ..................................................................... |
32 |
|
Sélection d’une langue....................................................................... |
34 |
|
Prenez des photos .............................................................................. |
35 |
|
Vérifier les images .............................................................................. |
36 |
|
Fonctionnement de base.................................................................... |
37 |
Fr |
Touches du mode prise de vue ............................................................. |
37 |
|
Molette mode ......................................................................................... |
38 |
|
Modes SCENE (Scène) ......................................................................... |
38 |
|
Mode gros plan ...................................................................................... |
39 |
|
Modes flash ........................................................................................... |
39 |
|
Retardateur............................................................................................ |
40 |
|
Fonctionnalité d’économie d’énergie ..................................................... |
40 |
|
Menus et réglages............................................................................... |
41 |
|
Menu principal ....................................................................................... |
41 |
|
Effacement de toutes les photos ........................................................... |
41 |
|
Connexion de l’appareil photo .......................................................... |
42 |
|
Affichage sur un téléviseur .................................................................... |
42 |
|
Impression directe (PictBridge).............................................................. |
43 |
|
Transfert d’images.............................................................................. |
44 |
|
Logiciel OLYMPUS Master ................................................................. |
46 |
|
Caractéristiques.................................................................................. |
47 |
|
Précautions de sécurité ..................................................................... |
48 |
Avant d’utiliser votre appareil photo et pour garantir une utilisation correcte, lisez attentivement ce manuel.
Nous vous recommandons de prendre des photos-test pour vous habituer à votre appareil avant de commencer à prendre de vraies photos.
Veillez à ce que les mesures de sécurité présentées à la fin de ce manuel soient respectées.
Les captures de l’écran ACL et les illustrations de l’appareil photo utilisées dans ce manuel peuvent être différentes du produit réel.
28
Réunissez ces éléments (contenu de la boîte)
Appareil photo |
Courroie |
Batteries AA |
numérique |
|
(2) |
Câble USB |
Câble vidéo |
|
CD-ROM OLYMPUS Master |
Fr |
|
|
|||
|
Autres éléments |
• |
Manuel de Base (ce manuel) |
|
|
|
• |
Manuel Avancé |
|
|
|
• |
Carte de garantie |
|
|
|
Le contenu est susceptible de varier en |
|
|
|
|
fonction du lieu d’achat. |
|
|
Attachez la courroie
( Tendez la courroie afin qu’elle ne soit pas relâchée.
29

Insérez les batteries
a. Insérez les batteries dans l’appareil photo.
2 |
|
4 |
|
3 |
1 |
||
|
Fr
6
5
( Vous pouvez prendre une photo même si une carte xD-Picture Card™ optionnelle (appelée ci-après la carte) n’est pas insérée. Pour des informations concernant une carte optionnelle, veuillez vous reporter au Manuel Avancé.
Conseil
O
<
Les directions de la molette de défilement (ONXY) X |
|
|
|
|
Y |
sont indiquées par les symboles ONXYdans le |
|
|
|
|
|
présent manuel. |
|
|
|
|
|
|
|
|
|
|
|
|
|
N |
|||
30
 Loading...