


INSTRUCTIONS
Before using your camera, read this manual carefully to ensure correct use.
We recommend that you take test shots to get accustomed to your camera before taking important photographs.
Thank you for purchasing an Olympus camera. Before you start to use your new camera, please read these instructions carefully to obtain optimum performance and a longer service life from the unit.
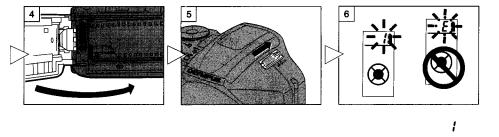
KEEP THE BATTERIES AWAY FROM
FIRE. NEVER TRY TO DISASSEMBLE,
RECHARGE, OR SHORT-CIRCUIT
BATTERIES. USED BATTERIES
SHOULD BE TREATED AS GENERAL
WASTE IN ACCORDANCE WITH
LOCAL GOVERNMENT
REGULATIONS.
2

Ignoring this warning may result in the death or serious injury of the user.
NEVER ATTEMPT TO DISASSEMBLE
THE CAMERA; ITCONTAINSA
HIGH-VOLTAGE CIRCUIT.
IN CASE OF MALFUNCTION,
CONSULT YOUR NEAREST
OLYMPUS DEALER OR OLYMPUS
SERVICE CENTER.
3
MAIN FEATURES
Built-in 28mm~110mm approx. 4X zoom-class lens for increased shooting range.
More powerful flash for telephoto needs. Extended-distance flash photography is available thanks to increased luminance capability. SLR lens ensures that what you see in the viewfinder is what you get on film.
Direct Mode Select buttons let you easily set/choose the right exposure mode for any shooting purpose.
Optional remote control to operate the camera from a distance.
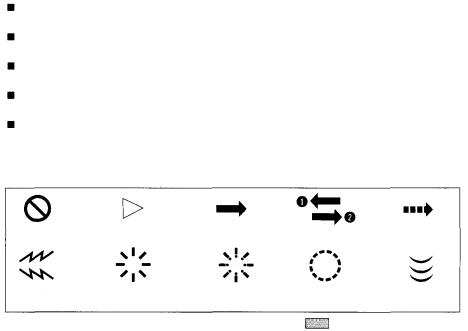
Symbols used in this manual:
Incorrect |
Order |
Manual |
Operation |
Automatic |
|
|
operation |
order |
operation |
Beep |
Indicator on |
Indicator |
Attention |
Depress |
|
|
blinking |
|
halfway |
|
Pay particular attention to items in this manual enclosed in boxes |
4 |
Products shown in pictures and illustrations may be slightly different from this unit. |

PREPARATIONS
BASIC OPERATIONS
ADDITIONAL
FUNCTIONS
TAKING BETTER PICTURES
CAMERA MAINTENANCE
Names and functions of parts ...... |
6 |
Outline ofoperations.......................... |
12 |
Viewfinder display .......................... |
8 |
Loading the batteries ..................... |
14 |
LCDpanel.................................... |
9 |
Checking the batteries .................... |
15 |
Diopter adjustment ........................ |
10 |
Points to remember...................... |
16 |
Using the strap/soft case ............ |
11 |
|
|
Loading the film ................................................................................................ |
|
|
18 |
Taking pictures ............................................................................................. |
|
|
21 |
Using the focus lock ......................................................................... |
|
|
24 |
Unloading the film ......................................................................... |
|
|
25 |
Flash photography ........................... |
26 |
Selftimer ............................................ |
32 |
Using the exposure modes .................... |
33 |
Restoring the standard |
|
shooting mode.................................... |
40 |
Spot metering ................................ |
41 |
Remotecontrol(optional).................. |
43 |
Effects of zoom and its advantages .............................................................. |
45 |
|
Autofocus(AF).............................................................................. |
47 |
|
Exposure ............................................................................................... |
49 |
|
Filmspeed............................................................................... |
51 |
|
Metering the amount of light ........................................................ |
51 |
|
Accessories (optional)........................................................................ |
53 |
|
Questions and answers ................................................................... |
54 |
|
Care and storage ......................................................................... |
55 |
|
Battery handling ............................................................................. |
58 |
|
Troubleshooting ..................................................................................... |
59 |
|
Specifications .......................................................................... |
62 |
5 |
|
|
PREPARATIONS
NAMES AND FUNCTIONS OF PARTS
Direct Mode Select buttons (See p. 33.)
Selects exposure modes: Stop Action, Portrait, Landscape, and Night Scene.
F. No. button (See p. 38.)
Sets the aperture in the
Aperture-Preferred Auto mode.
Shutter release button
Flash mode button
Spot/L.T.(Long Time) button- (See p. 41/39.)
Selftimer indicator (See p. 32.) Remote control sensor
(See p. 43.)
Lens*
Lens cap
6
Full Auto button (See p. 40.)
Restores the standard shooting mode.
LCDpanel(Seep.9.)
Power switch/ flash release
Flash
Strap attachment stud
Lens barrel
*Keep lens surface free of finger smudges or other marks, as sharpness can be effected. Carefully clean any such marks with lens cleaning tissue.
Viewfinder
(See p. 8.)
Diopter adjustment dial
Selftimer/remotecontrol button
(See p. 43.)
Date/time indicator
QUARTZDATE MODE buttons
(See quartzdate insertion)
Back cover
Mid-roll rewind button.
(See p. 25.)
Panorama switch
(See panorama insertion)
Zoom (T/W) buttons (See p. 21.)
Film window
For confirmation of film ISO speed
Back cover release
(See p. 18.)
Battery compartment cover
(See p. 14.)
Tripod socket
7

VIEWFINDER DISPLAY
Spot frame
The area used by the Spot Metering mode to set exposure.
Flash
Autofocus frame |
Autofocus (p. 17/23) |
Position your subject within the |
Lights when the subject is |
autofocus frame. |
in focus. |
Overexposure/ underexposure (p. 38)
 Please see 'Panorama insertion' for panorama format view finder.
8
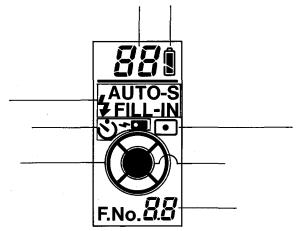
LCD PANEL
Exposure counter (p. 20) |
Battery check (p. 15) |
Flash modes (p. 26)
Selftimer/remote control
(p. 32/43)
Mode status indicator (p. 33)
Displays the mode selected for use.
Spot metering mode
(p. 41)
Full-Auto mode (p. 40)
The camera does everything automatically in this mode.
Aperture setting/shutter speed
(p. 38/39)
Shutter speed shown when using the Long Time mode.
Note: The LCD panel does not actually display all |
9 |
indications simultaneously as shown. |
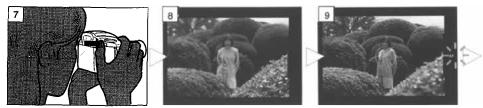
DIOPTER ADJUSTMENT
To adjust the viewfinder to compensate for near and farsighted vision.
Turn the diopter adjustment dial until theautofocusframebecomesclear.
Turn up if you are nearsighted or down if you are farsighted.
10
USINGTHESTRAP/SOFTCASE
The soft case can be attached to a |
|
belt with the belt loop. |
11 |
OUTLINE OF OPERATIONS
Basic Shooting Procedures
Load the batteries (p. 14).
Open the back cover (p. 18).
Load the film (p. 18).
Press the zoom buttons to determine the composition (P 21).
Place the autofocus frame on the subject you want to focus on
(P. 22).
Depress the shutter release button halfway, making sure the green autofocus indicator in the viewfinder lights and the autofocus beep is heard (p. 23).
12
Close the back cover (p. 19). |
Turn the power switch ON |
Make sure the exposure counter |
|
(p. 20). |
on the LCD panel reads |
|
|
(p. 20). |
Depress the shutter release |
When the film reaches the end, it |
Open the back cover to remove |
button fully to take a picture |
will automatically rewind (p. 25). |
the rewound film (p. 25). |
(p. 23). |
|
|
13

LOADINGTHEBATTERIES
Use two 3V lithium batteries (DL123A or CR123A).
 Useyourfingeroracointo turn the lock screw to OPEN.
  Place yourfingertip in the notch.
  And open the battery cover.
 Insert the batteries.
  And close the cover.
  Turn the lock screw to CLOSE.
|
When replacing the batteries, make |
|
sure to turn the power switch OFF |
|
before unloading the batteries. |
|
Take care not to injure your fingernail |
14 |
when opening the battery cover. |
|
 Align the (+) and (-) directions of the batteries correctly as shown.
Read "Battery Handling" on page 58.
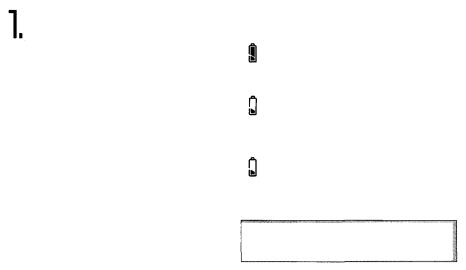
CHECKINGTHEBATTERIES
Turn the power switch ON. Be sure to check the batteries as well.
Display |
Meaning |
|
|
|
|
lights (turns off |
Batteries are OK. |
|
automatically) |
You can shoot. |
|
|
|
|
blinks and other |
Batteries are low |
|
and should be |
||
indicators on the |
||
replaced. |
||
LCD panel are |
||
|
||
displayed normally. |
|
|
blinks and other |
Batteries are dead |
|
and should be |
||
indicators on the |
||
replaced |
||
LCD panel go out. |
||
immediately. |
||
|
||
|
|
Keep spare batteries on hand when going on a long trip or when using the camera in cold weather.
15

POINTS TO REMEMBER
Hold the Camera Correctly.
Correct |
Correct |
Incorrect |
Note: As the focal length becomes larger, shaking the camera becomes more noticeable. Holdthe camerafirmlywith both hands while keeping elbowsatsidesto preventthe camerafrom shaking.
Cautions:
Try not to hold the lens barrel.
Keep your fingers and the strap away from the lens and flash.
16
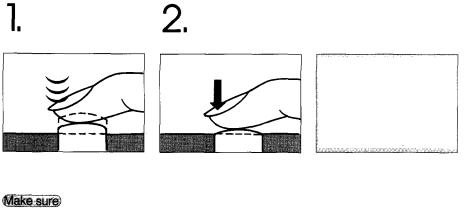
Proper Shutter Release. Theshutterrelease button hastwoclicks. Practice before loadingthefilm.
Keep the shutter |
Depress the |
release button |
shutter release |
depressed halfway. |
button fully. |
To lock the focus. |
To release the |
|
shutter and take |
|
the picture. |
The image is clear, the |
Note: When the autofocus |
autofocus beep is heard, |
indicator is blinking, the |
and the autofocus indicator |
shutter won't release. |
lights in the viewfinder. |
(See p. 47.) |
Cautions:
•Press the shutter release button gently.
•Avoid shaking the camera when pressing the shutter release button to prevent blurry pictures.
17
BASIC OPERATIONS
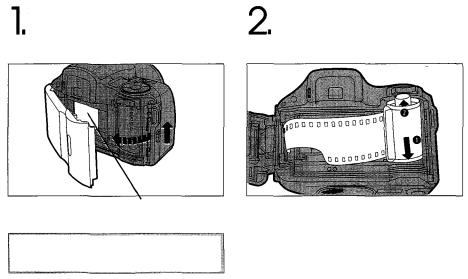
LOADINGTHEFILM
Slide the back cover |
Load the film. |
release upward to open |
|
the back cover. |
|
Shutter curtains
Caution: Do not touch the shutter curtain, and do not press it when loading the film.
18

Correct
Incorrect
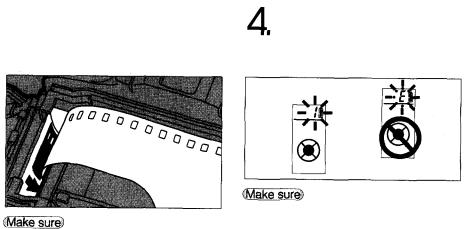
Align the tip of the film leader with the mark as shown, and close the back cover,
The film automatically advances to the first frame.
Note: Make sure the film is lying flat.
The film does not overlap any of the |
|
positioning guides shown above. |
19 |
Turn the power switch ON.
Place the film leader along the arrow as shown.
The exposure counter on the LCD panel reads  .
.
Note:
If  blinks in the exposure counter, as shown above, reload the film.
20
 Loading...