


 FL-600R
© 2012 |
|
|
|
VM315001 |
|
|
|
Printed in China |
|
|
|
|
||
|
|
EN |
INSTRUCTIONS |
7 |
|
NÁVOD K POUŽITÍ |
|
CS |
25 |
|
|
BEDIENUNGSANLEITUNG |
|
DE |
43 |
|
|
INSTRUCCIONES |
|
ES |
61 |
|
|
KÄYTTÖOHJEET |
|
FI |
79 |
|
|
MODE D’EMPLOI |
|
FR |
97 |
|
|
AANWIJZINGEN |
|
NL |
115 |
|
|
INSTRUKCJA |
|
PL |
133 |
|
|
ИНСТРУКЦИЯ |
|
RU |
151 |
|
|
ІНСТРУКЦІЯ |
|
UK |
169 |

1 |
1 |
6 |
|
|
|
MEMO |
|
|
|
|
|||
|
|
|
|
|
|
|
2 |
|
|
a |
|
4 5 67 8 |
|
3 |
|
7 |
|
1 |
|
|
|
|
|
|
|
|
|
4 |
|
8 |
b |
2 |
|
|
|
|
|
|
|
||
|
|
|
|
|
c |
|
5 |
|
9 |
c |
3 |
|
|
|
|
d |
||||
|
|
0 |
d |
|
|
|
|
|
|
|
|
||
|
|
|
|
|
|
|
|
|
e |
b |
9 |
0 |
ab |
|
|
a |
c |
|||
|
|
|
|
|
||
|
|
|
d |
|
|
|
3 |
|
|
|
4 |
|
|

Information for Your Safety
IMPORTANT SAFETY INSTRUCTIONS
When using your photographic equipment, basic safety precautions should always be followed, including the following:
yRead and understand all instructions before using.
yClose supervision is necessary when any flash is used by or near children. Do not leave flash unattended while in use.
yCare must be taken as burns can occur from touching hot parts.
5

yDo not operate if the flash has been dropped or damaged - until it has been examined by qualified service personnel.
yLet flash cool completely before putting away.
yTo reduce the risk of electric shock, do not immerse this flash in water or other liquids.
yTo reduce the risk of electric shock, do not disassemble this flash, but take it to qualified service personnel when service or repair work is required. Incorrect reassembly can cause electric shock when the flash is used subsequently.
yThe use of an accessory attachment not recommended by the manufacturer may cause a risk of fire, electric shock, or injury to persons.
SAVE THESE INSTRUCTIONS
6

Thank you for purchasing this Olympus product. To ensure your safety, please read this instruction manual before use, and keep it handy for future reference.
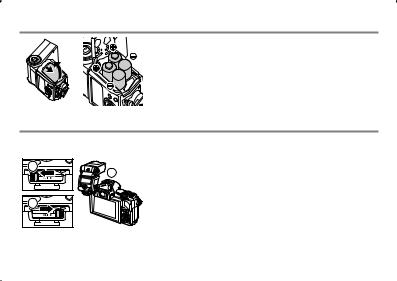
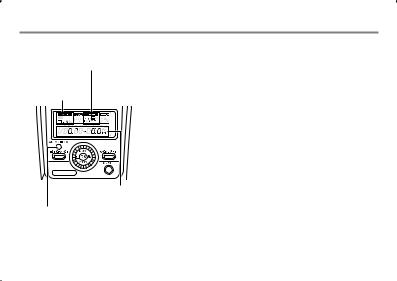
Names of Parts (Fig.  p. 3)
p. 3)
1Wide panel 2Light-emitting area
3Remote sensor 4AF illuminator/LED window 5Auto light receptor 6Catch light plate 7Control panel 8AUTO CHECK lamp 9TEST button/CHARGE lamp 0OK button aBounce lock release button bBACK LIGHT button cON/OFF button dLatch
eDial (a: flash compensation button; b: MODE button; c: LED light button; d: ZOOM button)
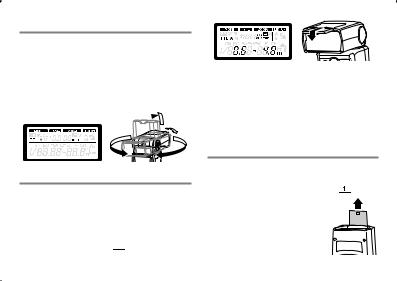
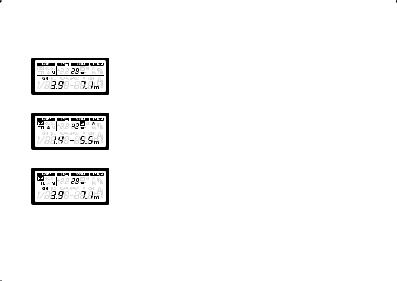
Control Panel (Fig.  p. 4)
p. 4)
X Details (p. 11, 18)
1Super FP flash 2Flash control mode 3Guide number (GN) 4Flash intensity control 5Zoom position (angle of illumination) 6FOUR THIRDS 7Zoom mode 8LED light 9ISO sensitivity 0RC mode group aAperture (F) bRC mode channel cTemperature warning dDistance units
Continuous Firing
The flash may become hot when fired many times in succession, resulting in damage
or malfunction. The flash should be fired no more than 10 times in succession
at intervals of 2.5 seconds, after which it should be left unused for at least 10 minutes.
Preparing a Battery (Sold Separately)
Choose from the below batteries:
•AA (R6) alkaline batteries (× 4)
•AA (R6) NiMH batteries (× 4)
x Note
AA (R6) manganese batteries cannot be used.
EN 7
Loading Batteries
1Open the battery compartment cover.
2Insert the batteries with correct +/– polarity. 3Close the battery compartment cover.
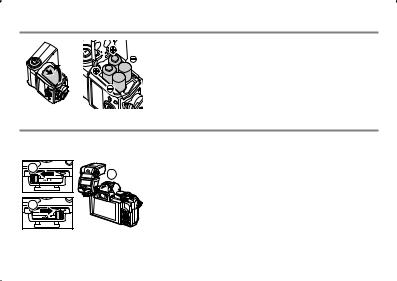
Attaching to the Camera
Confirm that both the camera and electronic flash are off. Attaching or removing the electronic flash while either the flash or the camera is on may result in malfunction.
1 |
2 |
1Slide the latch in the direction opposite to that |
|
indicated by the [LOCKX] icon (1). |
|
3 |
|
2Slide the flash into the hot shoe until it clicks securely |
|
into place (2). |
|
|
|
3Slide the latch to the [LOCKX] position (3). |
•To remove the flash, slide the latch in the direction opposite to the [LOCKX] arrow and slide it from the shoe.
8 EN
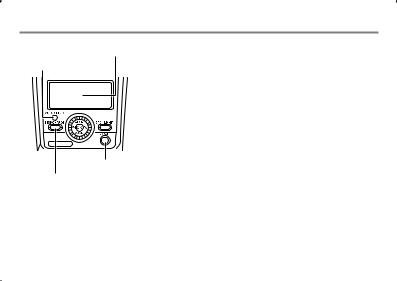
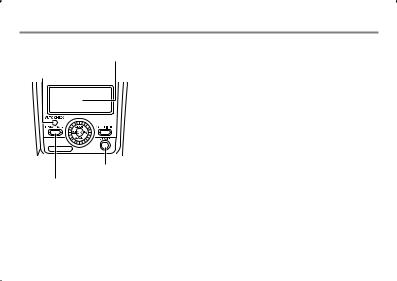
Turning on the Electronic Flash
Attach an electronic flash to the camera, and then turn the camera on.
Control panel
AUTO CHECK lamp
ON/OFF button CHARGE lamp
1Press the ON/OFF button.
• The control panel display will turn on.
• To turn the flash off, press the ON/OFF button again.
• Replace the batteries if the CHARGE lamp does not light after:
30 seconds (Alkaline batteries)
10 seconds (NiMH batteries)
•If the CHARGE lamp and AUTO CHECK lamp blink simultaneously, batteries are running low. Replace the batteries.
•The flash will enter sleep mode whenever the camera enters sleep mode.
•If no operations are performed for approximately 60 minutes, the flash will turn off automatically. Press the ON/OFF button to turn it on.
EN 9
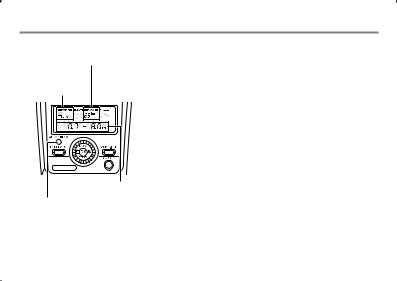
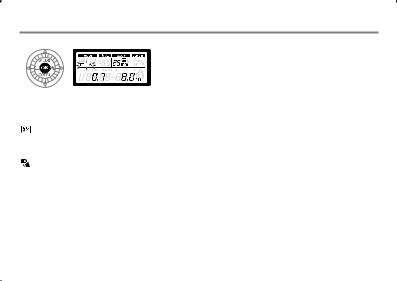
Shooting
Firing angle
Displayed according to the focal length of the lens.
Flash control mode
Light control range
AUTO CHECK lamp
1Use camera controls to choose the flash mode.
See the camera manual for details.
2Choose a flash control mode. g“Flash control mode” (p. 11)
3Press the shutter button halfway.
•The camera and flash will exchange shooting information and the flash range will be displayed in the control panel.
•Flash range varies with camera settings (ISO sensitivity, aperture, and lens focal length).
4Press the shutter button the rest of the way down to take the picture.
The AUTO CHECK lamp blinks for about 5 s after shooting to indicate that the flash has fired successfully.
•When using a flash, flash light may be blocked by the lens body, lens hood, etc.
•Use the wide panel to prevent overexposure at ranges of less than 1 m (3 ft.).
10 EN

Flash Control Mode
Choose a flash control mode according to your subject and shooting conditions. To select a mode, press the MODE (F) button and rotate the dial.
Control panel display |
Control operation |
The flash light intensity is controlled automatically according
TTL-AUTO to the camera’s setup. The flash will be adjusted based on the brightness taken through the camera’s lens. Usually use this mode
with a camera with communication capability.
AUTO
The flash will be adjusted based on the brightness captured by auto light receptor on the electronic flash. If the camera has


 communication capability, this mode can be used only when the Blinks: Out of flash control camera is an AUTO-compatible model.
range
EN 11

Control panel display |
Control operation |
MANUAL |
In this mode, the flash is emitted according to the guide number |
|
|
|
setting. Rotate the dial to choose the guide number. The flash |
|
displays the optimal range, which is calculated based on the guide |
|
number and camera settings. |
|
|
FP TTLAUTO |
Super FP flash. This mode allows you to use flash photography |
|
even at shutter speeds faster than the flash synchronization speed |
|
of the camera. Flash level is set automatically. Maximum output |
|
is reduced, resulting in a smaller flash range. Flash range also |
|
diminishes with shutter speed. |
FP MANUAL |
The flash fires at the selected guide number. Rotate the dial to |
|
|
|
choose the guide number. The flash displays the optimal range, |
|
which is calculated based on the guide number and camera |
|
settings. |
|
|
12 EN
Button Functions
Button |
Function |
Use |
|
Adjust flash level by up to ±5 EV. This |
|
|
value is combined with adjustments to |
1Press (H) or ZOOM (G). |
|
flash compensation made using the |
|
|
camera. |
2Rotate the dial. |
ZOOM |
Adjust the angle of illumination |
|
manually. “M” appears in the display. |
|
|
|
|
1Before shooting, set the LED light to manual. |
|
|
g“Other settings” (p. 17) |
Manually turn the LED light on or off. 2Press  (I) to turn the LED light on. Press
  (I) again to turn the LED light off. To view the
LED brightness setting, press and hold  (I) for 2 s while the LED light is on.
To fire a test flash, press the TEST button while the CHARGE lamp is lit. The AUTO TEST CHECK lamp blinks for about 5 s to indicate that the flash has fired successfully. If the
lamp does not blink, adjust settings or change the distance to the subject.
BACK The control panel backlight lights for about 15 s. The backlight turns off when camera LIGHT controls are used.
EN 13
Restoring Default Settings
1Keeping the OK button pressed, press the BACK LIGHT button for 2 s.
The control panel will blink once when settings are reset.
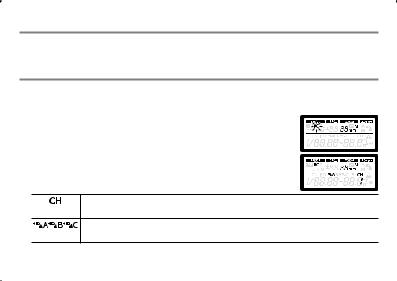
Wireless Flash Settings
Wireless control is available with Olympus digital cameras that support RC mode. The unit is controlled by means of a flash mounted on the camera. It can also be mounted on a camera for wireless control of multiple remote flash units. For information on cameras that support this system, see the camera manual.
1Set the camera and flash to RC mode.
Press MODE (F) and rotate the dial to select a flash control mode.
2Use the flash to select the channel and group.
Press MODE (F) and use FGHI to highlight items and rotate the dial to change.
Set the camera and flash to the same channel.
Channel
|
The camera can adjust flash settings * separately for up to 3 groups; choose the group |
Group |
to which the flash belongs. |
* Including flash control mode, flash level, and flash compensation.
14 EN

Placing Wireless Flash Units
Since the communication is performed with the flash emission of the camera, the flash positioning range varies with camera. See the camera manual for details.
|
1Attach the stand provided. |
1 |
• Slide the latch in the direction opposite to that indicated |
by the [LOCKX] icon (1) and slide the flash onto the |
|
|
stand until it clicks securely into place (2). |
|
• Slide the latch to the [LOCKX] position to latch the flash |
|
in place. |
|
• To remove the flash, slide the latch in the direction |
|
opposite to the [LOCKX] arrow and slide it from the |
|
stand. |
|
2Position the flash with the remote sensor facing the |
|
camera. |
2 |
Take a test shot after positioning. |
|
• We recommend using a single group of up to three |
|
remote flash units. |
•Flash may not fire due to the angle or distance between the camera and the object.
EN 15
Fixing the Irradiation Angle
Point the flash head at a wall or ceiling for bounce flash photography. The area
illuminated at ranges of 0.5–1.0 m (1.6–3.3 ft.) will not be correct; point the flash down.
1Pressing the bounce lock release button, turn the light-emitting section up/down and left/ right.
90° 
7°
180°
180°
Using the Wide Panel
Use for angles of illumination wider than 12 mm (24 mm in 135 format). The ZOOM display will blink if the lens focal length is under 12 mm.
1Slide out the wide panel and place it on the light-emitting area (Fig. 

 p. 3).
16 EN
•The estimated range display changes when the wide panel is used.
•The angle of illumination can be set to 10 mm and 8 mm only.
•Do not tilt the wide panel up.
•The ZOOM display will blink if the lens has a focal length of 12 mm or more.
Using the Catch Light Plate
The catch light plate reflects light from the flash to create a catch light effect.
1Slide out the catch light plate (Fig. 
 p. 3). Point the flash directly
upward with the plate toward the subject.
Other Settings
The following options can be selected in the control panel.
|
|
|
|
|
|
1Press the OK button. |
|
|
|
|
|
|
|
|
|
|
|
|
|
An item will blink in the control panel. |
|
|
|
|
|
|
2Press FGHI to highlight items. |
|
|
|
|
|
|
3Rotate the dial to change the highlighted item. |
|
|
|
|
Option |
Description |
|
MODE (flash control mode) |
p. 11 |
|||||
|
(flash compensation) |
p. 13 |
||||
ZOOM (angle of illumination) |
p. 13 |
|||||
|
|
|
|
|
|
Choose whether the LED lights automatically or manually. |
|
(LED light) |
A: Lights automatically as required. |
||||
|
|
|
|
|
|
M: Lights when the LED light button is pressed. |
GN (guide number) |
Adjust flash level. |
|||||
ISO sensitivity |
Adjust ISO sensitivity. |
|||||
Group |
Choose a group for RC mode (p. 14). |
|||||
Aperture |
Adjust aperture. |
|||||
Channel |
Choose a channel for RC mode (p. 14). |
|||||
EN 17

Custom Settings
Customize settings for improved ease of use.
1Press the OK button for more than 2 s. The flash will enter custom settings mode.
2Press FG to highlight items.
3Rotate the dial to change the highlighted item.
4Press the OK button for more than 2 s to save changes.
|
Control panel |
Option |
Description |
|
|
|
|
AF illuminator |
A: Controlled by camera. |
|
|
|
OFF: Does not light. |
|
|
|
|
|
|
|
|
|
LED brightness |
1/1–1/16: Adjust LED brightness. |
|
|
|
|
|
|
|
|
|
|
|
|
|
|
ON: Flash control display shows slave mode. |
|
|
|
|
|
|
|
|
Slave flash |
OFF: Flash control display does not show slave |
|
|
|
|
mode. |
|
|
|
|
|
|
|
|
Flash cable |
ON: Flash cable not used. |
|
|
|
OFF: Flash cable used. |
|
|
|
|
|
|
|
|
|
Zoom display |
: Display values for FOUR THIRDS lenses. |
|
|
|
OFF: Display 135 format equivalent values. |
|
|
|
|
|
|
|
|
|
|
|
18 EN

|
Control panel |
Option |
Description |
|
|
|
|
|
ON: Flash detects position of wide panel. Angle |
|
|
|
Wide panel detection |
of illumination adjusted automatically. |
|
|
|
|
OFF: Flash does not detect wide panel position. |
|
|
|
Distance units |
m: Distances displayed in meters. |
|
|
|
ft: Distances displayed in feet. |
|
|
|
|
|
|
|
|
|
Guide number |
ON: Flash output is shown as a guide number. |
|
|
|
display |
OFF: Flash output is shown as a relative value. |
|
|
|
|
|
|
|
|
|
ON: Show the flash range calculated by the |
|
|
|
Auto light sensing |
camera in AUTO flash control mode. |
|
|
|
OFF: Show the current aperture and ISO |
|
|
|
|
|
|
|
|
|
|
sensitivity. |
|
|
|
|
|
25–3200: Display the ISO sensitivity when AUTO Auto ISO display is selected as the flash control mode for cameras
that can not communicate with the flash unit.
EN 19

Cameras That Do Not Communicate with the Flash
AUTO
Set aperture and ISO sensitivity to the values selected with the camera.
1Set the flash control mode to AUTO. g“Flash control mode” (p. 11)
2Match the zoom position to the focal length of the lens. g“ZOOM” (p. 13)
3Adjust aperture and ISO sensitivity. g“Other settings” (p. 17)
If the selected values are out of the flash control range, [ISO] and [F] will blink in the display. The AUTO CHECK lamp blinks for about 5 s after the shutter is released to show that the flash has fired successfully.
MANUAL
Choose the guide number.
1Set the flash control mode to MANUAL. g“Flash control mode” (p. 11)
2Adjust flash level.
g“Other settings” (p. 17)
20 EN

Slave Mode
The flash can be fired remotely in sync with any flash fired by other units.
1Set the flash control mode to SL AUTO or SL MANUAL. g“Flash control mode” (p. 11) Adjust other flash settings as for AUTO or MANUAL mode.
g“Cameras That Do Not Communicate with the Flash” (p. 20)
2Position the flash. See the camera manual for more information.
• The flash can not be used with cameras that require a pre-flash.
•The flash may fire in response to flash units used by other photographers.
EN 21

Safety precautions
Read WARNINGS and CAUTIONS thoroughly to ensure safe usage. These safety precautions protect the users and others and prevent property damage.
WARNING |
Failure to observe the precautions indicated by this symbol may result in |
injury or death. |
•Do not use flash in places where it may be exposed to flammable or explosive gas. Otherwise, fire ignition or explosion may result.
•Do not directly solder the product or modify, remodel, or disassemble.
•Do not cover the light emitting area of the flash with your hand, and do not touch the light emitting area after continuous firing. It may burn your skin.
•Water and foreign matter inside of the device may cause fire or electric shock. If the device is immersed in or exposed to water or foreign matter is found inside of the device, turn off the power immediately and remove batteries with care. Contact your dealer or consult an Olympus Authorized Service Station.
•To prevent a traffic accident, do not direct the flash at a person operating a motor vehicle.
•Do not use the flash or AF illuminator in close proximity to others (especially infants). Keep the flash out of reach of children. Light from the flash can cause visual impairment.
•Do not use batteries that are not specified for use.
•Do not mix old and new batteries, or batteries made by different manufacturers.
•Do not connect substances such as metal to the (+) or (–) of batteries.
22 EN
Specifications
MODEL NO. |
: FL-600R |
Product type |
: External electronic flash for digital still camera |
Guide number |
: 36 (ISO100), 12 (ISO100, using the wide panel) |
Firing angle |
: Covers the angle of view of 12–42 mm lenses (equivalent to 24–85 mm in |
|
135 format) |
|
(With wide panel: 8 mm lens, equivalent to 16 mm in 135 format) |
Flash modes |
: TTL-AUTO, AUTO, MANUAL, FP TTL AUTO, FP MANUAL, |
|
SL AUTO, SL MANUAL, RC |
Flash emission period : Approx. 1/20000 to 1/500 seconds (except in Super FP flash)
Flash emission count |
: Approx. 250 times (using AA (R6) alkaline batteries) |
(at full activation)* |
Approx. 370 times (using AA (R6) NiMH batteries) |
Recharge time |
: Approx. 2.5 seconds (using AA (R6) alkaline batteries) |
|
Approx. 2 seconds (using AA (R6) NiMH batteries) |
|
(from full activation to CHARGE lamp lighting)* |
AF illuminator |
: Effective range: Approximately 1–5 m (varies with camera and lens used) |
Operating |
: Temperature: –10 to 42°C (14 to 108°F) |
environment |
Humidity: 20 to 90% |
Dimensions |
: 62 (W) × 104 (H) × 98 (D) mm/2.4 × 4.1 × 3.9 in. (excluding protrusions) |
Weight |
: 255 g (9 oz.) (excluding batteries) |
*Measurements obtained from in-house tests at Olympus. Actual figures may vary depending on shooting conditions.
Specifications are subject to change without any notice or obligation on the part of the manufacturer. EN 23

CAUTION |
Failure to observe the precautions indicated by this symbol may result in |
injury or property damage. |
•If you notice any abnormalities such as odor, noise, or smoke, stop using this device. Otherwise a fire or burn may result. Remove the batteries carefully to avoid burning yourself, and contact your dealer or consult an Olympus Authorized Service Station.
•Do not operate with wet hands. This may cause malfunction or electric shock.
European technical Customer Support
Please visit our homepage http://www.olympus-europa.com or call: Tel. 00800 - 67 10 83 00 (Toll-free)
+49 180 5 - 67 10 83 or +49 40 - 237 73 4899 (Charged)
For customers in Europe
The “CE” mark indicates that this product complies with the European requirements for safety, health, environment and customer protection. CE-mark products are for sale in Europe.
This symbol [crossed-out wheeled bin WEEE Annex IV] indicates separate collection
of waste electrical and electronic equipment in the EU countries. Please do not throw the equipment into the domestic refuse.
Please use the return and collection systems available in your country for the disposal of this product.
24 EN

Děkujeme vám za nákup tohoto výrobku značky Olympus. Pro zajištění své bezpečnosti si prosím před použitím přečtěte tento návod k obsluze a uchovávejte ho po ruce pro pozdější nahlédnutí.
Názvy součástí (Obr.  str. 3)
1Širokoúhlý panel 2Reflektor 3Senzor dálkového ovládání 4AF iluminátor/LED okno 5Automatický světelný receptor 6Odrazová destička 7Ovládací panel 8Kontrolka AUTO CHECK 9Tlačítko TEST/kontrolka CHARGE 0Tlačítko OK aTlačítko pro uvolnění aretace hlavy blesku bTlačítko
BACK LIGHT cTlačítko ON/OFF dZápadka eOvládací kolečko (a: Tlačítko kompenzace blesku; b: Tlačítko MODE; c: Tlačítko LED světla; d: Tlačítko ZOOM)
bKanál RC režimu cTeplotní varování dJednotky vzdálenosti
Kontinuální odpalování blesku
Blesk se může rozpálit při častém opakovaném odpalování blesku a to vede k poškození nebo k poruše. Odpalování blesku by nemělo proběhnout více než 10 krát za sebou v intervalech 2,5 sekund a pak by se blesk neměl používat nejméně po dobu 10 minut.
Ovládací panel (Obr.  str. 4) X Detaily (str. 29, 36)
1Blesk Super FP 2Režim řízení blesku 3Směrné číslo (GN) 4Ovládání intenzity blesku 5Umístění zoomu (úhel osvětlení) 6FOUR THIRDS 7Zoom režim 8LED světlo 9Citlivost ISO 0Skupina RC režimu aClona (F)
Příprava baterie (k dostání zvlášť)
Používejte baterie následujícího výběru:
•AA (R6) alkalické baterie (× 4)
•AA (R6) NiMH baterie (× 4)
x Poznámka
AA (R6) manganové články nelze použít.
CS 25
Vložení baterií
1Otevřete kryt bateriového prostoru.
2Vložte baterie s dodržením polarity +/–.
3Zavřete kryt bateriového prostoru.
Připevnění k fotoaparátu
Ověřte, zda je elektronický blesk i fotoaparát vypnut. Montáž nebo demontáž elektronického blesku při zapnutém elektronickém blesku nebo fotoaparátu může způsobit poruchu.
1 |
2 |
|
|
3 |
|
1Posuňte západku opačným směrem než naznačuje symbol [LOCKX] (1).
2Zasuňte blesk do sáněk, až zacvakne bezpečně na místo (2).
3Posuňte západku do pozice [LOCKX] (3).
•Pro odstranění blesku posuňte západku opačným směrem proti šipce [LOCKX] a vysuňte ho ze sáněk.
26 CS
Zapnutí elektronického blesku
Připevněte elektronický blesk k fotoaparátu a pak fotoaparát zapněte.
Ovládací panel
Kontrolka
AUTO CHECK
Tlačítko ON/OFF
Kontrolka CHARGE
1Stiskněte tlačítko ON/OFF.
• Displej kontrolního panelu se zapne.
• Pro vypnutí blesku stiskněte opět tlačítko ON/OFF.
• Vyjměte baterie, pokud se kontrolka CHARGE nerozsvítí po:
30 sekundách (alkalické baterie)
10 sekundách (NiMH baterie)
•Pokud blikají současně kontrolky CHARGE a AUTO CHECK, jsou baterie slabé. Vyměňte baterie.
•Blesk přejde do režimu spánku vždy, když do režimu spánku přejde fotoaparát.
•Pokud během přibližně 60 minut neproběhne žádná činnost, blesk se automaticky vypne. Pro jeho zapnutí stiskněte tlačítko ON/OFF.
CS 27
Snímání
Zoom blesku
Zobrazeno podle ohniskové vzdálenosti objektivu.
Režim řízení blesku
Efektivní dosah blesku
Kontrolka AUTO CHECK
1Pro výběr režimu blesku použijte ovládací prvky fotoaparátu.
Pro detaily nahlédněte do návodu fotoaparátu.
2Vyberte režim řízení blesku. g„Režim řízení blesku” (str. 29)
3Stiskněte tlačítko spouště do poloviny.
•Fotoaparát a blesk si vymění informace o snímání a na ovládacím panelu se zobrazí dosah blesku.
•Dosah blesku se liší v závislosti na nastavení fotoaparátu (citlivosti ISO, cloně a ohniskové vzdálenosti objektivu).
4Stiskněte tlačítko spouště až úplně dolů a vytvořte snímek.
Blikání kontrolky AUTO CHECK po dobu cca 5 s po pořízení snímku indikuje úspěšné odpálení blesku.
•Při použití blesku může být světlo blesku blokováno tělem objektivu, sluneční clonou apod.
•Abyste zabránili přeexponování při vzdálenostech menších než 1 m, použijte širokoúhlý panel.
28 CS

Režim řízení blesku
Podle fotografovaného objektu a podmínek záběru vyberte odpovídající režim řízení blesku. Pro výběr režimu stiskněte tlačítko MODE (F) a otáčejte ovládacím kolečkem.
Displej ovládacího |
Způsob ovládání |
|
panelu |
||
|
||
|
Blesk je ovládán automaticky podle nastavení fotoaparátu. |
|
TTL-AUTO |
Intenzita záblesku je řízena podle osvětlení snímaného skrz |
|
objektiv fotoaparátu. Tento režim se obvykle používá u fotoaparátu |
||
|
||
|
s možností komunikace. |
|
AUTO |
|
|
|
Intenzita záblesku je řízena podle osvětlení snímaného |
|
|
automatickým snímačem na elektronickém blesku. Tento režim lze |
|
|
využít jen pokud je fotoaparát vybaven možností komunikace a je |
|
Bliká: Mimo dosah |
slučitelný s režimem AUTO. |
|
|
||
ovládání blesku |
|
|
|
|
CS 29
Displej ovládacího |
Způsob ovládání |
|
panelu |
||
|
||
MANUAL |
V tomto režimu je intenzita blesku řízena podle nastaveného |
|
|
||
|
směrného čísla. Zvolte směrné číslo otáčením ovládacího kolečka. |
|
|
Blesk zobrazí optimální rozsah, který je vypočítán na základě |
|
|
směrného čísla a nastavení fotoaparátu. |
|
|
|
|
FP TTLAUTO |
Blesk Super FP. Tento režim umožňuje fotografování s bleskem, i |
|
|
když je rychlost závěrky větší než synchronizační rychlost blesku |
|
|
fotoaparátu. Úroveň blesku je nastavena automaticky. Maximální |
|
|
výkon je snížen a to má za následek menší dosah blesku. Dosah |
|
|
blesku je také snížen rychlostí závěrky. |
|
FP MANUAL |
Blesk vypálí podle zvoleného směrného čísla. Zvolte směrné |
|
|
||
|
číslo otáčením ovládacího kolečka. Blesk zobrazí optimální |
|
|
rozsah, který je vypočítán na základě směrného čísla a nastavení |
|
|
fotoaparátu. |
|
|
|
30 CS

Funkce tlačítek
Tlačítko |
Funkce |
Použití |
|
|
Úprava intenzity blesku až o ±5 EV. |
|
|
|
Tato hodnota je kombinována s |
1Stiskněte (H) nebo ZOOM (G). |
|
|
nastavením kompenzace blesku |
||
|
provedeným pomocí fotoaparátu. |
2Pootočte ovládacím kolečkem. |
|
ZOOM |
Ruční nastavení úhlu osvětlení. „M” se |
||
|
|||
objeví na displeji. |
|
||
|
|
1Před začátkem snímání nastavte LED světlo |
|
|
|
na ruční nastavení. |
|
|
|
g„Další nastavení” (str. 35) |
Ruční zapnutí či vypnutí LED světla. 2Stiskněte  (I) pro rozsvícení LED světla. Stiskněte
  (I) opět pro zhasnutí LED světla.
Pro zobrazení nastavení jasu LED, stiskněte a přidržte  (I) po dobu 2 s, když je LED světlo rozsvíceno.
Pro vypálení testovacího blesku, stiskněte tlačítko TEST, když kontrolka CHARGE svítí. TEST Blikání kontrolky AUTO CHECK po dobu cca 5 s indikuje úspěšné odpálení blesku. Pokud
kontrolka nebliká, upravte nastavení nebo změňte vzdálenost fotografovaného předmětu.
BACK Podsvícení ovládacího panelu svítí po dobu asi 15 s. Podsvícení zhasne, když se LIGHT používají ovládací prvky fotoaparátu.
CS 31

Obnovení původního nastavení
1Přidržte stisknuté tlačítko OK a stiskněte tlačítko BACK LIGHT po dobu 2 s.
Ovládací panel jednou blikne, když je nastavení vynulováno.
Bezdrátové nastavení blesku
Bezdrátové ovládání je dostupné u digitálních fotoaparátů Olympus, které podporují RC režim. Jednotka je ovládána za pomoci blesku připevněného k fotoaparátu. Také může být na fotoaparát připevněna za účelem bezdrátového ovládání mnohočetných vzdálených jednotek blesku. Pro informace o fotoaparátech, které podporují tento systém, nahlédněte do návodu fotoaparátu.
1Nastavte fotoaparát a blesk do RC režimu.
Stiskněte MODE (F) a otočte ovládacím kolečkem, abyste vybrali režim ovládání blesku.
2Použijete blesk pro výběr kanálu a skupiny.
Stiskněte MODE (F) a použijte FGHI pro zvýraznění prvků a otočte ovládacím kolečkem pro změnu.
Kanál (Channel) |
Nastavte fotoaparát a blesk na stejný kanál. |
|
Fotoaparát může upravit nastavení blesku * odděleně až pro 3 skupiny; vyberte |
Skupina |
skupinu, ke které blesk patří. |
* Zahrnuje režim ovládání blesku, úroveň blesku a kompenzaci blesku.
32 CS
 Loading...