


 Loading...
INSTRUCTIONS
EVIS EXERA XENON LIGHT SOURCE
OLYMPUS CLV-160

|
|
Contents |
Contents |
|
|
Labels and Symbols ..................................................................... |
1 |
|
Important Information — Please Read Before Use.................... |
3 |
|
Intended use ............................................................................................ |
3 |
|
Instruction manual .................................................................................... |
3 |
|
User qualifications..................................................................................... |
4 |
|
Instrument compatibility ........................................................................... |
4 |
|
Repair and modification ........................................................................... |
4 |
|
Signal words.............................................................................................. |
5 |
|
Dangers, warnings and cautions .............................................................. |
5 |
|
Chapter 1 Checking the Package Contents............................ |
8 |
|
Chapter 2 Light Source Nomenclature.................................... |
9 |
|
2.1 |
Front panel...................................................................................... |
9 |
2.2 Rear and side panels ...................................................................... |
11 |
|
Chapter 3 Installation and Connection ................................... |
13 |
|
3.1 |
Installation of equipment ................................................................. |
13 |
3.2Connection of the EVIS EXERA video system center or EVIS video
|
system center.................................................................................. |
15 |
3.3 |
Connection of an endoscope .......................................................... |
16 |
3.4 |
Connection of the OES video system ............................................. |
16 |
3.5 |
Installation of the water container ................................................... |
17 |
3.6 |
Connection to an AC mains power supply ...................................... |
18 |
Chapter 4 |
Inspection ................................................................ |
19 |
4.1 |
Inspection of the power supply ....................................................... |
19 |
4.2 |
Checking the lamp life..................................................................... |
21 |
4.3 |
Inspection of the filter function ........................................................ |
22 |
4.4 |
Inspection of air and water feeding ................................................. |
24 |
4.5 |
Inspection of the examination light.................................................. |
25 |
4.6 |
Inspection of the light decreasing function...................................... |
26 |
4.7 |
Inspection of transillumination function ........................................... |
27 |
4.8 |
Inspection of brightness adjustment ............................................... |
28 |
EVIS EXERA XENON LIGHT SOURCE CLV-160 |
i |

Contents
Chapter 5 |
Operation.................................................................. |
31 |
5.1 |
Igniting the lamp.............................................................................. |
33 |
5.2 |
Brightness adjustment .................................................................... |
33 |
5.3 |
Using the filter function ................................................................... |
35 |
5.4 |
Using the transillumination function ................................................ |
38 |
5.5 |
Adjusting air/water pressure............................................................ |
39 |
5.6 |
Turning the light source OFF .......................................................... |
39 |
Chapter 6 |
Lamp Replacement.................................................. |
40 |
6.1 |
Lamp life ......................................................................................... |
40 |
6.2 |
Replacement of the examination (xenon) lamp............................... |
40 |
Chapter 7 Care, Storage and Disposal .................................... |
48 |
|
7.1 |
Care ................................................................................................ |
48 |
7.2 |
Storage ........................................................................................... |
49 |
7.3 |
Disposal .......................................................................................... |
49 |
Chapter 8 |
Troubleshooting ...................................................... |
50 |
8.1 |
Troubleshooting guide .................................................................... |
50 |
8.2 |
Returning the light source for repair................................................ |
54 |
Appendix........................................................................................ |
|
55 |
System chart ............................................................................................ |
55 |
|
Operating environment.............................................................................. |
59 |
|
Transportation and storage environment ................................................. |
59 |
|
Specifications ............................................................................................ |
60 |
|
ii |
EVIS EXERA XENON LIGHT SOURCE CLV-160 |
Labels and Symbols
Labels and Symbols
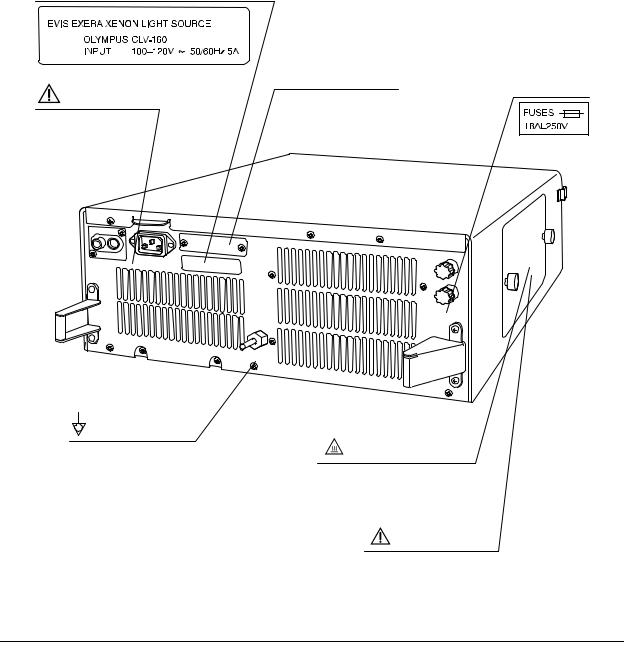
Safety-related labels and symbols are attached to the light source at the locations shown below. If labels or symbols are missing or illegible, contact Olympus.
Rear side
Electrical rating
Serial number plate |
Fuse rating |
|
Refer to instructions.
Equipotential Terminal
Warns that the inside is extremely hot immediately after the lamp is turned off.
Refer to instructions.
EVIS EXERA XENON LIGHT SOURCE CLV-160 |
1 |

Labels and Symbols
Back cover of this instruction manual
Manufacturer
Authorized representative in the European
Community
2 |
EVIS EXERA XENON LIGHT SOURCE CLV-160 |

Important Information — Please Read Before Use
Important Information — Please Read
Before Use
Intended use
This light source has been designed to be used with Olympus endoscopes, and ancillary equipment for observation, diagnosis, endoscopic treatment and recording of image data.
Do not use this light source for any purpose other than its intended use.
Instruction manual
This instruction manual contains essential information on using this light source safely and effectively. Before use, thoroughly review this manual and the manuals of all equipment which will be used during the procedure and use the equipment as instructed.
Keep this and all related instruction manuals in a safe, accessible location. If you have any questions or comments about any information in this manual, please contact Olympus.
Terms used in this manual
OES video converter, OES video system:
The OES video converter and OES video system are devices that convert endoscope images from a fiberscope into monitor images.
EVIS video system center:
The EVIS video system center is a device that converts signals from a videoscope or OES video converter into monitor images.
Mobile workstation:
The mobile workstation is a special trolley on which this light source is placed and used for endoscopic diagnosis and treatment.
EVIS EXERA XENON LIGHT SOURCE CLV-160 |
3 |

Important Information — Please Read Before Use
User qualifications
The operator of this light source must be a physician or medical personnel under the supervision of a physician and must have received sufficient training in clinical endoscopic technique. This manual, therefore, does not explain or discuss clinical endoscopic procedures.
Instrument compatibility
Refer to the “System chart” in the Appendix to confirm that this light source is compatible with the ancillary equipment being used. Using incompatible equipment can result in patient injury or equipment damage.
Repair and modification
Aside from the examination lamp and the fuses, this light source does not contain any user-serviceable parts. Do not disassemble, modify or attempt to repair it; patient or user injury and/or equipment damage can result.
Some problems that appear to be malfunctions may be correctable by referring to Chapter 8, “Troubleshooting”. If the problem cannot be resolved using the information in Chapter 8, contact Olympus.
4 |
EVIS EXERA XENON LIGHT SOURCE CLV-160 |

Important Information — Please Read Before Use
Signal words
The following signal words are used throughout this manual:
Indicates an imminently hazardous situation which, if not avoided, will result in death or serious injury.
Indicates a potentially hazardous situation which, if not avoided, could result in death or serious injury.
Indicates a potentially hazardous situation which, if not avoided, may result in minor or moderate injury. It may also be used to alert against unsafe practices or potential equipment damage.
Indicates additional helpful information.
Dangers, warnings and cautions
Follow the dangers, warnings and cautions given below when handling this light source. This information is to be supplemented by the dangers, warnings and cautions given in each chapter.
•As a TYPE BF applied part, this light source must never be applied directly to the heart and must not be used in procedures involving cardiac observation or surgery. Leakage current from the TYPE BF applied part may be dangerous and cause ventricular fibrillation or otherwise seriously affect the cardiac function of the patient. Accordingly, always adhere to the following points:
−Never apply the endoscope connected to this light source to the heart or any area near the heart.
−Never allow an endo-therapy accessory or another endoscope applied to or near the heart to come in contact with an endoscope connected to this light source.
EVIS EXERA XENON LIGHT SOURCE CLV-160 |
5 |

Important Information — Please Read Before Use
•Strictly observe the following precautions. Failure to do so may place the patient and medical personnel in danger of an electrical shock.
−When the light source is used to examine a patient, do not allow metal parts of the endoscope or its accessories to touch metal parts of other system components. Such contact may cause unintended current flow to the patient.
−Keep liquids away from all electrical equipment. If fluids are spilled on or into the unit, stop operation of the light source at once and contact Olympus.
−Do not prepare, inspect or use this light source with wet hands.
•Never install and operate the light source in locations where:
−The concentration of oxygen is high.
−Flammable anesthetics are present in the atmosphere.
Otherwise, explosion or fire may result because this light source is not designed to be explosion-proof.
•Do not touch the light guide of the endoscope connector immediately after removing it from the light source because it is extremely hot. Operator or patient injury can result.
•Do not look directly into the distal end of the endoscope or the output socket of this light source while the examination lamp is ignited. The intense light may cause eye injury.
•To be prepared in case of a light source failure, always have another light source available for immediate use.
•Xenon light sources produce significant heat due to the high intensity light required for endoscopic procedures and can cause a fire if brought into contact with flammable material. To avoid this, make sure that the distal ends of the light guide cable and endoscope do not touch drapes or other flammable material. Also, make sure that light emitted from the cable and scope is not directed toward a drape or other flammable material. Turn OFF the light source whenever it is not being used.
•The system should be establish with equipment complied with relevant EMC standards for safety reason.
•Equipment which do not comply with EMC standard may cause interference and its function or performance may be affected.
6 |
EVIS EXERA XENON LIGHT SOURCE CLV-160 |
Important Information — Please Read Before Use
•Portable or mobile phones may influence the medical electrical equipment by their emitting energy.
•Do not use a pointed or hard object to press the switches on the front panel. This may damage the switches.
•To avoid breaking electric contacts and causing a malfunction:
−Do not touch the electric contacts of the light source output socket.
−Do not subject any connector to excessive force.
As defined by the international safety standard (IEC 60601-1:1988), medical electrical equipment is
classified into the following types: TYPE CF applied part (the instrument can safely be applied to any part of the body, including the heart), and TYPE B/BF applied part (the instrument can safely be applied to any organ except the heart). The part of the body a videoscope or electrosurgical accessory can safely be applied to depends on the classification of the equipment to which the instruments are connected. Before beginning the procedure, check the current leakage classification type of each instrument to be used for the procedure. Classification types are clearly specified on the instruments and in the instruments’ instruction manuals.
Symbol |
Classification |
|
|
TYPE CF applied part
TYPE BF applied part
TYPE BF applied part
EVIS EXERA XENON LIGHT SOURCE CLV-160 |
7 |

Chapter 1 Checking the Package Contents
Chapter 1 Checking the Package
Contents
Match all items in the package with the components shown below. Inspect each item for damage. If the light source is damaged, a component is missing or you have any questions, do not use the light source; immediately contact Olympus.
Light source (CLV-160)
Light control cable (MH-966) |
Foot holder (MAJ-878) |
Spare fuse (MAJ-892) |
Power cord |
Instruction manual |
8 |
EVIS EXERA XENON LIGHT SOURCE CLV-160 |

Chapter 2 Light Source Nomenclature
Chapter 2 Light Source Nomenclature
2.1Front panel
5. Transillumination switch |
|
|
4. Filter switch |
Airflow regulator |
|
|
OFF switch |
|
3. Output socket |
Airflow regulator |
6. Airflow regulator |
|
switches |
|
|
ON switch |
|
|
|
2. Power indicator
7. Airflow indicators
1. Power switch
8. Emergency lamp indicator
|
13. Lamp ignition |
|
switch |
15. Reset switch |
12. Auto/manual indicators |
14. Lamp life indicator |
11. Auto/manual brightness selector |
|
10. Brightness level indicators |
|
9. Brightness adjustment switches |
EVIS EXERA XENON LIGHT SOURCE CLV-160 |
9 |

Chapter 2 Light Source Nomenclature
1.Power switch
Pressing the power switch in until its stops turns the light source ON. When the power is ON, the power indicator above the power switch is lit. To turn the light source OFF, press the power switch once again.
2.Power indicator
The power indicator is lit when the power is ON.
3.Output socket
This socket provides light, electrical signals and air to the endoscope.
4.Filter switch
When a special-purpose filter is installed, pressing this switch changes between normal observation mode and filter mode.
5.Transillumination switch
When pressing this switch, light emitted from the endoscope’s distal end becomes brighter for 7 seconds, then returns automatically to its original brightness level.
6.Airflow regulator switches
With these switches, the pressure of the air being fed from the endoscope can be controlled.
7.Airflow indicators
These indicators display the current airflow regulator setting (“L”, “M”, or “H”) when the airflow regulator “ON” switch is pressed.
8.Emergency lamp indicator
This indicator is lit when the emergency lamp (halogen) is in use, and blinking when emergency lamp (halogen) is disconnected or not mounted.
9.Brightness adjustment switches
These switches are pressed to adjust the brightness level.
10.Brightness level indicators
These indicators display the current brightness level.
11.Auto/manual brightness selector
This selector is pressed to select automatic or manual brightness control.
12.Auto/manual indicator
This indicator displays the brightness selector setting (“auto” or “manual”).
13.Lamp ignition switch
This switch is pressed to turn ON the examination (xenon) lamp.
14.Lamp life indicator
This indicator displays the total working hours of the examination (xenon) lamp.
15.Reset switch
After replacing the examination (xenon) lamp, the lamp life indicator is reset by pressing this switch for more than 3 seconds.
10 |
EVIS EXERA XENON LIGHT SOURCE CLV-160 |
Chapter 2 Light Source Nomenclature
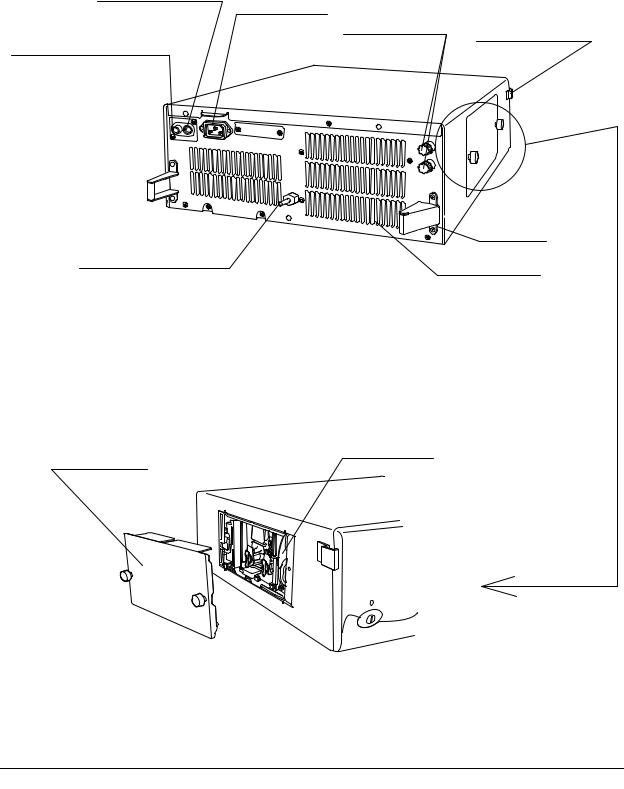
2.2Rear and side panels
2.AUX connector
AC mains inlet
3. Fuse holders |
4. Water container |
|
holder |
||
|
1. Light control connector
Rear foot
5. Potential equalization
terminal |
Ventilation grills |
|
|
|
Rear panel |
7. Filter disk
6. Lamp cover
Left side
EVIS EXERA XENON LIGHT SOURCE CLV-160 |
11 |

Chapter 2 Light Source Nomenclature
1.Light control connector
This connector is receptacle for the light control cable to connect the light source to the EVIS EXERA video system center or the EVIS video system center.
2.AUX connector
This connector is receptacle for the light control cable to connect the light source to the OES video system.
3.Fuse holders
The fuses are mounted here.
4.Water container holder
This holder is used for the installation of the water container.
5.Potential equalization terminal
For safety purposes, this terminal is connected to a potential equalization busbar of the electrical installation.
6.Lamp cover
This cover is removed to replace the examination lamp and a special-purpose filter.
7.Filter disk
This disk is hold a special-purpose filter when necessary.
12 |
EVIS EXERA XENON LIGHT SOURCE CLV-160 |

Chapter 3 Installation and Connection
Chapter 3 Installation and Connection
•Turn OFF all system components before connecting them. Otherwise, equipment damage can result.
•Use appropriate cables only. Otherwise, equipment damage or malfunction can result.
•Use the light source under the conditions described in the “Operating environments” and the “Specifications” in the Appendix only. Otherwise, improper performance, compromised safety and/or equipment damage may result.
Prepare the light source and compatible equipment (shown in the “System chart” in the Appendix) before each use, and refer to the instruction manuals of each system component. Install and connect the equipment as follows:
3.1Installation of equipment
•Do not place any equipment other than the EVIS video system center or OES video system on the top of the light source. Otherwise, equipment damage can result.
•Keep the ventilation grills of the light source clear. Blockage can cause overheating and equipment damage.
•Place the light source on a stable level surface, using the foot holder (MAJ-878).
•If no mobile workstation (WM-30, WM-N60) is used, confirm that the light source does not exceed the allowed maximum load of the installation site.
EVIS EXERA XENON LIGHT SOURCE CLV-160 |
13 |
Chapter 3 Installation and Connection
Installation on the mobile workstation
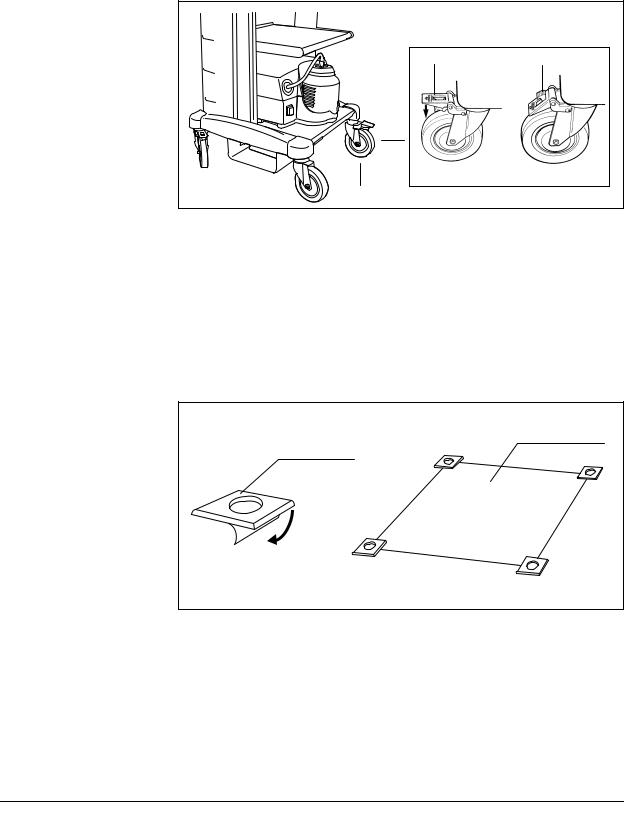
1.Place the mobile workstation on a level surface. Lock the caster brakes as shown in Figure 3.1.
2.
3.
Brake caster |
Brake release |
Caster |
|
Figure 3.1
Install the shelf of the mobile workstation as described in the mobile workstation’s instruction manual.
Using the pattern sheet as a template on the mobile workstation, position the foot holders at the four corners.
4. Peel the paper from the bottom of the foot holders and gently place them in position as shown in Figure 3.2.
Pattern sheet |
Foot holder |
Peel off |
Figure 3.2
14 |
EVIS EXERA XENON LIGHT SOURCE CLV-160 |
Chapter 3 Installation and Connection
5. Once in position, press the foot holders firmly in place.
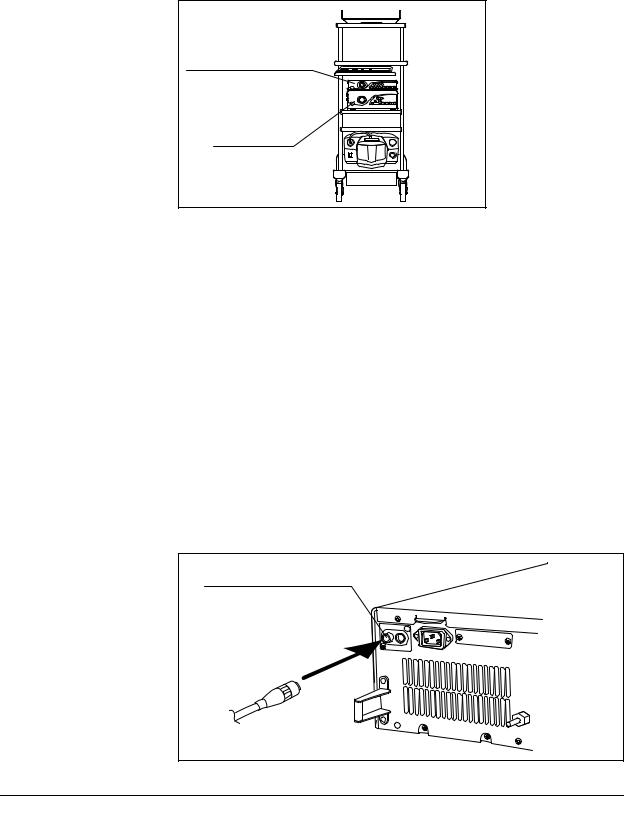
6. Place the light source on the mobile workstation so that the feet rest in the foot holders (see Figure 3.3).
Video system center
Light source (CLV-160)
Figure 3.3
Installation in another location
When installing the light source in another location, adhere the foot holders as described above.
3.2Connection of the EVIS EXERA video system center or EVIS video system center
Prepare an EVIS EXERA video system center or an EVIS video system center when using a videoscope or an OES video converter.
Connect the light control cable that comes with the EVIS EXERA video system center or the EVIS video system center to the light control connector (see Figure 3.4).
Light control connector |
Figure 3.4
EVIS EXERA XENON LIGHT SOURCE CLV-160 |
15 |

Chapter 3 Installation and Connection
3.3Connection of an endoscope
Before connecting the endoscope’s light guide connector to the light source, make sure that it is perfectly dry. If the endoscope’s light guide connector is wet (after disinfecting, for example), wipe and dry the exterior as described in the endoscope’s reprocessing manual. Otherwise, electrical shock or equipment damage can result.
Insert the light guide connector into the output socket on the front panel of the light source until it clicks into place (see Figure 3.5).
Figure 3.5
3.4Connection of the OES video system
•Set the auto/manual brightness selector to “AUTO” to prevent burns caused by close observation. So the brightness is adjusted automatically. If using manual brightness adjustment, set the brightness to the middle or lower level and never observe close to mucous membranes for a long time.
•When using rigidscope, set the auto/manual brightness selector to “AUTO” to prevent burns caused by close observation. So the brightness is adjusted automatically. If using manual brightness adjustment, set the brightness to the middle or lower level and never observe close to mucous membranes for a long time.
16 |
EVIS EXERA XENON LIGHT SOURCE CLV-160 |
Chapter 3 Installation and Connection
To view a fiberscope’s image on a video monitor, prepare an OES video system, such as the OTV-S6.
Connect the light control cable supplied with the OES video system to the AUX connector (see Figure 3.6).
AUX connector
Figure 3.6
3.5Installation of the water container
When using an endoscope where water can be fed via the light source, prepare the water container as shown in the “System chart” in the Appendix. Install the water container in the water container holder on the left side of the light source (see Figure 3.7).
Figure 3.7
EVIS EXERA XENON LIGHT SOURCE CLV-160 |
17 |
Loading...