


NEC SuperScript 610 User Guide
Silentwriter
SuperScript 610
User's Guide
PROPRIETARY NOTICE AND LIABILITY DISCLAIMER
The information disclosed in this document, including all designs and related materials, is the valuable property of NEC Corporation (NEC) and/or its licensers. NEC and/ or its licensers, as appropriate, reserve all patent, copyright and other proprietary rights to this document, including all design, manufacturing, reproduction, use, and sales rights thereto, except to the extent said rights are expressly granted to others.
The NEC product(s) discussed in this document are warranted in accordance with the terms of the applicable NEC product specification. However, actual performance of each such product is dependent upon factors such as system configuration, customer data, and operator control. Since implementation by customers of each product may vary, the suitability of specific product configurations and applications must be determined by the customer and is not warranted by NEC.
To allow for design and specification improvements, the information in this document is subject to change at any time, without notice. Reproduction of this document or portions thereof without prior written approval of NEC is prohibited.
Silentwriter is a U.S. registered trademark of NEC Corporation. All other product, brand, or trade names used in this publication are the trademarks or registered trademarks of their respective owners.
©Copyright, WinRefs 1993, Destiny Technology Corp. Ver. 1.0
©Copyright, 1992, Microsoft Corporation
First Printing — Oct. 1993
Revised — April 1994
Copyright 1993
NEC Corporation
7-1 Shiba 5-Chome, Minato-ku
Tokyo 108-01, Japan
All Rights Reserved

Contents iii
Contents
Using This Guide ............................................................... |
ix |
|
1. |
Introduction |
|
|
How the Printing Process Works .............. |
1-2 |
|
Standard Features ..................................... |
1-3 |
|
Optional Features...................................... |
1-6 |
|
Ordering Supplies and Accessories .......... |
1-7 |
2. |
Setting Up |
|
|
Unpacking ................................................. |
2-1 |
|
Unpacking ............................................. |
2-1 |
|
Locating the Printer Items ..................... |
2-2 |
|
Operating Requirements ........................... |
2-3 |
|
Printer Dimensions ................................ |
2-5 |
|
Printer Dimensions |
|
|
with 200-sheet Hopper ........................ |
2-6 |
|
System Requirements ............................... |
2-7 |
|
External Printer Parts ................................ |
2-8 |
|
Internal Printer Parts ............................... |
2-11 |
|
Toner Cartridge ...................................... |
2-13 |
|
Preparing the Toner Cartridge ............ |
2-14 |
|
Installing the Toner Cartridge ............. |
2-17 |
|
Installing Paper ....................................... |
2-20 |
|
Interface Cable........................................ |
2-23 |
|
Power Cord ............................................. |
2-25 |
|
Installing SuperScript Printing Software 2-27 |
|
3. Printing with Your Silentwriter SuperScript 610 |
|
|
|
Silentwriter SuperScript Print Modes ....... |
3-1 |
|
GDI Mode ................................................. |
3-2 |
|
GDI Setup Screen ................................. |
3-2 |
|
GDI Option Screen ............................... |
3-5 |
|
Printing Status Option ........................... |
3-6 |

iv Contents
Manual Duplex Printing ........................ |
3-6 |
PCL Print Mode ...................................... |
3-11 |
Saving Downloaded Fonts and Macros3-12 |
|
Page Ejects - Form Feeds |
|
(PCL Mode) .................................... |
3-13 |
Printing from a Windows Application ... |
3-14 |
Printing from DOS Application .............. |
3-14 |
Printing PCL Files from |
|
DOS Command Line ........................... |
3-14 |
4.NEC SuperScript Print Manager
5.Print Status Window
6.Selecting Paper and Media
|
Paper Properties ........................................ |
6-2 |
|
Print Areas ............................................ |
6-3 |
|
Paper and Media Use ............................ |
6-4 |
|
Preprinted Forms ................................... |
6-5 |
|
Heavy Print Stock ................................. |
6-6 |
|
Envelopes .............................................. |
6-6 |
|
Adhesive Labels .................................... |
6-8 |
|
Transparency Film ................................ |
6-9 |
|
Media Purchasing Specifications ............. |
6-9 |
|
Sheet Paper.......................................... |
6-10 |
|
Envelopes ............................................ |
6-12 |
|
Adhesive Labels .................................. |
6-13 |
|
Transparency Film .............................. |
6-14 |
|
Storage Guidelines .................................. |
6-14 |
7. |
Using Fonts |
|
|
Fonts in GDI Mode ................................... |
7-1 |
|
Fonts in PCL Mode .................................. |
7-3 |
8. |
Choosing Print Options |
|
|
How to Print Using Various Media .......... |
8-2 |
|
The Standard Hopper ................................ |
8-4 |

Contents v
Multi-sheet Feed and Single-sheet Feed 8-4
Loading the Paper ................................. |
8-4 |
The 200-sheet Paper Hopper (Optional) ... |
8-7 |
Removing the Standard Hopper ............ |
8-8 |
Installing the 200-sheet Paper Hopper .. |
8-9 |
Hopper Feed ........................................ |
8-10 |
Manual Feed ........................................ |
8-13 |
Removing the 200-sheet Hopper ........ |
8-15 |
Output Paths ........................................... |
8-16 |
Face-up Tray ....................................... |
8-17 |
Face-down Door.................................. |
8-17 |
9. Maintaining Your Printer |
|
Redistributing the Toner ........................... |
9-2 |
Cleaning the Printer .................................. |
9-7 |
Replacing the Toner Cartridge ................. |
9-8 |
Cleaning the Printer Mechanism ........... |
9-8 |
Cleaning Conditions .......................... |
9-9 |
Parts to Be Cleaned ......................... |
9-10 |
Cleaning Procedure ......................... |
9-12 |
Installing the Toner Cartridge ............. |
9-16 |
Transporting the Printer .......................... |
9-22 |
Removing the Toner Cartridge ........... |
9-22 |
Removing the 200-sheet Hopper ........ |
9-24 |
Removing the Interface Cable ............ |
9-24 |
Removing the Power Cord .................. |
9-25 |
Check List Before |
|
Transporting the Printer ........................ |
9-26 |
10. Troubleshooting |
|
Print Quality Maintenance ...................... |
10-2 |
Paper Jam................................................ |
10-2 |
Locations of Potential Paper Jams ...... |
10-3 |
Removing Jammed Paper ................... |
10-3 |
Paper Jams in the Hopper ................ |
10-4 |
Paper Jams in the Fuser Unit ........... |
10-5 |
Points to Check to Avoid |
|
Paper Jams ........................................ |
10-7 |
Testing the Printer .................................. |
10-8 |

vi Contents
Status Messages .................................... |
10-10 |
Installation Problems ........................ |
10-10 |
Operating Problems .......................... |
10-14 |
Output Quality ...................................... |
10-26 |
Light Page ......................................... |
10-26 |
Blank Page ........................................ |
10-27 |
Black Page ........................................ |
10-28 |
Streaked Page .................................... |
10-29 |
Spots on Back of Paper ..................... |
10-30 |
Blank Spots ....................................... |
10-31 |
Solid White Vertical Line ................. |
10-32 |
Graphics Appear Coarse |
|
in GDI Mode ................................... |
10-33 |
Text Appears Jagged or Low |
|
Resolution in GDI Mode ................. |
10-33 |
Unexpected Font in Either GDI or |
|
PCL Mode ....................................... |
10-34 |
Unexpected Font in PCL Mode ........ |
10-35 |
Shifted or Broken Image ................... |
10-35 |
Allocating Virtual Memory .................. |
10-36 |
Commonly Asked Questions ................ |
10-38 |
ACharacter Sets
BOptimizing Printer Performance
CSpecifications
DInterface Cable Specifications
ERemoving SuperScript Files from Your System Glossary
Index

Contents vii
List of Tables
1-1 |
Supplies and Accessories ............... |
1-7 |
6-1 |
Paper Specifications ..................... |
6-10 |
6-2 |
Envelope Specifications ............... |
6-12 |
6-3 |
Label Specifications ..................... |
6-13 |
6-4 |
Transparency Specifications ........ |
6-14 |
8-1-a Recommended Printing Methods |
|
|
|
[The Standard Hopper] ................... |
8-2 |
8-1-b Recommended Printing Methods |
|
|
|
[Optional 200-sheet Hopper] .......... |
8-3 |
10-1 |
Simple Troubleshooting ............... |
10-1 |

viii Contents

Contents ix
Using this Guide
This guide provides an introduction to the NEC Silentwriter SuperScript 610 printer and includes information about its setting up, features, operation, and maintenance.
If you are just beginning to use it, you may want to read this entire user’s guide to familiarize yourself with the printer. If you have been using the printer for some time, you can scan the Contents for specific information that you need.

x Contents
Introduction 1–1
1 Introduction
This guide provides complete instructions for operating your new NEC Silentwriter® SuperScript 610 printer. All printer features are explained and illustrated in detail.
Silentwriter SuperScript 610 is a new laser printer that has been developed specially for users of WindowsTM version 3.1. This printer is provided with the SuperScript software kit and requires no special add-in cards, cartridges, or cables. Silentwriter SuperScript 610 differs from other printers in that it is directly driven by the CPU of your computer; hence, it has faster response and better status information. In addition, by expanding the memory of your computer or upgrading to a more powerful PC, the performance of your SuperScript 610 can also be improved.
NEC SuperScript software supports two printing modes, namely, GDI mode and PCL emulation mode. GDI mode offers the full performance of the total printing system while the PCL emulation mode offers compatibility with existing PCL print files.
Your computer and Silentwriter SuperScript 610 communicate bi-directionally to exchange the operating status information (i. e., warm-up, paper out, paper jam, etc.) of SuperScript 610 to display messages requiring your attention on your screen, if necessary. Hence, you can focus on your work without referring to the printer operator panel periodically, a benefit brought by the SuperScript software.

1–2 Introduction
HOW THE PRINTING PROCESS WORKS
The SuperScript 610 is designed as a personal laser printer to conserve desk space and it features low power consumption .
Whenever you send a job to the printer, an “image” of the page to be printed is temporarily written to the rotating surface of an electrophotographic (EP) drum. This image acts like a magnet that attracts toner to the drum. (The toner and the drum are grouped in one self-contained cartridge.)
At the same time, paper (or transparency film or envelope) passes through the printer and near the drum. The paper is electrostatically charged as it reaches the drum.
Toner, previously attracted to the drum as image areas, is transferred to the charged paper. The paper then passes between two rollers where a combination of heat and pressure bonds the toner to the paper. The paper is then moved to the output tray.
|
|
Introduction 1–3 |
|
|
|
STANDARD |
The following list highlights Silentwriter SuperScript |
|
FEATURES |
610 features. |
|
|
|
Host-based Processing |
|
|
|
|
|
As mentioned in the introduction section, |
|
|
SuperScript uses your PC power to handle print |
|
|
tasks. |
|
|
Two Printing Modes |
|
|
|
|
|
The Silentwriter SuperScript 610 software allows |
|
|
you to select from two different modes of |
|
|
printing: |
|
|
• GDI mode provides fast, WYSIWYG (What |
|
|
You See Is What You Get) output. |
|
|
• PCL emulation mode provides compatibility |
|
|
with the popular printer language used in the |
|
|
LaserJet® IIP. Both Windows and DOS |
|
|
applications running under Windows can use |
|
|
PCL emulation mode for printing. |
|
|
Print speed: up to 6 pages per minute. |
|
|
|
|
|
Print resolution: 300 dots per inch. |
|
|
|

1–4 Introduction
Sharp Edge Technology
Silentwriter SuperScript 610 features the patented Sharp Edge Technology (SET). This feature detects and smoothes jagged edges of raster images to be printed by dividing one full dot into several subdots to be set in the appropriate position. The print quality of both text and graphics will be improved.
Paper input: from a 50-sheet hopper supporting:
Paper:
1Letter
2A4
3Executive
4A5
Envelope:
1Monarch
2Commercial 10
3DL
4C5

Introduction 1–5
Paper output: face-up tray with a maximum capacity of 50 sheets (at 64 g/m2), or face-down door.
Toner cartridge: clean, efficient printer operation centered around one easily replaceable cartridge. The Starter Toner Cartridge which is shipped with your printer will print 2,000 pages (at 5% coverage). Replacement toner cartridge will print 4,000 pages (at 5% coverage).
Product quality and support: the design quality and workmanship shared by all NEC printers, backed by our total commitment to full product support.
Power Saving Mode
This printer has the Power Saving Mode. In this mode, if there is no print job within specified time (default 15 minutes) while printer is idle, the fuser unit pauses and power consumption will be decreased. However the next printing operation needs a certain warming up time.
The printer is in the Power Saving Mode when it is turned on. You can also select either "Power Saving Mode ON" or "Power Saving Mode OFF" in NEC SuperScript Print Manager (See Chapter 4, NEC SuperScript Print Manager).
1–6 Introduction
OPTIONAL |
The optional feature available for the Silentwriter |
|
FEATURES |
SuperScript 610 include the following. |
|
|
|
Optional 200-sheet Paper Hopper supporting: |
|
|
|
Paper:
1Letter
2A4
3Executive
4A5
Envelope:
1Monarch
2Commercial 10
3DL
4C5

Introduction 1–7
ORDERING SUPPLIES AND ACCESSORIES
To order any of the following printer supplies or accessories, contact your NEC printer dealer.
Table 1-1 Supplies and Accessories
PRODUCT
ORDER NUMBER
Toner Cartridge |
135-037681-201-A |
Optional 200-sheet Hopper |
135-006432-201-A |
|
|
For a detailed description of the PCL’s printer language, the LaserJet IIP Printer Technical Reference Manual is available through the Hewlett Packard Company.

1–8 Introduction
Setting Up 2–1
2 |
Setting Up |
|
|
|
Perform the following procedures to set up your |
|
SuperScript 610. |
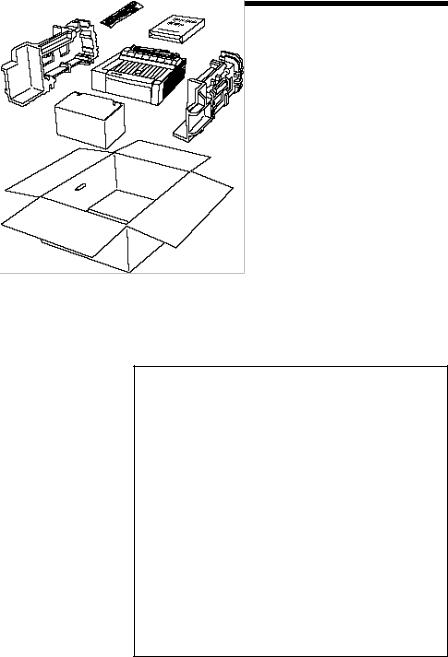
UNPACKING
1. Open the box.
Unpacking
2.Take out the documents (including software diskettes) and the power cord from the box.
3.Take out the Starter Toner Cartridge.
4.Lift the printer together with the packing materials.
2–2 Setting Up
Locating the
Printer Items
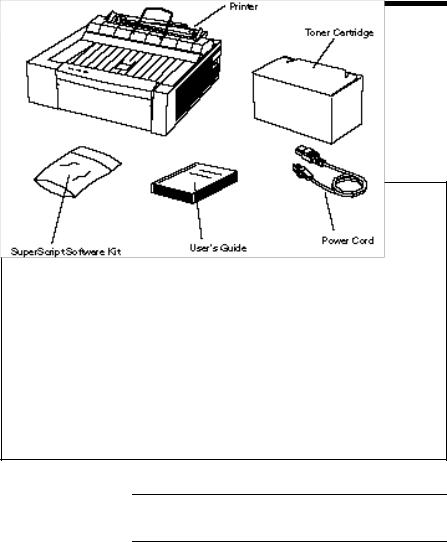
Locate the following items:
•NEC Silentwriter SuperScript 610 Printer
•SuperScript software kit
•User’s guide
•Power cord
•Starter Toner Cartridge
•Packing material (not shown)
NOTE: Save this user’s guide and all packing materials in case the printer needs to be repacked.
Setting Up 2–3
OPERATING REQUIREMENTS
The following operating requirements should be satisfied:
Place the printer on a sturdy, flat surface.
Keep the room well ventilated with a relative humidity between 20% and 80% and temperature between 50˚F and 90.5˚F (10˚C to 32.5˚C)
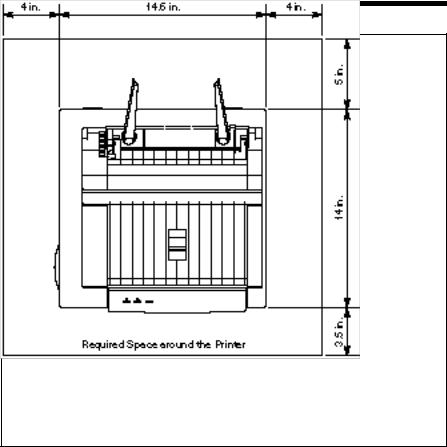
Leave adequate space around the printer for easy access (See the following figure.)
WARNING: Do not place objects near the printer that may cover the ventilation holes on its sides.
2–4 Setting Up
Setting Up 2–5
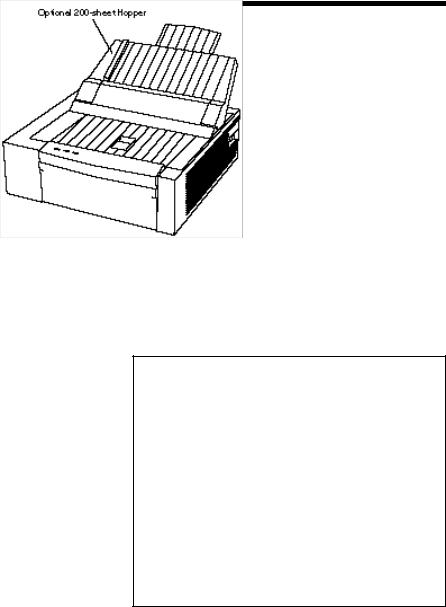
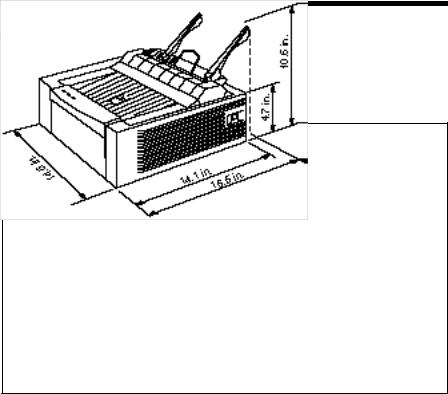
The following illustration shows the standard dimen- Printer sions of a Silentwriter SuperScript 610 printer.
Dimensions
2–6 Setting Up
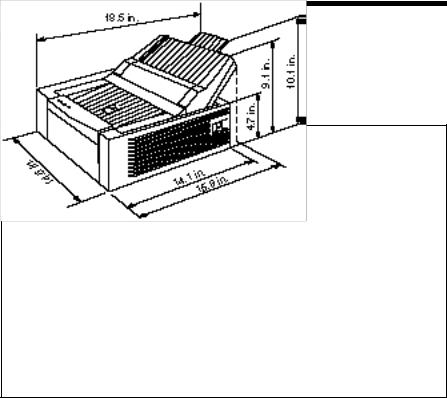
Printer Dimensions with 200sheet Hopper
The following illustration shows the dimensions of a Silentwriter SuperScript 610 printer when the 50sheet hopper is replaced by the optional 200-sheet hopper.

Setting Up 2–7
SYSTEM REQUIREMENTS
Silentwriter SuperScript 610 works with Windows 3.1, in Enhanced Mode, and requires MS-DOS 3.3 or later.
To run SuperScript, you will need an IBMcompatible PC with at least a 386SX 16-MHz CPU. This includes all 486-based and most 386-based PCs. Some older 386s cannot run in Windows Enhanced Mode, which means that SuperScript will not work properly on those systems. SuperScript will not run on 286-based PCs and other earlier systems. If you have Windows installed on your PC, you can verify whether it runs in Enhanced Mode by typing WIN/3 at the MS-DOS prompt. If your PC cannot run Windows in Enhanced Mode, the system will tell you.
SuperScript requires at least 4 megabytes PC memory (RAM), which is the amount of memory recommended by Microsoft for use with Windows 3.1. Adding more memory to your PC will increase the overall system and printer performance.
The SuperScript software requires approximately 1.4 megabytes disk space on your system’s hard disk drive. About 2 megabytes more disk space is needed to install the SuperScript TrueTypeTM Fonts. In addition, up to approximately 8.5 megabytes disk space is required for virtual memory under Windows. (If you have more than 4 megabytes RAM, you won’t need the entire 8.5 megabytes virtual memory. The total memory – PC RAM plus virtual memory – should add up to at least 12.5 megabytes. See Allocating Virtual Memory, in Chapter 10,
Troubleshooting)
A standard PC parallel printer port is required to connect with the SuperScript 610 printer through a standard parallel cable.

2–8 Setting Up
|
|
NOTE: Because of Silentwriter SuperScript 610’s |
|
|
high speed interface, it is important to use a properly |
|
|
manufactured parallel cable. Use of a poor quality |
|
|
parallel cable may affect your output. See Interface |
|
|
Cable specification, Appendix D. |
|
|
|
EXTERNAL |
The following two illustrations show external printer |
|
PRINTER |
parts. |
|
|
||
PARTS |
|
|
|
|
|
|
|
|
Setting Up 2–9
Upper Cover (also functions as a face-up tray)
Provides access to the inside of the printer and stacks printed sheets with printed side facing up. Maximum capacity: 50 sheets.
Lock Release Lever
Unlocks and opens the upper cover.
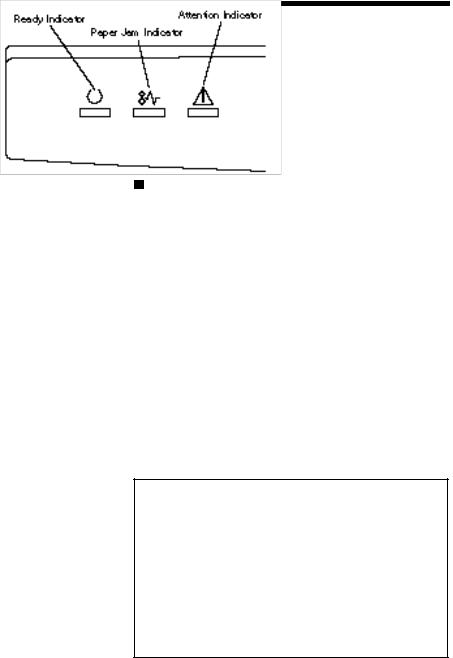
Status Panel
There are three indicator lights to show the operating status of the printer.
-Ready indicator: the left panel light is used to show that the printer is ready (steady green), warming up (rapid blinking), or in power saving mode (slow blinking).
-Paper Jam indicator: the middle panel light appears in red when the printer detects a paper jam.
-Attention indicator: the right panel light appears in red in error conditions other than the paper jams. For example, paper out, cover open, toner cartridge missing, or engine malfunction.
2–10 Setting Up
Standard Hopper
Holds up to 50 sheets of paper (at 17 lbs).
Face-down Door
Ejects the printed sheets with printed side facing down.
Power Switch
Turns the printer off or on.
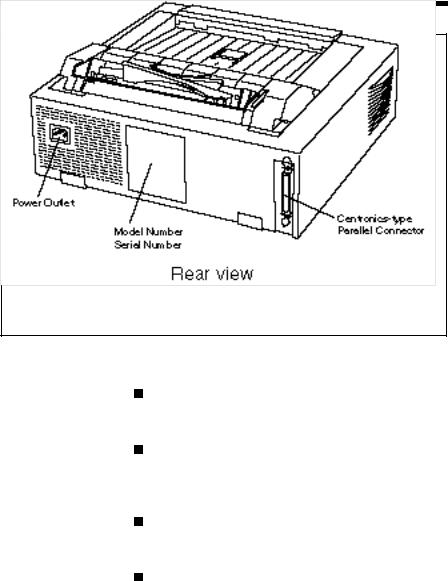
Model Number
Indicates the model number of your printer.

Setting Up 2–11
Serial Number
Indicates the serial number of your printer (You need to enter this number on the warranty registration)
Parallel Interface
Provides connection to the Centronics-type parallel interface connector of your computer.
Power Outlet
Connects the power cord to a power outlet.
INTERNAL
PRINTER
PARTS
2–12 Setting Up
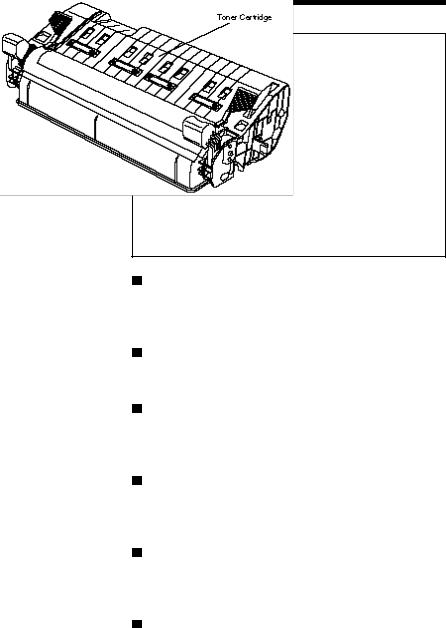
Toner Cartridge
Contains the toner powder used in the printing process and the EP drum.
Paper Guide Ribs
Guides the sheets to the fuser unit.
Transfer Roller
A high voltage roller that attracts the toner on the
EP drum.
Laser Diode Unit
Exposes and generates the print image on the EP drum surface.
Erase Unit
Equalizes the distribution of electric potential on the EP drum.
Fuser Unit
Fixes the toner to the paper.
 Loading...