

Speaker
SP-P4046
Quick Start Guide / Guide de démarrage rapide
Guida rapida / / Schnellstartanleitung
Guía de inicio rápido /
Contenls guym
• Speaker x 2 • Speaker wire (1500mm) • Mounting bracket x 4 • Extension biock x 4
• Speaker screws (10mm ien^h) x 12 • Quick Start Guide • Pad x 2 • Ciamp x 2
Follow these steps to connect the speaker to your LCD monitor
1. Turn off the power to the LCD monitor.
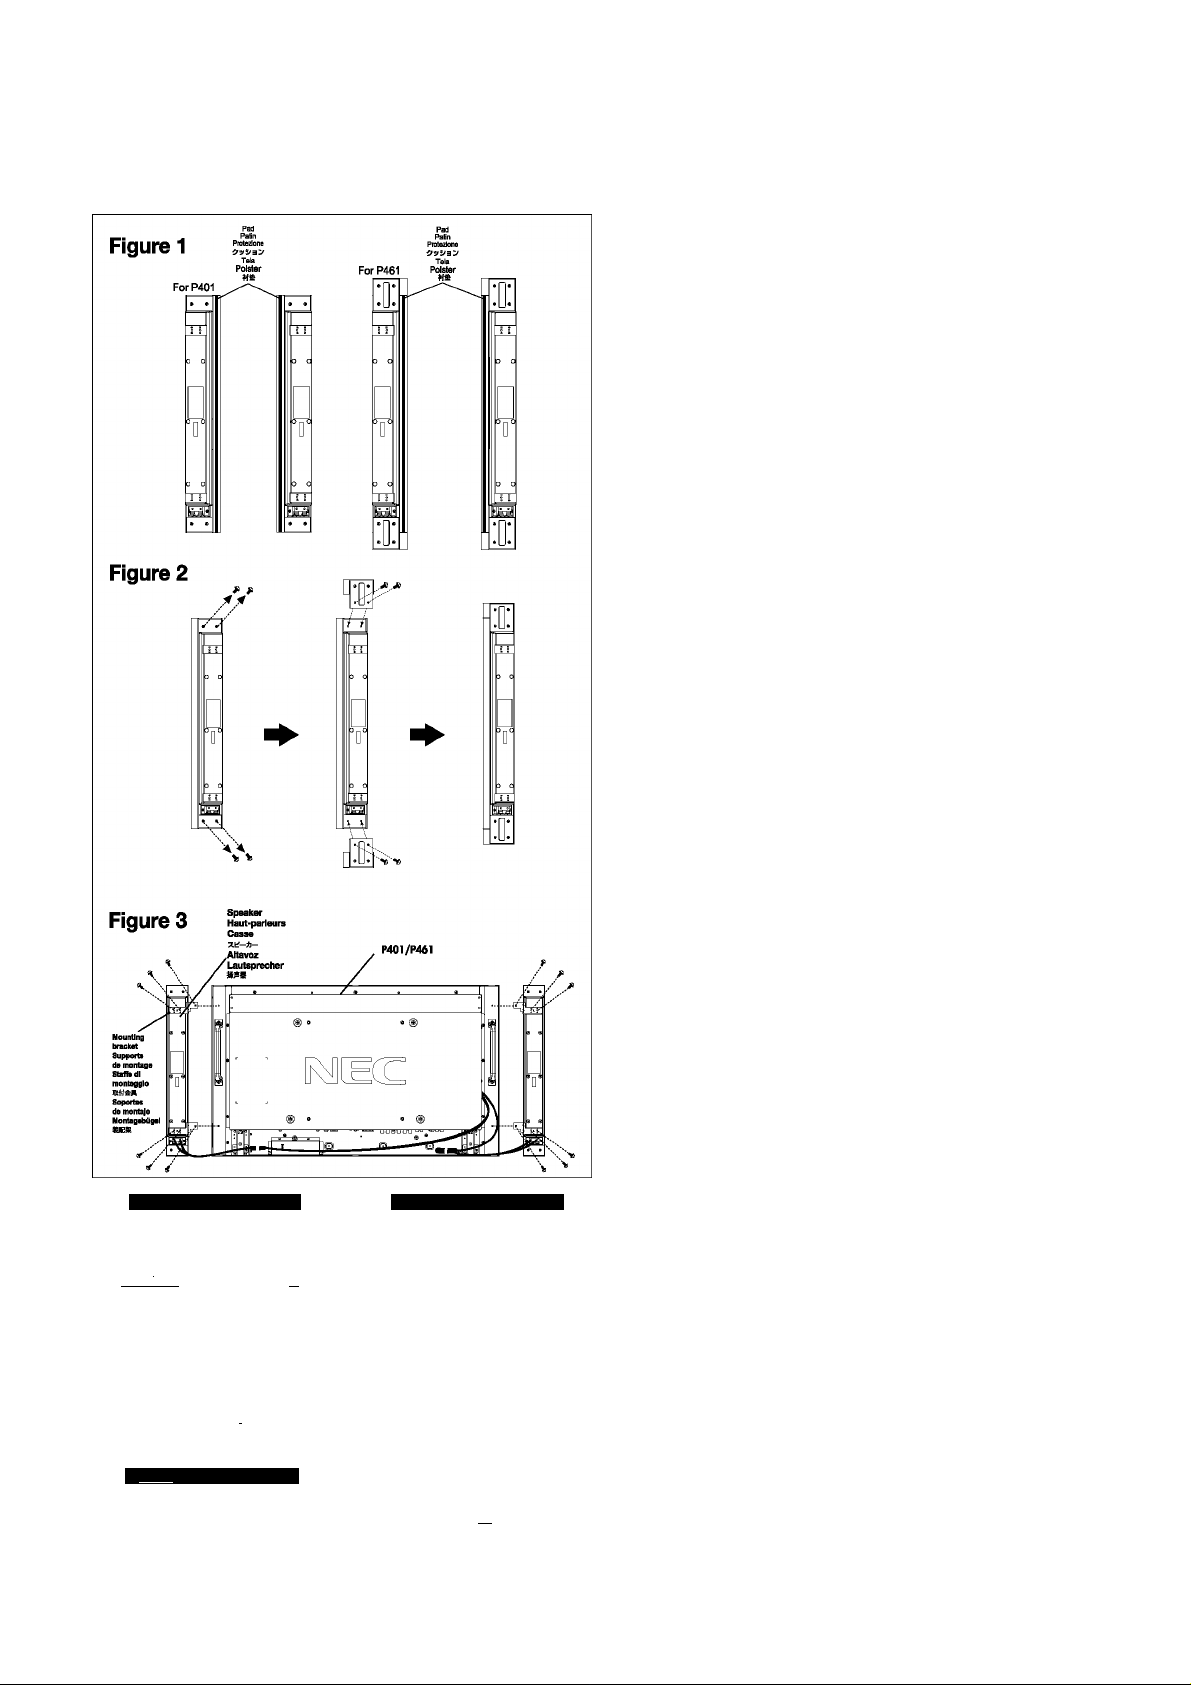
2. Attach the p^ to each speator. (Figurel)
3. if mounting speakers on the P401, proceed to step 4. if mounting speakers on the P461, you wiii
need to attach the extension biockstotheendsofthespeaters. Remove the tour screws attached to the
speaker. Use the same screws to attach the extension biock to the speaker. Repeat tor other biock. (Figure2)
4. Screw appropriate mounting brackets into appropriate position on each speater (2 bractets per speaker).
Use the brackets iabeied (R) on the right speator and brackets iabeied (L) on the left speaker.
5. Attach mounting bracket / speakers to the LCD monitor using one (1) biack 10mm screw(inciuded)
per bracket. (Figures)
6. Once both speakers are attached to the LCD monitor, connect the speater wires first to the terminals on the
LCD and then to the terminals on the attached speakers. (RgureS)
The red wire (+) connecto to the red (+) terminal on the spealW.
The black wire (-) connects to the black (-) terminal on the speaker.
To manage einess speaker wire, coll the speaker wire and wrap It using included damp.
7. Turn the LCD monitor power on.
Do not hold the display by the speakers when moving or shifting the display.
Troubleshooting
No speakersound
• Check that the speaker wire is correctly attached to the LCD monitor and to each speaker terminal.
• Check the volume setting.
• Check the mute button.
Cleaning the Cabinet
• Follow the "Recommended Use" in the displa/s user manual.
Specifications
• Power 15W +15W @8 ohm
• Frequency response 100Hz-25kHz
• Dimension (Net) 70.0mm(W) x 532.2mm(H) x 59.0mm(D) (without extension block)
•Weight (Net) 1.0 kg
Contenu
• Haut-parleur x 2 • Fil de haut-parleur (1500mm) • Supports de montage x 4 • Prolunghe x 4
• Vis de haut-parieurs (longueur 10mm ) x 12 • Guide de démarrage rapide • Patins x 2 «Attaches x2
Suivez ces ôtapes pour brancher les haut-parleurs sur votre moniteur LCD
1. Éteignez le bouton d'alimentation du moniteur LCD.
2. Fixez le patin sur chaque haut-parleur.(Flgurel)
3. Si vous devez fixer les haut-parleurs au P401, passez à l'étape 4. Se si vogliono montare le casse su P461 è
necessario attaccare le prolunghe alle estremità delle casse. Rimuovere le quattro viti che fissano la cassa.
Usare le stesse quattro viti per attaccare la prolunga alla cassa. Ripetere per l’altra prolunga. (Rgura 2).
4. Vissez les supports de montage appropriés à leur position prévue sur chaque haut-parleur (2 supports par
haut-parleur).
Utilisez les supports étiquetés (R) sur le haut-parleur droit et les supports étiquetos (L) sur le haut-parleur gauche.
5. Vissez les supporte de mont^e/haut-parleurs sur le moniteur LCD à l'aide d’une (1 ) vis noire de 10mm par
support. (Figures)
6. Une fois que les deux haut-parleurs sont fotos au moniteur LCD, branchez les fils des haut-parleurs sur les
bornes du moniteur LCD puis sur les bornes des haut-parleurs attachés. (FigureS)
Le fil avec la ligne roi^e (+) se branche sur la borne rouge (+) du haut-parleur.
Le fil avec la ligne noire (-) se branche sur la borne noire (-) du haut-paheur.
Pour gérer le surplus de câble haut-parleur ; Enroulez le fil de haut-parleur et fartes en une bobine à l’aide de I'
attache fournie.
7. Allumez l’alimentation du moniteur LCD.
Ne tenez pas l’écran par les haut-parleurs lorsque vous le déplacez.
Dépannage
Aucun son dans les haut-parleurs
• Vérifiez que le fil du haut-parleur est correctement attaché au moniteur LCD et que chaque haut-parleur est
branché sur chaque borne de haut-parleur.
• Vérifiez le réglage de volume sur les haut-parieurs.
• Vérifiez le bouton muet.
Nettoyage du boîtier
• Suivez l’uttllsatton recommandée dans le mode d’emploi de l’écran.
Spécifications
• Puissance 15W +15W @8 ohms
• Réponse en fréquences 10Ohlz - 25kHz
• Dimensions (Net) 70,0mm(L) x 532,2mm(H) x 59,0mm(P) (senza prolunga)
•Poids (Net) 1,0 kg
Disposing of your old NEC product
\ntlkiii the European Union
I 1 EU'Wide legislatiiCED, as impleznoited in
Member State, requires that waste electzicBl
and electronic products carrying the mark
X
I
(left) must be disposed <rf separately from
nnwifll himflg'hnlH waste. This monitors suit
electrical acceeeoriea, euch as signal cables or power
cords. When you need to dispose cd your NEC display
products, please follow the guidance of your local
authorit?, or ask the shop where you purchased the
product, at if applicable, follow any agreementa made
between youreelf and NEC.
The mark on electrical and electronic products only
applies to the current European Union Miember States.
Outride the European Union
If you wish to dispose of used electrical and electronic
products outside the European Union, pleaae contact
your local authority ao as to comply with the correct
disposal method
Smaltimento del prodotto NEC usato
NenTIrioDe Europee
' I La legislazione in vigore ncllUEc applicata dri
gingob Stato Membro prevede che i prodotti
Ж
elettrici ed elriaonid diameaai che recano il
I
ainibolo iltustiato a sinistra debbano essere
smaltiti separatamente rispetto a^ altri rifiuti domesticL
Questo comprende ì monitor e gli accesscri elettrici, come
i cavi segnali o di alimentazione. Per smaltireimomtoiNEC,
petanto, occrare infomiarsi presso gli enti locali oppure
EUminatioii des andem produits NEC
ic NEC et Tout-mime,
électnnìqueft ne t'q)pliqiie qn'am madKet actuels de ITTmoo
Ea debora de PDaioa fsrnp^iirnn
ia en deben de lUnìon Eunpéeane, eenìlls
tea Butothda hxalea camniéee pomieqwotet tee andes
chiedere ri punto vendha dove è stato acquistato il prodotto;
inahemotiva, occone attenersi a quanto eontenuto nei
contratti stqialati tra voi e NEC.
11 contrassegno sui prodotti elettrici ed elettrmid viene
qiplicato unicamente ai paesi che famn parte dell'Unione
Eun^ea.
Flinrl dall'Unione Europea
Se si desidera smaltite dei pudotti elettrici ed elettronici
fiuti dall'Unione Europea, contattare gli end locali
congietBnti ri fine di ^licate il metodo corretto di
toduiti fleetriquM et
Contenuti
• 2 Casse • Cavo casse (1.500 mm) • 4 Staffe di montaggio • 4 Bloc d’extension
• 12 Viti casse (da 10 mm) • Guida rapida • 2 Protezioni • 2 Una abrazadera
Attenersi alle fasi che seguono per coiiegare le casse ai monitor LCD
1. Disattivare l’interruttore d’alimentazione del monitor LCD.
2. Attaccare la protezione su ciascuna cassa. (Rgura 1 )
3. Se si stanno montando gli altoparlanti sul rTKxtello P401, passare al punto 4.
Si les haut-parleurs sont installés sur le P461, vous devrez fixer les blocs d’extension aux extrémités des hautparleurs. Retirez les quatre vis qui permettent de les fixer aux haut-parleurs. Utilisez ces mêmes vis pour fixer le
bloc d'extension au haut-parleur. Répétez l’opération pour l'autre bloc. (Figure2)
4. Mentore le stoffe di montaggio appropriate nelle posizioni appropriate di ciascuna cassa (2 stoffe per cassa).
Usare le staffs contrassegnate con (R) della cassa destra e le stoffa contrassegnate con (L) della cassa sinistra.
5. Montare il gruppo stofto/cassa sul monitor LCD usando una (1 ) vite da 10 mm per staffa. (Rgura 3)
6. Una volta che entrambe le casse sono attaccate al monitor LCD, collegare i cavi delle casse ai terminali sul
monitor LCD e poi ai terminali delle casse. (Figura 3)
Il cavo rosso (-•■) si collega al terminale rosso (+) della cassa.
Il cavo nero (-) si collega al terminale nero (-) della cassa.
Per gestire il cavo in eccesso: arrotolare II cavo e fermarlo usando il fermaglio tornito in dotazione.
7. Accendere il monitor LCD.
Quando si sposto il monitor, non aflerrarlo per le casse.
Risoluzione dei probiemi
Assenza sonoro casse
• Controllare che II cavo delle casse sia collegato In modo corretto, ed ai terminali corretti del monitor LCD
e delle casse.
• Controllare il volume delle casse.
• Controllare il tasto Mute.
Pulizia del mobile
• Eseguire le raccomandazioni d'uso del Manuale.
Specifiche
• Potenza 15W + 15W a 8 ohm
• Risposto di frequenza 100Hz - 25kHz
• Dimensioni (Netto) 70,0 mm (L) x 532,2 mm (A) x 59,0 mm (P) (sans bloc d’extension)
•Peso (Netto) 1i0l4
Contenido
• Altavoz X 2 * * Cable de los altavoces (1500 mm) • Soportes de montaje x 4 * Aglutinador x 2
• Tomillos para los altavoces (10 mm de largo) x 12 • Guía de Inldo rápido ■ Tela x 2 • Bloque alargador x 4
Siga estos pasos para conectar el altavoz al monitor LCD
1. Coloque el conmutador del monitor LCD en la posición de apagado.
2. Acople la tela a cada altavoz (Figura 1).
3. SI va a montar altavoces en el modelo P401 vaya al paso 4.
SI los altavoces serán montados en el modelo P461, necesitará conectar los bloques alargadores a
los extremos de los altavoces. Retire los cuatro tomillos conectados al altavoz. Utilice los mismos
tomillos para conectar el bloque alargador al altavoz. Repita la operación con el otro bloque. (Figura 2)
4. Atornille los soportes de montaje adecuados en la posición correcta en cada altavoz (2 soportes por
altavoz).
Utilice los soportes etiquetados con (R) en el altavoz derecho y los etiquetados con (L) en el altavoz
izquierdo.
5. Atornille el soporte de montaje y los altavoces al monitor LCD utilizando un (1) tomillo de lOmm de
color negro por soporte (Figura 3).
6. Cuando haya acoplado los dos altavoces al monitor LCD, conecte sus cables a los terminales de éste
y, a continuación, a los terminales de los altavoces montados (Figura 3).
El cable con la línea de color rojo (+) se conecta al terminal de color rojo (+) del altavoz.
El cable con la línea de color negro (-) se conecta al terminal de color negro (-) del altavoz.
Para administrar el cable sobrante de los altavoces: Enrolle el cable de los altavoces y envuélvalo
utilizando el aglutinador incluido.
7. Encienda el monitor LCD.
No agarre los altavoces cuando mueva o levante la pantalla.
Solucionar problemas
Los altavoces no emiten sonido
■ Compruebe que el cable de los altavoces está conectamente conectado al monitor LCD y, a su vez,
aquéllos están perfectamente conectados a sus terminales.
< Compruebe la configuración del volumen de los altavoces.
• Compruebe si el botón de silencio está activado.
Limpiar la carcasa
< Siga las instrucciones de uso recomendado del manual del usuario de la pantalla.
Especificaciones
• Potencia: 15 W + 15 Wa 8 ohm
• Respuesta de frecuencia: 100 Hz - 25kHz
• Dimensiones (netas): 70,0 mm (A) x 532,2 mm (L) x 59,0 mm (F) (sin bloque alargador)
• Peso (neto): 1,0 kg
Lleferumfeng
• Lautsprecher x 2 • Lautsprecherkabel (1500 mm) • Montagebügel x 4 • Polster x 2
• Lautsprecherschrauben 10 mm x 12 • Schnellstartanleitung • Klemme x 2 • Erweiterungsblöcke x 4
So verbinden Sie die Lautsprecher mit Ihrem LCD-iMonitor
1. Schalten Sie den LCD-Monitor über den Ein-/Ausschalter ab.
2. Bringen Sie an jedem Lautsprecher ein Polsteren (Abbildung 1).
3. Wenn Sie die Lautsprecher am P401 montieren, fahren Sie mit Schritt 4 fort.
Bringen Sie zum Montieren der Lautsprecher am P461 die Erweiterungsleisten an den Enden
der Lautsprecher an. Entfernen Sie die vier Schrauben des Lautsprechers. Verwenden Sie
diese Schrauben zum Anbringen der Erweiterungsleiste am Lautsprecher. Wiederholen Sie
die Schritte nun beim Befestigen der anderen Leiste. (Abbildung 2)
4. Befestigen Sie die Montagebügel an der richtigen Position an den einzelnen Lautsprechern (2
Bügel pro Lautsprecher).
Verwenden Sie die mit (R) gekennzeichneten Halterungen am rechten Lautsprecher und die
mit (L) gekennzeichneten Halterungen am linken Lautsprecher.
5. Befestigen Sie die Lautsprecher mit den Montagebügeln am LCD-Monitor; dazu verwenden
Sie jeweils eine schwarze 10-mm-Schraube pro Bügel (Abbildung 3).
6. Nachdem Sie beide Lautsprecher am LCD-Monitor angebracht haben, verbinden Sie
die Lautsprecherkabel mit den Anschlüssen am LCD-Monitor; das andere Ende der Ka
belverbindungen verbinden Sie mit den Anschlüssen an den Lautsprechern (Abbildung 3).
Das Kabel mit der roten Kennzeichnung (+) wird mit dem roten Anschluss (+) am Lautspre
cher verbunden.
Das schwarz gekennzeichnete Kabel (-) wird mit dem schwarzen Anschluss (-) am Lautspre
cher verbunden.
So verfahren Sie mit überschüssigem Lautsprecherkabel: Wickeln Sie das Lautsprecherka
bel auf und befestigen Sie es mit Hilfe der mitgelieferten Klemme.
7. Schalten Sie den LCD-Monitor ein.
Fassen Sie den Monitor nicht an den Lautsprechern, wenn Sie ihn bewegen.
Problemlösung
Kein Ton aus den Lautsprechern
• (Jberprüfen Sie, ob die Lautsprecherkabel richtig an die Anschlüsse von LCD-Monitor und Lautspre
cher angeschlossen sind.
■ Überprüfun Sie die Lautstärkeeinstellung an den Lautsprechern.
• (Jberprüfen Sie, ob die Stummschaltungstaste betätigt wurde.
Gehäuse reinigen
• Bitte halten Sie sich an die Empfehlungen in der Bedienungsanleitung des Monitora.
Technische Daten
■ Ausgangsleistung: 15 W +15 W bei 8 Ohm
• Frequenzgang: 100 Hz bis 25kHz
• Abmessungen (netto, B x H x T):70,0 x 532,2 x 59,0 mm (ohne erweiterungsblock)
• Gewicht (netto): 1,0 kg
ЯГ (cSäR ЬГ < fc'é и. ВеЩ
2. *ЯЬГ-Л-1С>7у1^э>«ЧгиШТ<йги. (Rgurel«i)
3. яе-л-*р401 l=ftu#lJ•«JSéli¥Щ4(=Jt^7?osй^'.яt:-л-*P461
4. (ÄS 10mm) |сТ#яе-Л-|Св1и(417Т<;£ЗИ. (1*1=-Э*2в)
*1Мсояе-Л-1::|* (R) iOiifiÄÄv *Я©ЯЕ-Л-1:;« (L) <0iifiÄÄStyftitT</£Sl4
5. (ÄSIOmm) -СЯЬ:-Л-«7*-ГЯГи-П=«У#1ГС<ЙЗП. (Р1дигеЗ#1Я)
6. яе-Л-*х-гЯГИ’1=®У^17», x-fЯГH’¿Я^Í-Л-*»40Яtí-Л—^—
(Р1д1геЗ#Ш)
A7j4№©«ÉIÍv li^ЙíГ7Я (+). ||Й»-74’ГЯ (-) rt. Яtí-Л-^г-Г^^йtÄГír«Jléldu
S#Oi'7>yt-T?ÄS«WBlUT<Ä:St'.
7. Г-гЯГИ'О£«а8Я4’у?«0М1сЬ*Г.
‘т^ЯГ^4’OTSI^t»эTШ■í■*J:5l=L/T</£SC^.
• яе-л-ó—г;ий*г-гяги'4:яе-л-0яь:-л-«?(сшь<5ййзпти«й'Я'<т<йзи.
■ Яít«íilCÄ■эTt^S^íA/й».
Ф-Vtí^y Ь®Ё¥ЛП
■ x-f ЯГИ'*«;ОТ^д7Л'«::П1<Я31Ч
й:Ш
SKA-^d *): в70.0mmXns 532.2гт¥пх№т3 59.0mm
•ИАЯЯ(14:): 1.0kg
n«iA
яе-Л-*#х2. яе-Л-0—Лк (ISOOmm) х2, ®ArPyá»x4v «fiÄÄx4, SltUfí(ín4irx12v
Ib der EoropilfclKO Diloa
AoBeibalb der EumpUechen Union
bei doi zuBlüiid^eii üTtlichen BebOrden
ЯГ1/4* UT < Л: S И.
: 15W+15W@8Q
100Hz'^25Hz
(4dí). ^y'>g>x2v ^7>/1-x2
Entioi^ng alter NEC Gerftte
Desecho de productos NEC obsoletos
En la Unión europea
A medida que la l^úlacidn de la Uni&i
Eun^a se va inq>lemattando en los distintos
estados mieiiibros, se está inyiTiianíiD que los
X
pfoductM residualea eléctricos y electrónicos
que llevanlamatcsque se mueatra a la izquierdase desechen
por separado de los residuos domésticos ce
desechar monitores NEC, siga las instiuccioiiBS de las
aatoridsdes locales, solicite infiamación al respecto eai el
establecimiento donde haya adquirido el momba o, si
corresponde, siga las condiciones acordadas con NEC.
Esta marca en productos eléctricos o electrónicos sólo se
^lica a los estados miembros actuales de la Unión europea.
Fuera de la Unión europea
Para desechar productos eléctricos o electrónicos fiiaa de la
Unión europea, póngase en contacto con las autoridades
locales pan utilizar el m^do de desecho adecusdo.
lesde monitores hai
s de alimartación o de sefial. Para
(Пдиге2#И)
NECS-T.íXrb4’0**l=OL'r
EUSiiffl4BT«ÍTáiívTV'5Ífe#l::*<J#.
EUüPMBi^-etíÉffiiO'T—¿7¿«E«Sh.TV'5
X
'
-- -
' «-Л«*5
ätfct33*s^i®ra-cauia®5a:!6ii*ß
ЩЙ®ЕийНВ1^-и®*ИЯё1г*-Г.
ЕиЯ15ВПФ£««£^
ШтШЩ-
• mäSx2.S^äS#ä(1500mm).äaaSx4.rS«S№x4
• tS;SS*M(ÍÍS10mm)x12.№ÍXn«S-WSx2.a*x2
LCD MSíS
1. SfflLCDBSSW*®.
2. (®1)
3. ш^м*ЯР401±, штттл. шй^*шр461±,
б. (Щ2)
4. (»tйíä2.^зas). &íb*(r)íiíi38b
5. ЙДМИЙ- 10mm LCD
(S3)
7. fTffLCDMSS*®.
Д ^siiiä*«0iSäi*eaMss.
ятя
• шаФ*яя¥Щф MssaíTíHí.
■ íb$15W+15W@8ohml
• 100Hz-25kHz
• 70.0mm(W) x 532.2mm(H) x 59.0mm(D)
• Ml.0kg
gi3t(L)a!is*ss®t«i0isii±.
. (®з) ттш (+) (+) «i. н
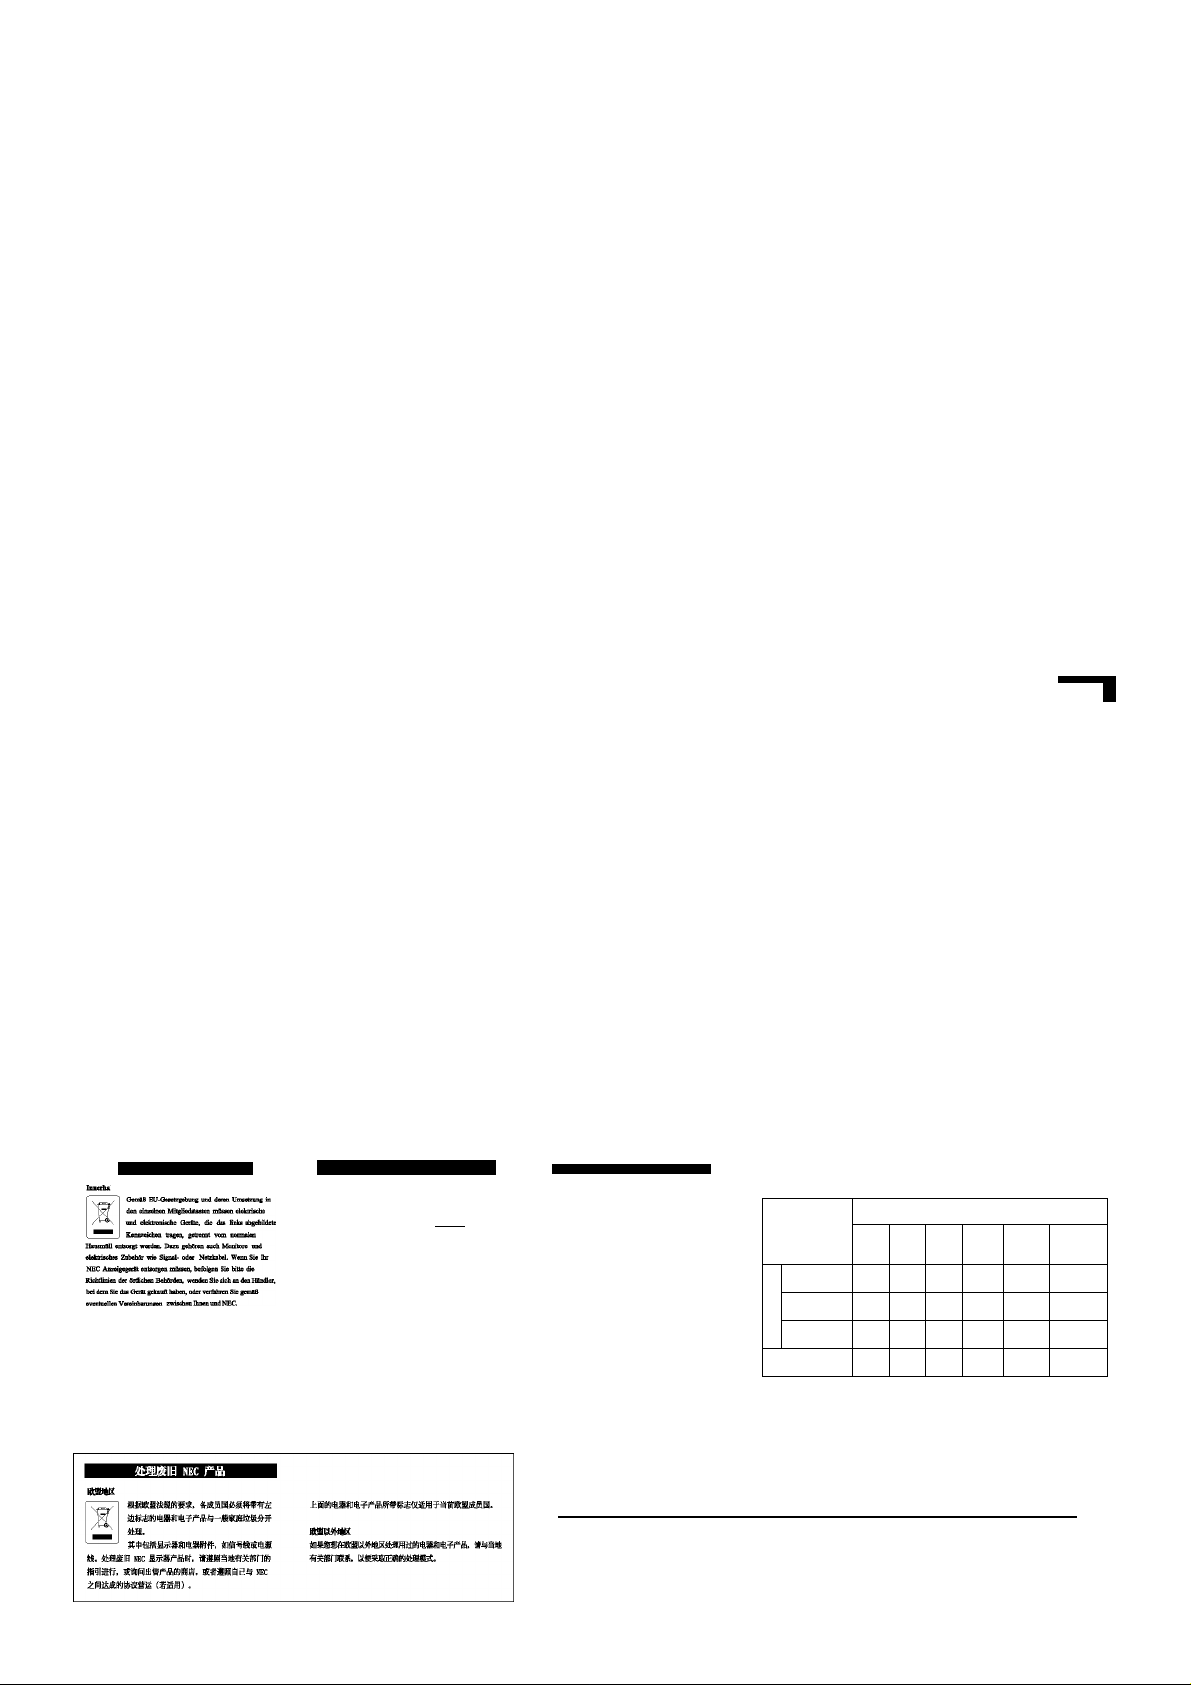
Chinese RoHS -information relevant for Chinese mark
Ш
K*ífo#saáSKS tai-.
(Pb)
(Hg)
О О о о о О
X
«1
О: T11363- 2006#««ЖМ
PSH^^T.
О о о о о
о О о о о о
О о о о о
О
(Cd)
ÄtfriS
[Cr(Vl)]
nrnt
»Ш-ШШ
(PBDE)
Turkish RoHS information relevant for Turkish market
In Conformity with the EEE Regulation
 Loading...