


S
UPER
N
S
CRIPT
ETWORK
870
Q
UICK
S
Basic Setup — 1, 2, 3
You need to set up your SuperScript™ 870 printer, 870 NIC, and
network so they work together. This QuickStart provides basic setup
instructions for the most popular systems using software on the
870
Network Solutions CD
.
1 - Install the 870 NIC in your printer and print
a test page.
Follow the instructions inside for installing and testing the 870 NIC.
2 - Assign an IP address to the 870 NIC.
Follow the instructions for Windows 95/98, Windows NT 4.x,
Windows for WorkGroups, or Windows Peer to Peer Printing.
(This step is not necessary for MacOS.)
3 - Configure your network to use the 870 NIC.
Follow the instructions for Netware 4.x,
Netware 3.x, lpr printing, or MacOS.
(For UNIX setup, see the
Network User’s Guide
)
TART
Supported Printing Environments
The 870 Network Upgrade Kit comes with
software for using the 870 printer on several
network operating systems or protocols,
including
• Microsoft
Windows NT 4.x, and UNIX
• NetWare
• Mac™ OS 7.x and 8.x using AppleTalk
• Peer to peer printing for Windows 95/98
and Windows NT 4.x
®
Windows
®
versions 3.x and 4.x
Your Starting Point
The instructions in this guide assume that you are
familiar with your network operating system and
layout, that your system is configured and
operating properly, and that your SuperScript 870
printer drivers are already properly installed.
See the SuperScript 870
information about your 870 Printer and its drivers.
®
95/98,
®
using TCP/IP
User’s Guide
for more
®
If you have difficulties setting up, see the SuperScript 870
If you still need help, contact NEC Printer Technical Support at their web site (www.nec.com/nectechsupport)
or phone 1-800-632-4650.
Network User’s Guide
for more detailed explanations.
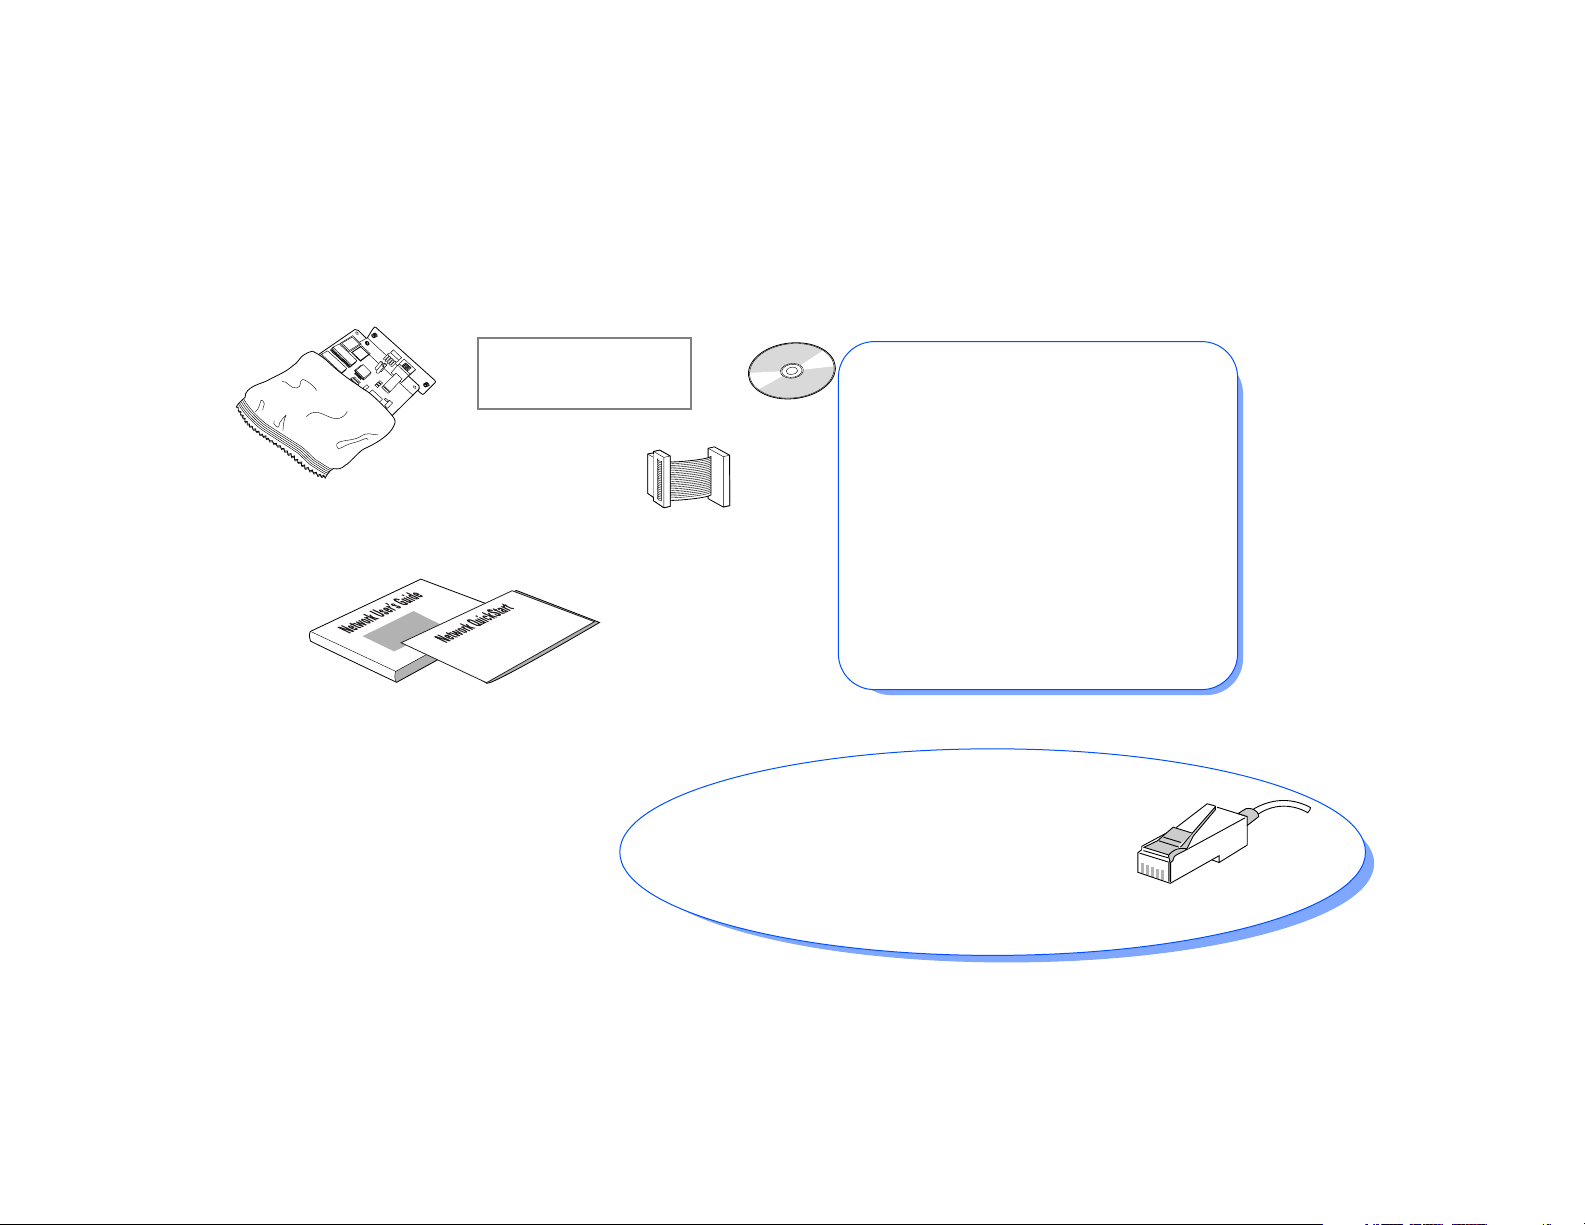
What’s in the SuperScript 870 Network Upgrade Kit
870
Network Solutions CD
Network Interface Card
(870 NIC)
870
Network User’s Guide
[PENDING
Mounting Bracket
plus 1 or 2 screws???]
870
Network QuickStart
870 NIC
Interface Cable
SuperScript MAP utility for Windows
95/98, and Windows NT setup.
Windows IPX peer to peer redirector for
Windows 95/98 and NT
Windows IP peer to peer redirector for
Windows 95/98 and NT
NT BootP for Windows 95 and Windows
NT and BootP Lite for Windows for
WorkGroups (for setting IP address)
Utilities and drivers for MacOS
Network Utilities for UNIX
Online Network User’s Guide
Read Me file
If you do not have a CD-ROM drive,
contact NEC Printer Technical Support
at www.nec.com/nectechsupport
or phone 1-800-632-4650
Additional Hardware
You’ll need a phillips-head screwdriver to install the
870 NIC in your printer and connect it to your
network. You’ll need a twisted pair cable with
10/100Base-T connectors to connect
it to your network.
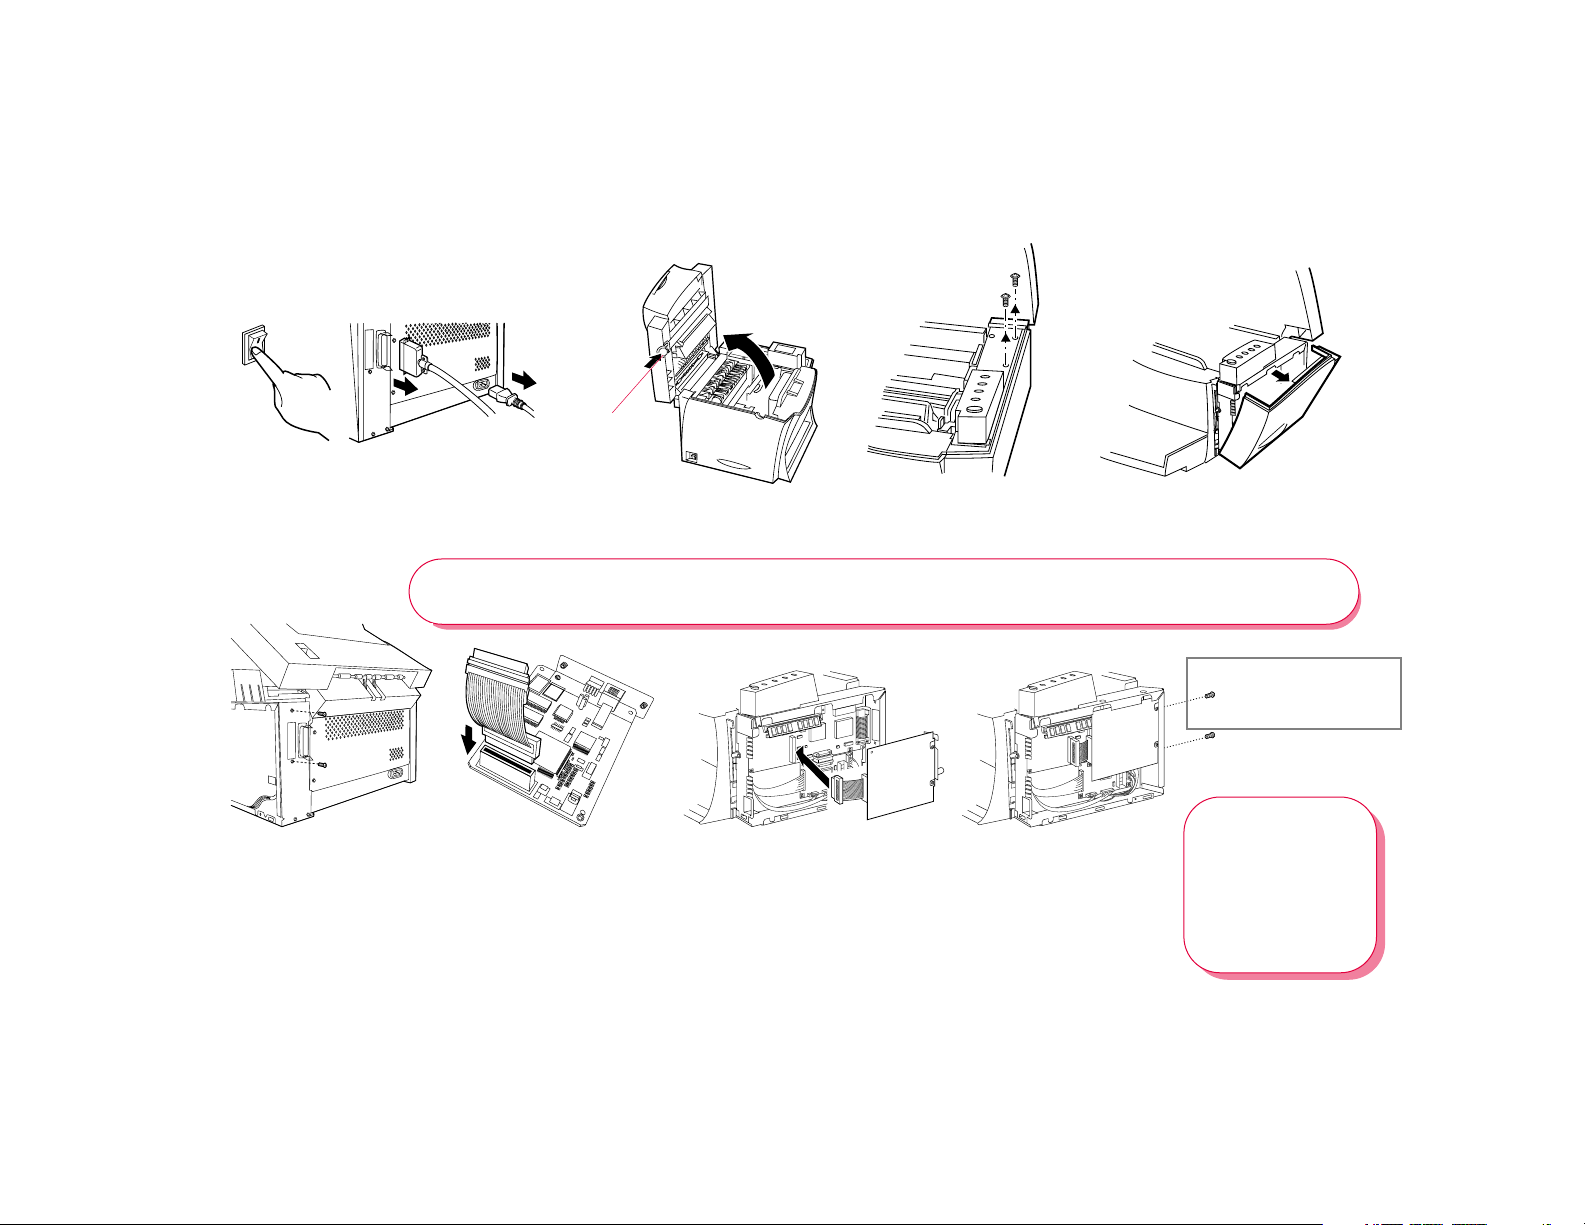
Installing the 870 NIC
ABCD
Top Cover
Release
Turn off the printer, remove the
power cord from the rear panel of
the printer, and disconnect the
printer parallel cable from the port.
Press the Top Cover Release
button and lift the Cover.
Remove the two screws
that hold on the
printer’s side cover.
Remove the side cover by
pulling it out and then up.
Caution!
also houses the optional memory expansion module (SIMM). Avoid touching the SIMM or controller board.
EF
Remove the two small
screws from the
expansion slot on the rear
of the printer and remove
the plate.
Carefully align the pins
and connect one end of
the interface cable to the
connector on the NIC.
When installing the NIC, take proper static control precautions to avoid damaging it. This area
G
Connect the free end of the
interface cable to the
connector on the controller
board.
H
Align the NIC with the
expansion slot. Then,
reinstall and tighten the
two small screws
removed in step E to
firmly attach the NIC to
the printer.
[PENDING
Mounting Bracket
plus 1 or 2 screws???]
To finish, replace
the side cover.
Reinstall and
tighten the screws
you removed in
step
C
. Then, close
the Top Cover of
the printer.

Testing the 870 NIC
Follow these steps to verify that the NIC is
installed and operating properly.
1. Reattach the power cord to the printer,
plug in the printer, and turn it on (it
may take up to 90 seconds to warm
up). Each time you turn on the printer,
it prints a Network Settings page with
NIC status information.
2. Turn off the printer.
3. Connect the network’s twisted pair
cable with 10/100BaseT connectors to
the new network port on your printer.
Also reattach the parallel cable if
necessary.
Now, turn on your SuperScript 870.
The Printer is ready to receive jobs. Next,
see the instructions for configuring the
870 NIC for your system.
Restoring Factory Defaults
To properly configure the 870 NIC, it
must be new, or restored to factory
default settings. To restore factory
default settings, turn off the printer,
then press and hold the Operator Panel
button while turning on the printer.
Continue holding for about 20 seconds.
Using the Network Settings Page
Every time you turn on
the printer, the 870 NIC
prints out a Network
Settings Page.
Keep this page. You will
need the information
for configuring
the 870 NIC.
The Unit Serial No. is
also shown on the back
of the NIC. It is used for
printer identification in
peer to peer and
NetWare protocols.
The Network Address
is also called the
hardware address or
MAC address
This is the IP address
you assign the 870 NIC.
You can rename the
printer in AppleTalk
using the SuperScript
870 Utility for MacOS
To print another Network
Settings page, press and
hold the Operator Panel
button on the printer for
about 4 seconds.
- - - - - - - - - - - - - - - - - - - - - - - - - - - - - - - - - - - - - - Unit Serial No: 991655 Version: 05.06
Network Address: 00:40:af:79:0d:38
Network Topology: Ethernet Connector:RJ45
Network Speed: 100 Megabits
Novell Network Information
Print Server Name: NEC_991655
Password Defined: No
Preferred File Server Name not defined
Directory Services Tree not defined
Directory Services Context not defined
Frame Type: Novell 802.3
Peer-to-Peer Information
Frame Type: 802.03
Network ID: 32803
TCP/IP Network Information
Frame Type: Ethernet II Protocol Address: 131.241.45.189
Subnet Mask: 255.255.255.0 Default Gateway: 131.241.45.254
AppleTalk Network Information enabled
Frame Type: 802.2 SNAP On 802.3
Preferred Appletalk Zone:*
- - - - - - - - - - - - - - - - - - - - - - - - - - - - - - - - - - - - - - -
Novell Connection Information
Printer Name: NEC_991655_P
Peer-to-Peer Connection Information
Printer Name: NEC_991655
AppleTalk Connection Information
AppleTalk Printer Name: Jane’s 870
TCP/IP Connection Information
Port Number : 10001
- - - - - - - - - - - - - - - - - - - - - - - - - - - - - - - - - - - - - - -
enabled
enabled
enabled
File Server: NW410
Queue: NEC_991655_Q Priority: 2 Attached: Yes
Queue: NEC_991655_Q2 Priority: 1 Attached: Yes
No Notify Defined
File Server: NW312
Queue: NEC_991655_Q Priority: 1 Attached: Yes
No Notify Defined
File Server: PPD
Queue: NEC_991655_Q Priority: 1 Attached: Yes
No Notify Defined

Using the SuperScript 870 NIC Home Page
Your 870 NIC has a built in web server and home page!
To view the 870 NIC Home Page, you need to have a web
browser, such as Netscape Navigator or Internet Explorer.
THE URL IS THE IP ADDRESS YOU ASSIGN TO THE 870 NIC.
Link to NEC’s web site to download the
latest printer drivers.
Online help and documentation are at
your fingertips.
Network A dministration Options
You can use the 870 NIC Home Page for
configuring and managing network
printers. The default password is
sysadm
.
View printer status instantly.

Windows 95/98 Windows NT 4.x Windows for WorkGroups
First, Configure the IP Address and Other
TCP/IP Parameters
Here we provide instructions for using
NTBootP to set the IP address manually.
1. Insert the 870
Click on the Windows
and select
2. Type <Drive>:\NTBOOTP.EXE and
click
OK
3. Select
menu of NTBootP.
4. Enter the
and
default gateway address
5. Enter the hardware address of the
NIC. It is listed on the Network
Settings page under
Address
6. Click on Go to send the new settings
to the NIC.
After a few minutes, the NIC will
reset and print its Network Settings
page. If it doesn’t print, recheck the
hardware address entry in NTBootP.
Next, Configure Your Network to Attach
the Printer
See the instructions for peer to peer
printing, NetWare 4.x or 3.x.
Network Solutions CD
Run
.
to launch the utility.
Configure
IP address
.
Start
from the Admin
,
subnet mask
Network
button
,
, if any.
First, Install the TCP/IP Protocol
1. Click on the Windows
select
Settings
Panel
.
2. Double click on
.
the
Protocols
not in the list of Network Protocols,
click on
3. Select the
Microsoft TCP/IP Printing or Simple
TCP/IP Services is not on the list of
Network Services, Click on
install them.
4. Click on
services have been added. If the TCP/
IP protocol has just been added,
Windows will prompt for the IP
address and other TCP/IP parameters.
The new protocols and services will
not be available until the system is
restarted.
Second, Configure the IP Address and
Other TCP/IP Par ameters
We suggest using NTBootP to set the IP
address manually. (See the instructions
for using NTBootP for Windows 95/98,
shown to the left).
Third, Configure Your Network to Attach
the Printer
See instructions for lpr setup, NetWare
4.x or 3.x, or peer to peer printing.
tab. If TCP/IP Protocol is
Add
to install it.
Services
Close
when all protocols and
Start
and then
Network
tab. If either
button;
Control
and select
Add
to
First, Configure the NIC IP Address and
Other TCP/IP Par ameters
Here we provide instructions for using
BootP Lite to set the IP address manually.
1. Insert the
Click on the Windows
select
2. Type <Drive>:\BOOTPL.EXE
and click
3. Select Configure from the Admin
menu of BootP Lite.
4. Enter the
Subnet Mask
and the NIC
the Network Settings page as Ethernet
Address).
5. Click on Go to send the new settings to
the NIC.
Wait for about two minutes for the
printer and NIC to reset. The Network
Settings page should report the newly
entered IP information.
6. To verify operation, start an MS DOS
session.
At the prompt enter:
ping
(repeat until you get a reply).
Then, Configure Your Network to Attach
the Printer
See the instructions for NetWare 4.x or 3.x.
870 Network Solutions CD
Run
.
OK
to launch the utility.
IP address
, the
MAC address
<IP address of NIC>
Start
for the NIC, its
Default Gateway
(listed on
button and
.
,

IP Peer to Peer Printing lpr Printing MacOS Setup
First, Prepare Your Computer System
You must have the NEC SuperScript 870
printer driver installed to print peer to peer.
Also, the Microsoft TCP/IP protocol stack
must be installed and properly configured
on your workstation. The network and the
network print servers must support IP.
Next, Install the PeertoPeer-IP Program
1. Insert the
into the drive. Click on Windows
button and select
2. At Run, type:
Then click
wizard prompts. When installation is
complete, click
Then, Add the Peer to Peer Printer in
Windows
1. Click the
then select
2. In the Printers window, double-click
Add Printer
wizard prompts. When the Add Printer
wizard asks how the printer is attached,
select
Manufacturer and
as the Printer.
3. Your peer to peer network printers will
be listed as local printer ports. Select
one.
4. Continue until the process is complete.
870
Network Solutions CD
Run
.
<drive>:\[what???],
OK
, and follow the Install
OK
.
Start
button, select
Printers
and follow the Add Printer
Local printer
.
. Specify
NEC SuperScript 870
Start
Settings
NEC
as the
,
The following procedure can be used to set
up the lpr spooler for a Windows NT 4.x
workstation/server.
1. Install the SuperScript 870
Drivers & Utilities for Windows NT 4.x
2. In Windows NT 4.x, click the
button, select
Printers
3. Select the
and then select
File menu
4. Click on the
870 driver installs to LPT1 by default).
5. Then select
6. Under
7. In the
8. In the
9. Click on the
10. Click on the radio button
11. Click
Av ailable Pr int er P or t
Port
and
Name or address of server
providing lpd
(Protocol) address of the printer.
Name of printer or print queue
on that server
word “PORT” must be in uppercase).
Click
OK
newly created port to the 870.
SuperScript 870
enter a name for your 870 printer.
OK
your printer.
Settings
.
NEC SuperScript 870
.
Ports
Add Port
New Port
field, enter the IP
field, enter
, then click
Sharing
to apply these settings to
, then select
Properties
tab (the SuperScript
button.
Close
Properties
from the
.
PORT1
to assign that
tab in the
Shared
Printer
Start
icon,
select
(the
NEC
window
and
LPR
.
First, Install 870 MacOS Software
1. Insert the 870
your drive and double-click the
SuperScript 870 Installer
2. The installer prompts you to select
.
installation preferences and creates
the SuperScript 870 Folder on your
hard drive.
Next, Choose the Printer
1. Select
and make sure the AppleTalk
button is selected.
2. In the Chooser, select the
870
printer icon, select the AppleTalk
zone your printer is on, then select the
printer’s name in the printer list.
Set Background Printing
In the Chooser, set Background Printing to
On or Off. Background Printing allows you
to continue working while a job is printing.
Then, Rename Your Printer
If you have more than one SuperScript 870
printer on your network, you should
rename your printer.
1. In the SuperScript 870 Folder on your
hard drive, double-click the
SuperScript 870 Utilities
2. From the Utilities menu, select
Printer
dialog box.
Network Solutions CD
icon.
Chooser
and follow the directions in the
from the Apple menu
SuperScript
icon.
Active
Name
in

NetWare 4.x NetWare 3.x
First, use NWADMIN to attach the Printer
1. Log in to NetWare 4.x with
administrator rights and open the
NetWare Administrator window.
2. Create Printer Object.
3. Create Print Server Object.
4. Create Print Queue Object.
5. Assign Printer Object
6. Assign Print Server Object
7. Check Assignments
note: You must specify the Prefer r ed NDS
Context and Preferred NDS Tree using the
NIC Home Page network administration
options. Continue with the instructions
below, to do this.
Next, use MAP and the NIC Home Page to
Configure the NIC
MAP is a Windows program that allows
configuration and management of the NICs
on IPX networks in Windows 95/98 or NT 4.x.
Install MAP
1. Start Windows, insert the 870
Solutions CD,
button and select Run.
2. Type <Drive>:\SETUP.EXE and click OK.
Run MAP and Select a NIC
In Windows click the Start button, select
Programs, then select MAP. When MAP
click the Windows Start
Network
starts, a list of all available units on the
network is displayed by serial number. Click
on a NIC in the list to display its Home Page.
Configure NetWare 4.x Settings
1. On the NIC Home Page, click the
Network A dministration button to
display options for configuring the NIC.
2. Click on NetWare Set up in the Protocols
column.
3. In the NetWare Configuration dialog box
that appears, enter a name in the
Preferred NDS Context field.
4. Then, enter a name in the Pr ef er red NDS
Tree field. (Leave the Preferred File
Server field blank.)
5. Enter the password and click on the
Accept Settings button. (The Password
default is
Confirm Successful Configuration.
1. In the Systems column, click on Reset.
2. Go back to the NIC Home Page, click the
Network A dministration button. Then, in
the System column, click on Unit
Status.
3. In the dialog box that appears, scroll
down to display the NetWare Status.
The Queue Status should be Attached. If
not, verify that entries for Print Server
Name, Preferred NDS Context, and Print
Server Password match those set in
NWADMIN.
sysadm
.)
1. Log in to NetWare 3.x with
Administrator rights and start
PCONSOLE.
2. Define the Print Queue.
3. Define the Print Server.
note: The Print Server name you
enter should match the name shown
on the Network Settings page under
Novell Network Information.
4. Define the Printer.
5. Assign the Print Queue.
6. Confirm Successful Configuration.
Turn the printer off and on and wait for
a Network Settings page to print.
The Novell Connection Information
area on the Network Settings page
displays the printer name, file server,
queue, etc. If it displays Attached: Y es,
this confirms that the NIC Print Server
is ready to accept print jobs. If not,
verify that the Print Server name
matches exactly the Print Server name
that was entered in PCONSOLE.
Copyright © 1998 NEC Technologies, Inc.
Part No. 808-878306-011-A
 Loading...