


SUPERSCRIPT 950C
USER’S GUIDE
August, 1999
Revision 1.0
819-300014-009

Proprietary Notice and Liability Disclaimer
The information disclosed in this document, including all
designs and related materials, is the valuable property of
NEC Technologies and/or its licensors, as appropriate,
reserve all patent, copyright and other proprietary rights to
this document, including all design, manufacturing,
reproduction, use and sales rights thereto, except to the
extent said rights are expressly granted to others.
The NEC Technologies product(s) discussed in this
document are warranted in accordance with the terms of the
Limited Warranty Statement accompanying each product.
However, actual performance of each such product is
dependent upon factors such as system configuration,
customer data and operator control. Since implementation
by customers of each product may vary, the suitability of
specific product configurations and applications must be
determined by the customer and is not warranted by NEC
Technologies.
To allow for design and specification improvements, the
information in this document is subject to change at any
time without notice. Reproduction of this document or
portions thereof without prior approval of NEC
Technologies is prohibited.
Microsoft, Windows, Windows 95, Windows 98,
Windows for Workgroups, and MS-DOS are registered
trademarks of Microsoft Corporation.
All other product, service, brand, or trade names used in
this publication are the trademarks or registered trademarks
of their respective companies or organizations. NEC
disclaims any responsibility for specifying which marks are
owned by which companies or organizations.
Copyright 1999
NEC Technologies, Inc.
1250 N. Arlington Heights Rd.
Itasca, IL 60143
All Rights Reserved.
Copyright 1999
NEC Corporation
7-1 Shiba 5-Chome, Minato-Ku
Tokyo 108-01, Japan
All Rights Reserved.
© NEC Technologies, Inc., 1999.
ii SuperScript 950C — User’s Guide

CONTENTS
CONTENTS
Chapter 1: Setting Up the Printer
Introduction 1
Identifying Printer Parts 2
Printer Setup 3
Printer Operator Panel 11
Chapter 2: Printer Software
Installing the Software 15
Using Windows Plug-and-Play 15
Using the NEC Meta Installer 16
NEC SuperScript 950C Folder 16
The Printer Driver 17
Driver Properties Window 17
General Tab 18
Details Tab 18
Color Management Tab 20
Sharing Tab 20
Settings Tab 21
The Printer Monitor 25
Running the Printer Monitor 25
The Printer Monitor Window 26
Printer Monitor Messages 29
Chapter 3: Print Cartridge Care and Use
Overview 33
Print Cartridge Alignment 35
Cleaning the Print Cartridges 36
Cleaning the Electrical Contacts 36
Cleaning the Nozzles Manually 36
Chapter 4: Troubleshooting
Overview 39
Printer Hardware 39
Paper 42
Print Cartridges 44
Printing 47
Appendix A: Media Specifications
Overview 51
Appendix B: Printer Specifications
Overview 59
Appendix C: MS-DOS and Windows 3.1x
Overview 61
Windows 3.1x Computers 61
Driver Installation 61
iii

NEC SuperScript 950C Program Group 61
Print Cartridge Alignment 62
Viewing the Driver Properties 62
Printer Sharing 63
MS-DOS Computers 65
Installing dosetup.exe 65
Print Cartridge Alignment 65
How to Print 65
How to Configure an MS-DOS Driver 65
Appendix D: Ordering Supplies
Overview 67
Appendix E: Technical Support
Overview 69
Assistance Nearby 69
Help From Within Your Company 69
Help From Your Dealer 69
NEC Technical Support 69
How to Contact NEC 70
NEC Warranty and Service 71
NEC Service Contracts 71
SuperScript 950C Printer Limited Warranty 72
Warranty Period 72
Warranty Coverage 72
Warranty Support 72
Obtaining Warranty Service 73
Limitation of Damages and Implied Warranties 73
FCC Statement 74
(For United States Use Only) 74
(For Canadian Use Only) 75
Declaration of Conformity 75
INDEX
iv SuperScript 950C— User’s Guide
CHAPTER 1
S
ETTING
NTRODUCTION
I
Congratulations on your purchase of the NEC SuperScript
950C inkjet printer. This unique dual position printer
allows you to personalize the organization of your work
environment by offering you two differ ent ways of setting
up your printer.
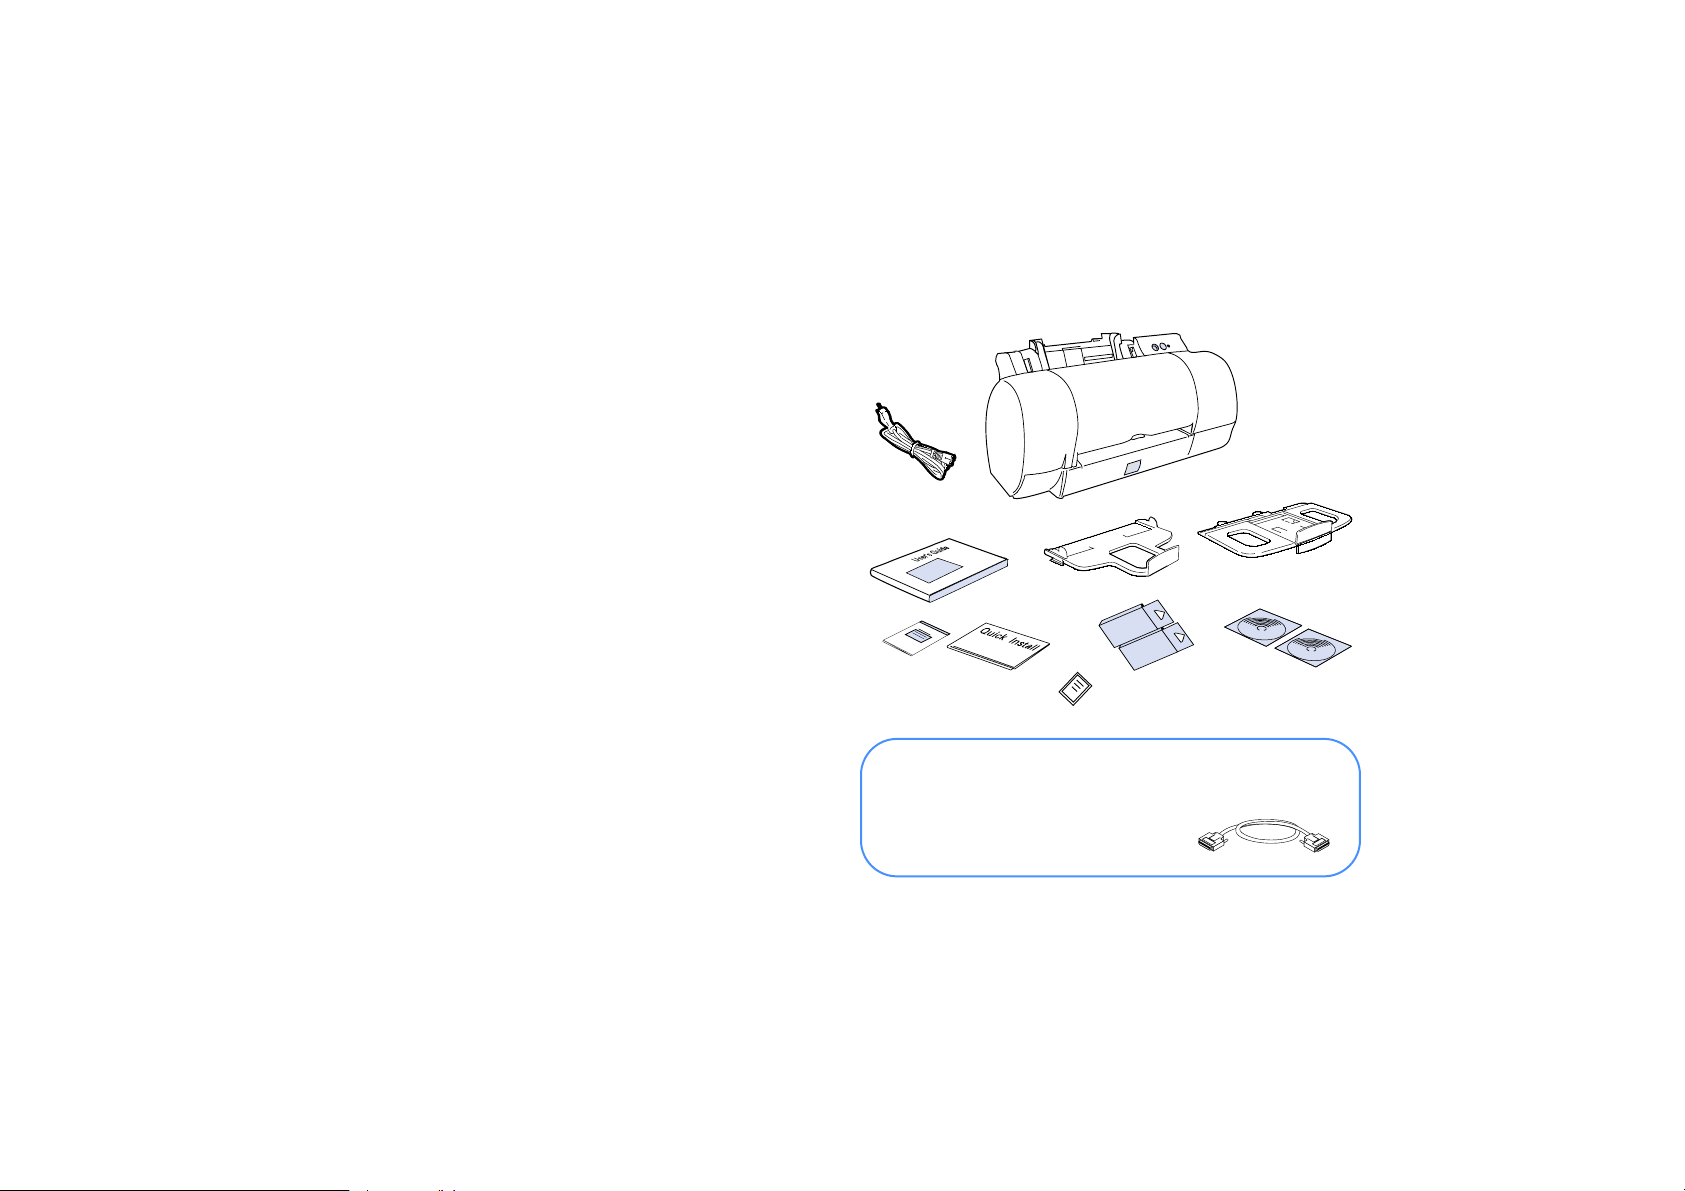
Remove the printer from the box and place it on a stable
level surface. Make sure all items shown are included in
the box. If an item is missing or damaged, call NEC
Technologies immediately at 978-742-7010. The contents
should include:
1. SuperScript
2. Electrical Power Cord
3. Print Cartridges (Black & Color)
4. Main Paper Tray
5. Input/Output Paper Tray
6. 2 CD ROMs
7. User’s Guide
8. Service Xpress
Registration Card
9. Product Name Label
10. Quick Installation Guide
U
TM
P
THE
950C Printer
SM
Brochure with Warranty
P
RINTER
Save the Quick Installation Guide, User’s Guide and
Software CDs for future reference. Save all packing
materials including the shipping carton.
1
2
4
7
8
Not Included....
To connect your printer, you need to provide an
IEEE 1284 Bidirectional parallel cable.
10
5
3
9
6
S
ETTING
U
P
THE
P
RINTER
1

DENTIFYING
I
Input/Output Paper Tray
Print Cartridge Carriage
Print Cartridge Release Lever
The Superscript 950C can operate in Primary
Profile (vertical profile) or Optional Profile
(horizontal profile) allowing you to set up the
printer to utilize either its small, vertical foot print
or its low, horizontal profile, depending on your
desktop layout.
RINTER
P
Main Paper Tray
Paper Width Guides
P
ARTS
Paper Length Guide
Release Button
Primary Profile (V)
Printer Cover
Operator Panel
Print Cartridge Rest Position
Manual Feed Slot
Optional Profile (H)
2 SuperScript 950C— User’s Guide
RINTER
P
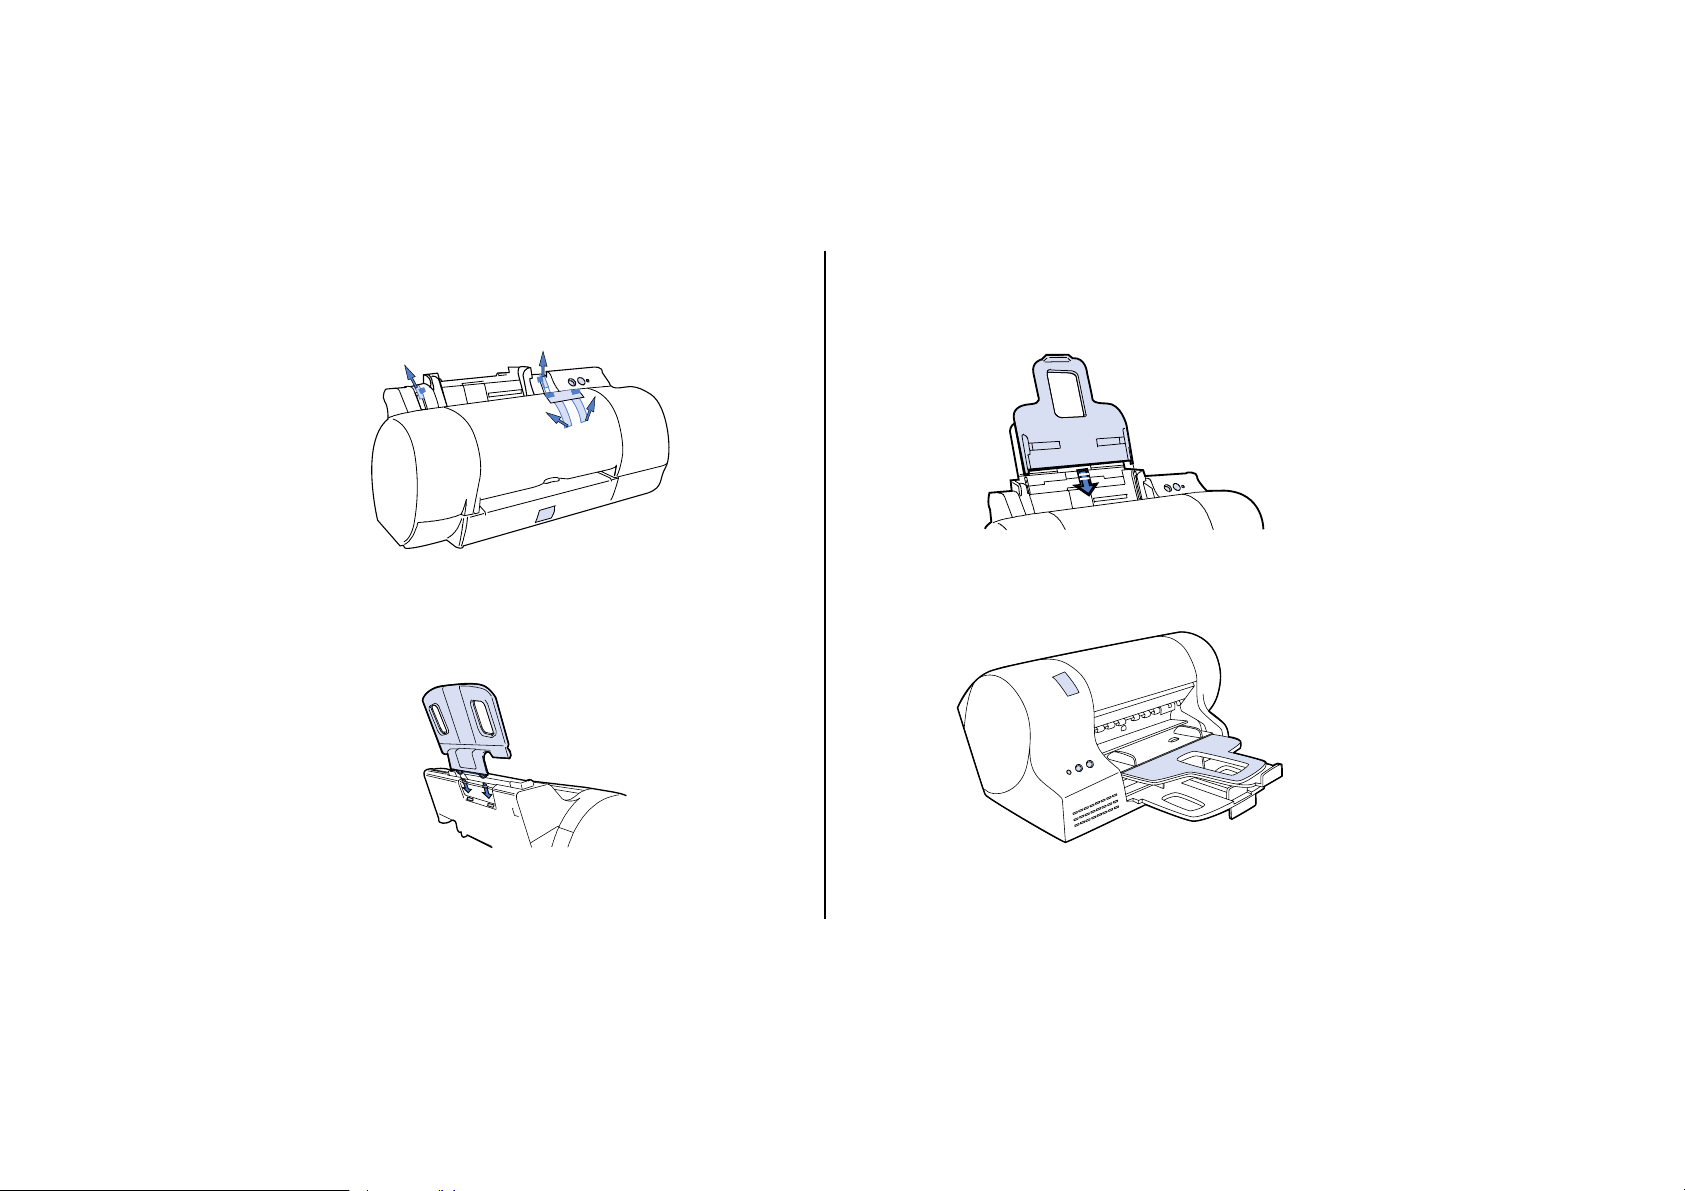
1. Remove the shipping tape from the printer.
2. Insert the Main Paper Tray into the Rear Slot as
shown.
S
ETUP
3. Slide and snap the Input/Output Paper Tray into the
adjustable arm slots located above the paper width
guides of the Main Paper Tray.
4. Flip the printer to its Optional Profile (H).
S
ETTING
U
P
THE
P
RINTER
3
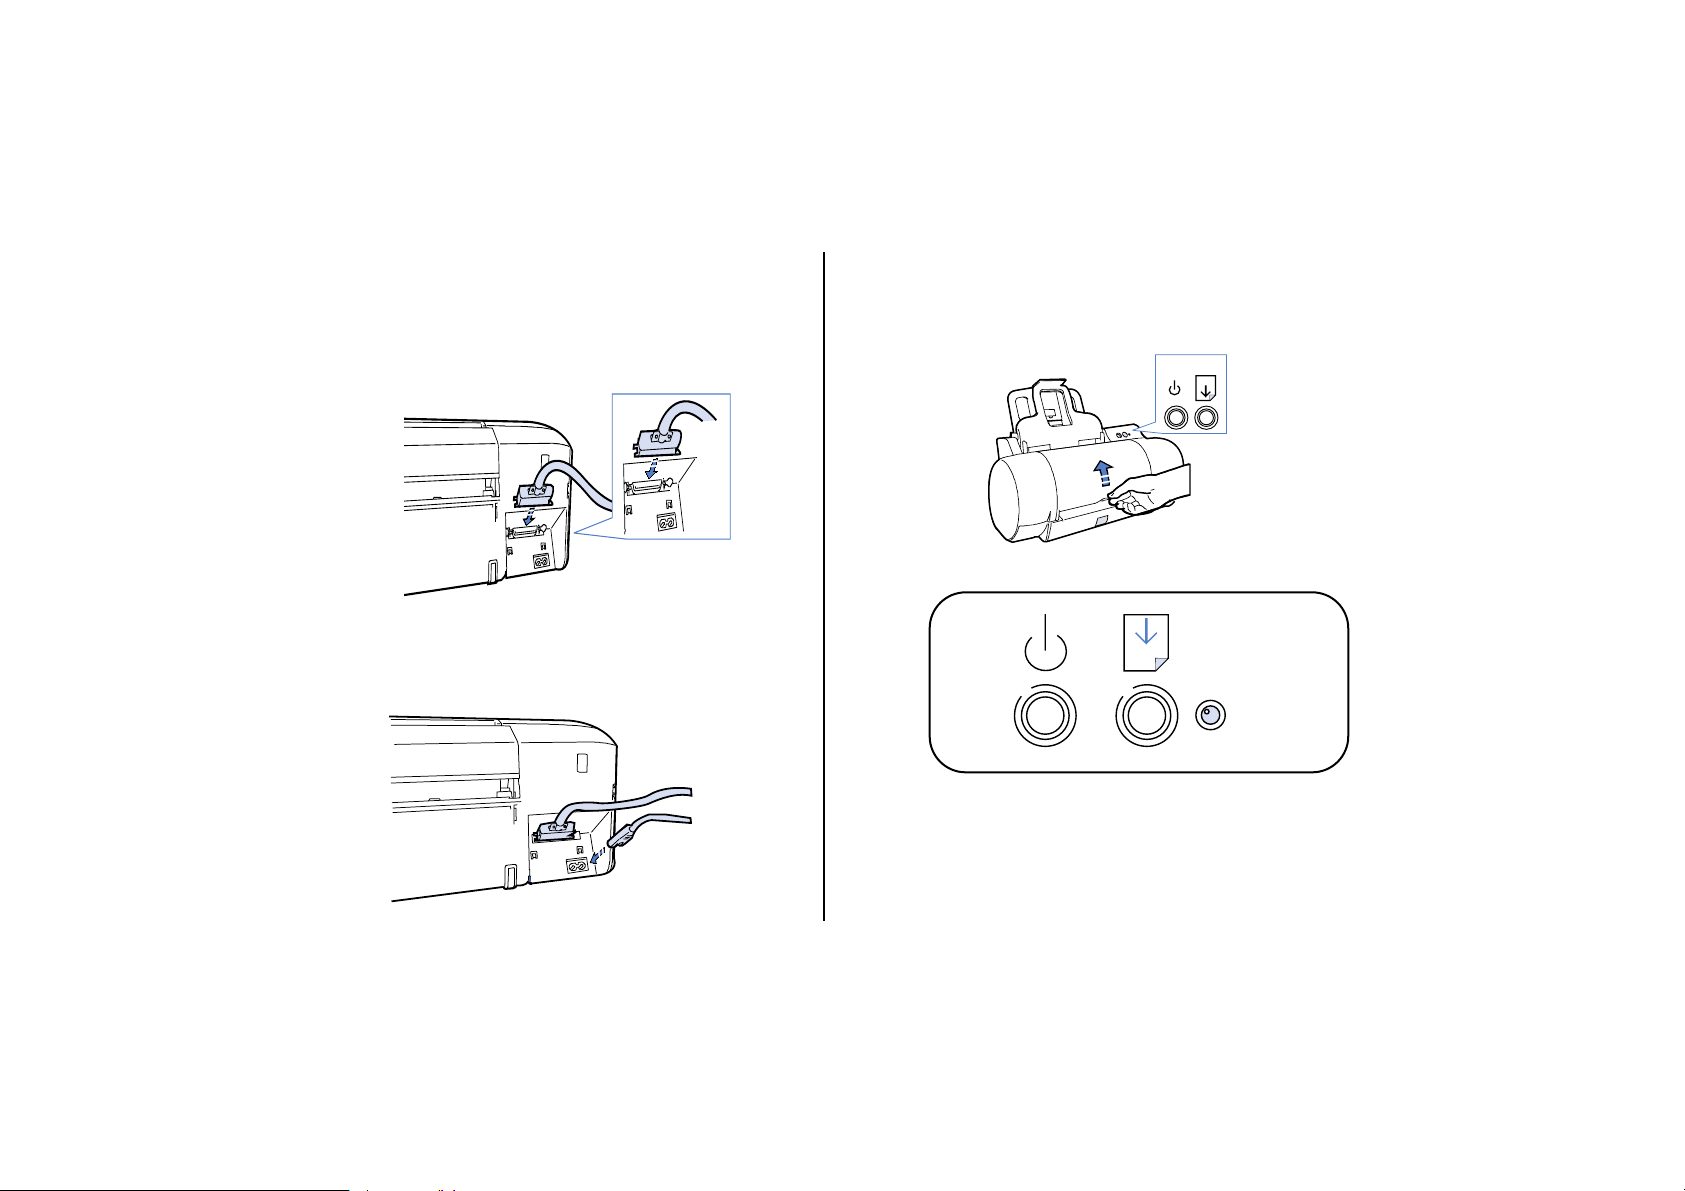
5. Rotate the printer so that the back of the printer faces
you. Connect the bi-directional parallel printer cable
to the parallel port on the rear of the printer. Connect
the other end to your computer, and tighten screws
down.
6. Plug the power cord into the two-pin socket at the
back of the printer. Plug the other end into a power
outlet.
7. Flip the printer back to Primary Profile (V), press the
Power button on. Open the Printer Cover. The Print
Cartridge Carriage will move to the “carriage loading
position” and the indicator light will start flashing.
2
1
Power
Paper
Indicator
Light
4

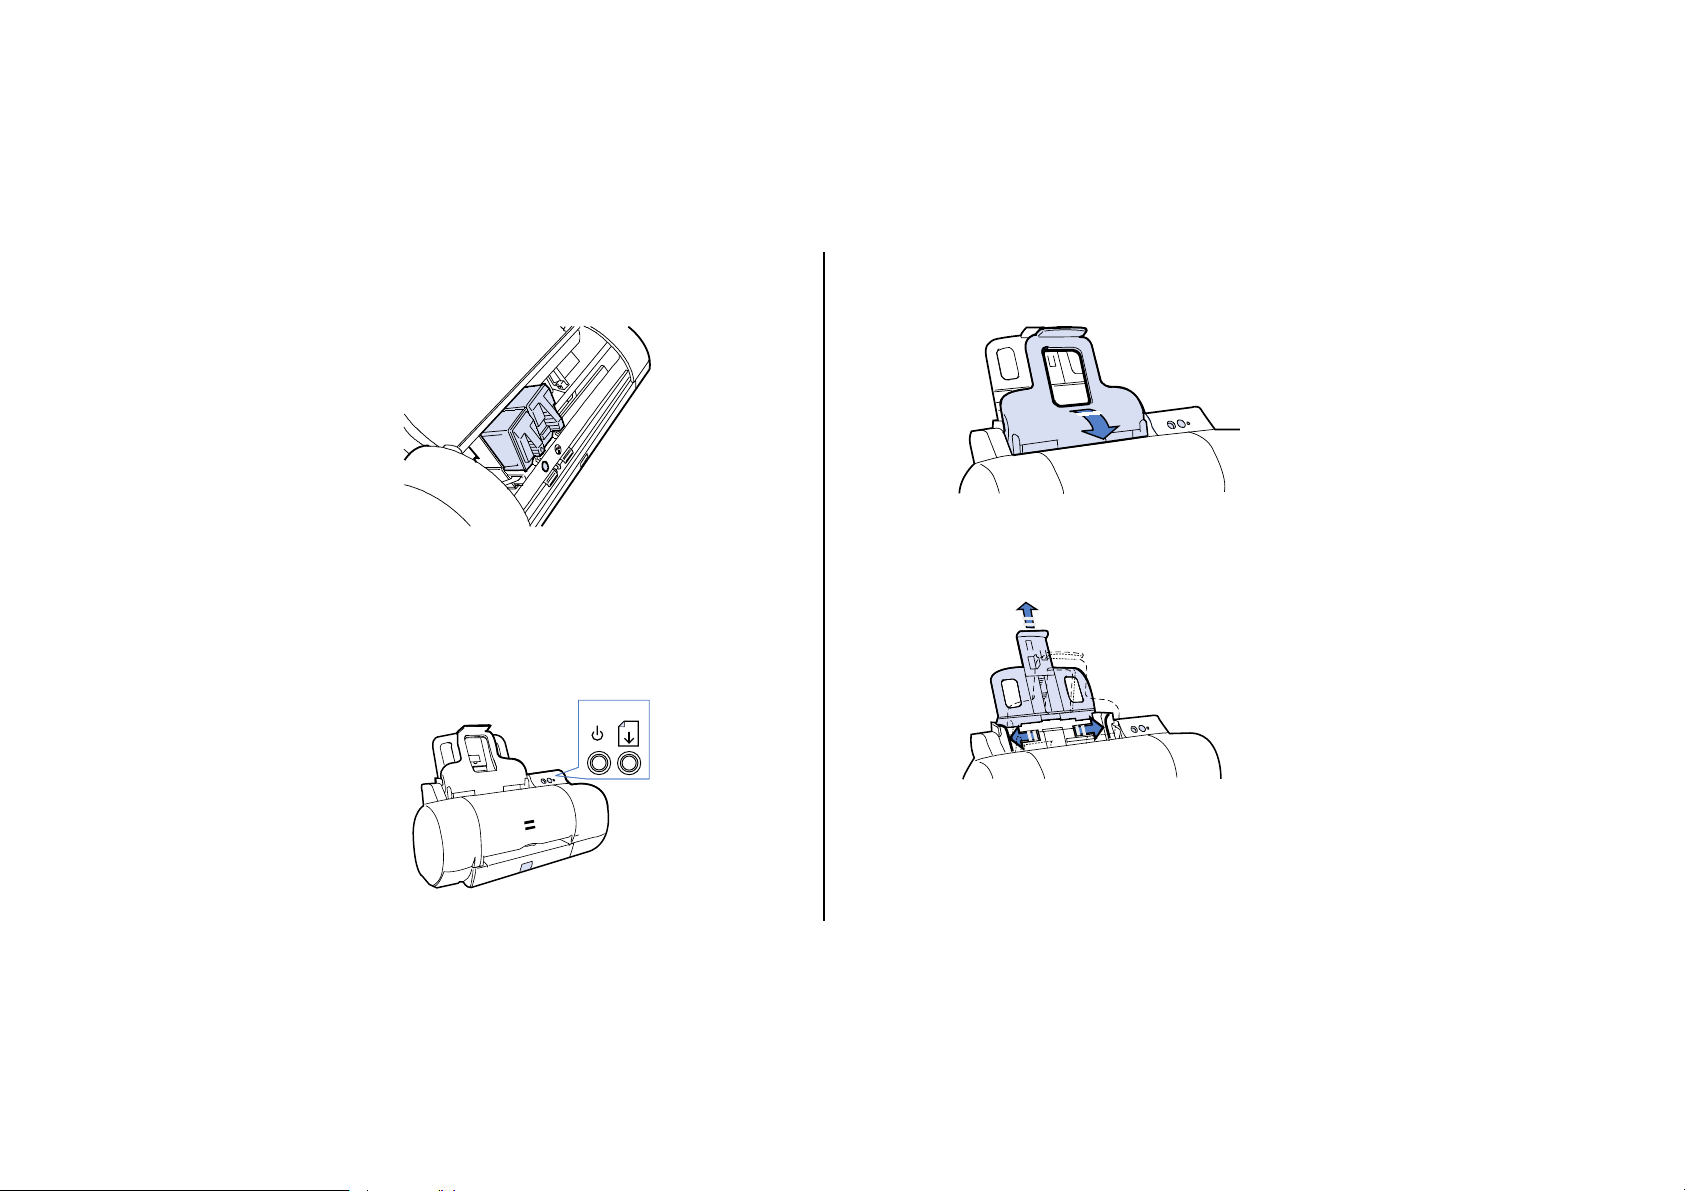
8. Remove the Black Print Cartridge from its package
and hold it as shown. Remove the protective tape by
lifting the label from the bottom. DO NOT touch
either the printing nozzles on the bottom or the
golden colored electrical contact areas.
9. A label in the Print Cartridge Seat and Print Cartridge
identifies the cartridge color . A single indicates a black
print cartridge.
10. Seat the Black Print Cartridge by pushing it towards
the green release lever until it clicks in place. Repeat
steps 8-10 for the Color Print Cartridge in the second
print cartridge seat.
S
ETTING
U
P
THE
P
RINTER
5
11. After inserting both print cartridges, close the Printer
Cover.
12. Press and hold the Power button (1), and then press
the Paper button (2). Release both buttons
simultaneously to initialize the print cartridges.
Initialization takes about 3 -5 minutes and is indicated
by the flashing light on the Operator Panel.
2
1
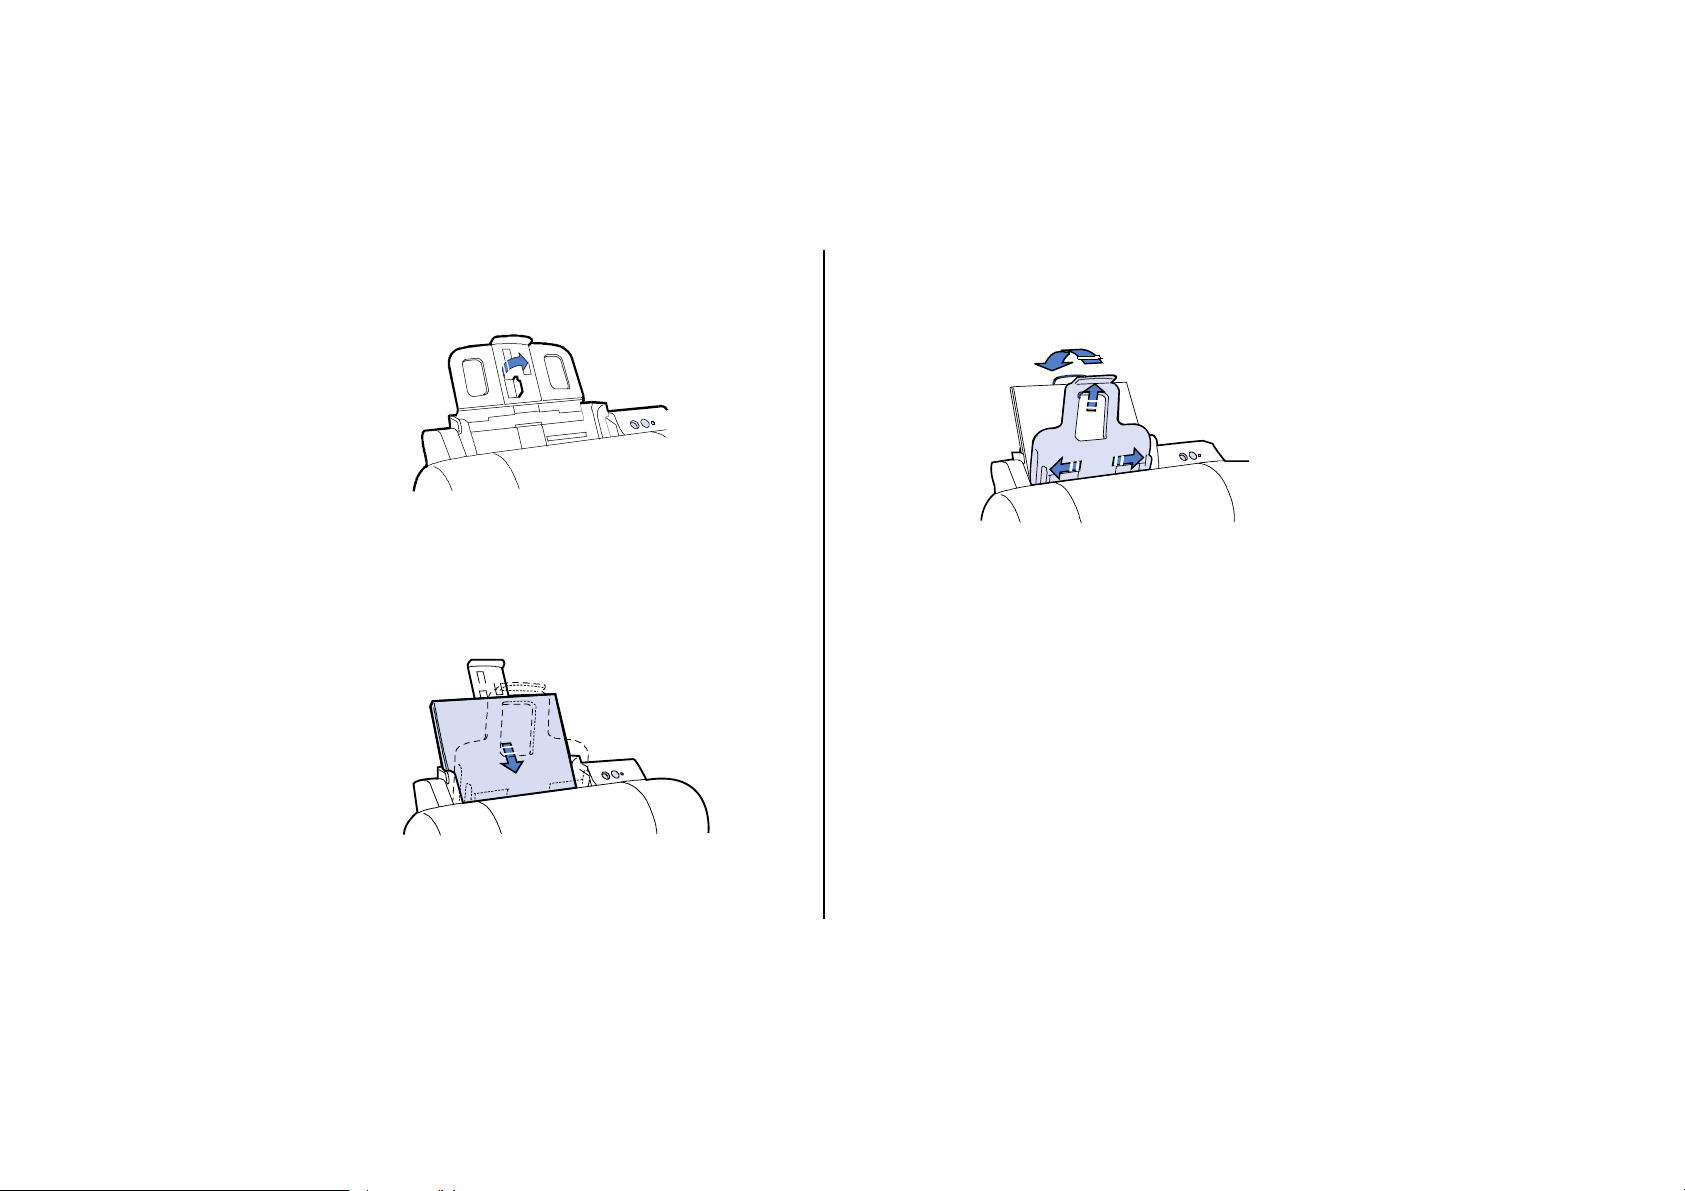
13. Hinge the Input/Output Paper Tray up to its angled
position.
14. Open the Paper Length and the Paper Width Guides
on the Main Paper Tray.
6
Note:
Intermediate guide on the Main Paper Tray.
15. Fan paper and center into the Main Paper Tray
adjusting guides to fit snugly. ONLY load paper up to
the tip of the arrow shown on the inside of the Paper
Width Guides.
If you want to print smaller sheets open the
16. Hinge the Input/Output Paper Tray back and make
sure its Paper Width and Paper Length Guides are
open.
Note:
software as described in Chapter 2.
17. Select an Operating profile.
Y ou can keep the printer in Primary Pr ofile (V), or you
can set the printer in Optional Profile (H). Make sure
you get a good connection of the parallel cable
especially if the Primary profile (V) is used. If you
select the Optional Profile (H) option, you must add
the Product Name Label. Remove label from its
backing and adhere it on top of current label in
recessed cavity as shown on the next page.
Perform Step 17 after installing the printer
S
ETTING
U
P
THE
P
RINTER
7
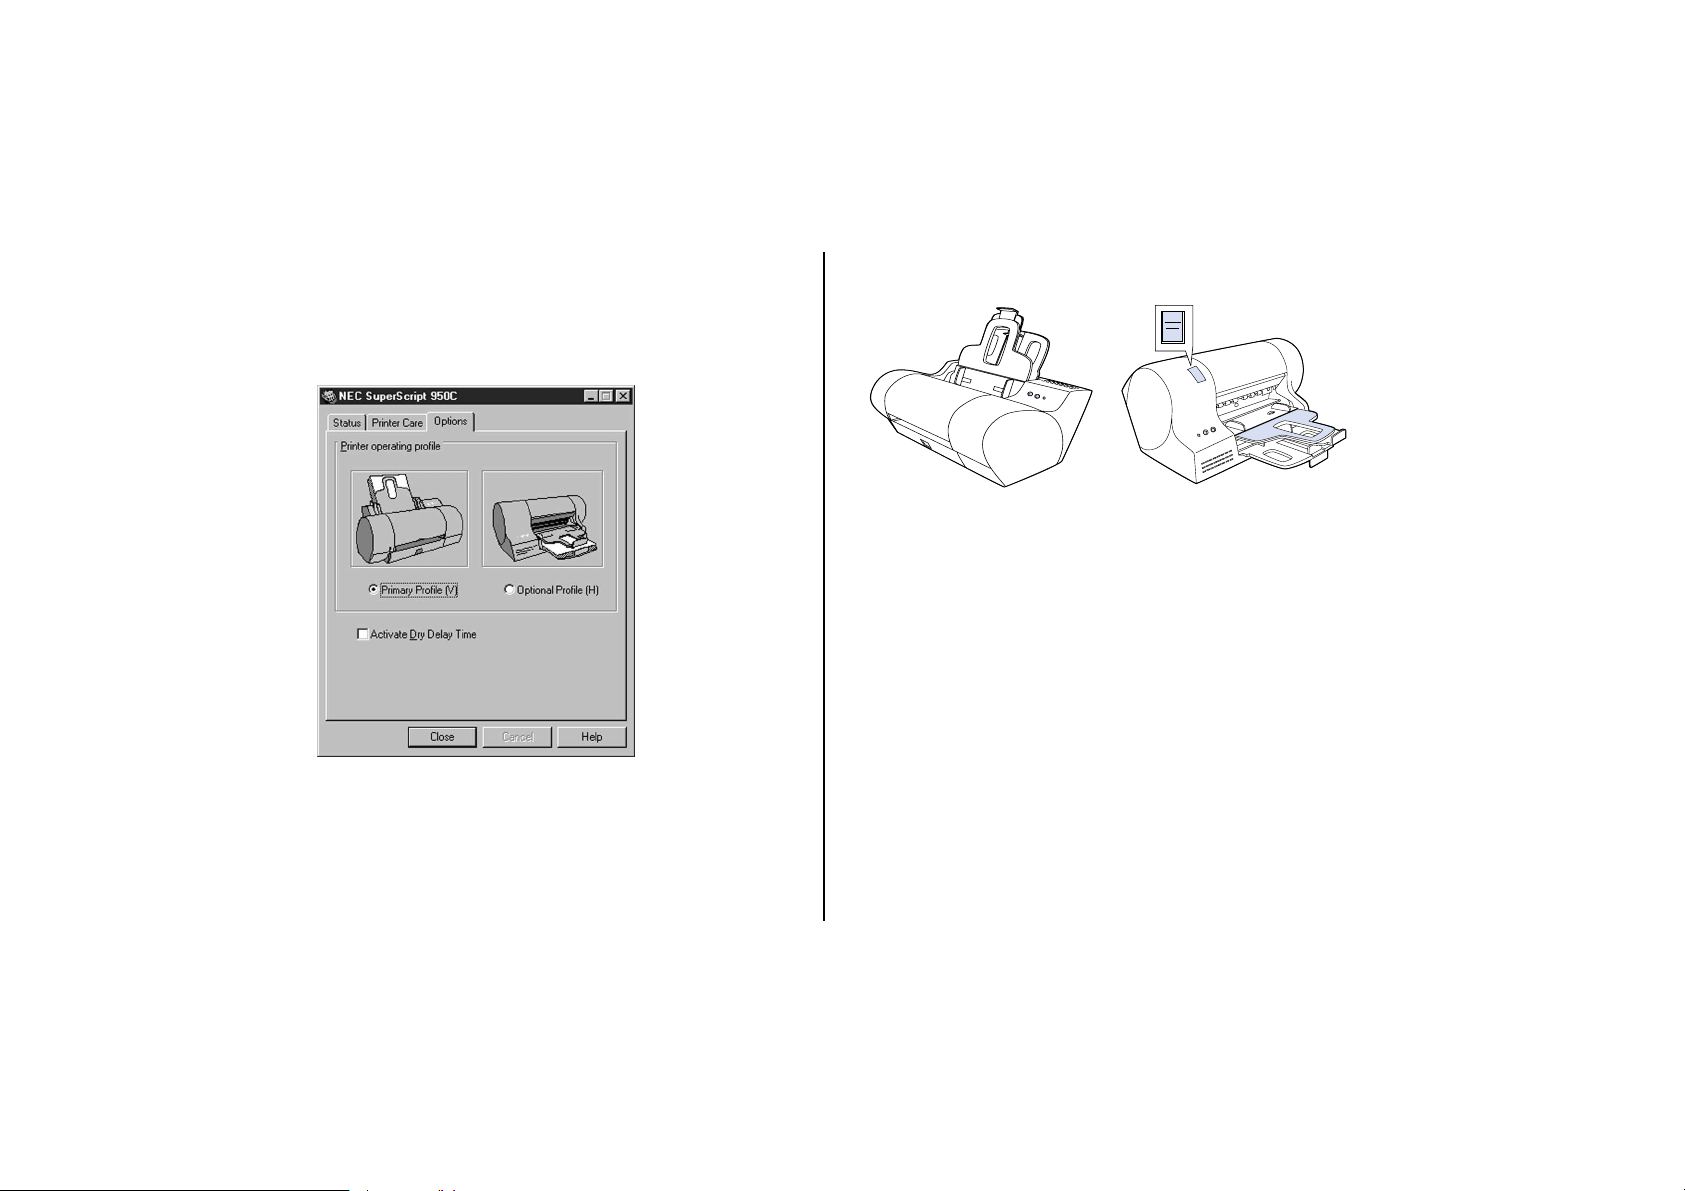
18. Next select Optional Profile (H) on Options Tab of
Printer Monitor shown below. To access the Printer
Monitor see “Running the Printer Monitor” on page
25.
Printer Monitor Window
NEC
Primary Profile (V)
Optional Profile (H)
8

Loading the Input/Output Paper Tray
Use the Input/Output Paper Tray for short print jobs that
require different paper than what is loaded in the Main
Paper Tray; for example, glossy paper or 0envelopes.
When the Input/Output Paper Tray becomes empty, the
printer will then use paper from the Main Paper Tray. Up
to 10 sheets can be loaded into the Input/Output Paper
Tray.
1. Open the Paper Length and the Paper Width Guides
on the Input/Output Paper Tray.
Primary Profile (V)
2. Thoroughly fan the paper before loading into the
Input/Output Paper Tray.
Optional Profile (H)
3. Close the Paper Width Guides against the sides of the
paper.
4. Close the Paper Length Guide against the edge of the
paper.
5. Make sure that the paper is neither too constrained
nor too loose.
S
ETTING
U
P
THE
P
RINTER
9
OK
Loading the Manual Feeder
Use these directions to load a single sheet of paper in the
Manual feeder:
1. Make sure that Manual Feeding is selected on the
Settings tab of the SuperScript 950C driver.
2. Insert the sheet in the manual insertion slot in the lower
front part of the printer when asked.
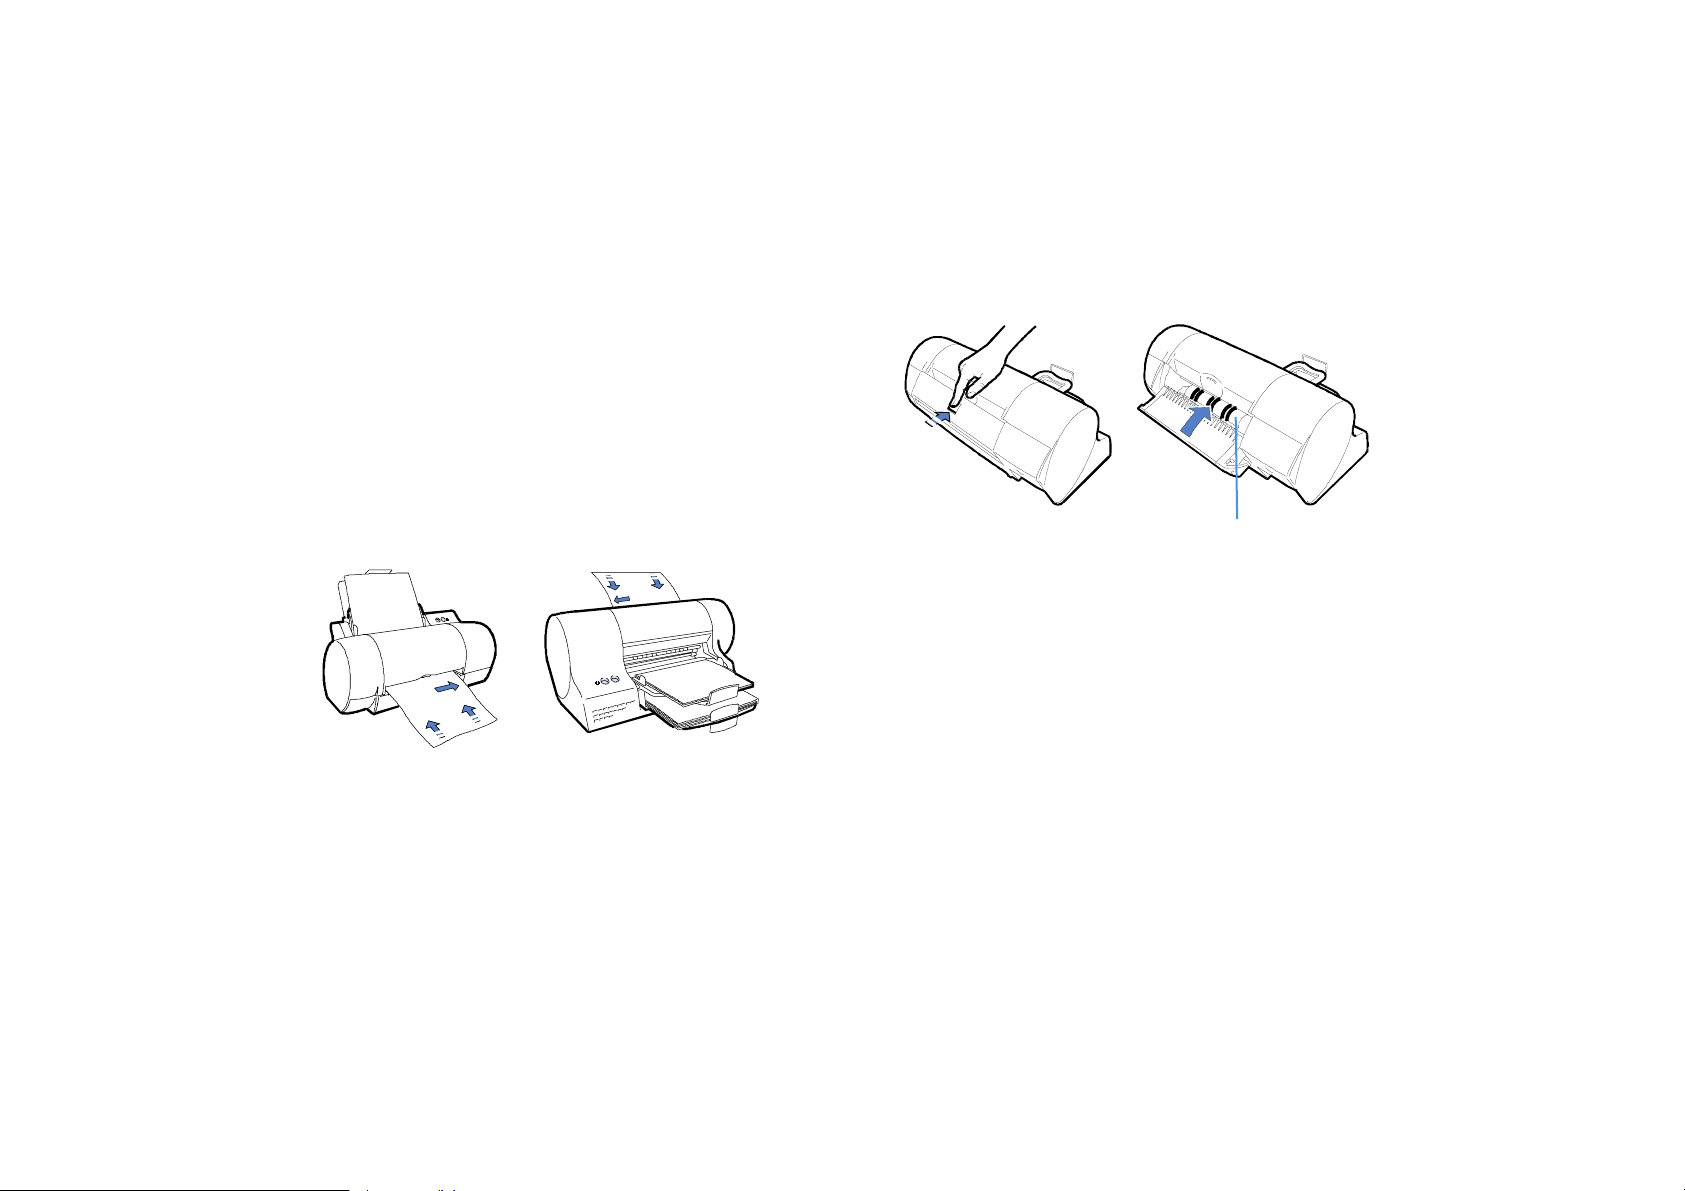
3. Align the sheet (to the right guide of the insertion slot
when the printer is in Primary Profile and align the
sheet to the left guide of the insertion slot if the printer is
kept in Optional Profile) and push it all the way in until
you hear the printer beep.
Primary Profile (V) Optional Profile (H)
4. Make sure the sheet is aligned between the side guides
and against the drive rollers.
Drive Rollers
5. Click on the
button for the paper insertion message
to start the print job.
10 SuperScript 950C— User’s Guide
RINTER
P
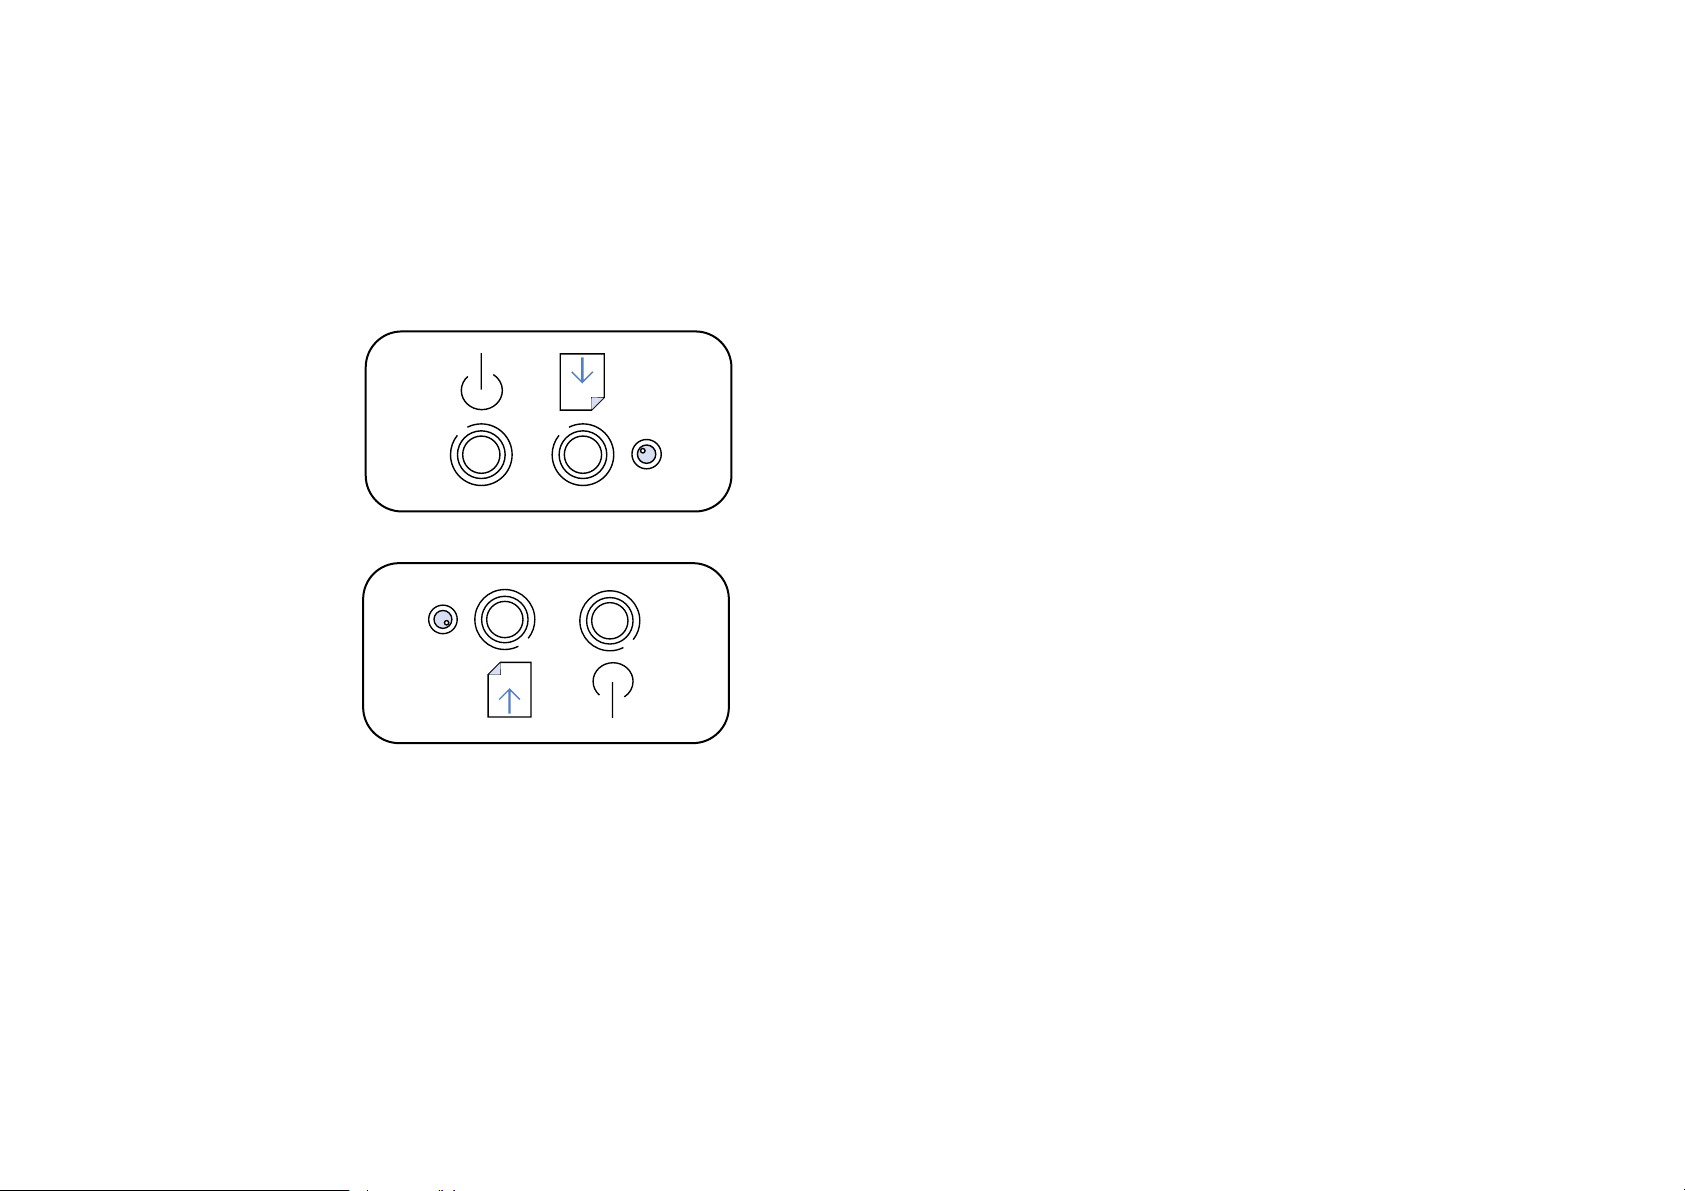
The buttons and indicator light on the Operator Panel will
display the printer’s status.
PERATOR
O
In Primary Profile (V)
Power
In Optional Profile (H)
Paper
P
ANEL
Paper
Power
The primary functions of the buttons and light are shown
S
ETTING
U
P
THE
P
RINTER
11
in the tables below.
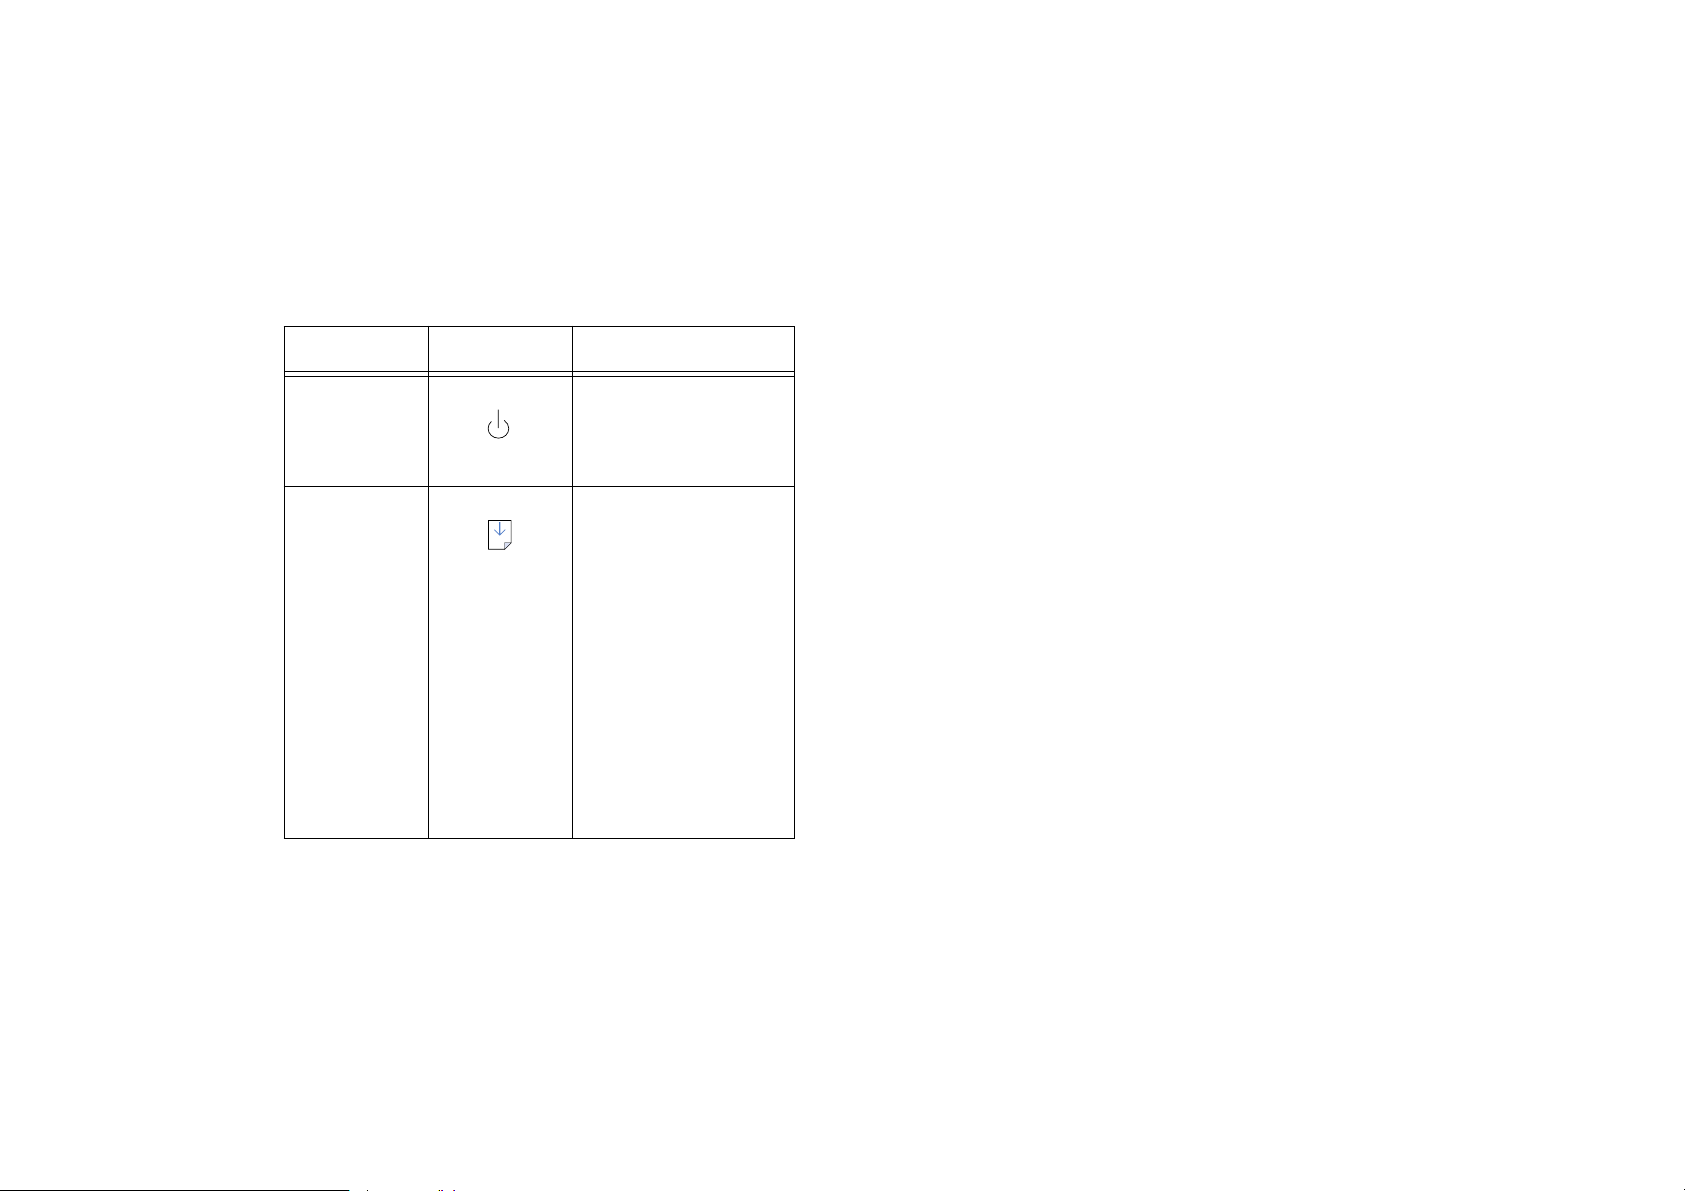
Table 1-1: Buttons (basic functions)
Function Button Function
Printer on/off Power Switches the printer
ON/OFF condition.
Paper control Paper 1. If paper is already
present in the paper
trays, press to eject.
2. Loads a sheet of
paper in the printer
ONLY after a “paper
error” signal condition
(paper out, paper jam,
etc.) has been
corrected. Press to
load document and
continue your print
job.
12 SuperScript 950C— User’s Guide
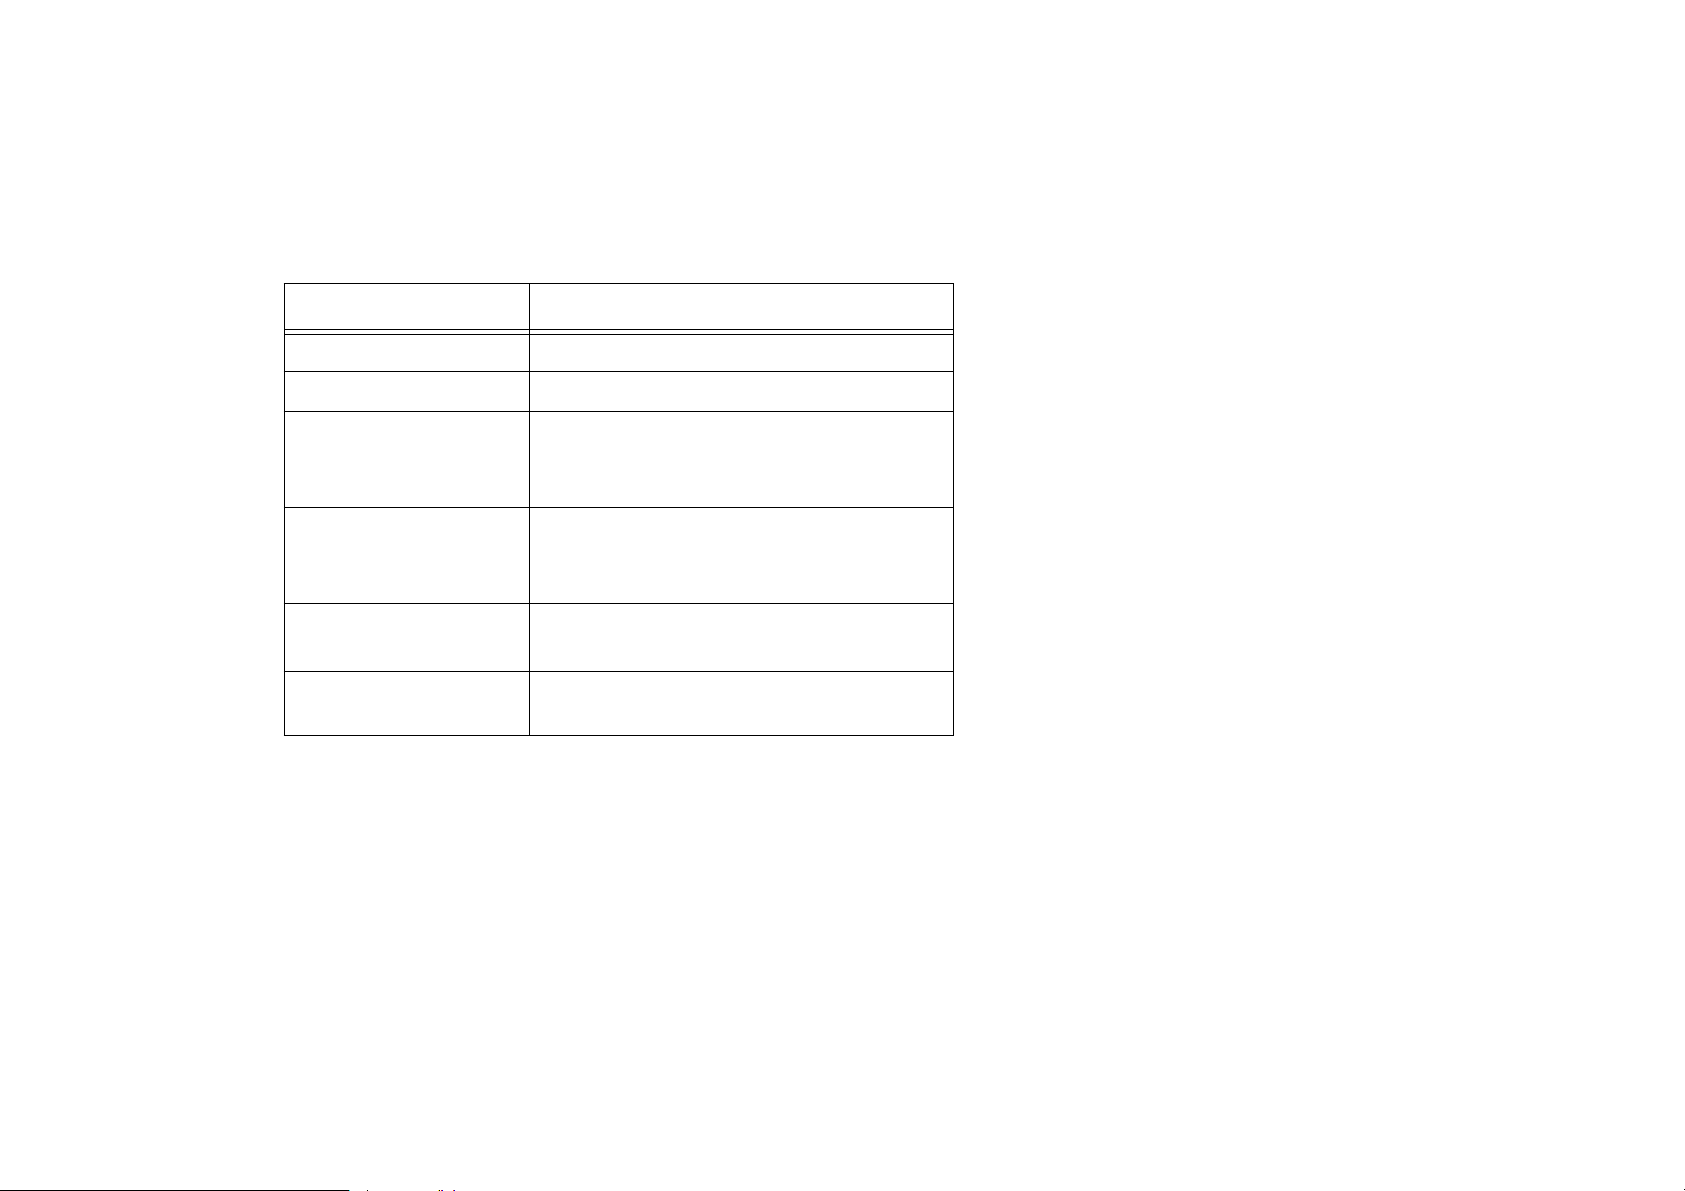
Table 1-2: Indicator Light
Status Condition
Off Printer is off
On Printer is on and in ready mode
Flashing Slowly
(1 flash per second)
Flashing Moderately
(2 flashes per second)
Flashing Quickly
(3 flashes per second)
Flashing Fast
(5 flashes per second)
• Printing
• Printing is paused
• Aligning print cartridges
• Print cartridge initialization
• Cartridge changing position
• Black or color cartridge not installed
• Out of paper
• Paper jam
• Printer failure
S
ETTING
U
P
THE
P
RINTER
13

14 SuperScript 950C— User’s Guide

CHAPTER 2
P
RINTER
NSTALLING
I
Note: If installing the printer software for the first
time, assure that the printer and computer are both
turned off before performing the following procedures!
The printer software can be installed using the Windows
Plug-and-Play feature or by using the NEC Meta Installer.
The Meta Installer is software, located on the SuperScript
950C Printing Solutions CD, that installs all the printer
software without having to use the Windows Plug-and-
Play feature.
Note:
method to install the printer software.
S
OFTWARE
THE SOFTWARE
NEC recommends using the Meta Installer
Using Windows Plug-and-Play
Windows Plug-and-Play is a featur e of W indows 95 and 98
that automatically recognizes when new hardware is
connected to the computer. If the printer is connected to
the computer with an IEEE 1284-compliant parallel cable,
Windows will be aware of it and begin asking you for
information so it can install the printer software. This
procedure will only install the printer driver.
Note:
then canceled out of the Windows Plug-and-Play
installation, use the NEC Meta Installer method.
To install a printer driver using Windows Plug-and-Play:
1. Turn on the printer.
2. Turn on your computer and while it starts, it will
become aware of the new printer connected to it.
3. Follow the instructions displayed on your monitor.
4. If asked to locate any files, just navigate to the root
directory of the SuperScript 950C Printing Solutions CD.
5. After the installation is completed, align the print
cartridges as described in Chapter 3, “Print Cartridge
Care and Use.”
If you started your system at an earlier time,
P
RINTER
S
OFTWARE
15

Using the NEC Meta Installer
The NEC Meta Installer is a program that installs all the
printer software without having to use Windows Plug-andPlay. During the install, you can choose which software you
want to install.
To install the printer software using the NEC Meta Installer:
1. Turn on your computer and wait until the desktop
appears.
2. Turn on the printer.
3. Insert the SuperScript 950C Printing Solutions CD into
your computer.
Note:
CD Installer appears on the monitor shortly after the disk
is inserted, go to Step 6, if not, go to Step 4.
4. From the desktop, double-click My Computer to open
the My Computer window.
5. Double-click the NEC SS950C icon to start the installer.
As an alternative, right mouse button click on NEC
SS950C then select Open or Autoplay to start the
installer. If neither one of these methods work, doubleclick Setup.exe which is located on the CD.
6. Follow the instructions that appear on your monitor to
complete the installation.
7. After the installation is completed, align the print
cartridges as described in Chapter 3, “Print Cartridge
Care and Use.”
If the NEC SuperScript 950C Printing Solutions
NEC S
During printer diver installation a NEC SuperScript 950C
folder was created. All the printer software, except for the
printer driver , is located in this folder. It contains five printer
software programs.
• SS950C Printer Monitor
Use this program for viewing the progress of a print job
and for monitoring printer status.
• “How do I” for SS950C
This file, is an easy-to-use help system for the printer
and printer driver.
• Troubleshooting for SS950C
This file contains a list of solutions to common problems
that may be encountered with the printer and its printer
driver .
• SS950C Uninstall
Use this program to remove the SuperScript 950C
software from your computer.
• Readme file
Use this file for learning about late breaking information
about the printer software that was not printed in this
user’s guide.
To view the contents of the NEC SuperScript 950C folder:
• Click the Windows Start button, point to Programs ,
then select NEC SuperScript 950C .
UPERSCRIPT
950C F
OLDER
16 SuperScript 950C— User’s Guide

THE P
The printer driver is software that is installed on your
computer that enables an application to communicate
with the printer. Open the properties window for the driver
whenever you want to adjust the properties of the driver,
for example, the page size and orientation.
The properties window can be opened from the Printers
window or from inside an application.
To open the Properties window from the Printers window:
1. Click the Windows Start button.
2. Point to Settings , then select Printers to open the
3. Select NEC SuperScript 950C .
4. From the File menu, select Properties to open the
To open the Properties window from an application:
1. From inside an application, open a file.
2. From the File menu, select Print to open the Print
3. Click Properties to open the Properties window.
RINTER DRIVER
Printers window.
Properties window.
dialog box.
Driver Properties Window
PRINTER SOFTWARE
The driver properties window divides all the properties
into four tabs.
• General
• Details
• Sharing
• Settings
A fifth tab, named Color Management, only appears on
computers running Windows 98.
The remainder of this section briefly describes each tab in
the properties window. For more information about each
property, click the Help button.
17
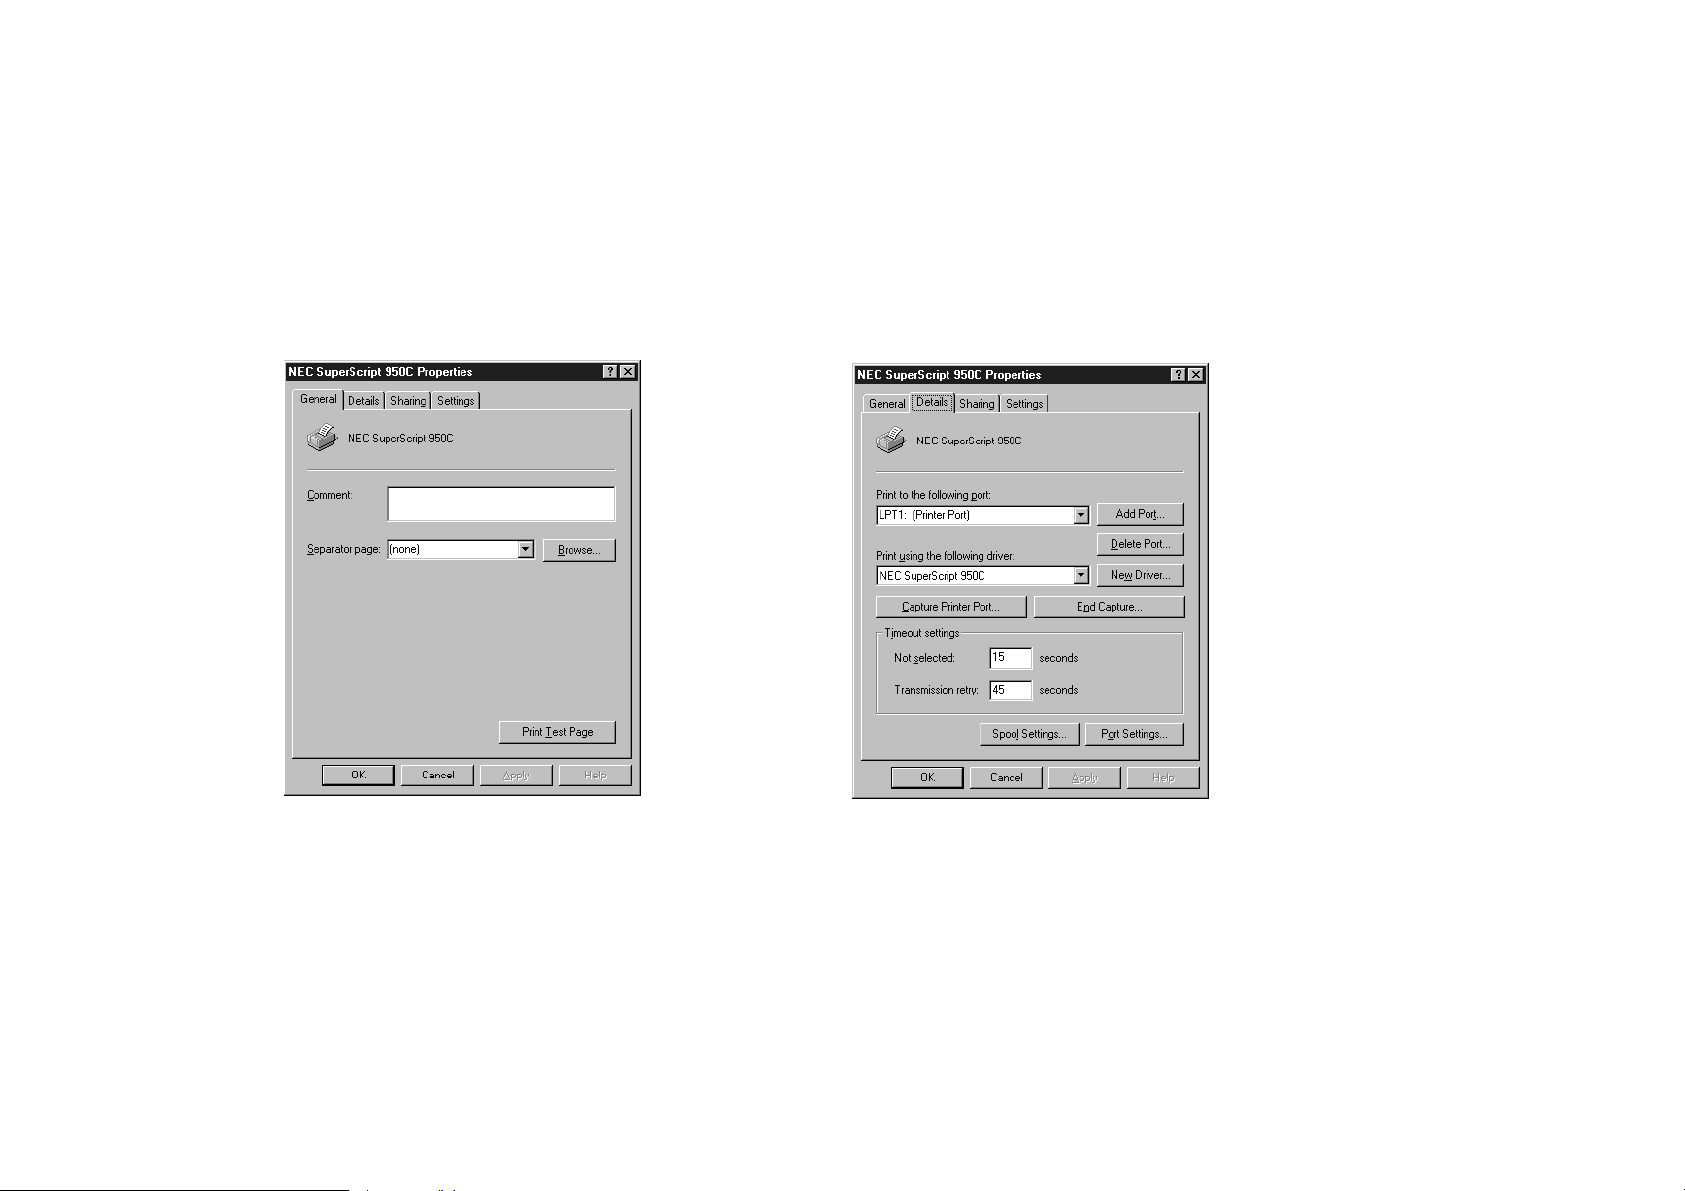
General Tab
Use this tab for printing test pages, providing a
description (comment) for the printer, and for printing
separator pages between print jobs.
Details Tab
Use this tab for changing a printer port or printer driver
and for adjusting the spool settings. Spool settings are
described on the following page.
18
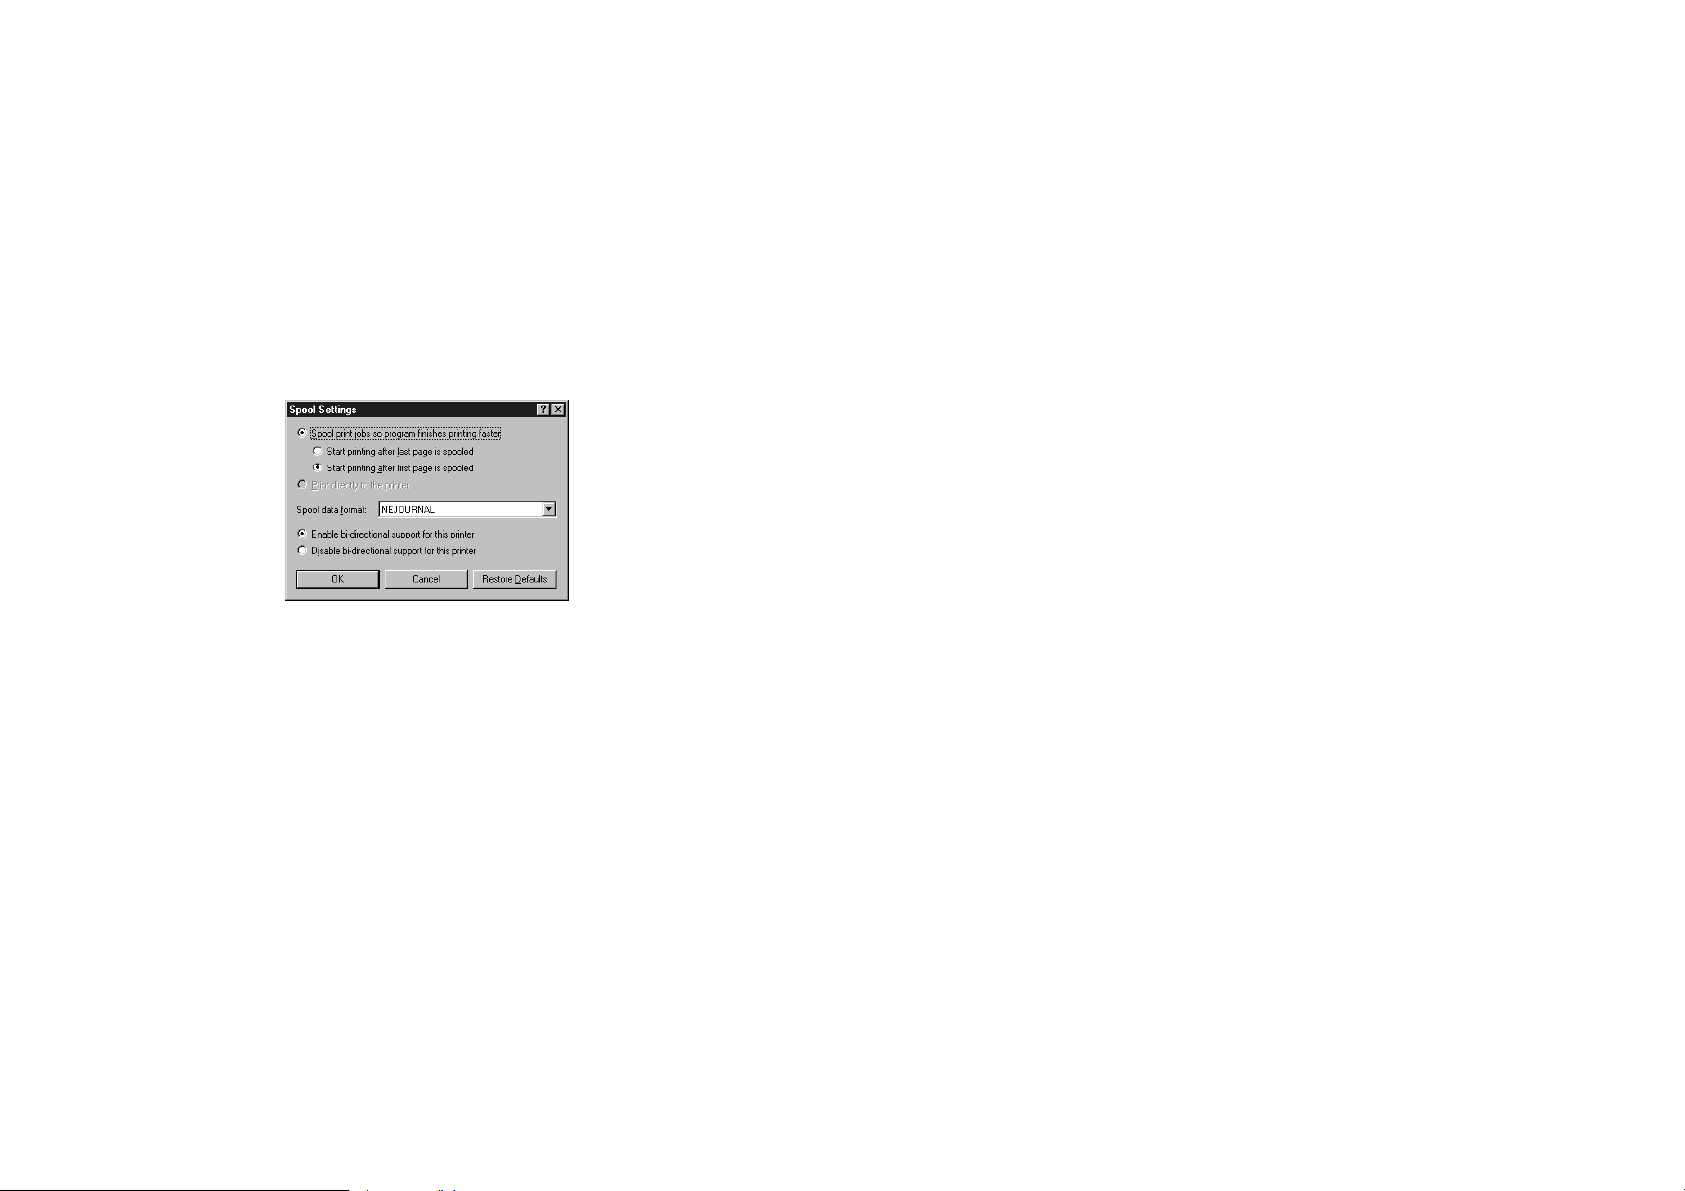
Spool Settings
The Spool Settings dialog box can be opened from the
Details tab by clicking on the Spool Settings button. Print
jobs that are spooled can be printed faster. Selecting bidirectional support allows the printer to communicate
with the NEC SuperScript 950C Printer Manager.
A
BOUT SPOOLED PRINT JOBS
When an application, such as a word processor or
spreadsheet, creates a print job, a journal file is created in
the default spool directory. By default, the spool file
format is NEJOURNAL. It contains a complete description
of your print job such as (type of document, type of paper ,
and print cartridge selection) in a form that can be
processed easily. This journal file is similar to a tape
recording in that it can be played, replayed and rewound
in order to process your print job. It is in the NEC
SuperScript 950C format.
Two Spool Data formats can be selected:
• EMF: This format is rarely used and lacks a lot of
information such as (Color Print Cartridge and
document type).
• RAW: This format is specifically used for printing to a
remote printer.
In this case, any information related to driver settings
(document type, Color Print Cartridge, and paper
type) is not taken into consideration. No message will
appear on your screen and the color output may be
wrong.
Note:
NEJOURNAL spool data format set by default.
P
RINTER SHARING AND SPOOLING
As a rule, you DO NOT have to modify the
When the printer is shared with network users (see
page 20), the print job sent from the source PC is spooled
in a NEJOURNAL file, then transformed by Windows to
RAW format.
BI-
DIRECTIONAL COMMUNICATION
If you want the NEC SuperScript 950C Printer Monitor to
display all status and error messages, click the Enable bi-
directional support for this printer option. If you do
not want to display all status and error messages, click the
Disable bi-directional support for this printer radio
button.
PRINTER SOFTWARE
19
Note: The two options NEJOURNAL and EMF will be
automatically grayed if you are connected to a remote
printer. In this case, you will not be warned of errors.
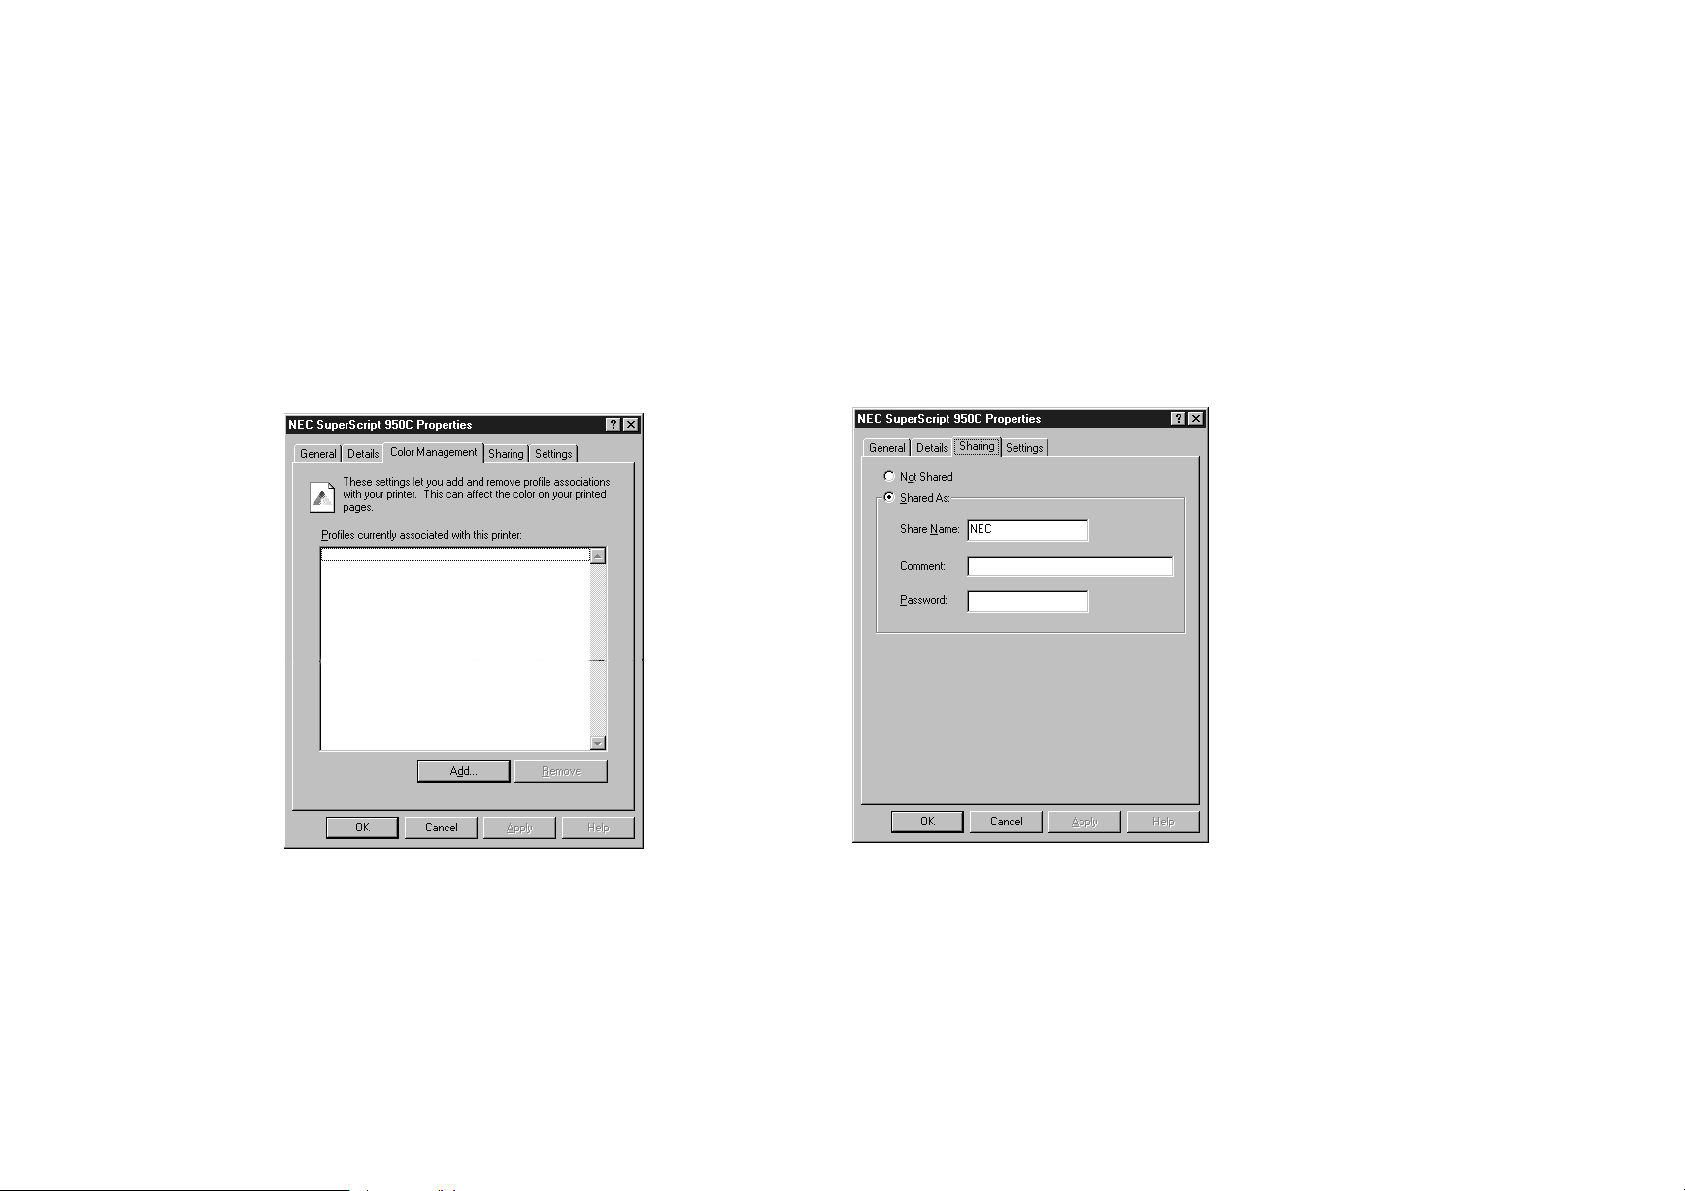
Color Management Tab
Although this is tab only available to computers running
Windows 98, it has no ef fect on the NEC SuperScript 950C.
Sharing Tab
If your computer is connected to a network, and the
printer is connected to your computer , use the Sharing tab
so that other Windows 95, 98, or NT 4.0 computers can use
the printer. To view this tab, the computer’s operating
system must have sharing turned on.
20
To add the Sharing tab:
1. Click the Windows Start button, point to Settings ,
then select Control Panel to open the Control Panel
window.
2. Double-click on Network to open the Network
Control Panel.
3. Click the Configuration tab to bring it to the front.
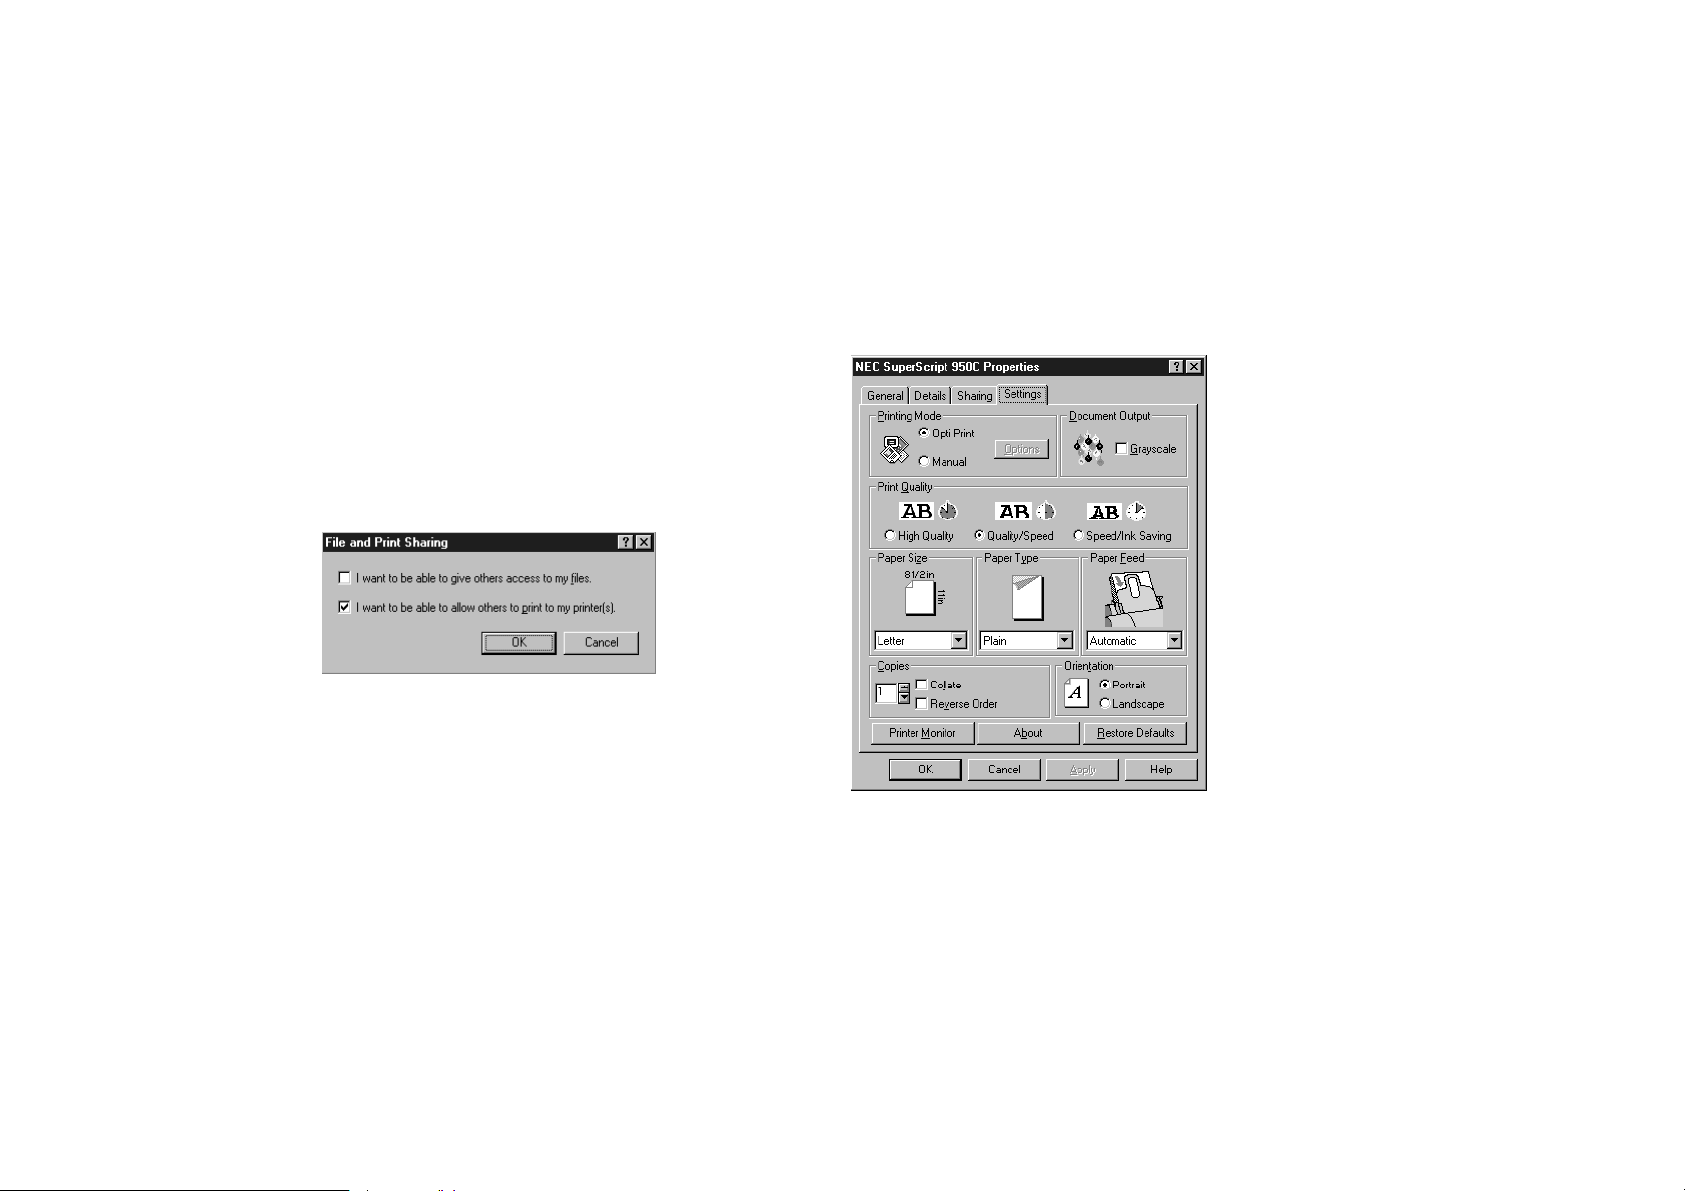
4. Click File and Print Sharing to open the File and
Print Sharing dialog box.
5. Select the I want to be able to allow others to print
to my printer(s) check box.
6. Click OK to return to the Network control panel.
7. Click OK to accept the changes.
8. Restart your computer.
Settings Tab
PRINTER SOFTWARE
Use the Settings tab for adjusting the printing mode,
document output, print quality, paper handling,
orientation, and number of copies to print.
Printing Mode
If Opti-Print is selected, the NEC SuperScript 950C
analyses your document in order to apply the best settings
for your print job.
21

If you want more control over the document type selection
process, or wish to override some of the decisions that
NEC SuperScript 950C makes, select Manual to activate
the Options button. Click on Options to open dialog box
where you can manually adjust the printing mode.
See“Manual Options” on page 24 for more information.
Document Output
This property is available either in Opti-Print or in Manual
Printing Mode.
Clear the Grayscale check box to print in color.
Note:
cartridges (Black and Color) are in the printer.
Printing is possible only if both print
If Grayscale box is checked then Black and White prints
are produced (shades of gray).
Print Quality
Print quality affects how the printer puts ink onto a sheet
of paper. It controls how many passes the print cartridge
makes. This option affects both the quality and speed of
printing.
H
IGH QUALITY
This mode is suitable for printing pictures, shadowed
graphics and photographs. This print quality is equivalent
to a 1200 x 1200 dpi resolution.
Q
UALITY/SPEED
This is the default setting for the driver. It represents a
good compromise between speed and quality when the
document is composed of text and simple patterned
graphics.
The quality will be acceptable for pictures and complex
artwork, though not optimized. This print quality is
equivalent to a 600 x 600 dpi resolution.
S
PEED/INK SAVING
This mode is the fastest way to print and reduces ink
usage by (about 50%) but the output is of draft quality.
This print quality corresponds to a 300 x 600 dpi
resolution.
Note:
paper is available in the Paper Type selection.
When Speed/Ink saving is selected, only Plain
Paper Size
Use the paper size pull-down list to select a paper size for
your printer. All paper sizes displayed can be used on the
printer.
Paper Type
To obtain the best results, the NEC SuperScript 950C
driver must recognize the type of paper used for printing.
The effects of ink on common paper differ from those
attainable with coated papers. To obtain the best results,
use NEC Premium Papers.
22

Paper Feed
When Automatic feed is selected, the paper will be
automatically fed from one of the automatic paper trays.
When Manual feed is selected, you must manually load
the paper.
Note:
paper Tray contains paper, will be used for printing
before paper in the Main Paper Tray is used.
Copies
Enter the number of copies that you wish to print. The
following options are available.
• Collate
All pages of the document will be printed before the
next set of copies are printed.
• Reverse Page Order
This causes your print job to begin printing with the
last page of the document.
The number of copies to be printed can be selected either
from the application you are working in or the printer
driver. As some applications may not take into
consideration the number of copies you inserted, we
recommend you set it in the driver.
Any paper that is loaded in the Input/Output
Orientation
Use orientation to control how the image is printed on
paper. An example is shown below.
Portrait
Landscape
A
A
Note: If your driver is set to Portrait and the Page
Setup in your application is set to Landscape, the
orientation in your application will generally, but not
always, be applied. Check that the settings in the driver
and your application do not contradict each other.
PRINTER SOFTWARE
23

Manual Options
If Manual printing mode was selected, the Manual Options
dialog box can be used for adjusting printing quality
properties.
T o open the Manual Options dialog box, click Options from
the Settings tab.
I
MAGE
Use these controls to change the brightness and contrast of
the image. Move the brightness slider to the left for a
brighter print and to the right for a lighter one. Move the
contrast slider to the left for a lower contrast print and to the
right for a higher contrast one.
D
ITHERING
Dithering controls the dot pattern with which images are
created when they are printed. In general, pattern dithering
produces textured images and is suitable for general word
processing, and simple solid graphics. Four types of
dithering can be selected.
• Spray
Spray is the NEC SuperScript 950C printing driver
name for Error-Diffusion. When using Spray mode, the
driver renders an image 32 or 24 bits per pixel in color
and 8 bits per pixel in black and white.
Spray (diffusion) printing uses an advanced rendering
technique to generate a smoother image. Graduated fills
look better, images look clear and photographs look
much closer to the original. With very complex images,
Spray mode can sometimes take a little longer but
generally the results are better.
• Pattern
Use for graphic images having few details and shading.
Most printers use Pattern to represent an image which
can give a grainy result.
• Line Art
Use for simple line art and computer graphics.
Note:
You should experiment with different Dither
24 SuperScript 950C— User’s Guide

options to learn which ones are best suited to your
printing needs. If your document is composed of mix
objects (Business Graphics, and Photos) select the
Opti-Print Printing Mode.
D
OCUMENT TYPE
• Choose Business if you want to print spreadsheets or
charts.
• Choose Clip Art if you want to print technical
drawings (CAD) or computer generated artwork.
• Choose Photos if you want to print photographs or
printed illustrations.
• Choose Unadjusted if you are printing documents
produced with software that enables the user to select
and calibrate the type of document.
THE P
The SuperScript 950C Print Monitor can be installed on
computers running Windows 3.1x. 95, or 98. Use it for
doing the following tasks.
• Monitoring Print Jobs
• Monitoring Printer Operational Status
• Servicing the Print Cartridges
• Changing the Operating Profile
If the printer is shared among network users, the error
messages reported by the Printer Monitor will be
RINTER
M
ONITOR
displayed through message boxes supplied by the
Windows operating system.
If you send a print job to a computer that is sharing its
SuperScript 950C, the Printer Monitor will only display
the spooling of the job. Error messages will not be
displayed.
Running the Printer Monitor
To start the Printer Monitor:
1. From the Windows taskbar, click Start.
2. Point to Programs , then NEC SuperScript 950C .
3. Select SS950C Printer Monitor .
The Print Monitor can be configured so that it will only
run when a print job is started. This is known as automatic
run mode.
To put the Print Monitor into automatic mode:
1. From the Windows taskbar, click Start.
2. Point to Settings , then select Printers to open the
Printers window.
3. Select NEC SuperScript 950C .
4. From the File menu, select Show Monitor during
print.
Note:
during print if you don’t want to be notified about
printer errors by the Printer Monitor.
Remove the check mark next to Show monitor
PRINTER SOFTWARE
25

The Printer Monitor Window
The Printer Monitor is divided into a Status tab, Printer Care
tab, and Options tab. The controls in each tab are briefly
described in this section. For more information about using
these controls, click the Help button.
Status Tab
Use the controls in the Status tab for viewing the progress of
a print job, and for aborting, pausing, or restarting a print
job. Status and error messages can also be viewed.
representing the printer will appear in the system tray of the
Windows taskbar. If an error occurs, a red cross will be
displayed on this icon to warn you.
Note:
Copy label (number of copies) will change to RAW. This
corresponds to the spool data format that you are
receiving.
If someone is printing to your shared printer, the
Printer Care Tab
Use the Printer Care tab for changing, aligning, and cleaning
the print cartridges. Help systems, such as How Do I and
Troubleshooting, can also be started from this tab.
If the Always Minimized check box is selected, an icon
26 SuperScript 950C— User’s Guide

C
HANGING A PRINTER CARTRIDGE
Use the Change button when you need to replace a Print
Cartridge.
To change a Print Cartridge:
1. Click Change to move the print cartridge to the
loading position.
2. Replace the print cartridge.
3. Click OK to return the print cartridge to its rest
position.
4. Depending on the color of the cartridge click Reset
Black or Reset Color.
The printer will then initialize the cartridges; a process
that will take 3-5 minutes.
When ever a cartridge is replaced, the cartridges must be
aligned.
A
LIGNING THE PRINT CARTRIDGES
Before aligning the print cartridges, assure that both print
cartridges are installed and paper is loaded.
Whenever a print cartridge is replaced, you must always
check the horizontal and vertical printing alignment. This
operation can also be performed if the print quality is not
satisfactory.
Aligning the cartridges takes about 3 minutes and requires
at least 2 sheets of paper. Status messages will guide you
through the procedure, and at the end of the procedure, a
confirmation test is performed.
To Align the cartridges:
• Click Align, then follow the instr uctions displayed on
your monitor.
C
LEANING THE PRINT CARTRIDGES
The print cartridges are cleaned periodically during the
printing process. If this automatic cleaning is not sufficient
to give you the required quality, you can clean the print
cartridges by clicking the Clean button.
This operation takes about 1 minute. After cleaning, click
Test Page to print a test page then verify the quality . After
this operation, all the nozzles should function correctly. If
results are still unsatisfactory, manually clean the nozzles
of the print cartridges as described on page 36.
P
RINTING A DEMONSTRATION PAGE
The demonstration page lists all the features of your
printer. It also assures that the driver and the printer
monitor have been correctly installed. Click Demo to print
the page.
P
RINTING A TEST PAGE
The test page shows printer technical specifications and
can be helpful when calling NEC technical support. To
print a test page, click the Print Test button.
PRINTER SOFTWARE
27

Options Tab
Use the Options tab to change the printer operating profile
and turning on an ink dry delay time.
P
RINTER POSITION
Select Primary Profile if you plan on using the printer in this
position, otherwise, select Optional Profile.
A
CTIVATE DRY DELAY TIME
This option can be selected when printing on special paper
or whenever you think that ink drying times will be long.
It works by automatically feeding paper into the printer , but
delays successive sheets to allow for the ink to dry on the
one just printed. Drying time depends on the quality of
print and the type of paper selected in the printer driver.
28 SuperScript 950C— User’s Guide

Printer Monitor Messages
The Printer Monitor Status tab displays messages about
printer operational status and the progress of a print job.
The following tables list the messages that can appear.
Table 2-1: Status Messages
Message Condition Correction (if error message)
PRINTER SOFTWARE
Initializing While turning the printer on, it begins an auto-
diagnosis and cleans the print cartridge
nozzles. During this stage, communication
with the computer is suspended.
Print Cartridge Initialization Ev ery time you replace the Print Cartridge you
have to wait for the end of the initialization
cycle.
Printer is Idle No print job sent; Printer is in ready mode.
Printing A print job is currently under way.
Print is Aborting Occurs when the Abort button in the Status
tab is clicked.
Print is Paused Occurs when the pause button in the Status
tab is clicked (and momentarily becomes a
Resume button).
The message “printer is idle” is shown
once this operation is completed.
The message “printer is idle” is shown
once this operation is completed.
Pressing the Resume button will enable
printing to continue.
29

Table 2-1: Status Messages
Message Condition Correction (if error message)
Printing Demo Page The Demo button in the Printer Care tab has
been clicked.
Printing Print Test Page The Print Test button in the Printer Care tab
has been clicked.
Aligning Print Cartridges The Align button in the printer Care tab has
been clicked.
Cleaning Print Cartridge The Clean button in the Printer Care tab has
been clicked.
Print Cartridge Changing
Position
Ink Dry Delay Time: if you
do not wish to wait, press
the paper button to
resume
The “Change” button has been clicked in the
printer control tab.
Appears before the printer loads the next
document, when the “Activate Dry Delay Time”
button in the Options tab of the printer monitor
has been selected. Appears when print job
requires Dry Delay Time.
30 SuperScript 950C— User’s Guide

Table 2-2: Error Messages
Message Condition Correction (if error messages)
PRINTER SOFTWARE
The printer is Out of
Paper
The printer connected is
not a SS950C
Switched off or
disconnected
Color Print Cartridge
installed in the black
print cartridge housing
Black Print Cartridge
installed in the color
housing
Black Print Cartridge is
not installed
Printing stops and the LED flashes rapidly. Insert paper, then from the Operator’s
Panel, press the Paper button. Printing
will then continue.
The printer connected is another type of NEC
SuperScript inkjet printer.
The printer is not connected to the PC, or it is
switched off.
The housing of the two print cartridges is
physically similar, to permit the insertion of the
Black Print Cartridge in the Color cartridge
housing.
The housing of the two print cartridges is
physically similar, to permit the insertion of the
Color Print Cartridge in the Black cartridge
housing.
Black Print Cartridge is missing. Install Black Print Cartridge.
Connect the SS950C printer.
Turn on, or connect the printer to your
computer.
Insert Color Print Cartridge in the correct
housing which is marked by three dots.
Insert Black Print Cartridge in the
correct housing which is marked by a
single dot.
31

Table 2-2: Error Messages
Message Condition Correction (if error messages)
Color Print Cartridge is
Color Print Cartridge is missing. Install Color Print Cartridge.
not installed
Faulty EEPROM Printer Interface Error between the controller and
the engine.
Switch the Printer off then turn it on
again. If the prob lem still persists call the
technical support immediately.
Faulty carriage Hardware problem. Call technical support immediately.
Table 2-3: Error Messages for Windows 3.1x only
Message Condition Correction (if error messages)
Check your printer Out of paper. Load paper.
The Print Manager is not
active in the Control panel
“Use Print Manager” is set in NEC SuperScript
950C Spool Manager, but not in Windows
Activate “Use Print Manager” in both
environments.
Control Panel/Printers.
32 SuperScript 950C— User’s Guide

CHAPTER 3
PRINT CARTRIDGE CARE
AND USE
O
VERVIEW
The SuperScript 950C is shipped with two print
cartridges.
• A Black Print Cartridge
• A Color Print Cartridge
The cartridges provided are of the disposable kind; once
they have been exhausted they MUST be replaced. Dots
on the cartridges identify what color they are. One dot
identifies it as a black cartridge, and three dots identify it
as a color cartridge.
When replacing the print cartridges use the following
cartridges.
• NEC Black Print Cartridge, order no.30-080
• NEC Color Print Cartridge, order no.30-085
Note:
ink, since this could damage both the print cartridge
and the printer.
Do not attempt to refill the print cartridge with
To replace a print cartridge:
1. Start the Printer Monitor.
2. Click Change in the Printer Care tab, or hold down
the power button and press paper once and then
release both the buttons on the printer’s Operator
Panel at the same time.
3. Open the Printer Cover.
2
1
4. Press the green release lever to unlatch the Black or
Color Print Cartridge.
PRINT CARTRIDGE CARE AND USE
33

5. Remove the Black or Color Print Cartridge, holding it by
the grip.
6. Remove the new print cartridge from its packing.
Remove the protective tape by lifting the label from the
bottom as shown. DO NOT touch either the printing
nozzles on the bottom or the golden colored electrical
contact area.
7. On the Print Cartridge Print Cartridge Carriage labels
are used to indicate which seat is used for the black and
color cartridges. The single dot indicates the black
cartridge, and the triple dots indicate the color cartridge.
8. Seat the print cartridge, by pushing it towards the green
release lever until it snaps in place.
9. After inserting the cartridge, close the Printer Cover.
The printer will then initialize the new cartridge.
Initialization will take 3-5 minutes.
10. Use the Printer Monitor to align the cartridge (described
in the next section).
34 SuperScript 950C— User’s Guide

P
RINT CARTRIDGE ALIGNMENT
After a print cartridge is replaced, they must be aligned.
1. Open the SS950C Printer Monitor file.
2. Click the Printer Care tab shown below.
3. Click the Align button.
4. Follow the on screen instructions.
5. Click Print test to verify the alignment.
Note:
requires at least 2 sheets of paper to be loaded in the
paper tray.
This operation takes about 3 minutes and
PRINT CARTRIDGE CARE AND USE
35

C
LEANING THE PRINT CARTRIDGES
Print cartridges are automatically cleaned at regular
intervals when the printer is on. This operation keeps
print cartridge nozzles unobstructed, to assure the correct
flow of ink. If automatic nozzle cleaning does not provide
a satisfactory print quality, perform the cleaning operation
using the clean function in the Printer Care tab. If the print
quality does not improve then, clean the electrical contacts
and manually clean the nozzles.
Cleaning the Electrical Contacts
To clean the electrical contacts:
1. Click on the Change button from the Printer Care tab.
2. Open the printer cover; then remove the print
cartridge that is causing the problem.
4. Insert the print cartridge in the printer and close the
Printer Cover.
5. Print test page to verify the quality.
Note:
the Print Cartridge Nozzles.
If print quality fails to improve, try cleaning
Cleaning the Nozzles Manually
WARNING! This operation may damage the print
cartridge and should be considered ONLY as a last
resort before replacing the WHOLE print cartridge.
To clean the nozzles:
1. Click Change from the Printer Care tab.
2. Open the printer cover, unlatch and remove the print
cartridge that is causing the problem.
3. Clean the electrical contacts (golden area) of the Print
Cartridge and Print Cartridge Carriage, using a
slightly damp lint free cloth. Make sure not to touch
the print cartridge nozzles.
3. Lightly dampen a paper napkin with distilled water
and let any excess liquid drain off.
36

4. Keeping the print cartridge with the nozzles facing
downwards, gently blot the cartridge on the napkin.
5. Repeat the operation several times on different points
of the napkin to clean the nozzles.
6. Insert the print cartridge in the printer and close the
Printer Cover.
7. Align the cartridge as described on Page 35.
8. Print a Test page to verify print quality.
PRINT CARTRIDGE CARE AND USE
37

38 SuperScript 950C— User’s Guide

CHAPTER 4
TROUBLESHOOTING
TROUBLESHOOTING
O
VERVIEW
This chapter describes some of the problems that may
occur during the day-to-day use of your printer, together
with suggestions for their solution.Your printer is
designed to require only minimum maintenance.
However, everyday use will give rise to a number of
simple printer care operations.
If you detect serious mechanical damage or printer failure,
do not attempt to repair it yourself. Call the technical
support.
This chapter divides printer problems into four sections. A
flashing light on the printer indicates a problem.
• Printer Hardware
• Paper
• Print Cartridge
• Printing
Printer Hardware
Printer Indicator Light
The status of the Indicator Light identifies the different
printer conditions: Table 4-1 describes each condition.
Table 1-3: Indicator Light
Status Condition
Off Printer is off
On Printer is on and in ready
mode
Flashing Slowly
(1 flash per second)
Flashing Moderately
(2 flashes per second)
Flashing Quickly
(3 flashes per second)
Flashing Fast
(5 flashes per second)
• Printing
• Printing is paused
• Aligning print cartridges
• Print cartridge
initialization
• Cartridge changing
position
• Black or color cartridge
not installed
• Out of paper
• Paper jam
• Printer failure
39

Printer is Not Powered
Indicator Light is not illuminated
• Check that the printer is properly connected to the
power socket.
• Press Power button .
Failure Condition
This error is identified by the following
• Very rapid flashing of the light indicator.
• Message fr om the Printer Monitor such as Carriage defect
or EPROM defect.
Try switching the printer off then on. If the problem persists
call technical support.
No Printer Reaction
There is no reaction when you switch the printer on.
• Check that you have connected the printer power cable
properly, both to the printer and to the electrical power
socket.
• With the Printer Cover open, press power button .
• Check that the Print Cartridge Carriage moves slightly
when you switch the printer on. If not, call technical
support.
• Try switching the printer off and then on again. If
nothing happens disconnect the printer and call
technical support.
Demo Page Did Not Print
If the Indicator Light is flashing, check that you have
installed both print cartridges and loaded some paper in one
of the paper trays.
If you tried printing the Demo Page from the Printer
Operator Panel:
• Check that you have executed the sequence corr ectly by
holding down the power button and pressing the
paper button four (4) times; then release both buttons
simultaneously.
• Pr ess the power button to switch the printer off, wait
a few seconds, then press the power button again.
If you tried printing the Demo Page from the Printer
Monitor:
• Check if a message is displayed on your Printer
Monitor. If there is, depending on its content, perform
the required operation.
• Try printing the Demo page again.
If you still cannot print the Demo Page, try printing the
windows Test Page (from the General Tab) to check if the
driver has been correctly installed and that you do not have
any problems with printer cable connection.
40 SuperScript 950C— User’s Guide

Print Test Did Not Run
If the Indicator Light is flashing, check that you have
installed both print cartridges and load some paper in one
of the paper trays.
If you tried printing the Print Test from the Printer
Operator Panel:
• Check that you have executed the sequence correctly
by holding down the power button and pressing
the paper button twice; then release the two
buttons simultaneously.
• Press the power button to switch the printer off,
wait a few seconds and then press the power button
again. Repeat the Operator Panel sequence.
If you tried printing the Print Test from the Printer
Monitor:
• Check if a message is displayed on your printer
monitor. If there is, depending on its content, perform
the required operation.
• Try printing the Print Test again.
If you still cannot print the Print Test, try printing the
Windows Test Page (from the General Tab) to check if the
driver has been correctly installed and that you do not
have problems with printer cable connection.
Switched Off or Disconnected Message
If this message is displayed on your printer monitor
and the Indicator Light does not blink:
• Check that your printer is switched on (Indicator
Light is lit).
• Check that your interface cable is of the correct type
(you can even try another cable).
Use an IEEE 1284-compliant cable.
• Make sure you have fixed the interface connectors
properly both to the printer and to the host.
• Check that you have configured your printer port
settings correctly according to the printer driver.
If you are connecting to other printers through a switch
box, you may be connected to the wrong printer.
If wrong printer message is displayed on your printer
monitor and the printer Indicator Light is blinking very
rapidly:
• The printer is in a failure condition. Unplug the
printer from the electrical power supply, then plug it
TROUBLESHOOTING
41

in again. If the Indicator Light keeps on blinking very
rapidly, contact technical support.
This is not a SuperScript
TM
950C Printer
If you are connected to another NEC printer through a
switch box, but printing with the NEC SS950C driver, this
message will be displayed on the printer monitor.
Just switch to the NEC SS950C printer.
Paper
The following problems related to the paper may occur:
• Out of paper message
• Paper does not load
• Paper jams
• Printed paper does not stack correctly
Out of paper message
If during printing, there is no paper either in the Main
Paper Tray or the Input/Output Paper Tray, a message
will be appear in Printer Monitor Status Tab and the light
indicator will flash rapidly.
To clear this condition, load paper in either of the paper
trays and press the paper button on the Operator
Panel.
If you have selected the Manual Paper source in the
Settings Tab of your driver, press the Paper button on
the Operator Panel.
Paper Does Not Load
• Check that the paper is within the specifications stated
and is not curled, crumpled or torn.
• Check that the paper is positioned correctly.
• Check that the paper is not held too tightly nor has too
much play.
• Check that the correct paper source is selected in your
printer driver.
• Repeat the paper loading procedure.
The Printer Does Not Feed the Paper
If the printer is not able to feed the paper for printing, it
will stop and the indicator light on the operator panel
starts to blink.
If this happens frequently, the cause may be an
accumulation of paper dust, ink, or other substances on
the paper drive rollers.
42

To clean the paper drive rollers:
1. Open the printer by pressing the release button
highlighted in the figure, (If the printer is in vertical
operating position, you need to rotate it to the
horizontal position).
2. Hold down the power button and press the paper
button nine times, then release the two buttons
together. The paper drive rollers will start moving.
Wipe the moving rollers with a damp soft cloth (or
cotton swab) until they are clean.
3. Turn off the printer.
4. Close the printer.
Paper Jams
If the paper has already exited from the print area:
• Remove the jammed paper, pulling it carefully
towards the Input/Output Paper Tray.
• Remove any imperfect or damaged paper from the
paper tray.
• Repeat the paper loading operation.
• Press the paper button .
If the paper is jammed in one of the paper trays:
1. Cancel the current print job from the Printer Monitor
Status Tab then pause the other queued jobs.
2. Press the power button then disconnect the printer
from the power supply.
TROUBLESHOOTING
43

3. Open the rollers cover as shown below. If the printer is
in a vertical position, you will need to lift it up slightly.
4. Remove the jammed paper then close the roller cover by
pushing it downwards until it clicks in place.
5. Remove any imperfect or damaged paper from the
paper trays.
6. Reconnect and turn the printer power on.
7. Load some paper.
8. Begin printing.
Incorrect Stacking
• Check that the Input/Output Paper Tray is not
overloaded (the maximum is 60 sheets).
• Check that the printed paper does not curl or stick
together.
Print Cartridges
If a problem related to the print cartridge occurs, it will be
indicated by the following.
• Quality of print.
• Indicator Light is flashing.
• Messages displayed by the Printer Monitor.
Test Page:
Test page contains information about the printer firmware
and the correct operation of the print cartridge nozzles.
Continuous lines indicate that the nozzles are functioning
correctly. Discontinuous lines indicate that the nozzles are
not functioning correctly (in this case you are advised to
clean the print cartridges from the printer monitor).
44 SuperScript 950C— User’s Guide

Table 4-2 describes the printer settings that are listed on
the Test Page.
Note:
nozzle tests are the current printer settings (if you run
the print test as soon as you install the printer, the
The DOSETUP values indicated after the
Table 4-4: Test Page Contents
values indicated are the printer default settings set by
the manufacturer). DOSETUP parameter values
illustrated in the table are valid only for DOS and are
not displayed in Windows.
TROUBLESHOOTING
SETUP
Parameter
Default Setting Parameter Description
PAPERFORMAT Letter Size of paper used for printing
PAPDEV ASF1 Paper tray from where the paper is supplied
PERSKIP ON Feature that permits a value for top and bottom margins
TEXTSCALE OFF Feature that permits a reduction of the linespacing value to guarantee the
set number of the printer lines per page, even when a top and bottom
margin are active
BIMDENSITY 300 Density of dots produced to form the printed character (value in dots per
inch)
TERMINATOR NORMAL Printer handling of the new line and line feed commands
QUALITY LQ Quality of printed characters produced
WIDTHTYPE NORMAL Character size, with respect to set value indicated by TYPESTYLE
45

Table 4-4: Test Page Contents
SETUP
Parameter
TYPESTYLE Courier Upright 10
Default Setting Parameter Description
Character font
cpi / 12 pts
CHARASET CP 437
Character set
International
Printer Does Not Print
• Check that the printer is powered on (Indicator Light on
the printer operator panel is lit).
If the Indicator Light is flashing:
• Check that you have inserted the print cartridges, in the
correct position.
• Check that the print cartridges are sitting in their seats
correctly.
• If you inserted a new print cartridge, remember to press
the corresponding Reset button in the Printer Care tab
of the Printer Monitor.
If the Indicator Light is not flashing:
• Check that you removed the protective film from the
print cartridges.
• Assure that the paper is present and loaded correctly.
If a message is displayed on your screen:
• Perform the operation requested by the message and
printing will resume.
Print Cartridge Carriage Does Not Return to its Rest
Position
• Check that you have inserted the print cartridge
properly, in the correct housing.
• Check that the print cartridges are sitting in their
respective seats correctly.
• Check that nothing is blocking the carriage path.
Characters are Faint
• Check the ink level as seen in the Printer Care tab of the
Printer Monitor.
• Print test page to check if nozzles are blocked and that
all electrical contacts are active in the Print Cartridge.
46 SuperScript 950C— User’s Guide

• If the printed document appears faint, clean the Print
Cartridges from the Printer Monitor.
• If the printed document continues to be faint,
manually clean the Print Cartridge nozzles /contacts
as described in chapter 3.
• Replace the black or color Print Cartridge.
Missing Dots
• Remove the Print Cartridge then insert it.
• Clean the Print Cartridge.
• Clean the electrical contacts on the Print Cartridge and
those on the Print Cartridge Carriage.
• Print a Test Page, to check that no nozzles are blocked
and that all the electrical contacts are active in the
Print Cartridge; check the print quality.
• If the print quality is not acceptable, change the Print
Cartridge.
No Print Cartridge is Installed message
In this case, a message is displayed from the driver on
your screen prompting you to insert a Print Cartridge.
Print Cartridge not in the right housing message
• You have inserted the black cartridge in the color
housing or the color cartridge in the black housing.
• Remove the Print Cartridge and insert it in the correct
housing.
High Ink Level Displayed
When there is high ink level displayed and the print
cartridge is out of ink.
• Replace the Print Cartridge.
• From the Printer Care tab of the Printer Monitor, click
the Reset button.
Printing
The following problems are described in this section.
Note:
Print Cartridge Carriage manually nor touch the area
within the Print Cartridge Carriage path.
• Printer Does not Receive Data
• Printing Stops
• Printing does not Resume after Changing the Print
Cartridges
• Printing Resumes but Nothing is Printed
• Poor Print Quality
• Borders are not in a Straight Line
• Strange Characters are Printed
During a printing operation, do not stop the
TROUBLESHOOTING
47

Printer Does not Receive Data
• Check that the printer is connected to power supply
outlet and is turned on. The Indicator Light on the
operator panel must be lit (but not flashing).
• Check the printer port setting on your computer. If
necessary change this setting.
• Check if the printer is in the special functions mode
(Indicator Light flashing with a fast/slow sequence).
• Try switching the printer off then on.
Printing Stops
• Check if the Indicator Light is flashing rapidly. If it is,
identify and correct the error condition.
• Check if a message is displayed on your screen. If there
is, identify and correct the error condition.
Printing Does not Resume
Printing does not resume after changing the print cartridge.
• Check that the Print Cartridges are inserted and are
seated correctly.
Note:
printer which takes about 3-5 minutes.
A new print cartridge must be initialized by the
Note: Remember to click the appropriate Reset button
in the Printer Care tab of the Printer Monitor.
Printing Resumes
Printing resumes but nothing is printed on paper.
• Remove the protective tape from the Print Cartridge
before inserting it in the printer.
Poor Print Quality
• Try printing on the other side of the paper.
• Make sure you are using good quality paper, preferably
NEC recommended media which has been thoroughly
tested and guarantees optimum results.
• Clean the Print Cartridges.
• Clean the electrical contacts on the Print Cartridge and
those in the Print Cartridge Carriage.
The Printed Image is Blurred or Smeared:
Always use high quality paper (paper type) indicated
specifically for inkjet printers, preferably NEC
recommended media.
The Printed Image is Faint or Poorly Defined:
Check your application color settings or modify your image
driver settings in the Manual Options dialog box.
The Printed Image is too Light/too Dark:
Check your application color settings or modify your image
driver settings in the Manual Options dialog box.
48 SuperScript 950C— User’s Guide

Borders Are Not in a Straight Line
An imperfect alignment is most evident if you are printing
table borders. This error occurs generally when you insert
a new print cartridge.
• Run the align function, to correct horizontal and
vertical misalignment of the characters.
Strange Characters are Printed
• Check that the default driver you have selected is the
correct one.
• Check the printer cable quality and length. The cable
must meet IEEE-1284 and the length must not be more
than 6 feet (2 meters).
• If you cannot solve this problem, call Technical
Support. They may request you to run a Hex-Dump
see “Running a Hex-Dump” on page 49.
Technical Support
If you cannot solve a problem with this troubleshooting
guide, call T echnical Support. They may have you perform
the following tasks.
• Determining the what printer firmware and printer
driver is being used.
• Running a Hex-Dump of a test piece to check that the
data transmission is operative.
Running a Hex-Dump
This is a printing mode where the transmitted characters
and also control codes are printed as two digit
hexadecimal codes. It is used for debugging.
To run the Hex-Dump:
1. Hold down the power button then press the paper
button seven times; then release the two buttons
simultaneously.
2. The Indicator Light will start flashing with a fast/slow
sequence.
3. Send a short text file from your computer. This file is
printed as a string of hexadecimal codes
corresponding to the individual characters
transmitted.
4. To exit, press the power button on the printer
operator panel (printer is turned off).
TROUBLESHOOTING
49

50 SuperScript 950C— User’s Guide

APPENDIX A
MEDIA SPECIFICATIONS
O
VERVIEW
This appendix has general guidelines for purchasing and
storing paper and other media for your NEC SuperScript
950C inkjet printer . Your printer supports a wide variety of
print media, including
• Plain paper
• Transparencies
• Envelopes
• Inkjet labels
• Glossy
• Photo paper
• Inkjet coated
• Card stock
Recommended Paper Weights
Plain Paper: 16 to 53 lb. bond (60 to 200 g/m2 bond)
Recommended Media
The following printing media are those handled by the
printer and recommended by NEC.
Envelopes: You can print envelopes from the Main
Paper Tray or the Input/Output Paper Tray. Load no
more than 25 envelopes in the Main Paper Tray at a
time. The Input/Output Paper Tray holds 3
envelopes. The leading edge of an envelope that feeds
into the printer must be straight. The fold must be
firmly creased and be no thicker than two paper
thicknesses. As a rule, the larger the envelope is, the
more difficult it is to feed properly. You should load
envelopes with the flap edge to the right. The address
side must face down and the flap side must face up.
Adhesive Labels: Adhesive labels consist of a top
(print surface) sheet, an adhesive layer, and a liner
(peel-away backing). The top sheet is usually
xerographic paper and must meet the general
specifications for that kind of paper . The liner must be
coated for easy release of the top sheet and adhesive
layer sheets. Do not use label stock with the backing
sheets exposed between the individual labels
Transparency Film: Always use those specifically
indicated for ink jet printers; they are designed to
absorb the ink correctly. You can insert them either in
packs of up to 50 in the Main Paper Tray or 5 at a time
in the Input/Output Paper Tray.
MEDIA SPECIFICATIONS
51

Choosing Paper and Media
Choosing quality paper is the most effective measure you
can take to achieve consistently good results from your
printer.
Although we do not endorse particular manufacturers. This
chapter shows you how to recognize quality media products
and gives detailed specifications for print materials.
Note:
manufacturing of your selected media, we cannot
warrant the use or results of any specific media with the
SuperScript 950C printer.
Because we cannot control the quality or
You must judge the quality and performance of any paper.
T est any paper for compatibility with your SuperScript 950C
printer before you make a large purchase.
Note the following media guidelines.
• Check that the media meets all specifications noted in
this chapter.
• Order a small quantity to test with your printer and
your work environment.
• T ransparencies should have a single sheet of plain paper
as a backing.
Care of Printer paper
Use the following precautions when handling printer paper.
Avoid storing the paper in any of the following places:
•A place subject to direct sunlight
•A hot place with an open flame
•A humid place
•A dusty place
In addition to the recommended paper, you may also use
generic paper as long as it meets the printer paper
specifications of size and weight. When using the Main
Paper Tray the weight should be (16 to 53lbs), If the Input/
Output Tray is used the weight should not exceed (16 to
40lbs). Try samples of the generic paper to determine if the
printer performance and print quality are acceptable to you.
Paper jams or poor print quality may result from using print
media that is not recommended for use in this printer or
from print media that is damaged.
Do not use media with the following characteristics
• Paper that does not meet the size and weight (16 lb to
• 53 lb) specifications of this printer
• Paper that is wrinkled, curled, torn, or bent
• Paper that is wet
• Paper that is extremely rough or heavily textured
52 SuperScript 950C— User’s Guide

• Paper that is sticky or has an adhesive surface
• Paper that is pasted
• Paper that is stapled or clipped
• Label stock with the backing sheets exposed between
the individual labels
• Envelopes with thick or uneven edges
• Envelopes with clasps attached to them
• Embossed envelopes
Driver Settings
Always make sure that you have selected in your printer
driver the Paper Type and Paper Format features that
correspond to the type of printing media you intend to
use. In particular, the color calibration in the driver is set
specifically for each of the different types handled., so an
incorrect setting will result in poor quality print-out.
To access the driver settings see “The Printer Driver” on
page -17.
Paper Sizes and Capacity
The Main Paper Tray holds upto 150 sheets of 16 to 53pound (60 g/m2) paper . The Input/Output Paper T ray can
hold up to 10 sheets of standard U.S. letter paper, and
other paper sizes shown below. Envelopes can be feed
automatically up to 25 from the Main Paper Tray or 3 from
the Input/Output paper Tray.
The paper sizes accepted by the printer can be divided
into two categories. “Standard” and “Narrow”, depending
on the format, the insertion mode will be different. Both
these formats can be inserted in the Main Paper Tray and
the Input/Output Paper Tray. Standard size is equal or
wider than 165 mm.
Table 5-1: Standard Format Sheets
Paper Size Millimeters Inches
US Letter 216 x 279 8.5 x 11
US Legal 216 x 356 8.5 x 14
US Executive 184 x 267 7.25 x 10.5
DIN A4 210 x 297 8.27 x 11.69
MEDIA SPECIFICATIONS
B5 182 x 257 7.16 x 10.12
User Defined
(minimum)
101.6 x 148.5 4 x 5.85
53

Table 5-1: Standard Format Sheets
Table 5-2: Narrow Format Sheets
Paper Size Millimeters Inches
User Defined
216 x 356 8.5 x 14
(maximum)
Table 5-2: Narrow Format Sheets
Paper Size Millimeters Inches
US Com 10 104.8 x 241.3 4.13 x 9.5
DL 110 x 220 4.33 x 8.66
Table 5-3: Single Sheets
Format/
Measurement
Paper length 297 mm/
Paper width 216 mm/
Letter Legal US EXEC A4 A5
356 mm/
11 in
14 in
216 mm/
8.5 in
8.5 in
267 mm/
10.5 in
184 mm/
7.25 in
Paper Size Millimeters Inches
C6 114 x 162 4.49 x 6.38
DIN A5
148.5 x 210 5.85 x 8.27
(vertical)
Note Card No 1 101.6 x 152.4 4 x 6
Note Card No 2 127 x 203.2 5 x 8
Note Card A6 105 x 148.5 4.13 x 5.85
Print Area
The following tables describe the supported paper sizes
297 mm/11.7 in210 mm/
8.3 in
210 mm/8.27 in148 mm/
5.8 in
54

Table 5-3: Single Sheets
MEDIA SPECIFICATIONS
Format/
Measurement
Left margin 6.35 mm/
Right margin 6.35 mm/
Top margin 1.00 mm/
Bottom margin
(color)
Bottom margin
(black)
Table 5-4: Envelopes
Format/
Measurement
Envelope length 225 mm/8.88 in 220 mm/8.66 in 162 mm/6.37 in
Envelope width 105 mm/4.13 in 110 mm/4.33 in 114 mm/4.46 in
Letter Legal US EXEC A4 A5
6.35 mm/
0.25 in
0.25 in
0.04 in
18.00 mm/
0.71 in
13.00 mm/
0.51 in
U.S. COM 10 DL C6
0.25 in
6.35 mm/
0.25 in
1.00 mm/
0.04 in
18.00 mm/
0.71 in
13.00 mm/
0.51 in
3.30 mm/
0.13 in
3.30 mm/
0.13 in
1.00 mm/
0.04 in
18.00 mm/
0.71 in
13.00 mm/
0.51 in
3.30 mm/
0.13 in
3.30 mm/
0.13 in
1.00 mm/
0.04 in
18.00 mm/
0.71 in
13.00 mm/
0.51 in
3.30 mm/
0.13 in
3.30 mm/
0.13 in
1.00 mm/
0.04 in
18.00 mm/
0.71 in
13.00 mm/
0.51 in
55

Table 5-4: Envelopes
Format/
Measurement
U.S. COM 10 DL C6
Left margin 10.16 mm/0.40 in 10.16 mm/0.40 in 10.16 mm/0.40 in
Right margin 10.16 mm/ 0.40 in 10.16 mm/ 0.40 in 10.16 mm/ 0.40 in
Top margin 1.00 mm/ 0.04 in 1.00 mm/ 0.04 in 1.00 mm/ 0.04 in
Bottom margin
18.00 mm/ 0.71 in 18.00 mm/ 0.71 in 18.00 mm/ 0.71 in
(color)
Bottom margin
13.00 mm/ 0.51 in 13.00 mm/ 0.51 in 13.00 mm/ 0.51 in
(black)
Table 5-5: Cards
Format/
Measurement
U.S. Cards 4x6 in. U.S. Cards 5x8 in. A6 Cards
length 152 mm/6 in 203 mm/8 in 149 mm/5.83 in
width 102 mm/4 in 127 mm/5 in 105 mm/4.1 in
Left margin 3.30 mm/0.13 in 3.30 mm/0.13 in 3.30 mm/0.13 in
Right margin 3.30 mm/ 0.13 in 3.30 mm/ 0.13 in 3.30 mm/ 0.13 in
56 SuperScript 950C— User’s Guide

Table 5-5: Cards
MEDIA SPECIFICATIONS
Format/
Measurement
Top margin 1.00 mm/ 0.04 in 1.00 mm/ 0.04 in 1.00 mm/ 0.04 in
Bottom margin
(color)
Bottom margin
(black)
U.S. Cards 4x6 in. U.S. Cards 5x8 in. A6 Cards
18.00 mm/ 0.71 in 18.00 mm/ 0.71 in 18.00 mm/ 0.71 in
13.00 mm/ 0.51 in 13.00 mm/ 0.51 in 13.00 mm/ 0.51 in
57

58 SuperScript 950C— User’s Guide

APPENDIX B
PRINTER SPECIFICATIONS
Power Consumption
Operating average: Less than 26 watts (W) average
during operation
In Power-save mode: Less than 2 watts (W)
PRINTER SPECIFICATIONS
Printing Technique
Non-impact, bubble ink jet, with water-resistant ink
Print Speed
Color: 6 sheets/minute
Black: up to 10 sheets/minute
Processor
20 MHz MIPS RISC processor
Random Access Memory (RAM)
2 MB standard
Resolution
1200 x 1200 dpi color and black
Printer Language Emulations
• PCL 3 + with high resolution graphics extensions
Interface Ports
• IEEE 1284-compliant parallel
Power Requirements
Multi voltage from 115 VAC -15% to 240 VAC +10%
Temperature
Operating: 50°F to 90°F (10°C to 32°C)
Non-operating: 35°F to 104°F (2°C to 40°C)
Humidity
Operating: 20-80% RH (non-condensing)
Non-operating: 10-95% RH (non-condensing)
Dimensions (Multi-Profile Dimensions)
Primary Profile (V):
Width: 17.2" (436 mm)
Depth: 9.8" (250 mm)
Height: 7.6" (194 mm)
Optional Profile (H):
Width: 17.2" (436 mm)
Depth: 10" (255 mm)
Height: 8.8" (210 mm)
Weight
Without Consumables : 13 lb (6 kg)
59

Administrative Compliance
• FCC part 15, subpart B, Class B
• Energy Star Compliant
• Year 2000 Compliant
Printer Cartridge Life Expectancy
Life expectancy of the Printer Cartridge that ships with the
printer is:
Black: 1050 pages
Color: 460 pages
Noise Level
• Operating Print Quality Setting:
Speed/Ink Saving : Less than 46 dBA
Quality/Speed: Less than 42.5 dBA
Highest Quality: Less than 41.9 dBA
• Standby: Less than 26 dBA
60 SuperScript 950C— User’s Guide

APPENDIX C
MS-DOS AND WINDOWS 3.1X
O
VERVIEW
A color printer driver is supplied with your SuperScript
950C for computers running Microsoft MS-DOS or
Windows 3.1x. This appendix describes how to install and
use the driver for those computers.
W
INDOWS
3.1X C
OMPUTERS
9. Click Browse to open the Browse dialog box.
10. Navigate to the root directory of the NEC SuperScript
950C Printing Solutions CD.
11. Click OK to return to the Install Driver window.
12. From the List of Printers list, assure NEC
SuperScript 950C is seen.
13. Click OK to begin the software installation.
When completed, NEC SuperScript 950C will
appear in the Installed Printers list of the Printers
window.
After the installation is completed, align the print
cartridge.
MS-DOS AND WINDOWS 3.1X
Driver Installation
To install the color printer driver:
1. Insert the NEC SuperScript 950C Printing Solutions CD
into your computer.
2. Move to the Program Manager window.
3. Double-click on Main to open the Main window.
4. Double-click on Control Panel to open the Control
Panel window.
5. Double-click on Printers to open the Printers
window.
6. Click the Add button.
7. From the List of Printers , select Install Unlisted or
Updated Printer .
8. Click Install to open the Install Driver window.
NEC SuperScript 950C Program Group
The NEC SuperScript 950C program group contains
programs for your printer. It was installed during the
driver installation and can be found in the Program
Manager window. The following programs can be found
in the program group.
• The SS950C Printer Monitor
• “How do I” for SS950C
• Troubleshooting for SS950C
• Spool Manager
61

Print Cartridge Alignment
Print cartridges contain both the inkjet nozzles and inkjet
ink. Align the print cartridge after installing any new
cartridge and whenever symptoms of incorrect printing
alignment appear.
To align the print head:
1. Move to the Program Manager window.
2. Double-click on NEC SuperScript 950C to open the
NEC SuperScript 950C window.
3. Double-click on SS950C Printer Monitor to open the
SS950C Printer Monitor.
4. Click the Printer Care tab to bring it to the front.
5. Click Align to begin the alignment process.
6. When completed, click Print Test to print a test page.
7. Inspect the test page for quality. Repeat the alignment
procedure if necessary.
Viewing the Driver Properties
The printer driver can be opened from inside a common
program such as a word processor, or from the Program
Manager window.
To open from the Program Manager window:
1. Move to the Program Manager window.
2. Double-click Control Panel to open the Control Panel
window.
3. From the Control Panel window, double-click Printers
to open the Printers dialog box.
4. From the Installed Printers list, assure the NEC
SuperScript 950C is selected.
5. Click Setup to open the driver.
To open from inside an application:
1. Start the application.
2. From the File menu, select Print to open the Print Setup
dialog box.
3. From the Printers list, assure the NEC SuperScript 950C
is selected.
4. Click Properties to open the properties window.
62 SuperScript 950C— User’s Guide

Printer Sharing
If the printer is directly connected to your computer, and
your computer is connected to a network, you can share
your printer with other network users. Other users must
be running Windows 3.1x.
The computer which is sharing the printer is called the
sharing computer. Networked computers that want to use
the shared printer are called clients.
Two procedures are used for setting up printer sharing.
One involves configuring the sharing computer, and the
other involves configuring the client computer.
To configure the sharing computer:
1. Install the printer driver as described on Page 61.
2. Move to the Program Manager window.
3. Double-click the NEC SuperScript 950C program
group.
4. From the NEC SuperScript 950C window , double-click
Spool Manager to open the Spool Manager window.
5. Assure the NEC SuperScript 950C is selected.
6. From the Queue menu, select Setup to open the
Queue Setup dialog box.
7. From the General tab, select the Use Print Manager
for this Port checkbox.
8. Click OK to return to the Spool manager window.
9. Close the Spool Manager window.
10. Move to the Program Manager window.
11. Double-click Main to open the Main window.
12. Double-click Control Panel , to open the Control
Panel window.
13. Double-click Printers to open the Printers window.
14. Assure the Use Print Manager checkbox is selected.
15. Close the Printers window.
16. Close the Control Panel window.
17. Double-click on Printer Manager to open the Printer
Manager window.
18. From the Printer Name list, select NEC SuperScript
950C.
19. From the Printer menu, select Share printer as to
open the Share Printer dialog box.
20. From the Printer drop-down list, select NEC
SuperScript 950C .
21. In the Share as text box, type in a description of the
printer.
This description will be seen by network users when
searching for the printer.
22. Click OK to return to the Print Manager window.
23. The Print Manager window must be running for
printer sharing.
After the sharing computer has been configured, a client
computer can be configured.
MS-DOS AND WINDOWS 3.1X
63

To configure a client computer:
1. Install the printer driver as described on Page 61.
2. Move to the Program Manager window.
3. Double-click the NEC SuperScript 950C program
group.
4. From the NEC SuperScript 950C window, double-
click Spool Manager to open the Spool Manager
window.
5. Assure the NEC SuperScript 950C is selected.
6. From the Queue menu, select Setup to open the
Queue Setup dialog box.
7. From the General tab, select the Use Print Manager
for this Port checkbox.
8. Click OK to return to the Spool manager window.
9. Close the Spool Manager window.
10. Move to the Program Manager window.
11. Double-click Main to open the Main window.
12. Double-click Control Panel , to open the Control
Panel window.
13. Double-click Printers to open the Printers window.
14. Assure the Use Print Manager checkbox is selected.
15. Close the Printers window.
16. Close the Control Panel window.
17. Double-click on Printer Manager to open the Printer
Manager window.
18. From the Printer menu, select Connect Network
Printer to open the Connect Network Printer dialog
box.
19. From the Show shared printers on list, navigate to
the computer that is sharing the printer.
20. Select the sharing computer to display the printer in the
Shared printers on list.
21. From the Shared printers on list, select the printer.
22. Click OK to return to the Print Manager window.
23. The Print Manager window must be running for
printer sharing.
64

MS-DOS C
Computers that run MS-DOS do not need to install a
printer driver. Drivers that are native to the MS-DOS
operating system can be used. All that must be installed is
dosetup.exe. Use this program for making simple
adjustments to a driver such as paper size and orientation
and for aligning the print head.
OMPUTERS
Installing dosetup.exe
To install dosetup.exe:
1. Insert the NEC SuperScript 950C Printing Solutions CD
into your computer.
2. Move to your computer’s command prompt.
3. Type copy d:\dosetup.exe then press Enter to
copy dosetup.exe to the new directory.
Note:
The letter assigned to the CD-ROM drive in your
computer may be different.
The print cartridge must now be aligned.
The drive letter used in this example is “d.”
Print Cartridge Alignment
MS-DOS AND WINDOWS 3.1X
Print cartridges contain both the inkjet nozzles and inkjet
ink. Align the print cartridge after installing any new
cartridge and whenever symptoms of incorrect printing
alignment appear.
To align the print head:
1. Move to your computer’s command prompt.
2. Type dosetup.exe then press Enter.
3. Follow the instructions presented on the screen to
Align the print cartridge.
How to Print
To print from a DOS application:
1. Start the DOS application.
2. Open or create a file that you want to print.
3. From the File menu, select Print to open the print
dialog box.
4. Assure that LPT1 port is selected.
5. Select Print to begin printing.
How to Configure an MS-DOS Driver
A native MS-DOS printer driver can be configured by
running dosetup.exe. Basic controls, such as page sizes and
orientation, can be changed to meet you printing needs.At
the end of this section is a table that lists what commands
can be adjusted in dosetup.exe and what command values
can be used.
65

To configure the driver:
1. Move to your computer’s command prompt.
2. Type dosetup.exe then press Enter to start the driver
configuration program.
Command Description Acceptable Values
Paper
Format
TextScale OFF
Bimdensity Controls the
Terminator Select AutoLF to
Quality Controls how ink
Width T ype Select Half Width
Controls the
paper size.
printing
resolution.
feed the paper out
of the printer after
a print job.
is applied to the
paper.
to print on half the
width of the
paper. Select
HalfHieght to print
A4,A5,A6Letter,Legal,Executiv
e, C5,C6,B6,COM #10,DL,
Card 1 4x6",Card 2 5x8"
ON
75,100,150, 300 (dots per inch)
AutoLF withCR = CR=CR+LF LF=LF
AutoCR withLF = CR=CRLF=LF+CR
LQ (Letter Quality)
NLQ (Near Letter Quality)
DRAFT (Draft)
HalfWidth
HalfHeight
Command Description Acceptable Values
Charaset Controls what
type of character
set to use.
1 - CP 437 international
2 - PC 8 Denmark/Norway
3 - CP 850 Multilingual
4 - ECMA-94 Latin 1
5 - Roman 86 - Legal
7 - ISO 2 - IRV
8 - ISO 4 - United Kingdom
9 - ISO 6 - ASCIII
10 - ISO 10 - Sweden
11 - ISO 11 - Sweden Names
12 - ISO 14 - JIS ASCIII
13 - ISO 15 - Italy
14 - ISO 16 - Portugal
15 - ISO 17 - Spain
16 - ISO 21 - Germany
17 - ISO 60 - Norway 1
18 - ISO 61 - Norway 2
19 - ISO 69 - France
20 - CP 860 Portugal
21 - UNIX International
22 - CP 863 French Canadian
23 - PC Abicomp International
24 - PC Abicomp Portugal
25 - CP 852 Latin 2
26 - CP 857 Turkey
27 - CP 866 Cyrillic
28 - CP 210 Greece
29 - CP 851 Greece
30 - 862 Hebrew
66 SuperScript 950C— User’s Guide

APPENDIX D
ORDERING SUPPLIES
O
VERVIEW
T o or der printer supplies, contact your NEC printer dealer
or call NEC Technologies at 1 800-632-2326 . You can also
contact NEC through the Internet at the following internet
address.
www.nectech.com/supplystore
Supplies
When replacing printer cartridges use ONLY:
• NEC Black Print Cartridge, # 30-080
• NEC Color Print Cartridge, # 30-085
Paper Supplies:
• Fine white inkjet paper, # 70-100 (Pack of 500)
• Premium coated inkjet paper, # 70-110 (pack of 100)
• High grade glossy photo paper, #70-240 (pack of 10)
• Premium transparency, # 70-120 (pack of 20)
• T-shirt transfer paper, # 70-290 (pack of 10)
• Snapshot photo paper (4 x 6), # 70-250 (pack of 24)
• Glossy inkjet paper, # 70-115 (pack of 20)
See Appendix A of this user’s guide for specific
information about paper recommendations.
Note:
your printer! Use the mail-in card included in the
Service Xpress Brochure or register at NEC’s website:
www.nec.com.
For warranty purposes, remember to register
ORDERING SUPPLIES
67

68 SuperScript 950C— User’s Guide

APPENDIX E
TECHNICAL SUPPORT
backed by complete support resources and programs
within NEC. Your dealer can provide you with details on
all available support options.
TECHNICAL SUPPORT
O
VERVIEW
This chapter provides information about different
resources for information and technical support, including
• How to reach NEC Technical Support for assistance
• How to obtain NEC service contracts
• SuperScript 950C Printer Limited Warranty
A
SSISTANCE NEARBY
Often, the best source for assistance is closer than you
think. Before calling NEC, check out the options below.
Help From Within Your Company
If your organization is large and has purchased many
NEC printers, the best source of assistance may be within
your own company. Your company may have designated
central support personnel that you can go to when you
have any problems or when you need supplies such as
paper or inkjet cartridges. These central support personnel
can then contact the appropriate dealer or NEC support
staff.
Help From Your Dealer
The dealer from whom you purchased your printer is
NEC T
NEC Technical Support is available to answer your
questions, Monday through Friday, 8:30 a.m. to 8:00 p.m.,
Eastern Standard Time.
Please have the following printer information ready when
you contact NEC:
• Model number
• Serial number
• Date and place of purchase
• NEC Maintenance agreement number (if printer is
already under agreement)
NEC Technical Support can help you with the initial
installation of this product. Please contact your operating
system or network software vendor if you require
assistance in optimizing or customizing your system.
ECHNICAL SUPPORT
69

How to Contact NEC
There are a number of ways to contact NEC or receive
information about technical issues, products, and services.
Contacting NEC Technical Support
To contact NEC technical support or customer service by
telephone, in North America, call 978-742-7010 to speak to a
representative about technical support, extended
warranties, repairs, or customer service.
Reaching NEC on the World Wide Web
NEC’s web site provides up-to-date product information
and includes links to NEC’s FTP site and e-mail address.
The internet address is www.nec.com
For customer service and technical support, navigate to
www.nectech.com.
• Search the Knowledge Base for compatibility charts,
specifications, white papers, technical drawings, and
various other helpful documents.
• Explore the FAQ pages for common problems and
solutions.
• Visit the Message Board to post your technical questions
or to search a vast library of previous technical support
solutions.
• Browse Service Programs to learn about ways to extend
or enhance your existing warranty.
• Use the Dealer Locator to find a NEC Technologies’
sales or service center near you.
Sending Internet Electronic Mail
You can e-mail your questions to NEC. NEC will respond
within three business days. Send e-mail messages to:
tech-support@nectech.com
Sending a Facsimile Transmission
Questions or comments can be faxed to NEC by dialing
(978) 742-7049.
Be sure to indicate the number where NEC can telephone or
fax a response.
Using FastFacts
NEC’s technical support staff have created technical notes
and tips for using NEC products. You can order these
documents by touchtone menu and have these
automatically sent to your fax machine.
To use NEC FastFacts in the US, call 978-742-7010
To use NEC FastFacts in Canada, call 630-775-7999
Follow instructions for ordering documents and include
your return fax number.
Reaching the NEC Bulletin Board System
You can use the NEC Bulletin Board System (BBS) to send
messages and transfer files. The BBS number is
(978) 742-8706.
70 SuperScript 950C— User’s Guide

Writing NEC
You can mail your questions and comments to NEC
Technical Support at the following address:
Printer Technical Support, Dept. #3390
NEC Technologies, Inc.
305 Foster Street
Littleton, MA 01460-2004
NEC W
ARRANTY AND SERVICE
Your SuperScript 950C printer comes with a one-year
exchange warranty. The complete warranty is provided
below. All repair requests must be prequalified by calling
NEC Product Support at 978-742-7010.
NEC Service Contracts
The initial one-year warranty period comes with two
options. The first one is where you must return your
product for repair or replacement. The second one, is
where NEC will ship a replacement product without
receiving the original one first, if you guarantee return of
your original product with a major credit card. Warranty
extension and warranty upgrade up to 3 years is available
through NEC’s Service Xpress (SM) brochure. NEC
Customer Service and its dealers offer a complete range of
services, including onsite repairs and maintenance.
Several maintenance agreement programs are available to
meet your needs and budget, including:
• Onsite agreements on a yearly or multi-yearly basis
which ensure priority response from NEC Customer
Service and Support
• Per-incident repair services for scheduled
maintenance.
• Extended exchange warranties with pre-paid
shipping.
To discuss an extended warranty or a service contract,
contact NEC Customer Service at 978-742-7010.
Note:
hardware and software configurations to operate as
specified by NEC. It is the owner's responsibility to
supply these supporting items, and where necessary,
to reconfigure and/or furnish additional hardware and/
or software as required or specified by NEC to assure
normal product operation. NEC incurs no obligation to
furnish or install said items. NEC reserves the right to
modify or update SuperScript software as it deems
necessary and to determine distribution policies for
such changes to existing owners.
This product requires specific computer
TECHNICAL SUPPORT
71

S
UPERSCRIPT
L
IMITED
NEC TECHNOLOGIES, INC. (hereinafter NECTECH)
warrants this Product to be free from defects in material
and workmanship and agrees to repair or replace any part
of the enclosed unit which proves defective under these
terms and conditions.
W
950C P
ARRANTY
RINTER
Warranty Period
Labor is warranted for one (1) year from the date of the
first consumer purchase. Parts are warranted for one (1)
year from the date of the first consumer purchase. The
Inkjet Cartridge is warranted until it runs out of ink or
until its usable life expires, whichever occurs first.
Warranty Coverage
This warranty may be enforced only by the first consumer
purchaser and it is not transferable.
Except as specified below, this warranty covers all defects
in material or workmanship and agrees to repair or
replace (at NECTECH’s option) any part of the enclosed
unit. The following are not covered by this warranty:
1. Any Product which is not distributed in the U.S.A. or
Canada by NECTECH or which is not purchased in
the U.S.A. or Canada by the first consumer purchaser.
2. Any Product on which the serial number has been
defaced, modified, or removed.
3. Damage, deterioration, or malfunction resulting from:
a. Accident, misuse, abuse, neglect, fire, water, lightning,
or other acts of nature, improper storage,
unauthorized product modification, or failure to
follow instructions supplied with the Product.
b. Alteration, repair, or attempted repair by anyone not
authorized by NECTECH.
c. Any shipment of the Product (claims must be
presented to the carrier).
d. Removal or installation of the Product.
e. Any other cause which does not relate to a Product
defect.
4. Cartons, carrying cases, batteries, external cabinets,
magnetic tapes, or any accessories used in connection
with the Product.
5. This warranty covers only NECTECH-supplied
components. Service required as a result of thir d party
components is not covered under this warranty.
Warranty Support
NECTECH will pay labor and material expenses for
covered items, but we will not pay for the following:
1. Removal or installation charges.
2. Costs of initial technical adjustments (set-up),
including adjustment of user controls.
3. Payment of shipping and related charges incurred in
returning the Product for warranty repair or
exchange.
72

Obtaining Warranty Service
All service calls must be qualified by a NECTECH
technical support specialist. A service r equest can be made
by calling 978-742-7010.
NECTECH may send a replacement printer which will be,
at NECTECH’s option, new or like new, and will meet all
of the specifications of the replaced printer. The
replacement printer will be shipped for delivery within 3
business days at NECTECH’s expense within the United
States or Canada upon receipt of your defective printer, or
upon receipt of a major credit card number to guarantee
receipt of the defective printer. The warranty period on
any replacement printer shall be either 1) the remaining
balance of the original one (1) year term, or 2) ninety (90)
days, whichever is longer. With the exception of the
duration, the terms and conditions of this warranty shall
apply to any replacement printer. No service will be
provided outside of the United States or Canada.
NECTECH requires that you provide the original bill of
sale or receipt as proof of purchase in order to obtain
warranty service. Please retain such proof of purchase
with your records.
You can contact Customer Service and Technical Support
by dialing 978-742-7010.
Limitation of Damages and Implied
Warranties
NECTECH’s sole liability for any defective product is
limited to the repair or replacement of the product at our
option. NECTECH shall not be liable for:
1. Damage to other property caused by any defects in
this product, damages based upon inconvenience, loss
of use of the product, loss of time or data, commercial
loss; or
2. Any other damages, whether incidental,
consequential, or otherwise.
This warranty is exclusive and is in lieu of all other
warranties, express or implied, including but not limited
to, the implied warranties of merchantability or fitness for
a particular purpose. Some states do not allow the
exclusion of implied warranties or the limitation or
exclusion of liability for incidental or consequential
damages. Therefore, the above exclusions or limitations
may not apply to you.
This warranty gives you specific legal rights, and you may
also have other rights which vary from state to state.
For information, telephone 978-742-7010
TECHNICAL SUPPORT
73

Note: Note: All Products returned to NECTECH for
service MUST have prior approval; this may be obtained
by calling the above number. Any unit shipped to
NECTECH without authorization may be returned freight
collect.
This Product is warranted in accordance with the terms of
this limited warranty. Consumers are cautioned that
Product performance is affected by system configuration,
software, the application, customer data, and operator
control of the system, among other factors. While NEC
TECHNOLOGIES, INC. Products are considered to be
compatible with many systems, the specific functional
implementation by the customers of the Product may vary.
Therefore, the suitability of a Product for a specific purpose
or application must be determined by the customer and is
not warranted by NECTECH.
FCC S
TATEMENT
(For United States Use Only)
Federal Communications Commission Radio Frequency
Interference Statement.
WARNING! Changes or modifications to this unit not
expressly approved by the party responsible for
compliance could void the user’ s authority to operate the
equipment.
the FCC Rules. These limits are designed to provide
reasonable protection against harmful interference in a
residential installation. This equipment generates, uses, and
can radiate radio frequency energy and, if not installed and
used in accordance with the instructions, may cause harmful
interference to radio communications.
However, there is no guarantee that interference will not
occur in a particular installation. If this equipment does
cause harmful interference to radio or television reception,
which can be determined by turning the equipment off and
on, the user is encouraged to try to correct the interference
by one or more of the following measures.
• Reorient or relocate the receiving antenna.
• Increase the separation between the equipment and
receiver.
• Connect the equipment to an outlet on a circuit different
from the one to which the receiver is connected.
• Consult the dealer or an experienced radio or TV
technician for help.
Use a shielded and properly grounded I/O cable to ensure
compliance of this unit to the specified limits of the rules.
This equipment has been tested and found to comply with
the limits for a Class B digital device, pursuant to Part 15 of
74 SuperScript 950C— User’s Guide

(For Canadian Use Only)
This digital apparatus does not exceed the Class B limits
for radio noise emissions from digital apparatus as set out
in the radio interference regulations of the Canadian
Department of Communications.
Le présent appareil numerique n’émet pas de bruits
radioélectriques dépassant les limites applicables aux
appareils numériques de Classe B présentes dans le
règlement sur le brouillage radioélectrique édicaté par le
Ministère des Communications du Canada.
Declaration of Conformity
This device complies with part 15 of the FCC Rules.
Operation is subject to the following two conditions:
1. This device may not cause harmful interference.
2. This device must accept any interference received,
including interference that may cause undesired
operation.
U.S. Responsible Party: NEC Technologies, Inc.
Address:
Telephone Number: 630-467-5000
Type of product: Inkjet Printer
Equipment Classification: Class B Peripheral
Model: SuperScript 950C
1250 N. Arlington Heights Road,
Itasca, Illinois 60143
We hereby declare that the equipment specified
above conforms to the technical standards as
specified in the FCC rules.
TECHNICAL SUPPORT
75

76 SuperScript 950C— User’s Guide

INDEX
A
Alignment 35
B
bi-directional parallel cable 4
C
Cartridge 33
alignment 27, 35
changing 27
cleaning 27, 36
life expectancy 60
replacing 33
D
Demonstration page 27
DOS
printing 66
Driver Properties 17
options 28
Driver properties
Color Management 19
Details Tab 18
General Tab 17
Printer Care Tab 26
Settings Tab 53
Sharing Tab 20
spool settings 19
F
FCC Statement 74
H
Hex-dump 49
Run 49
humidity 59
I
ink drying 28
interface ports 59
M
Messages
error 31
status 29
N
NEC SuperScript 950C folder 16
noise level 60
O
Optional Profile 3
Orientation 23
Orientation, paper
landscape 23
portrait 23
P
Paper 9
care 52
choosing 52
Input/Output Paper Tray 9
Main Paper Tray 7
Manual Feeder 10
paper jams 43
printable area 60
recommended 51
sizes and capacity 53
supplies 67
weights 51
paper sizes and capacity 53
paper weights 51
plain paper 51
thick stock 51
Plug-and -Play 15
power consumption 59
power requirements 59
Primary Profile 4
print area 54
print method 59
print speed 59
Printer 1
dimensions 59
Operator Panel 11
Optional Profile 7
INDEX
77

Primary Profile 7
Printer parts 1, 2
repair 71
setting up the printer 1
printer dimensions 59
printer processor 59
R
RAM 59
release button 43
Run/Show Printer Monitor 26
S
SCSI 59
service contracts 71
supplies, ordering 67
T
technical support 69
Test page 18, 27
Troubleshooting 39
paper 42
Print Cartridge 44
Printer hardware 39
printing 47
U
uninstalling software 16
W
Warranty 71
78 SuperScript 950C— User’s Guide
 Loading...