


NEC
UPER
S
CRIPT
S
D
D
™
1260
User’s Guide
808-823052-120-A

PROPRIETARY NOTICE AND LIABILITY DISCLAIMER
The information disclosed in this document, including
all designs and related materials, is the valuable
property of NEC Corporation (NEC) and/or its
licensors. NEC and/or its licensors, as appropriate,
reserve all patent, copyright and other proprietary,
rights to this document, including all design,
manufacturing, reproduction, use, and sales rights
thereto, except to the extent said rights are expressly
granted to others.
The NEC product(s) discussed in this document are
warranted in accordance with the terms of the Warranty
Statement accompanying each product. However,
actual performance of each such product is dependent
upon factors such as system configuration, customer
data, and operator control. Since implementation by
customers of each product may vary, the suitability of
specific product configurations and applications must
be determined by the customer and is not warranted by
NEC.
T o allow for design and specification impr ovements, the
information in this document is subject to change at any
time, without notice. Reproduction of this document or
portions thereof without prior written approval of NEC
is prohibited.
Microsoft, Windows, Windows 3.1x, Windows 95,
PowerPoint, and MS-DOS are registered trademarks of
Microsoft Corporation.
Adobe PrintGear®, the Adobe PrintGear® logo, and
Memory Booster Technology, are trademarks of Adobe
Systems Incorporated.
All other product, service, brand, or trade names used
in this publication are the trademarks or registered
trademarks of their respective companies or
organizations. NEC disclaims any responsibility for
specifying which marks are owned by which companies
or organizations.
HP, PCL, and LaserJet are trademarks of HewlettPackard Company.
First Printing—April 1997
Document Number: 808-823052-120-A
Copyright 1997
NEC Technologies, Inc.
1250 N. Arlington Heights Rd.
Itasca, IL 60143
All Rights Reserved.
SuperScript, Sharp Edge Technology, and See, Hear and
Feel the Difference are trademarks of NEC Corporation.
© NEC Technologies, Inc., 1997.
ii
NEC SuperScript 1260 User’s Guide
Copyright 1997
NEC Corporation
7-1 Shiba 5-Chome, Minato-Ku
Tokyo 108-01, Japan
All Rights Reserved.

Table of Contents
1 Setting Up
Overview 1-1
Introduction 1-2
Selecting a Location for the Printer 1-3
Printer Dimensions 1-3
Unpacking the Printer 1-4
Location of Major Parts 1-5
Major parts seen when the Top Cover is open 1-6
Printer Operating Environment Requirements 1-7
Printer Operating Requirements 1-7
System Requirements 1-8
Software Requirements 1-8
Installing the Toner Cartridge 1-9
Loading Paper into the Cassette 1-11
Connecting the Interface Cable 1-15
Connecting the AC Power Cord 1-15
Switching ON the Printer 1-16
Switching OFF the Printer 1-16
Printer Safety 1-17
Ordering Supplies and Accessories 1-18
2 Operator Panel
Overview 2-1
Using the Operator Panel 2-2
LED Operation 2-3
Operator Panel Buttons 2-8
Resetting the Printer 2-9
Status Icons and Messages 2-9
Default Settings 2-11
3 SuperScript Software
Overview 3-1
SuperScript 1260 Software
for Windows 3-2
SuperScript 1260 Printer Software and
Accessories 3-2
Installing SuperScript 1260
Software 3-3
The ABCs of Installation for Windows 95 3-3
The ABCs of Installation for Windows 3.1
and 3.11 3-4
SuperScript 1260 Windows Printer Driver 3-5
Setup Tab 3-6
1

Table of Contents
Watermark Options 3-8
Layout Options 3-10
2-Sided Printing 3-11
Booklet Printing 3-13
Paper Source Tab 3-16
Destination Tab 3-17
Image Control Tab 3-18
Imaging Mode 3-18
Halftone Features 3-19
Darkness 3-20
Accessories Tab 3-20
Advanced Tab 3-21
Print Memory 3-22
Paper Sizes 3-22
Printer Administration 3-23
4 Windows Status Monitor
Overview 4-1
Introduction 4-2
What is Printer Status? 4-3
Loading the Status Monitor 4-3
Minimized Views 4-4
Features of the Mini-Window View 4-4
Features of the Icon View in Windows 3.1 4-5
Sound Alerts 4-6
Accessing the Maximized Status Monitor 4-6
The Maximized Status Monitor 4-6
General Tab 4-6
Change Printer Tab 4-9
Alerts Tab 4-9
Preferences Tab 4-11
5 DOS Printing
Overview 5-1
The DOS Printing Utilities 5-2
Printing from DOS Programs 5-2
Installing DOS Software Only 5-2
DOS Printer Control Panel 5-3
Main Menu 5-3
Control Printing (pause, reset, eject) 5-5
Change Printer Settings 5-6
Change LaserJet IIP Emulation Settings 5-8
Print Sample Pages 5-8
Change Status Monitor Settings 5-9
Change Printer Port 5-10
DOS Status Monitor 5-10
Starting the Status Monitor 5-10
Using the DOS Status Monitor 5-11
6 Using the Printer
Overview 6-1
Using the 250-Sheet Paper
2
NEC SuperScript 1260 User’s Guide

Table of Contents
Cassette 6-2
Using the Multi-purpose Tray 6-5
Loading Paper into the Multi-purpose Tray 6-6
Loading Envelopes into the
Multi-purpose Tray 6-7
Loading Transparencies and
Adhesive Labels 6-9
Closing the Multi-purpose Tray 6-10
7 Printer Options
Overview 7-1
The 500-Sheet Feeder 7-3
The 500-Sheet Cassette 7-5
The Envelope Cassette 7-9
The Face-Up Output Tray 7-12
Memory Expansion Module (SIMM) 7-14
8 Maintaining Your Printer
Overview 8-1
Redistributing the Toner 8-2
About the Toner Cartridge 8-4
Replacing the Toner Cartridge 8-5
Installing the Toner Cartridge 8-5
Cleaning the Printer Case 8-5
Relocating the Printer 8-7
9 Troubleshooting
Overview 9-1
Maintaining Print Quality 9-2
Simple Troubleshooting 9-2
Print Quality Problems 9-3
Installation Problems 9-6
Clearing Paper Jams and Wrinkling 9-7
Removing Jammed Paper 9-8
10 Getting Service
Overview 10-1
Getting Service and Support 10-2
Getting Help from Your Company 10-2
Getting Help from Your Dealer 10-2
Getting Help from NEC 10-2
NEC Warranty and Service 10-4
SuperScript 1260 Printer Limited Warranty 10-5
Warranty 10-6
Warranty Length 10-6
Warranty Coverage 10-6
Warranty Support 10-7
Getting Warranty Service 10-7
Limitation of Damages and Implied
Warranties 10-7
Finding Supplies, Printer Options,
and Spare Parts 10-8
3

Table of Contents
A Selecting Print Media
Overview A-1
Selecting Paper and Media A-2
Care of Printer Supplies A-2
Paper Properties A-3
Paper Recommended for Use in This Printer A-4
Special Print Media Recommended for
Use in This Printer A-5
Additional Paper for Use in This Printer A-6
Print Areas A-7
Preprinted Forms A-7
Heavy Print Stock A-8
Envelopes A-8
Adhesive Labels A-9
Transparency Film A-9
Media Purchasing Specifications A-9
B Safety Information
Overview B-1
Ozone Emission B-2
UL Standards for Ozone B-2
Employer Responsibilities B-2
Recommendations for Minimizing
Ozone Exposure B-2
Laser Safety B-3
CDRH Regulations B-3
FCC Statement B-3
Technical Specifications B-4
Glossary
Index
4
NEC SuperScript 1260 User’s Guide

Setting Up the Printer
Overview
This chapter gives you the information you need
when you set up your printer, load paper, and
begin printing. It includes:
• Selecting a location for your printer
• Unpacking the printer
• Printer requirements
• Location of printer parts
• Getting started
• Loading paper into the paper cassette
• Printer safety
• How to order supplies and accessories
1
1-1

Chapter 1: Setting Up the Printer
Introduction
The NEC SuperScript 1260 printer is a new laser
printer developed specifically for use with
TM
Windows 95, Windows
groups, and DOS applications. This printer is
provided with the SuperScript 1260 software kit,
and requires no special add-in cards or cartridges.
We do require a good quality parallel interface
cable (see Chapter 10, “Using FastFacts” ).
The NEC SuperScript 1260N printer is the same
printer as above except that it has a Network
Interface Card (NIC) already installed. There is a
Macintosh print driver included as a network
option. For more information, see the “NEC 1260
Network Printer Configuration User’s Guide”.
Your computer and SuperScript 1260 communicate bidirectionally to exchange operating status
information (e.g., warm-up, paper out, paper jam)
and display messages requiring your attention.
Hence, you can focus on your work without
referring to the printer operator panel periodically, a benefit of the SuperScript 1260 software.
3.1, Windows for Work-
This manual contains operation information for
the NEC SuperScript 1260 laser printer and covers
seven major areas of printer information:
1. Setting up the printer
• Space, electrical, and operating environment
requirements
• Installation procedures for hardware and
software
• Using the printer
• Selecting paper for use in the printer
• Operating instructions
2. Printer options
• Available printer options; how to install,
remove, and use them
3. Maintaining the printer
• Toner cartridge information
• Cleaning and relocating the printer
4. Printer problems
• Error messages, print quality problems, and
paper jam recovery instructions
5. Getting service
6. Selecting print media
7. Safety information
• Technical specifications
1-2
NEC SuperScript 1260 User’s Guide
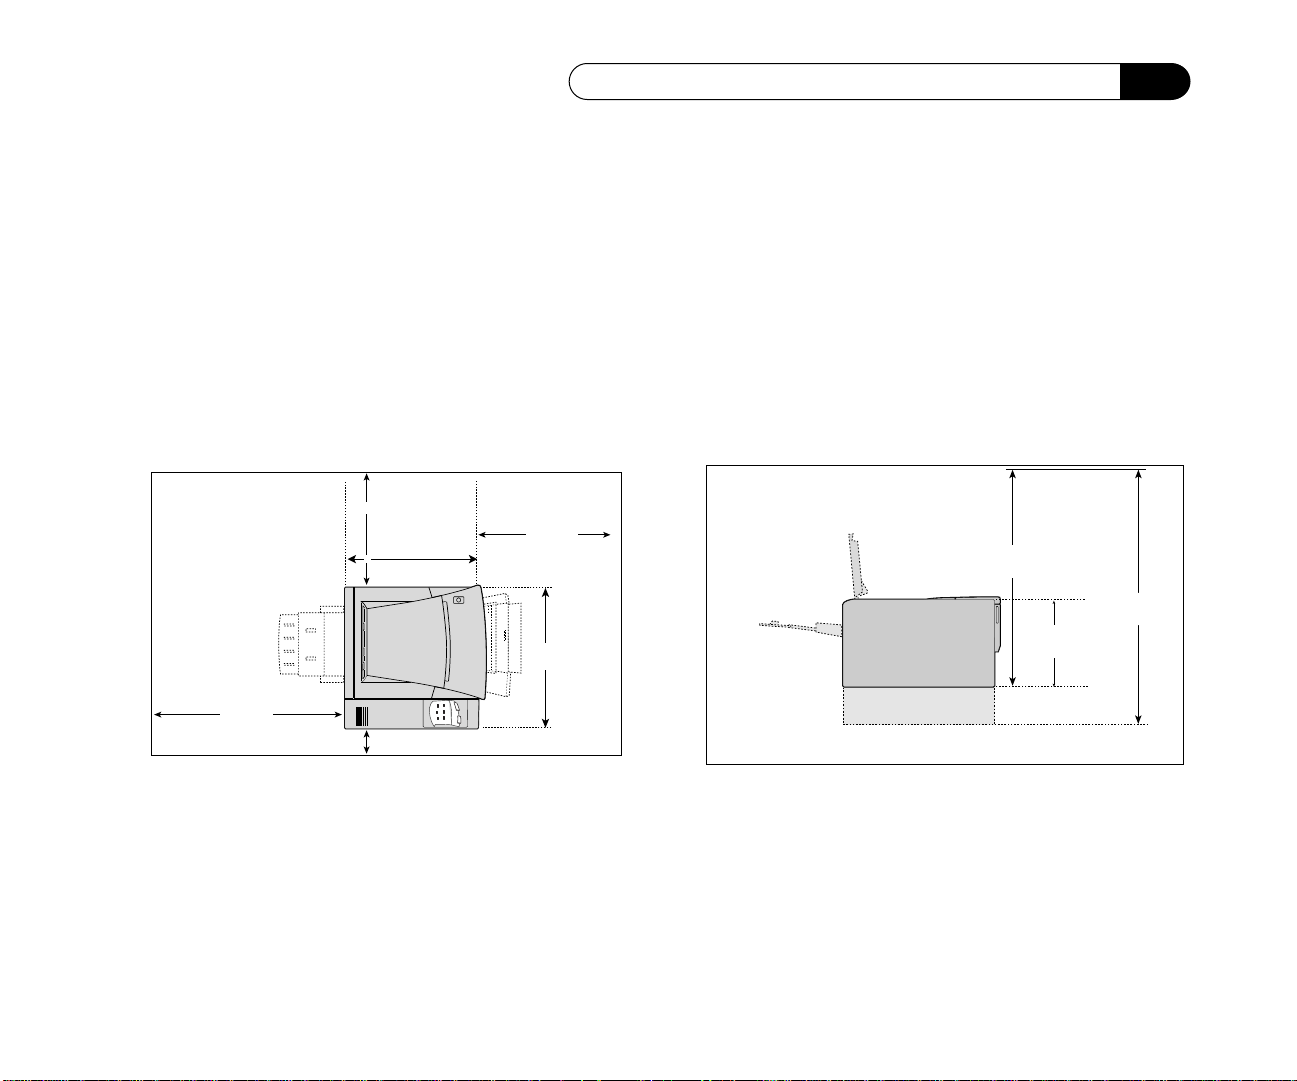
30.1 in
(765 mm)
25.6 in
(650 mm)
9 in
(228 mm)
Selecting a Location for the Printer
Selecting a Location for the Printer
Follow all space, electrical, and operating
environment requirements when selecting a
location for your printer.
Printer space requirements
Leave at least the minimum air space between the
printer and the surrounding wall and furniture.
Top View
7.09 in (180 mm)
8.70 in
(221 mm )
16.57 in
(421 mm )
12..20 in
(310 mm )
16.34 in (415 mm)
1 in (25 mm)
Printer Dimensions
The following illustrations show standard
dimensions and recommended clearances for a
SuperScript 1260 printer.
Caution! Do not block the ventilation fan
outlet that is located on the right side of
the printer.
Side View
1-3
Chapter 1: Setting Up the Printer
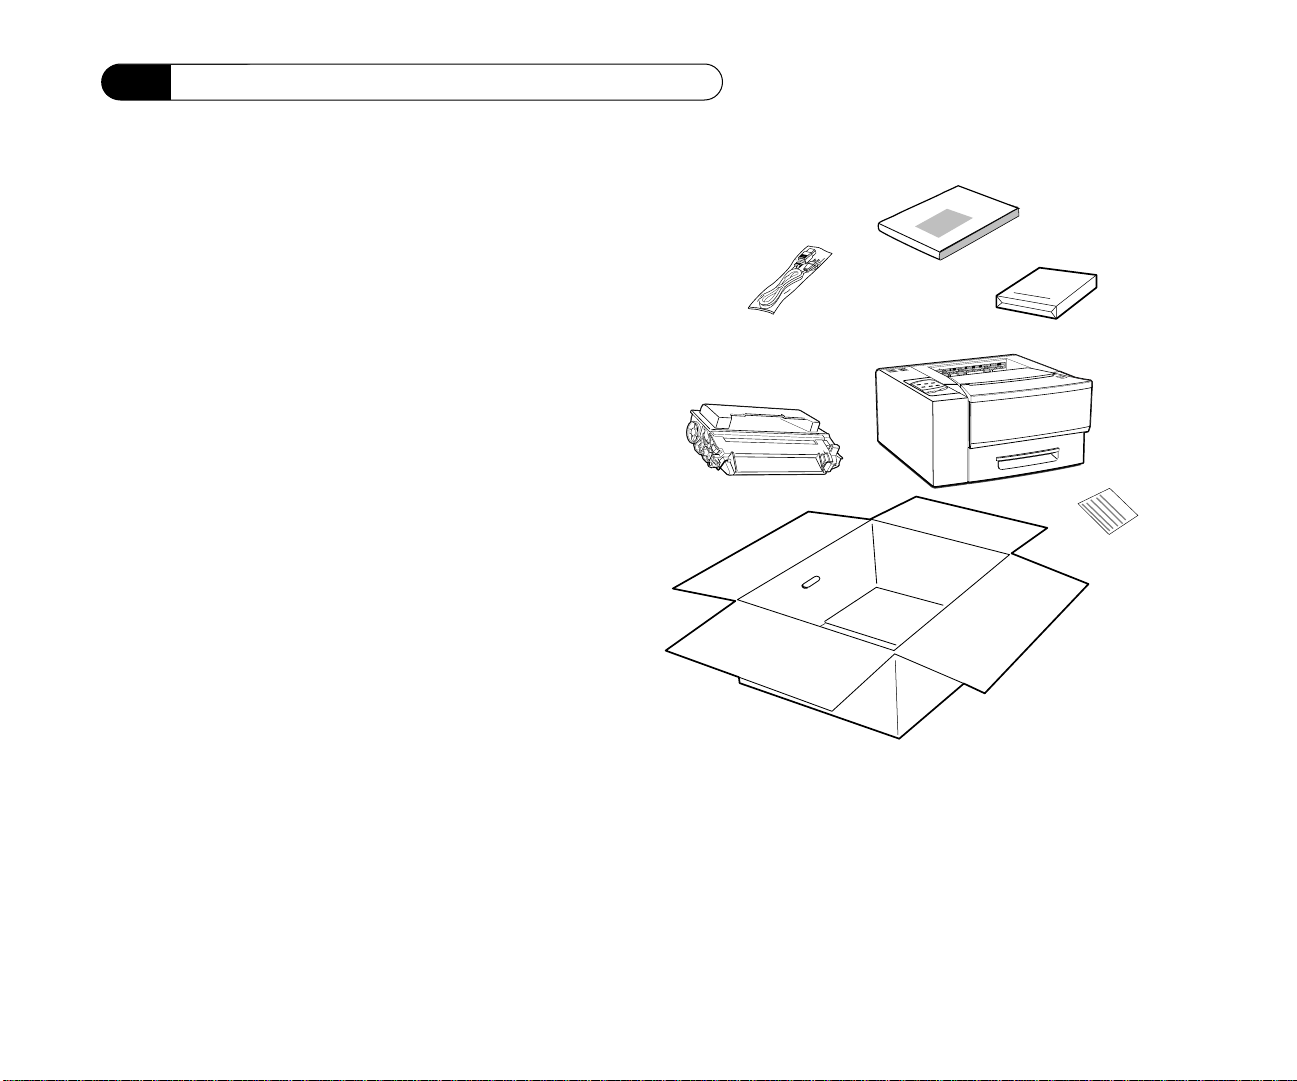
Unpacking the Printer
Remove the printer from the shipping box and
place it on a stable, level surface.
WARNING! The printer weighs
approximately 28 lbs. without options or
consumables installed. Use care when
removing it from the shipping box and
ask for assistance.
After you have removed the printer and accessories from the shipping box, lift the top cover of the
printer and remove the styrofoam cube from
inside. Check to make sure you received all of the
items listed below. If any item is missing or
damaged, contact the store where you purchased
the printer.
1. Printer with 250-Sheet paper cassette
2. Toner cartridge
3. AC power cord
4. Accessory kit
• NEC SuperScript 1260 User’s Guide
• Warranty card and Quick Reference Guide
• Software diskette and SuperScript 1260
“ Solutions” CD
User's Guide
Software
Diskette
& CD
WARRANTY
Note: It is very important to install the
software properly in order for this printer
to work.
Save this user’s guide for reference and all
packing materials (including the shipping
carton) in case the printer needs to be repacked.
1-4
NEC SuperScript 1260 User’s Guide
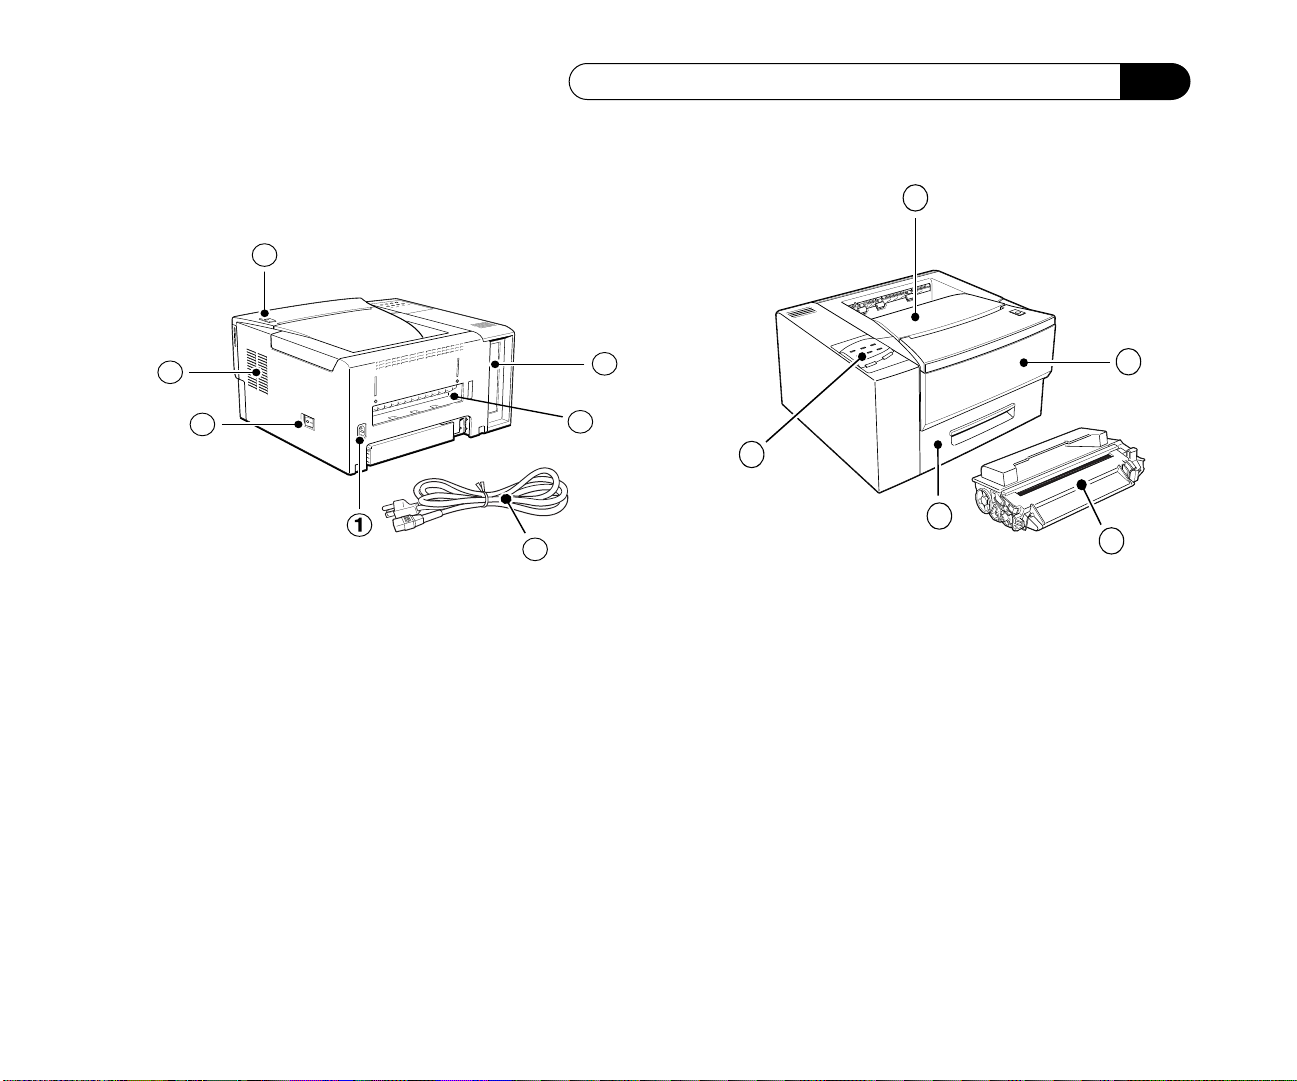
Location of Major Parts
Location of Major Parts
4
3
2
1. AC Power Cord Socket
Connect the AC Power Cord to this socket.
2. Main Power Switch
Use to switch the printer ON and OFF.
[I] is ON. [O] is OFF.
3. Ventilation Fan Grill
Inlet for the printer Fan.
4. Top Cover Release Button
Push in to open the Top Cover.
5. Printer Controller Board
Allows a host computer to connect, through an
interface cable.
6. Rear (Output) Slot
7. AC Power Cord
9
5
6
8
11
7
8. Operator Panel
Used to monitor printer status
9. Top Cover
Open to access the T oner cartridge or to clear paper
jams. When closed, the Top Cover functions as the
main output tray.
10. Front Cover
Open to use the Multi-purpose tray. The tray holds
80 sheets of paper or 10 envelopes.
11. 250-Sheet Cassette
The standard paper cassette. The cassette holds 250
sheets of paper.
12. Toner Cartridge
Contains the drum and the dry toner.
10
12
1-5

Chapter 1: Setting Up the Printer
Major parts seen when the Top Cover is open
1. Fuser Warning Label
Posted on the top of the fuser. The fuser is very
hot. Be careful when clearing paper jams in the
fuser area.
2. Fuser
Uses heat and pressure to permanently adhere
the toner image to the paper before the printer
delivers the paper to the output tray.
3. Cleaning Brush
Use to clean the drum mirror.
4. Toner Cartridge Guide Channel
Match the color markings on the channel with
the color markings on the Toner cartridge to
correctly install the Toner cartridge in the
printer.
1-6
NEC SuperScript 1260 User’s Guide

Printer Operating Environment Requirements
Printer Operating Environment Requirements
• Install the printer on a level and stable surface.
• Install the printer in an area that will have a temperature range of 41˚F to 95˚F (5˚C to 35˚C).
• Extreme temperature changes may result in a buildup of condensation inside the printer. Condensation
can cause print quality problems and paper jams. If there are wide temperature variations within the
printer environment, allow one hour for the printer to stabilize before using it.
• Install the printer in an area that has a relative humidity range of 15% to 85% (non-condensing).
• Install the printer in an area that is shielded from the direct air flow of heaters, air conditioners, or
humidifiers.
• Install the printer in an area that is shielded from direct sunlight.
• Leave adequate space around the printer for easy access.
Printer Operating Requirements
Nominal line voltage and frequency 115VAC @ 50/60 Hz
Maximum power consumption 600 watts
115 V Model
1-7

Chapter 1: Setting Up the Printer
System Requirements
The SuperScript 1260 printer works with MS-DOS
3.3 or higher, Windows 3.1 (in Enhanced Mode) ,
Windows 95, or Windows for WorkGroups.
To run SuperScript 1260 Windows software, you
will need an IBM-compatible PC with at least a
386SX 16-MHz CPU. This includes all 486-based
and most 386-based PCs. To verify if your PC can
run in Enhanced Mode , type WIN/3 at the MS-DOS
prompt. If your PC cannot run Windows in
Enhanced Mode , the system will tell you.
The SuperScript 1260 printer can also be run
directly from DOS. The printer will automatically
invoice PCL emulation mode to process DOS jobs.
A standard PC parallel printer port is required to
connect with the SuperScript 1260 printer through
a high quality parallel cable (see “FastFacts” in
Chapter 10).
Because of the SuperScript 1260’s high speed
interface, it is important to use a properly
manufactured parallel cable. Use of a poor quality
parallel cable may affect your output.
Software Requirements
To use the SuperScript 1260 Windows software,
you will need:
• A 386 or better personal computer
• A 1.44 MB 3.5-inch floppy disk drive
• At least 4 MB (6 MB recommended) of RAM
for use with Windows 3.1 or 3.11
• At least 8 MB of RAM for use with
Windows 95
• Microsoft Windows 3.1, 3.11, or 95
To use the SuperScript 1260 Solutions CD, in
addition to the requirements listed above, you
will need:
• A CD-ROM drive (486 personal computer
recommended)
• Additional RAM, if needed for CD operation
To use the SuperScript 1260 DOS software, you
will need:
• A 286 or better personal computer
• A 1.44 MB 3.5-inch floppy drive
• At least 640 K of RAM
• DOS 3.3 or later
After you have removed the printer from the
shipping box, complete the following instructions
1-8
NEC SuperScript 1260 User’s Guide
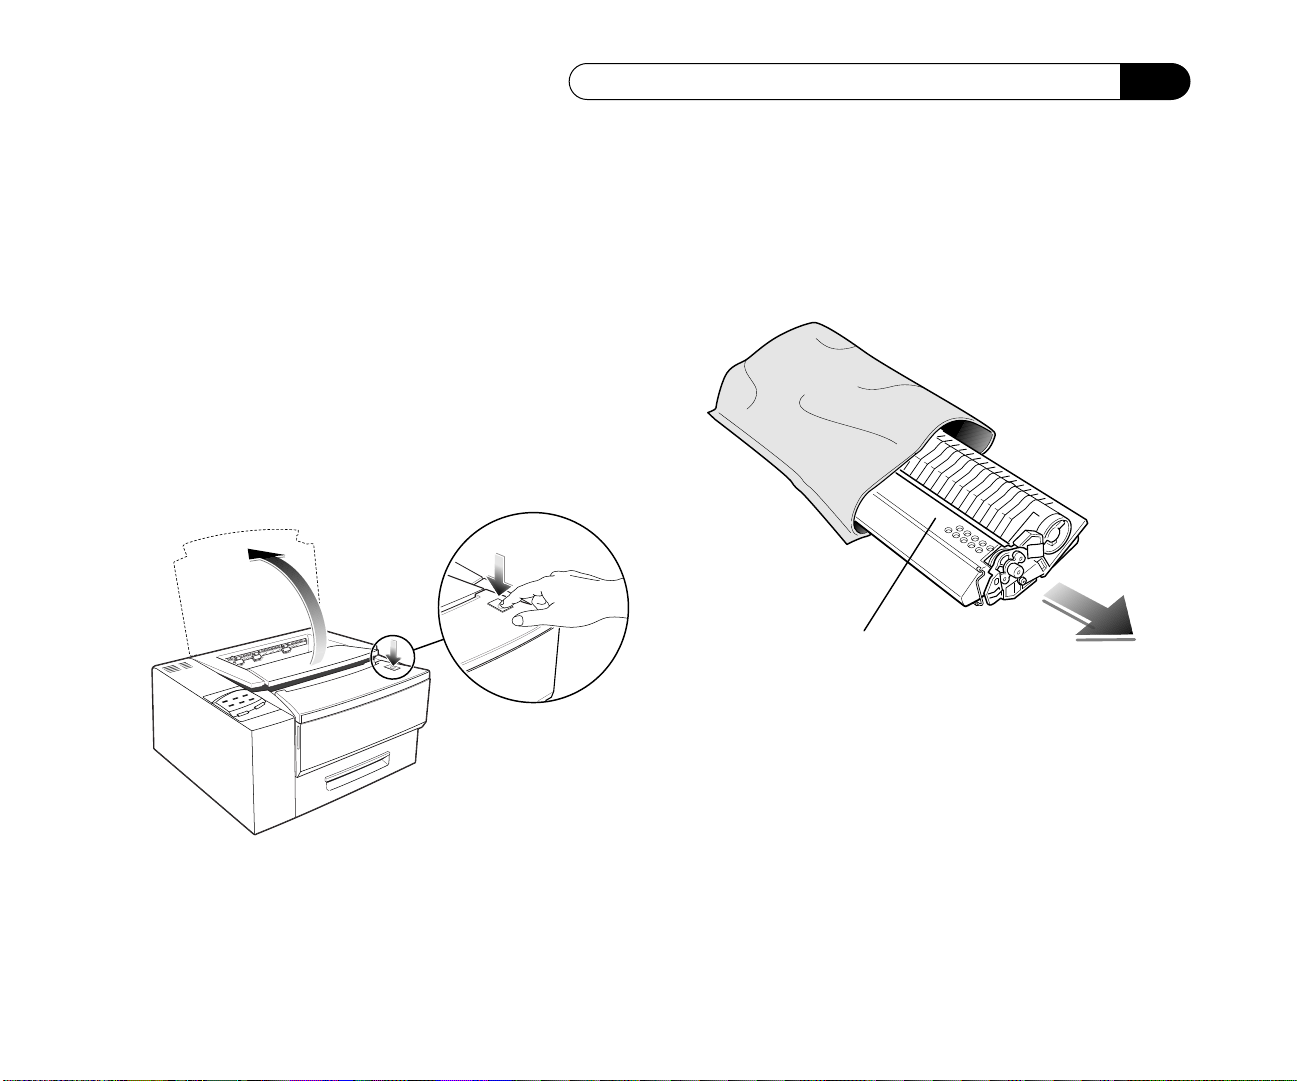
Installing the Toner Cartridge
Drum shutter
to prepare the printer for use. If you have printer
options to install, refer to Chapter 7, “ Printer
Options” section of this manual.
Installing the Toner Cartridge
The Toner cartridge assembly contains the
photosensitive drum and the dry toner.
1. Press the release button and open the
top cover. (Make sure the styrofoam packing
cube has been removed from inside.)
2. Remove the new Toner cartridge from the
shipping carton.
3. Remove the new Toner cartridge from the foil
wrapper.
4. Save the foil wrapper.
Caution! Do not expose the toner
cartridge to direct sunlight or to strong
room light. You should complete the Toner
cartridge installation within 5 minutes
Do not open the drum shutter.
1-9
Chapter 1: Setting Up the Printer
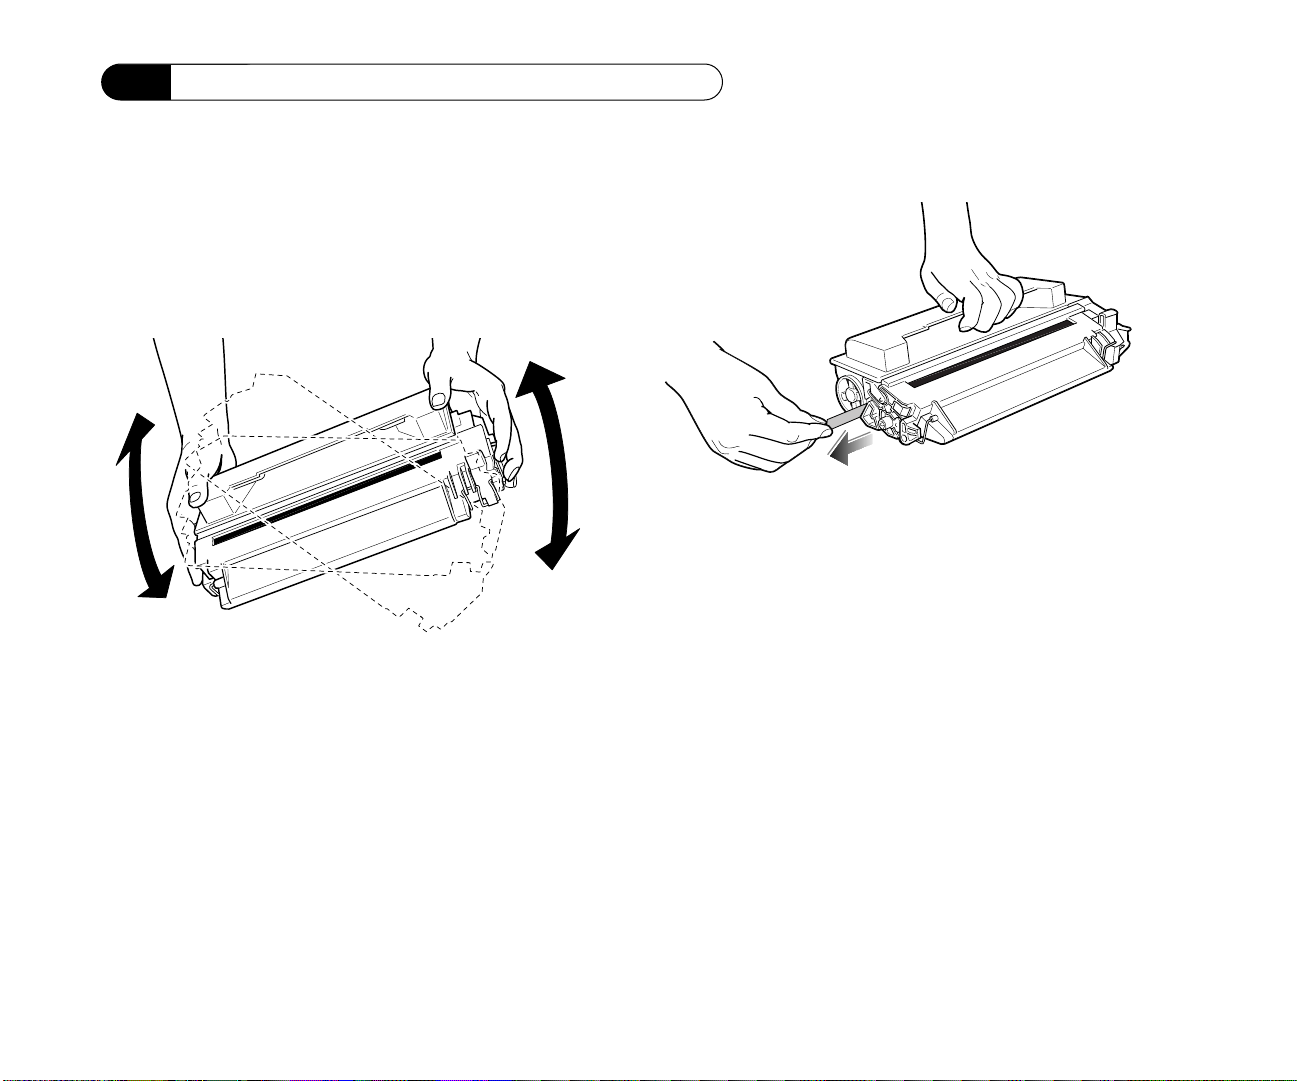
5. Shake the Toner cartridge gently several
times to evenly distribute the toner inside the
cartridge.
6. Place the Toner cartridge on a flat surface.
7. Locate the toner seal tab at the end of the
cartridge.
Use one hand to firmly hold down the
cartridge.
8. Use the other hand to pull the tab straight out
and remove the toner seal.
Caution! The toner tab may break if you
pull up instead of straight out. You must
remove the entire toner seal before you
can use the Toner cartridge
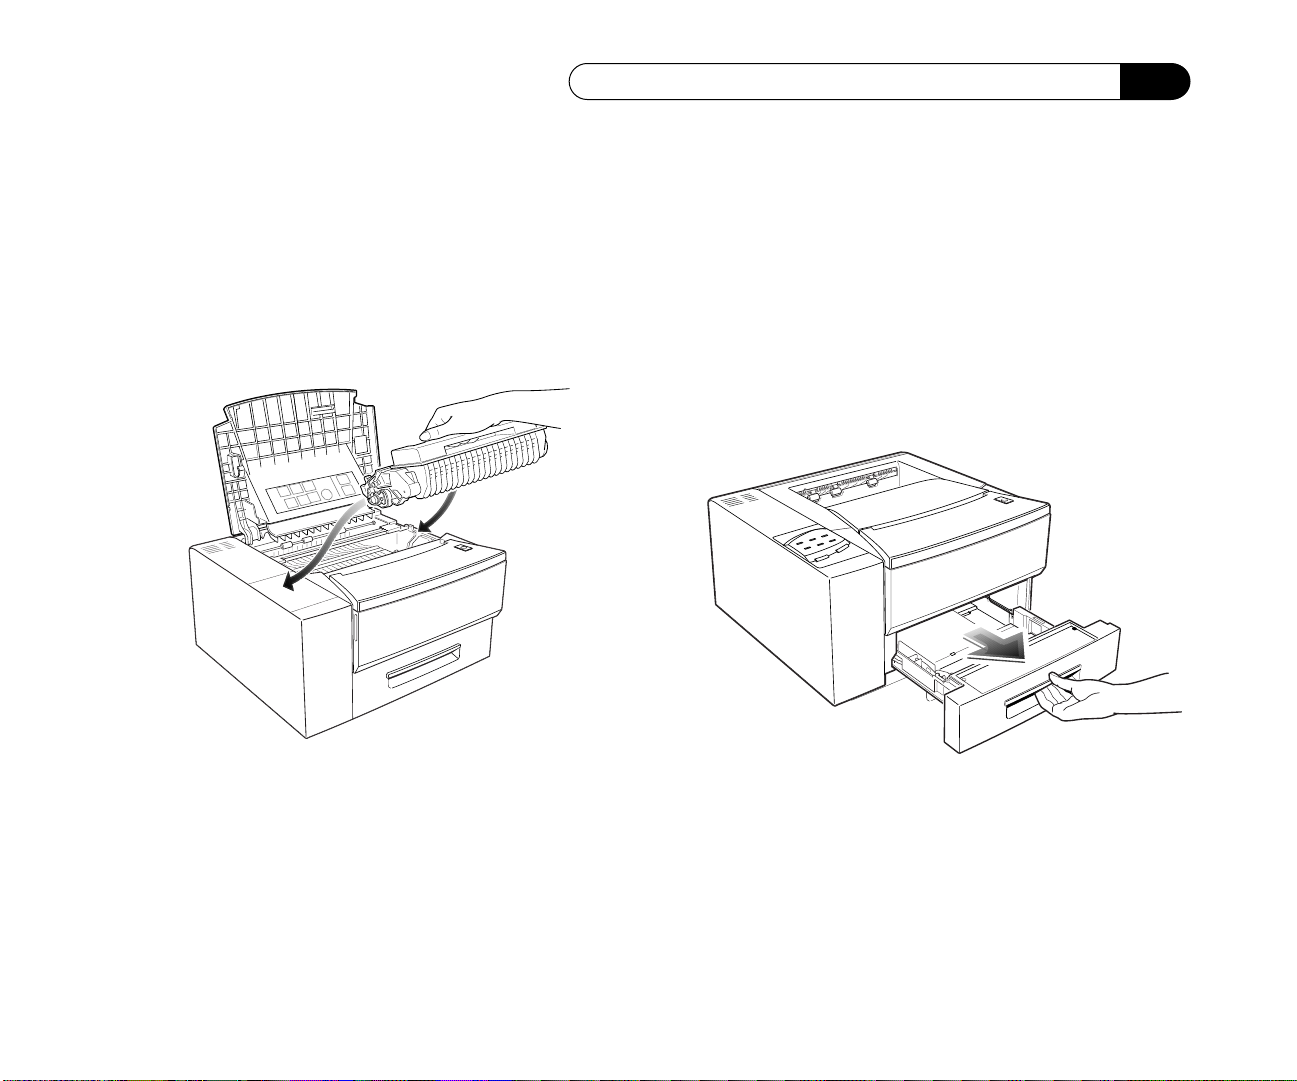
9. Hold the Toner cartridge as shown in the
illustration.
10. Insert the cartridge into the printer guide
channels.
1-10 NEC SuperScript 1260 User’s Guide
Loading Paper into the Cassette
11. Push in on the cartridge until it stops, then
push in on both sides of the cartridge to make
sure it is seated correctly.
12. Close the top cover.
If you cannot close the top cover, you may
have incorrectly installed the Toner cartridge.
Remove the Toner cartridge and reinstall it.
Media” section of this manual for information on
choosing the correct paper types and sizes to use
with this printer.
Note: Use the Multi-purpose tray or optional
Envelope cassette (Part # 1262) to feed envelopes. Do not mix paper types and do not
overfill the cassette.
1. Remove the 250-Sheet cassette from the
printer.
Loading Paper into the Cassette
The SuperScript 1260 paper cassette holds 250
sheets of standard 20 lb to 28 lb letter or legal size
paper, or 50 sheets of standard labels or transparencies. Refer to Appendix A, “Selecting Print
1-11
Chapter 1: Setting Up the Printer
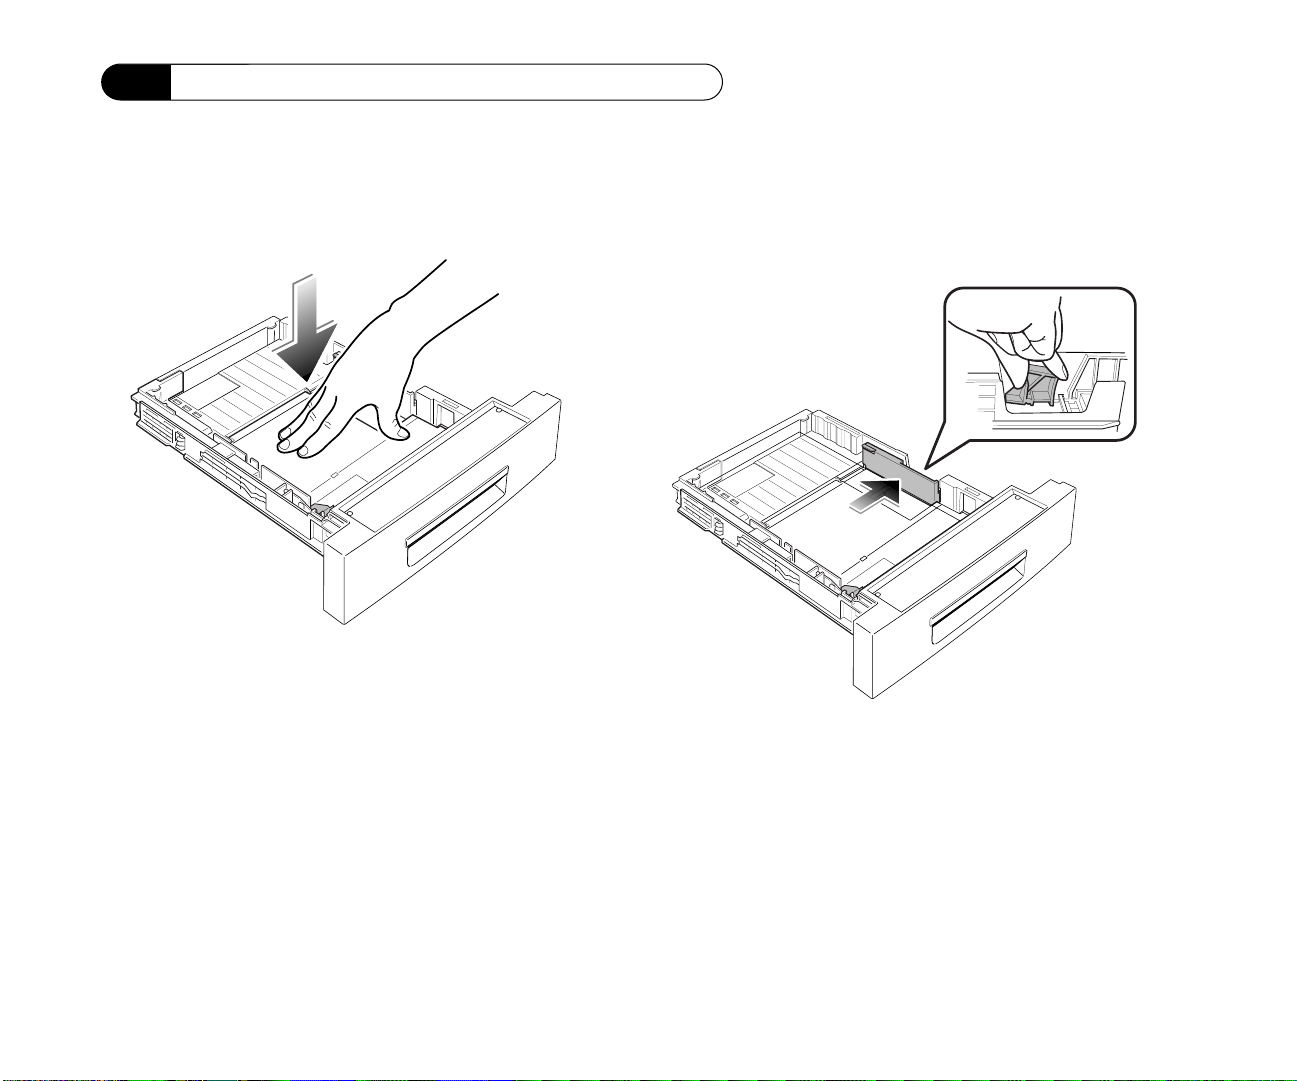
2. Press down on the bottom plate to lock it into
position.
3. Push the side guide handle and slide the
guide out as far as possible.
1-12 NEC SuperScript 1260 User’s Guide
Loading Paper into the Cassette
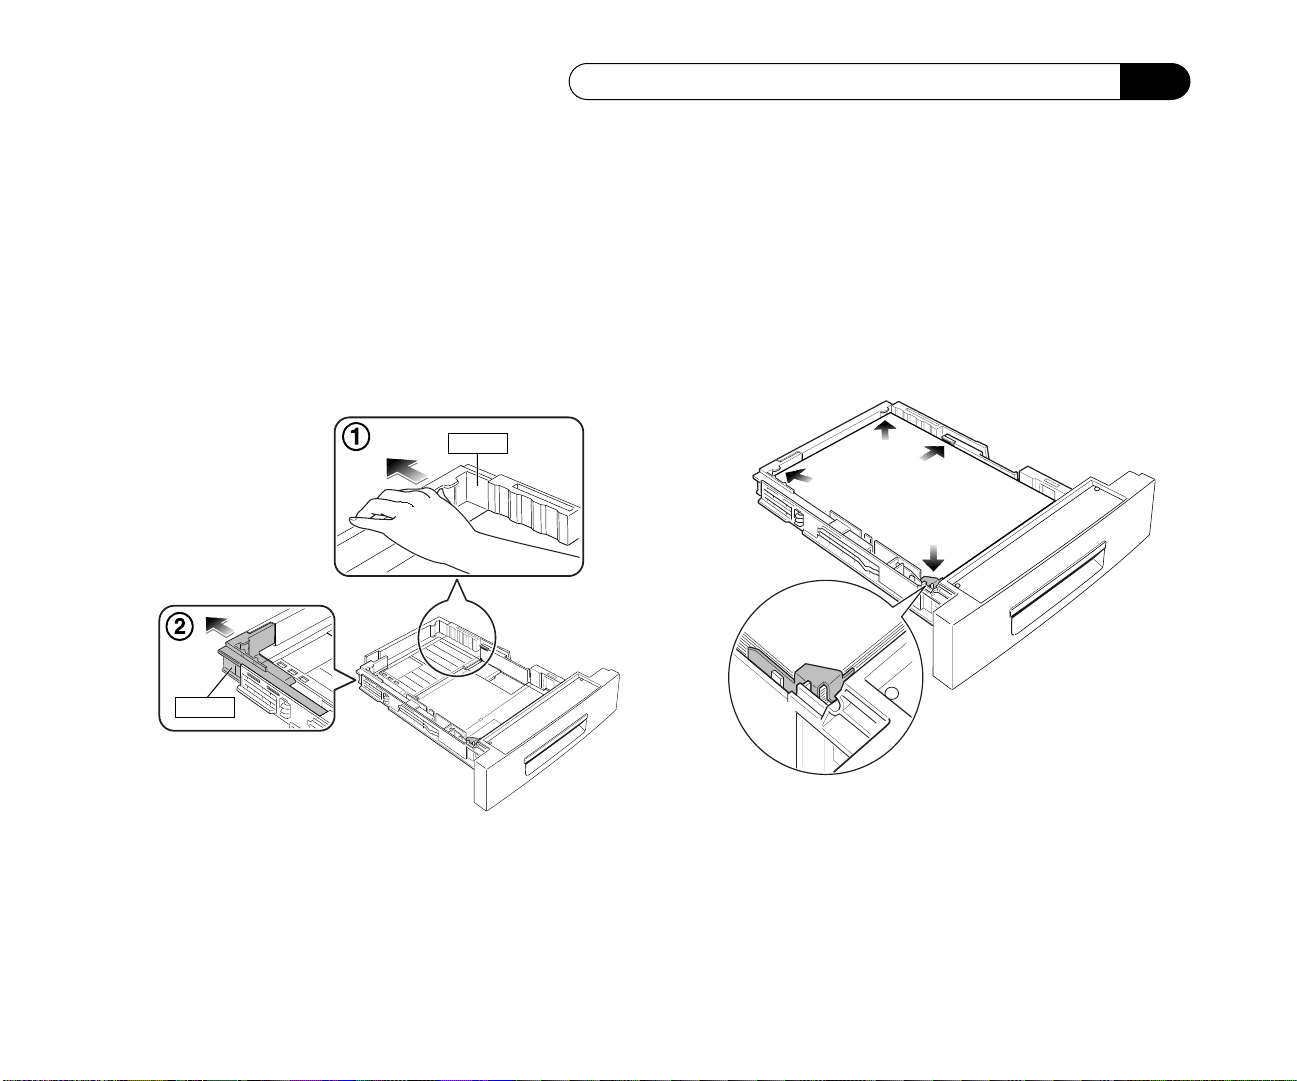
Guide B
4. Adjust the end paper guides to the desired
paper size:
1. Slide end guide A out or into the desired
paper size.
2. Slide end guide B to align with end guide A.
This is not necessary with letter size paper.
Guide A
5. Insert the stack of paper along the left side of
the cassette.
Make sure the paper goes underneath the
metal clip that is located at the front of the
cassette and underneath the plastic tabs that
are located on the end guides.
1-13
Chapter 1: Setting Up the Printer
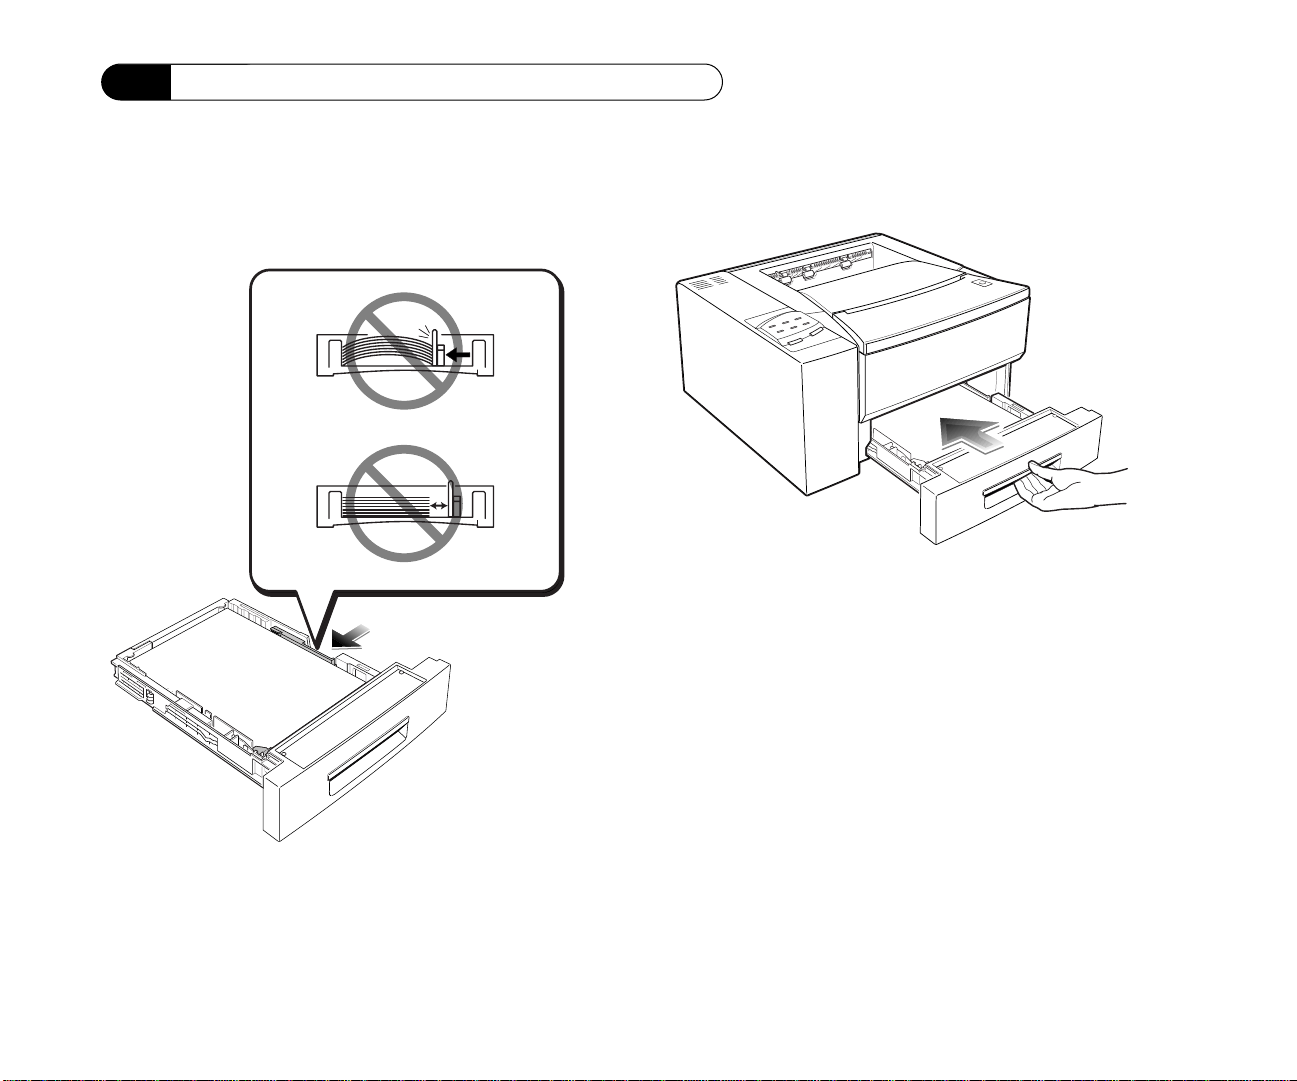
6. Slide the side guide in so it presses lightly
against the edge of the paper stack.
7. Reinstall the paper cassette into the printer.
Note: For proper paper and media
selection refer to Appendix A, “Selecting
Print Media.”
For information on loading various media
refer to Chapter 6, “Using the Printer.”
Caution! Do not adjust the side guide so
tightly that it bows the paper stack
1-14 NEC SuperScript 1260 User’s Guide
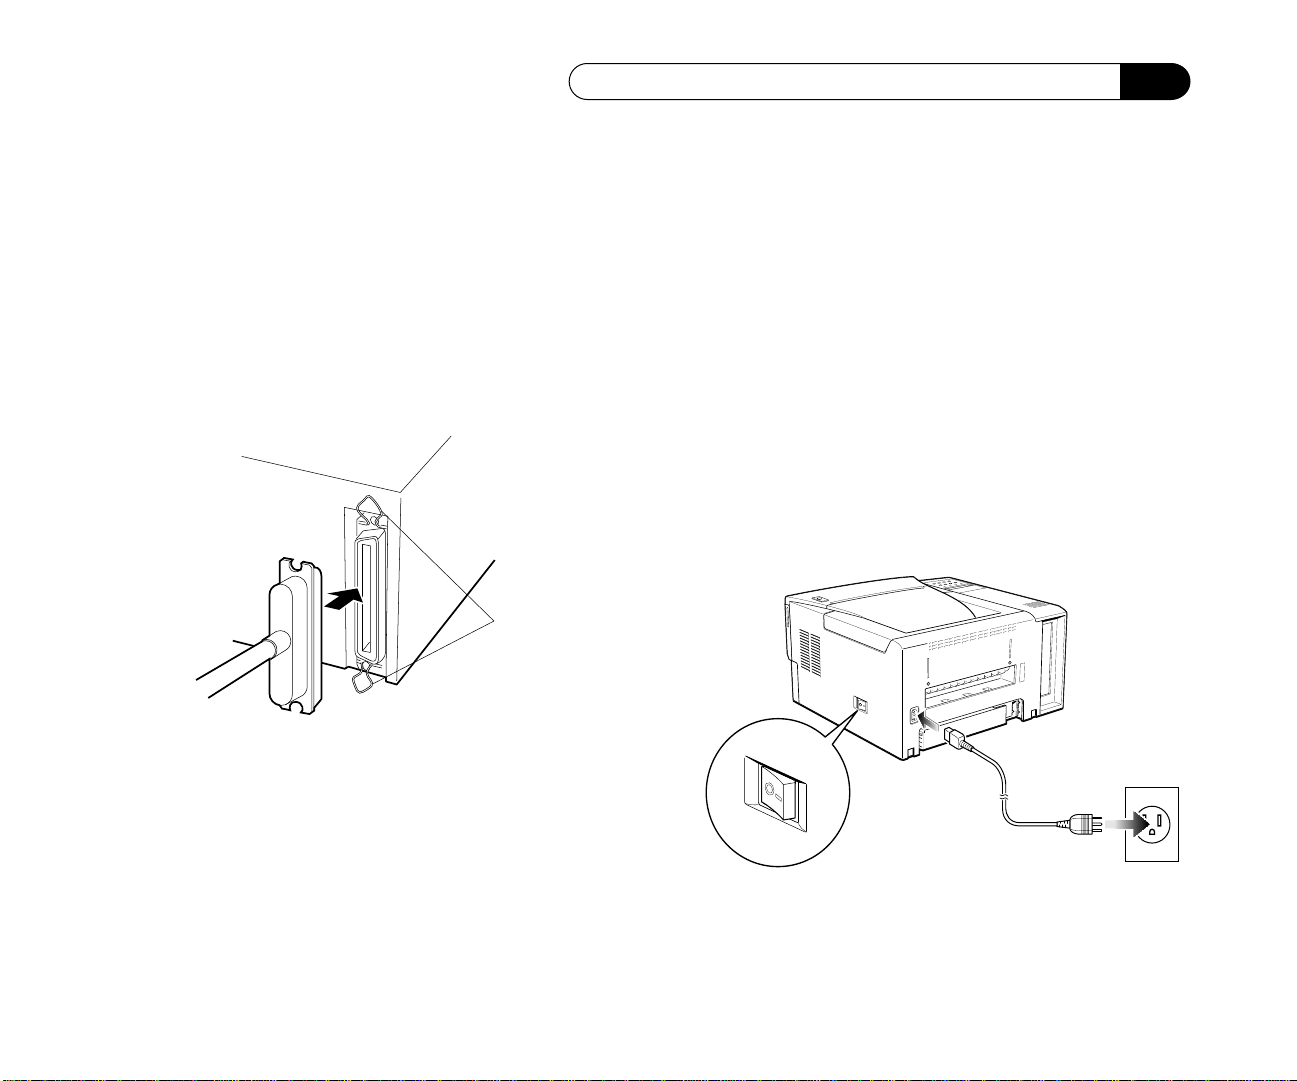
Connecting the Interface Cable
Connecting the Interface Cable
Use a good quality parallel cable to connect this
printer to a computer. Connect the interface cable
as described below.
1. Make sure the power switch is set to OFF [O].
2. Plug the interface cable connector into the
printer and then secure the lock springs.
Lock Springs
3. Connect the other end of the cable to the
computer. Refer to the computer manual for
details about selection of a proper interface
connector.
Connecting the AC Power Cord
1. Make sure the power switch is set to OFF [O].
Plug the AC power cord into the AC socket
located on the printer rear cover.
2. Plug the other end of the AC power cord into
a grounded AC wall outlet.
Caution! Be sure the voltage at the AC
wall outlet is correct for your printer.
Serious printer damage will result if your
printer is the 115VAC model and your AC
wall outlet is providing 220VAC.
1-15
Chapter 1: Setting Up the Printer
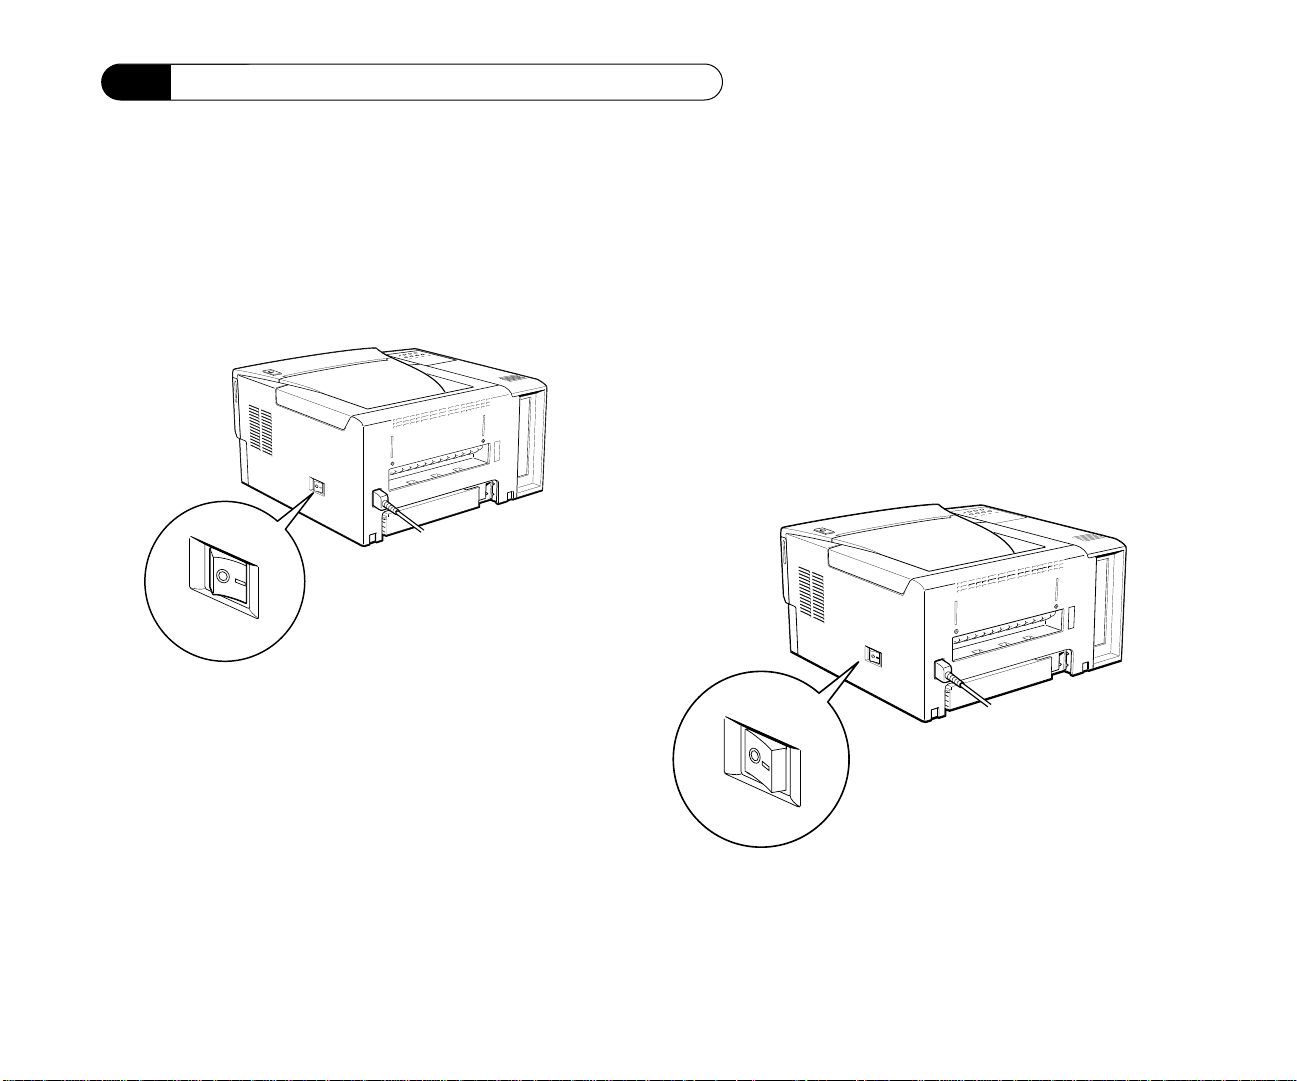
Switching ON the Printer
Switch ON the printer power by pressing [I]
on the main power switch which is located on
the right side of the printer.
Switching OFF the Printer
1. Switch OFF the printer power by pressing [O]
on the Main power switch located on the right
side of the printer.
Caution! Do not switch OFF power while
the printer is processing a print run. Wait
until the printer has finished the print run
and has ejected all of the prints before
you switch OFF power.
1-16 NEC SuperScript 1260 User’s Guide

Printer Safety
Printer Safety
Use common sense and good judgment whenever
you are operating your printer.
To reduce the risk of fire
• Use only the AC power cord that is supplied
with the printer, or one that is UL
compatible. (NEC will not replace this cord if
you lose it.)
• Never use multi-plug adapters or extension
cords to connect the printer to an AC wall
outlet.
• Make sure the AC wall outlet meets the
electrical requirements of your printer.
• If you are not going to use the printer for
long periods of time turn the printer off and
unplug it from the AC wall outlet. Remove
all of the paper from the paper cassettes.
• Never place flammable liquids or materials
near the printer.
• Do not install the printer in a dusty or dirty
area.
• If the printer makes an unusual sound or
begins to smoke, immediately switch off the
power, unplug the printer from the AC wall
outlet, and call for service.
To reduce the risk of electrical shock
• Do not remove screws, covers, or parts from
the printer.
• Do not attempt to disassemble the printer.
High voltage is always present inside the
printer. If you have a problem with the
printer, call for service.
• Do not touch the AC power cord when your
hands are wet.
• Do not use the printer if the AC power cord
is damaged or frayed.
• Never place heavy objects on top of the
printer.
• Never place containers of liquid above or
near the printer.
• Be careful not to drop staples, paper clips, or
other small metal objects into the printer.
To reduce the risk of burn
• When replacing the Toner cartridge or clearing a jam, do not touch the Fuser. The Fuser
operates at a very high temperature and is
marked with a warning label.
• Do not touch the rear (output) slot while the
printer is on. It is very hot.
To reduce the risk of eye injury
• The SuperScript 1260 laser generates a
intense beam of light that can cause serious
1-17

Chapter 1: Setting Up the Printer
eye damage. The printer, however, is
designed so the laser beam is completely
contained within the printer during all
modes of customer operation.
• To avoid accidental contact with the laser
beam, perform all printer service procedures
exactly as described in this manual and
never attempt to dismantle the printer,
remove any of the printer covers, or attempt
to operate the printer with the Top Cover
open.
To reduce the risk of personal injury
• Be careful when lifting the printer.
• Do not install the printer so it is within the
reach of small children.
• Observe all caution and warning messages
displayed in this manual.
• Observe all caution and warning labels
displayed inside the printer.
Ordering Supplies and Accessories
To order printer supplies and accessories, contact
your NEC printer dealer or call 1–800–NEC–INFO
to locate a supplies dealer nearest you.
Table 1:1 Supplies and Options
Supplies / Options Order Number
1260 Toner Cartridge 20-100
250-Sheet Cassette 1265
500-Sheet Cassette 1264
500-Sheet Feeder
(comes with 500-sheet
cassette, not sold separately)
Envelope Cassette
(must be used with 500-sheet
feeder and can hold 50
envelopes)
1261
1262
1-18 NEC SuperScript 1260 User’s Guide
Face Up Output Tray 1263
1260 Network Inter-
1266
face Card (NIC)

Operator Panel
Overview
This chapter describes the operator panel and its
functions. It explains:
• LED operation
• Panel button operation
• Status monitor icons
• Factory default settings
2
2-1
Chapter 2 : Operator Panel
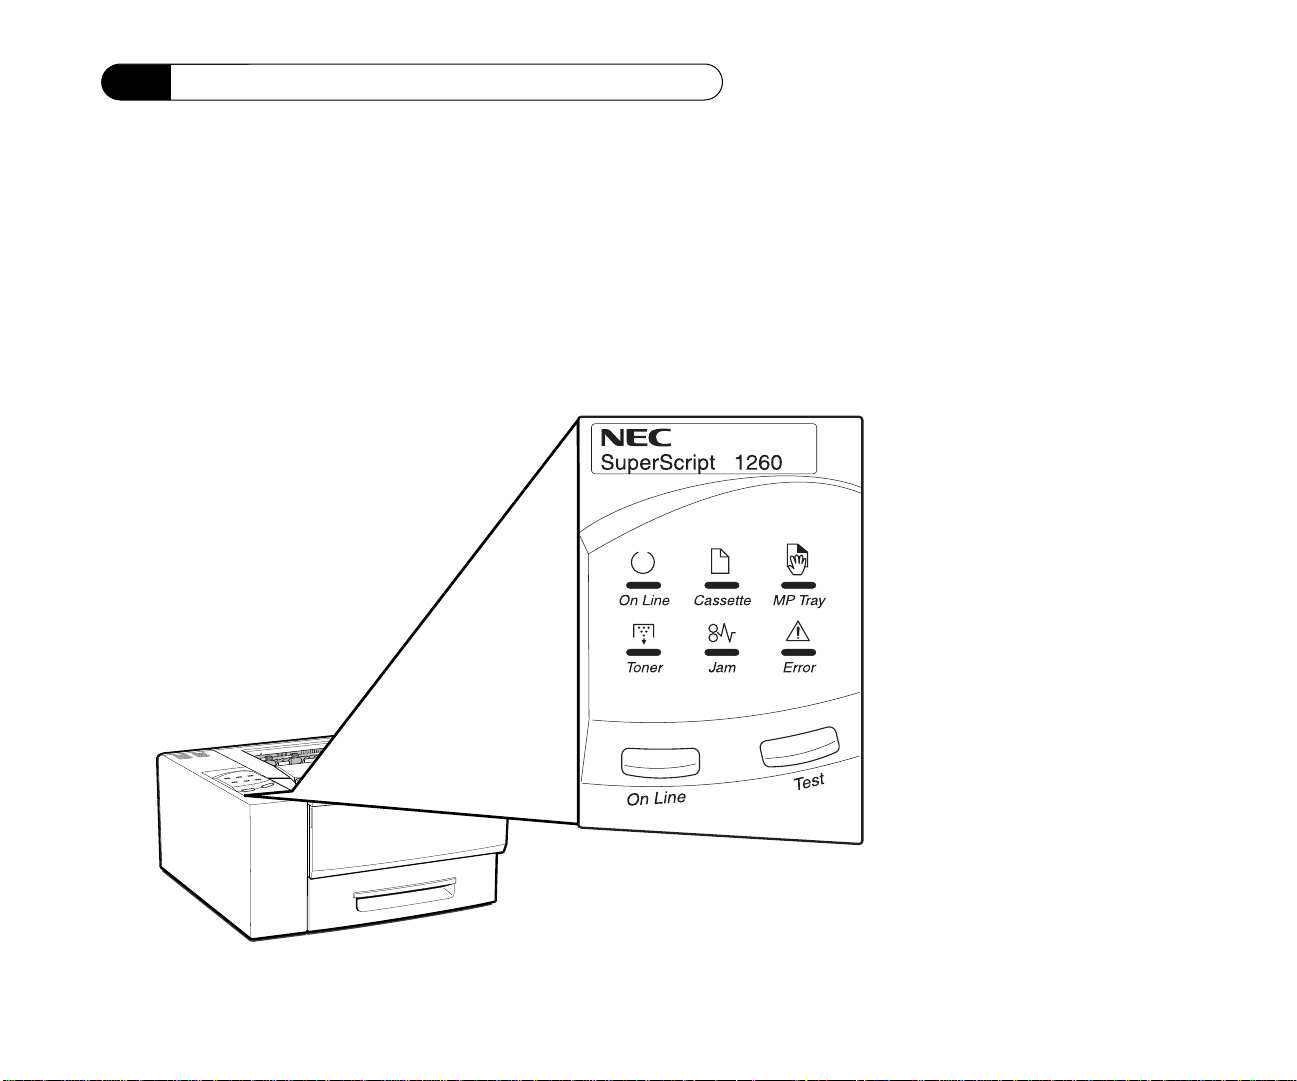
Using the Operator Panel
The printer operator panel includes 6 LED’s
(lights) and 2 buttons. The LED’s indicate printer
status and the buttons allow you to control
printing—for example you can reset, pause,
resume, and print a test page from the front panel.
The operator panel consists of six light-emitting
diodes (LED) and two front panel buttons.
• The On Line LED (green) indicates normal
operation (warming up, ready, or Energy
Saving Mode). When combined with other
LED’s it may also indicate other states. (See
Table 2–1.)
2-2 NEC SuperScript 1260 User’s Guide

LED Operation
• The Cassette LED (amber) indicates that the
printer needs paper.
• The MP Tray LED (amber) indicates that the
printer is ready for manual feed or that the
Multi-purpose tray needs paper.
• The Toner LED (amber) indicates the toner
supply is getting low.
• The Jam LED (red) indicates a paper jam.
• The Error LED (red) indicates printer errors
such as an open cover or incorrect paper size.
• The On Line button lets you resume operation
after correcting a problem (such as adding
more paper or closing the cover). You can also
use the button to initialize the printer or reset
it to factory defaults.
• The Test button lets you print a settings page.
LED Operation
When the printer is first powered on, all LED’s
light immediately and then cycle from left to right
in sequence. The blinking lights indicate that the
printer is initializing and performing an internal
test. When the printer is ready to accept a job, the
green On Line LED stays steadily lit. From the
ready state, pressing the On Line Button for four
seconds and releasing it activates the initialization
(reset) and internal test. The LED’s will remain on
for 0.5 seconds, then off for 0.5 seconds, then
repeat until the button is released.
Table 2-1 provides a prioritized list of printer
problems with LED status, condition, cause, and
solution.
Please note that:
• “Blink” always means 0.5 seconds on, 0.5
seconds off, then it repeats.
• “Slow blink” is 0.5 seconds on and 5.0
seconds off, then it repeats.
• “Double-blink” means 0.25 seconds on, 0.25
seconds off, 0.25 seconds on, 1.0 second off,
then it repeats.
2-3

Chapter 2 : Operator Panel
Table 2-1: Condition Indications and Solutions
LEDs CONDITION CAUSE/SOLUTION
All lit steady Printer Hardware
Error
All lit steady
except On Line
All lit then cycle
all LEDs
All lit then cycle
all LEDs
Cycle through all
LEDs
NIC (Network
Interface Card) Error
Power On When you power on the printer, all the LEDs light and then, during
Factory Default Reset During power up, press the On Line Button until lights stop cycling,
Reset When the On Line button is pressed for at least 4 seconds (in all
A printer hardware error is detected. Possible printer errors include
malfunction of the fuser unit, laser unit, scanning motor, or fan.
Corrective Action: First power off the printer and then turn power
back on. If the problem continues, contact your NEC dealer for
service or call NEC technical support (see Chapter 10).
Corrective Action: Press the Test button on the Operator panel to
verify communication. Refer to “SuperScript 1260 Network Printer
Configuration Guide”.
hardware check, cycle through all LEDs (starting from On Line LED
and moving right), and then the green light blinks until the printer is
ready to accept a job during the Power On cycle.
then release. After that, the green light blinks until the printer is
ready to accept a job.
Corrective Action: Release the Front Panel Button after the LEDs
light in acknowledgment. Once the button is released, the printer
sets factory defaults, initializes, and goes to READY.
states other than during power up), it cycles through all LED’s and
then the green light blinks until the printer is ready to accept a job.
Corrective Action: Release the Front Panel Button after the LEDs
blink in acknowledgment. Once the button is released, the printer
initializes and goes to READY.
2-4 NEC SuperScript 1260 User’s Guide

Table 2-1 Condition Indications and Solutions
LEDs CONDITION CAUSE/SOLUTION
LED Operation
Error (red) on
steady
Jam (red) on
steady
Error (red) Blinks
On Line (green)
on steady
Top Cover Open
No Cartridge
Paper Jam This occurs when there is a paper jam.
Page too complex This indicates errors like “page too complex.” It will be affected by
This occurs if the T op cover is open or the Toner cartridge is missing.
Corrective Action: Make sure the printer has a Toner cartridge
installed. Check that the Top cover is completely closed. The printer
will resume operation.
Corrective Action: Clear the paper jam. See Chapter 9, “Trouble-
shooting” for more help with paper jams.
Entry jams always reprint the jammed page.
the auto-continue setting.
• If auto-continue is on, the Windows status monitor mini-window
will display a message indicating which page is too complex and the
document will continue printing.
• If auto-continue is turned off, the Windows status monitor miniwindow will display the status alert and the printer will behave by
blinking the error light and printing the partial page.
To correct, press the On Line button.
2-5

Chapter 2 : Operator Panel
Table 2-1: Condition Indications and Solutions (continued)
LEDs CONDITION CAUSE/SOLUTION
Error (red) on
steady
On Line (green)
blinks
Error (red) blinks
On Line (green)
on steady
MP Tray (amber)
on steady
MP Tray (amber)
blinks or
Cassette (amber)
blinks
Cassette (amber)
on steady
Paper size mismatch
Paper source lights up
(MP or Cassette)
Adobe Memory
Booster used
Waiting for Manual
Feed
No paper This occurs when the cassette or Multi-purpose tray is out of paper.
Missing cassette The cassette is not installed.
This occurs after printing a page set for an incorrect paper length.
Corrective Action: Insert the correct paper size (in the cassette or
manual feed). The printer resumes normal processing. The document
must be reprinted.
This informs the user that Adobe Memory Booster was used.
See page 3–22 for more information.
This condition occurs when the printer is waiting for paper in the
Multi-purpose tray.
Corrective Action: Insert a sheet of paper into the Multi-purpose (MP)
tray. You may need to press the On Line button momentarily.
If the On Line button is pressed without supplying paper, the paper
will be picked from the paper cassette (if available).
Corrective Acton: Refill with correct size paper. Printer will resume
printing automatically.
Corrective Action: Installing cassette will automatically return
system to ready.
Toner (amber) on
steady
2-6 NEC SuperScript 1260 User’s Guide
Low on toner The toner level is low in the Toner cartridge.
Corrective Action: Redistribute the toner by removing the Toner cartridge and rocking it from side to side or replace the Toner cartridge.

Table 2-1: Condition Indications and Solutions
LEDs CONDITION CAUSE/SOLUTION
LED Operation
On Line (green)
on steady
On Line (green)
blinks
On Line (green)
blinks slowly
On Line (green)
double-blinks
On Line
(green)blinks
Cassette/Error on
steady
Ready The printer is ready.
Note: Pressing the On Line button will take the printer offline.
In use The LED blinks while the printer is processing a job from your
computer or while finishing printer warm up and initialization. This
includes waiting for the computer to send additional data or for the
printer engine to move paper.
Energy Saving The LED blinks slowly while the printer is in Energy Saving Mode.
Energy Saving Mode starts after the printer has been READY as long
as specified by the Energy Saving Mode setting. The printer exits
Energy Saving Mode when it receives a job, or the On Line Button is
pressed.
Waiting PCL data left in the printer.
Corrective action: Pressing the On Line button will cause a Form Feed
then resume to Idle/Ready.
Wrong paper size You have loaded a different sized paper in your paper cassette or tray
than specified.
Corrective Action: Press the On Line button once to manually feed the
correct paper size. Press the On Line button again to use paper from
the upper cassette. There is no size sensing in the Multi-purpose tray
or the optional Envelope cassette.
2-7

Chapter 2 : Operator Panel
Operator Panel Buttons
Printer functions associated with the Operator
panel buttons are not executed until you release
the button. The LED’s show that certain
conditions have been selected.
Table 2-2: Front Panel Buttons
The following table shows the effects of pressing
the On Line and the Test buttons for certain
conditions and durations. Pressing the buttons for
other conditions has no effect.
On
CONDITION
Power On √ At power up
Power On √ At power up
Any condition except Power On √ 4 seconds Resets the printer: All data in the
Ready √ Momentary Takes printer offline
Ready √ Momentary Starts settings page
Receiving/Processing/Printing
data
2-8 NEC SuperScript 1260 User’s Guide
Line
Button
√ Momentary Pauses printing
Test
Button
DURATION EFFECT
Start FACTORY DEFAULT RESET
until all LEDs
stop cycling
depress for 4
seconds
processing
Start FACTORY DEFAULT RESET
of NIC (Network Interface Card)
processing. See NIC manual.
printer is cleared and the printer is
returned to the Ready state.

Resetting the Printer
On
CONDITION
Paused/offline √ Momentary Resumes printing from pause; or
Energy Saving √ Momentary Leaves “Energy Saving Mode”
Paper Size Error √ Momentary Resumes printing to next available
• When the green On Line LED is blinking and
in use, pressing the On Line button will cause
the printer to pause.
Line
Button
Resetting the Printer
Resetting the printer is useful if you wish to
cancel a print job or clear the printer of all data
(including temporarily downloaded fonts). Turn
the printer off, then press and hold the On Line
button for 4 seconds. The printer resets by
performing an internal diagnostic test and then
returns to the online state.
Test
Button
DURATION EFFECT
to On Line from offline
and goes to Ready state
paper cassette source
• When the green On Line LED is steady and
not in use, pressing the Test button will print
a settings page.
Status Icons and Messages
The following table lists status icons and their
associated messages as they appear on the
Windows Status Monitor screen.
2-9
Chapter 2 : Operator Panel
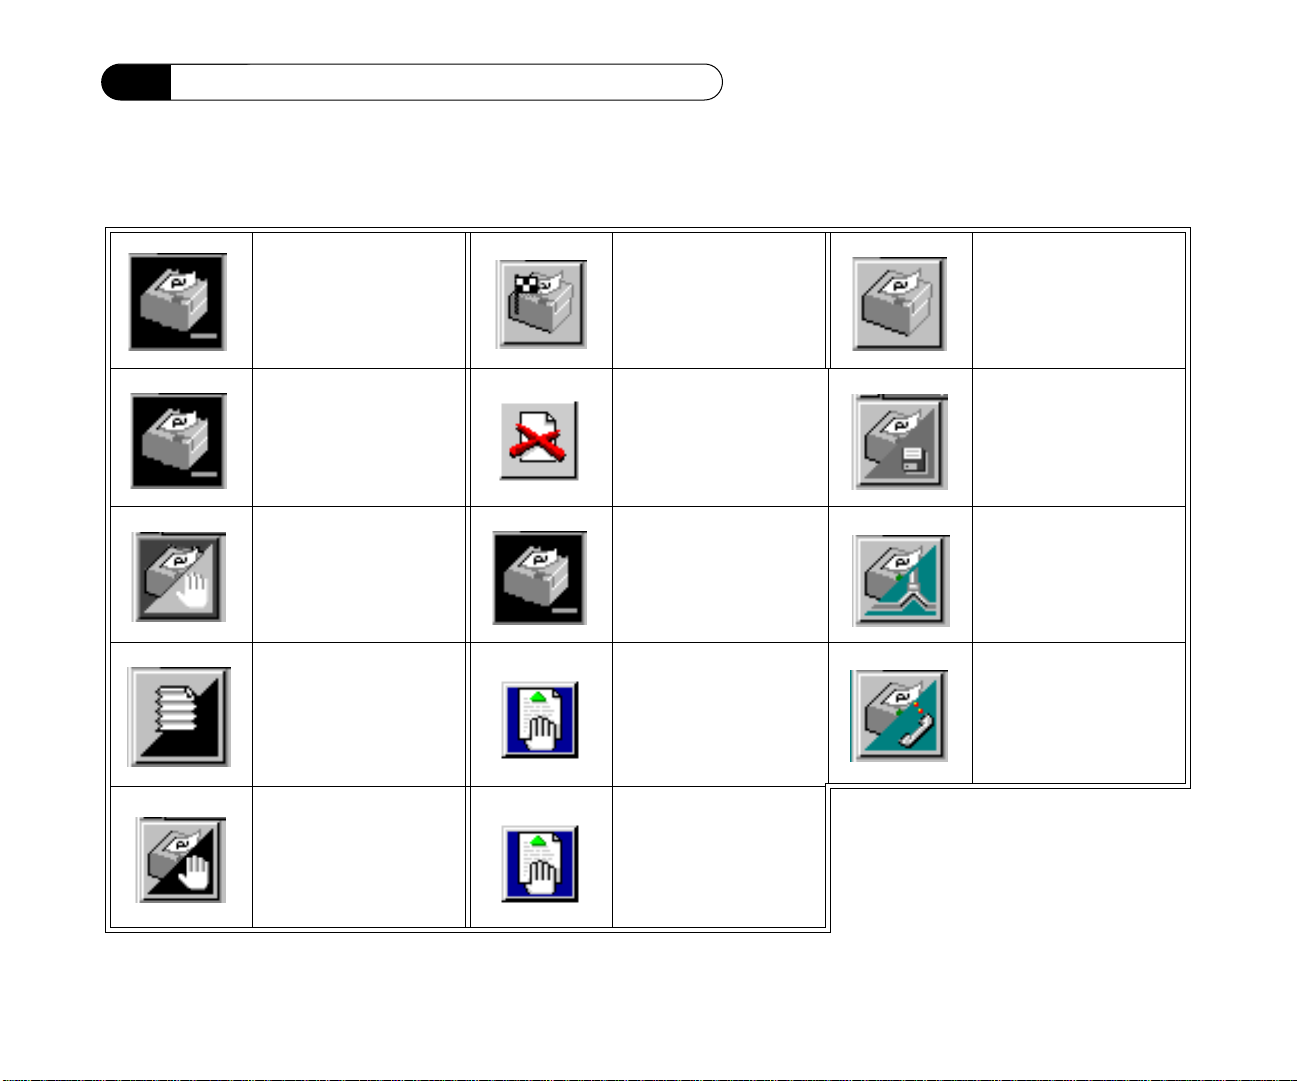
Table 2-3: Status Monitor Icons
Ready
(green light steady)
Printing
(green light flashes)
Offline Busy
Paper Jam Manual Feed Print to Fax
Error
(red light)
Job Complete Energy Save
(green slow blink)
Add Paper Print to File
Print to Network
(yellow light flashes)
2-Sided Job Pause
printer
2-10 NEC SuperScript 1260 User’s Guide

Default Settings
The following table lists the SuperScript 1260 factory default settings.
Table 2-4: SuperScript 1260 Default Settings
NAME SETTING
Adobe Memory Booster On
Energy Saving Mode Off
Toner Saving Mode Off
NEC Sharp Edge Technology On
Manual Feed Off
Jam Recovery Off
Manual Feed Timeout 255 seconds
Wait Time-out 40 seconds
Auto-Continue On
Horizontal Offset 0
Vertical Offset 0
Paper Size Letter
Lines of Text 60
Orientation Portrait
Copies 1
Printer Port LPT1
Printer Name NEC SuperScript 1260
DOS Status Monitor Hot-Key Ctrl-Alt-S
Font Courier 12 point medium
Default Settings
2-11

Chapter 2 : Operator Panel
2-12 NEC SuperScript 1260 User’s Guide

SuperScript Software
Overview
This chapter gives you the information you need
in order to successfully install and use the SuperScript 1260 printer driver. You must install the
NEC SuperScript 1260 printer driver in order to
successfully print. This chapter explains:
• The printer software and accessories
• Installing the software on your computer
• Options such as resolution, poster and
N-up printing
• Watermarks
• Paper source selections
• 2-Sided or duplex printing
• Halftone features
• Memory information
3
3-1

Chapter 3 : SuperScript Software
SuperScript 1260 Software for Windows
Your new SuperScript 1260 is built on Adobe
PrintGear, an award-winning laser printing technology. Adobe PrintGear allows your SuperScript
1260 to deliver very high speed performance, easy
to use networking and unmatched features at
dramatically lower costs than competing printers.
SuperScript 1260 Printer Software and Accessories
Included with your SuperScript 1260 printer is
some of the world’s most advanced printer
software:
• The Windows Printer Driver—an advanced
printer driver that includes special features
like watermark printing, booklet and poster
printing, thumbnail or N-up printing, and 2Sided printing.
• The SuperScript 1260 Windows status
monitor—a program that gives you real-time
feedback about your printer and current print
jobs. The SuperScript 1260 Windows Status
Monitor, in icon or mini-window view, is like
having your printer’s front panel always
available from your Windows desktop.
• Two SuperScript 1260 DOS printing utility
programs: The DOS Printer Control Panel and
the DOS Status Monitor. These programs let
you change printer settings and monitor
printer status in the DOS environment.
This User’s Guide explains how to install and use
these programs. The Windows printer driver is
covered in this chapter. See Chapter 4 for the
Windows Status Monitor and Chapter 5 for the
DOS printing utility programs.
Note: Printer settings for energy saving
timeout, Adobe Memory Booster, jam
recovery, wait timeout, manual feed timeout, and auto-continue can be changed in
Windows or DOS. Other printer settings,
such as horizontal and vertical offset, can
only be changed using the DOS Printer
Control Panel. Refer to Change Printer
Settings in Chapter 5, “DOS Printing
Utilities.”
3-2 NEC SuperScript 1260 User’s Guide

Installing SuperScript 1260 Software
Installing SuperScript 1260
Software
The Install program installs the Windows and,
optionally, DOS components of SuperScript 1260
software. It lets you choose the type of installation
that works best for you, copies the necessary files
to your hard disk, and installs the SuperScript
1260 Windows Printer Driver and SuperScript
1260 Windows Status Monitor into Windows.
There are three installation types available: standard, custom, and network.
If you want to install the SuperScript 1260 DOS
software without using the Windows Install
program, see “Installing SuperScript 1260 DOS
software only,” in Chapter 5.
Standard Installation
This is the simplest installation method: all the
SuperScript 1260 software will be installed for
you automatically using standard settings. Standard installation is recommended for most users.
Custom Installation
Custom installation allows you to choose individual components to meet your needs. You have the
option of installing the SuperScript 1260 Windows
Printer Driver, the Windows Status Monitor, and
the DOS utility software. You can also specify
which sound alerts (if any) you want to use, and
several other installation options.
Network Installation
Network installation allows you to copy the
SuperScript 1260 software to a network drive,
from which you can install the software on individual workstations attached to that network.
Note: If you are encountering difficulty
installing the software or printing a test
page, refer to chapter 9, “Troubleshooting”, in this manual.
The ABCs of Installation for Windows 95
The SuperScript 1260 supports multiple installation paths in Windows 95:
• The printer may be installed by selecting
“Start, Run” from the task bar.
• The printer may be detected via Plug & Play if
it is locally connected,
• The printer may be installed via the icon
labeled “Add Printer” in the printers folder.
The recommended way to install the software is
by selecting “Start, Run” from the task bar. If you
choose to install the software either via Plug &
Play or by clicking “Add Printer,” the wizard will
3-3

Chapter 3 : SuperScript Software
take you step by step through the necessary
actions. When you are installing the software
from the SuperScript 1260 Solutions CD, refer to
the instructions on the CD sleeve. For installing
from the diskette using the “Start, Run” method
follow the instructions below:
1. Insert the SuperScript 1260 Install disk in
floppy drive A: (you can also use drive B: if
3 1/2 in.).
2. From the Windows Task Bar, choose Start,
Run.
3. Type A:\INSTALL in the dialog box, and
press Enter.
4. Follow the instructions, and choose the type
of installation you want. Click the help button
at any time to get more detailed information
on your installation options.
The ABCs of Installation for Windows 3.1 and 3.11
To install the software from the 1260 Solutions
CD, follow the instructions on the CD sleeve. To
install from the diskette, follow the instructions
below:
1. Insert the SuperScript 1260 Install disk in
floppy drive A: (you can also use drive B: if
3 1/2 in.).
2. From the Windows Program Manager, choose
Run from the File menu.
3. Type A:\INSTALL in the dialog box, and
press Enter.
4. Follow the instructions, and choose the type
of installation you want. Click the help button
at any time to get more detailed information
on your installation options.
Note: Do not install in Windows 3.1 or
3.11 with Add Printer.
3-4 NEC SuperScript 1260 User’s Guide

SuperScript 1260 Windows Printer Driver
SuperScript 1260 Windows Printer
Driver
When you run the SuperScript 1260 Install program, the SuperScript 1260 Windows Printer
Driver is installed as your default Windows
printer driver.
The SuperScript 1260 Windows Printer Driver
gives you control over your printer, including
optimized graphics imaging and halftone printing. In addition, it provides a set of special printing features, including:
• Watermark printing (superimposed text or
graphics, such as “Draft”, “Confidential” or a
logo)
• Booklet printing
• 2-Sided printing
• Thumbnail or “N-up” printing
(multiple pages reduced to fit on one sheet of
paper)
• Poster printing (one page enlarged to print on
multiple sheets)
Note: Many Windows programs allow
you to change printer settings, such as
number of copies, paper size, or printer
resolution. For some of these settings, the
changes you make in Windows programs
will override the settings specified in the
SuperScript 1260 Windows Printer Driver.
This documentation will make note of
printer settings in the SuperScript 1260
Windows Printer Driver that may be overridden by Windows programs.
Accessing the SuperScript 1260
Windows Printer Driver
There are several ways to access the SuperScript
1260 Windows Printer Driver:
• In Windows 3.1, from the Windows Control
Panel, select Printer, then Setup.
• In Windows 95, from the Printers group
(accessed from the Start menu and then
Settings), right-click the SuperScript 1260
printer icon, then properties.
• In many Windows programs, click the Setup
or Properties button on the Print dialog box, or
select Printer Setup from the File menu.
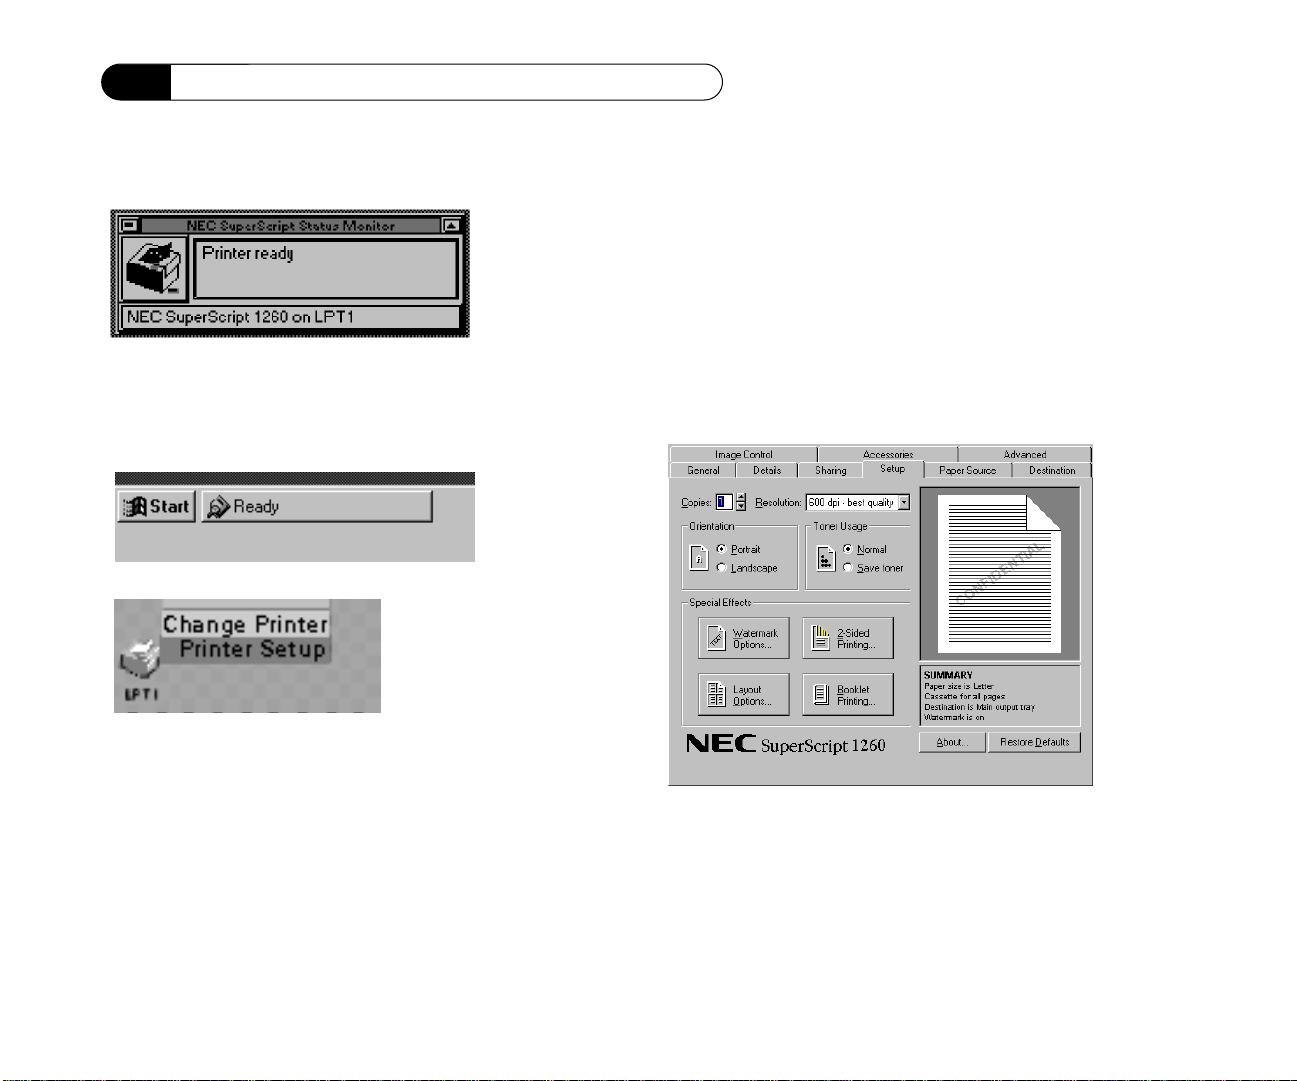
• From the maximized SuperScript 1260 Status
Monitor (described in a later section), click the
Printer Setup button on the General tab.
• From the SuperScript 1260 Status Monitor in
mini-window view, double click the name of
the default printer at the bottom of the
window.
3-5
Chapter 3 : SuperScript Software
• From the icon view or mini-window of the
SuperScript 1260 Status Monitor , select Printer
Setup from the control menu.
(Windows 95)
at the top of the window. Each tab is described in
one of the following sections.
Note: The Windows 95 Driver dialog box
will also contain General and Detail Tabs
(and a Sharing Tab, when you are
connected to a network).
Setup Tab
Icon View
(Windows 3.1)
Using the SuperScript 1260 Windows Printer Driver
The features of the SuperScript 1260 Windows
Printer Driver are arranged on six tabs: Setup,
Paper Source, Destination, Image Control, Accessories, and Advanced.
To access one of the tab dialog boxes, click the tab
3-6 NEC SuperScript 1260 User’s Guide
The Setup tab includes these settings:
• Copies (1-99) • Toner Usage
• Resolution • Watermark Options

Setup Tab
• Orientation (Portrait
or Landscape)
• 2-Sided Printing
The preview area on the right of the Setup tab
shows the appearance of a page with current settings. The summary area below the preview
reports current settings that affect the appearance
of the page and also the paper’s destination.
Y ou can r estore all settings of the SuperScript 1260
Windows Printer Driver to their defaults by clicking Restore Defaults.
You can see version and copyright information
about the SuperScript 1260 Windows Printer
Driver by clicking About.
Each of the settings of the Setup tab is described
below.
• Layout Options (“N-up”
or poster printing)
• Booklet Printing
Copies
Use the Copies box to set the number of copies
you want to print. You can select from 1 to 99
copies.
Note: This setting may be overridden by
the copies setting in some Windows programs.
Resolution
Select from the available settings to set the maximum resolution for your print jobs, as measured
in dpi (dots per inch). Choose 150 dpi - draft, 300
dpi - faster output, or 600 dpi - best quality. Higher
resolutions produce the best quality output, but in
some instances may take longer to print than
lower resolutions.
Note: Some Windows programs may
have a resolution setting, but you cannot
select a higher resolution than the resolution you have set in the SuperScript 1260
Windows Printer Driver.
Orientation
Choose Portrait or Landscape to select the default
orientation of the printed page.
This setting may be overridden by the orientation
setting in Windows programs.
Toner Usage
Use these buttons to select Normal or Save Toner.
When Save Toner has been selected, text and
graphics will print gray rather than black. Output
printed with Save Toner selected is readable, and
will make your toner last longer , but is suitable for
drafts only, not final copies.
3-7

Chapter 3 : SuperScript Software
Watermark Options
A watermark is text and/or a graphic that is
superimposed on your final output, usually in a
lighter gray. Typical text watermarks are “Draft”
or “Confidential,” but you can also create a watermark with your own text or graphic.
Pressing the Watermark Options button brings up
the Watermark Options dialog box.
right shows the text, size, and position of each
watermark on the page.
Text Watermark
To create your own text watermark, click Add in
the Text area of the Watermark Options dialog
box. The Edit Text Watermark dialog box will
appear.
You can choose a watermark from either of the
lists on the left. If <none> is selected, no watermark will print. As you move the highlight down
the list of watermarks, the preview area at the
3-8 NEC SuperScript 1260 User’s Guide
Use this dialog box to enter the text and layout of
your watermark. You can set the watermark’s
font, size, and darkness, as well as the angle and
position on the page. The preview area at the right
shows the effect of your settings.

Setup Tab
The preview will display both the currentlyselected text watermark and any selected graphic.
However, you can change only the text in this
dialog box. The text in the preview will overlay
the graphic if the two overlap.
Y ou may name your watermark in the Name field.
It will initially take the same name as the Text
field, but you can use any name up to16 characters in length.
Click OK to add the new watermark to the list on
the Watermark Options dialog.
To edit one of the watermarks on the list, from the
Watermark Options dialog box, highlight the
watermark you want to change. Click Edit to
bring up the Edit Watermark dialog box. The Edit
dialog box is similar to the Add Watermark dialog
box.
When your changes are complete, click OK.
Graphic Watermark
To create a graphic watermark, click Add in the
graphics area of the Watermark Options dialog
box. A graphic watermark can be any
uncomprepressed, valid bitmap (i.e. .bmp) file.
The Watermark Graphics dialog box will appear.
To select a bitmap to be used as a graphic watermark, enter the path or select browse to locate the
bitmap file.
You can name your graphic separate from the file
name in the Bitmap field. Use no more than 16
characters (in the Name field).
The preview will display both the currently
selected text and any selected bitmap. However,
you can change only the bitmap in this dialog box.
You may then change the darkness, scale and
position of your graphic watermark.
Press the OK button when done.
3-9
Chapter 3 : SuperScript Software
If you try to print using a bitmap watermark and
the driver cannot locate the bitmap file at print
time (it has been moved, renamed, or deleted), the
screen displays an alert. You can then choose to
either print without the graphic or cancel the print
job.
Choosing Actual Size will place the graphic on the
page at 100%. If the graphic is large, this can result
in the image running off the edge of the paper,
which will be reflected in the preview and can be
corrected by resizing at a lower percentage.
Note: The angle option available in the
text watermark dialog box is not available
for graphics.
In the Watermark Options dialog box, Select Print
watermark on first page only if you want the water-
mark to print only on the first page of a job.
To delete a watermark from the list, highlight the
watermark and click Delete.
Note: When printed, the text watermark
will always overlay the bitmap graphic.
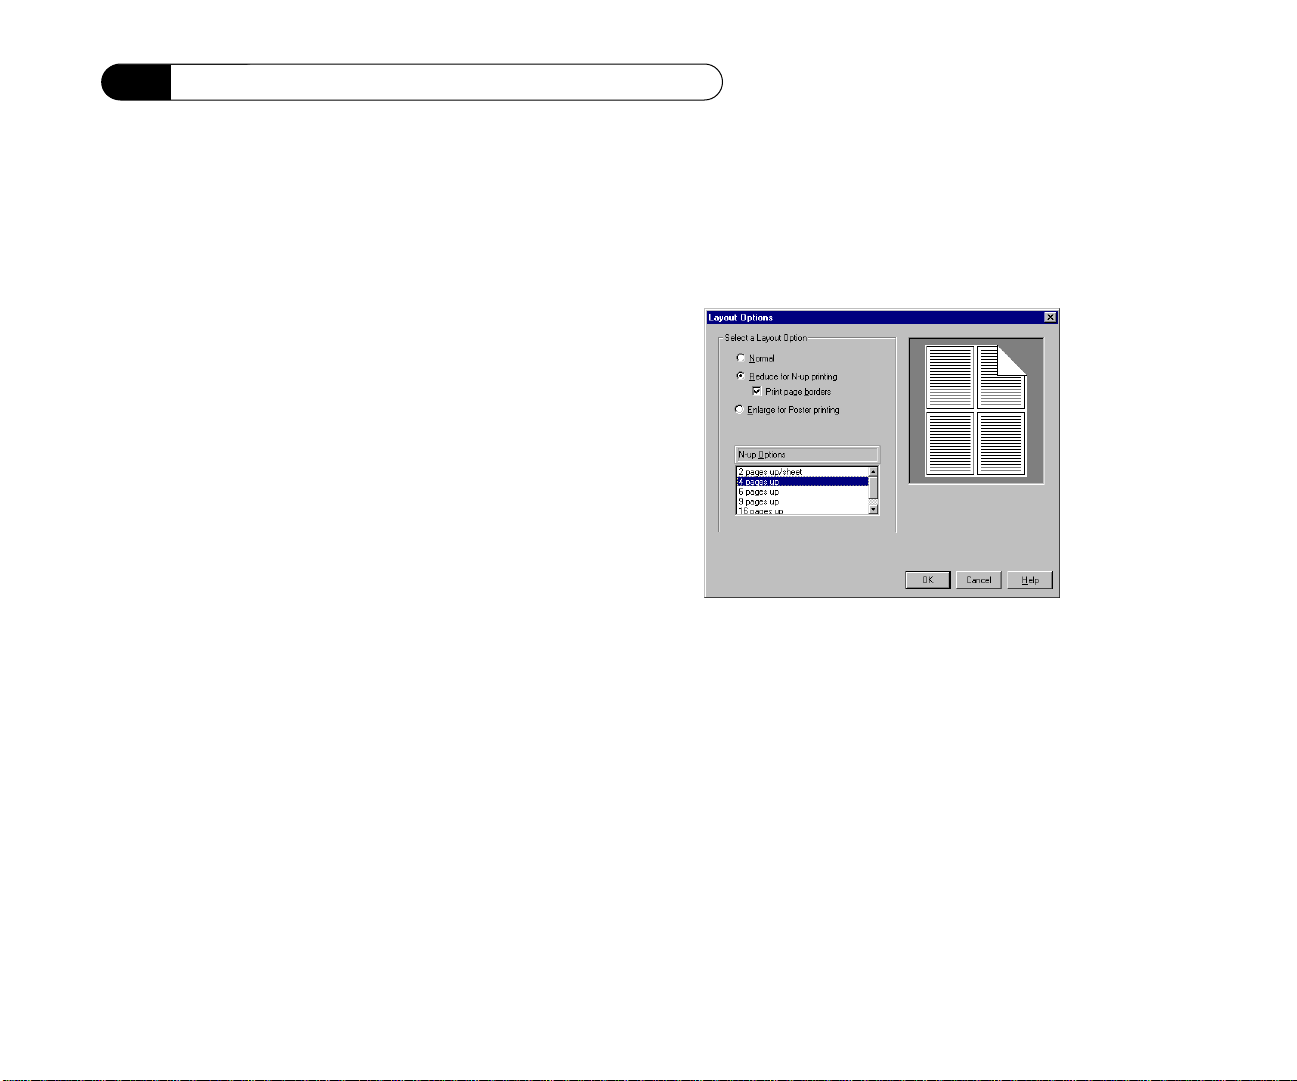
Layout Options
Clicking this button on the Setup tab lets you
choose between normal printing and two special
printing options.
Reduce for Thumbnail or N-up Printing
This feature allows you to print multiple reducedsize pages on one sheet of paper. You can choose
to print 2, 4, 6, 9, or 16 pages up (the number of
reduced pages to print on each sheet of paper).
3-10 NEC SuperScript 1260 User’s Guide
N-up printing is great for saving paper on drafts,
or for presentation handouts and lets you quickly
scan multiple pages at a glance. You can also
specify whether you want to print page borders
around the reduced pages. The preview area at
the right shows the effect of the present settings.
Setup Tab
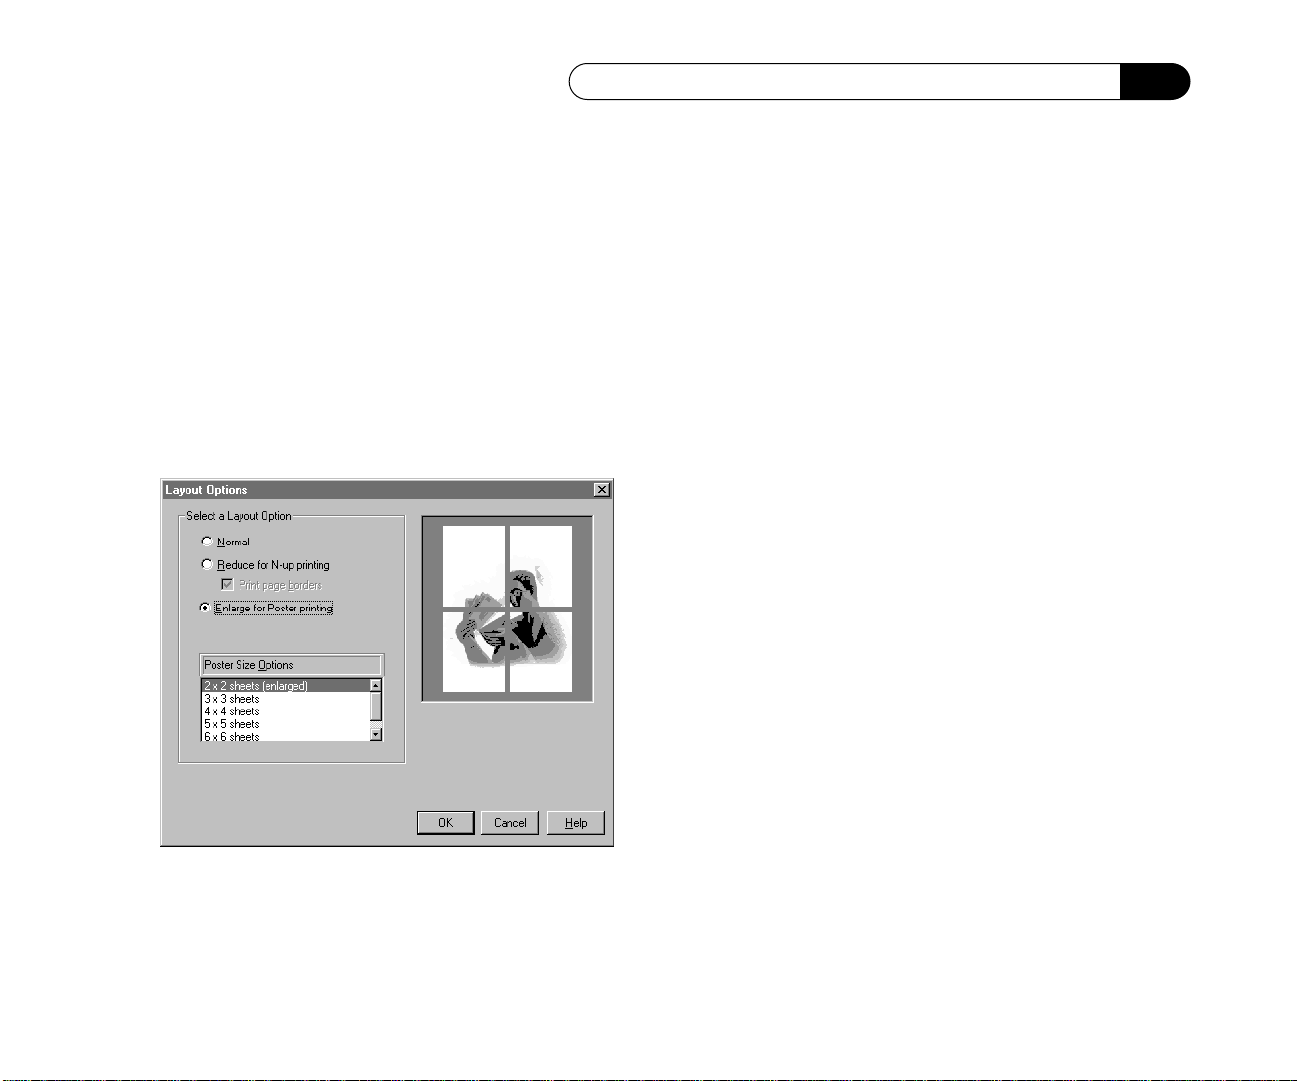
Enlarge for Poster Printing
This feature enables you to print large, multiplesheet versions of your page. You can print a poster
that’s 2 x 2, 3 x 3, 4 x 4, 5 x 5, or 6 x 6 sheets in size.
The preview area at the right shows the effect of
your choice.
When assembling your poster print job, you will
notice a small unprintable area around the edges
of each sheet of paper. They are made to be overlapped during assembly.
Note: During N-up, Watermark and
Poster printing, the SuperScript 1260 Windows printer driver stores an intermediate
representation of the whole print job on
your hard disk. The amount of disk space
required depends on the size of the print
job and the amount of graphics data it
includes. For pages containing graphics,
you may need several megabytes of hard
disk space for each page of the print job.
2-Sided Printing
2-Sided printing requires a little help from you.
When 2-Sided printing is selected, the printer will
print side one of the print job’s pages, then pause
to allow you to reinsert the pages into the printer
in the correct direction. Then the driver will print
the other side of the pages.
If you select 2-Sided printing, several additional
choices are available:
• Choose Print instruction sheet to have an
instruction page printed before the first page
of your print job. This page will indicate how
to re-feed the pages (i.e., the orientation and
direction) for printing on the second side. We
recommend you select this option, because it
is very important that the second printing
pass be correctly handled.
• Choose Display help messages to get detailed
on-screen help as the 2-Sided printing process
proceeds. You may want to turn this option off
once you’ve become familiar with the process.
3-11

Chapter 3 : SuperScript Software
Options
If you select 2-Sided printing the following dialog
box appears.
Note: We recommend that you use the
default choice of the Multi-purpose tray
for your paper source when printing 2Sided.
This dialog box lets you choose between two
binding options for your 2-Sided print jobs:
• Choose 2-Sided Book (for binding on the long
edge) if your document will be read like a
book. This option is the default. It causes the
text on the second side to be oriented the same
direction as the text on the first side.
• Choose 2-Sided (for binding on the short edge) if
the reader of your document will be turning
its pages vertically like a tablet or pad of
paper. If you choose this option, the text on
the second side of the page will be upside
down in relation to the first side.
• Choose the optional rear Face-up output tray
or rear slot for the destination of letter or A4
size paper.
• 2-Sided jobs using legal size paper must exit
through the top main output tray.
• For best results use a heavier paper stock such
as 24 lb., especially when using the main output tray.
3-12 NEC SuperScript 1260 User’s Guide

Setup Tab
• The heat of the printer may cause a slight curl
to the paper as it passes through the printer
the first time. This may result in a slight wrinkling of the paper when it is printed on the
second side. If this happens, roll the paper in
the reverse direction of the curl before you
reinsert the paper into the printer.
Note: During 2-Sided printing, the
SuperScript 1260 Windows Printer Driver
stores the whole print job on your hard
disk. The amount of disk space required
depends on the size of the print job and
the amount of graphics data it includes.
For pages containing graphics, you may
need several megabytes of hard disk
space for each page of the print job.
Booklet Printing
Booklet printing lets you produce booklets in
book or tablet form. Booklets have two reducedsized pages on each side of the sheet. You fold
these sheets to complete the booklet. When you
use booklet printing, the SuperScript 1260
Windows Printer prints the pages in the correct
order so that all you need to do is fold the printed
pages in half.
The SuperScript 1260 Windows Printer Driver
will print the first side of the booklet pages, then
pause for you to reinsert the pages into the
printer. Optionally, the driver will print an
instruction sheet and/or provide on-screen
instructions to help you reinsert the pages
correctly.
Booklet printing works by using special Booklet
paper size definitions. There are Booklet paper
sizes for letter, legal, and A4 paper. When you
pick one of these Booklet paper sizes in one of
your Windows programs, the driver will do what
is needed to print a booklet, including reducing
the page size and activating 2-Sided printing.
Note: The paper size setting in the
SuperScript 1260 driver is overridden by
the paper size setting in most Windows
programs. In order to print a Booklet, you
must select the Booklet paper size from
the list of paper sizes in your Windows
program (see Step 7 below).
3-13
Chapter 3 : SuperScript Software
Instructions For Using the Booklet
Printing Feature:
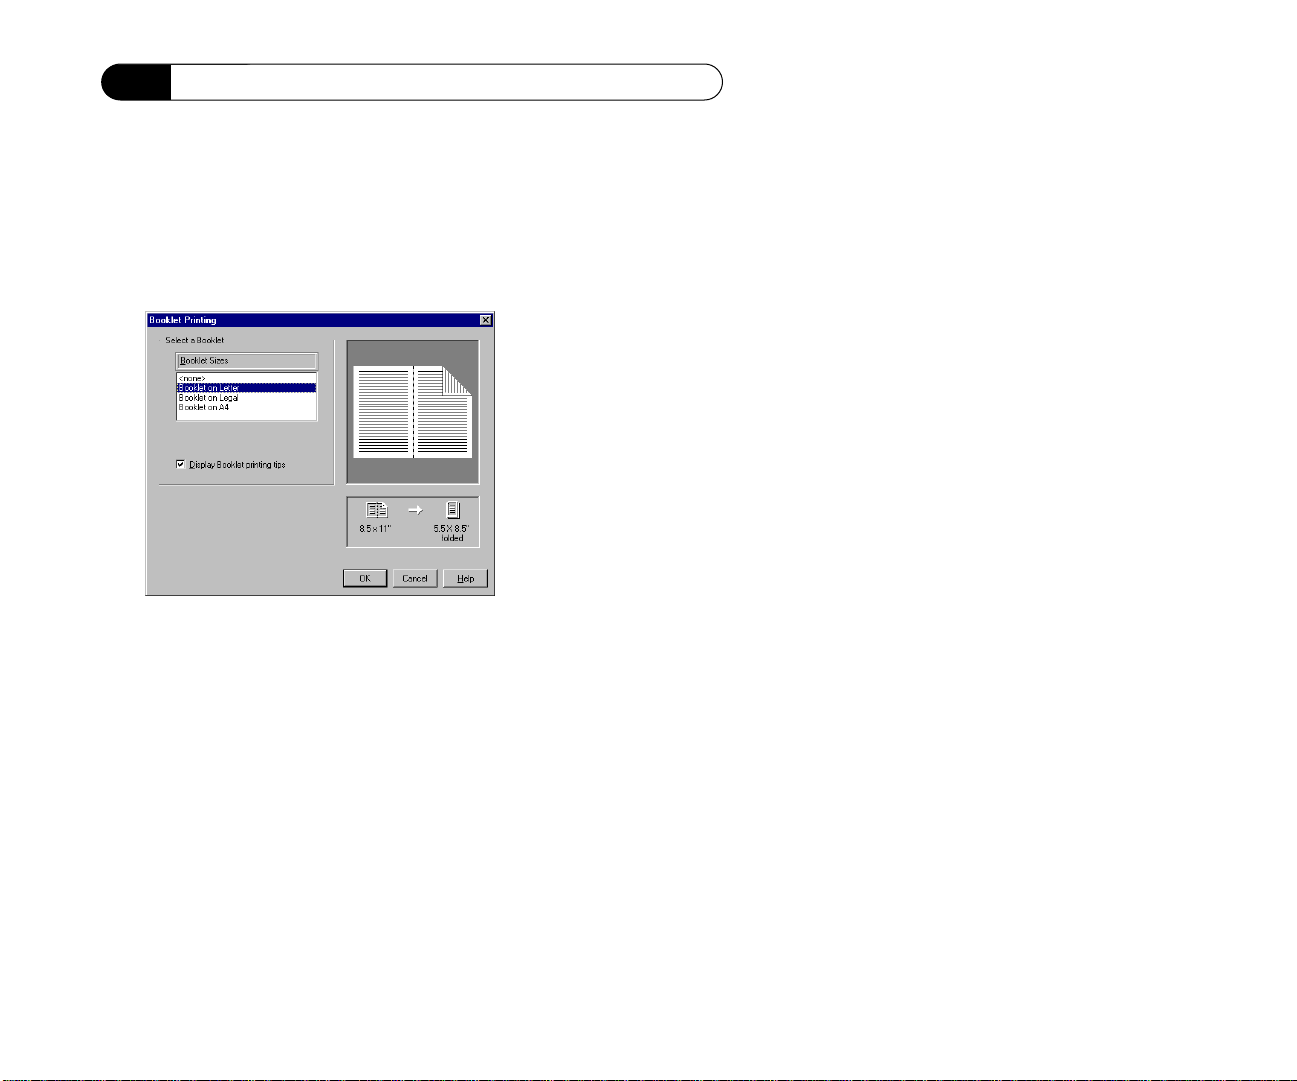
1. Click the Booklet Printing button. The Booklet
Printing dialog box appears.
2. Select the Booklet paper size you want to use
from the list of Booklet Sizes.
You have a choice of three Booklet paper sizes:
Booklet on Letter, Booklet on Legal, or Booklet on A4.
Choose the paper size that matches your paper.
As you highlight different Booklet paper sizes, the
preview area at the right changes to show how the
booklet will look. The area beneath the preview
gives the dimensions of the selected paper stock
and the size when folded.
Note: Although you can print a booklet
simply by selecting a Booklet paper size in
your Windows program without selecting
one in the SuperScript 1260 Windows
Printer Driver, we suggest you select a
Booklet paper size in both the driver and
the Windows program until you are familiar with Booklet printing. This will allow
you to use the driver’s booklet preview
feature and help screens.
3. To get on-screen instructions for Booklet printing, select Display Booklet printing tips. We
strongly recommend that you select this
option until you are familiar with Booklet
printing.
4. When your Booklet printing settings are
complete, click OK. If you selected on-screen
instructions, read the instructions and click
OK.
5. When you choose a booklet paper size, 2sided printing is automatically turned on. The
2-sided dialog box accessed from the setup tab
provides additional options. Select Print
instruction sheet (recommended) and/or Display
help messages. These settings are turned on by
default. We strongly recommend you select
both until you are familiar with 2-Sided printing. Click OK.
3-14 NEC SuperScript 1260 User’s Guide

Setup Tab
6. In the Windows program you want to print
your booklet from, prepare the booklet
document. Set margins and fonts as you want
them to appear in the booklet.
Remember that each booklet page will be one-
half as large as the sheet it is printed on and
you may not want the same size margins as
when you print on a full sheet. For example, if
you select booklet on letter, your page size
needs to be 5 1/2” X 8 1/2”. You may want to
select 1/4” margins to allow space for the text
of your document.
If you are printing an existing document as a
booklet, your document will be automatically
reformatted when you select the booklet
paper size. You may need to adjust the
margins and check the formatting for this new
booklet size.
7. Important: In your Windows program, select
the Booklet paper size you want to use. (You
must complete this step in order for your document to print as a booklet.)
Windows programs have different ways to
select a paper size. Frequently, the paper size
is changed on a Print Setup or Page Setup
dialog box invoked from the File menu. You
may need to consult your program’s manual
or help system to learn how to select a paper
size.
When you select a Booklet paper size in your
program, you’ll notice that the document is
automatically reformatted to reflect the new
size. (However, you may need to make
adjustments to the size of your text and
margins.)
Note: In some programs such as
Microsoft PowerPoint, you cannot set
paper size to Booklet in the file or page
setup dialog boxes. Therefore, you cannot
use these programs to successfully perform Booklet Printing.
8. When ready, print your document. The SuperScript 1260 Windows Printer Driver
will print the first side of the booklet pages,
with an instruction sheet. For Booklet Letter,
the printed paper will exit through the rear
slot or Face-up output tray. For Booklet Legal,
the paper will exit to the main output tray on
the top cover.
9. After the first side has printed, the printer will
pause and wait for you to reinsert all the
pages in the Multi-purpose tray or cassette
according to directions on the instruction
sheet. Press the On Line button. When
finished printing, you can fold the pages to
complete the booklet.
3-15

Chapter 3 : SuperScript Software
Paper Source Tab
The settings in the Paper Source tab allow you to
control the paper size and paper source that will
be used for your print jobs. The Paper Source tab
includes these settings:
• Paper Source Selection
• Paper size
The printer picture at the right of the dialog box
shows the printer and the paper source that is currently selected.
Note: If you have purchased additional
accessories for your printer, like the 500Sheet cassette, you must select this
option from the Accessories tab in order
for the option to be selectable from the
driver. (See the Accessories tab explanation later in this chapter.)
The Summary area at the bottom of the dialog box
reports the current settings.
Each of the settings of the Paper Source tab is
described below.
Paper Source Selection
This setting enables you to use a different paper
source for the first page of a print job than for the
remaining pages. For example, you can use this
feature to print on letterhead stationery for the
first page and plain paper for the rest of a
document.
Choose Use same paper source for all pages if you do
not want to use a different paper source for the
first page than for subsequent pages. Then choose
the desired paper source in the area below the
Paper Source Selection box.
Choose Different paper source for first page (e.g., let-
terhead) if you want to use a different paper sour ce
for the first page of your document. You can then
3-16 NEC SuperScript 1260 User’s Guide

Destination Tab
specify the two paper sources by clicking on the
First Page Source and Other Pages vertical tabs.
Paper Size
Select from the list of supported paper sizes: Letter, Legal, A4, Executive, B5, Booklet on Letter,
Booklet on Legal, Booklet on A4, Com10 Envelope, Monarch Envelope, DL Envelope, and C5
Envelope.
The list of paper sizes displayed depends on the
Paper Source you choose. For instance, if the
Envelope cassette is selected, only envelope sizes
will be displayed in the list.
(You can choose to include U.S. or international
paper sizes, or both, in the list of paper sizes. Use
the Paper Sizes setting in the Advanced tab.)
Selecting a paper size from the list that starts
with “Booklet” (such as “Booklet on Letter”)
activates the SuperScript 1260 Windows Printer
Driver’s Booklet printing feature. For information
on this feature, see Booklet Printing in the Setup
Tab section, above.
Destination Tab
The Destination Tab allows you to choose the
output of your print job.
Output Settings
If the Output Settings is set to Printer , the print job
is sent to your printer. If you want to send the
print job to a file for printing later, click Print to
file. You will be prompted for a file name when
you print. Note that the file you create when you
print to file can only be printed on a SuperScript
1260 printer. To print the file later, copy the print
file to the printer. To copy this file to the printer,
use the DOS copy command. For example:
Copy /b filename.prn lpt1:
Note: The paper size setting in a
Windows program may override the
paper size setting in the SuperScript 1260
Windows Printer Driver.
3-17

Chapter 3 : SuperScript Software
Output Tray
The NEC SuperScript 1260 printer has two possible paper output selections: the Main output tray
(on top) and the Face-up output tray (if installed)
or Rear slot. If you have purchased the Face-up
output tray, you will need to notify the print
driver by adding it via the Accessories tab (see
Accessories tab later in this chapter).
If the Face-up output tray has not been installed,
the button labeled “Face up tray,” will be labeled
“Rear slot” instead. This output choice is useful
for thicker paper, labels, and transparencies
because the paper path runs straight through the
printer.
Note: This option is not available for
legal size paper.
The summary area at the bottom of the dialog box
reports current settings such as paper size and
source.
Image Control Tab
The settings on the Image Control tab allow you
to fine tune your image quality, and to balance
print quality and print speed. The Image Control
tab includes these controls:
• Imaging Mode: choose the mode used to print
the job.
• Halftone features: choose the way the printer
will render graphic images and grays.
• Darkness: darken or lighten the printing of
grays in graphic images.
• Sharp Edge Technology: choose whether to
smooth both curves and diagonal lines.
Settings in the Image Control tab are described
below.
Imaging Mode
The SuperScript 1260 Windows Printer Driver can
image the page in several different ways. The
Imaging Mode area lets you fine tune your image
quality and manage the trade-off between print
quality and print speed.
3-18 NEC SuperScript 1260 User’s Guide

Image Control Tab
Note: Not all image files will print
correctly in all modes. For best results, try
each of the three manual modes. Also, try
printing your image with Color smoothing
(described in “Halftone Features”) turned
off.
Automatically select best imaging mode
Choose this option to have the driver select the
imaging mode based on the program that is printing the document. This option will print most
print jobs correctly.
Manually select imaging mode
• Choose Optimize for text & spreadsheets to
ensure that print speed is fastest when printing documents that contain lots of horizontal
and vertical lines, such as spreadsheets or
tables and text.
• Choose Optimize for graphics and photos to
ensure that documents with graphic images
print at their best quality. In this mode, everything except for fonts is sent as graphic data.
This reduces the amount of data sent to the
printer for complex pages, and may produce
better output in some instances.
• Choose Image entire page as graphic to ensure
the best possible match between what you see
on the screen and what is printed. When this
option is selected, the entire page, including
fonts, is sent as a single graphic image to the
printer. This is slower, but in some cases may
produce more accurate matching between
printed output and the screen than the other
modes.
Halftone Features
The SuperScript 1260 Windows Printer Driver lets
you fine-tune the way colors in graphics images
are converted to gray dot patterns.
Choosing Optimize for laser print output improves
the quality of graphics printing by using specially-optimized grayscale patterns to print
graphics. Choosing this option gives you two further choices:
• Fine which provides smoother grays and fills.
• Standard, faster output may result in coarser
grays, but faster printing.
Choosing Optimize for photocopy reproduction uses
a circular half-tone dot method for reproducing
grays. This produces better final results if you will
be photocopying your printed pages.
The Color smoothing option speeds up printing by
substituting an appropriate gray for colors which
are represented on-screen by a mix of two
3-19

Chapter 3 : SuperScript Software
different color pixels. In most cases you won’t
notice any difference in the printed output. However, in rare instances, some regions of graphics
with areas of fine detail may look smeared when
printed. If this happens, uncheck color smoothing
to remove the smearing effect.
Darkness
Move the slider to lighten or darken grays overall.
This only applies to graphic images.
Sharp Edge Technology
The SuperScript 1260 features Sharp Edge
Technology, NEC’s technology which detects and
smooths jagged edges of characters and diagonal
lines. It works by filling in corners and jagged
edges with smaller and more precisely placed
dots, thereby smoothing the edges.
We recommend that you leave Sharp Edge Technology turned on so that you can take advantage
of its ability to improve the print quality of both
text and line art.
printer. If you have purchased options for your
printer, you will need to add them here in order
for the options to be accessible elsewhere in the
driver.
• To install an option, you highlight it and click
the Add button. The option is added to the
Options installed for your printer box.
• When an option is installed, the picture at the
right updates appropriately. All other pictures
of the printer (in other tabs) will automatically
update and your new options will now be
selectable.
Accessories Tab
The Options you can add list will contain the com-
plete list of options that are available for your
3-20 NEC SuperScript 1260 User’s Guide

Advanced Tab
• To remove an option from the “installed
options” list, you highlight it and click the
Remove button.
Note: Removing the 500-Sheet cassette
option from the Installed Options List also
removes the Envelope cassette from that
list because the Envelope cassette
requires the presence of the 500-Sheet
cassette.
Memory Currently Installed
The Printer memory box shows the amount of
additional printer memory installed.
If your printer is directly connected to your PC via
the parallel port, the SuperScript 1260 Windows
printer driver will usually be able to determine
and display how much memory is installed in
your printer. If your printer is not directly connected (e.g., if you are using a printer sharing
device or printing through the network), you
need to set the amount of additional memory
installed in the printer yourself. If you have
added additional memory it is recommended that
you select this amount in order to optimize printing. Check how much memory is installed by
pressing the test button on your printer’s operator
panel to print a settings page.
Advanced Tab
The Advanced tab includes:
• Printer Memory, which lets you turn Adobe
Memory Booster Technology™ on or off.
• Paper Sizes, which lets you choose which
paper sizes (U.S., international, or both) you
want to be available.
• The Multilanguage font support check box (in
Windows 95).
• The Printer Administration button that
launches a dialog box that changes your
printer settings such as Energy Saving timeout.
3-21

Chapter 3 : SuperScript Software
The settings available on the Advanced tab are
described below.
Print Memory
Adobe Memory Booster Technology™
Your SuperScript 1260 features Adobe Memory
Booster, an advanced printer technology that
effectively triples your printer’s memory, allowing you to print complex documents that traditional printer architectures would fail to print.
Adobe Memory Booster Technology™ ensures
that pages will print even if they are very complex
or use a lot of printer memory. If the page is too
complex (i.e. has a lot of rules, graphics, or very
dense text), Adobe Memory Booster will automatically use some printer memory in an attempt to
simplify the page without any loss of output quality. If the page is too large to fit in memory (or, in
some instances, if simplifying a complex page has
used up too much memory), Adobe Memory
Booster will automatically compress the page to
fit in memory. In this case, you may notice some
loss of resolution in graphics on your printed
page. If your printer is directly connected to your
computer, and you are running the Status Monitor, you will be notified if the page was not
printed at the resolution set in the printer driver.
We recommend you leave Adobe Memory
Booster turned On so that you can take advantage
of its ability to print even your most complex
pages.
Paper Sizes
Use this setting to select which paper sizes are
available and displayed in the paper size list box
of any Windows application and in the Paper
Source tab of the SuperScript 1260 driver. Choose
Show all paper sizes if you want both U.S. and international sizes to be available for printing. Choose
Filter the paper size list and Only U.S. sizes (e.g. Letter) or Only International sizes (e.g. A4, B5) to limit
the paper size options that are available. This is
useful, for example, if you only print on U.S. sizes
–it allows the driver to display only the sizes you
use.
Multilanguage Font Support (Windows 95 only)
Select Multilanguage font support for proper
printing of a character set which contains more
than 256 characters. Typically, Central-European,
Cyrillic, Baltic, Greek, and Turkish-based languages include more than 256 characters. Printing
may be a bit slower when this option is enabled.
This option is only available in Windows 95.
3-22 NEC SuperScript 1260 User’s Guide

Advanced Tab
Printer Administration
Selecting the Printer Administration… button
brings up the following dialog box:
Consult your network administrator before
changing the settings in this box. The new settings
will take effect as soon as you press O.K.
Timeout Settings
Auto-continue–This setting determines how the
printer responds if it senses a complexity or
memory overflow error. Options are:
On: A printer message appears on the status
monitor, but printing continues. If the error
was due to complexity or memory overflow
after the problem page has been ejected from
the printer, the remainder of the document
may be printed depending on the error that
occurred. This is the default setting for the
SuperScript 1260 printer.
Off: A printer message appears on the
operator panel and Windows Status Monitor.
Printing stops until you correct the problem.
Note: When a SuperScript 1260 is
connected to a network, Auto-continue
should be set to On in order to prevent
jobs from backing up in the print queue.
Jam recovery–Jam recovery is a feature that
allows the printer to reprint a page after it has
jammed. Jam recovery can be set to On or Off (the
default). When it is set to On, the printer will
automatically attempt to reprint the lost page
after a jam is cleared.
The SuperScript 1260 will always reprint any page
incompletely imaged due to a paper jam. Turning
Jam recovery on will set aside memory so that the
printer may also be able to recover jammed pages
which have completed imaging.
3-23

Chapter 3 : SuperScript Software
Note: Jam recovery will not function if
you turn off the printer power before
clearing the paper jam.
Wait timeout–This setting defines the time that
the printer waits between blocks of data coming
from the computer before it considers the job
complete and processes what is in the print buffer.
The Wait timeout can be any time between 1 and
255 seconds. The Wait timeout default is 40 seconds. For most text applications this is adequate.
If you plan on generating very complex pages,
you may want to increase the Wait timeout.
Manual Feed/Duplex timeout–This setting is
used to determine the length of time the printer
will wait for paper to be manually fed before pulling paper from the cassette. It may be set to OFF
to tell the printer to wait indefinitely. The default
setting is 255 seconds and should be left on if the
printer is connected to a network.
Energy Saving
Checking Enable Energy Saving allows your
printer to reduce power consumption to a minimum during inactive periods. It will set your
printer to power down after a specified time of
inactivity. This will save energy when you are not
using your printer . To “wake” the printer up press
the On Line button, press resume in the
maximized status monitor or send a print job to
the printer.
You can adjust the setting for the number of minutes before the printer powers down by entering
any number between 1 and 255 in the minutes
field.
3-24 NEC SuperScript 1260 User’s Guide

Windows Status Monitor
Overview
This chapter explains the Status Monitor for the
NEC SuperScript 1260 laser printer. It includes:
• Loading the Status Monitor
• The mini-window and icon view of the Status
Monitor
• The maximized Status Monitor
• Changing the Windows default printer
• Visual and sound alerts
4
4-1

Chapter 4 : Windows Status Monitor
Introduction
The SuperScript 1260 Status Monitor gives you
many features to monitor your printer and print
jobs, including:
• Continually checks the status of the printer to
provide you with visual and audible feedback
on the printer and your print jobs.
• Lets you pause or resume printing, or quickly
cancel printing.
• Lets you print pages that demonstrate printer
features or show printer information.
• Gives you a quick way to change your default
Windows printer.
• Provides instant access to the SuperScript 1260
Windows Printer Driver and its special
features, and to the Windows Print Manager
(in Windows 3.1x).
The SuperScript 1260 Status Monitor shows you
everything you need to know about your printing. When there is a problem (such as running out
of paper), it becomes visible and reports the difficulty. It can even notify you about the problem
with a sound alert.
When everything is going fine, the SuperScript
1260 Status Monitor stays quiet and out of the
way, ready to provide details of your printer and
print job status at your request. You control when
and how it informs you of printing conditions
through the Alerts tab.
A Note About Bidirectional Communication…
The level of features and the level of status information available from the Status Monitor
depends on the type of connection established
with your printer . If your SuperScript 1260 printer
is directly connected to your computer, you will
be able to establish bidirectional communication,
by using a high quality bidirectional parallel
cable. (Due to differing serial port designs, you
may require a IEEE certified cable.) This enables
you to pause, resume, and reset your printer from
the Status Monitor. If you are sharing your SuperScript 1260 printer via a printer sharing device,
features like pause, resume, and reset will also be
available, although only from the printer’s operator panel, not via the Status Monitor. The section
below describes the various levels of printer
status.
4-2 NEC SuperScript 1260 User’s Guide
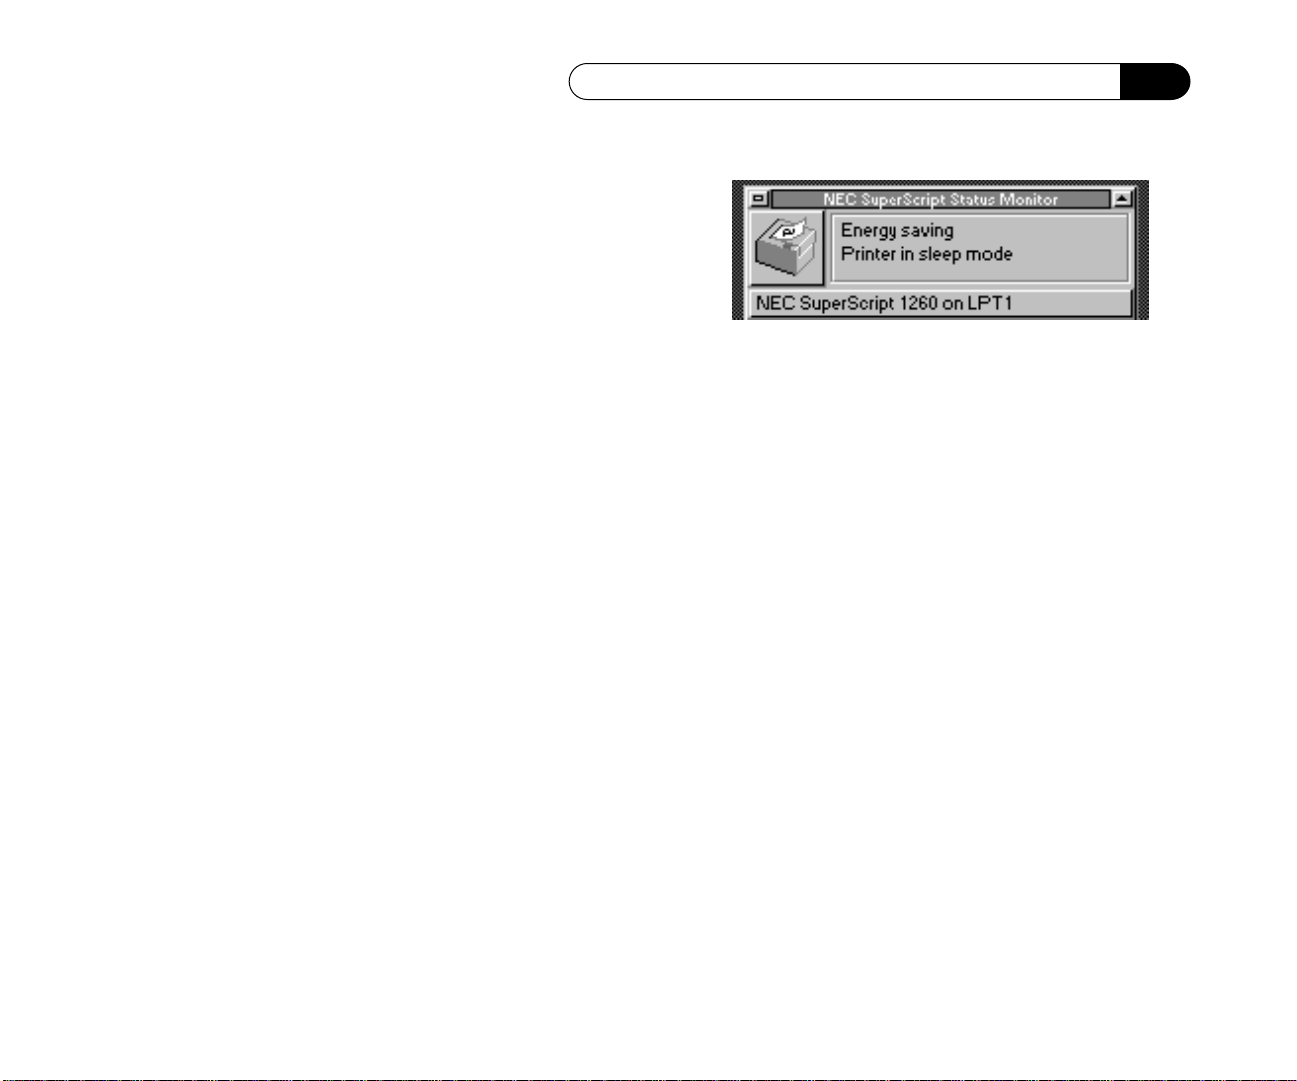
What is Printer Status?
Your printer receives data from your computer
over the printer cable. Your printer can also send
data back to the computer to report on a number
of aspects of printer operations. This data is
referred to as printer status.
The SuperScript 1260 Status Monitor continually
monitors this printer status information to keep
you informed of what’s happening with your
printer . The detail of printer status depends on the
way the printer is connected to the computer.
• If the default printer is a SuperScript 1260
printer and it’s directly connected to your
computer with a bidirectional parallel cable,
the printer status information is very detailed,
even pinpointing the specific nature of most
printer errors. This is because the SuperScript
1260 printer supports continuous bidirectional
communication with the computer.
• If a SuperScript 1260 printer is connected with
a print sharing device, less detailed but still
very useful printer status information is available, including printer error, paper out, busy, or
ready.
• If a non-SuperScript 1260 printer is connected,
no status information is available.
What is Printer Status?
Loading the Status Monitor
During a standard installation, the SuperScript
1260 Status Monitor is set to load
automatically whenever you run Windows.
If, during custom installation, you choose not to
load the SuperScript 1260 Status Monitor automatically, you can load it at any time by doubleclicking its program icon in the NEC SuperScript
program group.
If, after installing the SuperScript 1260 Status
Monitor , you want to change the way it loads, you
can do so using the Preferences tab in the maximized SuperScript 1260 Status Monitor , described
below.
Note: For best results, disable or
uninstall other printers’ status monitors
on your system before loading the SuperScript 1260 Status Monitor.
4-3

Chapter 4 : Windows Status Monitor
Minimized V iews
By default, the SuperScript 1260 Status Monitor
appears on your desktop as a mini-window.
Using the Preferences Tab you can
change the SuperScript 1260 Status
Monitor to appear as either an icon
Windows 3.1x
and allow you to instantly access the maximized
SuperScript 1260 Status Monitor window with its
extensive collection of status reporting and
printer control features.
in Windows 3.1x or as an indicator
on the Windows 95 taskbar. All
three report your printer’s status,
The mini-window supports drag-and-drop
printing from Windows 95 Explorer or from File
Manager in Windows 3.1x and similar programs.
To use drag-and-drop printing, you’ll need to
associate the Windows pr ograms that will be used
to print your jobs with the file extensions of the
files you want to print, as described in the File
Manager, Explorer or other program’s documentation.
Features of the Mini-Window View
The mini-window reports the current printer and
port on the bar at the bottom, as illustrated below.
Clicking the bar once brings up a list of all of the
available Windows printers (including the SuperScript 1260).
Windows 95
4-4 NEC SuperScript 1260 User’s Guide
To select one of the printers on the list as the
default Windows printer, click it once. The newlyselected default printer’s name and port will
appear on the bar at the bottom of the miniwindow.

Features of the Mini-Window View
To access the setup dialog box for the currentlyselected Windows printer, double-click its name
on the bar at the bottom of the mini-window.
You can also use the control menu to go to the
printer chooser or the printer setup dialog box for
the current default printer. If you are directly connected to your SuperScript 1260, you will have the
option of pausing and resetting the printer from
the control menu.
Click on Change Printer
to bring up the printer
chooser which displays
a list of all available
Windows printers.
Features of the Icon View in Windows 3.1
The SuperScript 1260 Status Monitor in Windows
3.1x icon view takes up very little screen space but
still provides information and control over your
printer. By contrast, in Windows 95 this view is
located on the Taskbar.
Click once on the icon to get a
control menu which allows you to
maximize, move, or close the
Status Monitor. You can also use
the control menu to go to the
printer chooser or the printer
setup dialog box for the current
default printer. If you are directly connected to
your SuperScript 1260, you will also have the
option of pausing and resetting the printer from
the control menu.
Click on Change Printer to bring up the printer
chooser which displays a list of all available
Windows printers. You can select a different
printer as the default by clicking its name on the
list.
4-5

Chapter 4 : Windows Status Monitor
Sound Alerts
In addition to visual status the SuperScript 1260
Status Monitor can provide audible warnings of
printer errors and status such as paper out or
print job complete. The Alerts tab of the maximized SuperScript 1260 Status Monitor window,
described below, lets you control audible alerts.
Accessing the Maximized Status Monitor
To maximize the Status Monitor, double-click the
icon (in Windows 3.1x), single-click on the Status
Monitor in the task bar (in Windows 95), or
double click on the mini-window . The SuperScript
1260 Status Monitor will be maximized and show
the tabs illustrated above. You can use its full
range of status reporting and printer control
features.
The Maximized Status Monitor
When the SuperScript 1260 Status Monitor is maximized, all its features are available from four tab
dialog boxes: General, Change Printer , Alerts, and
Preferences.
When you maximize the SuperScript 1260 Status
Monitor the General tab is visible. To access the
features of any tab dialog box, just click its tab.
Each tab is described in a separate section below.
General Tab
The General tab provides several frequently-used
features, including:
• Displays detailed information about your
printer status
• Lets you quickly access the default printer
driver’s Setup dialog box, and the Windows
Print Manager in Windows 3.1x, if it is
currently enabled
• Provides access to printer details (if you’ve
selected the SuperScript 1260 as your default
printer)
• Allows you to pause or resume printing if you
are directly connected to your printer and
have bidirectional communication enabled
4-6 NEC SuperScript 1260 User’s Guide

The Maximized Status Monitor
• Lets you reset the printer to “kill” a print job
instantly and clear the printer’s memory
General Tab Windows 3.1x
These features are described in detail below.
Printer Status Area
This area shows the status icon and complete
printer status for the default printer.
Pause Printer/Resume Printer
Click this button to pause your printing. If a job is
printing, it will stop after the current page has
printed. The printer will not accept any more data
when printing has been paused.
When you have paused printing, the button will
read Resume Printing. Clicking Resume Printing
will restart the print job, or will instruct the
printer to start accepting data again.
For example, you might pause printing a big job
to make sure the right kind of paper is loaded.
After confirming the paper is right, you can click
Resume Printing to continue the print job.
Note: The Pause Printing/Resume
Printing buttons are only available for
SuperScript 1260 printers that are
connected directly to your computer.
General Tab Windows 95
Reset Printer
Click this button to reset your printer or clear the
current print job. If no job is printing, the printer’s
memory will be cleared. If a job is printing, it will
4-7

Chapter 4 : Windows Status Monitor
be cleared, that is, the current page will be
printed, and the rest of the job will be cancelled.
Reset will also clear any print jobs that are in the
printer (but haven’t begun printing yet).
You can use the Reset button to “kill” a print job
that you do not want to print.
Note: The Reset Printer button is only
available for SuperScript 1260 printers
that are connected directly to your
computer.
Printer Setup
Clicking this button displays the printer driver
setup dialog box for the current default Windows
printer. See “SuperScript 1260 Windows Printer
Driver” in Chapter 3 for more information on the
driver.
Print Manager in Windows 3.1x
Clicking this button displays the Windows Print
Manager. Print Manager must be enabled (from
Windows Control Panel, Printers) for this button to
be active.
Printer Info
Clicking this button brings up the Printer Info dialog box. (This button is available only if the current default printer is a SuperScript 1260 printer.)
4-8 NEC SuperScript 1260 User’s Guide
These features are available from the Printer Info
dialog box:
Printer Details Area
The area at the upper left gives you information
on your printer , for example: name, manufacturer,
and usage history (this information will be more
detailed if the default printer is a SuperScript
1260, connected directly to your computer).
Print Demo Page
Click the Print Demo Page button to print a page
highlighting your printer’s features, capabilities,
and benefits.

The Maximized Status Monitor
Print Settings Page
Click Print Settings Page to print a page which
shows your printer’s model, version, installed
memory, and other information.
Change Printer Tab
The Change Printer tab provides a quick and easy
way to change the Windows default printer.
The Change Printer tab contains these settings:
Current Default
The name of the current Windows default printer
is shown highlighted in this tab.
List of Available Printers
The scrolling list in the center of the tab shows the
available Windows printers. It also shows the
current port connection for each printer and
whether the printer is connected locally or
through a network.
As you move the highlight through the list of
available printers, the current status of each
printer is shown in the Status area below the list
of available printers.
Set as Default
Click the Set As Default button to make the
currently highlighted printer the Windows
default printer.
Status Area
This area reports the status of the currently highlighted printer on the list of available printers.
Alerts Tab
The Alerts tab lets you control how and when the
SuperScript 1260 Status Monitor alerts you during
printing.
4-9
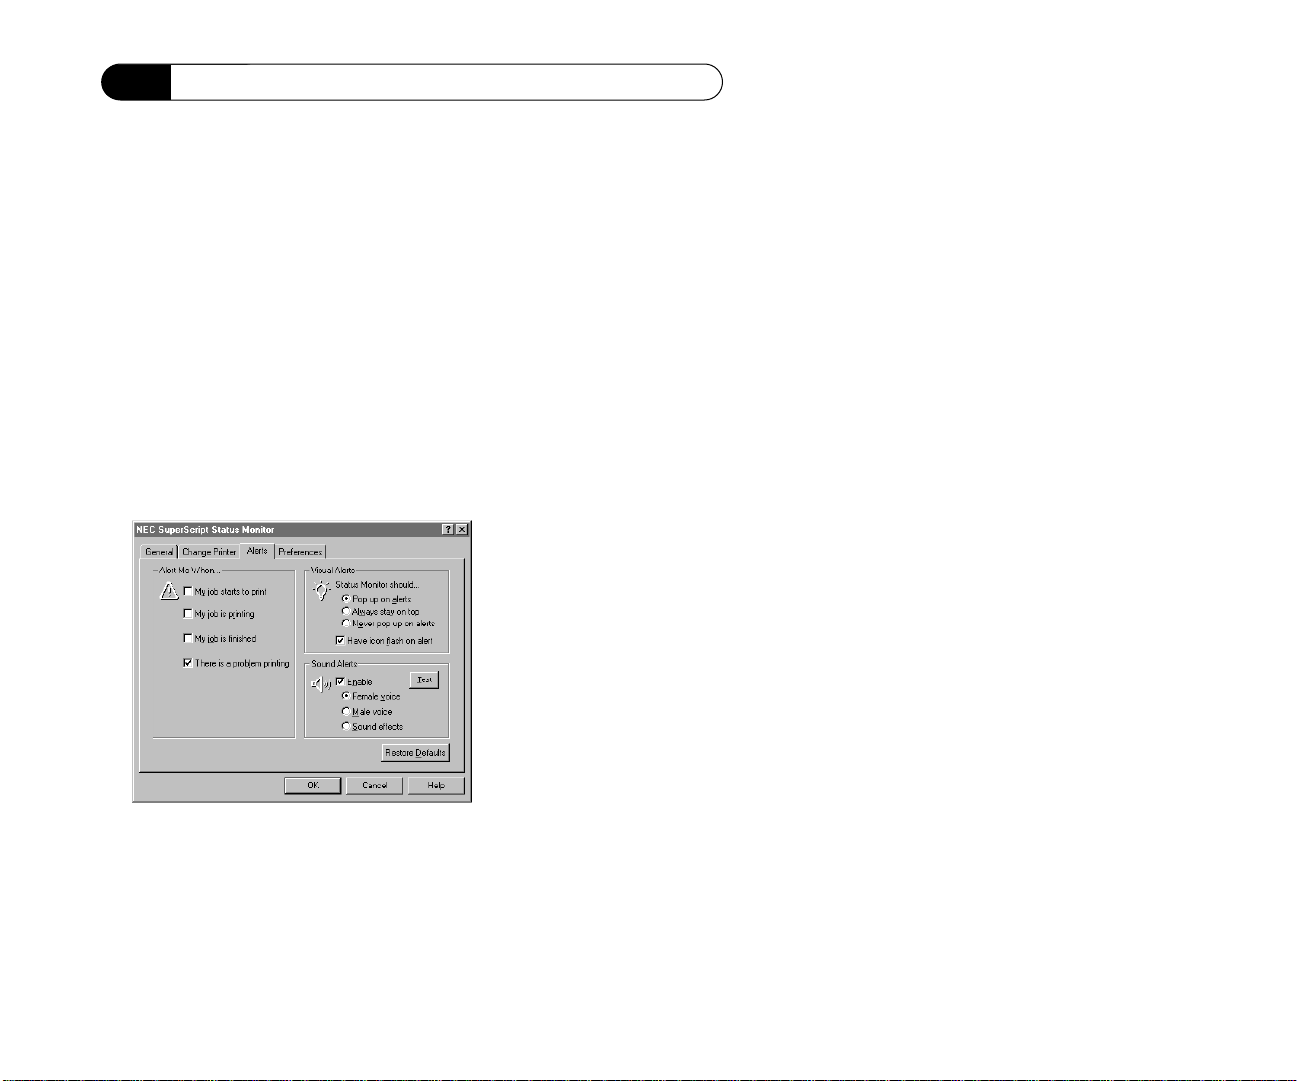
Chapter 4 : Windows Status Monitor
These options are available:
Alert Me When
You can choose which printing events will cause
the SuperScript 1260 Status Monitor to alert you.
You can choose any or all of the
following events:
• My job starts to print
• My job is printing
• My job is finished
• There is a problem printing
Visual Alerts
This area gives you control over the behavior of
the mini-window or icon view (in Windows 3.1x)
on your desktop.
Pop up on alerts
If you select Pop up on alerts, the SuperScript 1260
Status Monitor mini-window or icon will pop up
over other Windows programs. You can see the
text message reporting the alert condition.
Always stay on top
If you select this option, the mini-window or icon
will always remain visible, whether or not there is
an alert. Of course, if a printing condition occurs,
the mini-window, icon or task bar will report it.
Never pop up on alerts
If you select this option, the mini-window or icon
will not pop up to alert you.
Have icon flash on alert
Choose this option if you want the icon to flash
when there is an alert.
Sound Alerts
This area provides options for the audible alerts
the SuperScript 1260 Status Monitor can provide
if you installed sounds during installation and
you have a sound driver installed. (A sound
driver will be installed if needed under Windows
3.1x.)
4-10 NEC SuperScript 1260 User’s Guide

Enable
Choose Enable if you want sound alerts. You must
have a sound card and driver , or a softwar e sound
driver installed. If you enable sound alerts you
can choose the type of alert you want:
• Female voice
• Male voice
• Sound effects
The Test button lets you hear the type of sound
alert that is currently selected.
Restore Defaults
Click this button to restore all of the default settings for the Alerts tab.
Preferences Tab
The Preferences tab lets you choose how you want
the SuperScript 1260 Status Monitor to be minimized, and whether the SuperScript 1260 Status
Monitor will load automatically on Windows start
up.
The Maximized Status Monitor
Preferences Tab Windows 3.1x
Preferences Tab Windows 95
4-11

Chapter 4 : Windows Status Monitor
Minimized Status Display in Windows 95
The currently selected minimized view is shown
on the right of the tab. These are the available
choices:
Display as Mini-Window
Choose this option if you prefer the mini-window
as your minimized SuperScript 1260 status
monitor view. The mini-window provides more
room for text display of printer status, and reports
which printer is currently selected as the default.
If you select the mini-window view, you can
choose the font size you want for the status text.
Display as Icon in Windows 3.1x
Choose this option if you prefer the icon view.
Display on Taskbar in Windows 95
Choose this option if you prefer the SuperScript
1260 Status Monitor viewed on the taskbar.
Automatically Load Status Monitor
When Windows Starts Up
Choose this option if you want SuperScript 1260
Status Monitor to load automatically when
Windows starts. If selected, a load command is
added to the load = line in your Windows
WIN.INI file.
The load command is: load=asistat
About
Click this button to get copyright and version
information about the SuperScript 1260 Status
Monitor.
Restore Defaults
Click this button to restore all of the default settings for the Preferences tab.
4-12 NEC SuperScript 1260 User’s Guide

DOS Printing
Overview
This chapter explains printing from your SuperScript 1260 printer while in the DOS environment.
It includes the following subjects:
• The DOS printing utilities
• Printing from DOS
• Installing DOS software
• DOS printer control panel
• DOS Status Monitor
• Using the DOS Status Monitor
5
5-1

Chapter 5 : DOS Printing
The DOS Printing Utilities
The “Printer Drivers and Utilities for Windows
3.1x and Windows 95” software disk included
with your SuperScript 1260 printer contains two
utility programs for the DOS environment that
provide a number of printer control and monitoring features. These programs are:
• The DOS Control Panel: a program you run
from the DOS prompt which enables you to
specify a number of printer settings and to
print sample pages.
• The DOS Status Monitor: a memory-resident
(TSR) program that can pop up in DOS
programs to give you real-time feedback
about your printer’s status, as well as
enabling you to pause and resume printing,
reset the printer, or eject a page.
These two programs are primarily useful to DOS
users who do not use Microsoft W indows. Many of
the functions of the SuperScript 1260 DOS
printing utility programs are also available in the
SuperScript 1260 Windows Status Monitor and
Windows Printer Driver.
Note: Some of the printer settings can
only be changed using the DOS Control
Panel. These settings include:
default font, default symbol set, lines per
page, horizontal offset and vertical offset.
These settings will not override your
application settings and are explained in
the section below called “Change Printer
Settings.”
The DOS Status Monitor and Printer Control
Panel are designed to work seamlessly with each
other and with the SuperScript 1260 Windows
Status Monitor. This seamless interaction is possible because the DOS and Windows programs
share the same configuration file. If you are printing from a DOS application within W indows, you
should rely on the Windows Status Monitor not
the Dos Status Monitor because Windows is controlling your print job.
Printing from DOS Programs
When you print from DOS programs, your SuperScript 1260 printer automatically uses LaserJet IIP
emulation mode. When printing from a DOS program, you must select the LaserJet IIP as the
installed printer if your program gives you a
choice.
5-2 NEC SuperScript 1260 User’s Guide

Installing DOS Software Only
Installing DOS Software Only
To install the SuperScript 1260 DOS software (for
example, if you don’t use Windows), you can
manually copy the software from the ”Printer
Drivers and Utilities” diskette to your hard drive:
1. From the DOS prompt, create a directory on
your hard drive for the DOS software (for
example: \necdos):
Type md c:\necdos and press e
2. Change to the directory you have just created:
Type cd c:\necdos and press e
3. Copy the SuperScript 1260 DOS program files
N1260CP.EXE, N1260CP.HLP and
N1260SM.EXE from the “Printer Drivers and
Utilities” diskette:
Type copy a:\n1260cp.exe and press
e
Type copy a:\n1260cp.hlp and press
e
Type copy a:\n1260sm.exe and press
e
DOS Printer Control Panel
The Printer Control Panel is a DOS program that
lets you change a number of printer settings, print
sample pages, and change the settings of the DOS
Status Monitor.
To run the Printer Control Panel:
From the DOS prompt,
n1260cp and press e.
type
The Printer Control Panel will run and you will be
at the Main Menu, described in the next section.
Main Menu
The Main Menu, which appears when you run the
Printer Control Panel, is used to access sub-menus
where you make changes to printer settings and
choose other options.
To select menu options from the Main Menu highlight up and down with the keyboard arrow keys
and press
e.
5-3

Chapter 5 : DOS Printing
From the Main Menu the following menus are
available:
Control printing (pause, reset, eject)
This menu lets you pause or continue printing,
reset the printer, or eject a page. (Pause and Reset
are only available for SuperScript 1260 printers
connected directly to your computer.)
Change printer settings
This menu lets you change a number of internal
SuperScript 1260 printer settings.
Change LaserJet IIP emulation
settings
This menu lets you select a number of settings
that are used when you print from DOS using
LaserJet IIP emulation mode. This mode is automatically used whenever you print from DOS
software, do a printscreen, or copy a text file to the
printer .
Print sample pages
This menu lets you print two sample pages, one
showing your printer’s internal settings and the
other showing your printer’s internal fonts.
Change Status Monitor settings
This menu lets you change the Hot key used by
the DOS Status Monitor, and choose whether you
want the DOS Status Monitor to provide audible
warnings of printer problems.
Change printer port
If you have multiple printers connected to your
computer , you can use this menu to specify which
printer port your NEC SuperScript printer is connected to.
Exit to DOS
This menu option exits the SuperScript 1260
5-4 NEC SuperScript 1260 User’s Guide

DOS Printer Control Panel
Printer Control Panel and returns you to the DOS
prompt.
Each menu is described below.
Control Printing (pause, reset, eject)
The features on this menu are similar to those
available in the memory-resident DOS Status
Monitor program. They allow you to monitor
your printer’s status and to send several printer
control commands.
started printing be finished. Continue printing
causes the printer to accept input again.
Note: Pause/Continue printing, and
Reset printer choices are only available for
SuperScript 1260 printers that are connected directly to your computer and with
bidirectional communication (not under
Windows).
Reset Printer
Selecting this option sends a reset command to
the printer. This cancels all jobs being processed
by the printer . If any fonts have been downloaded
to the printer, they are cleared.
Eject a page
Selecting this option ejects a page from the printer .
You can use this feature if there is data left in the
printer after printing a text job or doing a print
screen.
Return to Main Menu
This option returns you to the Main Menu.
Pause/Continue Printing
Selecting this option pauses the printer, or continues (restarts) printing if it has been paused. Selecting Pause printing stops the printer from
receiving input, but lets pages that have already
5-5

Chapter 5 : DOS Printing
Change Printer Settings
The choices on this menu let you change a
number of your printer’s internal settings. For
most users the default settings will be satisfactory.
Energy saving timeout
This setting lets you specify how long your
printer will wait without receiving data before
going into Energy Saving Mode. The default setting is OFF. When you activate Energy Saving,
you can choose any value from 1 to 255 minutes.
The On Line light on your printer’s front panel
will blink slowly when the printer is in Energy
Saving Mode. The printer will automatically
“wake” from Energy Saving Mode when it
receives a print job or the On Line button is
pressed.
Adobe Memory Booster
This option lets you turn Adobe Memory Booster
on or off. Adobe Memory Booster is an advanced
printer technology that effectively triples your
printer’s memory, allowing you to print complex
documents that traditional printer architectures
would fail to print. The default setting is on and
we recommend that you leave this on. See page 322 of this manual for more information.
Jam recovery
When jam recovery is turned on, the printer
reserves part of its memory so that it can reprint a
page if there is a printer jam. This causes printing
to be slower. The default setting is off.
Wait timeout
This setting determines how long the printer will
wait for data before ejecting a partially printed
page. You may want to set a longer time if you use
software that pauses for processing for extended
periods during printing (such as some database
programs). The default setting is 40 seconds. You
can deactivate the wait timeout by setting it to off.
Manual feed timeout
This setting determines how long the printer will
wait for you to insert paper from the Multipurpose tray when manual feed has been
5-6 NEC SuperScript 1260 User’s Guide

DOS Printer Control Panel
selected. If you do not insert paper within the
specified period, the printer will print the job
using paper from the paper cassette. The default
setting is 255 seconds. You can also set this timeout
to off, which causes the printer to wait indefinitely
(not recommended for a network printer).
Auto-continue
When auto-continue is on, the printer
automatically resumes printing after most errors.
When auto-continue is off, the printer waits for
you to press the On Line button of the control
panel before it resumes printing. The default
setting is on.
Horizontal offset
The horizontal offset setting allows you to shift
the printing on the page either to the right or left.
You can use this setting to very accurately adjust
the printing position, for example, if you need to
print onto pre-printed forms. Setting a negative
value moves the printing position to the left. A
positive value moves the printing to the right. You
can set a value from -127 to +127. The default
setting is 0 (zero). Each increment is equal to one
three-hundredth of an inch.
Vertical offset
The vertical offset setting allows you to shift the
printing on the page up or down. For example, if
you need to print onto pre-printed forms. Setting
a negative value moves the printing position up
on the page. A positive value moves the printing
down. You can set a value from -127 to +127. The
default setting is 0 (zero). Each increment is equal
to one three-hundredth of an inch.
Save settings, return to Main Menu
Select this option when you have the settings on
this menu set as you want them. The current settings will be sent to the printer and you will
return to the Main Menu.
If you do not want to store the current settings,
you can press
without saving your settings. You can also press
^ to return to the Main Menu
p to restore all settings to their default values.
5-7

Chapter 5 : DOS Printing
Change LaserJet IIP Emulation Settings
This menu lets you specify a number of settings
that affect your print jobs when you print from
DOS, including doing print screens, copying text
files to the printer, or printing from a DOS program that does not have a LaserJet IIP printer
driver.
Note that if you print from a DOS program that
does have a LaserJet IIP printer driver, such as a
DOS word processor, the program’s printer driver
usually overrides any settings on this menu. Be
sure to select LaserJet IIP as your installed printer
if your DOS program gives you a choice.
Print Sample Pages
This menu lets you choose between two sample
pages that you can print:
Printer settings page
Choose Printer settings page to print a page which
shows your printer’s model, version, installed
memory, and other information.
PCL font page
Choose PCL font page to print samples of the
internal fonts included with your printer. These
internal resident fonts are: Courier 12 pt.,medium,
italic, bold; Courier 10pt., medium, italic, bold
and Line printer 8.5pt.
5-8 NEC SuperScript 1260 User’s Guide

DOS Printer Control Panel
For a detailed description of the PCL printer language, the LaserJet IIP Printer Technical Reference
Manual is available through the Hewlett-Packard
Company. Call Hewlett-Packard’s Direct Marketing Division toll free at 1-800-538-8787 or direct at
408-720-2428. In Canada call 905-206-4383.
Return to Main Menu
This option returns you to the Main Menu.
Change Status Monitor Settings
This menu lets you change two settings for the
memory-resident DOS Status Monitor. If you
change one of these settings, the change will take
effect the next time you run the Status Monitor.
default for audible warnings is on.
Hot-key
Choose the hot-key used to pop up the DOS
Status Monitor. The default hot-key combination
is b-a-S. If you want to specify a different
hot-key, you can press any combination of the Alt
key, Ctrl key, left shift key , right shift key, and any
letter or number.
Save Settings, return to Main Menu
Select this option when you have selected the settings on this menu set as you want them. The current settings will be saved and you will return to
the Main Menu.
If you do not want to keep your changes, press
to return to the Main Menu without saving your
settings. Press
p to restore the default settings.
^
Audible warnings
Choose whether you want sound warnings when
there is a printer error such as a paper error. The
5-9

Chapter 5 : DOS Printing
Change Printer Port
This menu lets you specify which parallel port
your SuperScript 1260 printer is connected to. The
port you select is also the port that the DOS Status
Monitor program will monitor. The default
printer port is LPT1.
DOS Status Monitor
The DOS Status Monitor is a memory-resident
(TSR) program that can pop up over DOS programs to give you feedback about your printer’s
status, as well as enabling you to pause/continue
printing, reset the printer, or eject a page.
The amount of status information displayed and
the features available from the DOS Status
Monitor, depends on whether the printer is
connected directly to your computer or through a
printer sharing device:
• Detailed information about print jobs will be
provided as status information if the default
printer is a SuperScript 1260 connected
directly to your computer.
• If a SuperScript 1260 printer is connected with
a printer sharing device, the DOS Status Monitor can still provide some printer status information such as paper error and offline.
• If a non-SuperScript 1260 printer is connected,
no status information is available.
5-10 NEC SuperScript 1260 User’s Guide
Starting the Status Monitor
Installation of the DOS Status Monitor is
described in the section called “Installing SuperScript 1260 DOS software only” above.

DOS Status Monitor
To run the DOS Status Monitor:
1. From the DOS prompt, change to the directory
that contains the DOS Status Monitor (by
default C:\WINDOWS if the standard installation was used):
2. To load the DOS Status Monitor into memory, Type N1260SM and press
3. To pop up the DOS Status Monitor, press its
hot-key combination. By default, the hot-key
is Ctrl-Alt-S.
If you need to change the hot-key because of a
conflict with a DOS program, you can do so using
the Printer Control Panel program as described in
the section called “Change Status Monitor
Settings” above.
Note: Under some circumstances, the
DOS Status Monitor may not be able to
pop up over a DOS program if the program is displaying a graphic screen.
e.
Auto Loading the DOS Status Monitor
You might want to have the DOS Status Monitor
load automatically when you start your computer .
To do this you need to add this line to your
AUTOEXEC.BAT file:
(Substitute the directory location where you
installed N1260SM.EXE if it is not \WINDOWS.)
You can add this line with a text editor like DOS
Edit.
Using the DOS Status Monitor
When you press its hot-key (by default, ba-S), the DOS Status Monitor screen pops up.
Printer Status Information
The name of the SuperScript 1260 printer and the
printer port it is connected to are shown on the
first line of the DOS Status Monitor screen.
Information about the printer’s current status is
shown in the middle of the screen. Depending on
whether or not bidirectional communication is
enabled for your printer and the printer’s current
status, one or two lines of status information are
displayed.
C:windows\N1260SM.EXE
5-11

Chapter 5 : DOS Printing
Printer Control Options
The printer control options are shown below the
printer status information area. To perform an
action, type its letter as indicated on the screen.
P - Pause Printing
Pressing
will stop after the current page. If no job is
printing, the printer will not accept any more data
until you press
C - Continue Printing
If your printer has already been paused, or if it is
waiting for you to take some action, pressing
will continue (restart) the print job.
P pauses printing. If a job is printing, it
C for Continue.
Note: Pause printing is only available for
SuperScript 1260 printers that are
connected directly to your computer.
C
Note: Continue Printing is only available
for SuperScript 1260 printers that are
connected directly to your computer.
R - Resets Printer
Pressing
printer, which clears all data and downloaded
fonts from the printer’s memory.
E - Ejects page
Pressing
eject a page. This is useful, for example, if you do
a print screen from your computer.
X - Exits this menu
Pressing
R sends a Reset command to the
Note: Reset printer is only available for
SuperScript 1260 printers that are
connected directly to your computer.
E sends a command to the printer to
X or ^ exits the DOS Status Monitor.
5-12 NEC SuperScript 1260 User’s Guide

Using the Printer
Overview
This chapter gives you the information you need
when you load paper and begin printing. The
chapter has information about:
• Using the 250-Sheet cassette
• Using the Multi-purpose tray (MP Tray)
• Loading envelopes into the Multi-purpose
tray
• Loading transparencies and adhesive labels
6
6-1

Chapter 6 : Using the Printer
Using the 250-Sheet Paper Cassette
The SuperScript 1260 laser printer 250-Sheet
cassette holds up to 250 sheets of 20 lb paper
(letter or legal), or 50 sheets of standard labels or
transparencies. Refer to Appendix A, “Selecting
Print Media” of this manual for information on
choosing the correct paper types and sizes to use
with this printer.
Note: Use the optional Envelope
cassette or the Multi-purpose tray to feed
envelopes. Do not mix paper types and do
not overfill the cassette.
1. Make sure the printer is not printing. Remove
the 250-Sheet cassette from the printer.
2. Press down on the bottom plate to lock it into
position.
3. Push the side guide handle in the direction of
the arrow printed on the handle and slide the
guide out as far as possible.
6-2 NEC SuperScript 1260 User’s Guide

Using the 250-Sheet Paper Cassette
Guide B
4. Adjust the end paper guides to the desired
paper size:
•Slide end guide A out or in to the desired
paper size.
•Slide end guide B to align with end guide A
(not necessary when set to letter size).
Guide A
5. Insert the stack of paper along the left side of
the cassette.
Make sure the paper goes underneath the
metal clip that is located at the front of the
cassette and underneath the plastic tabs that
are located on the end guides.
6-3

Chapter 6 : Using the Printer
6. Slide the side guide in so it presses lightly
against the edge of the paper stack.
Note: Do not adjust the side guide so
tightly that it bows the paper stack.
7. Reinstall the paper cassette into the printer.
6-4 NEC SuperScript 1260 User’s Guide

Using the Multi-purpose Tray
Using the Multi-purpose Tray
Use the Multi-purpose tray to print transparencies,
labels or envelopes (see note on page 6-2) in addition
to making quick runs of paper types or sizes that are
not currently loaded in the paper cassette.
PAPER TYPE & NAME MAXIMUM STACK CAPACITY AND MAXIMUM STACK HEIGHT
(measured with the stack on a flat surface)
Letter (Xerox 4024DP 20lb) 80 sheets or 3/8"
Envelope (COM #10) 10 envelopes or 3/8"
Transparency (Xerox 3R2780) 40 sheets or 3/8"
Label (Xerox 3R4469) 40 sheets or 3/8"
Note: Wait until the printer has warmed
up and is ready to print before loading
paper into the tray. Do not load paper into
The Multi-purpose tray feeds paper ranging in size from
A4 to Legal 14" and weights ranging from 20lb (75g/
m2) to 50lb (190 g/m2). The following table lists recommended print media and the maximum media stack
height for the Multi-purpose tray.
WARNING! Do not rest your hand or
place heavy objects on the open front
cover or on the open Multi-purpose tray.
the tray while printing a job. Wait until the
printer finishes the run.
6-5

Chapter 6 : Using the Printer
Loading Paper into the Multi-purpose Tray
1. Squeeze and pull to open the front cover.The
Multi-purpose tray then drops down.
2. Pull on the tray tab to fully extend the Multipurpose tray.
3. Select a stack of the print media you want to
feed through the tray.
Make sure you do not exceed the paper
capacity of the tray:
•80 sheets of paper
•40 sheets of transparencies or labels
4. Fan the stack before loading it into the tray.
See page 6–9.
5. Arrange the stack so the side to be printed
faces up.
6. Slide the stack along the left side of the Multipurpose tray and underneath the plastic tab.
7. Slide the paper stack all the way into the tray.
The stack stops when it reaches the feed roll
area of the Multi-purpose tray.
6-6 NEC SuperScript 1260 User’s Guide

8. Slide the Multi-purpose tray side guide in to
the left so it presses lightly against the edge of
the paper stack.
9. Make sure the paper stack is under the side
guide tab.
Using the Multi-purpose Tray
2. Pull on the Multi-purpose tray tab to fully
extend the Multi-purpose tray.
Loading Envelopes into the Multi-purpose Tray
1. Open the front cover.
The Multi-purpose tray drops down when
you open the front cover.
3. Select a stack of the envelopes you want to
feed through the tray.
Make sure you do not exceed the 10 envelope
capacity of the tray.
4. Fan the stack before loading it into the tray.
6-7

Chapter 6 : Using the Printer
5. Make sure all of the envelope flaps are closed.
6. Arrange the stack so the envelope flaps are
face down, and the flap side of the envelopes
are aligned with the left side of the tray.
7. Insert the short end of the stack into the Multipurpose tray, with the flap side of the
envelopes on the left side of the tray, and the
bottom of the envelope stack riding under the
plastic tab on the left side of the tray.
8. Slide the Multi-purpose tray’s right side guide
in so it presses lightly against the edge of the
envelope stack.
9. Make sure the envelope stack is under the side
guide tab.
6-8 NEC SuperScript 1260 User’s Guide

Loading Transparencies and Adhesive Labels
Loading Transparencies and
Adhesive Labels
The Multi-purpose tray holds up to 40 transparencies or adhesive labels: the 250-Sheet cassette
holds 50 transparencies.
Transparencies
When you are printing on transparency film,
always remove the first printed transparency
from the output tray before feeding a second
one through. This prevents scratching the film
surface of the first transparency. Only use
transparencies that are designed for laser
printers.
Adhesive Labels
NEC recommends that adhesive labels be fed
manually through the Multi-purpose tray.
However, they may also be loaded into the
paper cassette like regular paper.
Note: If you change media in the Multipurpose tray and you have selected
“Manual feed” as your paper source the
job may not continue printing until you
press the On Line button.
Adhesive labels consist of a top (print surface)
sheet, an adhesive layer, and a liner (peelaway backing). Use labels that cover the entire
surface of the liner sheet. Labels placed on a
liner sheet with interrupting spaces make it
difficult for consistent feeding and may jam in
your printer.
Using the Multi-purpose tray, the image is
printed on the side facing up—so load
adhesive labels with the label side up, liner
side down.
Note: You should fan the sheets before
loading.
6-9

Chapter 6 : Using the Printer
Closing the Multi-purpose Tray
1. Remove all of the paper from the
Multi-purpose tray.
2. Slide the right side guide all the way back to
the right.
3. Close the extended tray and slide the tray
back.
4. Close the front cover and firmly press in on
the top corners to lock it in place.
6-10 NEC SuperScript 1260 User’s Guide

Printer Options
Overview
This chapter explains the various printer options
available for the NEC SuperScript 1260 laser
printer. It includes:
• The 500-Sheet feeder and how to
install it
• The 500-Sheet cassette
• The Envelope cassette and how to install it
• The Face-up output tray and how to install it
• Adding memory to the printer
Note: In order to select options, you
must first select the options from the
Accessories tab. See Chapter 3, “Super-
Script Software” of this manual.
7
7-1

Chapter 7 : Printer Options
Printer Options
You can add the following NEC printer options to
the NEC 1260 SuperScript laser printer.
250-Sheet Feeder
part# 1265
The 250-Sheet cassette is the standard paper
cassette used with the 1260 SuperScript printer. It
holds 250 sheets of 20 lb paper, 50 sheets of labels
or 50 transparencies. An extra 250-Sheet cassette
might be handy to use for storing legal size or
letterhead papers.
500-Sheet Feeder
part # 1261
The 500-Sheet feeder provides a second paper
feeder for the SuperScript 1260 printer. It can be
used with either the 500-Sheet cassette or the
Envelope cassette; however it is sold with the 500Sheet cassette.
Envelope Cassette
part # 1262
The Envelope cassette holds as many as 50
envelopes. It must be used with the 500-Sheet
feeder.
Face-up Output Tray
part # 1263
The Face-up output tray allows paper to leave the
printer “face up” and out the back instead of the
normal “face down” and out the top.
Note: Before you use or order any print
media, please refer to Appendix A,
“Selecting Print Media”. The rear slot or
Face-up output tray is a straight path and
works well for heavier paper and labels.
500-Sheet Cassette
part # 1264
The 500-Sheet cassette holds 500 sheets of standard paper or various quantities of other print
media. It must be used with the 500-Sheet feeder.
7-2 NEC SuperScript 1260 User’s Guide

The 500-Sheet Feeder
The 500-Sheet Feeder
part # 1261
The optional 500-Sheet feeder allows you to use
the 500-Sheet cassette or the Envelope cassette, in
addition to the standard 250-Sheet feeder.
Installing the 500-Sheet Feeder
1. Switch OFF the printer power.
POWER
OFF
2. Unplug the printer from the AC wall outlet.
3. Remove the power cord from the back of the
printer.
4. Unpack the 500-Sheet feeder and place it on a
flat stable surface.
5. Remove the cardboard packing filler inside
the feeder.
ON
6. Remove the three pieces of tape on top of the
unit. One contains the feeder joints used in
step 13.
7. Install the paper cassette in the feeder.
8. Face the front of the printer.
9. Lift the printer and position it over the 500Sheet feeder.
WARNING! The printer weighs
approximately 28 lbs. not including
options or consumables. Use care when
you lift the printer.
10. Carefully align the corners of the printer with
the corners of the feeder.
11. Slowly lower the printer onto the 500-Sheet
feeder, making sure the two pins located on
the left side of the feeder and the single pin
7-3

Chapter 7 : Printer Options
located on the right side of the feeder fit into
the corresponding openings in the bottom of
the printer.
12. Make sure the printer and 500-Sheet feeder
are firmly connected.
13. Use two feeder joints to fasten the rear of the
500-Sheet feeder to the rear of the printer.
14. Remove the 250-Sheet cassette and the 500Sheet cassette.
15. Use two feeder joints to fasten the front of the
500-Sheet feeder to the front of the printer.
WARNING! Do not operate or move the
printer and 500-Sheet feeder if the feeder
joints are not in place.
16. Install the 250/500-Sheet cassettes into the
printer.
17. Connect the AC Power Cord to the rear of the
printer.
18. Connect the other end of the AC Power Cord
to a grounded AC wall outlet.
19. Switch ON the printer power.
7-4 NEC SuperScript 1260 User’s Guide

Removing the 500-Sheet Feeder
1. Switch OFF the printer power.
2. Unplug the printer from the AC wall outlet.
3. Remove the power cord from the back of the
printer.
4. Squeeze each of the rear feeder joints while
sliding them out of the printer/feeder.
5. Remove the 250-Sheet cassette, the 500-Sheet
cassette or the Envelope cassette.
The 500-Sheet Cassette
6. Squeeze each of the front feeder joints while
sliding them out of the printer/feeder.
7. Lift the printer off the 500-Sheet feeder.
8. reinstall the 250-Sheet cassette.
9. Connect the AC power cord to the rear of the
printer
10. Connect the other end of the AC power cord
to a grounded AC wall outlet.
11. Switch ON the printer power.
WARNING! Remove all options before
attempting to lift or move the printer.
The 500-Sheet Cassette
part # 1264
The 500-Sheet cassette holds up to 500 sheets of
standard 20lb to 28lb paper. Refer to Appendix A,
“Selecting Print Media” for information on
choosing the correct paper types and sizes to use
with this printer.
7-5

Chapter 7 : Printer Options
Loading Paper into the 500-Sheet Cassette
Note: Use the optional Envelope
cassette to feed envelopes.
Do not mix paper types and do not overfill
the cassette.
1. Remove the 500-Sheet cassette from the 500Sheet feeder.
2. Press down on the bottom plate to lock it into
position.
7-6 NEC SuperScript 1260 User’s Guide
 Loading...