


NEC SuperScript 150C User Guide
SUPERSC RIPT™15 0 C
User’s Guide

Copyright © 1997, NEC Technologies |
Publication issued by: |
|
NEC Technologies, Inc. |
All rights reserved |
1250 N. Arlington Heights, Suite 500 |
|
Itasca, IL 60143 |
NEC Technologies reserves the right to modify the equipment described in this manual at any time and without notice.
TRADEMARKS
Any trademarks and/or proprietary names indicated are the property of their respective owners.
Printed in Italy
NOTICE: NEC Technologies makes no representations or warranties with respect to the contents of this document and specifically disclaims any implied warranties of fitness for any particular purpose. The information contained in this document is accurate to the best of our knowledge, but NEC Technologies is not liable for errors or misinterpretations.
NEC
NEC Technologies, Inc.
1250 N. Arlington Heights
Suite 500
Itasca, IL 60143
NECTECH SOFTWARE LICENSE AGREEMENT
PLEASE CAREFULLY READ THE FOLLOWING TERMS AND CONDITIONS BEFORE OPENING THIS SOFTWARE PACKAGE: OPENING THE PACKAGE INDICATES THAT YOU HAVE ACCEPTED THESE TERMS AND CONDITIONS. IF YOU DO NOT AGREE WITH THEM, YOU SHOULD IMMEDIATELY RETURN THE PACKAGE UNOPENED AND THE PRODUCT UNUSED TO THE PERSON FROM WHOM YOU PURCHASED THE PACKAGE WITHIN A REASONABLE PERIOD OF TIME FOR A FULL REFUND OF MONEY PAID FOR THE PACKAGE.
NECTECH provides the Software and licenses its use to you, the licensee, pursuant to the following terms. (From this time on, references to “you” mean the “licensee”, references to “NECTECH”
mean “NEC Technologies, Inc.”, references to “Printer” mean the printer product purchased with the Software, and references to the “Software” mean the software programs, including the coded font programs, in the medium (e.g., floppy disk, CD-ROM) of this package and/or in the ROM of the Printer and any other enhancements to the Software which you hereafter may acquire from NECTECH unless such acquisition is subject to another written license agreement.)
You assume responsibility for the selection of the Software to achieve your intended results. Further, you are responsible for the installation, use and results obtained from the Software.
LICENSE
(1)NECTECH grants to you a nonexclusive and royalty-fee license, subject to these sections (1) through (4) and the other provisions hereof:
(a)to use on the Printer one (1) copy of that portion of the Software which is provided to you preinstalled in the ROM of the Printer;
(b)to use on up to five (5) computers connected to the printer that portion of the Software included in the medium of this package; and
(c)to use the typeface trademarks used by NECTECH to identify the coded font programs and typefaces produced therefrom, provided that you can only use such trademarks to identify printed output produced by the coded font programs.
You may not rent or lease the Software, but you may transfer the Printer, the Software and accompanying documentation on a permanent basis, provided that you retain no copies of the Software and the recipient agrees to be bound by all of the terms and conditions of this Agreement.
(2)You agree not to alter, reverse engineer or disassemble the Software. You will not copy the Software except as necessary to use them on computers and the Printer described in section (1) above or backup purposes. You agree that any such copies of the Software shall contain the same proprietary notices that appear on and in the Software.
(3)Title to and ownership of the Software, related documentation and any reproduction thereof shall remain with NECTECH and its suppliers and the trademarks are the property of such trademark owners. Except as stated in section (1) and (2) above, this Agreement does not grant to you any right (whenever by license, ownership or otherwise) in or to patents, copyrights, trade secrets, trade names, trademarks or any other intellectual property right with respect to the Software.
(4)You will not export or re-export the Software without the appropriate United States or foreign government licenses.
COPYRIGHT
THE SOFTWARE IS COPYRIGHTED AND, EXCEPT AS PERMITTED BY THIS AGREEMENT, YOU MAY NOT DUPLICATE THE SOFTWARE OR DISCLOSE IT TO ANY OTHER PARTY.
TERM
This Agreement is effective until terminated. You may terminate it voluntarily at any time. Voluntary termination by you must be accompanied by complete destruction of the Software and copies thereof. NECTECH or its suppliers may terminate this Agreement without notice upon your failure to abide by this Agreement.
LIMITED WARRANTY
(1)NECTECH warrants to you that each medium (floppy disk, ROM and/or CD-ROM) containing the Software is free from defects in materials and workmanship and also warrants that it will replace any defective medium at no charge to you, if any such defective medium is returned to NECTECH within ninety (90) days of your purchase. (Any such return should be made to NECTECH at the address on this Agreement. “Attention: Printer Software Marketing”, together with a written notification of the defect.)
(2)YOU AGREE THAT THE SOFTWARE IS PROVIDED AND LICENSED “AS IS”. TO THE MAXIMUM EXTENT PERMITTED BY APPLICABLE LAW, NECTECH AND ITS SUPPLIERS DISCLAIM ALL OTHER WARRANTIES, EITHER EXPRESS OR IMPLIED, INCLUDING, BUT NOT LIMITED TO, IMPLIED WARRANTIES OF MERCHANTABILITY AND FITNESS FOR A PARTICULAR PURPOSE, WITH REGARD TO THE SOFTWARE. YOU BEAR THE ENTIRE RISK RELATING TO THE QUALITY OF THE SOFTWARE AND, IF THE SOFTWARE PROVES TO HAVE ANY DEFECTS, YOU ASSUME THE COST OF ANY NECESSARY SERVICING OR REPAIRS.
(3)SOME STATES DO NOT ALLOW THE EXCLUSION OF IMPLIED WARRANTIES, SO THAT THE ABOVE EXTENSION MAY NOT APPLY TO YOU. THIS WARRANTY GIVES YOU SPECIAL LEGAL RIGHTS AND YOU MAY ALSO HAVE OTHER RIGHTS WHICH VARY FROM STATE TO STATE.
LIABILITY
TO THE MAXIMUM EXTENT PERMITTED BY APPLICABLE LAW, IN NO EVENT SHALL NECTECH OR ITS SUPPLIERS BE LIABLE FOR ANY DAMAGES WHATSOEVER (INCLUDING, WITHOUT LIMITATION, LOSS OF USE, LOSS OF PROFIT, INTERRUPTION OF BUSINESS, OR ANY INDIRECT, SPECIAL, INCIDENTAL OR CONSEQUENTIAL DAMAGES OF ANY KIND) REGARDLESS OF THE FORM OF ACTION WHETHER IN CONTRACT, TORT (INCLUDING NEGLIGENCE), STRICT PRODUCT LIABILITY OR OTHERWISE, EVEN IF NECTECH HAS BEEN ADVISED OF THE POSSIBILITY OF SUCH DAMAGES. BECAUSE SOME STATES DO NOT ALLOW THE EXCLUSION OR LIMITATION OF LIABILITY FOR INCIDENTAL OR CONSEQUENTIAL DAMAGES, THE ABOVE LIMITATIONS MAY NOT APPLY TO YOU.
THIS AGREEMENT SHALL BE CONSTRUED AND INTERPRETED ACCORDING TO THE LAWS OF THE COMMONWEALTH OF MASSACHUSETTS.
This Page Intentionally Blank

Preface
This non-impact printer is designed and constructed to give constant print quality for text and high resolution graphics, in color and in black and white.
The printer is supplied with a disposable color print head, containing water-resistant ink, which uses “drop-on-demand” thermal ink jet technology. It produces a laser-like print density of up to 600 x 300 dots per inch (dpi) with minimal operating disturbance. The standard paper handling device allows the use of a wide range of paper and envelope types and sizes.
The printer can be connected to personal computers with a standard Centronics parallel interface. The resident firmware contains the PCL III + emulation. Compatible with MS-DOS and MS-Windows environments, as well as other commonlyused software applications, it can be used in most word processing and desktop publishing environments.
The Structure of the Manual
This user manual is divided into two parts: a Quick Start, which contains the essential information for installing and operating the printer, and a User Guide, divided into chapters, which contains more detailed information on the printer’s features and functions. The manual also contains a glossary of terms and an alphabetical index.
Quick Start
∙Unpacking
∙Identifying the printer parts
∙Connecting your printer
∙Inserting the print head
∙Loading paper
∙Printing the “demo” page
∙Installing printer software
∙Preparing the printer using the Printer Monitor
∙Help
Preface |
iii |
User Guide
∙
∙
∙
∙
∙
∙
Chapter 1 - User Interface
Software printer monitor, indicating print job status and containing a series of printer care functions.
Printer operator panel, giving the functions of the light indicators (LEDs) and keys.
Embossed template, containing common error conditions and print head insertion procedure.
Chapter 2 - Ink Jet Print Head
How to insert/remove the ink jet print head in/from the printer, how to clean it and preserve optimum print quality.
Chapter 3 - Paper
Characteristics of the paper that can be used in the printer.
Usable print areas
Chapter 4 - Using Software
Description of the printing system interface and the printer mointor.
How to change the printer settings via the printer driver settings or the printer set-up utility.
Chapter 5 - Troubleshooting
Troubleshooting guide, indicating common problems and their solution.
How to obtain the print test.
Appendices
Options and product characteristics.
Refer to the appropriate chapter of the user guide whenever you encounter a problem.
iv |
Preface |

Table of Contents
Preface
Quick Start
Unpacking . . . . . . . . . . . . . . . . . . . . . |
1 |
Identifying the Printer Parts . . . . . . . . . . . |
2 |
Connecting Your Printer . . . . . . . . . . . . . |
3 |
Inserting the Print Head . . . . . . . . . . . . . |
4 |
Loading Paper in the Printer . . . . . . . . . . . |
6 |
Installing Printer Software . . . . . . . . . . . . |
9 |
Installing the SuperScript 150C color printer |
|
driver . . . . . . . . . . . . . . . . . . . . . . |
10 |
Removing the SuperScript 150C Driver . . . . |
12 |
Preparing your Printer using the Printer |
|
Monitor . . . . . . . . . . . . . . . . . . . . . |
13 |
Help . . . . . . . . . . . . . . . . . . . . . . . |
14 |
1. User Interface |
|
|
Printer Monitor . . . . . . . . . . . . . . . . . . 1-1 |
||
Printer Operator Panel |
. . . . . . . . . . . . . |
1-2 |
Embossed Template |
. . . . . . . . . . . . . . |
1-7 |
2. |
Ink Jet Print Head |
|
|
Replacing the Print Head |
. . . . . . . . . . . . 2-1 |
|
Print Head Care . . . . . . . . . . . . . . . . . 2-3 |
|
3. |
Paper |
|
|
Types . . . . . . . . . . |
. . . . . . . . . . . . 3-1 |
|
Dimensions . . . . . . . |
. . . . . . . . . . . . 3-2 |
|
Insertion . . . . . . . . . |
. . . . . . . . . . . . 3-2 |
|
Driver Settings . . . . . . . . . . . . . . . . . . 3-3 |
|
|
Print Area . . . . . . . . |
. . . . . . . . . . . . 3-4 |
Table of Contents |
v |

4. Using Software
How to Use Your Printer Driver . . . . . . . . |
4-1 |
Modifying the Settings in Your Printer Driver . |
4-1 |
Property Sheet Contents . . . . . . . . . . . |
4-3 |
Help . . . . . . . . . . . . . . . . . . . . . . . |
4-5 |
Running the Printer Set-Up Utility . . . . . . |
4-6 |
5. Troubleshooting
General Care . . . . . . . . . . . . . . . . . . |
5-1 |
Error Conditions indicated by Print Head |
|
Position . . . . . . . . . . . . . . . . . . . . . |
5-2 |
Problems and Solutions . . . . . . . . . . . . |
5-2 |
Installation . . . . . . . . . . . . . . . . . . . . . . |
5-2 |
Paper . . . . . . . . . . . . . . . . . . . . . . . . . |
5-4 |
Print head . . . . . . . . . . . . . . . . . . . . . . . |
5-5 |
Printing . . . . . . . . . . . . . . . . . . . . . . . . |
5-8 |
Appendices
A.Supplies
B.Programmable Printer Features
C.Command Code Summary
D.Product Characteristics
E.Service and Support
F.Glossary
G.Index
vi |
Table of Contents |
Quick Start
This Page Intentionally Blank
Quick Start
This section is a rapid guide for installing your printer and preparing it for use. It contains a sequence of operations which should be performed in the order described.
More detailed information about the printer and its functions is given in the User Guide.
As soon as you have removed the printer and its accessories from the packing carton, check that all the parts ordered have been delivered and are undamaged.
If anything is missing or damaged, call your local retailer immediately.
The interface cable for connecting the printer to your PC is NOT supplied with the printer.
Unpacking
Keep the carton and all the packing materials in case you have to repack or ship the printer.
1
6
2 |
5 |
|
 3 4
3 4
1.Place the printer on an ample, stable surface near your computer or work station.
2.Make sure that there is enough space around the printer for all its parts to be accessed comfortably.
3.Make sure that there is a convenient independent electrical power supply socket to which you can connect the printer.
4.Do NOT leave the printer exposed to direct sunlight or heat sources, or in dusty, dirty or poorly ventilated environments.
1. |
Printer |
2. |
Driver diskette and CD |
3. |
Color ink jet print head |
4. |
Electrical power cord |
5. |
User manual and NEC Media Pak |
6. |
Print head container |
|
|
|
|
Quick Start |
|
1 |
|

Identifying the Printer Parts
Automatic Sheet Feeder (ASF)
Top cover
Paper support
Socket for electrical power cord
Electrical data plate (on base of printer)
Print head carriage
 3-Key/2-Light indicator operator panel
Parallel interface cable connector socket
 Template, on inside of top cover, indicating error conditions/corrective
  action and print head replacement procedure
2 |
Quick Start |

Connecting Your Printer
To the electrical power supply
Your printer has no ON-OFF switch and is powered as soon as you connect it to the electrical power supply. Before plugging into the power supply socket, make sure that it is on a stable surface, that the top cover is closed and read the following warning carefully.
Make sure the power supplied has the voltage indicated on the electrical data plate on the base of the printer.
If the electrical data plate indicates a different voltage, call your local retailer immediately. DO NOT, UNDER ANY CIRCUMSTANCES, CONNECT THE PRINTER TO THE ELECTRICAL POWER SUPPLY.
Make sure that the plug on the power cable of the printer is of the type accepted by the wall socket you intend to use; if it is not, call your local retailer.
Do NOT attempt to change the plug yourself.
The socket outlet shall be installed near the equipment and shall be easily accessible.
The manufacturer declines all responsibility for accidents to persons or damage to the printer arising from the non-observance of this warning.
1.Plug the connector end of the power cord into the two-pin socket in the rear of the printer.
2.Plug the other end of the power cord into a wall socket.
As soon as you plug it into the electrical power supply, your printer will execute a series of internal checks and a mechanical reset. It will be in ON LINE condition (On Line light indicator lit).
After approximately 2 minutes of inactivity, the printer will go into “standby” mode in which both light indicators are off and the print head is in its rest position at the left hand end of its path. To activate it, just send a file to be printed or start any other printer operation.
Quick Start |
3 |
To your computer
Make sure your printer is NOT connected to the electrical power supply and that your computer/host system is switched OFF.
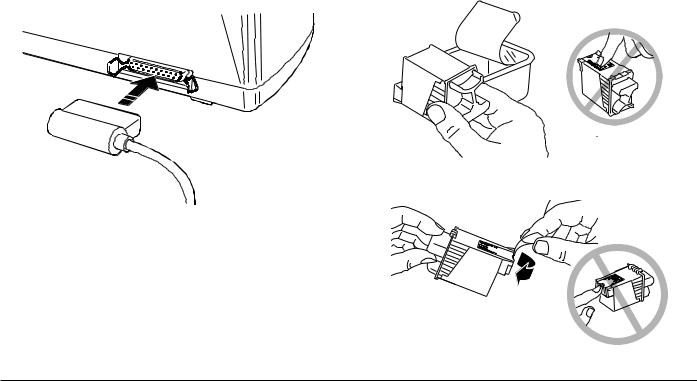
1.Plug the interface cable connector into the socket on the rear of the printer and, if necessary, close the spring clips on it.
2.Connect the other end of the interface cable to the appropriate interface connector socket (port) on your computer/host system.
3.Connect your printer to the electrical power supply and switch on your computer.
The interface cable is not supplied with the printer; consult your systems engineer or retailer for advice on the type of cable you require.
Inserting the Print Head
See the instructions embossed on the inside of the top cover (and illustrated in Chapter 1 of the User Guide)
1.Open the sealed print head container and remove the instructions leaflet and the print head, holding it by the thumb and finger grip (end opposite the protective film).
2. Remove the protective film.
4 |
Quick Start |
3.With the printer powered, press the Install Cartridge key on the operator panel to position the print head carriage in the head loading position. The light indicators on the operator panel will both start flashing.
If you do nothing for 30 seconds, the print head carriage will return to its rest position*. To return the print head carriage to the head loading position, you must press
Install Cartridge again.
*The print head carriage will not return to its rest position if there is no print head inserted.
4.Open the top cover of the printer.
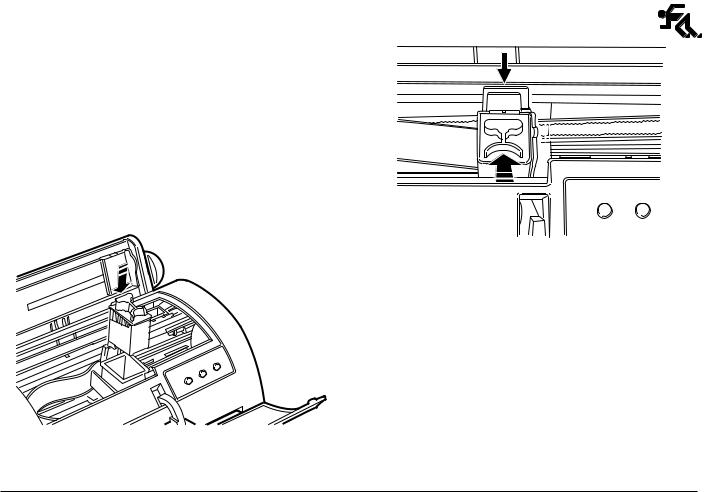
5.With the electrical contacts towards the corresponding contacts in the housing on the print head carriage, insert the print head gently into its chamber.
6.While holding the lip at the rear of the print head insertion area, push the print head towards the rear of the printer to click it in place.
7.Press the Install Cartridge key on the operator panel. The print head carriage will move to its rest position, at the left hand side of the printer.
8.Close the top cover
See Chapter 2 in the User Guide for further details on the handling and care of the ink jet print head.
Quick Start |
5 |
Loading Paper in the Printer
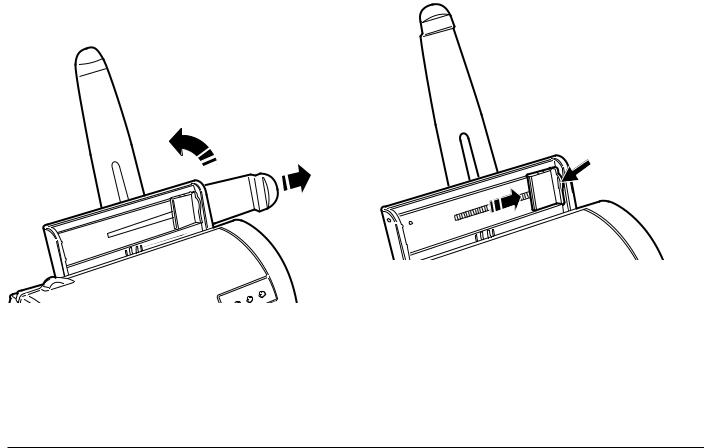
1.Pull out to the right the extendible top guide (1) on the rear of the automatic sheet feeder (ASF) and rotate it up to its vertical position (2). The paper support is optimized for standard Letter and A4 size formats.
2
1
2.Holding the tab on the right edge of the movable guide on the ASF, move it to its extreme right position (physical right hand margin).
6 |
Quick Start |
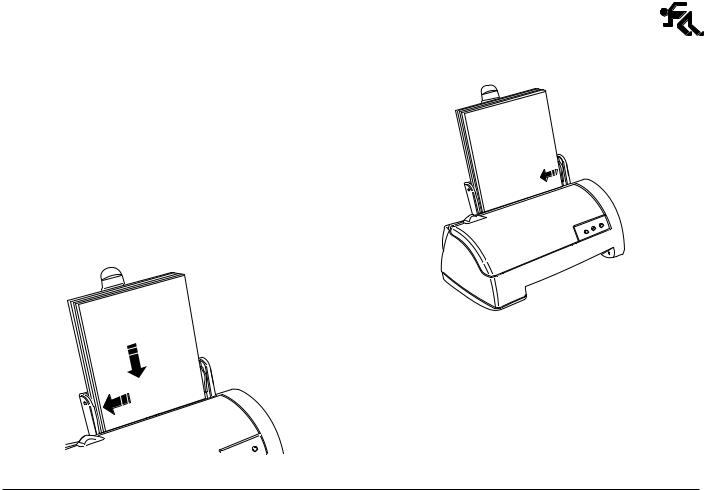
3. Fan the paper thoroughly.
4.Align the paper against the fixed left hand guide and load it into the tray, pushing it down carefully until it stops against the feed rollers inside the printer.
Do NOT add paper to the ASF; always remove any existing paper and fan it together with the paper to be loaded.
5.Position the right guide against the right edge of the paper.
Quick Start |
7 |
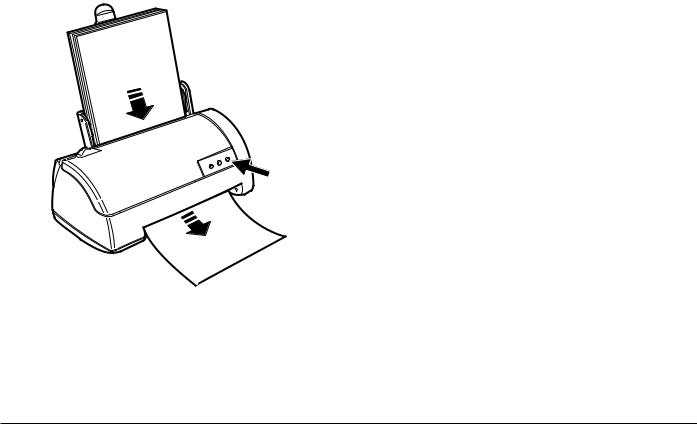
6.With the printer powered, press Form Feed . The paper moves to the Top of Form (TOF) position. Press Form Feed again, to make sure that the paper feeds smoothly through and exits from the printer, without crushing or skewing.
See Chapter 3 in the User Guide for further information on the types of paper you can use and the page layout.
8 |
Quick Start |

Installing Printer Software
Before installing your printer driver
The diskette supplied with your printer contains a high quality color and monochrome printing system in several languages for both Windows® 3.1/3.11 and Windows® 95 environments.
If you are installing using the CD, please follow the instructions supplied with the NEC Media Sample Pak
This advanced printing system includes :
∙a printer driver which gives you access to all the printer features through easy-to-use property sheets,
∙a printer monitor for easy access to Printing Status and Printer Care.
A printer setup utility program, for personalized printer settings under DOS if necessary, is also included in the diskettes.
Before installing any printer driver, we strongly recommend that you make a back-up copy of the original diskette (according to “Terms and conditions of the user license” included with the diskettes) and then use this copy for the installation procedure. This will allow you to keep the original diskette as a master so that, should any problem arise with the backup copy, you can make another copy.
q Information file (README.TXT)
Whenever necessary, latest information on the printer driver, or instructions updating this manual are included in an information file contained in the diskette(s).
If present, the file will automatically be copied into the driver group that will be created during driver installation.
If you want to check this file directly from the diskette:
∙under Windows® 3.1/3.11, open it through the “Write” application.
∙under Windows® 95, open if through the “Wordpad” application, specifying the correct file extension (*.WRI)
qSystem requirements
∙From Windows® 3.1 up to Windows® 95,
∙PC 386 or later with at least 4 MBytes of RAM,
∙1 MByte of free disk space.
Quick Start |
9 |

Installing the SuperScript 150C color printer driver
The installation procedure will vary, depending on the Windows® environment installed on your PC.
Windows® 3.1/3.11
1.Start Microsoft Windows®.
(If it is already running, make sure that all applications are closed before starting to install the driver.)
2.Insert the driver diskette in drive A (or B) of your PC.
3.From the File menu of the Program Manager, select the option “Run...”.
4.Type A:(or B:)\SETUP and press ENTER. The installation process starts.
5.Follow the instructions given in the sequence of windows displayed on your PC screen, until the driver is installed.
6.A group window with the driver name will be created automatically. It allows immediate access to the Spool Manager, the Printer Monitor, the Help and information files whenever these are required.
You can also install the printer driver through the “Add Printer” feature in the Control Panel in Program Manager/Main, proceeding as follows. The group described in point 6 above will still be created automatically.
1.Insert the diskette in drive A (usually) of your PC.
2.Activate Microsoft Windows® environment (If it is already running, make sure that all Windows application tasks are closed before starting to install the driver.)
3.Activate the Control Panel in the Main window, clicking twice with your mouse indicator on the corresponding icon.
4.Select the Printers icon, in the same way.
5.If the Installed Printers box is empty, click on Install..
6.If the Installed Printers box already contains one or more driver names, click on Add>> , select Install Unlisted or Updated Printer in the List of Printers and then click on Install... .
7.Check that the Install Driver window already indicates the drive (usually A) in which you have inserted the driver diskette, otherwise, click on the drive name and change it, using your PC keyboard; click on OK.
8.The Add Unlisted or Updated Printer window contains the list of drivers present on the diskette. Select the driver with your printer name and click on OK.
9.Your driver is now installed and your printer name appears in the List of Printers.
10.With your printer name highlighted, click on the Set as Default Printer button, so that your printer will be active in all your Windows® applications.
11.Check your printer connection by clicking on the
Connect.. button.
10 |
Quick Start |
By default, your printer will be connected on the LPT1 port which corresponds to the hardware connection of a parallel interface cable.
12. Click on the Close button of the Printers dialogue box.
Windows® 95
The Microsoft Windows® 95 operating system allows automatic installation of peripherals through the “Plug & Play” feature, a bi-directional communication and hardware recognition procedure.
Make sure that the printer and PC are connected to each other and are both powered.
The printer must NOT be in error mode, i.e. the indicator lights must not be flashing.
1.Activate Microsoft Windows® 95. If already started, execute the “Shut down” command and restart your computer.
2.A window is displayed, indicating that a new peripheral has been detected (New Hardware found and the printer name).
The same window shows the Driver from disk provided by hardware manufacturer option already highlighted. Click the OK button.
3.With the Install from Disk window displayed, insert the printer driver diskette in the drive selected, specify this drive if requested and click OK.
4.The Add Printer Wizard window is displayed. If there are no printer drivers already installed on your system, your printer will be installed as the Default printer.
If other printer drivers are already installed, and you wish to install the current one as the default printer, click Yes and then the Finish button.
The installation of the driver files will start.
5.At the end of the installation, you will be asked to remove the diskette and restart Windows.
A folder with the driver name will be created automatically in the Programs folder. It allows easy access at any time to the Printer Monitor, the Help and information files whenever these are required.
You can also install the driver using the Add Printers procedure. In this case, your printer need not be connected to your PC.
1.Click Start, highlight Settings, and then click Printers in the sub-menu which opens.
2.Double click Add Printer in the Printers window.
3.The first in a series of Add Printer Wizard windows is displayed; click Next > .
4.Click Have Disk... in the window now displayed.
5.Insert the printer driver diskette in drive A (or B) of your PC; click OK.
6.Click Next > .
7.Make sure LPT1: Printer port is highlighted; click
Next > .
If you have an “ECP” computer, make sure that its port setting is set to Printer Port (LPTx) and not to ECP Printer Port (LPTx).
Quick Start |
11 |

If necessary, once you have completed the driver installation, change this setting in your system properties:
–right click on the My Computer icon,
–select Properties, then Device Manager,
–double click on Ports (COM&LPT),
–select Printer Port: LPTx.
If Ports (COM&LPT) does not offer a simple LPTx port or if the selection of this port does not solve your problem, you must change your PC setting. For further information, see the “Installation” section in Chapter 5 - “Troubleshooting” and the documentation supplied with your PC.
8.Click Finish.
The installation of the driver files will start.
9.At the end of the installation, you will be asked to remove the diskette and restart Windows®.
For more details on the printer driver, its parameters and the printer setup, see Chapter 1 - “User Interface” and Chapter 4 - “Using Software” in the User Guide or consult your Windows® documentation.
Removing the SuperScript 150C Driver
qWindows® 95:
1.From the Start button select Settings and Printers.
2.Click the NEC SuperScript 150C icon and select Delete from File menu.
qWindows® 3.1x
1.From the Main group select Printers.
2.Highlight NEC SuperScript 150C and click Remove.
3.Delete the following files from the Windows System directory:
NE3CTRL.DLL, NE3DSPLR.EXE, NE3IMAGE.BMP, NE3JNLIB.DLL, NE3PRST.DLL, NE3RASTR.DLL, NE3SPMGR.EXE, NE3HLP.HLP, NE3RSC.DLL, NE2LJP.DRV, NE2LJPLN.DLL, NE2HLP31.HLP.
12 |
Quick Start |

Preparing your Printer using the Printer Monitor
Your printing system, i.e. the printer driver and the printer monitor is now installed. Before using your printing system, you must prepare your printer by performing two of the Printer Care functions contained in the Printer Monitor:
1.Check the bi-directional printing accuracy (Align),
2.Print a demo page (Demo).
How to access the Printer Monitor
q Under Windows® 3.1/3.11:
The Printer Monitor can be accessed from your printer driver group at any time: just double-click the specific icon.
q Under Windows® 95:
The Printer Monitor can be accessed at any time in either of the following ways:
1.Click Start, highlight Programs and then the printer name in the sub-menu which opens.
2.Click the Printer Monitor icon.
OR:
1.Click Start, highlight Settings, and then click Printers in the sub-menu which opens.
2.Click your printer name to highlight it.
3.Click your right mouse button.
4.Select the option “Run the Printer Monitor” in the menu which opens.
In both environments, the Printer Monitor will also be activated any time a print job is sent.
Use of the Printer Monitor
The Printer Monitor contains two tabs:
Status : which provides information on files printed, as well as on document and page printing progress.
Printer Care : which allows you to run four different “service” operations:
∙Align : print head alignment (checking accuracy of bi-directional printing),
∙Clean : print head cleaning,
∙Demo : printing of the “demo” page,
∙Test : printing of the printer test page.
If you leave your printer monitor active, the status of your print jobs will always be displayed automatically.
Quick Start |
13 |

q Checking print accuracy (Align)
Whenever you insert a print head, you should always check the accuracy of bi-directional printing, to guarantee optimum printing quality. The printer monitor in your printing system makes this operation extremely easy:
Make sure your printer and PC are powered, your printing system is installed, the print head is inserted and paper is loaded.
1.Open the printer monitor on your PC screen.
2.Click the Printer Care tab.
3.Click the Align button, then follow the instructions displayed.
q Printing the “demo” page (Demo)
The demo page gives you a full color or black monochrome print-out and allows you to check the correct functioning of the print head.
1.Check that you are still in the Printer Care tab of the printer monitor.
2.Click the Demo button, then follow the instructions displayed.
Once you have completed these two operations, you can close the printer monitor.
Help
To simplify the use of the printer, and to help you if you have problems, this printer has an extensive user interface:
∙from your PC screen; the printing system installed from the diskettes supplied contains a printer driver and printer monitor with user-friendly screen interfaces and a detailed Help file.
For further details, see Chapter 1 - “User Interface” and Chapter 4 - “Using Software” in the User Guide.
∙the flashing of one or both of the light indicators on the printer operator panel signals the need for operator intervention.
For further details, see “Operator Panel” in Chapter 1 of the User Guide.
∙an embossed template on the inside of the printer cover, illustrates basic operating procedures and error conditions.
For further details, see “Embossed Template” in Chapter 1 of the User Guide.
Your printer is now ready for use. If you have problems with any operating procedure, or are unable to perform a specific function, always check that you have followed the instructions as given. If a repetition of the instructions is unsuccessful, see “Problems and Solutions” in Chapter 5 of the User Guide.
14 |
Quick Start |
User Guide
This Page Intentionally Blank

User Interface
This chapter describes the user interface of your printer, i.e. those parts and features of the printer that you use and/or refer to during day-to-day use. The user interface comprises the printer monitor which is loaded in your PC when you install your printing system, the printer operator panel and the template embossed on the inside of the printer cover.
Printer Monitor
The printer monitor is an on-screen aid with an extensive, user-friendly HELP feature. It contains a series of functions which are designed to help you during daily use of the printer. It can be viewed by clicking on the specific icon and allows you to:
∙view the printer operating status during a print job. It indicates the proportion of the document printed and error messages (Status),
∙perform printer care functions, to maintain optimum working conditions (Printer Care):
–Align : print head alignment (checking accuracy of bi-directional printing),
–Clean : print head cleaning,
–Demo : printing of the “demo” page,
–Test : printing of the printer test page.
Checking print accuracy (Align)
Whenever you insert a print head, you should check the accuracy of bi-directional printing, to guarantee optimum printing quality. The printer monitor in your printing system makes this operation extremely easy:
Make sure your printer and PC are powered, your printing system is installed, the print head is inserted and paper is loaded.
1.Click the printer monitor icon.
2.Click the Printer Care tab.
3.Click the Align button, then follow the instructions displayed.
Cleaning the print head (Clean)
If you notice a deterioration in the print quality, before changing the print head, run the “Clean” function.
1.Click the printer monitor icon (if it is not already open).
2.Click the Printer Care tab.
3.Click the Clean button, then follow the instructions displayed.
User Interface |
1-1 |
Printing the “demo” page (Demo)
The demo page gives you a full color or black monochrome print-out and allows you to check the correct functioning of the print head.
1.Click the printer monitor icon (if it is not already open).
2.Click the Printer Care tab.
3.Click the Demo button, then follow the instructions displayed.
Running the print test (Test)
The print test gives you a color or black monochrome print-out (the contents of the print-out vary depending on the type of print head inserted - see the specific section in Chapter 5 - “Troubleshooting”).
1.Click the printer monitor icon (if it is not already open).
2.Click the Printer Care tab.
3.Click the Test button, then follow the instructions displayed.
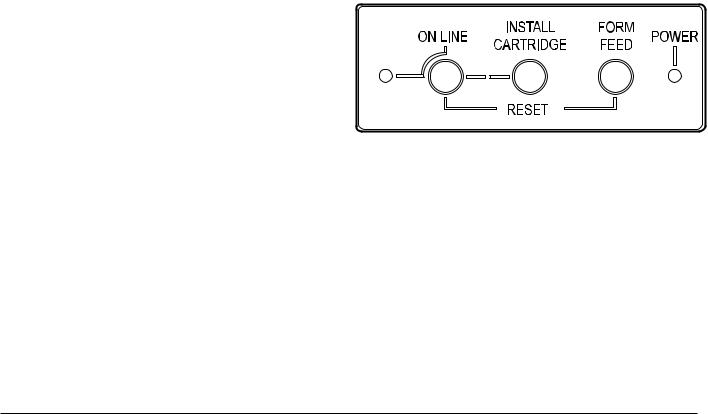
Printer Operator Panel
The behavior of the keys and light indicators on the operator panel will depend on the printer’s status.
Printer states:
∙free: no data to be printed;
∙busy: from the reception of data until the completion of its printing;
∙standby: printer powered but dormant (more than two minutes have elapsed since last interchange with host); reduces power consumption.
∙special function mode : user-invoked operating mode independent of host.
1-2 |
User Interface |

Basic key functions
Function |
Key |
Description |
|
|
|
Printer ready/ |
On Line |
Alternates the printer ON |
Pause |
|
LINE/ OFF LINE status. |
|
|
In ON LINE status, the On |
|
|
Line light indicator is lit and |
|
|
the printer can process and |
|
|
print data received from your |
|
|
computer. |
|
|
In OFF LINE (pause) status, |
|
|
the print head carriage is in |
|
|
the rest position at the |
|
|
physical left margin, the On |
|
|
Line light indicator is off and |
|
|
any printing operation is |
|
|
suspended. |
|
|
|
Print head |
Install Cartridge |
Moves the print head carriage |
positioning |
|
to/from the head loading |
|
|
position. |
|
|
Pressed once, causes the |
|
|
print head carriage to move |
|
|
to the head loading position |
|
|
(position 4 on the template). |
|
|
Pressed a second time, |
|
|
causes the print head |
|
|
carriage to return to the rest |
|
|
position (provided that the |
|
|
print head is inserted |
|
|
correctly). |
|
|
|
Function |
Key |
Description |
|
|
|
Paper load/ eject |
Form Feed |
Loads/ejects a document |
|
|
in/from the printer. |
|
|
When pressed, causes a |
|
|
document to be loaded to the |
|
|
first print position. |
|
|
If a document is already |
|
|
present in the printer, causes |
|
|
its ejection. |
|
|
|
User Interface |
1-3 |

Special key functions
Function |
Key(s) |
Description |
|
|
|
Demo page |
On Line held + Install |
The demo page is |
|
Cartridge |
printed. |
|
(at least 2 seconds) |
|
|
|
|
Print test |
Press and hold all |
The print test is printed. |
|
three keys in this |
|
|
order: On Line, Install |
|
|
Cartridge, Form Feed; |
|
|
release them together |
|
|
only when both the |
|
|
light indicators go off. |
|
|
Then press On Line |
|
|
three times |
|
|
|
|
Reset |
On Line held + Form |
Returns the printer to |
|
Feed |
its power-on condition. |
|
(at least 3 seconds) |
If done during data |
|
|
|
|
|
transmission/printing, |
|
|
the information is lost. |
|
|
|
Hex dump |
Press and hold all |
All subsequent data |
|
three keys in this |
transmitted to the |
|
order: On Line, Install |
printer will be printed in |
|
Cartridge, Form Feed; |
its hexadecimal format. |
|
release them together |
This feature should be |
|
only when both the |
used only under |
|
light indicators go off. |
technical guidance, as |
|
Then press On Line, |
it can generate |
|
Form Feed and |
extremely long |
|
Install Cartridge, in this |
print-outs. |
|
order. |
See Troubleshooting. |
|
|
|
Function |
Key(s) |
Description |
|
|
|
Exit from Hex |
On Line + Form Feed |
Reset |
dump |
|
|
|
|
|
1-4 |
User Interface |
 Loading...