


Table of Contents
1 Introduction
Overview 1–1
Standard Features 1–2
Configuration Overview 1–2
System Requirements 1–2
Unpacking the Printer 1–3
Locating the Printer Items 1–3
2 Setting Up and Using the Printer
Overview 2–1
Precautions for Installation 2–2
Installation Site 2–2
Power Source 2–2
Grounding 2–2
Printer Dimensions and Space Requirements 2–3
Operating Environment 2–3
External Printer Parts 2–5
Internal Printer Parts 2–7
Installing the Main Multipurpose Feeder Tray 2–8
Loading Paper 2–8
Loading the Manual Feeder 2–10
Duplex Printing 2–10
Setting Up the Photoconductor Module and
the Toner Module 2–11
Parallel Cable 2–13
Power Cord 2–13
Some Do’s and Don’ts for Using the Printer 2–14
3 Installing the Software
Overview 3–1
SuperScript Software Installation 3–2
Installing the SuperScript Software 3–3
SuperScript Installation Dialogs 3–3
Testing the Installation 3–8
Removing SuperScript Software 3–8
4 SuperScript Console
Overview 4–1
Control Panel 4–2
GDI Setup Window 4–4
Paper 4–4
Advanced Options 4–5
Print Quality 4–5
2Up/4Up 4–6
Form Settings 4–6
Create a Cover/Trailer Page or Overlay file 4–6
Local Queue 4–7
Job Log 4–8
SuperScript Console Menu 4–9
File 4–9
View 4–9
Settings 4–9
Priority 4–9
Local Printer Change 4–10
Network 4–10
Change Name 4–10
i

Run 4–10
Help 4–10
Exiting before printing has completed 4–10
Printing from a DOS Application 4–11
5 Monitoring the Printer Status
Overview 5–1
Expanded SuperScript Printer Status Display 5–3
Printer Error Status Messages and Recovery 5–3
Paper Out 5–4
Paper Jam 5–4
Cover Open or Toner Cartridge Missing 5–4
Duplex Printing 5–4
Power Off or Cable Problem 5–4
Engine is Warming Up 5–4
Engine Error 5–4
6 Maintaining the Printer
Overview 6–1
Replacing the Toner Module 6–2
Replacing the Photoconductor Module 6–2
Cleaning the Printer 6–2
Cleaning the Outside 6–3
Cleaning the Transport Roller and
Transfer Unit 6–3
A Troubleshooting
Overview A–1
Maintaining Print Quality A–2
Output Quality A–3
Blank Spots A–4
Solid White Vertical Lines A–5
Incomplete Page A–5
Correcting Paper Jams A–5
Installation Problems A–8
Wrong System or Hardware Configuration A–8
Insufficient Memory A–8
No Printer Port A–8
Insufficient Disk Space A–8
Removing Previously Installed SuperScript
Software A–9
B Frequently Asked Questions
C Printer Options
Overview C–1
250-Sheet Second Hopper C–2
Setting Up the 250-Sheet Hopper C–2
Loading paper on the second tray C–3
Memory Expansion Module (SIMM) C–4
D Selecting Print Media
Overview
Selecting Paper and Media D–2
Care of Printer Supplies D–2
Paper Properties D–3
Print Areas D–3
Media Use Guidelines D–4
Preprinted Forms D–4
Heavy Print Stock D–4
Envelopes D–5
Adhesive Labels D–5
Transparency Film D–6
Media Purchasing Specifications D–7
Printing with Various Media D–9
E Using Fonts
Overview E–1
Fonts in GDI Mode E–2
Fonts in PCL Mode E–3
Installing SuperScript TrueType Fonts E–3
Saving Downloaded Fonts and Macros
(PCL Mode) E–3
ii

F Safety Information
Laser Safety F–1
Internal Laser Radiation F–1
CDRH Regulations F–1
For United States Use Only F–2
FCC Statement F–2
Employer Responsibilities F–2
Minimizing Ozone Exposure F–3
Ozone Emissions F–3
UL Standards for Ozone F–3
EPA Energy Star Computers Award F–3
Technical Specifications F–4
G Glossary
H Technical Support
Assistance Nearby H–1
Help From Within Your Company H–1
Help From Your Dealer H–1
NEC Technical Support H–1
How to Contact NEC H–2
Sending Internet Electronic Mail H–2
Reaching the NEC Bulletin Board System H–3
Reaching NEC on Compuserve H–3
Reaching NEC on America Online H–3
Reaching NEC on AT&T Interchange H–3
Reaching NEC on the World Wide Web H–3
Writing NEC H–3
Ordering Supplies, Printer Options, and
Spare Parts H–3
Support from Your Software Vendor H–4
iii

PROPRIETARY NOTICE AND LIABILITY
DISCLAIMER
The information disclosed in this document, including
all designs and related materials, is the valuable
property of NEC Corporation (NEC) and/or its
licensers.NEC and/or its licensers, as appropriate,
reserve all patent, copyright and other proprietary
rights to this document, including all design,
manufacturing, reproduction, use, and sales rights
thereto, except to the extent said rights are expressly
granted to others.
The NEC products discussed in this document are
warranted in accordance with the terms of the
Warranty Statement accompanying each product.
However, actual perfomance of each such product is
dependent upon factors such as system configuration,
customer data, and operator control. Since
implementation by customers of each product may
vary, the suitability of specific product configurations
and applications must be determined by the customer
and is not warranted by NEC.
SuperScript is a trademark of NEC Technologies, Inc.
All other product, brand, or trade names used in this
publication are the trademarks or registered
trademarks of their respective owners.
© NEC Corporation, 1996
© Copyright, WinStyler™/Phase II, 1992-1996
Destiny Technology Corp. Ver. 2.0
© Copyright, WinRefs™/Phase II, 1996
Destiny Technology Corp. Ver. 2.0
© Copyright, DTIR™, 1992-1996
Destiny Technology Corp. Ver. 1.0
© Copyright, LaserAct®/Phase II, 1990-1996
Destiny Technology Corp. Ver. 4.5
© Copyright, PageStyler®/Phase II, 1989-1996
Destiny Technology Corp. Ver. 1.0
© Copyright, 1992, Microsoft Corporation
First Printing — July 1996
To allow for design and specification improvements,
the information in this document is subject to change
at any time, without notice. Reproduction of this
document or portions thereof without prior written
approval of NEC is prohibited.
00 PROPRIET* 96.9.24, 10:39 AM1
Copyright 1994-1996
NEC Corporation
7-1 Shiba 5-Chome, Minato-ku
Tokyo 108-01, Japan
All Rights Reserved
i

NEC Corporation
7-1, Shiba 5-chome, Minato-ku,
Tokyo 108-01, Japan
Tel: (03) 3454-1111
Telex: NECTOK J22686
Fax: (03) 3798-1510~1519
NEC (UK) Ltd.
NEC House, 1 Victoria Road
London W3 6UL United Kingdom
Tel: 081-993-8111
Telex: 924213 NECLDN G
Fax: 081-992-7161
NEC Technologies, Inc.
339 North Bernardo Ave.
Mountain View, CA 94043-5223 USA
Tel: 415-528-6000
Fax: 415-528-5700
NEC Europe Ltd.
NEC House, 1 Victoria Road
London W3 6UL United Kingdom
Tel: 081-993-8111
Fax: 081-992-7161
NEC Deutschland GmbH
Steinheilstraße 4-6,
D-85737 Ismaning, Deutschland
P.O. Box 1430
Tel: 089/96274-0
Fax: 089/96274-500
NEC France S.A.
56 Rue De Hautes Pâtures
92024 Nanterre Cedex, France
Tel: 1-4649-4649
Telex: NEC PARI 610880F
Fax: 1-4769-9595
NEC Scandinavia AB
Karlsbodavägen 20,
Box 20057-161 20 Bromma, Sweden
Tel: 8-635-9200
Telex: 10339 NECBSS S
Fax: 8-635-9350
NEC Ibérica S. A.
Miniparc 1, Edificio A, Calle Azalea 1,
28109EI Soto de la Moraleja,
Alcobendas, Madrid, Spain
Tel: 1-650-1313
Fax: 1-650-1967
NEC Italia S. R. L.
Viale Leonardo Da Vinci 97 Trezzano Sul
Naviglio Milano, Italy
Tel: 2-484-151
Fax: 2-484-00875
ii
00 PROPRIET* 96.9.24, 10:40 AM2

NEC Australia Pty. Ltd.
20 Rodborough Road, Frenchs Forest,
N.S.W. 2086, Australia (P. O. Box 500)
Tel: 2-930-2000
Telex: NECSYD AA 27411
Fax: 2-930-2020
NEC (Thailand) Ltd.
19th Floor, Asoke Tower Building.
219/63-65 Sukhumvit 21 Road,
Bangkok 10110, Thailand
Tel: 2-259-1192~8
Telex: 22102 NECTHAI TH
Fax: 2-259-1199~1201
NEC Singapore Pte., Ltd.
1 Maritime Square #12-10, World Trade Centre,
Singapore 0409, Singapore
Tel: 278-1818
Telex: NECSIN RS55874
Fax: 271-7188 or 271-7288
NEC Hong Kong Ltd.
11F, Tower B, Mandarin Plaza,
14 Science Museum Road,
Tsimshatsui East, Kowloon, Hong Kong
Tel: 3690335
Telex: 50041 NECBS HX
Fax: 7245733
NEC Taiwan Ltd.
12F, No. 37, Section 3, Min-Chuan East Road,
Taipei, Taiwan R. O. C.
Tel: 02-515-0000
Fax: 02-515-2255
NEC Sales (Malaysia) Sdn. Bhd.
13th Floor, Bangunan Arab-Malaysian
Letter Box No. 13C 55,
Jalan Raja Chulan
50200 Kuala Lumpur, Malaysia
Tel: 3-238-7788
Telex: NECSEL MA20309
Fax: 3-238-7312
00 PROPRIET* 96.9.24, 10:40 AM3
iii

Chapter 1: Introduction
1
Introduction
Overview
This chapter describes the standard features of the
SuperScript 660plus printer. It has the details about
• Unpacking the printer
• System requirements for the printer
• General information about Easy and Custom
installation
02 Ch.1 Intro 96.9.24, 10:48 AM1
1—1
Chapter 1: Introduction
This guide provides installation and operating
instructions for the NEC SuperScript 660plus.
The NEC SuperScript 660plus was developed
especially for users of Windows 95, Windows 3.1 and
Windows for Workgroups. The software supports GDI
and PCL emulation modes.
Standard Features
NEC SuperScript 660plus is a printing solution
developed for Windows 95, Windows 3.1 and
Windows for Workgroups that provides complete
Windows-based printing.
This new SuperScript 660plus provides the following
features:
• Full Compatibility with Windows 95, Windows 3.1,
and Windows for Workgroups
• Software emulation for HP LaserJet (PCL 5e
Emulation)
Configuration Overview
The SuperScript 660plus program provides Easy
Installation and Custom Installation options that you
can select based on how you intend to use the printer:
Easy Installation
• GDI mode only
Custom Installation (full featured)
• GDI and PCL
For Easy Installation you can use the CD-ROM or
floppy disks. For Custom Installation, you must use the
CD-ROM.
System Requirements
The minimum free disk space required is 40MB. This
matches the Microsoft general recommendation that
users maintain 40MB of free disk space at all times
when running Windows, for best performance.
1—2
02 Ch.1 Intro 96.9.24, 10:49 AM2
• Because of SuperScript’s high speed interface, it is
important to use a properly manufactured parallel
Chapter 1: Introduction
• Photoconductor module
• Power cord
• Parallel printer cable
• Packing material
Note: Save this Users Guide, the box, and all
packing materials in case the printer needs to be
repacked.
cable. A poor quality parallel cable may affect your
output. A long cable may also cause print
problems. For best results use the 6 foot length
cable supplied with your SuperScript 660plus
printer.
• A 1.4 MB floppy drive or CD-ROM drive is also
required.
• Microsoft Windows 95, Windows 3.1, or Windows
for Workgroups 3.11.
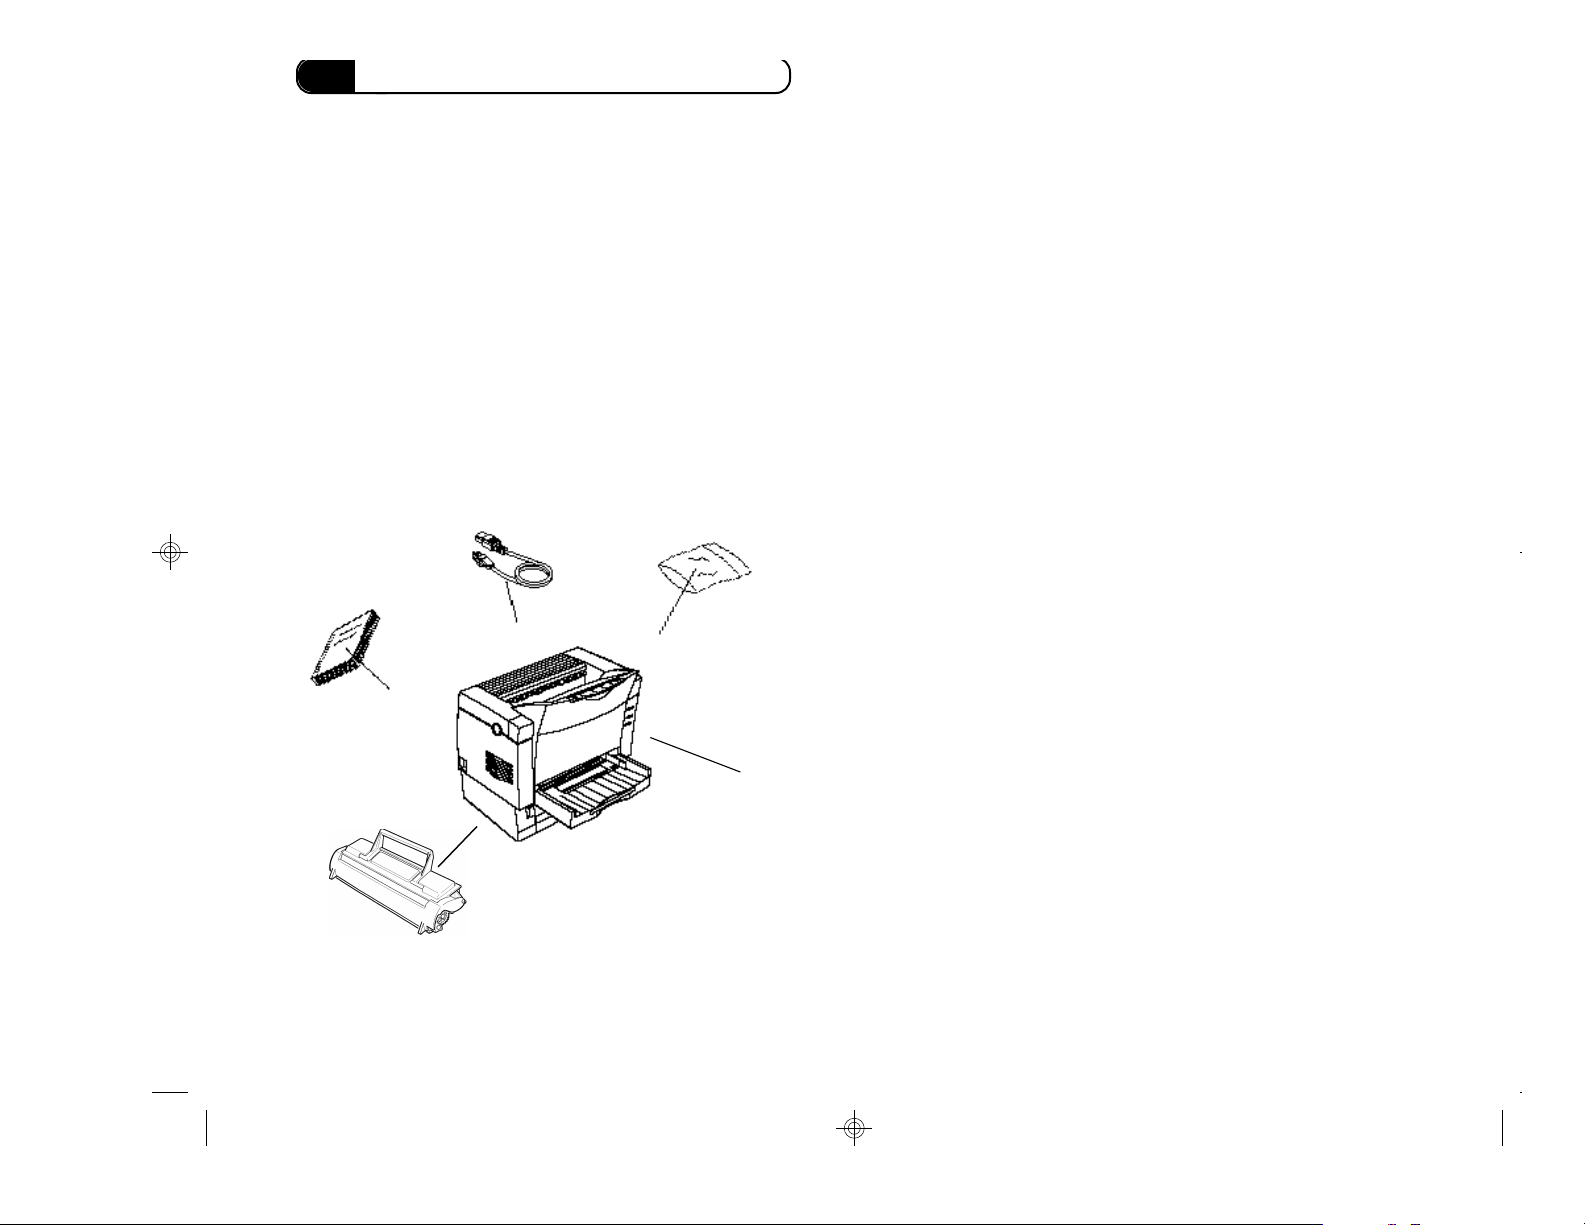
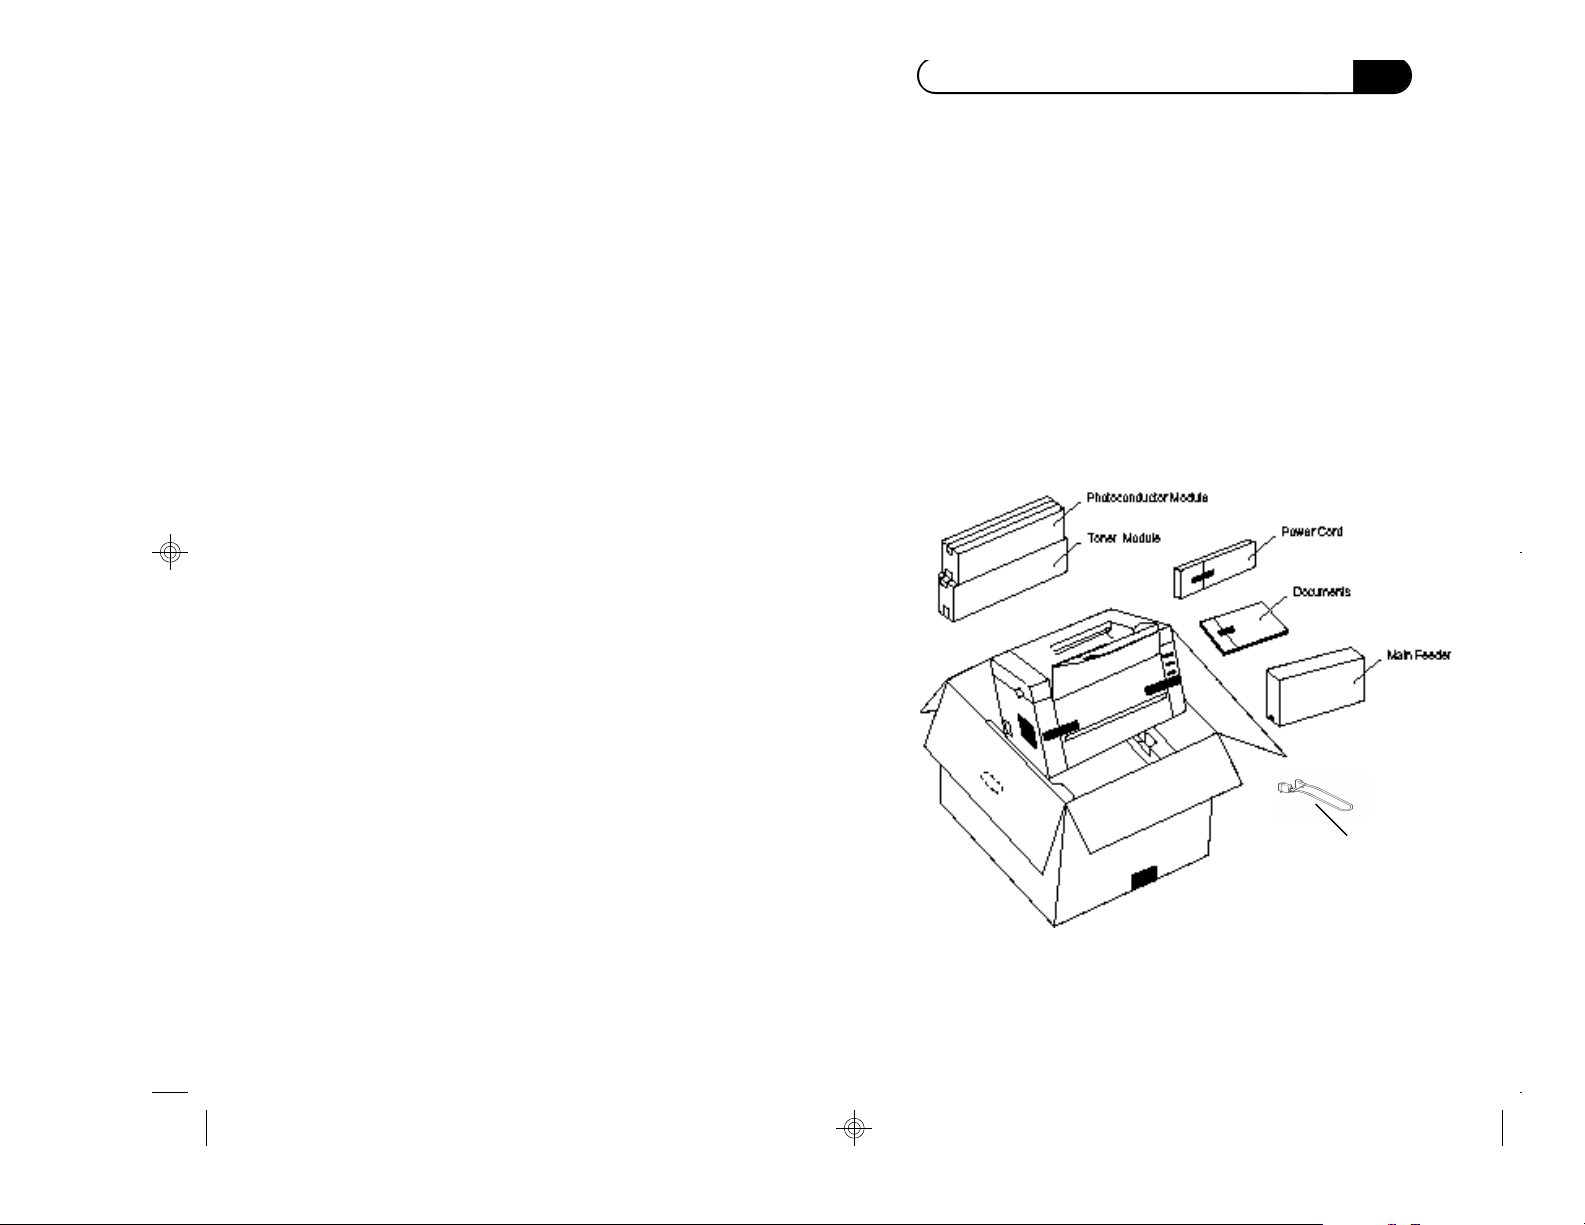
Unpacking the Printer
Follow these steps to set up your SuperScript printer.
1. Open the box and take out the documents the
software diskettes, the toner module, the
photoconductor module, the main feeder, the
parallel printer cable, and the power cord.
2. Lift out the printer together with the packing
materials and set on a flat, sturdy surface.
Locating the Printer Items
Locate the following items:
• NEC SuperScript 660plus Printer
• SuperScript 660plus software kit
• User’s Guide
• Quick Installation Guide
• Main feeder
• Toner module
02 Ch.1 Intro 96.9.24, 10:49 AM3
Parallel Printer Cable
1—3

Chapter 2: Setting Up and Using the Printer
Overview
This chapter gives you the information you need when
you set up your printer, load paper, and begin
printing. The chapter has information about
• Choosing an appropriate place for the printer
• Power sources and grounding the printer
• All internal and external printer parts
• How to install the main feeder tray
• How to load paper in the manual feeder
• How to print on both sides of the page
• How to install the photoconductor and toner
modules
• How to connect the printer cable and power cord
2
Setting Up and Using the Printer
03 Ch.2 Setting Up 96.9.24, 11:04 AM1
2—1

Chapter 2: Setting Up and Using the Printer
Precautions for Installation
Installation Site
To ensure a long life for the printer, it is important to
select an appropriate installation site. Choose a site that
meets the following requirements:
• A well-ventilated place.
• An area that will not generate ammonia or other
organic gases.
• A power outlet is nearby, so that the power cord
can be plugged in and unplugged easily.
• An area free from direct sunlight.
• A place that is out of the direct air stream of an air
conditioner, heater, or ventilator and is not subject
to very high or very low temperature or humidity.
• A stable and level location not subject to undue
vibration.
• A place free from anything that could obstruct the
printer’s heat exhaust duct.
• There are no curtains or other fabrics nearby that
could catch fire.
• There is no possibility of being splashed with
water, coffee, or any other liquid.
• The area is dust-free.
Power Source
The power source voltage requirements are as follows.
• Voltage fluctuation: 110 V 60 Hz
• Frequency fluctuation: Within ±0.3% 110V 60 Hz
Observe the following precautions when establishing
the power source for your printer:
• Use a power source with little voltage and
frequency fluctuation.
• Use an outlet with the specified voltage capacity
only.
• Be sure to insert the power cord all the way into
the outlet. The outlet should be located near the
printer and be easily accessible, so that the power
cord can be unplugged immediately when
necessary.
• Be sure that outlet is visible, and not hidden
behind the printer or any other office equipment.
• If any other electrical equipment uses the same
outlet, make sure that the capacity of the outlet is
not exceeded.
• If an extension cord is needed, use one with a
capacity greater than the power consumption of
the printer. A cord that falls short of the capacity
requirements could cause a fire.
• Never connect any other appliances or machines
by means of a multiple socket to the outlet you use
for the printer.
Grounding
Always ground the printer to prevent electrical shocks
in the case of electrical leakage. If you are unable to
make grounding connections consult your NEC
Technical Support at 1-800-632-4650 (toll free).
03 Ch.2 Setting Up 96.9.24, 11:05 AM2
2—2
Chapter 2: Setting Up and Using the Printer
Connect the grounding wire to
• The outlet’s ground terminal
• A grounding contact that complies with local
electrical standards.
Caution! Never connect the grounding wire to a gas
pipe, to the grounding wire for a telephone, or to a
water pipe.
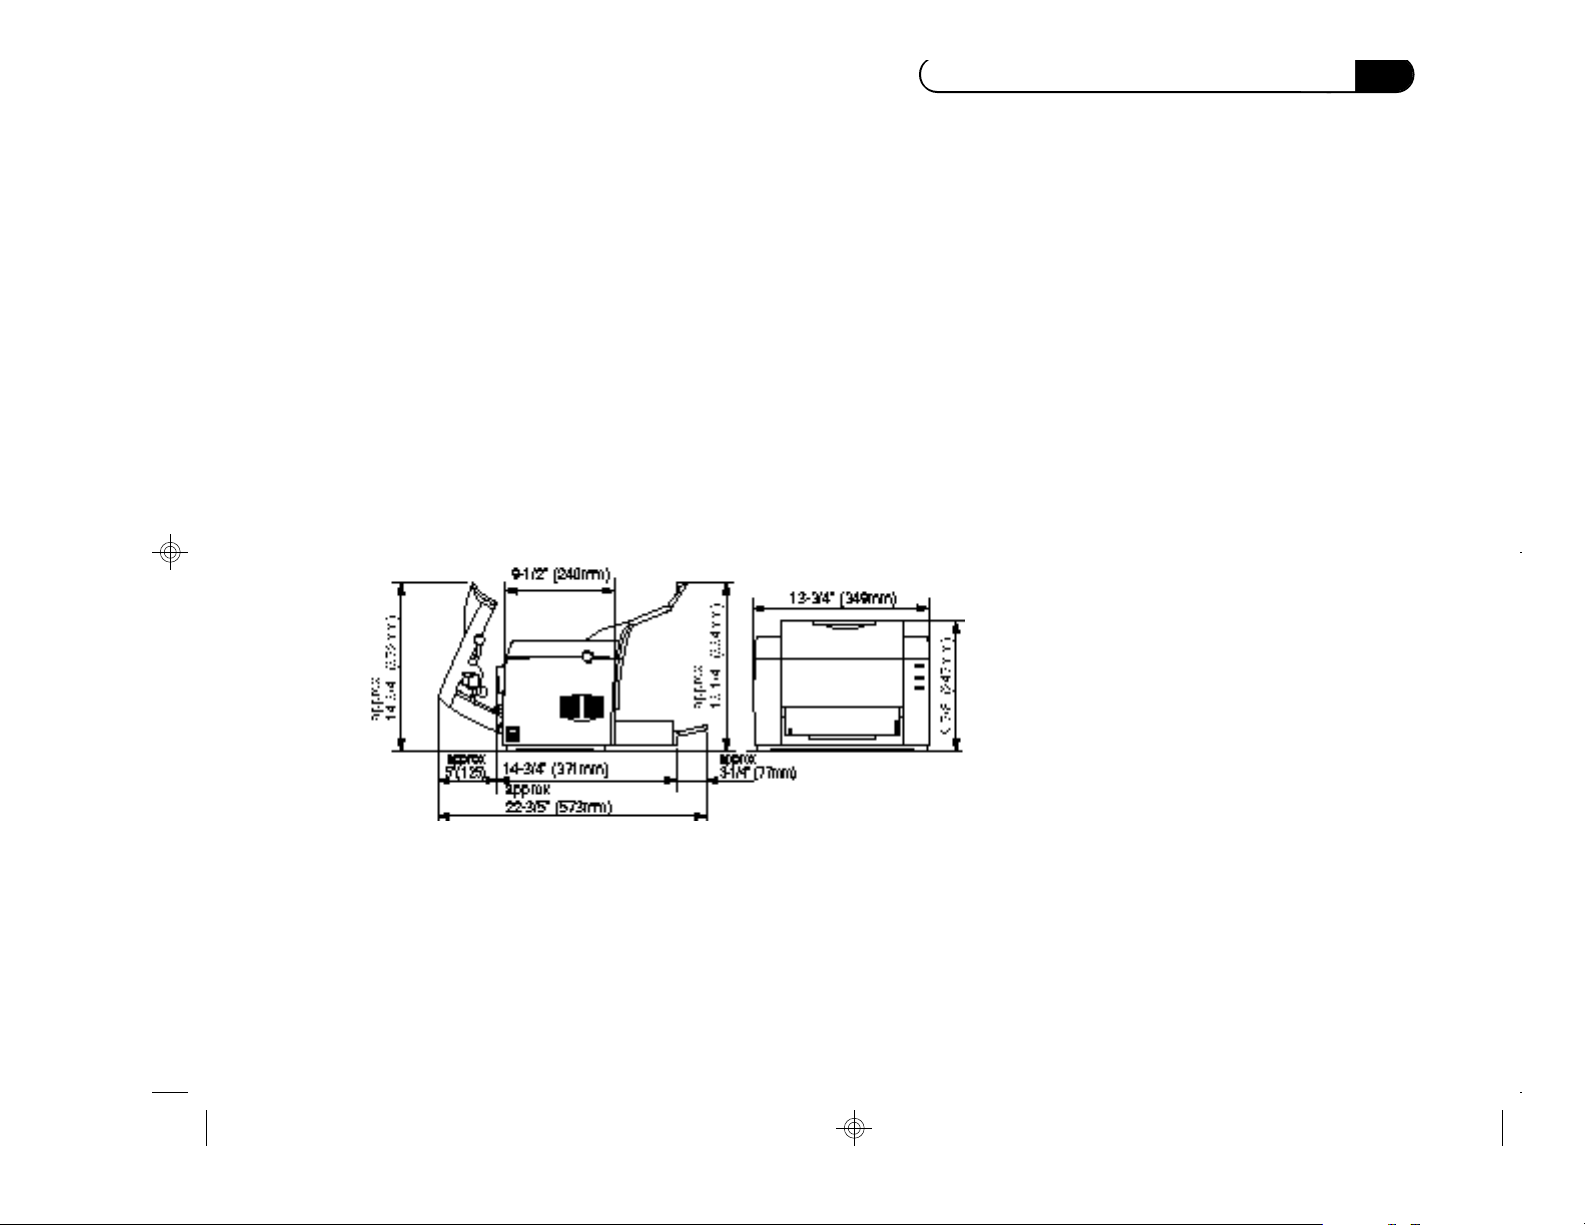
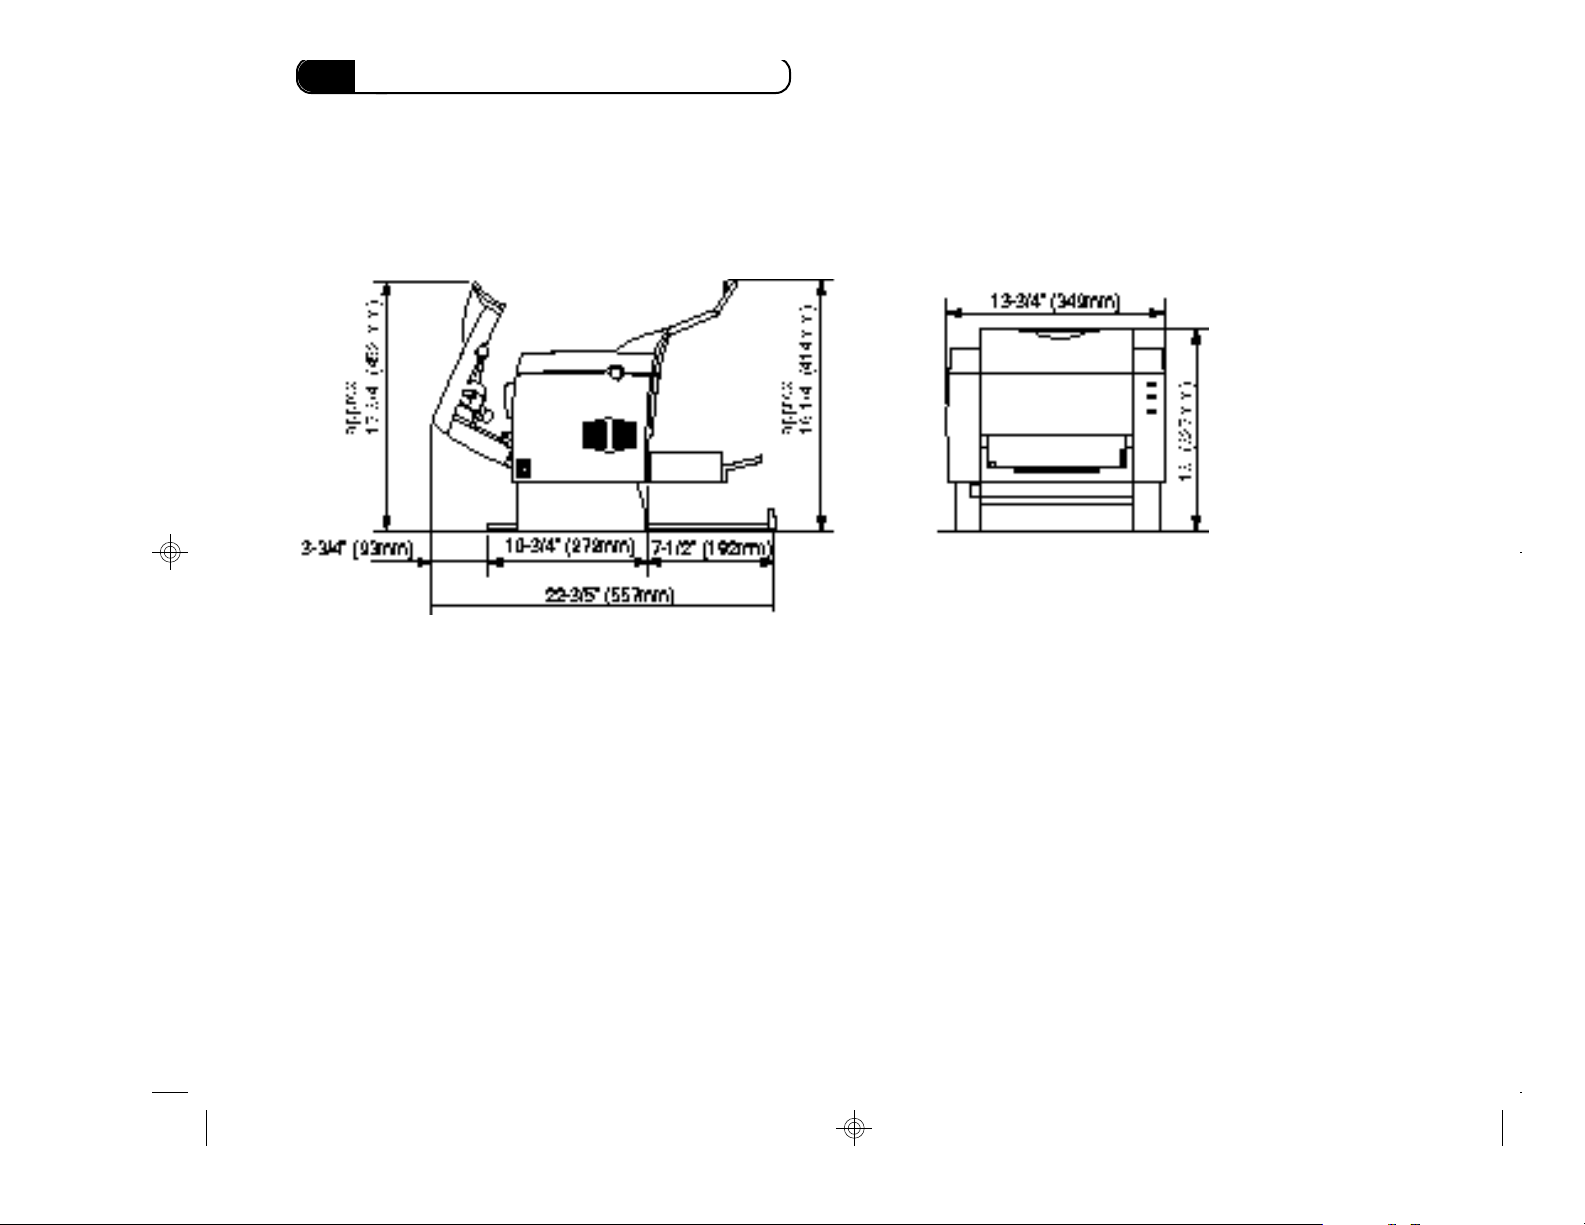
Printer Dimensions and Space Requirements
To ensure easy printer operation, supply replacement,
and service maintenance, adhere to the recommended
space requirements detailed below.
Operating Environment
The operating environmental requirements of the
printer are as follows:
Temperature: 50°F to 90.5°F (10°C to 32.5°C) with a
fluctuation of 10°per hour
Humidity: 20% to 80% RH with a fluctuation of
20% per hour
SuperScript 660plus with the optional
03 Ch.2 Setting Up 96.9.24, 11:05 AM3
2—3
Chapter 2: Setting Up and Using the Printer
250 sheet hopper mounted
Note: Because of the NEC SuperScript 660plus high
speed interface, it is important that you use the parallel
cable that is included with your SuperScript 660plus
printer. Using a poor quality parallel cable can affect your
output.
2—4
03 Ch.2 Setting Up 96.9.24, 11:05 AM4
Chapter 2: Setting Up and Using the Printer
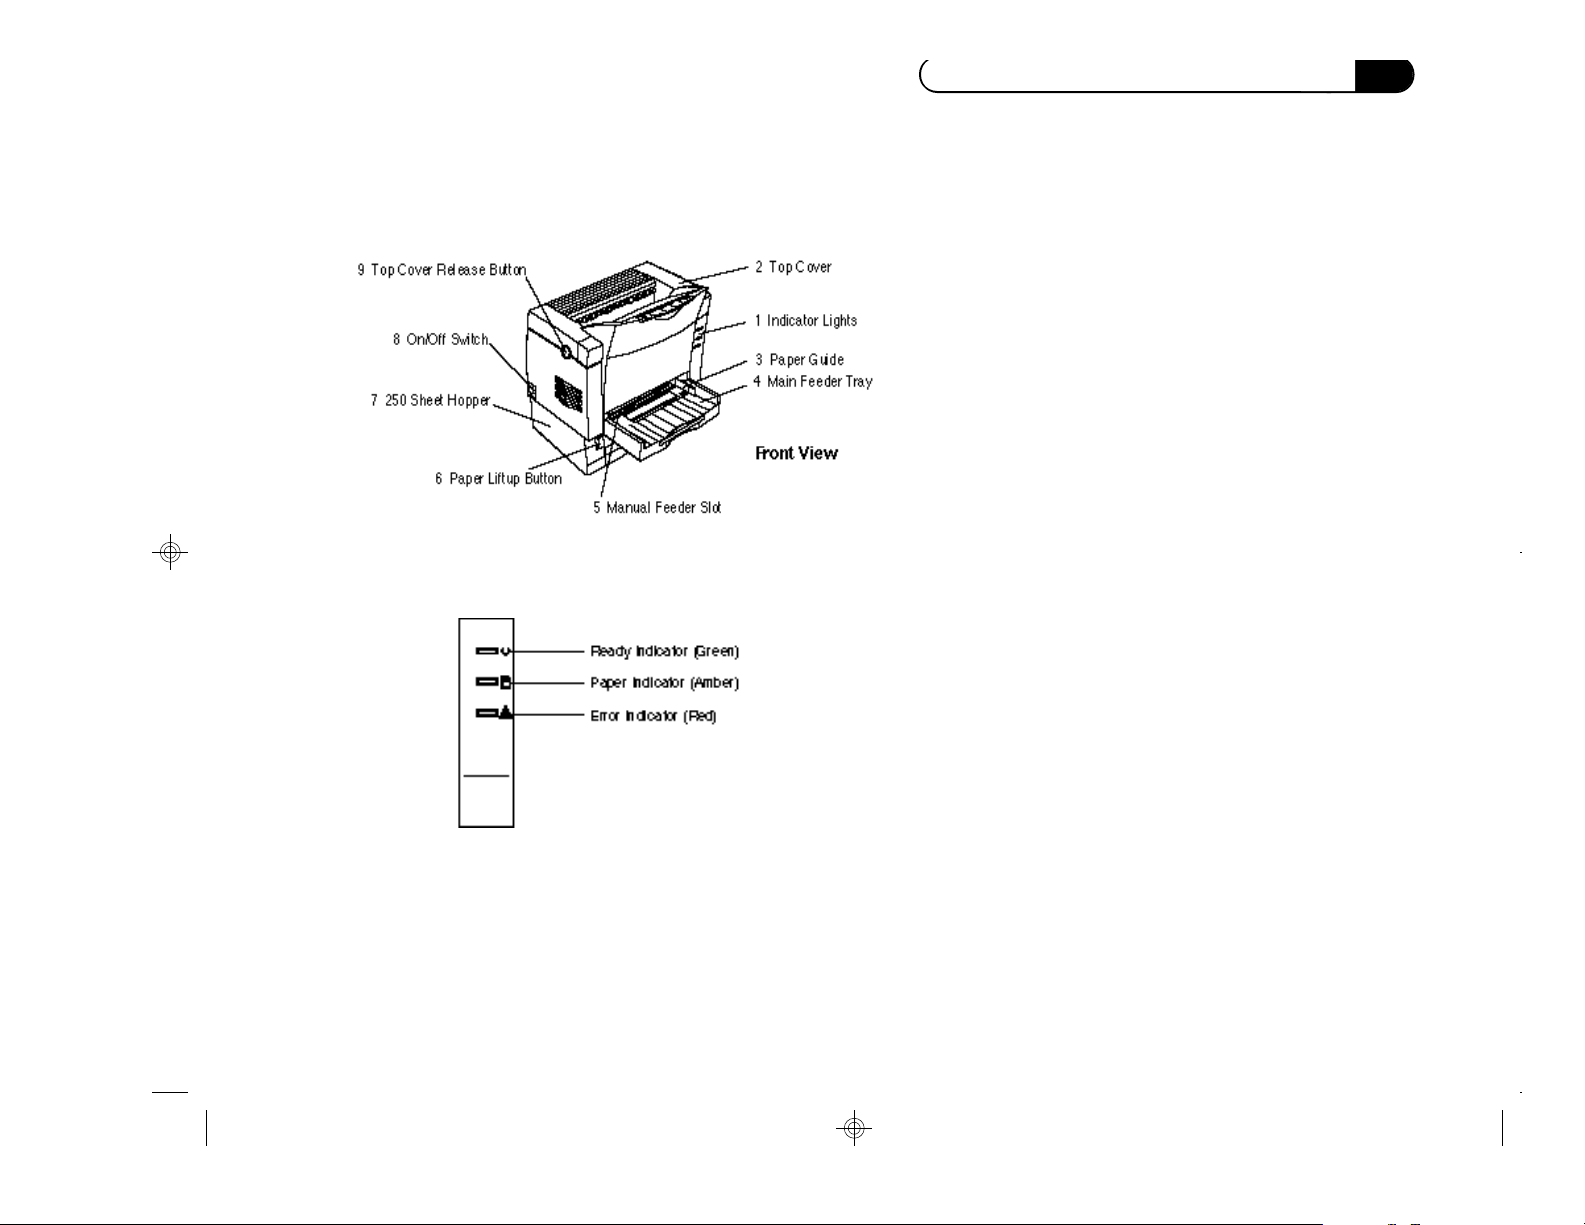
• Ready Indicator light – the upper light shows that
the printer is ready (steady green), warming up,
processing a job (rapid blink), or in power saving
mode (slow blink).
• Paper Indicator Light – the middle light shows
that the printer detects that the paper tray is empty
(steady amber), or that you are using the manual
feed (blinking).
• If you have the second hopper installed, “Pick
Miss” will appear on your screen if the paper did
not feed.
• Error Indicator – the lower light shows that the
printer detects that the cover is open, that there is
no toner module, no photoconductor module, or
that there is a paper jam (steady red), or that there
is a data error (blinking).
All indicators light when the printer is turned on, or
when there is a printer hardware error.
2. Top Cover (and output tray) – provides access to
the inside of the printer and, when printing, serves
as an output tray. It stacks the printed sheets with
the printed side facing down.
Maximum capacity: 100 sheets. (17 lb. paper)
3. Paper Guide – slides to the size of the paper.
(Main Feeder)
External Printer Parts
The following is an external view of the printer and its
parts.
1. Indicator Lights – three LED lights that indicate the
operating status of the printer.
03 Ch.2 Setting Up 96.9.24, 11:06 AM5
2—5
Chapter 2: Setting Up and Using the Printer
4. Main (multipurpose) Feeder – holds up to
150 sheets of paper.
5. Manual Feeder Slot – you insert a sheet of
paper or an envelope manually into this slot
in the manual feed print mode.
6. Paper Liftup Button – used when loading
paper in the (optional) 250 sheet hopper.
7. 250 Sheet Hopper (optional) – when fitted to
the printer, and used with the multipurpose
paper tray, permits printing up to 400 pages.
8. On/Off Switch
9. Top Cover Release Button – press to swing
the top cover up.
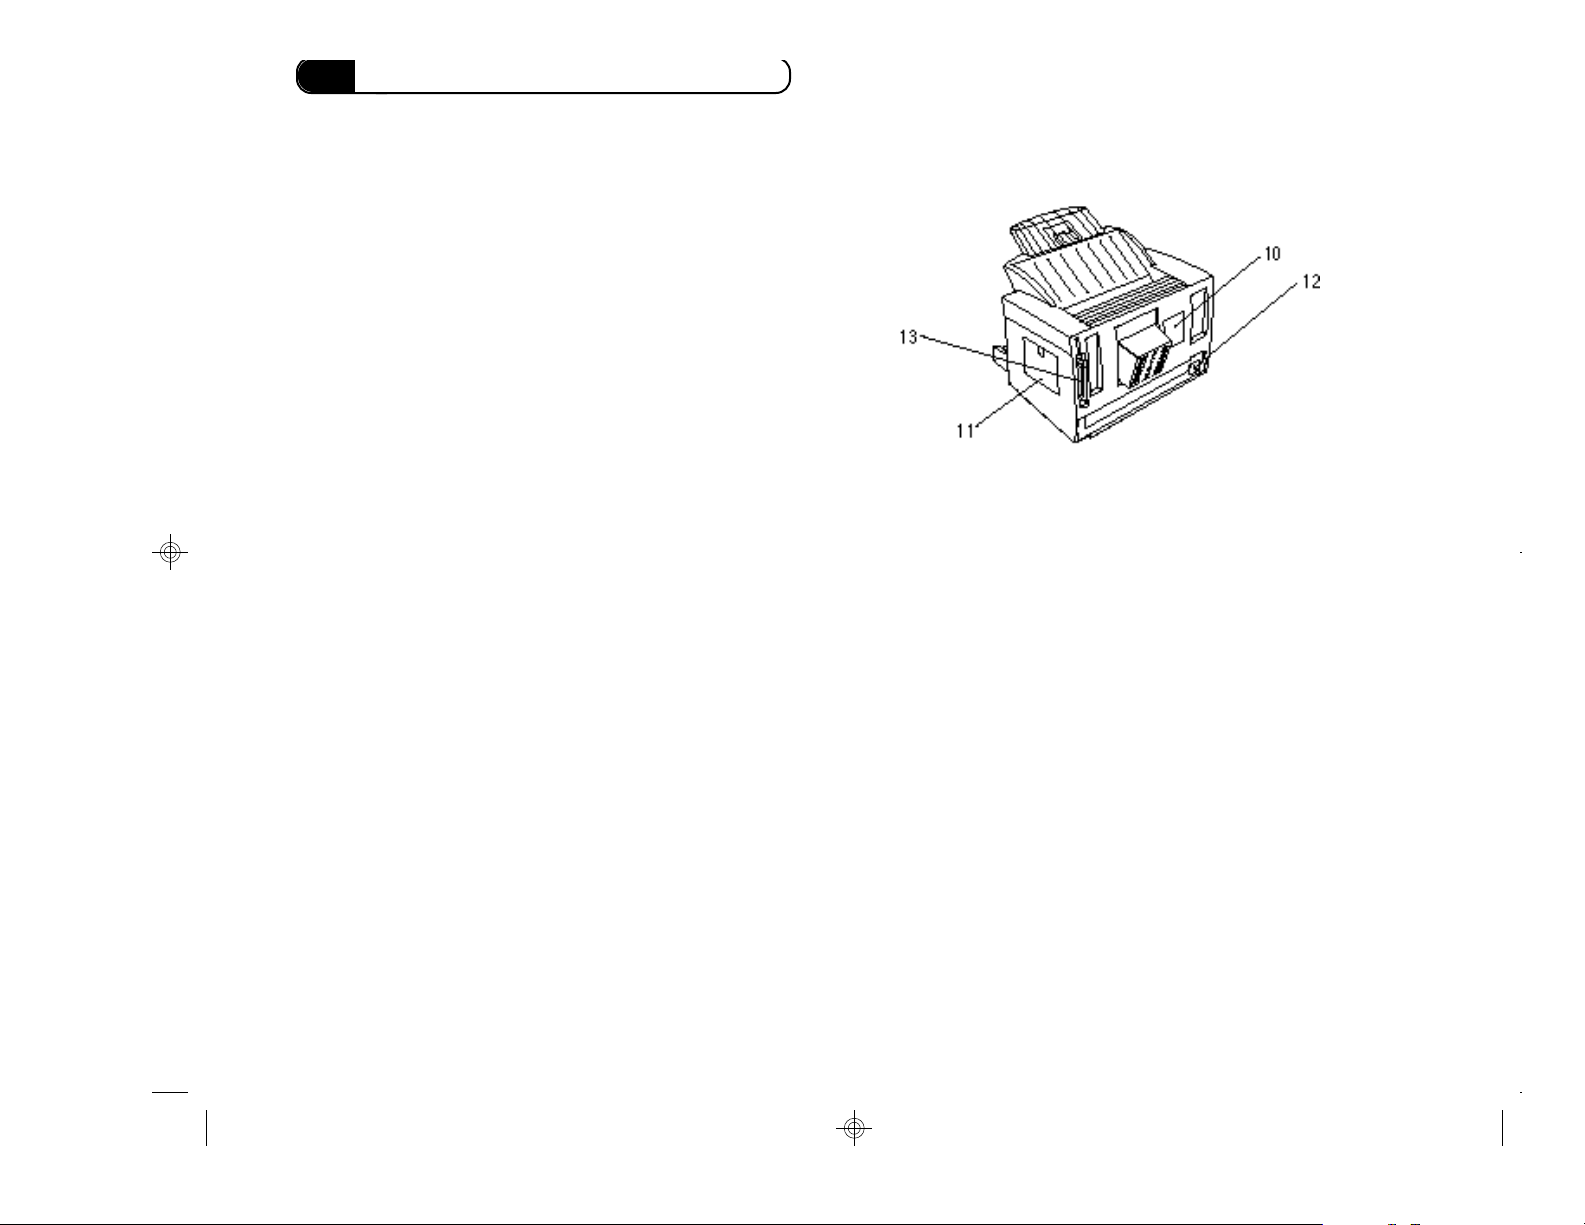
10. Model Number – indicates the model
number and the serial number of your
printer. You enter these numbers on your
warranty registration.
11. Memory Cover – provides access to the inside of
the printer, to the optional memory expansion
module. The printer’s memory can be expanded by
adding a Single Inline Memory Module (SIMM),
available from your local dealer.
2—6
03 Ch.2 Setting Up 96.9.24, 11:07 AM6
12. Power Plug – the printer’s power cord is inserted
here.
13. Parallel Port – provides the connection to the
computer’s Centronics-type parallel interface
connector.
Chapter 2: Setting Up and Using the Printer
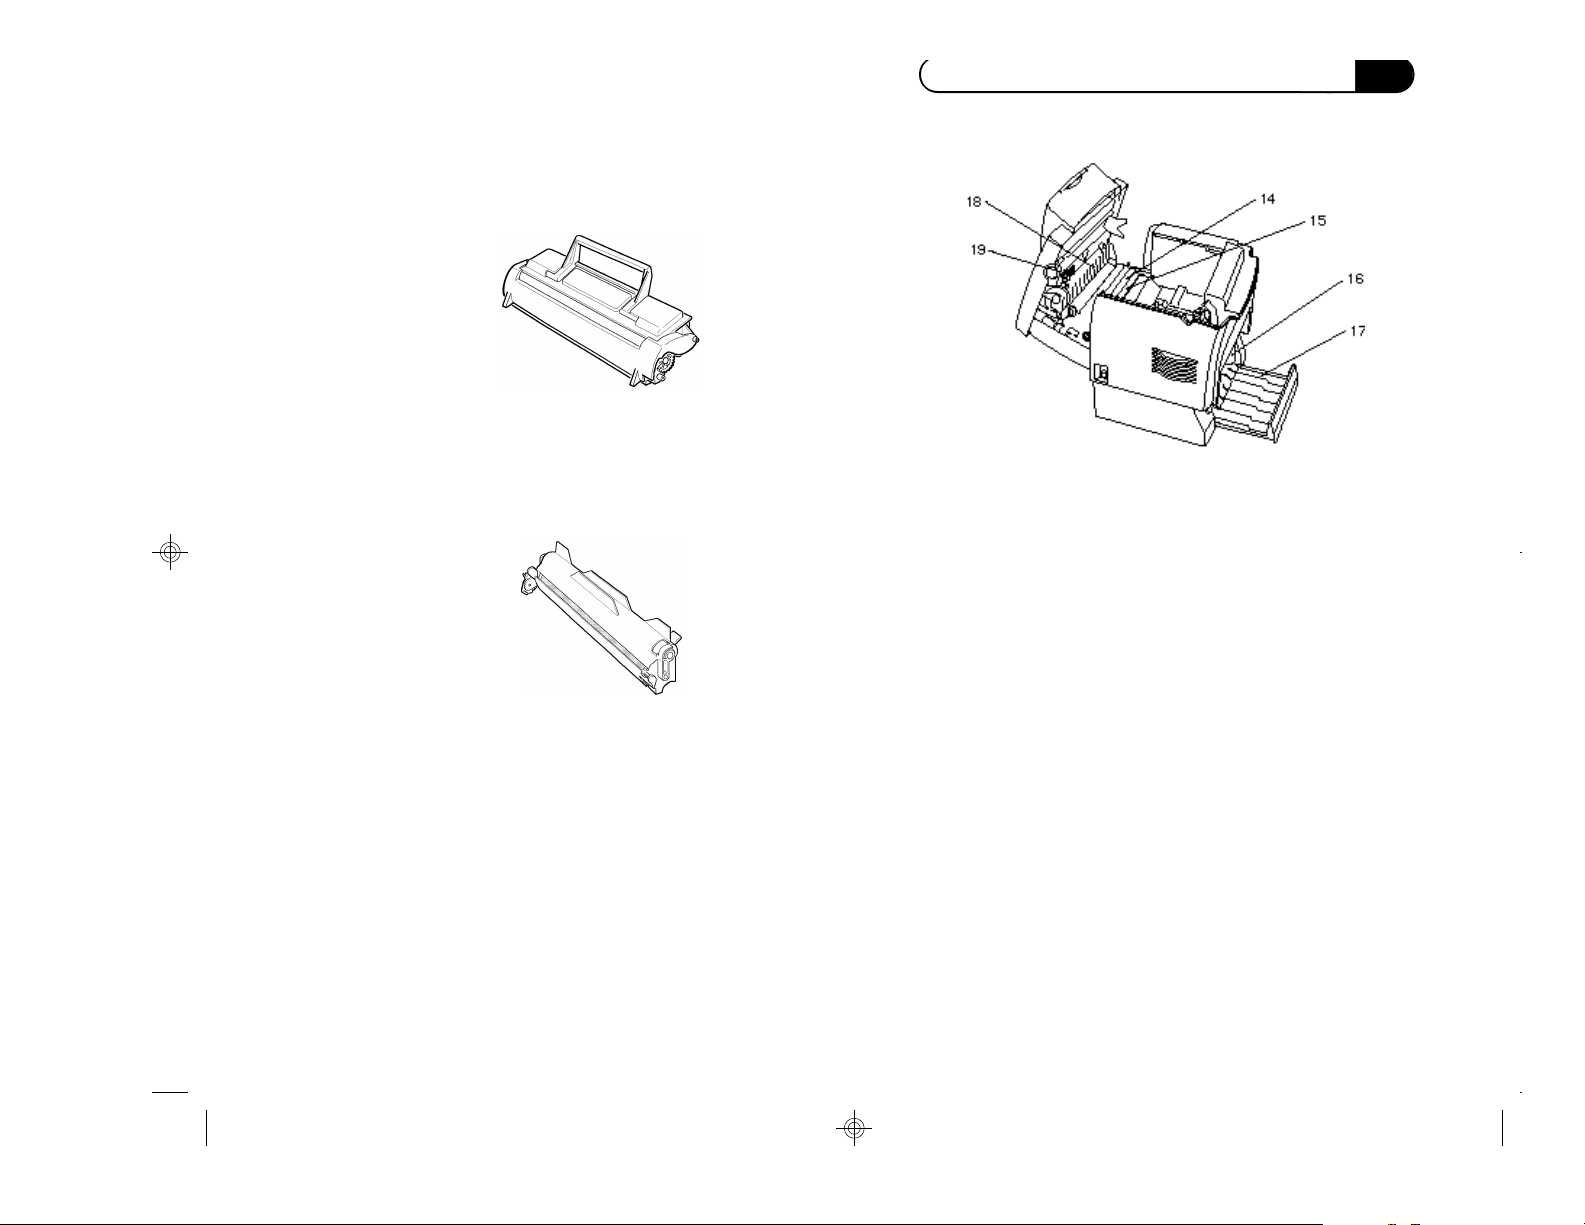
Internal Printer Parts
Toner Module – contains the toner used in the printing
process, which you can replace when the toner runs
out. (Approximately 3,000 pages at 5% coverage.)
Photoconductor Module – contains the
electrophotographic (EP) drum. Handle with the
utmost care. (Estimated life 20,000 pages)
14. Transport Roller – moves the paper through the
printer.
15. Transfer Unit (discharge plate) – a high voltage
plate that attracts the toner to the paper.
16. Paper Guide (for the 250 sheet hopper) – changes
the guide position to the size of the paper.
17. 250 Sheet Hopper (Optional) – when fitted to the
printer, and used with the multipurpose paper
tray, permits printing up to 400 pages.
18. Fuser Unit – fixes the toner image on the paper.
19. Transfer Unit Cleaner – used to clean the transfer
unit.
03 Ch.2 Setting Up 96.9.24, 11:07 AM7
2—7
Chapter 2: Setting Up and Using the Printer
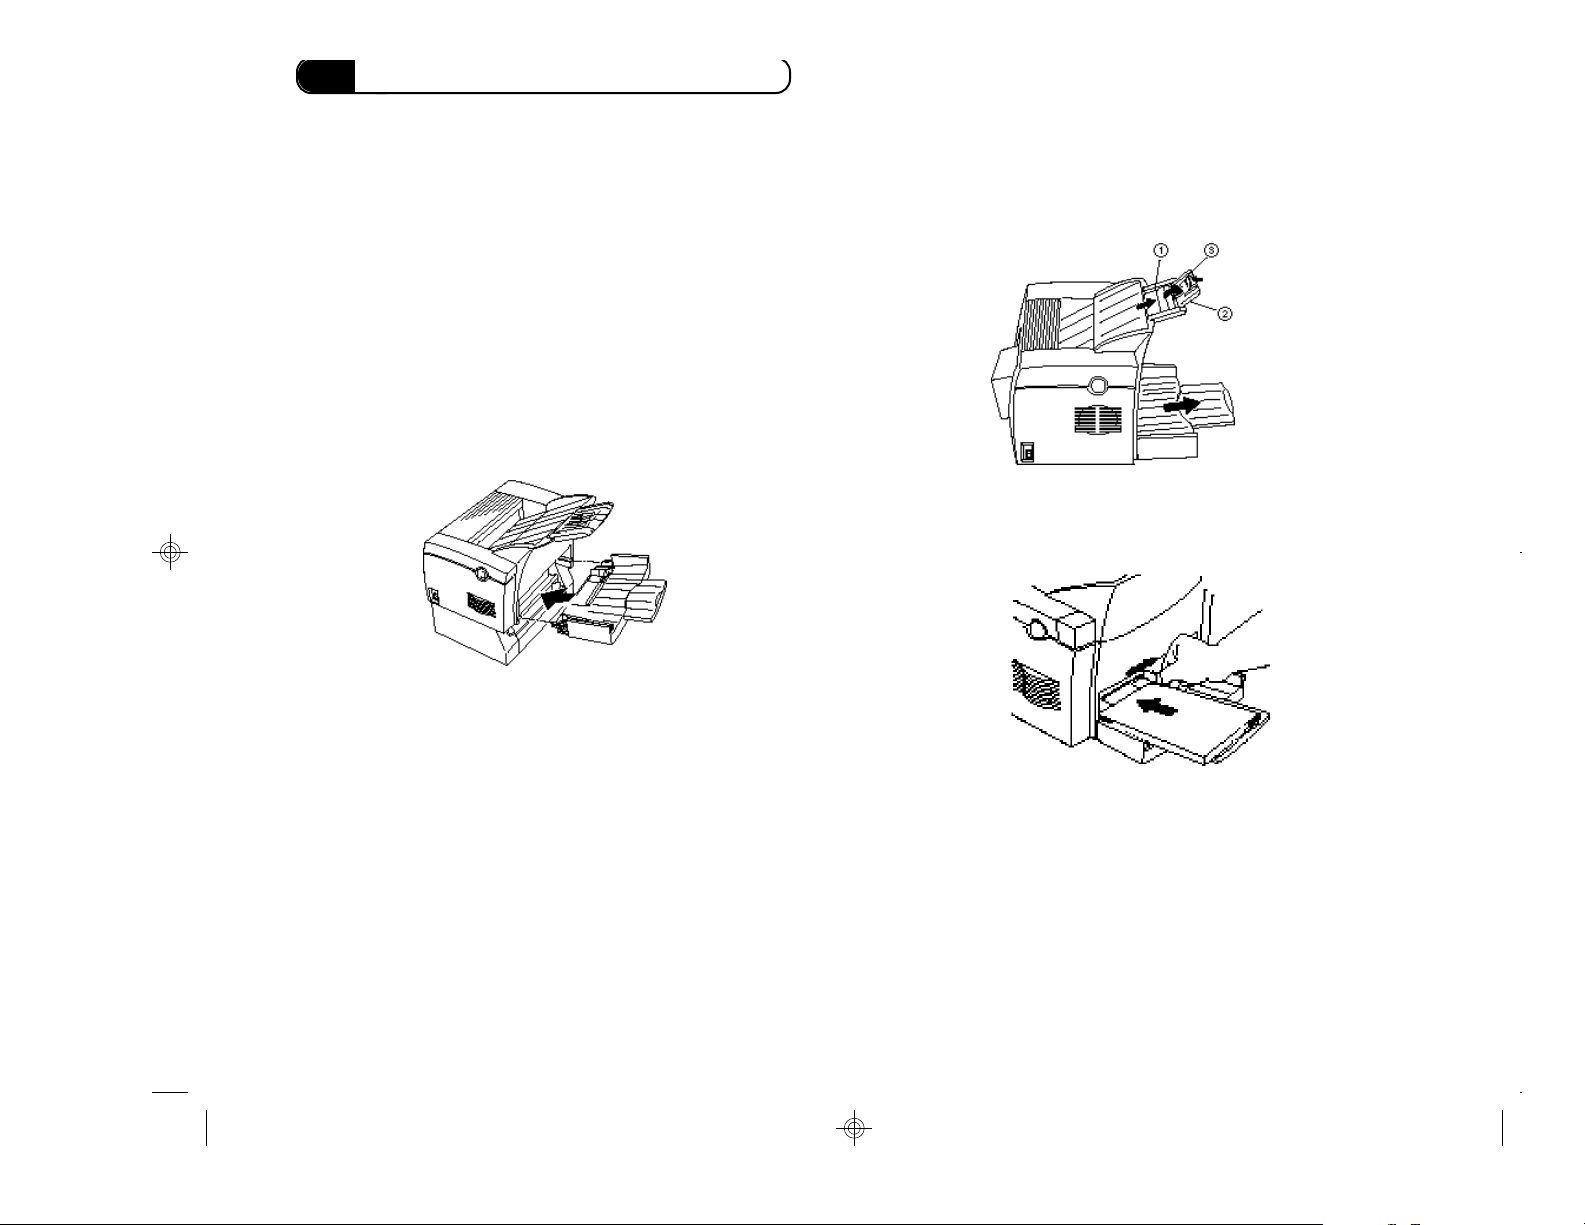
Installing the Main (Multipurpose) Feeder Tray
Referring to the figure of the external printer parts,
attach the multipurpose tray as follows:
1. Hold the multipurpose tray with both hands.
2. Carefully set the tray into the printer at an upward
angle.
3. Once the tray is completely inserted, gently press
down to lock the tray into place. Be sure it is
pressed down fully.
Raise the stopper e when using a letter-size or A4
size paper.
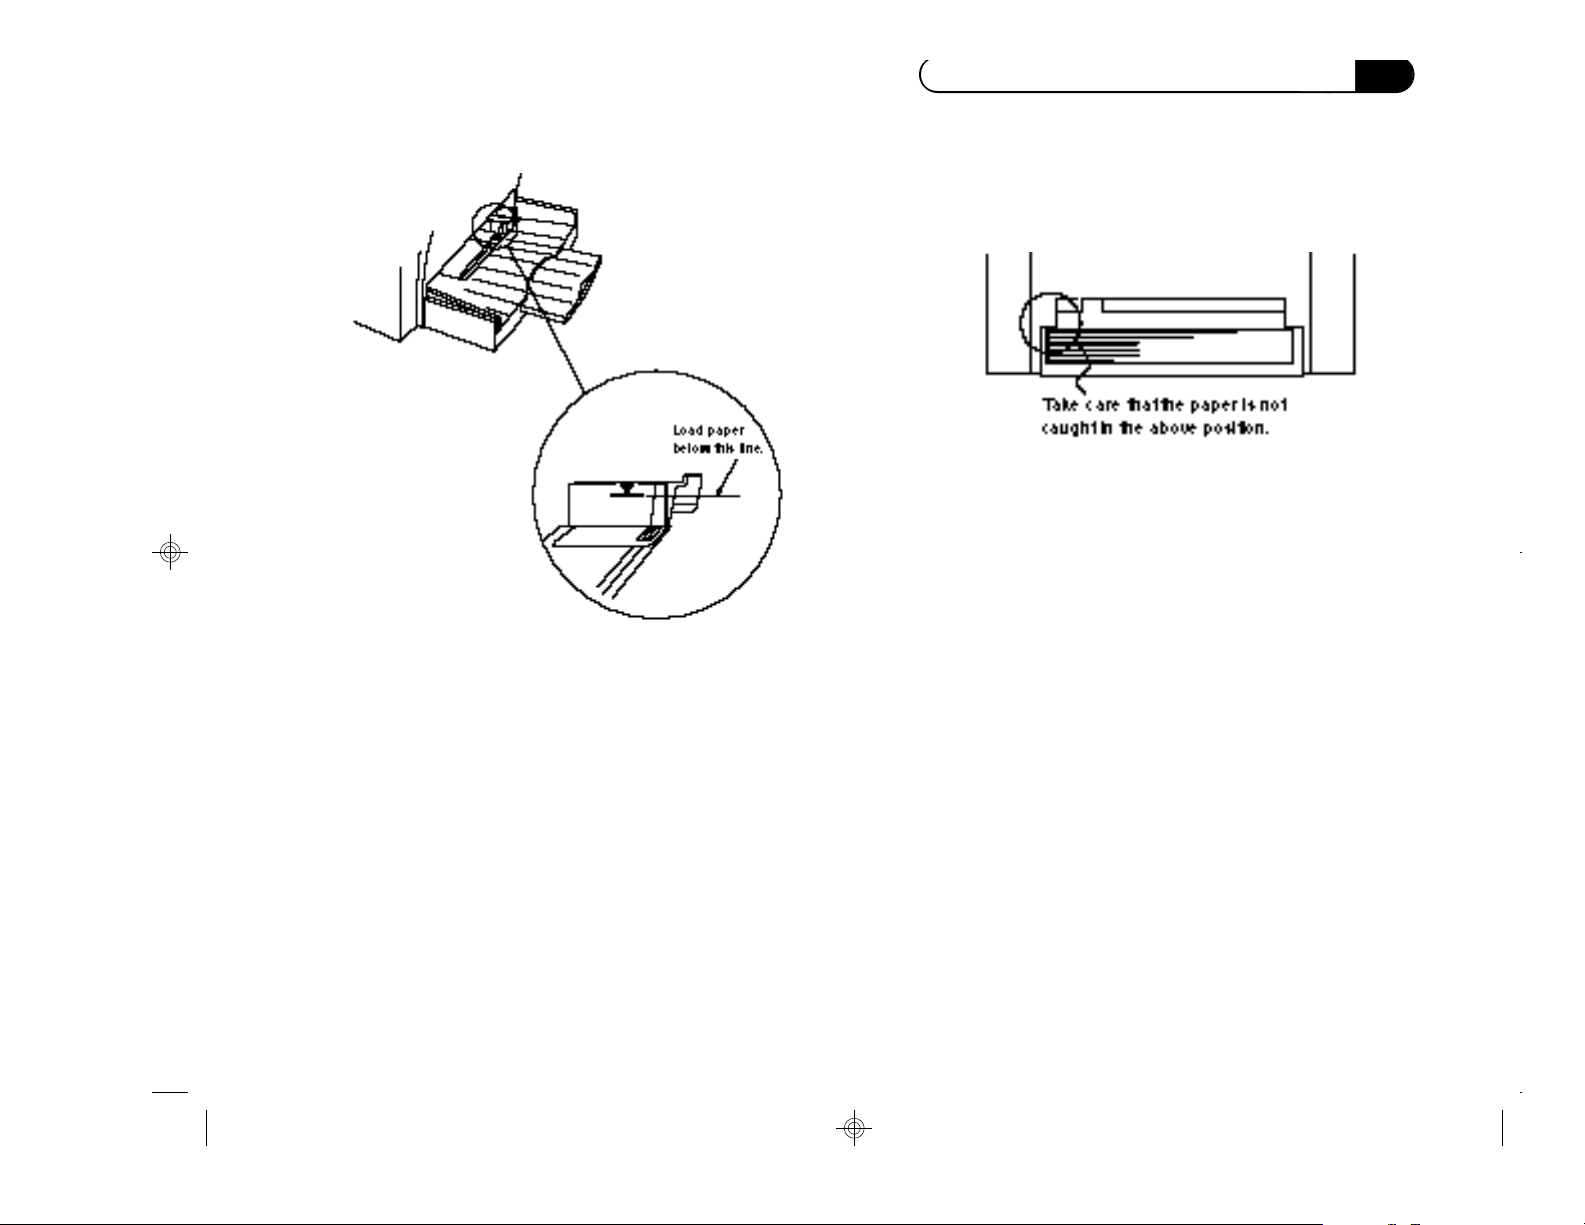
2. Load a stack of paper evenly into multipurpose
tray. Adjust the paper guide to fit snugly against
side of the paper:
Loading Paper
A maximum of 150 sheets (17 lb. paper) can be loaded
into the tray at once.
1. Pull out the extension piece of the multipurpose
tray.
Pull out the larger extension guide q, then fold out
the smaller extension guide w for paper out tray.
2—8
03 Ch.2 Setting Up 96.9.24, 11:08 AM8
Chapter 2: Setting Up and Using the Printer
Note: Do not load additional paper until all the paper
in the tray has fed through the printer.
Take care not to overload the tray. Do not add paper
while resetting the printer.
03 Ch.2 Setting Up 96.9.24, 11:08 AM9
2—9
Chapter 2: Setting Up and Using the Printer
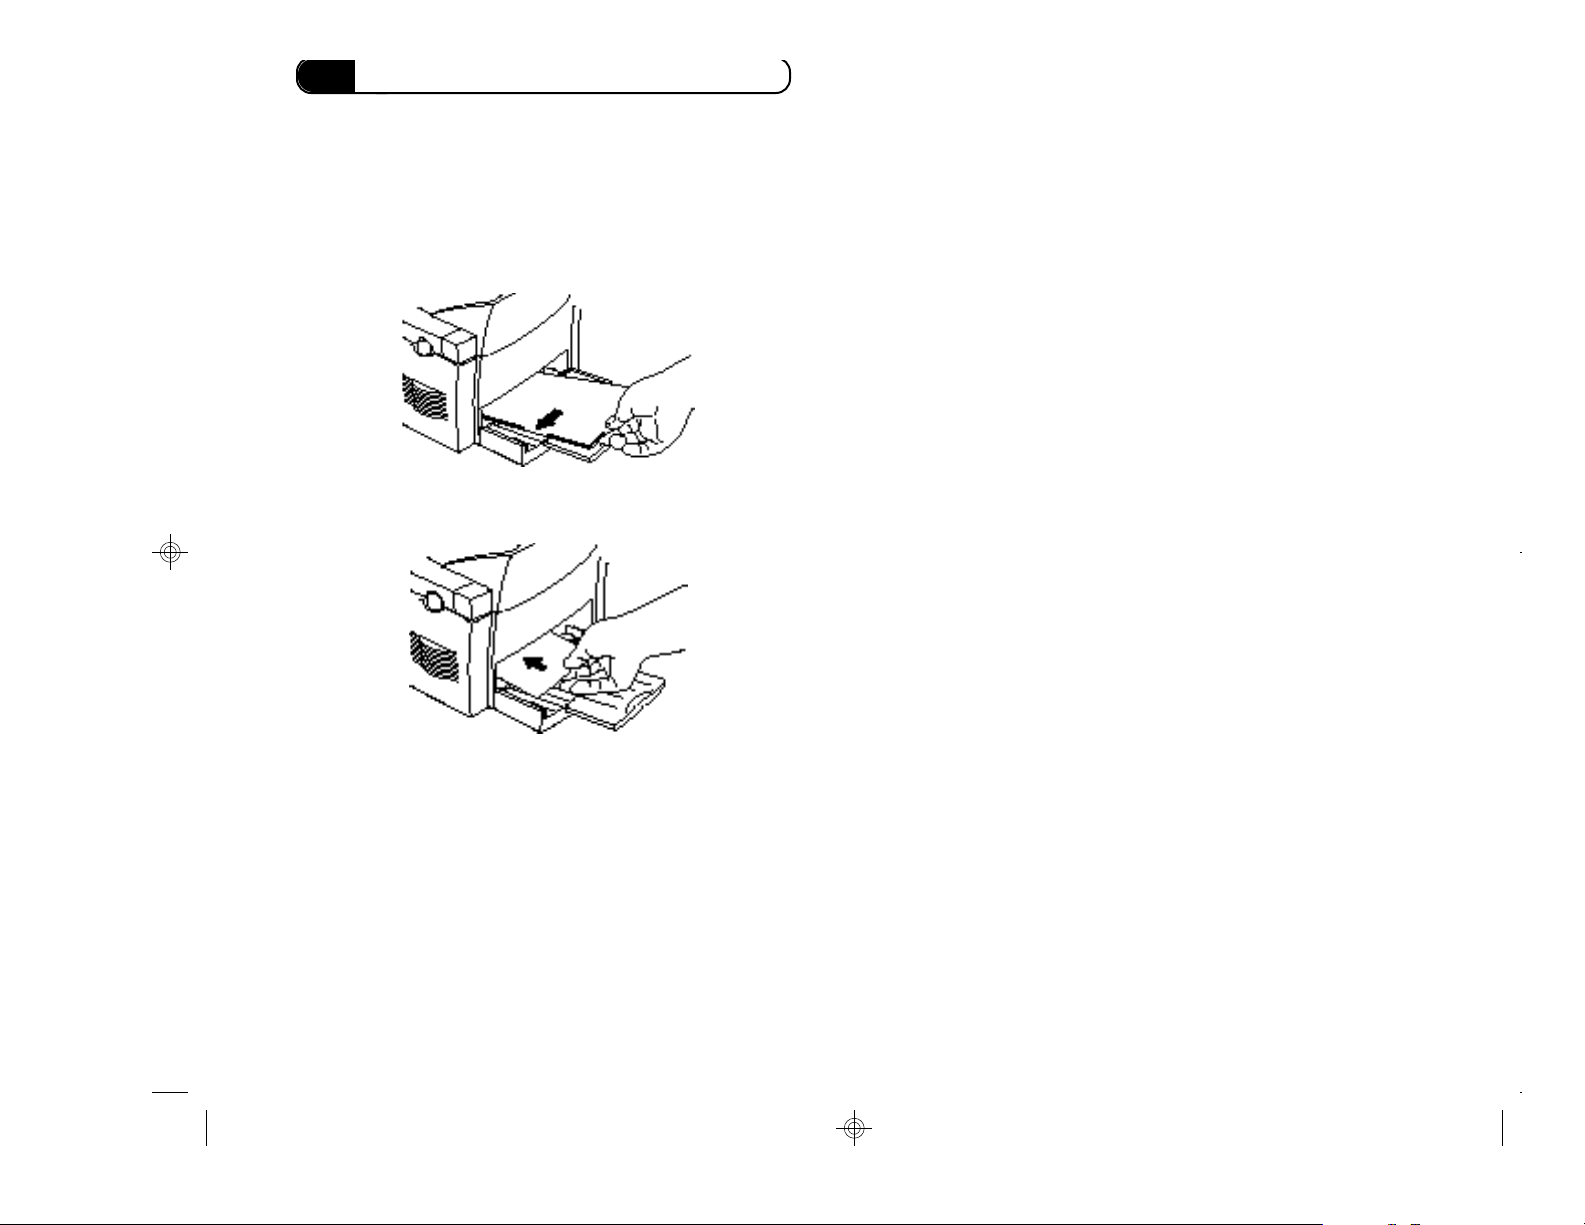
Loading the Manual Feeder
1. With the side to be printed facing up, press the
edge of the paper against the left side in the
manual feeding slot.
2. Insert one sheet of paper until it stops.
the slot at a time. Insert envelopes face up with the
narrow end first, and the flap to the right. Refer to
the paper path sticker in the accessory kit for a
small diagram showing you how to insert paper
and envelopes.
Duplex Printing
When printing on both sides of the paper (manually),
observe the following:
• Papers are not fed from the main feeder tray. Use
the manual feeder slot instead.
• Be sure the temperature is between 59°F to 77° F
(15° to 25°C) and the humidity is between 20 to 70%
• Be sure the image density of the text on the first
printed side does not exceed a black to white ratio
of 5%.
• Use paper 24 lbs. or heavier.
Insert only one sheet of paper or one envelope into
2—10
03 Ch.2 Setting Up 96.9.24, 11:08 AM10
• Use paper right after being unwrapped.
Chapter 2: Setting Up and Using the Printer
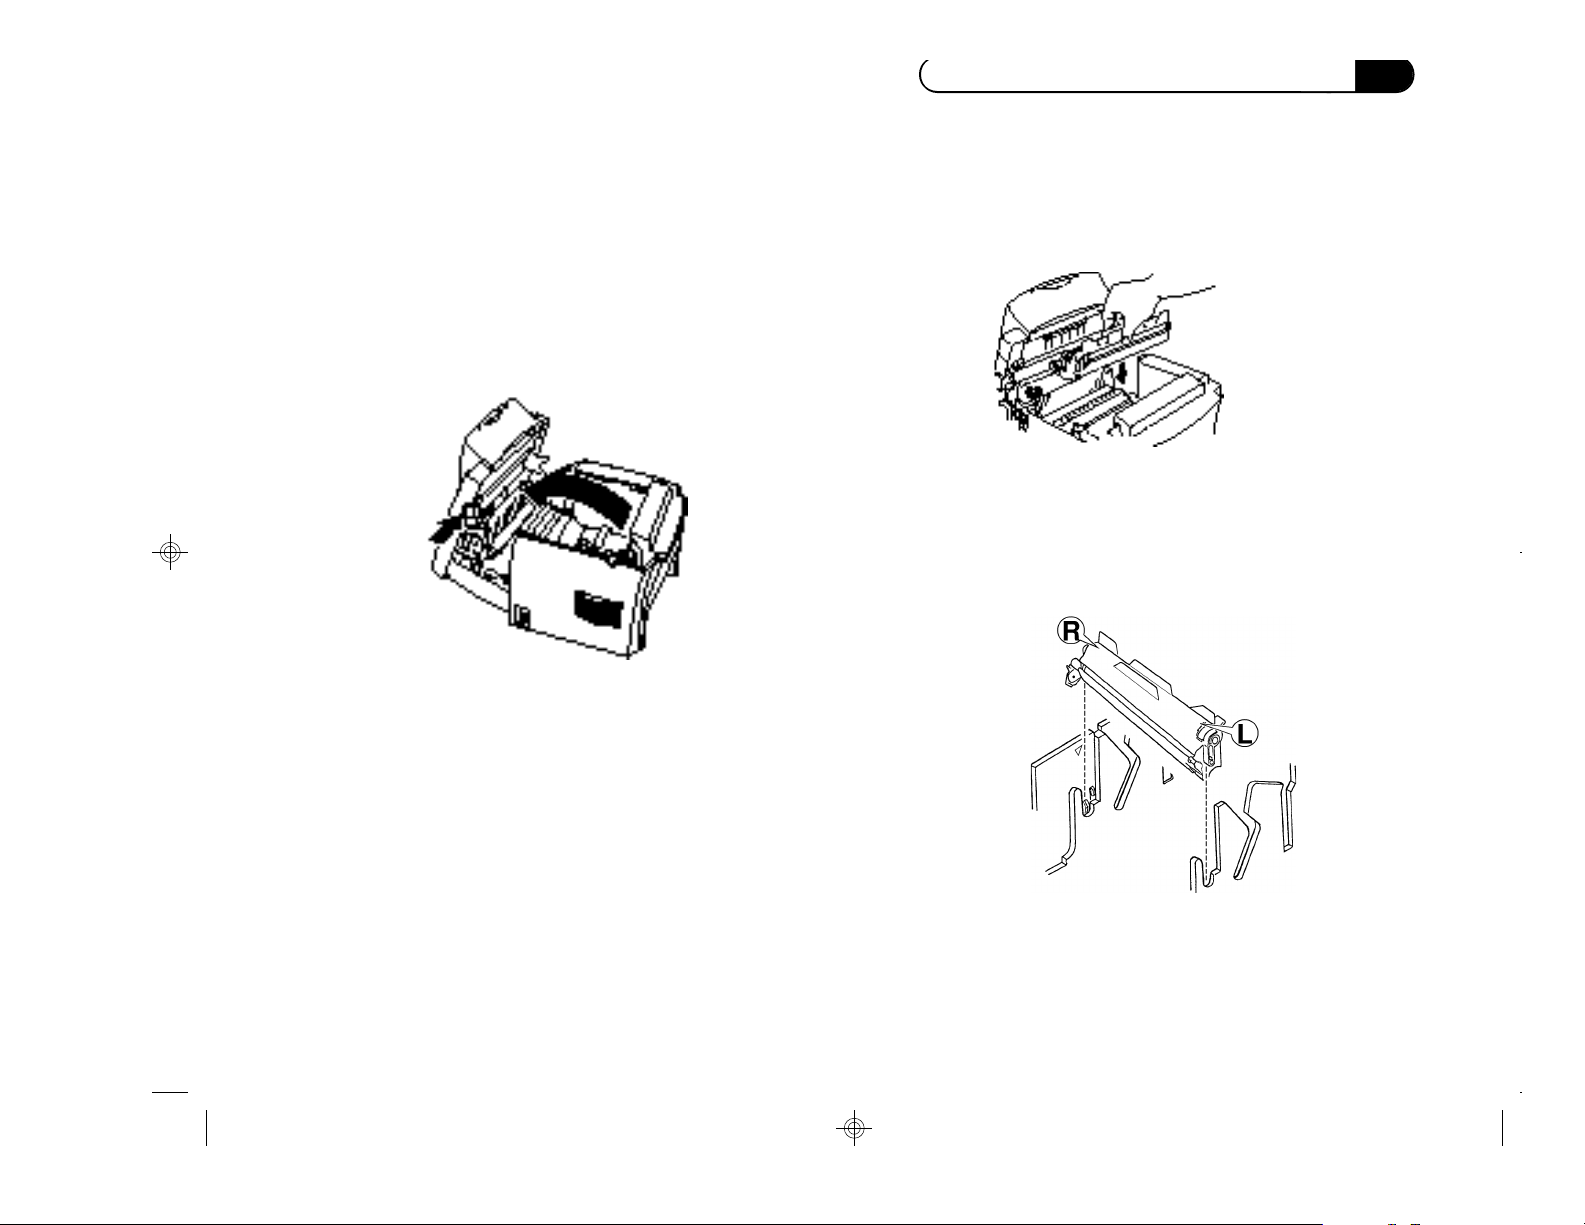
3. Install the photoconductor in the printer, aligning
the guides with the slits inside the printer frame.
Press it down firmly.
Installing the Photoconductor Module and
the Toner Module
Installing the photoconductor module and toner
module as follows:
1. Press the top cover release button, and swing the
top cover open completely.
2. Unpack the photoconductor module from its
carton.
Hold the photoconductor so that you see the L (left)
and R (right) markers on it, indicating how you hold it.
Caution! Whenever the photoconductor module is
removed from the printer be sure to cover it with a
cloth to prevent exposure to light.
03 Ch.2 Setting Up 96.9.24, 11:09 AM11
Right Left
2—11
Chapter 2: Setting Up and Using the Printer
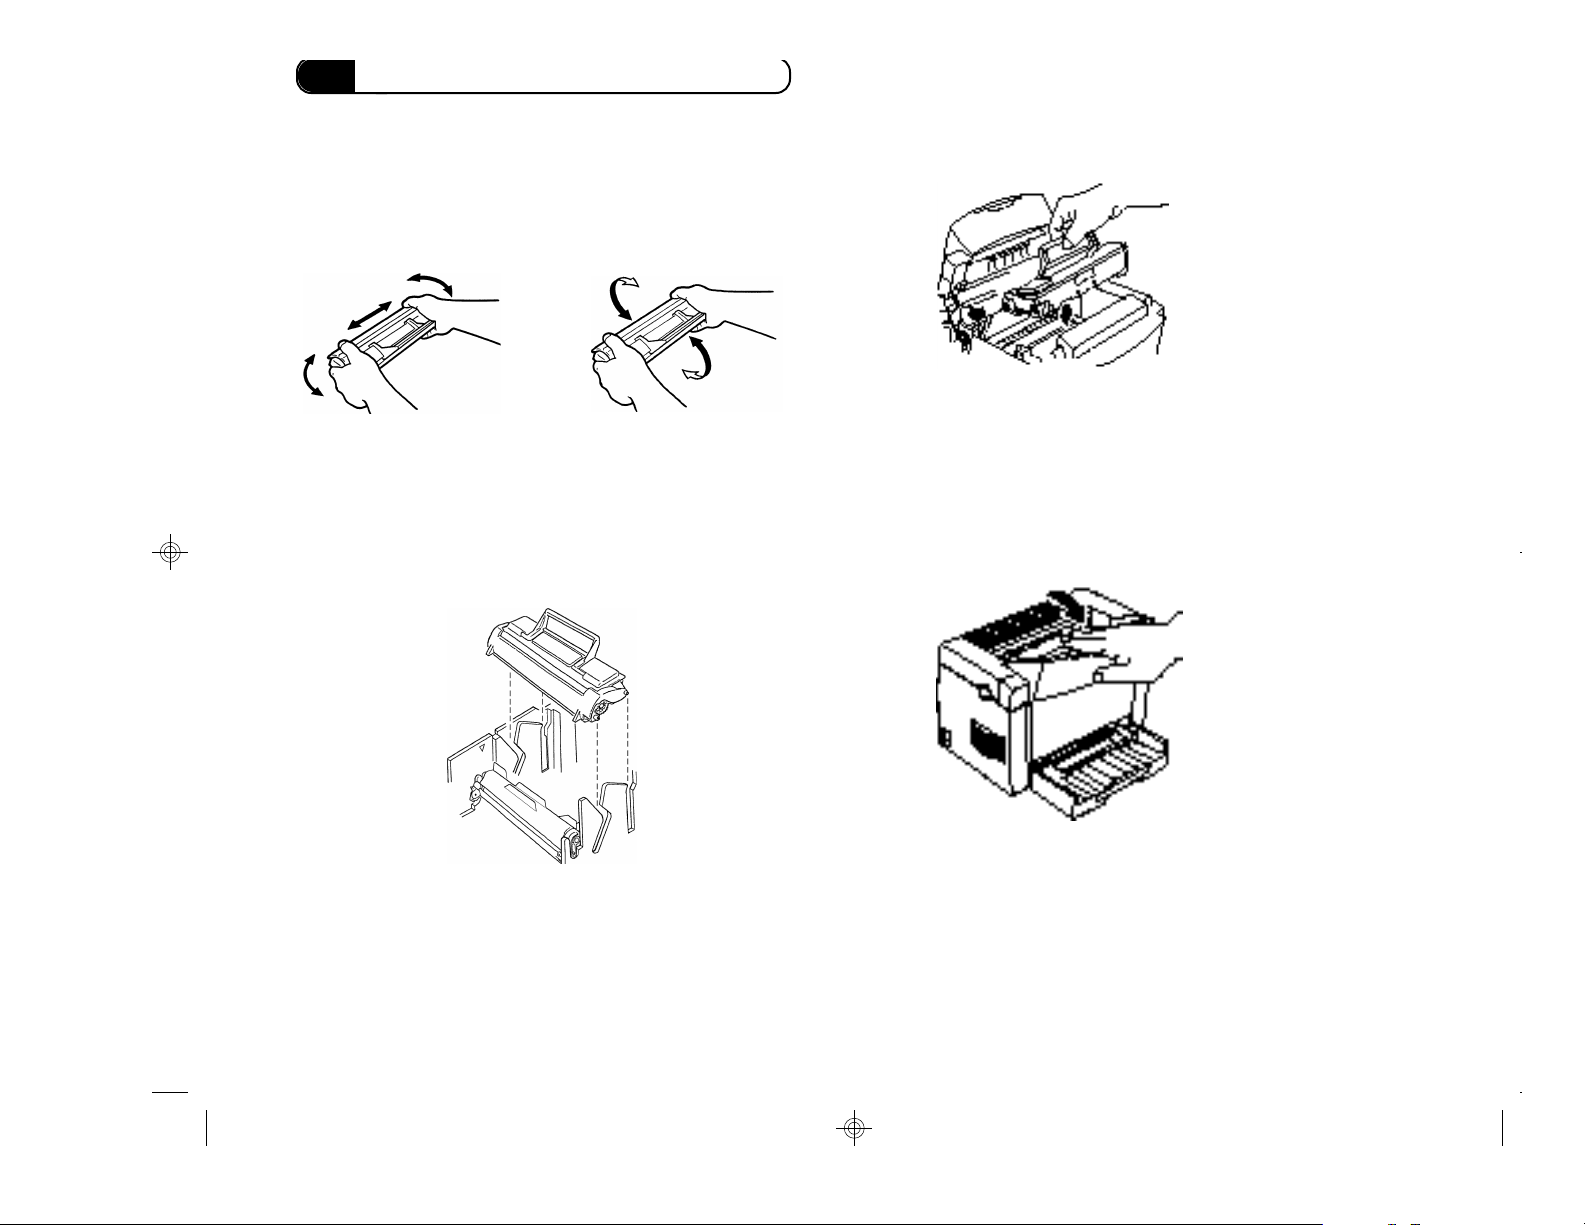
4. Unpack the toner module from its carton.
Holding the toner module with both hands, shake
it gently but firmly in the directions of the arrows.
5. Install the toner module in the printer, making sure
that the four pins of the toner module (two at the
front and two at the rear) align with the slits inside
the printer frame, and slide it securely in position.
6. Swing the top cover down and press the front
down to lock it into position.
2—12
03 Ch.2 Setting Up 96.9.24, 11:09 AM12
Chapter 2: Setting Up and Using the Printer
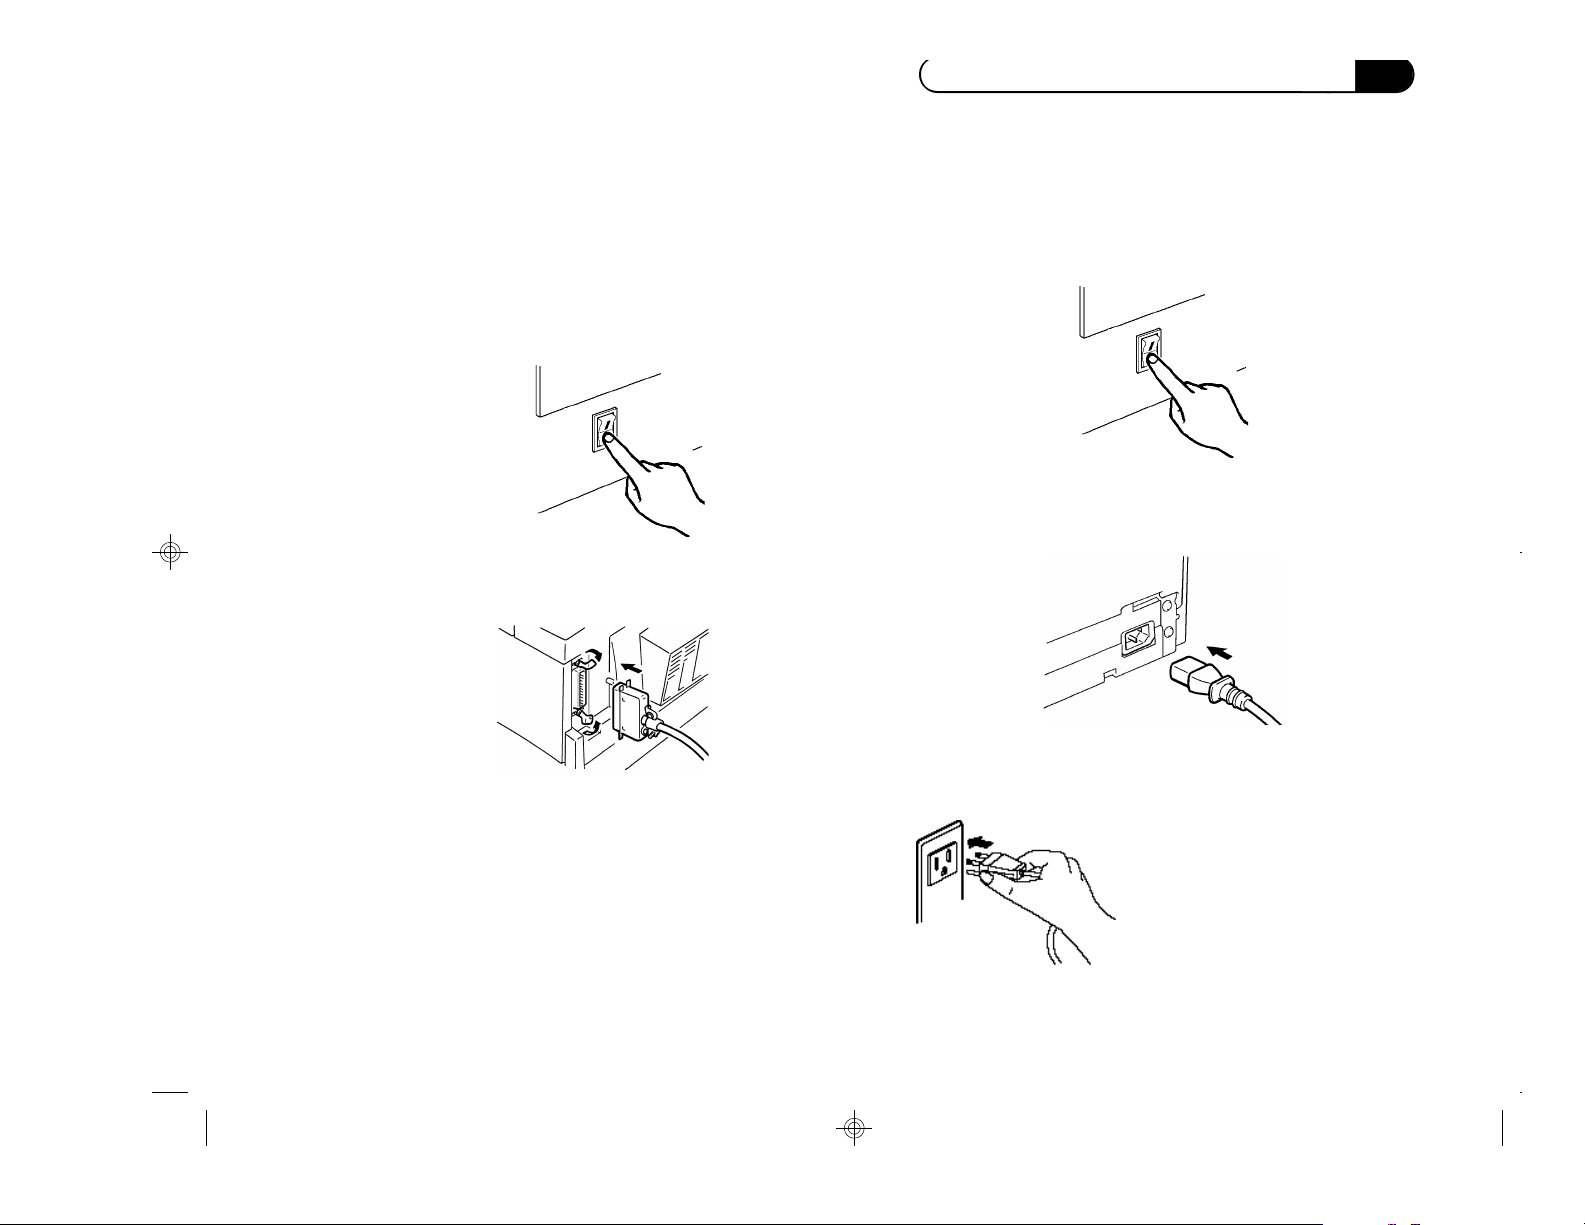
Power Cord
Connect the power cord as follows:
1. Switch OFF power to the printer.
Parallel Cable
Connect the parallel cable as follows:
1. Switch OFF power to the printer and to the
computer.
Caution! To protect your printer and computer from
possible damage, make sure the power switch is
OFF.
2. Plug the parallel cable into the printer, then secure
the lock springs.
2. Plug the power cord into the power plug on the
rear panel of the printer.
3. Connect the other end of the parallel cable to the
computer.
03 Ch.2 Setting Up 96.9.24, 11:10 AM13
3. Plug the other end of the power cord into a
properly grounded electric outlet.
Caution! Do not
connect the power cord
to the auxiliary outlet of
your computer.
2—13

Chapter 2: Setting Up and Using the Printer
Some Dos and Donts for Using the Printer
To ensure the optimum performance of the printer,
follow these precautions and admonitions:
• NEVER open any door, or turn the printer OFF
while it is printing.
• NEVER bring any magnetized object, flammable
gas, or liquid near the printer.
• When unplugging the power cord, do not pull on
the cord; rather, hold the plug and pull it out. A
damaged cord could result in a fire or cause an
electrical shock.
• NEVER attempt to unplug the power cord with a
wet or damp hand, as it could cause an electrical
shock.
• ALWAYS unplug the power cord when attempting
to move the printer. Moving the printer with the
power cord plugged in can damage the cord, and
result in a fire, or cause an electrical shock.
• ALWAYS unplug the power cord when you will
not be using the printer for a long time.
• NEVER remove any panel or cover that is secured.
The printer contains a high-voltage component
inside, which can cause an electrical shock.
• NEVER place a heavy object on the power cord, or
pull or bend the cord, as a fire or electrical shock
could result.
• ALWAYS be sure that the printer does not ride on
the power cord or communications cable of any
other electrical equipment, and it does not get such
a cord or cable wedged into its own mechanism, as
a malfunction or fire could result.
• NEVER drop paper clips, staples, or other small
pieces of metal through the vents or other printer
openings, as a fire or electrical shock could result.
• NEVER place a vase or vessel containing water on
the printer. If fluid gets inside it can cause a fire or
electrical shock.
• In case a piece of metal or fluid gets inside the
printer, turn it OFF immediately, unplug the power
cord, and call your NEC Technical Support at:
1-800-632-4560
A fire or electrical shock could result if the printer is
run without taking the necessary action.
• NEVER leave the printer running when it becomes
very hot or emits smoke, an unusual smell, or
noise. If that happens, immediately turn the
printer OFF, unplug it, and call your NEC
Technical Support at 1-800-632-4650. A fire or
electrical shock could result if you run the printer
without taking the necessary action.
Note: Locate the printer in a well ventilated room. A
negligible amount of ozone is generated during
normal operation of this printer. An unpleasant odor
may be created in poorly ventilated rooms during
extensive printer operations. For a comfortable,
healthy, and safe operating environment, it is
recommended that the room be well ventilated.
03 Ch.2 Setting Up 96.9.24, 11:11 AM14
2—14

Chapter 3: Installing the Software
Overview
This chapter gives you the information you need to
install the new SuperScript 660plus software, and to
remove any previous version you may have installed.
The chapter discusses
• The steps you take before you begin to install the
software
• Easy or Custom Installation
• The installation dialogs
• How to test that the installation is correct
• How to remove NEC SuperScript software
3
Installing the Software
04 Ch.3 Installing 96.9.24, 11:15 AM1
3—1

Chapter 3: Installing the Software
SuperScript Software Installation
This section describes the steps to set up the
hardware and software necessary to configure your
printer. Installation includes the following steps:
• Pre-installation
• Installation of the SuperScript software
• Testing and verifying the installation
Some procedures described below, such as disk
defragmention, may not be necessary for your PC
configuration. The installation description provides a
general approach. Your configuration may provide an
alternate set of selections, such as an installation
folder.
To install both GDI and PCL you need 40 MB space
on your hard disk.
Table 3-1 Pre-Installation Steps
1. Remove the current Click Start, then click Run.SuperScript software if it
installed in the PC. In Windows 95, type
C: \SSCRIPT\NECDELETE.EXE
in the command line box. Press Enter.
In Windows 3.1 and 3.11, if your current
SuperScript software is SuperScript
Network and PS option kit software, type
C: \NECSSFW\WSREMOVE.EXE in the
command line box. Press Enter.
2. Defragment the disk You can use Disk Defragmenter in Windows 95.
Refer to your Windows 95 documentation. This is
recommended, but not generally necessary.
Note: Be sure to remove the current SuperScript software
prior to installing the SuperScript 660plus in order to avoid
installation problems. Appendix A, Troubleshooting,
provides some instructions on what to do if you encounter
installation problems.
ACTION
COMMENT
04 Ch.3 Installing 96.9.24, 11:15 AM2
3—2
Chapter 3: Installing the Software
Installing the SuperScript Software
The SuperScript software installation program
analyzes your system configuration, installs the
SuperScript software and fonts, and makes the
necessary changes to the Windows startup files. As
shown in the following tables, there are two ways to
install SuperScript software:
• Custom Installation, which you can do either from
the installation diskettes or from the CD.
• Easy Installation, which must be done from the
diskettes.
Note: If you need to make full featured SuperScript
software installation diskettes, you can do it from
the SuperScript for Windows 95 installation CD as
follows. (You need seven empty diskettes. The
following instruction assumes the CD drive is drive
d and the diskette drive is a.)
At the DOS prompt, type
1. d:
2. cd \software\win95\makedisk
3. makefd a:
Then follow the instructions on your screen to make
the installation diskettes.
SuperScript Installation Dialogs
The installation dialogs presented during the setup
process are the same whether you install using
diskettes or the CD.
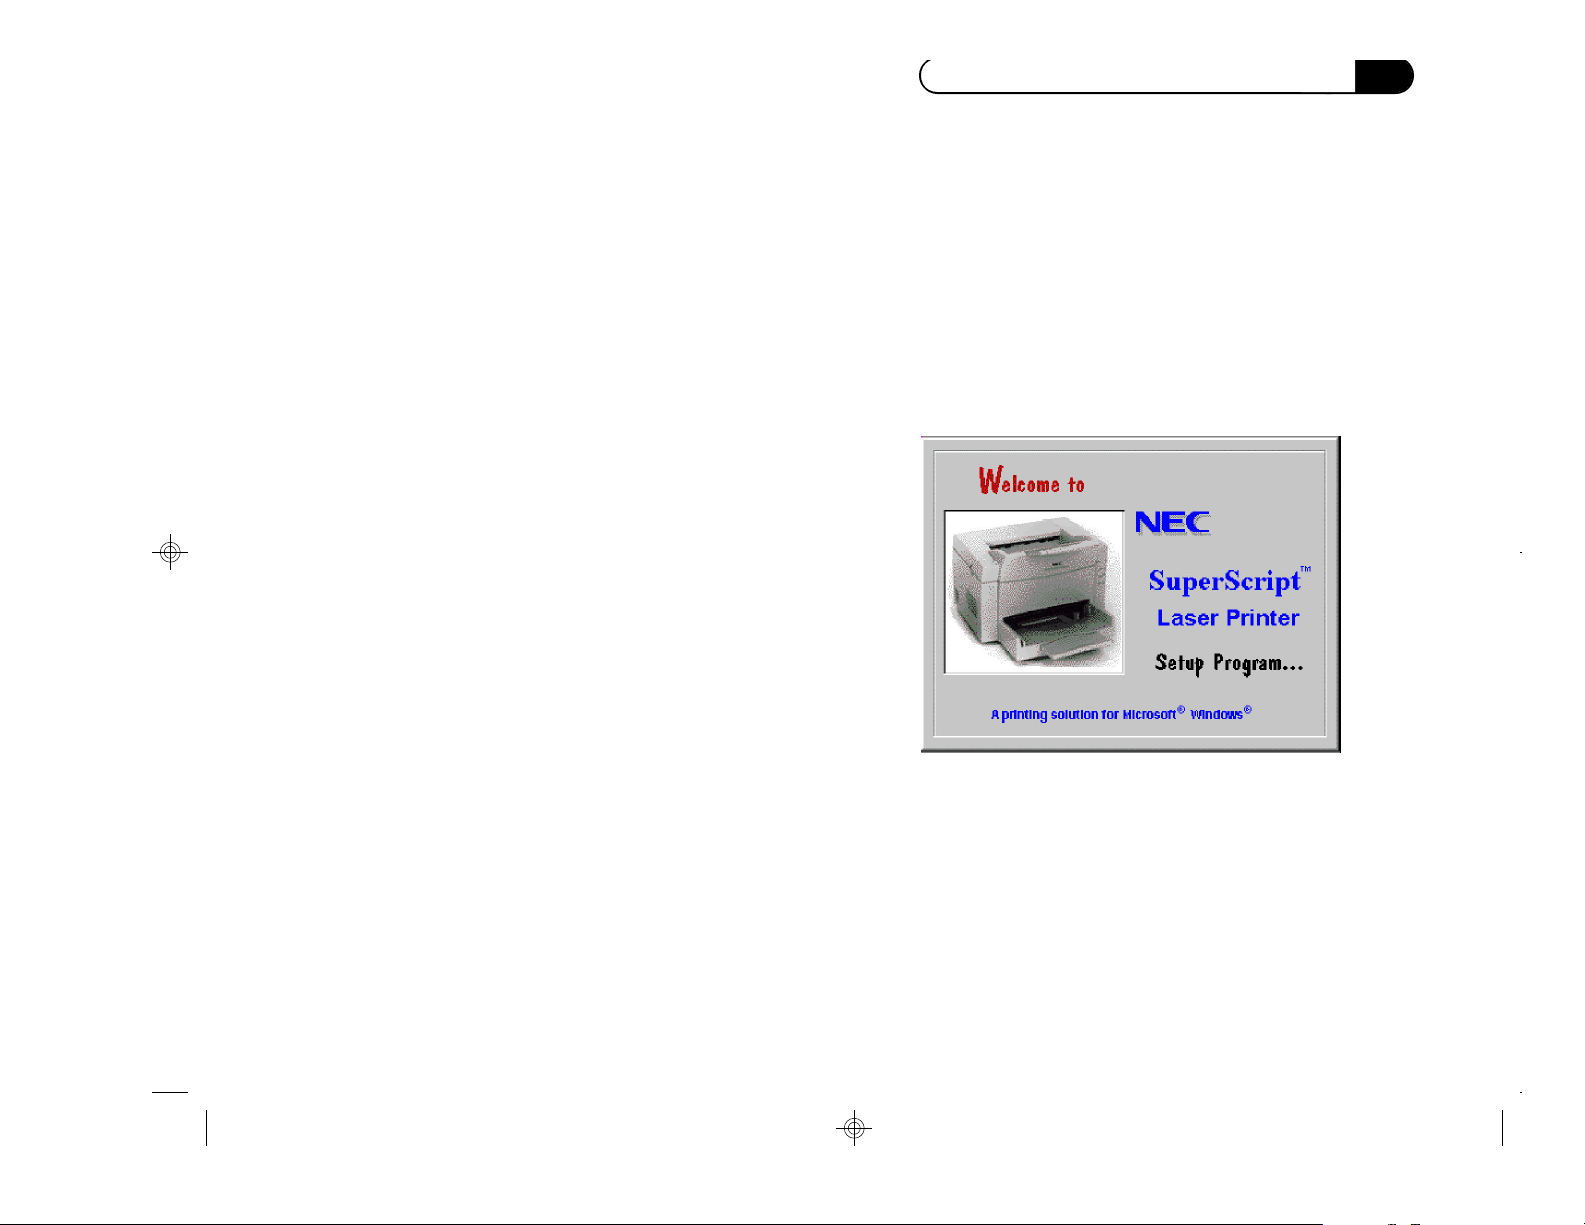
1. Once installation starts, the Welcome to
SuperScript setup screen appears, as shown in the
following figure. This screen is displayed for
approximately five seconds.
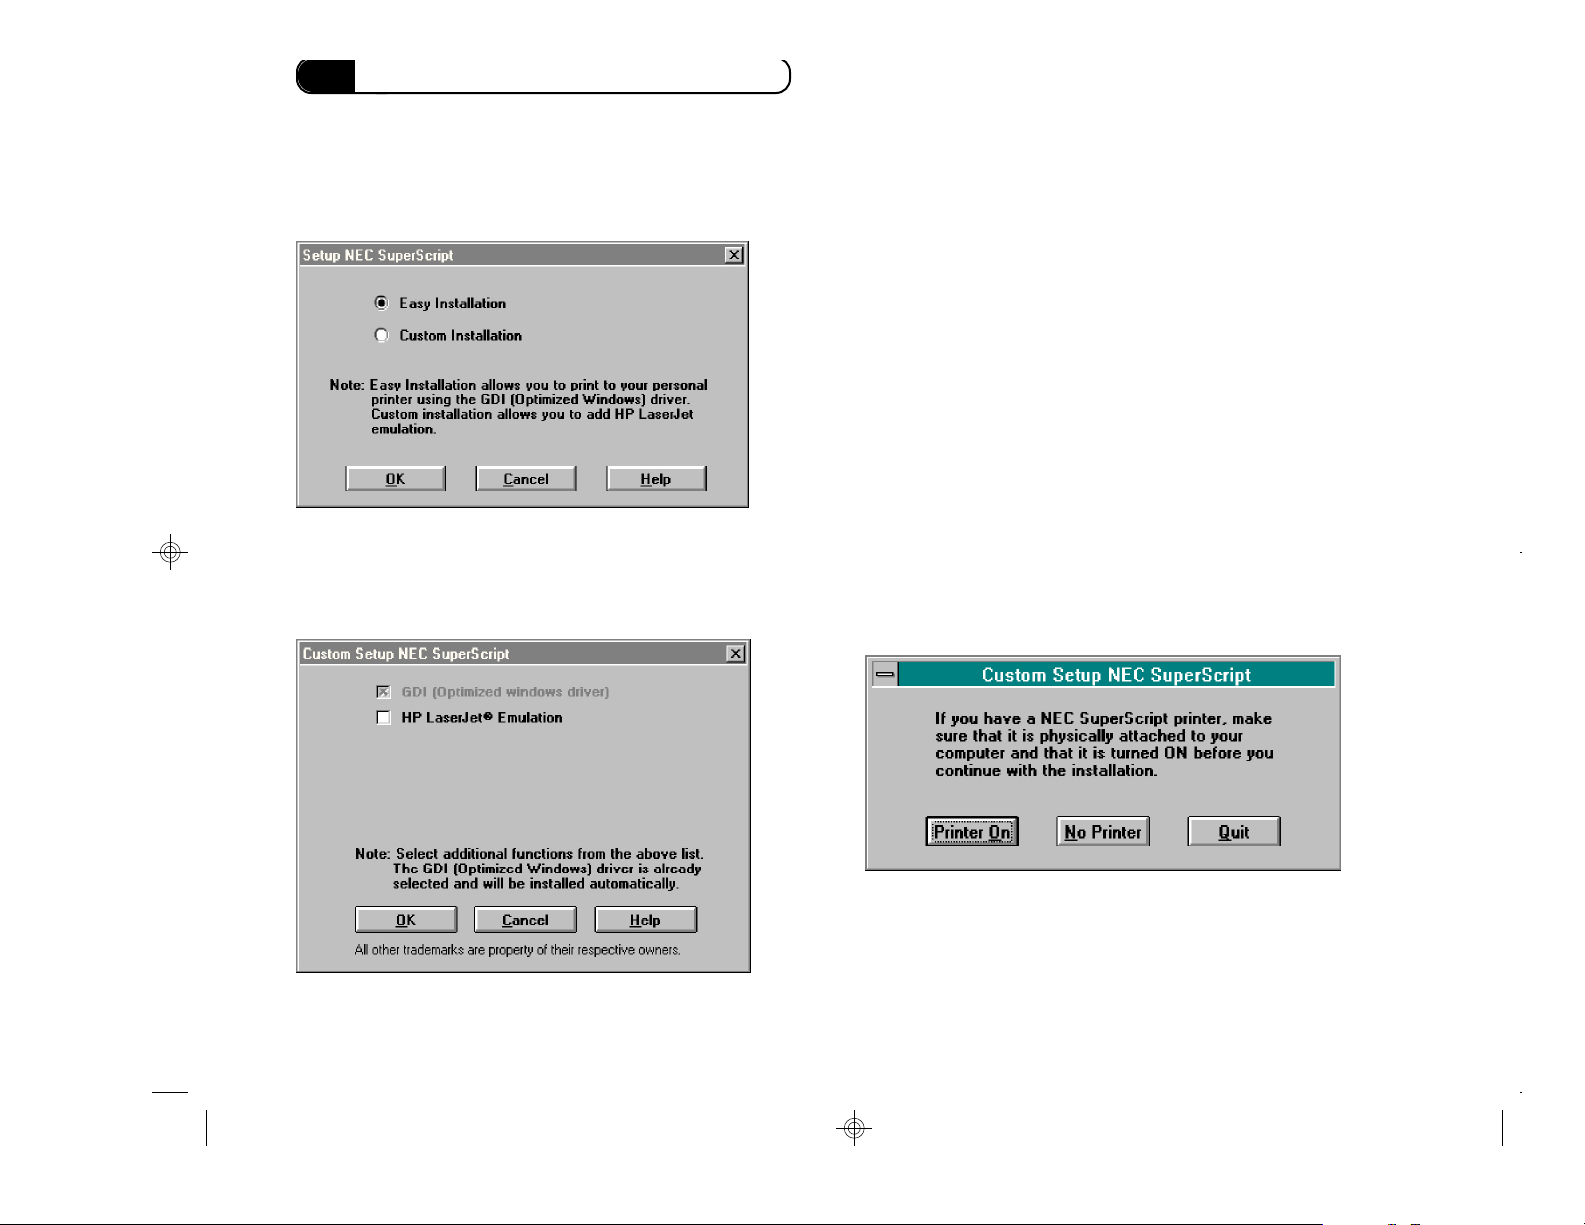
The first installation dialog box appears. You can
choose Easy Installation or Custom Installation.
04 Ch.3 Installing 96.9.24, 11:16 AM3
3—3
Chapter 3: Installing the Software
If you choose Easy Installation, the default
configuration is used.
2. If you have a previously installed version of the
SuperScript Software on your system you will be
prompted to remove it before installing the new
software. Click OK to remove the older version of
the software and continue installing the new
software.
The installation program displays the following
dialog and asks you to turn on the printer. When the
printer is connected and you have turned it on, click
Printer On to continue. Select No Printer if no printer
is connected.
If you choose Custom Installation, you can install the
full featured software.
3—4
04 Ch.3 Installing 96.9.24, 11:17 AM4
You do not have to have a printer connected to
successfully install the program. You can connect a
printer later.

Chapter 3: Installing the Software
4. The SuperScript Setup Program presents the
configuration User type option, asks for a
computer name, provides a comments area, and
asks for the name of the folder in which you want
the files installed.
The SuperScript Setup Program examines your PC
hardware and system configuration to ensure that the
minimum configuration requirements have been met.
5. The Setup Program presents the default printer
configuration information. The parallel port field
shows the physical port to which the SuperScript
printer is attached.
04 Ch.3 Installing 96.9.24, 11:19 AM5
At this point the SuperScript Setup Program has all
the information necessary to install the SuperScript
software and configure the system.
3—5
Chapter 3: Installing the Software
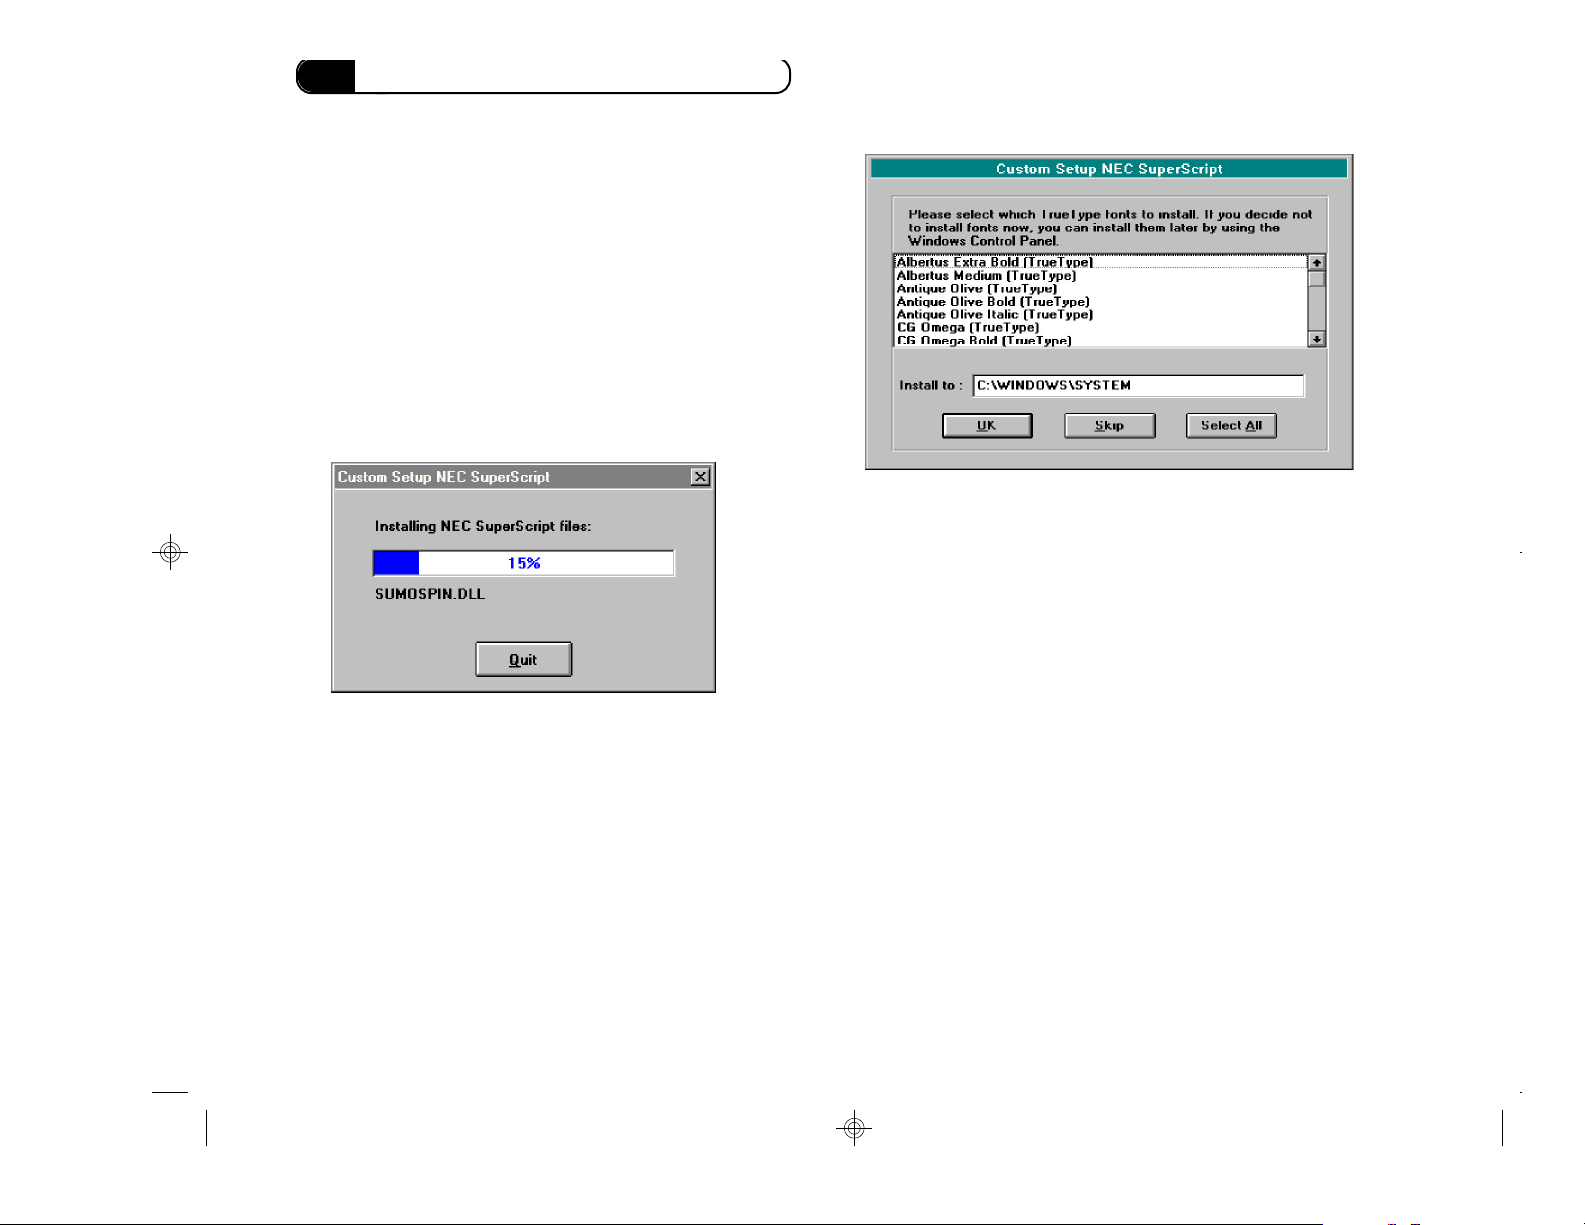
6. SuperScript Setup displays the installation
progress. If you choose to do so, you can click the
Quit button to abort the installation at any time.
Note: Quitting at any time means you will not be
able to print to the SuperScript printer. There is no
reason to quit the program. If you do quit you will
have to reinstall your old SuperScript software, or
the new SuperScript software later.
The default location for the fonts to be installed
is in the C:\WINDOWS\FONTS directory. You can
change the default directory by specifying a
different path. When you select OK after
choosing fonts, the installation program copies
the fonts to the folder and installs them in
Windows automatically. This requires
approximately 3.5 MB of hard disk space.
7. There are 53 TrueType fonts bundled with your
SuperScript software. You may choose to install
all, some, or none of the fonts. A custom
installation allows you to install only the fonts
you want.
3—6
04 Ch.3 Installing 96.9.24, 11:20 AM6
If you select Skip you will skip this step and
continue with the SuperScript installation. You
can install the fonts individually later.
Note: The fonts are not installed when you chose
Easy Installation.

Chapter 3: Installing the Software
COMMENT
Table 3-2 SuperScript Installation-
Diskette or CD
ACTION
8. For the installation to take effect, you must restart
Windows. The final menu gives you the option of
restarting Windows or continuing without
restarting.
9. Once SuperScript software is installed, NEC
SuperScript device names appear in the Printers
window of My Computer (see the next figure for
Windows 95 systems).
At this point your installation is complete.
1. Connect your SuperScript printer to Your PC must be OFF before
your PC and turn the printer on. you turn the printer ON.
2. Turn the PC on. Windows starts.
3. Windows 95 may display the New If this dialog box does not appear,
Hardware Found dialog box. or if you are using Windows 3.1
Select Driver from disk provided by or 3.11, go to step 4.
hardware manufacturer and click OK.
When the Install From Disk dialog box
appears, insert software diskette #1,
or the CD, in the drive. Click OK and
follow the displayed directions.
4. Insert software diskette #1, or the CD, These items are located in the
in the drive. SuperScript 660plus software kit.
5. Windows 95 users click Start, then The Run Program dialog
click Run. box appears.
Windows 3.1 or 3.11 users select Run The Run Program dialog
from the File menu. box appears.
6. a: \necsetup.exe or d: \necsetup.exe Type the command and press
Enter.
04 Ch.3 Installing 96.9.24, 11:21 AM7
Note: Once you start the installation, you can cancel at
any time by clicking Quit.
3—7

Chapter 3: Installing the Software
Testing the Installation
When you restart Windows, you can use the
SuperScript printer test function to make sure the
installation was successful. The printer test utility is
available through the Print Test Page button on the
Control Panel tab of the SuperScript Console. The test
utility prints several pages during the test. To begin a
test print, do the following:
1. Confirm that the printer is connected to the parallel
printer port you selected in the installation.
2. Confirm that the printer is turned on.
3. In Windows 95, click Start, point to Programs, NEC
SuperScript Tools, and then click NEC SuperScript
Console.
In Windows 3.1 and 3.11, double click NEC
SuperScript Tools Program Group, then double
click NEC SuperScript Console.
4. Click the Control Panel tab of the SuperScript
Console.
5. Click the Print Test Page button.
6. Choose the print mode, and click OK.
Print Test Page Button
Removing SuperScript Software
You can easily remove any installed SuperScript
software.
1. In Windows 95, click Start, then click Run. The
Run program dialog box appears. In Windows
3.1 or 3.11, click Run on the File menu.
2. In all of these cases, type
c:\necssfw\wsremove.exe. This is the
path to the folder containing wsremove.exe.
Press Enter.
By default, the de-install program is loaded in
c:\necssfw. If you have set up the SuperScript
files in a different folder, specify the location of
your setup folder.
3—8
04 Ch.3 Installing 96.9.24, 11:22 AM8

Chapter 4: SuperScript Console
Overview
This chapter explains the four windows in the
SuperScript Console program that you use to
configure and control your print jobs. You are given
information about
• Selecting your printer
• The Control Panel, where there are buttons you
can select to control a variety of printer functions.
• The Local Queue, where you control the jobs you
have sent to the printer. You can add a job to the
queue, delete a job, or rearrange the order in which
they print.
• The Job Log, which maintains a historical log with
useful information about your last ten jobs
4
SuperScript Console
05 Ch.4 Console 96.9.24, 11:54 AM1
4—1

Chapter 4: SuperScript Console
The SuperScript Console program provides a single
access point to the four major SuperScript program
windows. The purpose of the SuperScript Console
program is to provide an easy way to configure the
SuperScript printer and to monitor and control print
jobs.
To activate the SuperScript Console in Windows 95,
click the Start button, point to Programs, NEC
SuperScript Tools, and then click NEC SuperScript
Console.
In Windows 3.1 or 3.11 select NEC SuperScript Tools
Program group, then double click NEC SuperScript
Console.
Printer Selection 14 buttons
Printer Information
Each of the four major program features can be
accessed by clicking the folder tab under the menu
bar. The four tabs are:
• Local Queue
• Remote Queue
• Job Log
• Control Panel
Note: The Remote Queue is specific to NEC peer to
peer sharing and may not be functional. NEC
developed a proprietary sharing system for
environments with multiple NEC SuperScript
printers. For most environments, standard Windows
sharing is more suitable and the NEC SuperScript
660plus is fully compatible.
4—2
Control Panel
The Control Panel, the rightmost folder tab in the
window, provides a mechanism to configure and
control the SuperScript printer. The Control Panel
has 14 buttons that you use to control the printer, a
printer selection section to the left just below the
buttons, and the printer information section at the
bottom of the window.
The Printer selection list bar displays your currently
selected printer and provides a list of additional
printer selections. The printer selections applicable
to SuperScript software are:
• NEC SuperScript GDI (standard)
• NEC SuperScript PCL (custom installed)
Table 4.1 lists the Control Panel icons with a brief
description of what they do.
05 Ch.4 Console 96.9.24, 11:55 AM2

Chapter 4: SuperScript Console
ICON DESCRIPTION
Connect Port: Identifies the port to which your
printer is connected, such as LPT1.
PCL Control Panel: Displays the PCL Control
Panel menu that is used to set up PCL mode
when printing from a DOS file.
DOS Printing Option: Allows you to select a
printing mode for printing from DOS within
Windows. Refer to the section on DOS printing
in this chapter.
Status Report Options: Provides status report
options. You can select from the following
options: Minimize Printer Status Display
Beep When a Job is Complete
Beep on Printer Error
Note: This item is specific to NEC peer to peer
sharing and may not be functional. NEC developed a
proprietary sharing system for environments with
multiple NEC SuperScript printers. For most
environments, standard Windows sharing is more
suitable and the NEC SuperScript 660plus is fully
compatible.
Print Test Page: Outputs the printer test page.
You can test the connection between your PC
and the SuperScript printer by this function.
ICON DESCRIPTION
Toner Saving Mode: Allows you to save toner
by controlling print density. You can select on or
off. Default is off. Not available when SET
is on.
.
Sharp Edge Technology: SuperScript features
the patented Sharp Edge SET Technology .
This feature detects and smooths the jagged
edges of vectors by dividing one full dot into
several subdots set in the same area. The print
quality of both text and line graphics is thus
improved. Default is on. Not available when
Toner Saving is on.
Print Darkness/Line Width: Allows you to
control the line width darkness (not images).
You can set this mode to light, medium, or dark.
Default is medium.
Page Save Mode: When enabled, the current
page is saved in memory until printing is
complete. Enable for sensitive documents where
loss of data cannot be tolerated. Disable this
feature to increase throughput. Default is off.
Power Saving Mode: This printer has Power
Saving Mode. In this mode, if the printer is idle
for a specified time, the fuser unit pauses and
power consumption is decreased. Default is off.
Printer Setup: Allows you to set up the printer.
Clicking this icon displays a setup screen for the
printing mode currently selected. (Refer to the
next section on the GDI Setup Window.)
Table 4.1 SuperScript Control Panel Buttons
4—3
05 Ch.4 Console 96.9.24, 11:56 AM3

Chapter 4: SuperScript Console
Use the list bar to highlight the print mode you want to
use. To use the selected printer as a default, click on Set
As Default. You can also request current printer status
information by clicking on Local Printer Status..
At the bottom of the Control Panel window the printer
information section shows the picture and information
of the currently selected printer in each mode (GDI,
PCL). You can also select a printer by clicking one of
the two parts.
If you did not install PCL, the PCL Printer selection
will be grayed out and cannot be selected. If you want
to install PCL, you must do a Custom Installation
using the CD.
GDI Setup Window
With the printer selected in GDI mode, when you click
the printer setup button (the sixth button in the row) in
the Control Panel, the GDI setup window appears.
Paper
When you select Paper from the top of the GDI Setup
screen you can select the following:
• Paper Source: Hopper
Manual Feed
Second Hopper
• Orientation: Portrait
Landscape
• Paper Size: Letter 8-1⁄2 x 11 in.
Legal 8-1⁄2 x 14 in.
A4 210 x 297 mm
B5 182 x 257 mm
Executive 7-1⁄4 x 10⁻¹⁄2 in.
Envelope Monarch 3-7⁄8 x 7-1⁄2 in.
Envelope #10 4-1⁄8 x 9-1⁄2 in.
Envelope DL 110 x 220 mm
Envelope C5 162 x 229 mm
• Number of copies: 1 up to 99
4—4
05 Ch.4 Console 96.9.24, 11:57 AM4
• Scaling: 10% to 200%

Chapter 4: SuperScript Console
Advanced Options
When you select Advanced Options from the top of
the GDI Setup screen you can select the following:
• Use NEC SuperScript Print Manager
You must select Use NEC SuperScript Print Manager
to use the Print Order and Duplex features.
• Print Order: Page 1 on top
Prints in reverse order
• Duplex printing:
Manual Duplexing Book Style (side binding)
Report Style (top binding)
Print Instruction Page Printed with your
duplex job to explain
how to re-feed pages
to print the second side
Settings for GDI printing can be made in this window.
Note: If you want print jobs in GDI to be listed in the
Local Queue or Job Log, you must activate
SuperScript Print Manager by selecting Use NEC
SuperScript Print Manager on the GDI Setup window.
The GDI Setup Window has the following five tabs:
Paper, Advanced Options, Print
Quality, 2Up/4Up, and Form Settings.
Print Quality
When you select Print Quality from the top of the Setup
window, you can select:
• Print Resolution: 600 x 600
300 x 300
• Brightness To lighten or darken an
image.
• Contrast To adjust the difference in
the light and dark areas of
an image, to improve a flat
image.
• Image Box An image that demonstrates
how the brightness
and contrast settings affect
the printed output.
05 Ch.4 Console 96.9.24, 11:58 AM5
4—5

Chapter 4: SuperScript Console
2Up/4Up
When you select 2Up/4 Up from the top of the GDI
Setup window you can select the following:
• Draw Frame Border
Allows you to draw a frame or border around
multiple images on the same page.
Form Settings
Form Settings allows you to set up a Cover/Trailer
Page or Print Overlay. You must select Use the NEC
SuperScript Print Manager to use these features.
• Use NEC SuperScript Print Manager
• Print Cover Page
When selected, a cover page is printed at the
beginning of each print job. The File Name
designates the GDI file to be used as the cover
page.
• Print Trailer Page
When selected, a trailer page is printed after each
print job. The File Name designates the GDI file to
be used as the trailer page.
• Print Overlay
When selected, this feature will overlay a GDI file
on the print job. The File Name designates the GDI
file to be used as the overlay.
The following instructions are for NEC SuperScript
under Windows 95.
Create a Cover/Trailer Page or Overlay file
You can create a Cover/Trailer Page or an Overlay File
using any Windows application. The following instructions are for Microsoft WordPad as an example.
1. Using your application, create or open the
document to use as the Cover/Trailer.
2. Select Print from the File menu.
3. In the Print Setup window check to be sure the
printer selected is NEC SuperScript GDI.
Click on Print to File on the Setup window, and
click OK.
4. In the Print to File window, type the filename.
Check Save in the list box to see where the file is
saved. Click Save.
You are now ready to print using your Cover/Trailer
Page or Overlay.
05 Ch.4 Console 96.9.24, 11:59 AM6
4—6

Chapter 4: SuperScript Console
Local Queue
The Local Queue is used to review the status of your
queued print jobs.
The local queue shows
• the print job name
• the format of the print job (GDI, PCL)
• the size in bytes of the print job
• the time the job was sent to the queue
• the owner of the print job
Note: If the print job is in GDI without the NEC
SuperScript Print Manager active, the job is not listed
in the Local Queue. (Refer to the section on the GDI
Setup Window in this chapter.) The job will be listed
in the standard Windows printer queue.
If you double-click an entry in the job queue, a Print
Job Information dialog pops up to show you more
information about the job.
You can use drag-and-drop for jobs that have not yet
started printing. This allows you to rearrange the order
of your print jobs.To drag-and-drop, follow these steps:
1. Move the cursor to the entry you want to move.
2. Press the left mouse button. Do not lift your finger.
The entry will turn blue indicating that it has been
selected.
05 Ch.4 Console 96.9.24, 0:00 PM7
4—7

Chapter 4: SuperScript Console
Table 4.2 Local Queue Buttons
ICON DESCRIPTION
Pause: Pauses the printer
Resume: Resumes printing
Add: Adds a print job to the print queue
Delete: Deletes the highlighted print job fro the print queue
Job Log
The Job Log provides a historical log of the last 10 jobs
originated by your PC.
The Job Log includes
• the time the job was printed
• the server name of the print job
• the job name
• the format of the print job (GDI, PLC)
• the print result
3. Holding the button down, drag the print job to the
desired location in the queue.
4. Release the mouse button. The print job will now
show up in its new location, and the other print
jobs will move up or down in the queue.
The following table shows the Local Queue icons with
brief descriptions of what they do:
Note: If the print job is in GDI without the NEC
SuperScript print manager active, the job is not listed
in the Job Log. (Refer to the GDI Setup Window
section in this chapter.) The job is listed in the
standard Windows printer queue.
4—8
05 Ch.4 Console 96.9.24, 0:01 PM8

Chapter 4: SuperScript Console
• Toner saving
• Sharp edge technology
• Print darkness
• Page save
• Power saving
• Printer setup
• Connect port
• PCL control panel
• DOS printing option
• Print priority
• Local printer change
“Print Priority” and “Local Printer Change” can be
accessed only through this pull-down menu.
Priority
Windows lets you run several applications at the same
time. This helps productivity, but means you are
sharing your PC resources among several activities.
SuperScript software priority settings let you control
the priority of printing relative to other applications
running at the same time.
The menu lets you select high, medium, or low priority processing when you print. High priority produces
output faster, but it may slow down your system as
well. On the other hand, printing at a lower priority
lets other applications run faster, but your document
will take longer to print.
SuperScript Console Menu
Superscript software provides the standard Windows
menu items available in most Windows applications as
well as application-specific menu items. Some of the
menu items match buttons in the tabbed dialog. Some
SuperScript software functions can only be accessed
through the pull-down menus, such as the print
priority setting.
File
The File pull-down menu provides the application exit
item, as well as items to pause and resume printing,
and adding or deleting a document from the queue.
View
The View pull-down menu allows you to display the
print servers.
Note: This item is specific to NEC peer to peer
sharing and may not be functional. NEC developed a
proprietary sharing system for environments with
multiple NEC SuperScript printers. For most
environments, standard Windows sharing is more
suitable and the NEC SuperScript 660plus is fully
compatible.
Settings
The Settings pull-down menu lets you to make
changes to the following printer settings:
05 Ch.4 Console 96.9.24, 0:06 PM9
4—9

Chapter 4: SuperScript Console
Local Printer Change
If you have another NEC SuperScript printer and
want to replace the currently connected SuperScript
printer with it, you have to reinstall the SuperScript
software or use this function.
After the new SuperScript printer is connected to your
PC and turned on, select Local Printer Change and
then click Printer On.
Network
The Network pull-down menu allows you to share
and connect to a network printer, Monitor Clients if
configured as a Server, select Status Report Options,
and Change Name. Change Name can be accessed
only through the pull-down menu.
Change Name
This selection is available to all users and allows the
user to change the computer name. You must exit and
restart Windows before this change takes effect.
Note: This item is specific to NEC peer to peer
sharing and may not be functional. NEC developed a
proprietary sharing system for environments with
multiple NEC SuperScript printers. For most
environments, standard Windows sharing is more
suitable and the NEC SuperScript 660plus is fully
compatible.
Run
The Run pull-down menu allows you to view local
printer status, and print a test page.
Help
The Help menu links you to the SuperScript Help
system. You can select the Index to see a list of topics
related to SuperScript Software. Clicking About shows
version and copyright information for SuperScript.
Exiting before printing has completed
If you try to close the SuperScript console, or exit
Windows while there are print jobs queued and
waiting to be printed, the SuperScript program displays a message asking if you want to save the remaining print jobs.
If you select Yes the print jobs are saved as you exit.
When the SuperScript Console next starts up, it
resumes processing and printing the documents.
Selecting No deletes all pending print jobs on exit. The
original applications files, from which the print jobs
were created, are not affected. Selecting Cancel cancels
the exit selection and you return to the previous
window.
4—10
05 Ch.4 Console 96.9.24, 0:07 PM10

Chapter 4: SuperScript Console
Printing from a DOS Application
SuperScript is a Windows printer, designed for use
with Windows.
You can print from a DOS application, but you must
enter DOS from Windows 3.1 or 95. Click on the MSDOS icon in the main window, from the Program
Manager screen.
When you are ready to print, start your DOS application and print as you normally would.
To specify the printer port and printing mode, do the
following:
1. Double-click the SuperScript Console icon in the
SuperScript group window in the Program Manager.
2. Select DOS Printing from the Setting menu.
3. Select the Printer Port you want to use (usually
LPT1) and Printing mode for the file. Click OK.
Be sure the NEC SuperScript 660plus driver is the
default driver in Windows, and that the DOS application is set to an HP IIP driver.
05 Ch.4 Console 96.9.24, 0:07 PM11
4—11

Chapter 5: Monitoring the Printer Status
Overview
You can monitor the current status of the printer on
your screen. In this chapter you will find information
about
• The Printer Status window and what it does
• Controls you can exercise over the printer from
this window
• Problems that may arise when you print, and how
you can resolve them from this window
5
Monitoring the Printer Status
06 Ch.5 Monitoring* 96.9.24, 0:53 PM1
5—1

Chapter 5: Monitoring the Printer Status
Monitoring the Printer Status
The SuperScript 660plus printer allows you to monitor
the current status of the printer on your computer
using the SuperScript Status program. The program
has two primary functions:
• To let you monitor the status of the printer.
• To alert you when there is a problem, such as
paper running out.
There are two ways to run the Printer Status software.
In Windows 95, click the Start button, point to Programs, NEC SuperScript Tools, and then click Local
Printer Status Display.
In Windows 3.1 or 3.11, double click the NEC
SuperScript Tools program group, then double click
Local Printer Status Display.
Another way to access Printer Status is to click the
Local Printer Status button on the Control Panel tab of
the SuperScript Console.
The Printer Status window also appears automatically
when the software detects a printer error.
Note: On some PCs, when the Printer Status display
appears, shortcut keys are not available but you can
continue to use the mouse.
The SuperScript Printer Status display has three status
indicators, two boxes with information for you, and
various printer control buttons. The status indicators
mimic what you would see on the status panel of your
printer, and provide a quick view of the printer’s
status.
The information box at the top of the Printer Status
window shows the current printer status and displays
an icon if there is an error condition. The information
box at the bottom has specific job information when a
print job is printing or paused.
5—2
06 Ch.5 Monitoring* 96.9.24, 0:54 PM2

Chapter 5: Monitoring the Printer Status
The SuperScript Printer Status icons with brief descriptions of what they do are as follows:
Table 5-1 Printer Status
ICON DESCRIPTION
Expand: Expands the Printer Status
display. You use this when an error
occurs and you want more detailed
information about the recommended
solution.
Reduce: Reduces the Printer Status
display.
Pause: Pauses the printer.
Resume: Resumes the print job if it has
been paused. There are some error
conditions where fixing the problem
causes the printer to resume automatically. However, some error conditions
require that you resume printing after
the problem is fixed.
Expanded SuperScript Printer
Status Display
The Expanded Printer Status display has several
features that monitor, control, and resolve printer
errors. To expand the information you can get on the
Printer Status display, click the Expand button.
Printer Error Status Messages and Recovery
Part of the display shows a printer animation that
highlights the problem area on the printer and provides instructions on how to resolve it. To access the
printer animation, click the button in the upper left
corner of the dialog box with the picture of the printer.
This window provides animated help and walks you
through the steps required to get your printer running
again. In most cases, printing will resume automatically once the problem has been resolved. In some
06 Ch.5 Monitoring* 96.9.24, 0:55 PM3
Delete: Deletes the job that is currently
printing.
5—3

Chapter 5: Monitoring the Printer Status
cases you must click Resume.
Paper Out
The printer has run out of paper. Add more paper to
the paper tray.
Paper Jam
Paper has jammed inside the printer, making it impossible to continue printing. Open the printer cover,
remove all paper, and close the cover.
The printer starts up again automatically once the jam
has been cleared. The printer reprints the page that
jammed before continuing with the rest of your document.
Cover Open or Toner Cartridge Missing
Either your printer cover is open, or there is no toner
cartridge in the printer. Insert a toner cartridge if
necessary, then firmly close the printer cover.
Duplex Printing
Duplex (double-sided) mode is enabled, and the
printer has finished printing one side of your document. Turn the sheets over and reinsert them in the
paper feeder to print the other side. Click on Resume
to continue printing.
Power Off or Cable Problem
The NEC SuperScript software cannot find your
printer, either because the power is off, the cable is not
installed properly, or there is a problem with the
connection. Make sure the power switch is turned on,
the cable fits snugly, and nothing else is wrong with
the connection.
Engine is Warming Up
Wait until the printer’s engine has finished warming
up. The NEC SuperScript will be ready to start printing
as soon as it is warmed up.
Engine Error
If there is a problem with the printer engine, call NEC
Technical Support at 1-800-632-4650. See the Appendix
on Technical Support for more information about
obtaining technical support.
06 Ch.5 Monitoring* 96.9.24, 0:56 PM4
5—4

Chapter 6: Maintaining the Printer
Overview
This chapter provides the information you use when
you need to
• Replace the Toner Module
• Replace the Photoconductor Module
• Clean the printer
6
Maintaining the Printer
07 Ch.6 Maintaining* 96.9.24, 0:57 PM1
6—1

Chapter 6: Maintaining the Printer
Maintaining the Printer
Replacing the Toner Module
Each toner module contains toner that can print up to
3,000 letter size prints. (The number of prints is
calculated based on an average image density
equivalent to a black-to-white ratio of 5% or lower.)
More or fewer will print depending on the image
density.
As the amount of toner still available for use in the
toner module is reduced, the print image gradually
becomes lighter. When that happens, remove the toner
module from the printer, shake it two to three times,
and reinstall it. If this still does not make the image
darker, replace the toner module with a new one,
following the procedure in the Setting Up the
Photoconductor Module and Toner Module section in
Chapter 2.
Replacing the Photoconductor Module
Each photoconductor module can print up to about
20,000 prints under the following conditions: NEC
recommended paper, continuous printing, and a black
to white ratio of 5%. The number of prints may be
fewer depending on print conditions, such as number
of prints you make at a time, the kind of paper, or the
print density.
After the photoconductor module has turned out more
than 20,000 prints, the print image may become faint
and blurred. If this happens, replace the
photoconductor module with a new one, following the
procedure in the Setting Up the Photoconductor
Module and Toner Module section in Chapter 2.
Cleaning the Printer
Dust, dirt, and paper dust inside and outside the
printer aggravate printer performance and affect print
quality, making it necessary to clean the printer at
regular intervals.
Caution! Before starting the cleaning procedure,
be sure to turn the Power Switch OFF, and unplug
the power cord from the outlet.
Caution! The fuser unit inside the printer can
become very hot. Wait at least 10 minutes after the
printer has been shut down, and make sure that the
fuser unit has cooled down before touching the
interior.
07 Ch.6 Maintaining* 96.9.24, 0:58 PM2
6—2

Chapter 6: Maintaining the Printer
Cleaning the Outside
• Using a soft cloth dampened with mild detergent,
wipe the outside of the printer. Do not use abrasives
or corrosive detergents.
Cleaning the Transport Roller and Transfer Unit
1. Press the top cover release button, and swing open
the cover completely.
2. Remove the toner module, and then the
photoconductor module.
Caution! Whenever you remove the
photoconductor module, wrap it in a cloth
immediately to prevent light from striking it.
3. Turning the transport roller drive gear, wipe the
transport roller clean with a soft cloth.
07 Ch.6 Maintaining* 96.9.24, 0:59 PM3
4. Unsnap the transfer unit cleaner from the printer
cover.
6—3

Chapter 6: Maintaining the Printer
6. Press the cleaner slightly, then gently slide it
over the transfer unit, from right end to left end.
Then gently slide the cleaner on the transfer unit
from left end to right end. Repeat this motion three
times.
5. Insert the cleaner into the transfer unit as
shown in the illustration below.
Rear side
Front side
1.
2.
.
6—4
07 Ch.6 Maintaining* 96.9.24, 0:59 PM4

Chapter 6: Maintaining the Printer
7. Take the cleaner out of the transfer unit, then
re-attach the cleaner back on to the printer cover.
8. Reinstall the photoconductor module and the toner
module according to the directions in Chapter 2.
9. Press the top cover down gently, and close it securely.
07 Ch.6 Maintaining* 96.9.24, 0:59 PM5
6—5

Appendix A: Troubleshooting
Troubleshooting
Overview
This Appendix contains information about common
problems that arise using a printer, and it suggests
solutions for them. It has information about
• The meaning of the indicator lights on the printer
• Suggestions for maintaining high-quality output
• How to deal with pages that print badly
• How to deal with paper jams
• What to do about installation problems, hardware
problems, a shortage of disk space, or a problem
with the printer port
• How to remove previously installed SuperScript
software
A
08 App.A Trouble 96.9.24, 1:01 PM1
A—1

Appendix A: Troubleshooting
Maintaining Print Quality
Following are some suggestions for maintaining the
highest print quality from your printer.
• When the print output becomes light, redistribute
the toner. If light print persists, replace the toner
module or the photoconductor module. Refer to
Chapter 2 for information about replacing these
modules.
• Use high-quality paper or transparencies to obtain
sharp, crisp characters and maximum contrast.
Refer to Appendix D, Selecting Print Media, for
detailed specifications.
• Clean the appropriate parts of the printer. Refer to
Chapter 6, Maintaining the Printer, for instructions.
This section has information about resolving paper
jams and other printer output quality problems. Table
A-1 lists some solutions for occasional printer problems.
Table A-1 Simple Problems and Solutions
CONDITION SOLUTION
Check that the power cord is plugged
into a live outlet and the printer
power switch is turned on.
Check that upper cover is closed by
opening and closing it.
Check that the toner module and/or
the photoconductor module are
installed.
Try powering the printer off and on.
Check that all interface cable
connections are tightly secured.
Check for a paper jam or misfeed.
Check that the toner module and/or
the photoconductor module are
installed.
Check that the hopper has paper
loaded.
Check for a paper jam or misfeed.
Check that the paper is between 16
and 22 pounds base weight.
Power light is off
Red Attention light is steady and
printer does not print
Amber paper light is on and
printer does not print
Paper does not output to tray
Paper does not stack correctly
Red Attention light is blinking
and printer does not print
08 App.A Trouble 96.9.24, 1:02 PM2
A—2

Appendix A: Troubleshooting
Output Quality
This section has information to help you resolve print
output quality problems.
Light Page
• Clean the transfer unit with the Transfer Unit
Cleaner.
(Refer to Chapter 6, Maintaining the Printer.)
• Check to see if the toner is running low.
• Redistribute the toner. (Shake the toner module.
Reinsert the module and print several pages.)
• Replace the toner module.
• Replace the photoconductor module.
• If the problem persists, the transfer unit may need
to be replaced. Contact NEC Customer Service .
Light Page
Blank Page
• Clean the transfer unit with the Transfer Unit
Cleaner. (Refer to Chapter 6, Maintaining the
Printer.)
• Make sure the toner module and the
photoconductor module are installed correctly
• Make sure you are using a standard Centronics
parallel cable, and that your PC has a standard
parallel port.
• If necessary, replace the toner module or
photoconductor module.
• If the problem persists, the transfer unit may need
to be replaced. Contact NEC Customer Service.
Blank Page
08 App.A Trouble 96.9.24, 1:03 PM3
A—3

Appendix A: Troubleshooting
Blank Spots
• Use a fresh ream of paper. Paper should be stored
in its original package to keep it from absorbing
moisture.
• Check paper specifications (See Appendix D).
• Clean the transfer unit with the Transfer Unit
Cleaner.
• Shake the toner module. Reinsert the module and
print several pages.
• Reinsert the photoconductor module correctly and
print several pages.
• Install a new toner module.
• Install a new photoconductor module.
• If the problem persists, the transfer unit may need
to be replaced. Contact NEC Customer Service.
Black Page
• Reinstall the toner module and the
photoconductor module.
• If necessary, replace the photoconductor module.
Black Page
Streaked Page
• Check for any torn pieces of paper in the paper
path from a previous paper jam.
• Clean the transfer unit with the Transfer Unit
Cleaner (Refer to chapter 6, Maintaining the
Printer.)
• Shake the toner module. Reinsert the module and
print several pages.
• Install a new toner module or photoconductor
module, or both.
• If the problem persists, the Transfer Unit or Eject
Roller may need to be replaced. Contact NEC
Customer Service.
Streaked Page
A—4
08 App.A Trouble 96.9.24, 1:04 PM4

Appendix A: Troubleshooting
Solid White Vertical Lines
• Check for any torn pieces of paper remaining in
the paper path from a previous paper jam.
• Clean the transfer unit with the transfer unit
cleaner.
• Rock the toner module, reinsert it, and print
several pages. If necessary, install a new toner
module.
• If the problem persists, the transfer unit may need
to be replaced. Contact NEC Customer Service.
Solid White Vertical Lines
Incomplete Page
• An incomplete page may be printed when you are
printing a complex image. Add an optional
memory expansion module to the printer. Refer to
Appendix C, Printer Options.
Correcting Paper Jams
When the paper path is blocked, the printer stops
printing, and “Paper Jam” is displayed on your screen.
Do not pull the paper out forcefully because it may
tear, leaving pieces of paper in the printer that may
prevent the printer from feeding sheets normally.
Remove the jam with care according to the following
procedures.
Caution! Do not touch the fuser unit, it is extremely
hot.
1. Press the top cover release button, then swing the
cover open completely.
08 App.A Trouble 96.9.24, 1:04 PM5
A—5

Appendix A: Troubleshooting
2. Take the toner module and the photoconductor
module out of the printer.
Caution! Whenever the photoconductor module is
removed from the printer, be sure to cover it with a
cloth to prevent light from striking it.
3. Pull the misfed sheet out from inside the printer.
• The leading edge of the paper is visible after
the paper take-up section.
front of the fusing unit.
4. Pull the misfed sheet at the exit toward the print
tray.
• The trailing edge of the paper is visible in
A—6
08 App.A Trouble 96.9.24, 1:05 PM6
5. Remove the stack of paper from the paper tray

Appendix A: Troubleshooting
and pull out the misfed sheet from inside
the printer.
6. If you used the manual feeding slot, pull out the
paper that was inserted into it.
main feeder.
• Press the paper lifting plate of the 250-sheet
hopper, together with the paper stack on the
tray, down into locked position.
• Remove the paper stack from the tray and pull
out the misfed sheet.
7. If you used the optional 250-sheet hopper, remove
08 App.A Trouble 96.9.24, 1:05 PM7
A—7

Appendix A: Troubleshooting
8. Reinstall the photoconductor module and then the
toner module. Refer to Chapter 2 for details on
how to install these modules.
Installation Problems
If you have any problems installing the printer, review
the following information to help you resolve any
difficulty.
Wrong System or Hardware Configuration
If the installation program detects that your PC is not
powerful enough, it quits without installing
SuperScript. Refer to Chapter 2 for information about
detailed system requirements.
9. Press down gently on the printer cover to close it
securely.
Note: If the paper jams frequently, the fuser unit
may need to be replaced. Contact NEC Customer
Service.
A—8
Insufficient Memory
SuperScript requires at least 8 megabytes of memory
(8MB RAM) to install. If the installation program
detects that your PC does not have sufficient memory, it
will quit without installing SuperScript.
No Printer Port
To connect to a SuperScript printer, a parallel port is
required. If the installation program does not detect a
parallel port it will notify you, but it will allow you to
continue installation.
Insufficient Disk Space
SuperScript software requires at least 40 megabytes of
free disk space. Clear enough disk space on your hard
disk before continuing with the installation.
08 App.A Trouble 96.9.24, 1:06 PM8

Removing Previously Installed
SuperScript Software
You must remove any previously installed SuperScript
software before installing the new software, or Windows may fail to work. If Windows does not work
normally, you can start Windows in Safe Mode, then
remove the previous SuperScript software by running
the Remove program.
Refer to Chapter 3, Installing the Software, and to the
Windows documentation (or to Windows Help) for
information about Safe Mode.
Appendix A: Troubleshooting
08 App.A Trouble 96.9.24, 1:06 PM9
A—9

Appendix B: Frequently Asked Questions
Review the following questions and answers to gain an
understanding of how the SuperScript 660plus operates. Refer to this chapter again if you experience any
printing difficulties.
Q. How do I print envelopes?
Envelopes can be printed through the main
(multipurpose) feeder, with the guides adjusted
to accommodate their size. Be sure to use
envelopes that meet the guidelines in Appendix D, Selecting Paper and Media.
Q. What kind of labels should I use?
You can print on sheets of labels that meet the
guidelines in Appendix D, Selecting Print
Media, using the single sheet feed method. Be
sure to test a sample lot before purchasing in
quantity.
Q. How can I maintain the print quality of the
SuperScript 660plus printer?
The following key areas affect the print quality:
• Paper type and quality. (Refer to Appendix
D, Selecting Print Media.)
• Environment around the printer and paper.
Refer to Chapter 2, Setting Up and Using
the Printer, and Appendix D, Selecting Print
Media.
• Basic maintenance of the printer. Refer to
Chapter 6, Maintaining Your Printer.
Q. What is the expected average life of a
SuperScript toner module and photoconductor
module?
The toner module prints approximately 3,000
pages at 5% black-to-white ratio; the photoconductor module prints approximately 20,000
pages at 5% black-to-white ratio. Actual page
life depends upon your print applications and
the other print conditions.
Q. How will I know when it is time to change the
toner module?
When the output is light, try to redistribute the
toner and to clean the transfer unit. If the light
print persists, replace the toner module.
If the printed output becomes faint and
blurred, replace the photoconductor module.
Q. Can other brands of toner cartridges be used on
the SuperScript printer?
No. Only the toner module manufactured by
NEC can be installed in the printer.
Q. Can the toner module be refilled?
Do not attempt to refill a used cartridge, as
damage to the printer may result. Replacing
toner does not account for the fact that other
parts of the module have exceeded their de-
B
Frequently Asked Questions
09 App.B Frequency* 96.9.24, 1:09 PM1
B—1

Appendix B: Frequently Asked Questions
signed life.
Q. What is the proper way to ship a SuperScript
printer?
Pack the printer carefully in the original pack-
ing materials. If you did not save your shipping
carton, you may purchase one by calling the
NEC National Response Center - Spare Parts, at
1-800-388-8888 (toll free).
Q. Can a 115 volt SuperScript printer be converted
to 220 volts in the field?
No. The voltage must be specified at the time of
purchase.
Q. Can I use an external print spooler?
No, external print spoolers are not designed to
work with the high speed bidirectional interface.
09 App.B Frequency* 96.9.24, 1:09 PM2
B—2

Appendix C: Printer Options
Overview
This chapter describes two options you have to enhance your printer’s performance. You can
• Install a 250-sheet hopper
• Set up the hopper and add paper to it
• Add memory to the printer
C
Printer Options
10 App.C Options* 96.9.24, 1:14 PM1
C—1

Appendix C: Printer Options
Optional items for the printer include the 250-sheet
second hopper and the SIMM board.
250-Sheet Second Hopper
The optional hopper makes it possible to load extra
paper into the printer. Up to 250 additional sheets of
letter, A4, or executive paper can be loaded into the
paper cassette.
Setting Up the 250-Sheet Hopper
1. Take the 250-sheet hopper out of the shipping
carton. Remove the vinyl bag and peel off the
shipping tape.
3. Holding both sides of the second paper tray, slightly
bend the tray as shown. Insert the second tray all the
way into the port of the 250-sheet hopper as shown.
4. Fit the paper guide furnished with the unit into the
position corresponding to the paper size you plan to
use.
For executive size paper
Inside
2. Press the paper lifting plate down until it locks into
position.
C—2
10 App.C Options* 96.9.24, 1:15 PM2
For letter or A4 size paper
Outside

Appendix C: Printer Options
5. Place the printer on top of the 250-sheet hopper,
ensuring that the two coupling pins on top of the
hopper fit into the holes in the bottom of the printer.
Loading paper on the second tray
1. Press the paper lifting plate down until it locks in
position.
2. Load the paper stack on the tray so that its front side
(the side facing up when the package was
unwrapped) faces up.
3. Load the paper no higher than the maximum level
indicator. Do not add paper until all sheets in the
tray have been used.
4. Press the paper setting button to unlock the paper
lifting plate.
10 App.C Options* 96.9.24, 1:15 PM3
C—3

Appendix C: Printer Options
Memory Expansion Module (SIMM)
SuperScript 660plus memory can be expanded by
adding a Single Inline Memory Module (SIMM).
Adding the memory expansion module will solve the
memory overflow problem that causes incomplete
page printing. In some cases it may improve printing
throughput.
The 72-pin memory expansion module is available
from your local dealer.
Follow these steps to install the memory expansion
module:
1. Turn OFF the printer power.
Caution! To protect your printer from possible
damage, be sure it is powered down prior to
installation of the module.
2. Remove the power cord from the rear panel of the
printer.
3. Using a coin, turn the screw located on the right
panel of the printer in the direction of the arrow,
and remove the memory cover. You can see the
memory socket on the controller board.
CAUTION! Do not touch any controller board parts
with your fingers.
C—4
10 App.C Options* 96.9.24, 1:16 PM4

Appendix C: Printer Options
6. Press the module up until you hear a click as it
snaps into place. Check that the module is held in
place securely by the metal holders on each side.
4. Hold the module so that the notch is on the right
and the metal edge faces toward the memory
socket.
5. Hold the module at an angle and push it firmly
into the socket.
7. Replace the memory cover. First insert the memory
cover downward into the printer, then move it to its
original position. Next, using a coin, tighten the
screw by turning in the direction of the arrow.
Caution! Check that the memory cover is firmly
secured.
C—5
10 App.C Options* 96.9.24, 1:16 PM5

Appendix D: Selecting Print Media
D
Selecting Print Media
Overview
This Appendix has both general guidelines and
detailed specifications for purchasing and storing
paper and other media for your SuperScript 660plus.
The chapter covers
• Selecting paper and media
• Taking care of printer supplies
• Descriptions of the properties of different kinds of
paper
• Print areas on various paper sizes
• Useage guidelines for preprinted forms, heavy
stock, envelopes, adhesive labels, and
transparency film
• Specifications for the purchase of paper, envelopes,
adhesive labels, and transparency film
• Guidelines for the storage of your media
• Guidelines for printing with various media
11 App.D Media* 96.9.24, 1:20 PM1
D—1

Appendix D: Selecting Print Media
Selecting Paper and Media
The NEC SuperScript 660plus printer supports a wide
variety of print media.
Choosing quality paper is your best bet for avoiding
many of the output problems common to heatintensive printing. It is the most effective measure you
can take to achieve consistently good results from your
printer.
Although we do not endorse particular manufacturers,
this chapter mentions products that have consistently
demonstrated high quality. This chapter shows you
how to recognize quality media products. It has
detailed specifications for print materials, and how to
handle and store them.
Note: Because we cannot control the quality or
manufacturing of your selected media, we cannot
warrant the use or results of any specific media with
the NEC SuperScript 660plus printer.
Note the following media guidelines:
• Check that the media meets the detailed
specifications noted in this chapter.
• Order a small quantity to test with your printer
and your work environment. Some paper vendors
offer print quality guarantees to insure that the
output meets a predetermined standard when used
with laser printers. If you do not like the paper,
you may be able to return it for another type, but
test that one, too.
You must judge the quality and performance of any
paper. We strongly recommend that you test several
reams of paper for SuperScript 660plus compatibility
before you make a large purchase.
• Tell both your supplies buyer and the prospective
seller that you are using these media in a laser
printer.
Care of Printer Supplies
Use the following precautions when handling printer
supplies — toner module, photoconductor module,
and paper.
Avoid storing the supplies in any of the following
places:
• A place subject to direct sunlight. (The
photoconductor module should not be exposed to
any light, incandescent or fluorescent.)
• A hot place with an open flame
• A humid place
• A dusty place
Paper that is not loaded in the printer tray, but has
been removed from its wrapper, should be stored in a
sealed plastic bag in a cool, dark place.
Use only the toner module and toner that have been
designed for the exclusive use of this printer.
Keep supplies out of the reach of children.
11 App.D Media* 96.9.24, 1:21 PM2
D—2

Appendix D: Selecting Print Media
• The acceptable range of media weight for use is 16
to 28 lbs (60 to 105 g/m2).
Print Areas
Acceptable media sizes and their print areas are as
follows:
• Letter 8.5 in. x 11 in. print area 8.0 in. x 10.5 in.
(216 mm x 279 mm) (203 mm x 267 mm)
• Legal 8.5 in. x 14 in. print area 8.0 in. x 13.5 in.
(216 mm x 356 mm) (203 mm x 343 mm)
• Monarch Envelopes
3.875 in. x 7.5 in. print area 3.2 in. x 6.9 in.
(98.4 mm x 190.5 mm) (82.4 mm x 174.5 mm)
• Commercial Envelopes
10 4.125 in. x 9.5 in. print area 3.5 in. x 8.9 in.
(105 mm x 241 mm) (89 mm x 225 mm)
• International DL Envelopes
110 mm x 220 mm print area 3.70 in. x 8.03 in.
(4.22 in. x 8.66 in.) (94 mm x 204 mm)
• International C5 Envelopes
6.38 in. x 9.02 in. print area 5.75 in. x 8.39 in.
(162 mm x 229 mm) (146 mm x 213 mm)
Load envelopes face up, with the narrow side in first.
The flap should be down and to the left. Refer to the
Paper Loading sticker included in the printer
accessories kit.
Paper Properties
Paper manufactured from 100% chemical wood pulp
containing no more than 25% cotton fiber is
recommended. Paper should be dust-free and have
cleanly cut edges. Do not use wrinkled, curled, or
damp paper; it often causes misfeeds, paper jams, and
illegible output.
Most printing paper has two sides: top, often called
the “felt” side, and bottom, or “wire” side. The
package label generally has an arrow showing you
how to load paper so that output goes to the wire side.
NEC has tested Xerox® 4024TM (20 lb.) paper and
obtained satisfactory results. Generally, paper
manufactured for photocopying has good print
quality and paper-handling characteristics.
Note: Paper properties can be changed by the
manufacturers. NEC has no control over such
changes. Thus NEC neither warrants nor
recommends the use of any particular paper and
the user assumes all responsibility for the quality
and performance of paper selected.
No matter which manufacturer you select, note the
following considerations.
• Smoother surface paper generates sharper output
resolution and detail.
• Coated paper can melt, discolor, or release
hazardous emissions at temperatures greater than
392°F (200°C).
11 App.D Media* 96.9.24, 1:22 PM3
D—3

Appendix D: Selecting Print Media
• Forms should be printed with heat-resistant inks
that do not vaporize or generate harmful emissions
at temperatures greater than 392°F (200°C) for 0.1
second.
• Do not use paper printed with low-temperature
inks.
• Inks must not be flammable.
• Inks must not be affected by the resin components
in the toner.
• Take care to avoid changing the moisture content
of paper being preprinted, or using materials that
change the electrical or handling properties of the
paper. Forms should be sealed in a moisture-proof
wrapping after preprinting to prevent moisture
changes during storage.
Heavy Print Stock
Heavy (thick) printed stock can generate misfeeds and
paper jams, in addition to causing excessive wear on
the print mechanism.
• Bond paper exceeding 22 lbs. (82 g/m2) must be
placed in, and fed from the manual feeding slot one
sheet at a time .
• Do not use paper heavier than 28 lbs. (105 g/m2).
The acceptable range of media weight is 16 to 28
lbs. (60 to 105 g/m2).
Media Use Guidelines
Observe the following guidelines for media selection.
Do not attempt to print on any of the following types
of paper:
• extremely smooth or shiny coated paper
• very rough, textured, or embossed paper
• multipart forms or carbonless papers
• paper coating, dyes, or inks not compatible with a
fusing temperature of 392°F (200°C)
• paper that produces hazardous emissions when
exposed to 392°F (200°C) temperatures for 0.1
second
• paper that might offset or discolor
• damaged, wrinkled, or irregularly shaped paper
• paper containing large amounts of clay or talc
• paper that does not lie flat
• preprinted forms with inks containing metallic
substances
• perforated feed paper and cutout paper
Preprinted Forms
During printing, heat applied to preprinted forms can
remove ink from the form and leave residue (called
offset) inside the printer.
In addition to offset residue problems, ink residues
may generate harmful gases and emissions. Note the
following considerations:
11 App.D Media* 96.9.24, 1:23 PM4
D—4

Appendix D: Selecting Print Media
Envelopes
The printer accepts the following standard envelope
sizes:
• Monarch 3.875 in. x 7.5 in. (98.4 mm x 190.5 mm)
• Commercial 10 4.125 in. x 9.5 in. (105 mm x 241
mm)
• DL 110 mm x 220 mm (4.33 in. x 8.66 in.)
• C5 162 mm x 229 mm (6.38 in. x 9.02 in.)
• B5 176 mm x 250 mm (6.93 in. x 9.84 in.)
NEC has tested Eaton 25% cotton (20 lb. diagonal
seamed) and obtained satisfactory results.
Note: NEC neither warrants nor recommends the
use of any particular envelope and the user assumes
all responsibility for the quality and performance of
the envelopes selected.
The leading edge of an envelope that feeds into the
printer must be straight. The fold must be firmly
creased and be no thicker than two paper thicknesses.
As a rule, the larger the envelope, the more difficult it
is to feed properly.
The base weight of envelope paper must be 20 lbs. (75
g/m2). Commercial envelopes, called regular or
business envelopes, are the most widely used and are
probably the most reliable for your printing needs.
Neither envelopes with peel-off adhesive strips nor
envelopes that are heavily embossed feed well. Avoid
heavily textured or coated envelopes.
In addition, avoid
• envelopes with snaps, clasps, tie strings,
cellophane windows, or curved or thick leading
paper edges. They do not feed consistently.
• envelopes composed with glues, inks, and
adhesives that could discolor, scorch, or melt when
heat is applied.
• adhesives that generate harmful emissions at
temperatures greater than 392°F (200°C for 0.1
second.
• envelopes made with recycled paper.
• envelopes that use an adhesive that relies on
pressure for sealing.
• envelopes that have already been through the
printer once. Do not feed envelopes into the printer
a second time.
• envelope seams that do not have a continuous and
even glue line (excluding the envelope flap).
Adhesive Labels
Adhesive labels consist of a top (print surface) sheet,
an adhesive layer, and a liner (peel-away backing). The
top sheet is usually xerographic paper and must meet
the general specifications for that kind of paper. The
liner must be coated for easy release of the top sheet
and adhesive layer, particularly after being subjected
to print head heat.
11 App.D Media* 96.9.24, 1:24 PM5
D—5

Appendix D: Selecting Print Media
Transparency Film
When you print on transparency film, always remove
the first printed transparency from the output tray
before feeding a second one through. This prevents
scratching the film surface of the first transparency.
The transparency must be able to withstand
temperatures of 392°F (200°C) for 0.1 second.
Test transparent film for satisfactory performance prior
to purchase.
• Transparent film must be fed from the manual
feeding slot one sheet at a time .
NEC tested 3M® CG3300 and obtained satisfactory
results.
NEC has tested Avery® 5162 labels and obtained
satisfactory results.
Note: Label properties can be changed by the
manufacturers. NEC has no control over such
changes. Thus NEC neither warrants nor
recommends the use of any particular label and the
user assumes all responsibility for the quality and
performance of labels selected.
Note the following considerations regarding label
printing:
• Labels must be fed from the manual feeding slot
one sheet at a time .
• The adhesive should not melt or generate harmful
emissions at temperatures greater than 392°F
(200°C ) for 0.1 second.
• Labels should cover the entire surface of the liner
sheet. Labels placed on a liner sheet with spaces
between them make it difficult for consistent
feeding because one sheet contains several doublethickness areas.
• Adhesive must not “spill over” its paper edge or
any die cuts. Excess adhesive can bond to the print
mechanism and cause poor quality output or
mechanical problems. To test for excessive
adhesive, put a piece of paper on top of the
adhesive-backed paper and press down. The two
pieces should not stick together.
11 App.D Media* 96.9.24, 1:25 PM6
D—6

Appendix D: Selecting Print Media
Media Purchasing Specifications
The following purchase specifications are intended for
the person who orders your print media. It is possible
that even when these specifications are met, operating
environment inconsistencies might keep the paper
from measuring up to its optimum capabilities. Always
test a representative sample before making a large
purchase of any print media.
Table D-1 Paper Specifications
ITEM SPECIFICATION
Acid content 5.5 pH to 8.0 pH
Ash content Cannot exceed 10% or contain large
amounts of clay or talc
Single-sheet feed* 60 to 105 g/m2 (16 to 28 pound)
Multi-sheet feed 60 to 82 g/m2 (16 to 22 pound)
Brightness 83% minimum
Caliper 3.7 to 7.5 mils
Furnish 100% chemical wood pulp with up to 25%
cotton fiber recommended
Curl Zero curl toward image side, minimum 15-
inch radius curl toward opposite side
Cut edge condition Sharp edges, no visible fray
Electrical surface 2.0 to 15 x1010 ohms/square resistivity
(conditioned at 71.6¡F (22¡C) plus 50%
relative humidity)
Electrical volume 1.2 to 15 x1011 ohm x centimeter resistivity
(conditioned at 71.6¡F (22¡C) plus 50%
relative humidity)
Finishing Cut sheets must be within –0.0313 inches
of nominal, corners at 90+ –0.2¡
Fusing capability Cannot scorch, melt, offset, or release
emissions when heated to 392¡F (200¡C)
for 0.1 second
Grain Long grain
Moisture content 4% to 6% by weight
Opacity Minimum of 85%
Packaging Polylaminated moisture-proof ream wrap
Smoothness 100 to 300, Sheffield scale
Stiffness 1.6 minimum machine direction
0.6 minimum cross direction (Taber)
Wax pick 12 minimum (Dennison)
* Single-sheet feed refers to placing print media in the manual feeding
slot one sheet at a time.
11 App.D Media* 96.9.24, 1:26 PM7
D—7

Appendix D: Selecting Print Media
Table D-2 Envelope Specifications
ITEM SPECIFICATION
Base weight 20 lb. (75 g/m2) single thickness
Caliper 5.5 mils (0.14 mm), single thickness
Furnish 100% chemical wood pulp with up to 30%
cotton fiber
Curl Envelope must lie flat, with no more than 0.25
inch curl across the entire surface
Electrical surface resistivity 2.0 to 15 x 1010 ohms/square (conditioned at
71.6¡F (22¡C) plus 50% relative humidity)
Finishing Cannot have adhesive exposed to the
printer. Must be accurately folded (–0.04
inches) so that there are no more than two
paper thicknesses anywhere along the
envelope surface, all glue lines must be
continuous and all folds must be sharply
creased.
Fusing capability Cannot seal, scorch, melt, offset, or release
hazardous emissions when heated to 392¡F
(200¡C) for 0.1 second
Moisture content 4% to 6% by weight
Smoothness 100 to 250, Sheffield scale
Table D-3 Adhesive Label Specifications
ITEM SPECIFICATION
Caliper No more than 0.0075 (0.19 mm)
Construction The label stock must provide good toner
adhesion. No adhesive can be on the external
label surfaces. General label attachment/diecutting cannot allow for peeling during
transport, printing, or electrical fusing. Labels
should cover the entire carrier sheet.
Curl Zero curl toward image side, minimum 30-
degree radius curl toward opposite side. Curl
must be within specifications after heating a
392¡F (200¡C) for 0.1 second.
Electrical surface resistivity 2.0 to 15 x1010 ohms/square
Electrical volume resistivity 1.2 to 15 x1011 ohms/centimeter
Finishing Cut sheets must be within –0.0313 inch of
nominal, corners at 90¡ –0.2¡
Fusing capability Cannot scorch, melt, offset, or release
hazardous emissions when heated to 392¡F
(200¡C) for 0.1 second
Packaging Moisture-proof wrap
Shelf life One year (minimum) stored at 71.6¡F (22¡C)
at 50% relative humidity
Smoothness 100 to 250, Sheffield scale
11 App.D Media* 96.9.24, 1:27 PM8
D—8

Appendix D: Selecting Print Media
Printing with Various Media
Table D-5 lists the media type and input capacity of
print media you can load.
Table D-5 Recommended Printing Methods –
Multipurpose Tray
MEDIA TYPE (SIZE) INPUT (CAPACITY)
Sheet Paper (16-22 lb) Max. 150 sheets (17 lb.)
(Letter, Executive, A4, B5, Legal)
Heavy Paper (23-28 lb) 1 sheet
or Transparency Film
Adhesive Label 1 sheet
Envelope Max. 5 pieces (depends on
(Commercial 10, Monarch, envelope type)
International DL,
International C5)
Table D-4 Transparency Film Specifications
ITEM SPECIFICATION
Cutting dimension tolerance –0.031 in. (–0.7 mm)
Cutting angle tolerance 90¡ –0.2¡
Thickness 3.9 to 4.3 mils (0.100 to 0.110 mm)
Surface treatment Double sided
Storage Guidelines
Note the following guidelines when storing paper:
• Do not stack cartons of paper more than 6 cartons
high.
• To optimize print quality, store and use paper at
temperatures no lower than 68°F (22°C), with
humidity of 50%, ±5%.
• If you must store the paper in an extremely humid
environment, keep it tightly wrapped in plastic.
• If you must store the paper in extremely cold or
hot environments, allow several hours for a
temperature adjustment before you use the paper.
The greater the temperature difference, the longer
this period should be.
11 App.D Media* 96.9.24, 1:28 PM9
D—9

Appendix E: Using Fonts
Overview
This chapter contains information about fonts and how
they affect your output. This chapter discusses
• Fonts in GDI Mode
• Fonts in PCL Mode
• How to install SuperScript TrueType fonts
• How to save downloaded fonts and macros in PCL
Mode
E
Using Fonts
12 App.E Fonts* 96.9.24, 2:18 PM1
E—1

Appendix E: Using Fonts
Fonts in GDI Mode
SuperScript software can work rapidly and accurately
with the standard TrueType fonts as well as the
standard Windows GDI fonts.
One benefit of the SuperScript GDI (Graphical Device
Interface) WYSIWYG (What You See Is What You Get)
approach becomes clear as you use fonts. In Windows,
any font you can see on the screen will print on your
printer. This includes TrueType, Type 1 (through
Intellifont for Windows).
TrueType is most common, since it is already built into
Windows. However, in most cases the performance
difference between TrueType and other fonts is
negligible.
One advantage of GDI mode becomes evident when
you work with documents that have multiple fonts. A
standard printer language such as PostScript must
fetch additional information every time it processes a
new font. A document with many different fonts can
take a noticeably long time to print. In GDI mode, the
work of fetching font information takes place at the
time the document is retrieved and displayed on the
screen. Printing the document requires only a small
amount of additional processing, which means quick
text printing no matter how many fonts are included.
Note: Windows includes some special built-in fonts
that were not meant for printing, including MS Serif
and MS Sans. These special fonts were designed for
screen display, and so their resolution (number of
dots per inch) is coarser than the fonts that normally
appear on a printed page. We recommend that you
do not select these fonts when creating your
documents.
If you only need TrueType fonts (identified with a TT
symbol on your font list), you can hide all others from
your list of available fonts, by following these steps:
1. In Windows 95, click the Start button, point to
Settings, then click Control Panel. The Control
Panel window appears.
In Windows 3.1 or 3.11, double-click the Main
program group, then double–click the Control
Panel.
2. Double-click the Fonts icon in the Control Panel
window. The Fonts window appears.
3. Select the View menu and click Options. The
Options dialog box appears.
4. Click the TrueType tab.
5. Select Show only TrueType fonts in the programs
on my computer. Click OK to exit the Options
dialog box.
12 App.E Fonts* 96.9.24, 2:19 PM2
E—2

Appendix E: Using Fonts
Fonts in PCL Mode
NEC SuperScript PCL (Printer Command Language)
mode supports all resident fonts, corresponding to the
internal fonts in the HP LaserJet 4P.
You can select these resident fonts in SuperScript PCL
mode. If you did not install the SuperScript TrueType
fonts included with your software, you will not be able
to select these resident fonts. Install these fonts now by
reinstalling your SuperScript software or by using the
font utility in Windows. The procedure is described in
the next section.
Installing SuperScript TrueType Fonts
There are 53 additional TrueType fonts bundled with
your SuperScript software. This font installation is
necessary to access all resident fonts in the HP LaserJet
4P emulation mode. If you did not install them when
you installed the SuperScript software, follow these
instructions to install them now.
1. In Windows 95, click the Start button, point to
Settings, and then click Control Panel. The Control
Panel window appears.
In Windows 3.1 or 3.11, double-click the Main
program group, then double-click the Control
Panel.
2. In the Control Panel window, double-click the
Fonts icon. The Fonts window appears.
3. Select Install New Font in the File menu. The Add
Fonts dialog box appears.
4. Insert the NEC SuperScript CD and then select the
drive in the Drives list box. The fonts on the NEC
SuperScript CD appear in the List of Fonts box.
5. Select the fonts you want to install in the List of
Fonts box, or choose the Select All button to install
them all. You can add multiple fonts at once by
holding down the Control key on your keyboard
while selecting additional fonts with the mouse.
6. Click OK to add the selected font. The Font
window box appears.
7. Click Close.
Saving Downloaded Fonts and Macros
(PCL Mode)
When the PCL interpreter is closed any downloaded
fonts or macros are lost, just as if you had turned off a
regular PCL printer.
You can preserve this information through the NEC
SuperScript Console to keep the PCL interpreter
active.
1. In Windows 95, click the Start Button, point to
Programs, NEC SuperScript Tools, and then click
NEC SuperScript Console.
In Windows 3.1 or 3.11, double-click the NEC
SuperScript Tools program group, then doubleclick NEC SuperScript Console.
12 App.E Fonts* 96.9.24, 2:20 PM3
E—3

Appendix E: Using Fonts
2. Download macros or soft fonts in advance, using
the Add button of the Local Queue tab, to copy
them to the printer.
3. Minimize the SuperScript Console.
4. Start or return to your application and print your
document.
This will preserve your downloaded fonts and macros.
Also, if your next print job uses PCL, it will take less
time to print because the SuperScript PCL interpreter
has already been loaded. However, if you switch from
PCL to GDI mode, this information will be lost, just as
if you were changing printer languages in a
conventional printer.
12 App.E Fonts* 96.9.24, 2:20 PM4
E—4

Appendix F: Safety Information
Safety Information
Safety Information
Laser Safety
This printer is certified as a Class 1 laser product under
the U.S. Department of Health and Human Services
(DHHS) Radiation Performance Standard according to
the Radiation Control for Health and Safety Act of 1968.
This means that the printer does not produce
hazardous laser radiation.
Since radiation emitted inside the printer is completely
confined within protective housings and external
covers, the laser beam cannot escape from the machine
during any phase of user operation.
The SuperScript 660plus is a page printer that operates
by means of a laser. There is no possibility of danger
from the laser provided the printer is operated
according to the instructions in this manual.
F
Internal Laser Radiation
Maximum Radiation Power: 5.0 x 10⁻⁴(W)
Wave Length: 770-810 (nm)
This is a Class IIIb Laser Diode Assy that has an
invisible laser beam. The print head unit is NOT A
FIELD SERVICE ITEM. The print head unit should not
be opened under any circumstances.
CDRH Regulations
The Center of Devices and Radiological Health (CDRH)
of the U.S. Food and Drug Administration
implemented regulations for laser products on August
2, 1976. These regulations apply to laser products
manufactured from August 1, 1976. Compliance is
mandatory for products marketed in the United States.
The printer’s rear panel indicates compliance with the
CDRH regulations and must be attached to laser
products marketed in the United States.
Caution! Use of controls, adjustments, or performance of procedures other than those specified in
this manual may result in hazardous radiation
F–1

Appendix F: Safety Information
exposure.
For United States Use Only
FEDERAL COMMUNICATIONS COMMISSION
RADIO FREQUENCY INTERFERENCE STATEMENT
WARNING! Changes or modifications to this unit
not expressly approved by the party responsible
for compliance could void the user’s authority to
operate the equipment.
• Reorient or relocate the receiving antenna.
• Increase the separation between the equipment
and receiver.
• Connect the equipment to an outlet on a circuit
different from that to which the receiver is
connected.
• Consult the dealer or an experienced radio/TV
technician for help.
Use a shielded and properly grounded I/O cable to
ensure compliance of this unit to the specified limits of
the rules.
Note: This equipment has been tested and found to
comply with the limits for a Class B digital device,
pursuant to Part 15 of the FCC Rules. These limits
are designed to provide reasonable protection
against harmful interference in a residential
installation. This equipment generates, uses and can
radiate radio frequency energy and, if not installed
and used in accordance with the instructions, may
cause harmful interference to radio
communications.
However, there is no guarantee that interference will
not occur in a particular installation. If this equipment
does cause harmful interference to radio or television
reception, which can be determined by turning the
equipment off and on, the user is encouraged to try to
correct the interference by one or more of the following
measures.
F—2
Employer Responsibilities
Because ozone can be an irritant, various regulatory
agencies have established limits to the amount of ozone
to which employees may be exposed. The workplace
specifications are:
• A person may not be exposed to an average
concentration of greater than 0.1 part per million
(PPM) of ozone for a period of eight hours.
• In addition, the employee should not be exposed to
peak concentrations of ozone greater than 0.3 PPM
for longer than 15 minutes.
The employer is responsible for providing a work
environment that meets these standards.

Appendix F: Safety Information
Minimizing Ozone Exposure
Almost all ozone concerns arise from abnormal site or
operating conditions. The following conditions may
generate an ozone complaint:
• installation of multiple laser printers in a confined
area
• extremely low relative humidity
• poor room ventilation
• the exhaust port of the printer is directed towards
the face of personnel
• long, continuous printing combined with any of
the above
Inspect your work environment for the operating
conditions listed above if you believe ozone emissions
are a problem in your area.
Some people may be ultra-sensitive to ozone odor. If
these situations are encountered, it is advisable to
position the printer away from the sensitive user.
Ozone Emissions
Laser printers and photocopiers generate ozone gas
(O3) as a by-product of the electrophotographic
process. Ozone is only generated while the printer is
printing.
UL Standards for Ozone
The only existing standard for ozone emissions has
been established by Underwriters Laboratory (UL). All
SuperScript 660 family printers meet this standard
when shipped from the factory to our customers.
EPA Energy Star Computers Award
The NEC SuperScript 660plus meets the requirements
of the Environmental Protection Agency's Energy Star
Computers program for printers. The purpose of this
program is to promote the manufacturing and
marketing of energy-efficient office automation
equipment, thereby potentially reducing combustionrelated pollution.
Your SuperScript 660plus, as shipped from the factory,
has this feature disabled to improve the first page out.
You may change this time period to any interval
between 1 to 30 minutes if you wish.
Some additional tips for saving energy are:
1. Use the “Print Preview” function if it is available
in your application software.
2. Use the “Manual Duplex” feature to print on both
sides of the paper.
F–3

Appendix F: Safety Information
3. Shorten the “Power Saving Mode On” time period
to less than 15 minutes.
Technical Specifications
Print Speed
6ppm @ A4,Letter
First Print Time
19 sec.
Warm up Time
40 sec. (100V-120V) (from cold state)
35 sec.(230V) (from cold state)
Resolution
600 dpi
Technology
LaserDiode+PolygonMirror
Paper Size
Letter, A4, A5, B5, Legal
Width: 100-216mm
Length: 148-356mm
Paper kind
Normal, Recycled: 60-105 g/m
Transparency, envelope, label, etc.
Paper source
Main Feeder tray: 150 sheets (171b)
Manual Feed Slot
Optional: 250 sheet second hopper
Paper Stacking
2
100 sheets face down
Noise
46dB(A) printing
30dB(A) standby
Power Voltage
100V-120V: 50/60Hz
230V: 50/60Hz
Power consumption
100V-120V, 420W
230V, 480W
Operating Environment
Temperature: 50-90.5°F (10-32.5°C)
Humidity: 20-80%
Administrative Compliance
UL 1950
CSA-22.2, No. 950
FCC Class B
CDRH Class I
RAM
Standard 256 KB
Max. 4.25 MB
F—4

Glossary
ASCII American Standard Code for Information
Interchange. This standard defines character set codes
that are used for data interchange between data
terminal equipment.
attributes Characteristics of a font. These include
orientation, symbol set, spacing, pitch, point size, style,
weight, and typeface.
backup A spare copy of a disk, or file. Backing up your
disks and files ensures that you will not lose
information if the original is lost or damaged.
baud The rate of data transmission measured in bits
per second.
bitmap A dot-by-dot representation of a text character
or graphic image.
bitmapped font A font that is stored as a pattern of
dots. These fonts require a lot of memory because a
representation for each font size is stored. In contrast,
an outline font is stored as mathematical data. A single
representation of an outline font can be scaled to any
size.
Glossary
buffer An electronic memory area where text is stored
for processing by the printer.
click To press down and release the mouse button at
the location you want an action to take place.
control panel Sets the system parameters and
attributes such as the appearance of windows, the
display of data, the peripherals to be used and the like.
CPI Characters per inch. A unit for measuring type
based on the number of characters in one inch. Also
known as pitch.
CPU Central processing unit. The part of the computer
that interprets, processes, and executes instructions.
Also known as the microprocessor.
default A preset setting that is automatically read by
the printer (or computer) until you change it.
density The relative darkness of print, or the amount
of white that shows through the printed characters.
G
G—1

Glossary
dialog box A box that appears on the screen with
a message, or requesting information from you.
DOS Disc Operating System. An operating system
developed by Microsoft.
dpi Dots per inch. A measure of the resolution at
which your printer can output text and images.
The higher the number, the finer the resolution.
emulation The imitation of another printer
language.
feeder The mechanism that feeds paper and other
media into the printer. See also multipurpose
feeder.
file Any named, ordered collection of information
stored on a disk.
firmware Programs stored permanently in readonly memory (ROM). Such programs are built into
the printer at the factory. They can be executed at
any time, but cannot be modified or erased from
memory. See also ROM.
font A character set within a tyypeface that has
specific spacing, pitch, point size, style, and weight.
font file A file used to store fonts in the system file.
fuser unit The mechanism in your printer that applies
heat and pressure to fix the toner image permanently
onto the paper.
GDI Graphical Device Interface. In Windows, a library
of core functions that processes graphical data for
display and printing.
graphic An image that graphically represents an object,
a concept, or a message.
handshake A protocol that allows devices to exchange
information about the connection between them, such
as when to start exchanging data.
icon A small graphic image that represents a program,
file, or command. Often you select an icon to access the
item it represents.
indicator lights LED lights on the printer that indicate
the current printer status.
fixed space font A typeface in which the width of
all characters is the same. Also called a monospace
font.
G—2
initialization A state where all settings return to their
default values.

Glossary
Job Log A historical log of the last 10 jobs originated
by your PC.
justification Making all full lines of text the same
length in order to create an even right (or left) edge.
KB Abbreviation for kilobyte, i.e., one thousand bytes.
lpi Lines per inch. A measure of how many lines are
printed in an inch of text.
MB Abbreviation for megabyte, i.e., one million bytes.
multipurpose feeder A printer feeder you can use for
printing envelopes, transparencies, labels, or heavy
paper stock.
offline The state in which the printer cannot accept or
print out data.
online The state in which the printer can accept and
print out data.
orientation Describes the position of images on a page
with respect to the long and short edges of the paper.
Portrait orientation means the page is taller than wide
as you view the text upright. Landscape orientation
means the page is wider than tall as you view the text
upright.
outline font A font that is stored as mathematical data
that can be used to generate many sizes from the same
representation. This is in contrast to a bitmapped font
which is stored as a pattern of dots. An outline font can
be scaled to any size. Also known as a scalable font.
paper jam Paper that is misfed and stops within the
printer. It must be cleared before the printer can
continue printing.
parallel interface An interface that uses multiple data
circuits. It is usually faster than serial ports and may
also support bidirectional communication between
devices.
peripheral device Any device (such as a printer) that
you attach to your computer.
photoconductor module A rotating surface that
receives an image of a page to be printed and transfers
it as toner to paper, using an electrostatic process.
point A unit of size for type. One point equals 1/72
inch.
port A socket on the connector panel of a computer or
peripheral device where you can plug in a cable to
connect to another computer or device, or to a
network.
G—3

Glossary
print area The region on a page that can actually be
printed.
printer driver A software file that translates printer
commands.
Print Manager An application program that runs in the
background when printing. Once the print file is sent
to the Print Manager, the Print Manager controls the
print queue and then sends the file to the printer. You
can then perform other tasks while printing.
Print Status Window Window on your screen that
displays any print job currently under way. When
printer errors occur, the printer status is shown in this
window, which also includes the steps that should be
taken to correct the error.
Program Manager When Windows is started, the
Program Manager is executed and remains running
while Windows is running.
proportional font A font in which the distance
between characters varies according to the width of the
characters. See also fixed face font.
raster image An image that is stored as a pixel-by-pixel
representation (or bitmap).
rasterize To convert to a pixel-by-pixel representation
(or bitmap) of an image.
resident font A typeface residing in printer ROM.
resolution The number of dots used to represent an
image—usually measured in dots-per-inch (dpi). The
higher the number of dots, the finer the resolution.
ROM Read only memory. Its contents can be read but
not changed.
screen font A font that can be displayed on the screen
that matches a font on your printer.
SIMM Single Inline Memory Module. Units of random
access memory (RAM) that can be installed on your
printer.
soft font A font that is stored on a diskette and can be
transferred to printer memory and stored temporarily.
Also known as temporary font.
RAM Random-access memory. Memory in which
information can be accessed in an arbitrary manner.
This memory can be written to, and read from.
G—4
SuperScript Console Provides an easy way to
configure the SuperScript printer and to monitor and
control print jobs.

Glossary
symbol set The characters and special symbols that
make up a font.
toner module A unit that contains the toner powder
that serves as “ink” in the printing process.
transfer roller The transfer roller is the black rubber
roller located inside the printer, just below the toner
module. It should be replaced at the same time you
replace the fuser cartridge.
TrueType font An outline font format developed by
Apple Computer, Inc., and used by Microsoft in its
Windows operating system.
Type 1 font An outline font format developed by
Adobe Systems for PostScript.
typeface A family of fonts that shares a distinct design.
Virtual Memory A technology that allows memory to
be expanded more than the actual main memory of the
computer. When Windows is used in Enhanced mode
with an i386 (SX) or newer CPU, a part of the hard disk
is used as a swap file and part of the information
stored in the main memory is stored in the swap file.
This virtually expands the capacity of the main
memory.
is an application that runs under DOS and implements
a user interface that has windows, icons, and menus.
WYSIWYG What You See Is What You Get. A user
interface system in which the document represented
on the screen matches the printed output.
Windows Operating system developed by Microsoft. It
G—5

Appendix H: Technical Suupport
H
Technical Support
Overview
This chapter provides information about resources for
information and technical support, including
• How to reach NEC Technical Support by voice,
fax, mail, and online, for technical assistance
• Where to find additional documentation about this
product
• How to order supplies and printer options
• How to contact software vendors with questions
about their software applications
Assistance Nearby
Often, the best source for assistance is closer than you
think. Before calling NEC, check out the options
below.
Help From Within Your Company
If your organization is large and has purchased many
NEC printers, the best source of assistance may be
within your own company. Your company may have
designated central support personnel that you can go
to when you have a problem or when you need
supplies such as paper or toner cartridges. These
central support personnel can then contact the
appropriate dealer or NEC support staff.
Help From Your Dealer
The dealer from whom you purchased your printer is
backed by complete support resources and programs
within NEC. Your dealer can provide you with details
on all available support options.
15 App.H Technical Support* 96.9.24, 2:00 PM1
H—1

Appendix H: Technical Support
otherwise call 1-800-388-8888.
French-speaking Canadians call 1-800-268-4115 for
repairs only, otherwise call 1-800-388-8888.
Sending Internet Electronic Mail
You can email your questions to us. NEC will respond
within one business day. Send email messages to
tech-support@nectech.com
Sending a Fax
You can fax questions or comments to NEC at
1-508-635-4049, or
1-508-635-4666
Be sure to indicate the number where NEC can
telephone or fax a response.
Using FastFactsNECs
Information Retrieval System
NEC’s technical support staff have created technical
notes and tips for using NEC products. You can order
these documents by touchtone menu and have them
automatically sent to your fax machine.
To use NEC FastFacts, dial
1-800-366-0476
Follow the instructions for ordering documents and
providing your return fax number.
Reaching the NEC Bulletin Board System
NEC Technical Support
NEC technical support is available to answer your
questions, Monday through Friday, 8:30 a.m. to 8:00
p.m., Eastern Standard Time.
Please have the following printer information ready
when you contact NEC:
Model number
Serial number
Date and place of purchase
How to Contact NEC
There are a number of ways to contact us or receive
information about technical issues, products, and
services.
Contacting NEC Technical Support by Telephone
The NEC toll-free number for printer technical
support is 1-800-632-4650.
Contacting NEC Customer Service by Telephone
In the U.S., call 1-800-388-8888 to speak to a
representative about new product sales and
literature, technical support, repairs, and customer
service.
In Canada, call 1-800-268-4191 for repairs only,
15 App.H Technical Support* 96.9.24, 2:01 PM2
H—2

Appendix H: Technical Suupport
You can use the NEC Bulletin Board System (BBS) to
send messages and transfer files. The BBS number is
1-508-635-4706
Reaching NEC on Compuserve
Compuserve members can link to bulletin boards
and transfer files to and from NEC. To reach the NEC
section, type
GO NECTECH
Reaching NEC on Microsoft Network
Members of the Microsoft Network can access the
NEC support forum and obtain marketing
information. To reach the NEC section, type
GO NECTECH
Reaching NEC on America Online
Members of America Online can access the NEC
support forum, obtain marketing information,
transfer files, and send messages. To reach the NEC
section, type the keyword
NECTECH
Reaching NEC on AT&T Interchange
Members of AT&T Interchange can access the NEC
support forum, obtain marketing information,
transfer files, and send messages. The NEC section is
in Companies Online
Reaching NEC on the World Wide Web
NEC’s web site provides up-to-date product
information and will eventually include links to
NEC’s FTP site and email address. Using your web
browser, open this Uniform Resource Locator (URL)
site:
http://www.nec.com
Writing NEC
You can mail your questions and comments to NEC
Technical Support at the following address
Technical Support, Dept. #3390
NEC Technologies, Inc.
1414 Massachusetts Ave.
Boxborough, MA 01719
Ordering Supplies, Printer Options, and Spare Parts
To order printer supplies such as toner cartridges, or
the printer options available for your printer, contact
your SuperScript 660plus dealer or call 1-800-NECINFO to locate the supplies dealer nearest you.
The information below shows available parts and part
numbers.
SuperScript 660plus Printer Options:
250-sheet 2nd hopper
SuperScript 660plus Supplies:
Toner Module 20 - 090
Photoconductor Module 20 - 095
15 App.H Technical Support* 96.9.24, 2:02 PM3
H—3

Appendix H: Technical Support
Lotus 1-2-3 Lotus Develop. Corp. 617-577-8500
Lotus Notes Lotus Develop. Corp. 617-577-8500
Norton Desktop Symantec Corp. 408-252-5700
Office Novell 800-228-1023
PageMaker Adobe Systems, Inc. 415-961-4400
Paradox Borland Int’l, Inc. 800-523-7070
Persuasion Adobe Systems, Inc. 415-961-4400
PhotoShop Adobe Systems, Inc. 415-961-4400
Photostyler Adobe Systems, Inc. 415-961-4400
Picture Publisher Micrografx, Inc. 214-234-2694
Printshop Broderbund Software 415-382-7818
Project Microsoft Corp. 800-426-9400
Q & A Symantec Corp. 408-252-5700
Quattro Pro Borland Int’l, Inc. 800-523-7070
Quicken Intuit 520-295-3100
Reflex Borland Int’l, Inc. 800-523-7070
Sprint Borland Int’l, Inc. 800-523-7070
SuperCalc Computer Associates 408-562-8800
SuperProject Computer Associates 408-562-8800
Symphony Lotus Develop. Corp. 617-577-8500
TimeLine Symantec Corp. 408-252-5700
TurboTax Intuit 520-295-3100
Windows Microsoft Corp. 800-426-9400
Word MicrosoftCorp. 800-426-9400
WordPerfect Novell 800-228-1023
Works Microsoft Corp. 800-426-9400
Support from Your Software Vendor
Often, printing problems can be traced to incorrect
software settings or incompatible configurations.The
following list provids information for contacting
several popular software vendors about their products.
They may be able to provide instructions for such tasks
as adding your printer to the application, selecting
drivers, and printing.
Software Company Telephone
ACCPAC Computer Associates 408-562-8800
Ami Pro Lotus Develop. Corp. 617-577-8500
ATM Adobe Systems, Inc. 415-961-4400
AutoCAD 11 Autodesk, Inc. 415-507-5000
AutoCAD 12 Autodesk, Inc. 415-507-5000
AutoShade Autodesk, Inc. 415-507-5000
AutoSketch Autodesk, Inc. 415-507-5000
Bannermania Broderbund Software 415-382-7818
Charisma Micrografx, Inc. 214-234-2694
Chart Microsoft Corp. 800-426-9400
Corel Draw Corel Systems Corp. 613-728-8200
dBase Borland Int’l, Inc. 800-523-7070
Designer Micrografx, Inc. 214-234-2694
DisplayWrite IBM 817-962-4000
DrawPerfect Novell 800-228-1023
Excel Microsoft Corp. 800-426-9400
FreeHand Adobe Systems, Inc. 415-961-4400
Freelance + Lotus Develop. Corp. 617-577-8500
Harvard Graphics Software Publishing Corp. 970-522-9064
Illustrator Adobe Systems, Inc. 415-961-4400
15 App.H Technical Support* 96.9.24, 2:03 PM4
H—4

Index
A
adhesive label specifications D–8
B
black page A–4
blank page A–3
C
CD-ROM, use for installation 1–2
CDRH Regulations F–1
cleaning
caution when cleaning the printer 6–2
the printer 6–3
Transfer Unit 6–3
transport roller 6–3
Connect Port 4–3
Control Panel E–3, 4–2
Cover Open or Toner Cartridge Missing
message 5–4
current status, monitoring 5–2
Custom Installation 1–2, 3–3
Customer Service A–3
D
delete a print job 5–3
device names 3–7
DOS printing option 4–3
downloaded fonts and macros E–3
Duplex Printing message 5–4
E
Easy Installation 1–2, 3–3
16 Index* 96.9.24, 2:06 PM1
Employer Responsibilities F–2
Engine Error message 5–4
envelope specifications D–8
envelopes, printing on 2–10
EPA Energy Star Computers Award F–3
error messages 5–3
Expanded Printer Status display 5–3
F
FCC Statement F–2
fonts
installing E–3
True Type 3–6
G
GDI mode E–2
GDI Setup Window 4–4
I
incomplete page A–5
install new font E–3
Installation
Custom 1–2, 3–3
dialogs 3–3
Easy 1–2, 3–3
grounding 2–2, 2–13
multipurpose tray 2–8
parallel cable 2–3, 2–14
power source 2–2
precautions 2–2
site 2–2
ventilation 2–14
Installation problems A–8
Installing fonts E–3
Installing the SuperScript Software 3–3

Insufficient Memory A–8
Internal Laser Radiation F–1
L
Laser Safety F–1
light page A–3
loading paper 2–6, 2–8
Local Queue 4–7
N
NEC Customer Service A–3
no printer port A–8
O
optional items
250-sheet hopper C–2
memory expansion module (SIMM) C–4
ozone emissions F–3
ozone exposure, minimizing F–3
P
Page Save Mode 4–3
paper
selecting type 4–4
specifications D–7
paper jam A–5, 2–5
Paper Jam message 5–4
Paper Out message 5–4
pause the printer 5–3
PCL (Printer Command Language) mode E–3
PCL Control Panel 4–3
Photoconductor Module
average life B–1
replacing 6–2
setting up 2–11
Power Off or Cable Problem message 5–4
Power Saving Mode 4–3
precautions, for installation 2–2
previously installed SuperScript software, removin
A–9
print
darkness 4–3
quality B–1
test page 4–3
Print Manager
for changing print order 4–5
for duplex printing 4–5
print quality A–2
printer selection list bar 4–2
Printer Setup 4–3
Printer Status
icons 5–3
software 5–2
window 5–2
printing, recommended methods D–9
Problems and Solutions A–8
R
reduce printer status display 5–3
removing previously installed SuperScript software
A–9
resume the print job 5–3
S
Setup Program 3–5
Sharp Edge Technology (SET) 4–3
shipping the printer B–2
software
previously installed 3–4
solid white vertical liness A–5
specifications
adhesive labels D–8
envelope D–8
paper D–7
transparency film D–9
status of the printer. See Printer Status
16 Index* 96.9.24, 2:07 PM2

Status Report Options 4–3
streaked page A–4
SuperScript
compatability 1–2
software emulation 1–2
SuperScript GDI E–2
System Requirements 1–2
free disk space 1–2
parallel cable 1–2
T
Technical Specifications F–4
Technical Support
in case of damage 2–14
toner module
average life B–1
replacing 6–2
time to change B–1
Toner Saving Mode 4–3
transparency film specifications D–9
TrueType fonts E–2, 3–6
U
unpacking the printer 1–3
V
voltage B–2
W
Wrong System or Hardware Configuration A–8
16 Index* 96.9.24, 2:07 PM3
 Loading...