


Miele KM 490, KM 491, KM 493, KM 494, KM 497 User Manual
...
Operating instructions
Ceramic hobs with induction KM 490 / KM 491 / KM 493 KM 494 / KM 497 / KM 498
KM 490-1 / KM 491-1 / KM 493-1 KM 494-1 / KM 497-1 / KM 498-1
To avoid the risk of accidents or damage to the appliance it is essential to read these
operating instructions before it is installed or used for the first time.
GHi
M.-Nr. 05 619 381

Contents
Description of the appliance. . . . . . . . . . . . . . . . . . . . . . . . . . . . . . . . . . . . . . . . . 4 Models . . . . . . . . . . . . . . . . . . . . . . . . . . . . . . . . . . . . . . . . . . . . . . . . . . . . . . . . . . . 4 Control panel . . . . . . . . . . . . . . . . . . . . . . . . . . . . . . . . . . . . . . . . . . . . . . . . . . . . . . 5 Cooking zone sensors and displays . . . . . . . . . . . . . . . . . . . . . . . . . . . . . . . . . . . . 6 Timer sensors and display. . . . . . . . . . . . . . . . . . . . . . . . . . . . . . . . . . . . . . . . . . . . 6 Cooking zones . . . . . . . . . . . . . . . . . . . . . . . . . . . . . . . . . . . . . . . . . . . . . . . . . . . . . 7
Warning and Safety instructions . . . . . . . . . . . . . . . . . . . . . . . . . . . . . . . . . . . . . 8
Caring for the environment . . . . . . . . . . . . . . . . . . . . . . . . . . . . . . . . . . . . . . . . . 15
Before using for the first time. . . . . . . . . . . . . . . . . . . . . . . . . . . . . . . . . . . . . . . 16 General notes . . . . . . . . . . . . . . . . . . . . . . . . . . . . . . . . . . . . . . . . . . . . . . . . . . . . 16 Cleaning and heating up for the first time . . . . . . . . . . . . . . . . . . . . . . . . . . . . . . . 16
Operation . . . . . . . . . . . . . . . . . . . . . . . . . . . . . . . . . . . . . . . . . . . . . . . . . . . . . . . 17 The induction principle . . . . . . . . . . . . . . . . . . . . . . . . . . . . . . . . . . . . . . . . . . . . . 17 Pans . . . . . . . . . . . . . . . . . . . . . . . . . . . . . . . . . . . . . . . . . . . . . . . . . . . . . . . . . . . . 18 Sensor switches. . . . . . . . . . . . . . . . . . . . . . . . . . . . . . . . . . . . . . . . . . . . . . . . . . . 19 Switching on . . . . . . . . . . . . . . . . . . . . . . . . . . . . . . . . . . . . . . . . . . . . . . . . . . . . . 19 Settings . . . . . . . . . . . . . . . . . . . . . . . . . . . . . . . . . . . . . . . . . . . . . . . . . . . . . . . . . 20 Pan recognition . . . . . . . . . . . . . . . . . . . . . . . . . . . . . . . . . . . . . . . . . . . . . . . . . . . 21 Pan size recognition. . . . . . . . . . . . . . . . . . . . . . . . . . . . . . . . . . . . . . . . . . . . . . . . 22 Auto heat-up . . . . . . . . . . . . . . . . . . . . . . . . . . . . . . . . . . . . . . . . . . . . . . . . . . . . . 23 Booster . . . . . . . . . . . . . . . . . . . . . . . . . . . . . . . . . . . . . . . . . . . . . . . . . . . . . . . . . 24 Switching off and residual heat indicators. . . . . . . . . . . . . . . . . . . . . . . . . . . . . . . 25
Safety features . . . . . . . . . . . . . . . . . . . . . . . . . . . . . . . . . . . . . . . . . . . . . . . . . . . 26 Safety lock . . . . . . . . . . . . . . . . . . . . . . . . . . . . . . . . . . . . . . . . . . . . . . . . . . . . . . . 26 Safety switch-off. . . . . . . . . . . . . . . . . . . . . . . . . . . . . . . . . . . . . . . . . . . . . . . . . . . 27 Overheating protection . . . . . . . . . . . . . . . . . . . . . . . . . . . . . . . . . . . . . . . . . . . . . 28
2

Contents
Timer . . . . . . . . . . . . . . . . . . . . . . . . . . . . . . . . . . . . . . . . . . . . . . . . . . . . . . . . . . . 29 Setting the timer. . . . . . . . . . . . . . . . . . . . . . . . . . . . . . . . . . . . . . . . . . . . . . . . . . . 29 Setting the minute minder . . . . . . . . . . . . . . . . . . . . . . . . . . . . . . . . . . . . . . . . . . . 29 Switching a cooking zone off automatically. . . . . . . . . . . . . . . . . . . . . . . . . . . . . . 30 Switching between timer functions . . . . . . . . . . . . . . . . . . . . . . . . . . . . . . . . . . . . 30
Cleaning and care . . . . . . . . . . . . . . . . . . . . . . . . . . . . . . . . . . . . . . . . . . . . . . . . 31
Problem solving guide . . . . . . . . . . . . . . . . . . . . . . . . . . . . . . . . . . . . . . . . . . . . 33
Electrical connection . . . . . . . . . . . . . . . . . . . . . . . . . . . . . . . . . . . . . . . . . . . . . 35
After sales service . . . . . . . . . . . . . . . . . . . . . . . . . . . . . . . . . . . . . . . . . . . . . . . . 37 Data Plate . . . . . . . . . . . . . . . . . . . . . . . . . . . . . . . . . . . . . . . . . . . . . . . . . . . . . . . 37
3

Description of the appliance
Models
KM 490 / KM 491
KM 490-1 / KM 491-1
ac Induction cooking zones with booster
bd Induction cooking zones
e Control panel
KM 493 / KM 494 / KM 497 / KM 498
KM 493-1 / KM 494-1
KM 497-1 / KM 498-1
ac Induction cooking zones with booster
bd Induction cooking zones
e Control panel
4
Description of the appliance
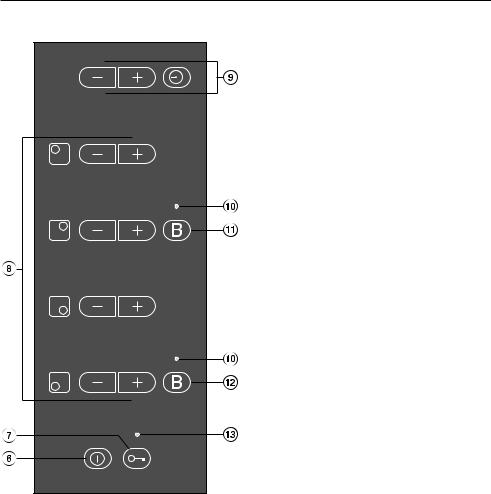
Control panel
Sensor switches for:
f Hob ON/OFF
g Safety lock
h Cooking zones
i Timer (see "Timer sensors and display")
k Booster for rear right cooking zone
l Booster for front left cooking zone
Indicator lamps for:
j Booster
m Safety lock
5

Description of the appliance
Cooking zone sensors and displays
n Cooking zone symbol
oDisplays:
0 = Cooking zone ready for use
1 to 9 = Power settings H = Residual heat
ß= No pan on cooking zone or pan unsuitable (see section on suitable pans)
F = Fault message (see "Problem solving guide")
p Indicator lamp for auto heat-up
q Sensors for setting the power level
Timer sensors and display
r Timer display
s Indicator lamp for automatic switch off, e.g. of the rear right cooking zone
Sensor switches for:
t alternating between timer functions and selecting a cooking zone with automatic switch off
u setting the timer
6
|
|
Description of the appliance |
|
|
|
|
|
Cooking zones |
|
|
|
|
|
|
|
Cooking |
KM 490 / KM 491 / KM 493 / KM 494 / KM 497 / KM 498 |
||
zones |
KM 490-1 / KM 491-1 / KM 493-1 / KM 494-1 / KM 497-1 / KM 498-1 |
||
|
minimum to maximum |
Rating in watts** |
|
|
Ø in cm* |
|
|
|
|
|
|
y |
14 - 20 |
normal: |
1800 |
|
|
with booster: |
2300 |
w |
14 - 20 |
normal: |
1800 |
|
|
if booster front |
|
|
|
left is engaged: |
1080 |
|
|
|
|
x |
16 - 23 |
normal: |
2200 |
|
|
with booster: |
3000 |
z |
10 - 16 |
normal: |
1400 |
|
|
if booster rear |
|
|
|
right is engaged: |
630 |
|
|
|
|
|
|
Total: |
7200 |
|
|
|
|
|
|
|
|
*Pans of any diameter within the given range may be used.
**The wattage quoted may vary depending on the size and material of the pans used.
7

Warning and Safety instructions
Installation and connection
The appliance must be installed and connected by a suitably
qualified and competent person in strict accordance with local and national safety regulations. The manufacturer cannot be held liable for damage caused by incorrect installation or connection.
The electrical safety of this appliance can only be guaranteed
when continuity is complete between the appliance and an effective earthing system, which complies with local and national safety regulations. It is most important that this basic safety requirement is regularly tested, and if there is any doubt, the electrical wiring in the home should be inspected by a qualified electrician. The manufacturer cannot be held liable for the consequences of an inadequate earthing system (e.g. electric shock).
Do not connect the appliance to the mains electricity supply by an
extension lead. Extension leads do not guarantee the required safety of the appliance (e.g. danger of overheating).
This appliance must not be installed over a dishwasher, washing machine, tumble dryer,
refrigerator, freezer or fridge-freezer. The high temperatures radiated by it could damage the appliance below. This could also impair the hob's ventilation system.
This equipment may only be used in mobile installations such as
ships, caravans, aircraft etc. if a risk assessment of the installation has been carried out by a suitably qualified engineer.
On hobs with bevelled glass edges a small gap may be visible
between the hob and the worktop during the first few days after installation. This gap will reduce with time as the appliance is used and will not affect the electrical safety of your appliance.
8

Warning and Safety instructions
Correct usage
To avoid the risk of accidents and damage to the appliance, you
should read these operating instructions carefully before using it for the first time. They contain important notes on the installation, safety, operation and care of the appliance.
For safety reasons this appliance must only be operated after it has
been built in. This is necessary to ensure that all electrical components are shielded.
This appliance is intended for domestic use only and is not to be
used for commercial purposes.
Only use the appliance to prepare food in the home. Any other usage
is at the owner's risk and could be dangerous. The manufacturer cannot be held liable for damage caused by incorrect or improper use of the appliance.
9

Warning and Safety instructions
Safety with children
The appliance is only intended for use by adults who have read these
operating instructions.
This appliance is not a toy! To avoid the risk of injury keep
children well away and do not let them play with it or use the controls. They will not understand the potential dangers posed by it. They should be supervised whenever you are working in the kitchen.
Older children may use the appliance only when its operation
has been clearly explained to them, and they are able to use it safely, recognising the dangers of misuse. Supervise its use by the elderly or infirm.
Use the safety lock to prevent children operating the appliance or
altering the settings.
The appliance gets hot when in use and remains hot for quite a
while after being switched off. To safeguard against burning, keep children well away from the appliance at all times.
Do not store anything which might arouse a child's interest in storage
areas above or next to the appliance. Otherwise they could be tempted into climbing onto the appliance with the risk of burning themselves.
Keep all pans out of reach of children. Turn pan handles inwards
away from the edge of the hob. Danger of burning or scalding. Special hob guards are available from good retail outlets.
Packaging (e.g. cling film, polystyrene) and plastic wrappings
must be kept out of the reach of babies and young children. Danger of suffocation. Dispose of or recycle all packaging safely as soon as possible.
Old appliances must be disconnected from the power
supply, any plug rendered useless and the cable cut off directly behind the appliance to ensure it presents no danger to children while being stored for disposal. This should be done by a competent person.
10
Warning and Safety instructions
Protecting the appliance from damage
Do not drop anything on the ceramic surface. Even a light
object could cause damage in certain circumstances.
Do not use pots or pans on the ceramic hob with bases with
pronounced edges or ridges. These could scratch or scour the hob surface permanently. Grains of salt and sand can also scratch.
Do not allow either solid or liquid sugar, or pieces of plastic or
aluminium foil to get on the ceramic surface when it is hot. If this should occur, switch off the appliance and carefully, while they are still hot, scrape off all remains of these materials using a shielded scraper blade. Take care not to burn yourself. If residues are allowed to cool before being removed, the ceramic surface will be susceptible to pitting or even cracking.
Clean the appliance once it has cooled down.
To prevent the risk of spillages etc. burning on, remove any soiling as quickly as possible and ensure that pan
bases are clean, dry and free of grease.
Do not use a steam cleaner to clean this appliance. The steam
could reach electrical components and cause a short circuit. Pressurised steam could also cause permanent damage to the surface and to other components, for which the manufacturer cannot accept liability.
Never place hot pans near the control area. This could damage
the electronic unit underneath.
If a drawer is fitted directly underneath the hob, ensure that
there is sufficient space between the drawer and its contents and the underside of the appliance in order to ensure sufficient ventilation for the hob.
In countries where there are areas which may be subject to infestation
by cockroaches or other vermin, pay particular attention to keeping the appliance and its surroundings in a clean condition at all times. Any damage which may be caused by cockroaches or other vermin will not be covered by the appliance guarantee.
11

Warning and Safety instructions
Protection from burning and scalding
The surface of the appliance is hot when in use, and remains hot for
quite a while after being switched off. There is a danger of burning until the residual heat indicators go out.
For added protection it is advisable to use heat-resistant pot holders or
gloves when using the appliance. Do not let them get damp or wet, as this causes heat to transfer through the material more quickly with the risk of scalding or burning yourself.
Do not heat up unopened tins of food on the hob as pressure will build up in the tin and it can explode.
This could result in injury and scalding or damage.
Do not use the hob as a resting place for anything else. The article
could melt or catch fire if residual heat is still present or if the appliance is switched on by mistake.
Do not cover the appliance, e.g. with a cloth, kitchen foil, etc. There
is a danger of this burning or catching fire if the hob is hot.
Never leave the appliance unattended when cooking with oil
or fat as these are fire hazards if overheated. Very hot oil can catch fire and could even set a cooker hood above on fire. Always heat fat slowly, watching as it heats.
If, despite this, oil or fat does catch fire, do not attempt to put out the
flames with water. Use a suitable fire blanket, saucepan lid, damp towel or similar to smother the flames.
Do not flambé under a cooker hood. The flames could set the
cooker hood on fire.
12
 Loading...